Power Fist 8656860 Le manuel du propriétaire
- Taper
- Le manuel du propriétaire

V4.0 8656860
Please read and understand all instructions before use. Retain this manual for
future reference.
User Manual
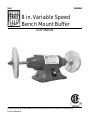
8 in. Variable Speed
Bench Mount Buffer

8656860 8 in. Variable Speed Bench Mount Buffer V4.0
2 For technical questions call 1-800-665-8685
SPECIFICATIONS
Wheel Size 8 in.
Arbor Size 5/8 in.
No Load Speed 2,000 to 3,450 RPM
Voltage Rating 120V
Current Rating 7A
Frequency Rating 60Hz
INTRODUCTION
The 8 in. Variable Speed Bench Mount Buffer is great for polishing, buffing and
the smoothing of metal and other materials. It has a 3/4 HP motor, sealed ball
bearings for smooth and quiet operation and precision machined shafts. The
cast iron base comes predrilled to attach to a bench or pedestal.
SAFETY
WARNING! Read and understand all instructions before using this tool. The
operator must follow basic precautions to reduce the risk of personal injury
and/or damage to the equipment.
Keep this manual for safety warnings, precautions, operating or inspection and
maintenance instructions.
HAZARD DEFINITIONS
Please familiarize yourself with the hazard notices found in this manual. A notice
is an alert that there is a possibility of property damage, injury or death if certain
instructions are not followed.
8 in. Variable Speed
Bench Mount Buffer

V4.0 8 in. Variable Speed Bench Mount Buffer 8656860
Visit www.princessauto.com for more information 3
DANGER! This notice indicates an immediate and specific hazard that will
result in severe personal injury or death if the proper precautions
are not taken.
WARNING! This notice indicates a specific hazard or unsafe practice that
could result in severe personal injury or death if the proper
precautions are not taken.
CAUTION! This notice indicates a potentially hazardous situation that may result
in minor or moderate injury if proper practices are not taken.
NOTICE! This notice indicates that a specific hazard or unsafe practice will
result in equipment or property damage, but not personal injury.
WORK AREA
1. Operate in a safe work environment. Keep your work area clean, well-lit
and free of distractions.
2. Keep anyone not wearing the appropriate safety equipment away from the
work area.
3. Store unused tools properly in a safe and dry location to prevent rust or
damage. Lock tools away and keep out of the reach of children.
4. Do not install or use in the presence of flammable gases, dust or liquids.
PERSONAL SAFETY
WARNING! Wear personal protective equipment approved by the Canadian
Standards Association (CSA) or American National Standards Institute (ANSI).
PERSONAL PROTECTIVE EQUIPMENT
1. Always wear impact safety goggles that provide front and side protection
for the eyes. Eye protection equipment should comply with CSA Z94.3-07
or ANSI Z87.1 standards based on the type of work performed.
2. Wear the appropriate type of full-face shield in addition to safety googles,
as the work can create chips, abrasive or particulate matter.
3. Wear gloves that provide protection based on the work materials or to
reduce the effects of tool vibration.
a. Do not wear gloves when operating a tool that can snag the material
and pull the hand into the tool.

8656860 8 in. Variable Speed Bench Mount Buffer V4.0
4 For technical questions call 1-800-665-8685
4. Wear protective clothing designed for the work environment and tool.
5. Non-skid footwear is recommended to maintain footing and balance in the
work environment.
6. Wear steel toe footwear or steel toe caps to prevent a foot injury from
falling objects.
7. Wear the appropriate rated dust mask or respirator.
8. This tool can cause hearing damage. Wear hearing protection gear with an
appropriate Noise Reduction Rating to withstand the decibel levels.
PERSONAL PRECAUTIONS
Control the tool, personal movement and the work environment to avoid
personal injury or damage to tool.
1. Do not operate any tool when tired or under the influence of drugs, alcohol
or medications.
2. Avoid wearing clothes or jewelry that can become entangled with the
moving parts of a tool. Keep long hair covered or bound.
3. Do not overreach when operating a tool. Proper footing and balance
enables better control in unexpected situations.
SPECIFIC SAFETY PRECAUTIONS
WARNING! DO NOT let comfort or familiarity with product (gained from
repeated use) replace strict adherence to the tool safety rules. If you use
this tool unsafely or incorrectly, you can suffer serious personal injury.
1. Use the correct tool for the job. This tool was designed for a
specific function. Do not modify or alter this tool or use it for
an unintended purpose.
2. Keep hands and fingers away from the buffing area. Any part of body
coming in contact with moving parts could cause an injury.
3. Never use a tool with a damaged buffing wheel. Change the buffing wheel.
Use only flanges supplied with the buffer.
4. Before using the tool on a workpiece, test the tool by running it at the highest
no-load speed for at least 60 seconds in a safe position. Stop immediately if
there is any abnormal vibration or wobbling that could indicate poor
installation of the buffing wheel. Check the tool to determine the cause.

V4.0 8 in. Variable Speed Bench Mount Buffer 8656860
Visit www.princessauto.com for more information 5
5. Do not start the tool when the buffing wheel is touching the workpiece.
6. Do not allow the tool’s motor to overload and/or overheat by taking
work breaks.
7. This tool will not stop moving immediately. Do not leave the tool
unattended until it has come to a complete stop.
8. Clean dust and debris from beneath the buffing wheels frequently.
9. Do not stand directly in front of the machine when turning it ON. Always
stand off to the side of the machine and do not allow any part of your body
to be in line with the wheel’s path.
10. Make sure the bench mount buffer is on a firm, level surface and properly secured
to avoid injury from unexpected movement. Firmly clamp or bolt the bench mount
buffer to a support surface to prevent slipping or sliding during the operation.
11. Do not use a buffing wheel that vibrates when used. Replace the wheel if it
cannot be balanced. Also inspect the machine for other causes of vibration
such as worn bearings or a bent shaft. Repair or replace broken
components immediately before reusing the machine.
12. Only use a buffing wheel of the recommended size with the correct
arbor size and shape that matches the buffer’s spindle.
KICKBACK PRECAUTIONS
Kickback is a sudden reaction to a pinched or snagged cutting accessory caught
on the material. The material can be ejected and inflict a serious injury on the
user or a bystander. Kickback can also damage the tool or workpiece.
Kickback can be avoided by taking proper precautions:
1. Maintain a firm grip on the material and position your body and arms to
allow you to resist a kickback. Kickback can propel the material in the
direction of the grinding accessory’s rotation.
2. Use special care when working on corners, sharp edges or flexible material.
These workpieces have a tendency to snag the grinding accessory.
3. Only use buffing accessories designed for the tool.
POWER TOOL PRECAUTIONS
1. Do not allow the tool to run without load for an extended period of time, as
this will shorten its life.

8656860 8 in. Variable Speed Bench Mount Buffer V4.0
6 For technical questions call 1-800-665-8685
2. Do not cover the air vents. Proper cooling of the motor is necessary to
ensure normal life of the tool.
3. Avoid unintentional starting. Ensure the switch is off when connecting to
the power source.
4. Disconnect the power source before installing or servicing the tool.
5. After making adjustments, make sure that any adjustment devices are
securely tightened.
6. Remove adjusting keys and wrenches before turning the tool on. A wrench
or a key that is left attached to a rotating part of the tool increases the risk
of personal injury.
7. Never force the tool. Excessive pressure could break the tool, resulting in
damage to your workpiece or serious personal injury. If your tool runs
smoothly under no load, but does not run smoothly under load, then
excessive pressure is being used.
8. Do not touch an operating motor. Motors can operate at high temperatures
and can cause a burn injury.
9. Only use an accessory that exceeds the No Load Speed rating (see
Specifications).
ELECTRICAL SAFETY
WARNING! To reduce risk of electric shock, be certain that the plug is
connected to a properly grounded receptacle.
1. Disconnect tool from power source before cleaning, servicing, changing
parts/accessories or when not in use.
2. Protect yourself against electric shocks when working on electrical
equipment. Avoid body contact with grounded surfaces. There is an
increased chance of electrical shock if your body is grounded.
3. Do not expose tool to rain or wet conditions. Water entering a power tool will
increase the risk of electric shock.
4. Do not disconnect the power cord in place of using the ON/OFF switch on the
tool. This will prevent an accidental startup when the power cord is plugged into
the power supply.

V4.0 8 in. Variable Speed Bench Mount Buffer 8656860
Visit www.princessauto.com for more information 7
a. In the event of a power failure, turn off the machine as soon as the
power is interrupted. The possibility of accidental injury could occur if
the power returns and the unit is not switched off.
5. Do not alter any parts of the tool or accessories. All parts and
accessories are designed with built-in safety features that may be
compromised if altered.
6. Make certain the power source conforms to requirements of your
equipment (see Specifications).
7. When wiring an electrically driven device, follow all electrical and safety
codes, as well as the most recent Canadian Electrical Code (CE) and
Canadian Centre for Occupational Health and Safety (CCOHS).
8 Grounded tools must be plugged into an outlet that is properly installed
and grounded in accordance with all codes and ordinances. Check with
a qualified electrician if you are in doubt as to whether the outlet is
properly grounded. If the tool should electronically malfunction or break
down, grounding provides a low resistance path to carry electricity away
from the user.
a. Never remove the grounding prong or modify the plug in any way, as
this will render the tool unsafe.
b. Do not use any adapter plugs.
9. DO NOT use this device with a 2-prong wall receptacle.
a. Choose an available 3-prong power outlet.
b. Replace 2 prong outlet with a grounded 3-prong receptacle, installed
in accordance with the CE Code and local codes and ordinances.
WARNING! All wiring should be performed by a qualified electrician.

8656860 8 in. Variable Speed Bench Mount Buffer V4.0
8 For technical questions call 1-800-665-8685
POWER CORD
1. Insert the power cord plug directly to the power supply whenever possible.
Use extension cords or surge protectors only when the tool's power cord
cannot reach a power supply from the work area.
a. Use in conjunction with a Ground Fault Circuit Interrupter (GFCI). If
operating a power tool in a damp location is unavoidable, the use of a
GFCI reduces the risk of electric shock. It is recommended that the
GFCI should have a rated residual current of 30 mA or less.
2. Do not operate this tool if the power cord is frayed or damaged as an electric
shock or surge may occur, resulting in personal injury or property damage.
a. Inspect the tool's power cord for cracks, fraying or other faults in the
insulation or plug before each use.
b. Discontinue use if a power cord feels more than comfortably warm
while operating the tool.
c. Have the power cord replaced by a qualified service technician.
3. Keep all connections dry and off the ground to reduce the risk of electric
shock. Do not touch plug with wet hands.
4. Prevent damage to the power cord by observing the following:
a. Do not pull on the cord to disconnect the plug from an outlet.
b. Keep cord away from heat, oil, sharp edges or moving parts.
c. Place the electrical cord in a position that prevents it from coming into
contact with the tool and from getting caught by the workpiece. The
cord should always stay behind the tool.
5. Do not allow people, mobile equipment or vehicles to pass over
unprotected power cords.
a. Position power cords away from traffic areas.
b. Place cords in reinforced conduits.
c. Place planks on either side of the power cord to create a
protective trench.

V4.0 8 in. Variable Speed Bench Mount Buffer 8656860
Visit www.princessauto.com for more information 9
UNPACKING
WARNING! Do not operate the tool if any part is missing. Replace the
missing part before operating. Failure to do so could result in a malfunction
and personal injury.
Remove the parts and accessories from the packaging and inspect for damage.
Make sure that all items in the parts list are included.
Contents:
• Bench Mount Buffer • 5/8 in.-11 Hex Nuts, 2 pc • Wheel Flange, 4 pc
• Spacer, 2 pc • Sewn Wheel • Soft Wheel
ASSEMBLY & INSTALLATION
Numbered references in parenthesis (#1) refer to the included Parts List.
The buffer comes completely assembled with hex nuts (#1), wheel flanges (#2)
and spacers (#3) packed separately. One spiral sewn wheel and one soft wheel
are included.
INSTALL BUFFING WHEELS
Install the left, then the right buffing wheel onto the bench top buffer.
1. Remove the plastic protective sleeve from the left armature shaft.
2. Slide a spacer (#3) onto the left armature shaft.
3. Slide an inner wheel flange (#2) onto the armature shaft with the flat side
towards the buffing wheel.
4. Slide a buffing wheel on to the armature shaft and butt it against the inner
wheel flange.
5. Slide in the outer wheel flange (#2) and butt the flat side of the flange
against the buffing wheel.
6. Tighten the left-hand threaded hex nut (#1) on to the armature shaft. Make
sure the buffing wheel is firmly held in place and the hex nut is snug against
the outer wheel flange. Use additional spacers (not supplied) if required.
7. Repeat steps 1 to 6 to install a buffing wheel on the other side of the buffer.
Use the right-hand threaded hex nut (#21) for step 6.

8656860 8 in. Variable Speed Bench Mount Buffer V4.0
10 For technical questions call 1-800-665-8685
MOUNT BUFFER
PEDESTAL MOUNT
1. Align the mounting holes in the buffer with the pedestal holes.
2. Drop a 1/4-20 x 1-1/4 in. bolt into each mounting hole.
3. Slide a 1/4 in. washer onto one bolt from beneath the pedestal plate.
4. Place a 1/4-20 in. hex nut on the same bolt and tighten until there is only
1/8 in. space between the buffer base and the pedestal plate.
5. Repeat for the other three bolts.
6. Add another hex nut to each bolt and tighten to prevent them from
loosening due to vibration.
BENCH MOUNT
1. Position the buffer on the bench and mark each hole of the base on
the bench.
2. Predrill a hole for each wood screw if necessary.
3. Place a flat washer over a 1/4 x 1-1/4 in. wood screw.
4. Insert a wood screw and washer through the holes in the base.
5. Tighten the screws until the space between the buffer and bench is 1/8 in.
OPERATION
ON/OFF SWITCH WITH KEY
The ON/OFF rocker switch with key (#16) is located on the front of the buffer. Press
the switch up to turn the power ON. Push the switch down to turn the power OFF.
Remove the yellow key from the switch when you are finished working with the
buffer. The power switch will not work without the yellow safety key in place. The
safety key can only be removed when the power switch is in the OFF position.
BASIC BUFFER OPERATIONS
1. Keep a steady, moderate pressure on the work and keep it moving at an
even pace for smooth buffing.
2. Pressing too hard overheats the motor and prematurely wears down the
buffing wheels.

V4.0 8 in. Variable Speed Bench Mount Buffer 8656860
Visit www.princessauto.com for more information 11
3. The buffing wheel should rotate into the object being buffed.
4. Adjust the buffer’s speed with the control knob (#24). See Specifications
for the RPM range.
CARE & MAINTENANCE
1. Maintain the tool with care. A tool in good condition is efficient, easier to
control and will have fewer problems.
2. Inspect the tool components periodically. Repair or replace damaged or
worn components. Only use identical replacement parts when servicing.
3. Follow instructions for lubricating and changing accessories.
4. Only use accessories intended for use with this tool.
5. Maintain the tool’s labels and name plates. These carry important information.
If unreadable or missing, contact Princess Auto Ltd. for replacements.
6. Replacement wheels must have a minimum rated speed of 3,600 RPM and
a maximum diameter of 8 in.
7. The threads on the right side of the buffer (facing unit) are right hand;
threads on the left side are left hand. Hold the wheels firmly to loosen the
hex nut.
8. Make sure hex nuts are tight and snug against the outer wheel flange prior
to restarting buffer.
9. A guard or other part that is damaged should be properly repaired or
replaced. Do not perform makeshift repairs.
WARNING! Only qualified service personnel should repair the tool. An
improperly repaired tool may present a hazard to the user and/or others.
LUBRICATION
This tool is permanently lubricated at the factory and requires no additional
lubrication.
STORAGE
When not in use for an extended period, apply a thin coat of lubricant to the
steel parts to avoid rust. Remove the lubricant before using the tool again.

8656860 8 in. Variable Speed Bench Mount Buffer V4.0
12 For technical questions call 1-800-665-8685
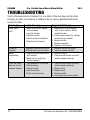
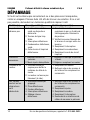
TROUBLESHOOTING
Visit a Princess Auto Ltd. location for a solution if the tool does not function
properly or parts are missing. If unable to do so, have a qualified technician
service the tool.
Problem(s)
Possible Cause(s)
Suggested Solution(s)
Buffer won’t
start.
1. Blown line fuse or tripped
circuit breaker.
2. Low line voltage.
3. Defective switch.
4. Defective, blown capacitor.
5. Defective circuit board.
1. Replace with fuse of proper
size, if fuse is blown. Reset
tripped breaker.
2. Check power supply for voltage
and correct as needed.
3. Replace switch.
4. Replace capacitor.
5. Replace circuit board.
Excessive
vibration.
1. Improper mounting of buffer.
2. Buffing wheel out of balance.
1. Remount bench top buffer.
2. Adjust or replace wheels.
Motor
overheating.
1. Excess pressure required to
buff material.
2. Motor not turning freely
(without power).
1. Replace wheels.
2. Clean around wheels and shaft
and/or replace bearings.
Fuses are being
blown or circuit
breakers tripped.
1. Overloading due to binding.
2. Defective plug.
3. Defective cord.
4. Defective switch.
5. Faulty internal wiring.
1. Clean around wheels and shaft
and/or replace bearings.
2. Replace plug.
3. Replace cord.
4. Replace switch.
5. Have electrician rewire buffer.

V4.0 8 in. Variable Speed Bench Mount Buffer 8656860
Visit www.princessauto.com for more information 13
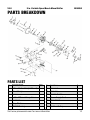
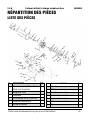
PARTS BREAKDOWN
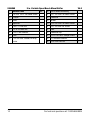
PARTS LIST
# DESCRIPTION QTY
1 5/8 in.-11 Hex Nut (LH Thread) 1
2 Wheel Flange 4
2 Spacer 2
4 5-0.8 x 228 mm Flange Screw 4
5 Endshield 1
6 Wavy Washer 2
7 6204ZZ Bearing 2
8 Armature 1
9 Grommet 1
11 Motor Fan 1
12 Variable Switch 1
13 Power Supply Cord 1
14 Strain Relief 1
15 Base 1
16 Switch with Key 1

8656860 8 in. Variable Speed Bench Mount Buffer V4.0
14 For technical questions call 1-800-665-8685
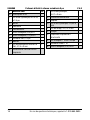
#
DESCRIPTION
QTY
17
#10-24 x 1/4 in. Pan Head Screw
5
18 Bumper 4
19 Cover 1
20 Capacitor 1
21 5/8 in.-11 Hex Nut 1
22 1/4 in.-20 Hex Nut 2
23 1/4 in. Lock Washer 2
24 Knob 1
25 4-1/4 x 8 mm Thread Forming
Screw
2
26
Circuit Board Assembly
1
27 4-0.7 x 8 mm Pan Head Screw 1
28 Endshield 1
29 Sensor 1
30 3-0.5 x 6 mm Pan Head Screw 2
31 4-0.7 x 5 mm Set Screw 1
32 Plate 1
33 Endshield Cap 1
34 #10- 24 x 3/8 in. Flange Screw 4
35 #10 Serrated Washer 5
36 5-0.8 mm Hex Nut 4

V4.0 8 in. Variable Speed Bench Mount Buffer 8656860
Visit www.princessauto.com for more information 15

8656860 8 in. Variable Speed Bench Mount Buffer V4.0
16 For technical questions call 1-800-665-8685

V 4,0 8656860
Vous devez lire et comprendre toutes les instructions avant d'utiliser l'appareil.
Conservez ce manuel afin de pouvoir le consulter plus tard.
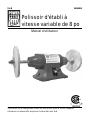
Manuel d'utilisateur
Polissoir d'établi à
vitesse variable de 8 po

8656860 Polissoir d'établi à vitesse variable de 8 po V 4,0
2 En cas de questions techniques, appelez le 1-800-665-8685
SPÉCIFICATIONS
Taille de roue 8 po
Arbre 5/8 po
Vitesse à vide 2 000 à 3 450 tr/min
Tension nominale 120 V c.a.
Courant nominal 7 A
Fréquence nominale 60 Hz
INTRODUCTION
Le polissoir d’établi à vitesse variable de 8 po convient idéalement pour polir, ainsi
que pour lisser le métal et les autres matériaux. Celui-ci est muni d’un moteur de
3/4 CV, de roulements à billes scellés afin de procurer un fonctionnement silencieux
et produire ainsi des arbres usinés avec précision. La base en fonte comporte déjà
des trous permettant de la fixer sur un établi ou sur un socle.
SÉCURITÉ
AVERTISSEMENT ! Veuillez lire et comprendre toutes les instructions avant
d'utiliser cet outil. L'utilisateur doit respecter les précautions de base
lorsqu'il utilise cet outil afin de réduire le risque de blessure ou de
dommage à l'équipement.
Conservez ce manuel qui contient les avertissements de sécurité, les
précautions, les instructions de fonctionnement ou d'inspection et d'entretien.
Polissoir d'établi à
vitesse variable de 8 po

V 4,0 Polissoir d'établi à vitesse variable de 8 po 8656860
Visitez www.princessauto.com pour plus d'informations 3
DÉFINITIONS DE DANGER
Veuillez-vous familiariser avec les avis de danger qui sont présentés dans ce
manuel. Un avis est une alerte indiquant qu'il existe un risque de dommage à la
propriété, de blessure ou de décès si on ne respecte pas certaines instructions.
DANGER ! Cet avis indique un risque immédiat et particulier qui
entraînera des blessures corporelles graves ou même la
mort si on omet de prendre les précautions nécessaires.
AVERTISSEMENT ! Cet avis indique un risque particulier ou une pratique non
sécuritaire qui pourrait entraîner des blessures
corporelles graves ou même la mort si on omet de
prendre les précautions nécessaires.
ATTENTION ! Cet avis indique une situation possiblement dangereuse qui
peut entraîner des blessures mineures ou modérées si on
ne procède pas de la façon recommandée.
AVIS ! Cet avis indique un risque particulier ou une pratique non
sécuritaire qui entraînera des dommages au niveau de
l'équipement ou des biens, mais non des blessures corporelles.
AIRE DE TRAVAIL
1. Travaillez dans un environnement de travail sécuritaire. Gardez votre aire
de travail propre, bien éclairée et exempte de toute distraction.
2. Assurez-vous que les personnes qui ne portent pas l'équipement de
sécurité approprié ne se trouvent pas à proximité de l'aire de travail.
3. Rangez les outils correctement dans un lieu sécurisé et sec. Gardez les
outils hors de la portée des enfants.
4. N'installez pas et n'utilisez pas d'outils électriques en présence de gaz, de
poussière ou de liquides inflammables.
SÉCURITÉ PERSONNELLE
AVERTISSEMENT ! Portez de l'équipement de protection personnelle
homologué par l'Association canadienne de normalisation (CSA) ou
l'American National Standards Institute (ANSI).

8656860 Polissoir d'établi à vitesse variable de 8 po V 4,0
4 En cas de questions techniques, appelez le 1-800-665-8685
ÉQUIPEMENT DE PROTECTION PERSONNELLE
1. Portez toujours des lunettes antiprojections qui offrent une protection
frontale et latérale pour les yeux. L'équipement de protection des yeux
devrait être conforme à la norme CSA Z94.3-07 ou ANSI Z87.1 fonction du
type de travail effectué.
2. Portez un écran facial panoramique de type approprié avec les lunettes de
sécurité puisque cette tâche peut créer des copeaux, des matières
abrasives ou des particules.
3. Portez des gants qui protègent en fonction des matériaux de travail et pour
réduire les effets des vibrations de l'outil.
a. Ne portez pas de gants lorsque vous utilisez un outil dans lequel le
tissu pourrait demeurer coincé, entraînant ainsi la main.
4. Portez des vêtements de protection conçus pour l'environnement de travail
et pour l'outil.
5. Les chaussures antidérapantes sont recommandées pour maintenir la
stabilité et l'équilibre au sein de l'environnement de travail.
6. Portez des chaussures à embout d'acier ou à coquilles d'acier pour éviter
les blessures aux pieds dues à la chute d'objets.
7. Portez un masque antipoussières ou un appareil respiratoire
nominal approprié.
8. Cet outil peut causer des dommages à l'ouïe. Portez un dispositif de
protection anti-bruit présentant une cote de réduction du bruit adéquate en
fonction du niveau de décibels.
PRÉCAUTIONS PERSONNELLES
Gardez le contrôle de l'outil, de vos mouvements et de l'environnement de
travail pour éviter les blessures ou le bris de l'outil.
1. N'utilisez pas l'outil si vous êtes fatigué ou sous l'effet de drogues, d'alcool
ou de médicaments.
2. Évitez de porter des vêtements ou des bijoux pouvant se prendre dans les
pièces mobiles d'un outil. Gardez les cheveux longs recouverts ou attachés.
3. N'utilisez pas l'outil si vous devez étirer les bras pour vous en servir. Une
stabilité et un équilibre appropriés sont nécessaires afin d'avoir un meilleur
contrôle en cas de situations inattendues.
La page est en cours de chargement...
La page est en cours de chargement...
La page est en cours de chargement...
La page est en cours de chargement...
La page est en cours de chargement...
La page est en cours de chargement...
La page est en cours de chargement...
La page est en cours de chargement...
La page est en cours de chargement...
La page est en cours de chargement...
La page est en cours de chargement...
La page est en cours de chargement...
-
 1
1
-
 2
2
-
 3
3
-
 4
4
-
 5
5
-
 6
6
-
 7
7
-
 8
8
-
 9
9
-
 10
10
-
 11
11
-
 12
12
-
 13
13
-
 14
14
-
 15
15
-
 16
16
-
 17
17
-
 18
18
-
 19
19
-
 20
20
-
 21
21
-
 22
22
-
 23
23
-
 24
24
-
 25
25
-
 26
26
-
 27
27
-
 28
28
-
 29
29
-
 30
30
-
 31
31
-
 32
32


Power Fist 8656860 Le manuel du propriétaire
- Taper
- Le manuel du propriétaire
dans d''autres langues
- English: Power Fist 8656860 Owner's manual
Documents connexes
-
Power Fist 8978561 Manuel utilisateur
-
Power Fist 8871584 Le manuel du propriétaire
-
Power Fist 8978652 Manuel utilisateur
-
-
Power Fist 12 in. Electric Concrete Saw Manuel utilisateur
-
-
-
-
-