Power Fist 8353229 Le manuel du propriétaire
- Taper
- Le manuel du propriétaire

V4.0 8353229
Please read and understand all instructions before use. Retain this manual for
future reference.
User Manual
1 HP Mini Dust Collector

8353229 1 HP Mini Dust Collector V4.0
2 For technical questions call 1-800-665-8685
SPECIFICATIONS
Wattage 750 W
Rating (Voltage, Current, Frequency) 120V / 5.7A / 60Hz
Air Flow 500 CFM
Impeller Diameter 6 in.
Horsepower
1 Hp
Inlet Diameter 4 in.
Bag Diameter 13 in.
Filtration Size 35 Micron
Motor Speed 4,500 RPM
Dimensions (Length x Width x Height)
13-1/4 x 12 x 12 in.
Weight 18.5 lb (8.4 kg)
INTRODUCTION
The 1 HP Mini Dust Collector draws in airborne dust and debris from your work
area and traps it in a 12 gallon (45 litre) bag. The lock out switch and key
prevents unsupervised use of the dust collector. The attached carrying handle
allows the user to reposition or relocate the dust collector as needed.
SAFETY
WARNING! Read and understand all instructions before using this tool. The
operator must follow basic precautions to reduce the risk of personal injury
and/or damage to the equipment.
Keep this manual for safety warnings, precautions, operating or inspection and
maintenance instructions.
1 HP Mini Dust Collector

V4.0 1 HP Mini Dust Collector 8353229
Visit www.princessauto.com for more information 3
HAZARD DEFINITIONS
Please familiarize yourself with the hazard notices found in this manual. A notice
is an alert that there is a possibility of property damage, injury or death if certain
instructions are not followed.
DANGER! This notice indicates an immediate and specific hazard that will
result in severe personal injury or death if the proper precautions
are not taken.
WARNING! This notice indicates a specific hazard or unsafe practice that
could result in severe personal injury or death if the proper
precautions are not taken.
CAUTION! This notice indicates a potentially hazardous situation that may result
in minor or moderate injury if proper practices are not taken.
NOTICE! This notice indicates that a specific hazard or unsafe practice will
result in equipment or property damage, but not personal injury.
WORK AREA
1. Operate in a safe work environment. Keep your work area clean, well-lit
and free of distractions. Place lights so you are not working in a shadow.
2. Keep anyone not wearing the appropriate safety equipment away from the
work area.
3. Store unused tools properly in a safe and dry location to prevent rust or
damage. Lock tools away and keep out of the reach of children.
4. Do not install or use in the presence of flammable gases, dust or liquids.
PERSONAL SAFETY
WARNING! Wear personal protective equipment approved by the Canadian
Standards Association (CSA) or American National Standards Institute (ANSI).
PERSONAL PROTECTIVE EQUIPMENT
1. Always wear impact safety goggles that provide front and side protection
for the eyes. Eye protection equipment should comply with CSA Z94.3-07
or ANSI Z87.1 standards based on the type of work performed.

8353229 1 HP Mini Dust Collector V4.0
4 For technical questions call 1-800-665-8685
2. Wear gloves that provide protection based on the work materials or to
reduce the effects of tool vibration.
3. Wear protective clothing designed for the work environment and tool.
PERSONAL PRECAUTIONS
Control the tool, personal movement and the work environment to avoid
personal injury or damage to tool.
1. Do not operate any tool when tired or under the influence of drugs, alcohol
or medications.
2. Avoid wearing clothes or jewelry that can become entangled with the
moving parts of a tool. Keep long hair covered or bound.
3. Do not overreach when operating a tool. Proper footing and balance
enables better control in unexpected situations.
SPECIFIC SAFETY PRECAUTIONS
WARNING! DO NOT let comfort or familiarity with product (gained from
repeated use) replace strict adherence to the tool safety rules. If you use
this tool unsafely or incorrectly, you can suffer serious personal injury.
1. Use the correct tool for the job. This tool was designed for a specific
function. Do not modify or alter this tool or use it for an unintended
purpose.
2. Do not use the tool if any parts are damage broken or misplaced. Repair or
replace the parts.
3. Only collect sawdust with the dust collector. Other materials can strike the
impeller or metal components and create a spark, igniting the sawdust and
causing a fire or explosion.
4. Always wear a respirator and safety glasses when removing, emptying or
replacing collection bags. Secure bags tightly to dust collector to avoid
bags from ‘blowing off'.
5. Do not remove the safety screen from the inlet. Doing so will alter the
airflow and could damage the motor.
6. Never insert fingers or any other objects through the grill guard when the
impeller is in operation.

V4.0 1 HP Mini Dust Collector 8353229
Visit www.princessauto.com for more information 5
7. Do not insert or allow foreign objects to enter into the unit’s openings to
prevent equipment damage. Do not block the unit’s air intakes or exhaust.
8. Never point the air stream at any point of your body, other people or
animals. Debris and dust may be ejected without warning.
9. Some wood contains preservatives that can be toxic. Take extra care to
prevent inhalation and skin contact when working with these materials.
Request, and follow, all safety information available from your material
supplier.
ELECTRICAL SAFETY
WARNING! Do not touch or handle a live tool with any part of your body that
is wet or damp. Wet skin reduces resistance to electrical current,
increasing the danger of a serious or fatal shock.
WARNING! To reduce risk of electric shock, be certain that the plug is
connected to a properly grounded receptacle.
1. Disconnect tool from power source before cleaning, servicing, changing
parts/accessories or when not in use.
2. Protect yourself against electric shocks when working on electrical
equipment. Avoid body contact with grounded surfaces. There is an
increased chance of electrical shock if your body is grounded.
3. Do not expose the tool to rain or wet conditions. Water entering a tool will
increase the risk of electric shock.
4. Do not disconnect the power cord in place of using the ON/OFF switch on
the tool. This will prevent an accidental start-up when the power cord is
plugged into the power supply.
a. In the event of a power failure, turn off the machine as soon as the
power is interrupted. The possibility of accidental injury could occur if
the power returns and the unit is not switched off.
5. Do not alter any parts of the tool or accessories. All parts and
accessories are designed with built-in safety features that may be
compromised if altered.
6. Make certain the power source conforms to requirements of your
equipment (see Specifications).

8353229 1 HP Mini Dust Collector V4.0
6 For technical questions call 1-800-665-8685
7. When wiring an electrically driven device, follow all electrical and safety
codes, as well as the most recent Canadian Electrical Code (CE) and
Canadian Centre for Occupational Health and Safety (CCOHS).
8. Grounded tools must be plugged into an outlet that is properly installed
and grounded in accordance with all codes and ordinances. Check with a
qualified electrician if you are in doubt as to whether the outlet is properly
grounded. If the tool should electronically malfunction or break down,
grounding provides a low resistance path to carry electricity away from the
user.
a. Never remove the grounding prong or modify the plug in any way, as
this will render the tool unsafe.
b. Do not use any adapter plugs.
c. Ground the plastic components such as the hose and fittings with bare
12 gauge copper wire to discharge static build up.
9. This device is only for use on 120 V (single phase) and is equipped with a
3-prong grounded power supply cord and plug.
10. DO NOT use this device with a 2-prong wall receptacle.
a. Choose an available 3-prong power outlet.
b. Replace 2 prong outlet with a grounded 3-prong receptacle, installed
in accordance with the CE Code and local codes and ordinances.
WARNING! All wiring should be performed by a qualified electrician.
POWER CORD
1. Insert the power cord plug directly to the power supply whenever possible.
Use extension cords or surge protectors only when the tool's power cord
cannot reach a power supply from the work area.
a. When operating a tool outside, use an outdoor extension cord marked
W-A or W. These cords are rated for outdoor use and reduce the risk
of electric shock.
b. Use in conjunction with a Ground Fault Circuit Interrupter (GFCI). If
operating a tool in a damp location is unavoidable, the use of a GFCI
reduces the risk of electric shock. It is recommended that the GFCI
should have a rated residual current of 30 mA or less.

V4.0 1 HP Mini Dust Collector 8353229
Visit www.princessauto.com for more information 7
2. Do not operate this tool if the power cord is frayed or damaged, as an electric
shock or surge may occur, resulting in personal injury or property damage.
a. Inspect the tool's power cord for cracks, fraying or other faults in the
insulation or plug before each use.
b. Discontinue use if a power cord feels more than comfortably warm
while operating the tool.
c. Have the power cord replaced by a qualified service technician.
3. Keep all connections dry and off the ground to reduce the risk of electric
shock. Do not touch plug with wet hands.
4. Prevent damage to the power cord by observing the following:
a. Do not pull on the cord to disconnect the plug from an outlet.
b. Keep cord away from heat, oil, sharp edges or moving parts.
c. Never use the cord to carry the tool.
5. Do not allow people, mobile equipment or vehicles to pass over
unprotected power cords.
a. Position power cords away from traffic areas.
b. Place cords in reinforced conduits.
c. Place planks on either side of the power cord to create a
protective trench.
6. Do not wrap cord around the tool, as sharp edges may cut insulation or
cause cracks if wound too tight. Gently coil cord and either hang on a hook
or fasten with a device to keep cord together during storage.
POWER TOOL PRECAUTIONS
1. DO NOT use any power tool with a malfunctioning power switch or control.
A power tool that fails to respond to the controls is dangerous and could
cause an injury. A qualified technician must repair and verify the power tool
is operating correctly before it can be used.
2. Do not cover the air vents. Proper cooling of the motor is necessary to
ensure normal life of the tool.
3. Avoid unintentional starting. Ensure the switch is off when connecting to
the power source.

8353229 1 HP Mini Dust Collector V4.0
8 For technical questions call 1-800-665-8685
4. Disconnect the power source before installing or servicing the tool.
5. Do not touch an operating motor. Motors can operate at high temperatures
and can cause a burn injury.
UNPACKING
WARNING! Do not operate the tool if any part is missing. Replace the
missing part before operating. Failure to do so could result in a malfunction
and personal injury.
Remove the parts and accessories from the packaging and inspect for damage.
Make sure that all items in the contents are included.
Contents:
• Dust Collector • Casters with nuts and washers
• Hose Clamp • Collection/filtration bag
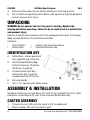
IDENTIFICATION KEY
A. Roller Base – Allows quick and
easy repositioning of the tool.
B. Dust Storage/Filtration Bag –
Collect and stores 12 gallons
(45 litres) of sawdust.
C. Lockout Switch with Key –
Remove the key to prevent
unsupervised use of the tool.
D. Carrying handle.
E. Inlet - 4 in. opening with safety screen.
ASSEMBLY & INSTALLATION
Numbered references in parenthesis (#1) refer to the included Parts List. Letter
references in parenthesis (A) refer to the included Identification Key.
CASTER ASSEMBLY
1. Thread a lock nut (#4) onto the caster’s (#3) threaded post.
2. Slide a washer (#5) onto the caster’s post.
Fig. 1

V4.0 1 HP Mini Dust Collector 8353229
Visit www.princessauto.com for more information 9
3. Insert the caster’s threaded portion into a corner hole of the base (#1). The
tubing on the base may require repositioning to align with the corner hole.
4. Place a lock washer (#6) onto the caster’s post.
5. Thread the cap nut (#7) onto the caster’s post. Tighten to secure.
6. Tighten the lock-nut to the frame until the caster is secure.
7. Repeat steps 1 to 6 for the other 3 casters.
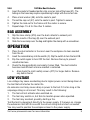
BAG ASSEMBLY
1. Slip the hose clamp (#19) over the dust collector’s exhaust port.
2. Slip the mouth of the bag (B) over the exhaust port.
3. Slide the hose clamp over the bag and tighten the clamp with a screwdriver.
OPERATION
1. Place the dust collector in the room near the workpiece to clear sawdust
from the air.
2. Insert the removable key into the switch (C). Flip the switch to turn the tool ON.
3. Flip the switch again to turn OFF the tool. Remove the key to prevent
unauthorized use.
4. Check the bag periodically and empty it when filled. The dust collector
becomes less efficient as more sawdust is collected.
a. Also check the inlet’s safety screen (#17) for larger debris. Remove
any debris found.
LOW VOLTAGE
Low voltage may cause overheating due to higher power current being drawn to
the tool that will shorten the motor life.
An extension cord may cause a drop in power to the tool if it is too long or the
amperage rating is not correct. This may result in the following:
1. The tool will not activate when switched on.
2. The tool may switch on, but fails to maintain power when operated.
3. The tool may overheat, possibly starting a fire.
Test the tool by plugging it directly to the power supply. If it powers on, change
the extension cord with to one with the correct rating and as short as needed.
You may need to position the workpiece closer to the power supply.

8353229 1 HP Mini Dust Collector V4.0
10 For technical questions call 1-800-665-8685
CARE & MAINTENANCE
1. Maintain the tool with care. A tool in good condition is efficient, easier to
control and will have fewer problems.
2. Inspect the tool components periodically. Repair or replace damaged or
worn components. Only use identical replacement parts when servicing.
3. Periodically check the impeller for damage caused by wood chips or debris
in the airflow.
4. Check the motor brushes for wear and replace when worn down.
5. Keep the tool handles clean, dry and free from oil/grease at all times.
6. Maintain the tool’s labels and name plates. These carry important information.
If unreadable or missing, contact Princess Auto Ltd. for replacements.
7. Inspect the bag for wear or tears and replace if necessary.
a. Replacement bags are available through Princess Auto (SKU 8353229).
8. Check that the hose clamp is tight before each use to prevent the bag from
blowing off.
WARNING! Only qualified service personnel should repair the tool. An
improperly repaired tool may present a hazard to the user and/or others.
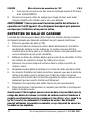
CARBON BRUSH MAINTENANCE
The carbon brushes may require maintenance when the motor performance of
the tool decreases or stops working completely.
1. Remove the brush caps (#39).
2. Remove the carbon brushes from the housing. Keep track of how the
carbon brushes are orientated during removal. The concave surface must
be oriented in the same way if the brushes are reused. This will prevent
unnecessary wear after reinstalling them.
3. Clean old carbon brushes before reinstalling them. Rub the contact areas
with a pencil eraser.
4. Reinsert the old carbon brushes in the same orientation to reduce wear.
5. Replace both carbon brushes if either is worn down more than 50 percent.

V4.0 1 HP Mini Dust Collector 8353229
Visit www.princessauto.com for more information 11
6. When installing the carbon brushes make sure the carbon portions of the
carbon brushes contact the motor armature, and that the springs face
away from the motor. Also, make sure the springs operate freely.
7. Replace the brush caps. Do not overtighten.
8. Run the tool for a while to help shape the new carbon brushes.
WARNING! Do not collect sawdust or debris while breaking in the carbon
brushes. New carbon brushes tend to spark when first used until they wear
and conform to the motor's armature. A spark can ignite the collected dust
causing a fire or explosion.
EMPTYING THE BAG
WARNING! Wear a respirator and safety glasses when removing, emptying or
replacing collection bags. The contents can suspend in the air and enter the
eyes or lungs, causing an initial discomfort and possible respiratory
problems in the long term.
1. Unplug the tool and remove the key from the lock out switch.
2. Loosen the hose clamp (#19) enough to allow the bag to be slipped off.
3. Pull the bag slowly off the tool’s exhaust. Squeeze the bag opening closed
to prevent the sawdust from releasing.
4. Tie the bag’s opening if the entire bag is being disposed of.
5. Empty the bag slowly into a container to prevent a cloud of sawdust from
forming. Dampen the sawdust in the container from time-to-time to keep
the dust down.
a. You may also empty the sawdust into a compost heap, if the sawdust
does not have chemical or natural toxins. Check with your material
supplier. If in doubt, empty into a container for disposal.
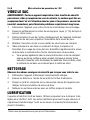
CLEANING
Follow the same safety precautions for Emptying the Bag.
1. Unplug the tool and discharge any static electricity.
2. Remove debris from the inlet safety screen.
3. Blow out the tool’s internal mechanism with compressed air to dislodge
any trapped sawdust.
4. Clean the outer surfaces with a clean, damp rag.

8353229 1 HP Mini Dust Collector V4.0
12 For technical questions call 1-800-665-8685
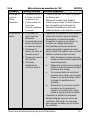
STORAGE
When not in use for an extended period, apply a thin coat of lubricant to the
steel parts to avoid rust. Remove the lubricant before using the tool again.
DISPOSAL
Recycle a tool damaged beyond repair at the appropriate facility.
Contact your local municipality for a list of disposal facilities or by-laws for
electronic devices, batteries, oil or other toxic liquids.

V4.0 1 HP Mini Dust Collector 8353229
Visit www.princessauto.com for more information 13
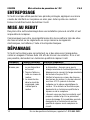
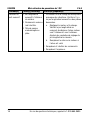
TROUBLESHOOTING
Visit a Princess Auto Ltd. location for a solution if the tool does not function
properly or parts are missing. If unable to do so, have a qualified technician
service the tool.
Problem(s) Possible Cause(s) Suggested Solution(s)
Motor will not
start.
1. There is a blown fuse
or open circuit breaker.
2. Low or no voltage
reaching motor.
3. Power enters control
circuit but does not
reach the motor.
1. Test for voltage at the fuse or circuit
breaker. Check that the fuse/circuit
breaker rating exceeds the motor’s
FLC by 25 percent.
2. Check each motor terminal’s
voltage. The voltage should be
within 10% of the voltage on the
motor’s nameplate. Test the motor
without a load. If it does not work,
have it serviced or replaced by a
qualified technician.
3. Confirm all contacts are clean, tight
and undamaged. If the problem
persists, have a qualified service
technician repair or replace the
circuit.
Fuse/circuit
breaker
overloads.
1. See 1 to 3 in Motor
will not start.
2. Motor shaft does not
turn when power
applied.
1. See 1 to 3 in Motor will not start.
2. Disconnect the motor from the load
and test under no-load conditions. If
the shaft does not turn, the bearing
are immobilized. Have the motor
serviced or replaced by a qualified
technician.
Motor is
overheating.
1. Broken or
disconnected ground.
2. Hot power lead is
connecting to the
motor frame.
1. Reconnect or replace the ground wire
and test for proper ground.
2. Have a qualified technician inspect the
motor and repair/replace the defective
wiring.

8353229 1 HP Mini Dust Collector V4.0
14 For technical questions call 1-800-665-8685
Problem(s) Possible Cause(s) Suggested Solution(s)
Motor is
overheating.
3. Motor overloads during
operation.
4. Worn or poorly
lubricated bearings.
5. Inadequate ventilation
reaching the motor.
3. A moving part of the motor may be
binding. Inspect the motor to see if
any parts are touching. Check to see
the motor’s shaft is straight.
a. Run the motor under normal
load and check the amount of
current it is drawing.
b Disconnect the motor from its
load and check the current
drawn while running under no-
load.
c. If the current draw is excessive
under load, but normal when
there is no-load, Inspect the
load to determine the problem.
d. If the no-load current is above
the listed rating, have the motor
serviced or replaced by a
qualified technician.
4. Replace and lubricate bearings.
5. Clean/clear all ventilation openings.
Use dry compressed air if blowing
debris out of the ventilation openings.
Excessive
vibration or
noise.
1. Excessive end play in
motor.
2. Worn or poorly
lubricated bearings.
3. Damaged or bent
Impeller.
1. An unbalanced motor or load creates
vibration. Check for excessive end
play or loose parts.
a. Realign the motor and load.
Check end play by trying to
move the motor shaft in and out.
Add end-play washers as
required.
b. If the shaft is bent, replace the
rotor or motor.
2. Replace and lubricate bearings.
3. Replace impeller.

V4.0 1 HP Mini Dust Collector 8353229
Visit www.princessauto.com for more information 15
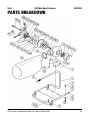
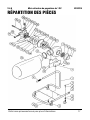
PARTS BREAKDOWN

8353229 1 HP Mini Dust Collector V4.0
16 For technical questions call 1-800-665-8685
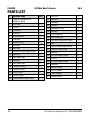
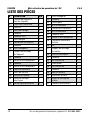
PARTS LIST
# DESCRIPTION QTY
1 Support Handle And
Machine Base
1
2 End Cap 1
3 Caster 4
4 Lock Nut 4
5 Washer 4
6 Lock Washer 4
7 Cap Nut 4
8 Handle Cover 1
9 Washer 8
10 Hex Nut 4
11 Machine Mounting Bracket 1
12 Washer 4
13 Hex Head Bolt 4
14 Washer 9
15 Hex Head Bolt 9
16 Collector Body 1
17 Safety Screen 1
18 Inlet Cover 1
19 Hose Clamp 1
20 Collection/Filtration Bag 1
21 Hex Nut 1
22 Washer 1
23 Impeller 1
24 Gasket 1
25 Collector Cover 1
26 Gasket 1
27 Lock Washer 4
28 Hex Head Bolt 4
29 Ground Conductor Cover 1
30 Key 1
31 Motor Mounting Bracket 1
32 Switch Cover Plate 1
33 Washer 2
34 Phillips Head Screw 2
35 Switch 1
36 Phillips Head Screw 1
37 Washer 1
38 Motor Brush 2
39 Brush Cover 2
40 Cord Clamp 1
41 Power Cord 1

V4.0 1 HP Mini Dust Collector 8353229
Visit www.princessauto.com for more information 17

8353229 1 HP Mini Dust Collector V4.0
18 For technical questions call 1-800-665-8685

V 4,0 8353229
Vous devez lire et comprendre toutes les instructions avant d'utiliser l'appareil.
Conservez ce manuel afin de pouvoir le consulter plus tard.
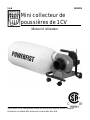
Manuel d'utilisateur
Mini collecteur de
poussières de 1 CV

8353229 Mini collecteur de poussières de 1 CV V 4,0
2 En cas de questions techniques, appelez le 1-800-665-8685
SPÉCIFICATIONS
Caractéristique(s) 750 W
Données nominales (tension, courant, fréquence) 120 V c.a. / 5,7 A / 60 Hz
Débit d'air 500 pi cube/min
Diamètre de l’impulseur 6 po
Puissance
1 CV
Diamètre d'entrée 4 po
Diamètre du sac 13 po
Taille de filtration 35 Micron
Vitesse du moteur 4,500 tr/min
Dimensions (Longueur à Largeur à Hauteur) 13 1/4 à 12 à 12 po
Poids 8,4 kg (18,5 lb)
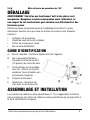
INTRODUCTION
Le mini collecteur de poussières de 1 CV récupère la poussière et les résidus en
suspension dans l’air de la zone de travail et les emprisonne dans un sac de
45 L (12 gallons). Le commutateur et la clé de verrouillage empêchent toute
utilisation non autorisée du collecteur de poussières. La poignée de transport
intégrée permet à l’utilisateur de déplacer facilement le collecteur de poussières.
SÉCURITÉ
AVERTISSEMENT ! Veuillez lire et comprendre toutes les instructions avant
d'utiliser cet outil. L'utilisateur doit respecter les précautions de base
lorsqu'il utilise cet outil afin de réduire le risque de blessure ou de
dommage à l'équipement.
Conservez ce manuel qui contient les avertissements de sécurité, les
précautions, les instructions de fonctionnement ou d'inspection et d'entretien.
Mini collecteur de
poussières de 1 CV
La page est en cours de chargement...
La page est en cours de chargement...
La page est en cours de chargement...
La page est en cours de chargement...
La page est en cours de chargement...
La page est en cours de chargement...
La page est en cours de chargement...
La page est en cours de chargement...
La page est en cours de chargement...
La page est en cours de chargement...
La page est en cours de chargement...
La page est en cours de chargement...
La page est en cours de chargement...
La page est en cours de chargement...
La page est en cours de chargement...
La page est en cours de chargement...
-
 1
1
-
 2
2
-
 3
3
-
 4
4
-
 5
5
-
 6
6
-
 7
7
-
 8
8
-
 9
9
-
 10
10
-
 11
11
-
 12
12
-
 13
13
-
 14
14
-
 15
15
-
 16
16
-
 17
17
-
 18
18
-
 19
19
-
 20
20
-
 21
21
-
 22
22
-
 23
23
-
 24
24
-
 25
25
-
 26
26
-
 27
27
-
 28
28
-
 29
29
-
 30
30
-
 31
31
-
 32
32
-
 33
33
-
 34
34
-
 35
35
-
 36
36


Power Fist 8353229 Le manuel du propriétaire
- Taper
- Le manuel du propriétaire
dans d''autres langues
- English: Power Fist 8353229 Owner's manual
Documents connexes
-
Power Fist 8703142 Le manuel du propriétaire
-
-
-
-
-
-
-
-
-
