PROPOINT 9040361 Le manuel du propriétaire
- Taper
- Le manuel du propriétaire

V1.0 9040361
Please read and understand all instructions before use. Retain this manual for future reference.

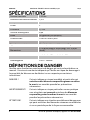
9040361 6 in. Variable-Speed Bench Grinder V1.0
2 For technical questions call 1-800-665-8685
Voltage rating
120V AC
Amperage rating
2.5A
Frequency rating
60 Hz
Phase
1
Horsepower
1/3 HP
Wheel/Pad size
6 in.
Grit
36 (coarse), 60 (medium)
No load speed
2,000 to 3,450 RPM
Arbor size
1/2 in.
Switch type
On/off with lockout key
Dimensions
15-5/8L x 10W x 11-3/4H in.
Base
8-3/4L x 6-1/4W in.
Weight
27 lb
Certification
CSA#196384
Please familiarize yourself with the hazard notices found in this manual. A
notice is an alert that there is a possibility of property damage, injury or
death if certain instructions are not followed.
DANGER! This notice indicates an immediate and specific hazard that
will result in severe personal injury or death if the proper
precautions are not taken.
WARNING! This notice indicates a specific hazard or unsafe practice that
could result in severe personal injury or death if the proper
precautions are not taken.
CAUTION! This notice indicates a potentially hazardous situation that may
result in minor or moderate injury if proper practices are not
taken.
NOTICE! This notice indicates that a specific hazard or unsafe practice
will result in equipment or property damage, but not
personal injury.

V1.0 6 in. Variable-Speed Bench Grinder 9040361
Visit www.princessauto.com for more information 3
Take on a variety of grinding, deburring, sharpening, cleaning and material
removal applications with this 1/3 HP bench grinder. It features a no load
speed of 2,000 to 3,450 RMP and includes 2 adjustable tool rests, 2 eye
shields, adjustable lamp and heavy duty base.
WARNING! Read and understand all instructions
before using this tool. The operator must follow
basic precautions to reduce the risk of personal
injury and/or damage to the equipment.
Keep this manual for safety warnings, precautions, operating or inspection
and maintenance instructions.
1. Operate in a safe work environment. Keep your work area clean, well-
lit and free of distractions. Place lights so you are not working in a
shadow.
2. Keep anyone not wearing the appropriate safety equipment away
from the work area.
3. Store tools properly in a safe and dry location. Keep tools out of the
reach of children.
4. Do not install or use in the presence of flammable gases, dust or
liquids.
5. Check work area before each operation to ensure extra equipment,
such as adjusting keys, wrenches, scrap, stock, and cleaning rags are a
safe distance from the tool.
6. Ensure the tool is properly secured to a stable work surface before
operating.
7. Keep the floor surrounding the work area clean and free from any
scrap material, oil and grease.
8. Keep work area child proof by using padlocks, master switches or by
removing starter keys when leaving the area.

9040361 6 in. Variable-Speed Bench Grinder V1.0
4 For technical questions call 1-800-665-8685
WARNING! Wear personal protective equipment
approved by the Canadian Standards
Association(CSA) or American National Standards
Institute(ANSI).
1. Always wear impact safety goggles that provide front and side
protection for the eyes. Eye protection equipment should comply
with CSA Z94.3-07 or ANSI Z87.1 standards based on the type of work
performed.
2. Wear the appropriate type of full-face shield in addition to safety
googles, as the work can create chips, abrasive or particulate matter.
3. Wear gloves that provide protection based on the work materials or
to reduce the effects of tool vibration.
3.1 Do not wear gloves when operating a tool that can snag the
material and pull the hand into the tool.
4. Wear protective clothing designed for the work environment and for
the tool.
5. Non-skid footwear is recommended to maintain footing and balance
in the work environment.
6. Wear steel toe footwear or steel toe caps to prevent a foot injury
from falling objects.
7. Wear a NIOSH approved respirator when working on materials that
produce hazardous fumes, dust or particulate matter.
8. This tool can cause hearing damage. Wear hearing protection gear
with an appropriate Noise Reduction Rating to withstand the decibel
levels.
Control the tool, personal movement and the work environment to avoid
personal injury or damage to the tool.
1. Do not operate any tool when tired or under the influence of drugs,
alcohol or medications.
2. Avoid wearing clothes or jewelry that can become entangled with the
moving parts of a tool. Keep long hair covered or bound.

V1.0 6 in. Variable-Speed Bench Grinder 9040361
Visit www.princessauto.com for more information 5
3. Do not overreach when operating the tool. Proper footing and balance
enables better control in unexpected situations.
4. Support the workpiece or clamp it to a stable platform. Holding the
workpiece by hand or against your body may lead to personal injury.
5. Securely hold this tool using both hands. Using a tool with only one
hand can result in loss of control.
6. Give your work undivided attention. Do not engage in conversations
or other activities while operating.
7. Do not stand on the tool.
8. Obtain advice from supervisors, instructors or other qualified persons
before operating if you are not thoroughly familiar with the tool.
9. Stand to one side when turning the tool on. This will ensure your
safety from loose fragments or parts.
10. Never perform layout, assembly, set up or other work on the tool’s
work bench when the tool is running.
WARNING! DO NOT let comfort or familiarity with
product (gained from repeated use) replace strict
adherence to the tool safety rules. If you use this
tool unsafely or incorrectly, you can suffer serious
personal injury.
1. Use the correct tool for the job. This tool was designed for a specific
function. Do not modify or alter this tool or use it for an unintended
purpose.
2. Do not use the tool if any parts are damaged, broken or misplaced.
Repair or replace the parts.
3. Examine the tool thoroughly before use. This includes inspection of
the machine and the safety guards, the alignment and operation of all
moving parts, the tool’s mounting and other breakage or condition
that may affect its operation.
4. Keep the safety guards and shields in place at all times and properly
adjusted and functioning when the machine is in use.
4.1 Ensure the spark shields are no further than 1/8 in. from the
grinding wheel and adjust as the wheel wears down.

9040361 6 in. Variable-Speed Bench Grinder V1.0
6 For technical questions call 1-800-665-8685
5. Use the tool at its correct speed and feed rate for optimal
performance and safety.
6. Never operate this tool until it has been completely and properly
assembled and installed.
7. Always use the provided blotter and wheel flanges to mount the
grinding wheels on the grinder shaft to prevent wheel damage or
accidental separation, which can result in fragments flying off the
wheel at high speeds.
8. Use only wheels suitable for the speed of the machine.
9. Use only wheels that have a bore exactly equal to the arbors of the
machine. Never attempt to force an undersized wheel to fit an arbor.
10. Do not overtighten the wheel nut.
11. Never use a tool with a cracked or worn grinding wheel. Change the
grinding wheel before using. Use only flanges supplied with the
grinder.
12. Never grind a workpiece on a wheel that is cold. Run the tool for one
full minute before any operation.
13. Do not grind magnesium or aluminum, as a fire may result. Always
clean the wheel between operations involving different materials.
14. Dress the wheel on the face only.
15. Contact a workpiece with the face of the wheel only.
16. Never apply coolant directly to the grinding wheel. Coolant can
weaken the bonding strength of the grinding wheel and cause it to
fail. Dip the workpiece in water to cool it.
17. When operation is complete, always disconnect the tool form its
power source and lock the switch in the off position.
1. Do not use any power tool with a malfunctioning power switch or
control. A power tool that fails to respond to the controls is
dangerous and can cause an injury. A qualified technician must repair
and verify the power tool is operating correctly, before it can be used.
2. Ensure the power supply matches the tool’s motor voltage (see
Specifications).

V1.0 6 in. Variable-Speed Bench Grinder 9040361
Visit www.princessauto.com for more information 7
3. Do not cover the air vents. Proper cooling is necessary prevent
damage to the tool’s motor.
4. Avoid unintentional starts. Ensure the switch is off when connecting
to the power source.
5. Disconnect the power source before installing or servicing the tool.
6. Remove adjusting keys and wrenches before using the tool. The tool
may eject an attached wrench or a key and cause an injury to you or
to a bystander.
7. Never point the tool towards yourself. It could inflict an injury.
8. Never force the tool. Excessive pressure could break the tool,
resulting in damage to your workpiece or serious personal injury.
Excessive pressure is the cause if your tool runs smoothly under no
load, but roughly under load.
9. Keep hands and fingers away from the work area. Any part of the body
contacting the tool’s working parts could result in an injury.
10. Only use accessories that are specifically designed for use with the
tool. Ensure the accessory is tightly installed.
11. Only use an accessory that exceeds the Speed Rating (see
Specifications).
12. Before using the tool on a workpiece, test the tool by running it at the
highest no-load speed for at least 60 seconds in a safe position. Stop
immediately if there is any abnormal vibration or wobbling that could
indicate poor installation of the grinding wheel. Check the tool to
determine the cause.
12.1 Do not allow the tool to run without load for an extended period
of time, as this will shorten its life.
13. Never touch the tool accessory or workpiece during or immediately after
use. They may be hot and could inflict a burn injury.
14. Do not touch an operating motor. Motors can operate at high
temperatures and can cause a burn injury.
15. Take work breaks to prevent the tool's motor from overheating
and/or overloading. Refer to the welding unit’s duty cycle in
Specifications. Refer to the plasma cutting machine’s duty cycle in
Specifications.

9040361 6 in. Variable-Speed Bench Grinder V1.0
8 For technical questions call 1-800-665-8685
16. Never use a tool with a cracked or worn tool accessory. Change the
tool accessory before using it.
17. Do not start the tool when the tool’s accessory is touching the
workpiece.
WARNING! Do not touch or handle a live tool with
any part of your body that is wet or damp. Wet
skin reduces resistance to electrical current,
increasing the danger of a serious or fatal shock.
WARNING! To reduce risk of electric shock, be
certain that the plug is connected to a properly
grounded receptacle.
1. Disconnect the tool from the power supply before making any
adjustments, changing accessories, cleaning, servicing or when
storing. Such preventive safety measures reduce the risk of starting
the tool accidentally.
2. Protect yourself against electric shocks when working on electrical
equipment. Avoid body contact with grounded surfaces. There is an
increased chance of electrical shock if your body is grounded.
2.1 Hold the tool by the insulated gripping surfaces when
performing an operation where it may contact hidden wiring or
its own cord. Contact with a ‘live’ wire will electrify exposed
metal parts and shock the operator.
2.2 Insulate yourself from the electrical current and ground using
dry insulating mats or covers big enough to prevent physical
contact with the workpiece or ground.
3. Do not disconnect the power cord in place of using the power switch.
This will prevent an accidental start-up when the power cord is
plugged into the power supply.
3.1 In the event of a power failure, unplug the machine as soon as
the power is interrupted. The possibility of accidental injury
could occur if the power returns.
4. Do not alter any parts of the tool or accessories. All parts and
accessories are designed with built-in safety features that may be
compromised if altered.

V1.0 6 in. Variable-Speed Bench Grinder 9040361
Visit www.princessauto.com for more information 9
5. Make certain the power source conforms to requirements of your
equipment (see Specifications).
6. When wiring an electrically driven tool, follow all electrical and safety
codes, as well as the most recent Canadian Electrical Code (CE) and
Canadian Centre for Occupational Health and Safety (CCOHS).
7. This tool is only for use on 120 V (single phase) and is equipped with
a three-prong grounded power supply cord and plug. Check with a
qualified electrician if you are in doubt as to whether the outlet is
properly grounded. If the tool should electronically malfunction or
break down, grounding provides a low resistance path to carry
electricity away from the user.
7.1 Never remove the grounding prong or modify the plug in any
way, as this will render the tool unsafe.
7.2 Do not use any adapter plugs.
8. A separate electrical circuit should be used for this tool.
8.1 This circuit should not be less than #12 wire and should be
protected with a 20A time lag fuse.
9. If using an extension cord, select one with a 3-wire cord with a 3-
prong grounding plug.
10. All extension cords should be heavy enough to carry the current of
the machine. An undersized cord will cause a drop in voltage,
resulting in loss of power and overheating.
CORD LENGTH
CORD GAUGE
>25
18 AWG
25 to 50
16 AWG
50 to 100
16 AWG
100 to 150
14 AWG
WARNING! All wiring should be performed by a
qualified electrician.

9040361 6 in. Variable-Speed Bench Grinder V1.0
10 For technical questions call 1-800-665-8685
DANGER! Do not use sand or silicate particulate
dust as an abrasive. Sand or silica particulate
dust can result in the lethal lung disease known
as silicosis, when inhaled over a period of time
as short as several weeks or as long as 5 to 10
years. Silicosis causes shortness of breath,
cough, fever and bluish skin (cyanosis). Seek
immediate medical attention if these symptoms
appear. Silicosis can kill you if untreated.
The abrasive blasting process emits abrasive media under pressure that
breaks apart upon impact. The resulting dust is a combination of the
abrasive media and the removed material. Both the media and
the material being removed may have toxic components, such as lead
in paint.
1. Check the abrasive media’s Material Safety Data Sheet (MSDS) for
information on the health risks and preventative measures you can
implement to minimize those risks.
2. Use only abrasives specifically intended for blasting. Never use sand
or silicates.
3. Avoid exposure to hazardous dust created during the blasting
process. Options include ventilation systems to remove or divert the
dust, containment methods such as cabinets or blast-cleaning
machines or working outside. Always check municipal by-laws
regarding abrasive blasting outdoors. Test the air quality to ensure
that exposure is reduced by the chosen option.
4. Never point the abrasive blasting gun at people or animals. Never
point the tool towards yourself. The abrasive media is under pressure
and can cause a physical injury.
5. Test the tool with a low media flow rate to ensure the media does not
ricochet and injure yourself or a bystander.

V1.0 6 in. Variable-Speed Bench Grinder 9040361
Visit www.princessauto.com for more information 11
WARNING! Do not operate the tool if any part is
missing. Replace the missing part before
operating. Failure to do so could result in a
malfunction and personal injury.
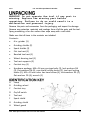
Remove the parts and accessories from the packaging and inspect for damage.
Remove any protective materials and coatings from all of the parts and the tool.
Spray penetrating oil on the surface then wipe away with a soft cloth.
Make sure that all items in the contents are included.
Contents:
• 6 in. grinder (1)
• Grinding shields (2)
• Spark shields (2)
• Flat tool rest (1)
• Beveled tool rest (1)
• Wheel dressing tool (1)
• Tool rest supports (2)
• Coolant tray (1)
• Hardware package: M6 x 16 mm carriage bolts (2), lock washers D6
(2), flat washers D6 (4), eye shield locking knobs (2), tool rest locking
knobs (2), M5 x 10 mm inner hex head screw (4), lock washers D5 (4),
flat washers D5 (4), wrench (1)
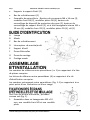
A Lamp
B Grinding wheel
C Coolant tray
D On/off switch
E Tool rest
F Spark shield
G Grinding shield
H Wheel guard

9040361 6 in. Variable-Speed Bench Grinder V1.0
12 For technical questions call 1-800-665-8685
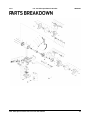
Numbered references in parenthesis (#1) refer to the included Parts List.
Letter references in parenthesis (A) refer to the included Identification Key.
Dashed numbers in parenthesis (Fig. 1-1) refer to a specific point in an
illustration or image.
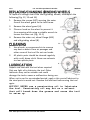
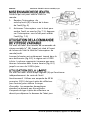
To attach the spark shields, accomplish the
following (Fig. 1).
1. Fit two M5 x 10 mm hex screws with an M5
lock washer and flat washer.
2. Use the assembled hex screws and washers to
secure the spark shield (F) to the wheel guard
(H). The spark shield should be approximately
1/8 in. from the grinding wheel.
3. Repeat steps 1 and 2 for the second spark shield.
To attach the grinding shields (G), accomplish the following.
1. Insert one of the M6 x 16 mm carriage bolts through the outermost
hole in the spark shield.
2. Secure using one of the M6 flat washers, one lock washer and a
threaded thumb knob.
3. Repeat steps 1 and 2 for the second grinding
shield.
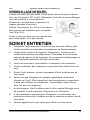
To attach the tool rests (E), accomplish the following
(Fig. 2).
1. Remove the tool rest lock knob (#28), star
washer and washer from the carriage bolt on
the lower portion of the wheel guard.
2. Using the carriage bolt, star washer, washer and
knob, attach the work rest bracket to the inside
of the wheel guard (H).
3. Attach the tool rest (E) to the tool rest support using the lock nut
(#32).
Fig. 1
Fig. 2

V1.0 6 in. Variable-Speed Bench Grinder 9040361
Visit www.princessauto.com for more information 13
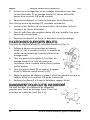
4. Adjust the position of the tool rest support so that the tool rest is
approximately 1/8 in. from the grinding wheel (B).
5. Repeat steps 1 through 4 for the second tool
rest.
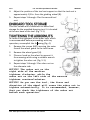
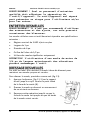
This tool comes with convenient on-board tool
storage for the provided dressing tool. It is located
at the rear base of the tool. (Fig. 3-1).
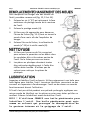
To confirm the tightness of the arbor nuts, which
is recommended before proceeding with any
operation, accomplish the fo llowing (Fig. 4).
1. Remove the screws (#37) securing the outer
face of the wheel guard to the tool frame.
2. Remove the wheel guard (H).
3. Place on hand on the wheel to prevent it
from moving while using a suitable wrench
to tighten the arbor nut (Fig. 5-1).
4. Repeat steps 1 through 3 for arbor not on
the alternate side.
NOTICE! The arbor nut on the
right side of the machine
tightens clockwise, while the
arbor nut on the left side of the machine
tightens counterclockwise.
NOTICE! As you use the tool, the force and
direction of the wheel will cause the arbor nut to
tighten automatically. It is recommended, however,
that you check the tightness of the arbor nut
before each operation.
Fig. 3
Fig. 4
Fig. 5

9040361 6 in. Variable-Speed Bench Grinder V1.0
14 For technical questions call 1-800-665-8685
WARNING! Make sure that the
on/off switch is in the OFF
position before connecting
the tool to its power
source. Do not touch the
metal prongs of the plug
while accomplishing this.
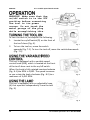
To turn the tool on, accomplish the following.
1. Locate the on/off switch (D) on the front of
the tool’s base (Fig. 6).
2. To turn the tool on, move the switch
upwards (Fig. 7-1). To turn the tool off, move the switch downwards
(Fig. 7-2).
This tool is equipped with a variable speed
control knob (#18), which is located on the front
of the tool’s base next to the on/off switch.
When the knob is fully rotated counterclockwise
(Fig. 8-1) the RPM is 2,000. The speed increases
as you rotate the knob clockwise (Fig. 8-2) to a
maximum of 3,450 RPM.
This tool is equipped with an adjustable lamp
(A) that operates independently from the tool
(Fig. 9).
Fig. 6
Fig. 7
Fig. 8
Fig. 9

V1.0 6 in. Variable-Speed Bench Grinder 9040361
Visit www.princessauto.com for more information 15
Warning! To reduce the risk of fire, use a 40 watt
or smaller, 120 volt, reflector track type light
bulb (not supplied). A standard household light
bulb should not be used. The reflector track type
light bulb should not extend below the lampshade.
Whenever this tool is not in use, the on/off
switch should be placed in the OFF position.
For longer periods of inactivity or for any
maintenance work, always disconnect the tool
from its power source.
To lock the tool, remove the switch (#15) by
pulling it straight outwards (Fig. 10-1).
The tool cannot be restarted until the switch is reinserted.
1. Maintain the tool with care. A tool in good condition is efficient,
easier to control and will have fewer problems.
2. Inspect the tool fittings, alignment, hoses and power supply cord
periodically. Have damaged or worn components repaired or replaced by
an authorized technician. Only use identical replacement parts when
servicing.
3. Follow instructions for lubricating and changing accessories.
4. Only use accessories intended for use with this tool.
5. Keep the tool clean, dry and free from oil/grease at all times.
6. Maintain the tool’s labels and name plates. These carry important
information. If unreadable or missing, contact Princess Auto Ltd. for
replacements.
7. Always switch the tool off and disconnect from the power source
before performing any inspections or maintenance.
8. If inspecting or maintaining safety guards, remember to always
replace immediately upon completion.
9. Regularly check the tightness of all hardware.
Fig. 10

9040361 6 in. Variable-Speed Bench Grinder V1.0
16 For technical questions call 1-800-665-8685
WARNING! Only qualified service personnel should
repair the tool. An improperly repaired tool may
present a hazard to the user and/or others.
WARNING! The use of accessories and attachments is
not recommended and may result in injury.
Grinding wheels that are used with this tool should meet with the
following specifications:
• Rated for 3,600 RPM or higher
• Width of 1 in.
• Diameter of 6 in.
• Arbor hole of 1/2 in.
• Use only balanced wheels
CAUTION! Using a wheel that is less than 3/4 in.
wide will cause vibration and could damage the
tool.
This tool comes with a diamond-based wheel dresser to keep your
grinding wheels both clean and square.
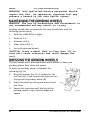
To dress the grinding wheel, accomplish the
following (Fig 11).
1. Bring the dresser (Fig. 11-1) forward on the
tool rest until it just touches the high point on
the face of the grinding wheel (B).
2. Dress the wheel by moving the dresser back
and forth.
3. Repeat this operation until the face of the
grinding wheel is clean and the edges are
square.
Fig. 11

V1.0 6 in. Variable-Speed Bench Grinder 9040361
Visit www.princessauto.com for more information 17
To replace or change one of the tool’s grinding wheels, accomplish the
following (Fig. 12, 13 and 14).
1. Remove the screws (#37) securing the outer
face of the wheel guard to the tool frame.
2. Remove the wheel guard (H).
3. Place on hand on the wheel to prevent it
from moving while using a suitable wrench to
loosen the arbor nut (Fig. 13-1).
4. Remove the arbor nut, wheel flange (#39)
and old grinding wheel (B).
1. Use a brush or compressed air to remove
any dust or debris from air passages and
other areas of the tool. Do not use hands.
2. All plastic parts should be cleaned regularly
with a soft, damp cloth. Never use solvents
to clean plastic parts.
Inspect and lubricate the tool when required.
Only use light oil to lubricate the tool. Other
lubricants may not be suitable and could
damage the tool or cause a malfunction during use.
When not in use for an extended period, apply a thin coat of lubricant to
the steel parts to avoid rust. Remove the lubricant before using the tool
again.
NOTICE! NEVER use a penetrating oil to lubricate
the tool. Penetrating oil may act as a solvent
that will break down the grease and cause the tool
to seize up.
Fig. 12
Fig. 13
Fig. 14

9040361 6 in. Variable-Speed Bench Grinder V1.0
18 For technical questions call 1-800-665-8685
Recycle a tool damaged beyond repair at the appropriate facility.
Contact your local municipality for a list of disposal facilities or by-laws for
electronic devices, batteries, oil or other toxic liquids.
IMPORTANT! DO NOT pollute the environment by
allowing uncontrolled discharge of waste oil.
Visit a Princess Auto Ltd. location for a solution if the tool does not
function properly or parts are missing. If unable to do so, have a qualified
technician service the tool.

V1.0 6 in. Variable-Speed Bench Grinder 9040361
Visit www.princessauto.com for more information 19

9040361 6 in. Variable-Speed Bench Grinder V1.0
20 For technical questions call 1-800-665-8685
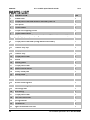
#
DESCRIPTION
QTY
1
Rubber feet
4
2
Philips pan screw and washer assembly M4 x 8
2
3
Base plate
1
4
Circuit board
1
5
Philips self-tapping screw
2
6
Circuit board cover
1
7
Philips pan screw and spring washer and flat washer assembly
3
8
Toothed lock washer
2
9
Philips pan screw and spring washer assembly
2
10
Lead sheath
3
11
Coolant tray clip
1
12
Philips pan screw
4
13
Coolant tray
1
14
Philips pan screw
4
15
Switch
1
16
Switch guard
1
17
Philips pan screw
4
18
Speed control knob
1
19
Rotary knob pad
1
20
Switch plate
1
21
Speed controller
1
22
Base
1
23
Wheel dressing tool
1
24
Wheel dressing clip
1
25
Hex flange nut
9
26
Wire fixing
1
27
Philips pan screw
1
28
Tool rest lock knob
2
29
Spring washer
2
30
Flat washer
4
31
Right moveable tool rest
1
La page est en cours de chargement...
La page est en cours de chargement...
La page est en cours de chargement...
La page est en cours de chargement...
La page est en cours de chargement...
La page est en cours de chargement...
La page est en cours de chargement...
La page est en cours de chargement...
La page est en cours de chargement...
La page est en cours de chargement...
La page est en cours de chargement...
La page est en cours de chargement...
La page est en cours de chargement...
La page est en cours de chargement...
La page est en cours de chargement...
La page est en cours de chargement...
La page est en cours de chargement...
La page est en cours de chargement...
La page est en cours de chargement...
La page est en cours de chargement...
La page est en cours de chargement...
La page est en cours de chargement...
La page est en cours de chargement...
La page est en cours de chargement...
La page est en cours de chargement...
La page est en cours de chargement...
La page est en cours de chargement...
La page est en cours de chargement...
-
 1
1
-
 2
2
-
 3
3
-
 4
4
-
 5
5
-
 6
6
-
 7
7
-
 8
8
-
 9
9
-
 10
10
-
 11
11
-
 12
12
-
 13
13
-
 14
14
-
 15
15
-
 16
16
-
 17
17
-
 18
18
-
 19
19
-
 20
20
-
 21
21
-
 22
22
-
 23
23
-
 24
24
-
 25
25
-
 26
26
-
 27
27
-
 28
28
-
 29
29
-
 30
30
-
 31
31
-
 32
32
-
 33
33
-
 34
34
-
 35
35
-
 36
36
-
 37
37
-
 38
38
-
 39
39
-
 40
40
-
 41
41
-
 42
42
-
 43
43
-
 44
44
-
 45
45
-
 46
46
-
 47
47
-
 48
48


PROPOINT 9040361 Le manuel du propriétaire
- Taper
- Le manuel du propriétaire
dans d''autres langues
- English: PROPOINT 9040361 Owner's manual
Documents connexes
Autres documents
-
Makita GB602W Le manuel du propriétaire
-
Powerfist 9039801 Le manuel du propriétaire
-
-
Power Fist 8656860 Le manuel du propriétaire
-
-
-
-
-