PROPOINT 8844029 Le manuel du propriétaire
- Catégorie
- Outils électroportatifs
- Taper
- Le manuel du propriétaire

V1.0 8844029
Please read and understand all instructions before use. Retain this manual for future reference.
AIR ANGLE GRINDER
5 IN.

8844029 5 in. Air Angle Grinder V1.0
2 For technical questions call 1-800-665-8685
SPECIFICATIONS
Wheel Diameter 5 in.
Max. Pressure 90 PSI
Air Consumption @ 90 PSI 3.5 CFM
Speed Rating 10,000 RPM
Spindle Thread 5/8 in. -11
Air Inlet 1/4 in. NPT
Min. Hose Size 3/8 in.
Material Die-cast Aluminum Housing
HAZARD DEFINITIONS
Please familiarize yourself with the hazard notices found in this manual. A
notice is an alert that there is a possibility of property damage, injury or
death if certain instructions are not followed.
DANGER! This notice indicates an immediate and specific hazard that
will result in severe personal injury or death if the proper
precautions are not taken.
WARNING! This notice indicates a specific hazard or unsafe practice that
could result in severe personal injury or death if the proper
precautions are not taken.
CAUTION! This notice indicates a potentially hazardous situation that may
result in minor or moderate injury if proper practices are not
taken.
NOTICE! This notice indicates that a specific hazard or unsafe practice
will result in equipment or property damage, but not personal
injury.

V1.0 5 in. Air Angle Grinder 8844029
Visit www.princessauto.com for more information 3
INTRODUCTION
The 5 in. Air Angle Grinder is ideal for easy weld cleanup, slag removal,
cutting, paint stripping and many other applications. Among its many features
are a built-in speed regulator, planetary gears and durable housing.
SAFETY
WARNING! Read and understand all instructions before using this
tool. The operator must follow basic precautions to reduce the risk
of personal injury and/or damage to the equipment.
Keep this manual for safety warnings, precautions, operating or inspection
and maintenance instructions.
WORK AREA
1. Operate in a safe work environment. Keep your work area clean, well-
lit and free of distractions. Place lights so you are not working in a
shadow.
2. Keep anyone not wearing the appropriate safety equipment away from
the work area.
3. Store unused tools properly in a safe and dry location to prevent rust
or damage. Lock tools away and keep out of the reach of children.
4. Do not install or use in the presence of flammable gases, dust or
liquids.
PERSONAL SAFETY
WARNING! Wear personal protective equipment approved by the
Canadian Standards Association (CSA) or American National
Standards Institute (ANSI).
PERSONAL PROTECTIVE EQUIPMENT
1. Always wear impact safety goggles that provide front and side
protection for the eyes. Eye protection equipment should comply with
CSA Z94.3-07 or ANSI Z87.1 standards based on the type of work
performed.
2. Wear the appropriate type of full-face shield in addition to safety
googles, as the work can create chips, abrasive or particulate matter.
3. Wear gloves that provide protection based on the work materials or to
reduce the effects of tool vibration.

8844029 5 in. Air Angle Grinder V1.0
4 For technical questions call 1-800-665-8685
3.1 Do not wear gloves when operating a tool that can snag the
material and pull the hand into the tool.
4. Wear protective clothing designed for the work environment and tool.
5. Non-skid footwear is recommended to maintain footing and balance in
the work environment.
6. Wear steel toe footwear or steel toe caps to prevent a foot injury from
falling objects.
7. Wear the appropriate rated dust mask or respirator.
8. This tool can cause hearing damage. Wear hearing protection gear
with an appropriate Noise Reduction Rating to withstand the decibel
levels.
9. The tool may contain high pressure. Use safety glasses and gloves for
protection during operation. Keep hands clear of the exposed rubber
portions of the hose.
PERSONAL PRECAUTIONS
Control the tool, personal movement and the work environment to avoid
personal injury or damage to tool.
1. Do not operate any tool when tired or under the influence of drugs,
alcohol or medications.
2. Avoid wearing clothes or jewelry that can become entangled with the
moving parts of a tool. Keep long hair covered or bound.
3. Do not overreach when operating a tool. Proper footing and balance
enables better control in unexpected situations.
4. Support the workpiece or clamp it to a stable platform. Holding the
workpiece by hand or against your body may lead to personal injury.
5. Keep your fingers away from the trigger/switch while carrying the tool,
attaching an air hose or an accessory. Lock the trigger/switch safety if
available.
6. Avoid unintentional starts. Be sure that the regulator/throttle switch is
in the neutral or OFF position when not in use and before connecting it
to any air source.
7. Serious injury or death may occur from inhaling compressed air. The air
stream may contain carbon monoxide, toxic vapors or solid particles.
Never inhale compressed air directly from the pump or air tool.

V1.0 5 in. Air Angle Grinder 8844029
Visit www.princessauto.com for more information 5
SPECIFIC SAFETY PRECAUTIONS
WARNING! DO NOT let comfort or familiarity with product (gained
from repeated use) replace strict adherence to the tool safety rules.
If you use this tool unsafely or incorrectly, you can suffer serious
personal injury.
1. Use the correct tool for the job. This tool was designed for a specific
function. Do not modify or alter this tool or use it for an unintended
purpose.
2. Do not use the tool if any parts are damage broken or misplaced.
Repair or replace the parts.
3. This tool will not stop moving immediately. Do not lay the tool down or
leave it unattended until it has come to a complete stop. A part that is
moving could make the tool jump or grab a surface and pull the tool
out of your control.
4. Always make sure the work surface is free from nails and other foreign
objects.
5. After changing the accessories or making adjustments, make sure the
flange nut and any other adjustment devices are securely tightened.
Loose adjustment devices will be violently thrown.
6. Always check accessories for damage before each use. Damaged
accessories can break during use and cause serious injury.
7. If you are interrupted when operating the angle grinder, complete the
process and switch off the tool before looking up.
8. Use metal and voltage detectors to locate hidden electric, water or
gas lines. Avoid touching live components or conductors.
9. Hold the tool by the insulated gripping surfaces when performing an
operation where the grinding tool may contact hidden wiring. Contact
with a ‘live’ wire will make exposed metal parts of the tool ‘live’ and
shock the operator.
10. Only use 5 in. grinder wheels or discs with this tool. Never use this
tool with blades designed for a circular saw.
AIR TOOL PRECAUTIONS
1. Use only clean and dry compressed air as a power source.
Contaminated or moist air will gradually damage the tool.
2. Install an in-line shutoff valve or regulator to allow immediate control
over the air supply in an emergency, even if a hose is ruptured.

8844029 5 in. Air Angle Grinder V1.0
6 For technical questions call 1-800-665-8685
3. Discontinue tool use if it does not work properly or air is leaking. Tag
or mark the tool as ‘defective’ or ‘out of service’ until repaired.
4. Check the manufacturer’s maximum pressure rating for air tools and
accessories. Compressor outlet pressure must be regulated to never
exceed the maximum pressure rating of the tool (see Specifications).
Exceeding the maximum PSI rating can create a bursting hazard,
causing injury and property damage.
5. Attach all accessories properly to the tool before connecting the air
supply. A loose accessory may detach or break during operation.
6. Never use oxygen, combustible gas or any other bottled gas as a
power source. Any power source other than an air compressor could
cause an explosion and serious personal injury.
7. Turn OFF the valve and discharge any remaining air pressure after
each use or before adjusting the tool.
8. Do not leave the air tool unattended with its compressed air supply on.
Turn off the compressed air supply and bleed the air tool of any
remaining compressed air before leaving the air tool unattended.
9. Serious injury may occur from loose debris being propelled at high
speeds from the compressed air stream. Always wear OSHA approved
safety glasses to protect the eyes during operation of the air compressor.
10. Never point the air stream or tools at any point of your body, other
people or animals. Debris and dust may be ejected without warning.
Always turn off the air compressor and drain tank pressure completely
before attempting maintenance or attaching air tools. Release
pressure slowly from the system.
AIR HOSE PRECAUTIONS
1. Inspect the tool's air hose for cracks, fraying or other faults before
each use. Discontinue use if the air hose is damaged or hissing is
heard from the air hose or couplers. Replace the defective air hose.
2. Do not allow people, mobile equipment or vehicles to pass over the
unprotected air hose. Position the air hose away from high traffic
areas, in a reinforced conduit or place planks on both sides of the air
hose to create a protective trench.
3. Prevent damage to the air hose by observing the following:
3.1 Never carry the tool by the air hose.
3.2 Keep the air hose behind the tool and out of the tool's work path.

V1.0 5 in. Air Angle Grinder 8844029
Visit www.princessauto.com for more information 7
3.3 Keep the air hose away from heat, oil, sharp edges or moving parts.
3.4 Do not wrap the air hose around the tool as sharp edges may pierce
or crack the air hose. Gently coil the hose and either hang on a
hook or fasten with a device to keep hose together when storing.
4. A damaged or disconnected air hose under pressure may whip
around and inflict personal injury or damage the work area. Secure the
compressor's air hose to a fixed or permanent structure with clamps
or cable ties.
POWER TOOL PRECAUTIONS
Tool accessory is a general term that refers to drill bit, saw or cutting
blades, grinding wheel, etc. as appropriate for the tool.
1. Do not use any power tool with a malfunctioning power switch or
control. A power tool that fails to respond to the controls is dangerous
and can cause an injury. A qualified technician must repair and verify
the power tool is operating correctly, before it can be used.
2. Do not cover the air vents.
3. Disconnect the power source before installing or servicing the tool.
4. Never force the tool. Excessive pressure could break the tool, resulting in
damage to your workpiece or serious personal injury. Excessive pressure is
the cause if your tool runs smoothly under no load, but roughly under load.
5. Keep hands and fingers away from the work area. Any part of body
contacting the tool’s working parts could cause an injury.
6. Only use accessories that are specifically designed for use with the
tool. Ensure the accessory is tightly installed.
7. Never touch the tool accessory or workpiece during or immediately after
use. They may be hot and could inflict a burn injury.
8. Never use a tool with a cracked or worn tool accessory. Change the
tool accessory before using it.
GRINDING TOOL PRECAUTIONS
WARNING! Some surfaces contain materials which can be toxic.
When working on materials that may contain lead, asbestos, copper
chromium arsenate or other toxic materials, extra care should be
taken to avoid inhalation and minimize skin contact.
1. Only use a grinding wheel that exceeds the maximum RPM of the tool
(see Specifications).

8844029 5 in. Air Angle Grinder V1.0
8 For technical questions call 1-800-665-8685
2. Only use a grinding wheel with the correct arbor size and shape that
matches the grinder’s spindle.
3. Always ensure the wheel guard is attached correctly and do not
operate the angle grinder without the guard attached.
4. Ensure the grinding wheel has a clean edge. Check the grinding
wheel for wear or chipping and replace if necessary.
5. Never install more than one wheel at a time.
6. Before using the tool on the workpiece, run the tool at the highest
speed, without a load, for at least 30 seconds in a safe position. Stop
immediately if there is any vibration or wobbling that could indicate
poor installation or a poorly balanced grinding wheel. Check the tool
to determine the cause.
7. Do not subject the grinding wheel to any lateral pressure as it may
damage the tool or cause it to kickback.
7.1 Confirm that your grinding wheel is designed for side-grinding
before using it for that purpose.
8. A large amount of sparks will be created when working with an angle
grinder. Hold the tool so that sparks fly away from you and other
persons or flammable materials. Keep up-to-date fire-prevention safety
instructions in the event of a fire.
9. Do not use a coolant or water with this angle grinder.
10. Do not use as a fixed grinder.
11. Only use the correct size wheel. Using a larger or smaller wheel may
apply unexpected forces against the wheel, causing it to shatter.
KICKBACK PRECAUTIONS
Kickback is a sudden reaction to a pinched or snagged grinding accessory.
The tool kicks out and away from the workpiece while the grinding
accessory is still active. This can inflict a serious injury on the user or a
bystander. Kickback can also damage the tool or workpiece.
Kickback can be avoided by taking proper precautions:
1. Maintain a firm grip on the tool and position your body and arms to
allow you to resist a kickback. Kickback will propel the tool in the
direction opposite to the grinding accessory’s direction of rotation. A
snagged grinding wheel may pull the tool out of the grasp of the user.

V1.0 5 in. Air Angle Grinder 8844029
Visit www.princessauto.com for more information 9
2. If kickback occurs, the accessory may:
2.1 pass over a body part, causing a seriously injury;
2.2 wrench the user’s arm causing muscle or joint injuries; and
2.3 strike bystanders.
3. Use clamps or a vice to hold down smaller workpieces.
4. Use special care when working on corners, sharp edges or flexible
material. These workpieces have a tendency to snag the grinding
accessory.
5. Only use grinding accessories designed for the tool.
6. Support large panels to minimize the risk of pinching the grinding
accessory. Large panels may sag under their own weight. Place
supports under the panel on both sides of the cutline. Place other
supports under the rest of the panels to prevent them from falling after
the cut.
VIBRATION PRECAUTIONS
1. This tool vibrates during use. Repeated or long-term exposure to
vibration may cause temporary or permanent physical injury. Take
frequent breaks when using the tool.
2. If you feel any medical symptoms related to vibrations (such as
tingling, numbness, and white or blue fingers), seek medical attention
as soon as possible.
3. Wear suitable gloves to reduce the effects of vibration.
4. DO NOT use this tool before consulting a physician if one of the
following applies:
a. Pregnant
b. Impaired blood circulation to the
hands
c. Past hand injuries
d. Nervous system
disorders
e. Diabetes
f. Raynaud's Disease
UNPACKING
WARNING! Do not operate the tool if any part is missing. Replace
the missing part before operating. Failure to do so could result in a
malfunction and personal injury.

8844029 5 in. Air Angle Grinder V1.0
10 For technical questions call 1-800-665-8685
Remove the parts and accessories from the packaging and inspect for
damage. Make sure that all items in the contents are included.
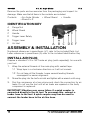
Contents: • Air Angle Grinder • Wheel Guard • Handle
• Wrench x 2
IDENTIFICATION KEY
A Flange Nut
B Wheel Guard
C Handle
D Trigger Lever Safety
E Trigger Lever
F Air Inlet
ASSEMBLY & INSTALLATION
Numbered references in parenthesis (#1) refer to the included Parts List.
Letter references in parenthesis (A) refer to the included Identification Key
INSTALL AIR PLUG
Prepare a standard 1/4 in. NPT male air plug (sold separately) for use with
your tool.
1. Wrap the external threads of the male plug with sealant tape.
1.1 Wrap tape in a clockwise direction so it will not unravel.
1.2 Do not tape all the threads. Leave several leading threads
unwrapped for easier alignment.
2. Screw the plug into the tool's air inlet and tighten with a wrench until snug.
3. Run the compressor at a low volume and check the connection for air
leaks. Do not use the tool until all air leaks are repaired or the faulty
component is replaced.
IMPORTANT! Vibration may cause failure if a quick coupler is
connected directly to the air tool. To overcome this, connect a
leader hose to the tool. A quick coupler may then be used to
connect the leader hose to the air line hose.

V1.0 5 in. Air Angle Grinder 8844029
Visit www.princessauto.com for more information 11
INSTALL THE GRINDING WHEEL
Accessories such as specialty wheels are installed in the same manner as
a grinding wheel.
1. Insert the wrench (#32) behind the rear flange nut to hold the spindle
(#25) by the flat sections.
2. Insert the pin wrench (#33) pins into the front flange nut openings.
Turn the wrench clockwise to loosen the nut.
3. Remove the front flange nut (#30 from the spindle.
4. Mount a 5 in. grinding wheel onto the spindle. Make sure the wheel is
properly oriented with the printed face against the angle grinder.
5. Screw the flange nut onto the spindle. Tighten with the wrench and pin
wrench by turning counterclockwise.
OPERATION
1. Clean the angle grinder of packing grease before first use. Also
grease the spindle gears. See the Air Tool Lubrication section for
instructions.
2. Loosen the wheel guard by pulling the small lever (#26) inside the wheel
guard. Rotate the wheel guard to the left or right to maximize user
protection when grinding. Push the small lever to lock the wheel guard
in place.
3. Install the grinding wheel (See Assembly & Installation). The type of
grinding wheel installed will depend on the material and task.
4. Connect the tool to the air source.
5. Set the compressor to the correct air pressure and flow (see
Specifications). Start the compressor.
6. Hold the angle grinder by the handle (C) and rear body.
7. Push the trigger lever safety (D) forward to free the trigger lever (E).
8. Squeeze and hold the trigger lever to increase the grinding wheel
speed. Wait until the wheel has reach full speed before applying it to
the material
9. Test the tool under no load to confirm the grinding wheel is installed
correctly.
10. Hold the angle grinder and apply the leading edge of the grinding
wheel against the material, so the debris is moved away from the work

8844029 5 in. Air Angle Grinder V1.0
12 For technical questions call 1-800-665-8685
area. Do not press down too hard, as this can cause the wheel to slow
or gouge the workpiece.
11. Lift the angle grinder from the material and slowly release the trigger
lever. The trigger lever safety will automatically snap back into place.
12. Wait for the wheel to stop before placing the tool down.
13. Shut the compressor off once the task is completed. Squeeze the trigger
to release residual compressed air from the hose and tool. Disconnect
the tool.
WHEELS AND ACCESSORIES
Angle grinder wheels and accessories are designed to cut, polish and
shape surfaces. Some wheels can be used on any material while others
are designed specifically for wood, plastic or metal.
Check the wheel facing for information on grit, arbor size, disc diameter,
max. speed and coating type.
Flap disc Metal removal and finishing. Available in different grits.
Wire wheel or cup Surface preparation, paint and rust removal.
Polishing disc Polish metal. Different disc materials available for
different types of polishing compounds.
Sanding Wheel Material removal of non-ferrous metals, steel and
aluminum.
Grinding Wheel Material removal of stone, concrete, tile or metal.
Available in different grits.
Cutting wheel Cut through metal or masonry, stone, tile and concrete.
Available in different grits.
CARE & MAINTENANCE
1. Maintain the tool with care. A tool in good condition is efficient, easier
to control and will have fewer problems.
2. Inspect the tool fittings, alignment and hoses periodically. Have damaged
or worn components repaired or replaced by an authorized technician.
Only use identical replacement parts when servicing.
3. Follow instructions for lubricating and changing accessories.
4. Only use accessories intended for use with this tool.
5. Keep the tool clean, dry and free from oil/grease at all times.

V1.0 5 in. Air Angle Grinder 8844029
Visit www.princessauto.com for more information 13
6. Maintain the tool’s labels and name plates. These carry important
information. If unreadable or missing, contact Princess Auto Ltd. for
replacements.
7. Keep the vent passages clear of accumulated dirt, dust, and oil.
8. Clean the tool after each use.
WARNING! Only qualified service personnel should repair the tool.
An improperly repaired tool may present a hazard to the user
and/or others.
AIR TOOL LUBRICATION
NOTICE! Only use air tool oil to lubricate the tool. Other lubricants
are not suitable and will damage the tool or cause a malfunction
during use.
NOTICE! Never use a penetrating oil to lubricate an air tool.
Penetrating oil acts as a solvent that will dissolve the tool’s grease
packing and may damage the o-rings, causing the tool to seize or
malfunction.
1. All air tools have an internal coating of grease to prevent corrosion
during shipping and storage. Remove this grease by adding a
generous amount of air tool oil in the air inlet and then run the tool
under no load until the exhaust is clear.
2. Manually add a drop or two of air tool oil into the tool’s male coupler
before each use and after every hour of continuous use. The tool will
not work properly without lubrication and parts will wear prematurely.
3. Avoid adding too much air tool oil as this can cause premature power
loss and eventual tool failure. A qualified technician will need to take
the tool apart and clean out the excess oil.
4. Apply a generous amount of air tool oil to the tool before storing it for
an extended period of time (overnight, weekend, etc.). Run the tool for
approximately 30 seconds to ensure the oil is evenly distributed
throughout the tool. Store it in a clean and dry location.
GREASE THE SPINDLE GEAR ASSEMBLY
Greasing the spindle gear assembly is recommended to extend the tool’s
life. Remove the screw (#25) in the front. Insert a grease gun nozzle into
the opening and squeeze several drops of grease into the head. Re-install
the screw, then run the tool for several moments to distribute the grease.

8844029 5 in. Air Angle Grinder V1.0
14 For technical questions call 1-800-665-8685
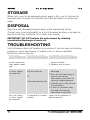
STORAGE
When not in use for an extended period, apply a thin coat of lubricant to
the steel parts to avoid rust. Remove the lubricant before using the tool
again.
DISPOSAL
Recycle a tool damaged beyond repair at the appropriate facility.
Contact your local municipality for a list of disposal facilities or by-laws for
electronic devices, batteries, oil or other toxic liquids.
IMPORTANT! DO NOT pollute the environment by allowing
uncontrolled discharge of waste oil.
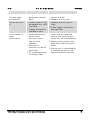
TROUBLESHOOTING
Visit a Princess Auto Ltd. location for a solution if the tool does not function
properly or parts are missing. If unable to do so, have a qualified
technician service the tool.
PROBLEM(S) POSSIBLE CAUSE(S) SUGGESTED SOLUTION(S)
Tool runs at
normal speed, but
loses power under
load.
Motor parts worn. 1. Have a qualified technician
service the tool.
2. Replace tool or parts.
Tool runs slowly.
Air flows slightly
from exhaust.
Motor parts jammed
with dirt particles.
OR
Airflow blocked by dirt.
1. Check air inlet filter for
blockage.
2. Pour air tool lubricating oil
into air inlet as per
lubrication instructions for
clearing shipping grease.
3. Operate tool in short bursts
to clear debris.
4. If tool still jammed, clean
tool and lubricate per
lubrication instructions.
Tool runs slowly.
Air flows slightly
from exhaust.
Air regulator in closed
position.
Open the air regulator to
desired airflow.

V1.0 5 in. Air Angle Grinder 8844029
Visit www.princessauto.com for more information 15
PROBLEM(S)
POSSIBLE CAUSE(S)
SUGGESTED SOLUTION(S)
Tools will not run.
Air flows freely
from exhaust.
Damage or excessive
wearing of internal
parts.
1. Have a qualified technician
service the tool.
2. Replace tool or parts.
Tool will not shut
off.
1. Throttle valve o-ring
dislodged from seat
inlet valve.
2. Trigger mechanism
jammed or dirty.
1. Replace throttle valve o-
rings.
2. Clean trigger mechanism
and lubricate.
Loss of power or
erratic
performance.
1. Excessive drain on
the air hose.
Incorrect size or
type of hose
couplers.
2. Moisture or
restriction in the air
hose/tank
3. Air compressor has
insufficient flow.
1. Check the air hose and
confirm the hose fitting is
correct for the inlet bushing.
2. Depressurize system and
drain tank and air hose of
water.
3. Ensure tool is connected to
a compressor with a rate
flow that matches the tool.

8844029 5 in. Air Angle Grinder V1.0
16 For technical questions call 1-800-665-8685
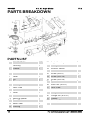
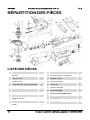
PARTS BREAKDOWN
PARTS LIST
#
DESCRIPTION
QTY
1
Housing
1
2
Rubber
1
3
Air Inlet
1
4
Valve Stem Set
1
5
Lever
1
6
Pin
1
7
Shroud
1
8
Bearing
3
9
Rear Plate
1
10
Cylinder Set
1
11
Rotor
1
12
Rotor Blade
4
13
Bearing Spacer
1
14
Front Plate
1
15
Bevel Gear
1
16
Packing
1
17
Angle Housing
1
18
O-Ring
1
19
Exhaust Sleeve
1
20
Screw
1
22
Screw (M5*6)
2
23
Screw (M5*45)
2
24
Screw (M5*55)
1
25
Spacer
1
26
Shaft Set (5/8 in.)
1
27
Face Plate
1
28
Screw
4
29
Flange Nut (5/8 in.)
1
30
Flange Nut (5/8 in.)
1
31
Handle
1
32
Wrench, 14 mm
1
33
Pin Wrench
1

V1,0 8844029
Vous devez lire et comprendre toutes les instructions avant d'utiliser l'appareil. Conservez ce
manuel afin de pouvoir le consulter plus tard.
MEULEUSE D’ANGLE
PNEUMATIQUE
5 PO

8844029 Meuleuse d’angle pneumatique de 5 po V1,0
2 En cas de questions techniques, appelez le 1-800-665-8685
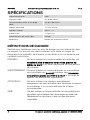
SPÉCIFICATIONS
Diamètre de roue 5 po
Pression max. 90 lb/po carré
Consommation d’air à 90 lb/po
carré
3,5 pi cubes/min
Vitesse nominale 10 000 tr/min
Spindle Thread 5/8 in. -11
Entrée d’air 1/4 po NPT
Diamètre min. de tuyau (po) 3/8 po
Matériaux Boîtier en aluminum coulé
DÉFINITIONS DE DANGER
Veuillez-vous familiariser avec les avis de danger qui sont présentés dans
ce manuel. Un avis est une alerte indiquant qu'il existe un risque de
dommage à la propriété, de blessure ou de décès si on ne respecte pas
certaines instructions.
DANGER ! Cet avis indique un risque immédiat et particulier qui
entraînera des blessures corporelles graves ou
même la mort si on omet de prendre les précautions
nécessaires.
AVERTISSEMENT ! Cet avis indique un risque particulier ou une pratique
non sécuritaire qui pourrait entraîner des blessures
corporelles graves ou même la mort si on omet de
prendre les précautions nécessaires.
ATTENTION ! Cet avis indique une situation possiblement
dangereuse qui peut entraîner des blessures mineures
ou modérées si on ne procède pas de la façon
recommandée.
AVIS ! Cet avis indique un risque particulier ou une pratique non
sécuritaire qui entraînera des dommages au niveau de
l'équipement ou des biens, mais non des blessures
corporelles.

V1,0 Meuleuse d’angle pneumatique de 5 po 8844029
Visitez www.princessauto.com pour plus d'informations 3
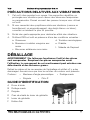
INTRODUCTION
La meuleuse d’angle de 5 po est l’outil idéal pour effectuer un nettoyage
facile de soudure, éliminer le laitier, décaper la peinture et bien d’autres
applications. La meuleuse inclut un régulateur de vitesse intégré, des
engrenages planétaires et un boîtier robuste.
SÉCURITÉ
AVERTISSEMENT ! Veuillez lire et comprendre toutes les
instructions avant d'utiliser cet outil. L'utilisateur doit respecter les
précautions de base lorsqu'il utilise cet outil afin de réduire le
risque de blessure ou de dommage à l'équipement.
Conservez ce manuel qui contient les avertissements de sécurité, les
précautions, les instructions de fonctionnement ou d'inspection et
d'entretien.
AIRE DE TRAVAIL
1. Travaillez dans un environnement de travail sécuritaire. Gardez votre
aire de travail propre, bien éclairée et exempte de toute distraction.
Placez les lampes de façon à ne pas travailler dans l’ombre.
2. Assurez-vous que les personnes qui ne portent pas l'équipement de
sécurité approprié ne se trouvent pas à proximité de l'aire de travail.
3. Rangez les outils correctement dans un lieu sécurisé et sec. Gardez
les outils hors de la portée des enfants.
4. N'installez pas et n'utilisez pas d'outils électriques en présence de gaz,
de poussière ou de liquides inflammables.
SÉCURITÉ PERSONNELLE
AVERTISSEMENT ! Portez de l'équipement de protection personnelle
homologué par l'Association canadienne de normalisation (CSA) ou
l'American National Standards Institute (ANSI).
ÉQUIPEMENT DE PROTECTION PERSONNELLE
1. Portez toujours des lunettes antiprojections qui offrent une protection
frontale et latérale pour les yeux. L'équipement de protection des yeux
devrait être conforme à la norme CSA Z94.3-07 ou ANSI Z87.1
fonction du type de travail effectué.

8844029 Meuleuse d’angle pneumatique de 5 po V1,0
4 En cas de questions techniques, appelez le 1-800-665-8685
2. Portez un écran facial panoramique de type approprié avec les
lunettes de sécurité puisque cette tâche peut créer des copeaux, des
matières abrasives ou des particules.
3. Portez des gants qui protègent en fonction des matériaux de travail et
pour réduire les effets des vibrations de l'outil.
3.1 Ne portez pas de gants lorsque vous utilisez un outil dans lequel
le tissu pourrait demeurer coincé, entraînant ainsi la main.
4. Portez des vêtements de protection conçus pour l'environnement de
travail et pour l'outil.
5. Les chaussures antidérapantes sont recommandées pour maintenir la
stabilité et l'équilibre au sein de l'environnement de travail.
6. Portez des chaussures à embout d'acier ou à coquilles d'acier pour
éviter les blessures aux pieds dues à la chute d'objets.
7. Portez un masque antipoussières ou un appareil respiratoire
nominal approprié.
8. Cet outil peut causer des dommages à l'ouïe. Portez un dispositif de
protection anti-bruit présentant une cote de réduction du bruit
adéquate en fonction du niveau de décibels.
9. L’outil peut être à haute pression. Portez des lunettes de sécurité et
des gants pour vous protéger au cours de l'opération. Gardez les
mains à l'écart des parties de caoutchouc exposées du tuyau.
PRÉCAUTIONS PERSONNELLES
Gardez le contrôle de l'outil, de vos mouvements et de l'environnement de
travail pour éviter les blessures ou le bris de l'outil.
1. N'utilisez pas l'outil si vous êtes fatigué ou sous l'effet de drogues,
d'alcool ou de médicaments.
2. Évitez de porter des vêtements ou des bijoux pouvant se prendre dans les
pièces mobiles d'un outil. Gardez les cheveux longs recouverts ou
attachés.
3. N'utilisez pas l'outil si vous devez étirer les bras pour vous en servir.
Une stabilité et un équilibre appropriés sont nécessaires afin d'avoir
un meilleur contrôle en cas de situations inattendues.
4. Soutenez la pièce à travailler ou fixez-la sur une plate-forme stable.
Une pièce à travailler tenue dans les mains ou appuyée contre votre
corps sera instable et peut entraîner des blessures corporelles.
La page est en cours de chargement...
La page est en cours de chargement...
La page est en cours de chargement...
La page est en cours de chargement...
La page est en cours de chargement...
La page est en cours de chargement...
La page est en cours de chargement...
La page est en cours de chargement...
La page est en cours de chargement...
La page est en cours de chargement...
La page est en cours de chargement...
La page est en cours de chargement...
La page est en cours de chargement...
La page est en cours de chargement...
La page est en cours de chargement...
La page est en cours de chargement...
-
 1
1
-
 2
2
-
 3
3
-
 4
4
-
 5
5
-
 6
6
-
 7
7
-
 8
8
-
 9
9
-
 10
10
-
 11
11
-
 12
12
-
 13
13
-
 14
14
-
 15
15
-
 16
16
-
 17
17
-
 18
18
-
 19
19
-
 20
20
-
 21
21
-
 22
22
-
 23
23
-
 24
24
-
 25
25
-
 26
26
-
 27
27
-
 28
28
-
 29
29
-
 30
30
-
 31
31
-
 32
32
-
 33
33
-
 34
34
-
 35
35
-
 36
36


PROPOINT 8844029 Le manuel du propriétaire
- Catégorie
- Outils électroportatifs
- Taper
- Le manuel du propriétaire
dans d''autres langues
- English: PROPOINT 8844029 Owner's manual
Documents connexes
Autres documents
-
Power Fist 8844102 Le manuel du propriétaire
-
-
-
Powerfist 9049024 Le manuel du propriétaire
-
-
-
Power Fist 12 in. Electric Concrete Saw Manuel utilisateur
-
 pro.point 8344129 Manuel utilisateur
