SportsArt V886 Le manuel du propriétaire
- Catégorie
- Tapis de course
- Taper
- Le manuel du propriétaire

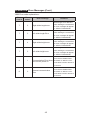
V886 OWNER’S MANUAL CONTENTS
1. INTRODUCTION ........................................................................... 2
2. SAFETY PRECAUTIONS ............................................................. 3
CONSIGNES DE SÉCURITÉ IMPORTANTES .............................. 7
3. LIST OF PARTS ............................................................................. 8
4. ASSEMBLE THE PRODUCT ........................................................ 10
STEP 0 An Introduction to Battery Switch.......................................... 10
STEP 1 Prepare for Assembly ........................................................... 12
STEP 2 Install the Main Frame .......................................................... 14
STEP 3 Move the Crosstrainer into Place for Use ........................... 16
STEP 4 Level the Crosstrainer ........................................................ 17
STEP 5 Install the Front Leg Tube ................................................... 18
STEP 6 Install the Carpet ................................................................. 19
STEP 7 Install the Ground Wire.......................................................... 20
STEP 8 Unit Inspection ..................................................................... 21
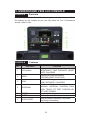
5. UNDERSTAND V886 LCD CONSOLE ............................................ 22
CONSOLE Overview ........................................................................ 22
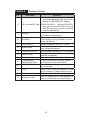
CONSOLE Features ....................................................................... 23
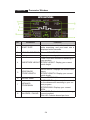
CONSOLE Parameter Window ....................................................... 24
CONSOLE Specications ................................................................ 25
CONSOLE Setup Guide .................................................................. 25
6. SAFETY TIPS FOR USING V886 CROSSTRAINER........................ 27
SAFETY TIPS Prohibitions .............................................................. 27
SAFETY TIPS Safety Operating Area .............................................. 28
SAFETY TIPS Essential Functions Guide ........................................ 29
SAFETY TIPS Exercise Guide ......................................................... 30
SAFETY TIPS Mounting and Dismounting Instructions .................... 31
7. OPERATE THE PRODUCT ............................................................. 32
OPERATION Start Screen ................................................................ 32
OPERATION Quick Start .................................................................. 32
OPERATION Mode ........................................................................... 34
OPERATION Programs .................................................................... 36
OPERATION Other Functions ........................................................... 42
OPERATION User Preference and Component Versions ................ 42
OPERATION Error Messages ........................................................... 44

8. HEART RATE MEASUREMENT ...................................................... 46
HEART RATE Telemetry ................................................................... 46
HEART RATE Contact ......................................................................... 46
9. MAINTENANCE ............................................................................... 48
MAINTENANCE Safety Precautions ............................................... 48
MAINTENANCE Disassembly Directions.......................................... 49
MAINTENANCE Schedule ............................................................... 51
MAINTENANCE Task List ............................................................... 52
MAINTENANCE Maintenance Log .................................................. 53
10. ACCESSORIES ............................................................................ 54
ACCESSORIES Standard ............................................................ 54
ACCESSORIES Option
(SA WELL+ Member System).......................... 54
ACCESSORIES MYE Wireless TV Audio_Channel Receivers ....... 55
ACCESSORIES Option (TV Rack)................................................... 57
11. APPENDIXES ................................................................................ 58
APPENDIX Technical Specications ............................................. 58
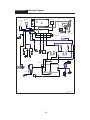
APPENDIX Wiring Diagram ........................................................... 59
APPENDIX Exploded Diagram .......................................................60

2
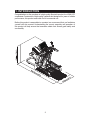
1. INTRODUCTION
Congratulations on the purchase of a high quality SportsArt product, the V886 LCD
crosstrainer Constructed of high quality materials and designed for years of reliable
performance, this product was made for full commercial use.
Before this product is assembled or operated, we recommend that you familiarize
yourself with this manual. Understanding the correct assembly and operation of
this product will help ensure that exercisers obtain their tness goals safely and
successfully.

3
2. SAFETY PRECAUTIONS
This product was designed and built for optimum safety. However certain precautions
should be taken during the use of this product. Please note the following safety
precautions:
● To reduce the risk of personal injury, read and understand all the instructions
before using this product.
● Make sure the product is installed and operated as instructed in this
manual. Be careful when mounting and dismounting the unit. The product
shall be disconnected from its power source during service and installed
and when replacing parts.
● Use this product only for the intended use described in this manual.
● Check the product before every use. Make sure all parts are assembled,
and all fasteners are tightened. Do not use the product if it is disassembled
in any way.
● Do not leave your device unattended while in use.
● Assemble and operate the product on a solid, level surface. Do not use
outdoors or near water (including swimming pools and saunas) and should
not be used where aerosol (spray) products or oxygen are used. Do not
operate on a blanket or near ammable materials.
● Keep all air ventilation areas free of blockage. Never drop or insert into
any opening.
● Wear appropriate workout clothes, don’t wear loose clothing, tie all long hair back,
wear shoes with rubber or high traction soles, don’t wear shoes with leather soles/
high heels or barefoot use this product.
● Never place liquids of any type directly on the unit, except in a bottle holder or
accessory tray. Lidded containers are recommended.
● Use the handrails whenever additional stability is required. In case of emergency,
such as tripping, the user should grab the handrails and place his/her feet on the
side platforms. The handrails may be held to enhance stability as needed, but are
not for continuous use.
● Keep away from moving parts. Moving parts may or may not stop immediately if
an object becomes caught or impedes normal motion.
● Do not attempt to modify the plug provided with this product. Proper power supply
must be provided. If the plug does not ft an outlet, contact a qualied electrician to
inspect or modify power in the facility.
● This product must be grounded. If it should malfunction or breakdown, Improper
grounding can increase the risk of electric shock. The product is equipped with a
power cord having an equipment-grounding conductor and a grounding plug. The
plug must be inserted into an appropriate outlet that is properly installed and grounded
in accordance with all local codes and ordinances. Check with a qualied electrician
if you are in doubt as to whether the power outlet is properly grounded.

4
2. SAFETY PRECAUTIONS (CONT.)
● To Avoid Injury, use extreme caution when stepping onto or off of a moving
belt.
● Never operate this product if it has been damaged in any way. If it is not working
properly, if it has been dropped or damaged, or dropped into water, contact a service
technician for repairs.
● Do not use accessories or parts that are not specically recommended by the
manufacturer (SportsArt). Such parts might cause injuries or cause the unit to fail
and void the warranty. We will not be responsible for any safety issue that arises
due to the misuse of accessories or parts. At the same time, we will terminate the
warranty terms of this equipment.
● Unpack and verify contents of boxes according to the list of parts to check if any
parts are missing. If the product is damaged or missing, contact your SportsArt
representative to nd out all the materials that were damaged during shipping. (Note:
Transport damage is the responsibility of the carrier.)
● This product is not intended for use by persons (including children 14 or younger)
with reduced physical, sensory, or mental capabilities, or by people who are otherwise
decient in product knowledge or experience. If such people use this product, they
should be given training and be supervised at all times by someone responsible for
their safety.
● CAUTION : The heart rate system is for reference only, if you feel any pain or any
abnormal feeling, please stop Exercise and consult your doctor immediately.
● Consult your physician before starting a workout or training program. It is
recommended that you undergo a complete physical examination. Have your doctor
review your training and diet programs to advise you of a workout routine you should
adopt.
● WORK within your recommended exercise level. DO NOT work to exhaustion.
● Before using this equipment to exercise, always do stretching exercises to properly
warm up.
● Always unplug this appliance from the electrical outlet immediately after using and
before cleaning.
● WARNING! Only qualied technicians should be allowed to contact electrical
components such as circuit boards. Some components carry an electrical charge
even after use has been discontinued or the product has been unplugged. For
products with power cords, turn off unit power, wait 5 minutes, then disconnect the
power cord from the power socket. For products without power cords, let the unit
sit without use for 5 minutes. Only after taking such precautions should covers be
removed and electrical components be accessed.
● Do not attempt to drag or carry this unit by the power cord. Keep the power cord
away from heated surfaces.

5
2. SAFETY PRECAUTIONS (CONT.)
● Noise emission under load is higher than without load.
● This equipment has been tested and found to comply with the limits for a Class
B digital device, pursuant to part 15 of the FCC Rules. These limits are designed
to provide reasonable protection against harmful interference in a residential
installation. This equipment generates, uses and can radiate radio frequency
energy and, if not installed and used in accordance with the instructions, may cause
harmful interference to radio communications. However, there is no guarantee that
interference will not occur in a particular installation. If the user desires to correct the
interference, it is at the user’s own expense.
● In conformity with the European Union Machinery directive 2006/42/EC, this
equipment runs at sound pressure levels below 70 dB(A) at the average operating
speed of 12 km/hr.
● Warning that any of the adjustment devices that could interfere with the user’s
movement should not be left projecting.
● The recommended minimum operating temperature is 15 degree celsius.
● Treadmills should be positioned away from walls to avoid injury due to falls.
Be sure that the back of the treadmill has at least six to seven feet of clear-
ance from a ledge, wall or window. The power supply and wiring should be
located away from walking paths or taped to prevent tripping when stepping
on or off of the running belt.
● Do not stand on the walk belt when starting the treadmill. Straddle the belt
with your feet on the left and right landing strips.
● Always use the safety key when operating the treadmill.
● The user weight limit for this product is 150kg (330lb).
Markings
CAUTION:
● Read instruction manual before using.
● Do not let children on or near the product.
● To reduce the risk of injury, stand on side rails before starting treadmill.
● To reduce the risk of injury from moving parts or electric shock, unplug before
cleaning or servicing.
WARRING:
● WHEN NOT IN USE REMOVE SAFETY KEY! STORE SAFETY KEY OUT OF
REACH OF CHILDREN.
● DURING USE, CLIP SAFETY KEY ONTO CLOTHES TO PROTECT USER
AND MACHINE.
● Heart rate monitoring system may be inaccurate.
● Over exercise may result in serious injury or death.
● If you feel faint, stop exercising immediately.
● Always attach clip to clothing before use.

6
2. SAFETY PRECAUTIONS (CONT.)
If you are a French speaking person in North America, apply the sticker
contained in the owner’s manual to the product as shown below.
Customers in other areas will not receive the sticker.
AVERTISSEMENT:
Lire le mode d 'emploi avan t utilisati on. Ne pas laisser les enfants su r ou à prox imité
du produit. Po ur réduire l e risque de blessure, se tenir su r les rails latéraux a vant de dém arrer le t apis
roulant. Pour réduire le r isque de bl essures cau sées par de s pièces en mouvement ou de choc
électrique, dé branchez-le tapis roula nt avant de le nettoye r ou de l'e ntretenir.
ATTENTION!
Les systèmes de surveillan ce de la fr équence car diaque peuv ent être in exacts. L'e xercice
excessif peut e ntraîner de s blessures graves ou la mort. Si vous vous sentez faib le, cessez
immédiatement de vous entr aîner. Touj ours fixer le clip de sécurité su r les vêtem ents avant utilisation .
AVERTISSEMENT:
Lire le mode d 'empl oi avant utili sation. N e pas laisser les enfants su r ou à proximi té
du pr oduit. Po ur ré duire le risqu e de bles sure, se tenir sur les rails latéraux avan t de déma rrer le tapis
roula nt. Pour rédui re le ris que d e blessur es causées par des pièces en mouvement ou de choc
élect rique, dé branc hez-le ta pis r oulant av ant de le nett oyer ou de l'e ntretenir.
ATTENTION!
Les s ystèmes d e sur veillance de l a fréquen ce cardiaque p euvent être in exacts. L'exer cice
exces sif peut entra îner des bless ures grav es ou la mort. Si vous vous sentez faible, cessez
imméd iatement de vo us entraî ner. Toujours fixer le clip de sécurité su r les vêtement s avant u tilis ation.

7
2. CONSIGNES DE SÉCURITÉ IMPORTANTES
Le produit SportsArt a été conçu et fabriqué afin d’assurer une sécurité optimale.
Cependant certaines précautions s’appliquent chaque fois que vous utilisez votre produit.
• Lisez entièrement le manuel avant l’assemblage et l’utilisation. Veuillez aussi
noter les consignes de sécurité suivantes:
• Veuillez lire attentivement les instructions et installer le produit selon les
instructions.
• Assemblez et faites fonctionner le produit sur une surface solide et plane; NE
PAS l’utiliser à l’extérieur ou près de l’eau.
• En aucun cas, ne laissez des enfants à proximité ou sur le produit.
• Vériez le tapis de course avant chaque utilisation. Assurez-vous que toutes les
pièces sont assemblées et que tous les éléments de xation sont serrés. NE PAS
utiliser le produit si l’appareil est démonté de quelque façon.
• Gardez vos mains loin des pièces mobiles.
• Portez des vêtements d’entraînement appropriés; NE PORTEZ PAS de
vêtements amples. NE PORTEZ PAS de chaussures à semelles en cuir ou à talons
hauts. Attachez les cheveux longs.
• Soyez prudent lors du montage et démontage de l’appareil.
• NE PAS utiliser d’accessoire non spéciquement recommandé par le fabricant.
Car cela pourraient provoquer des blessures ou entraîner une panne de l’appareil.
• Débranchez l’appareil de la prise avant l’entretien ou la suppression de toute
pièce.
• Une surveillance étroite est nécessaire quand de produit est utilisé par ou à
proximité d’enfants, de malades ou de personnes handicapées.
• Utilisez ce product uniquement pour l’usage prévu dans ce manuel.
• La limite de poids de l’utilisateur pour le produit est de 227 kg, 500 lb.
• Ce produit n’est pas destiné à être utilisé par des personnes (y compris des
enfants) dont les capacités physiques, sensorielles ou mentales sont réduites ou
qui ne disposent pas de l’expérience ou du savoir nécessaires, sauf si celles-ci
ont au préalable été formées eu égard à l’utilisation de produit par une personne
responsable de leur sécurité.
• Les enfants doivent être encadrés an d’empêcher qu’ils ne jouent avec le
produit.
• Ce produit n’est pas destiné à être utilisé par des personnes (y compris des
enfants) dont les capacités physiques, sensorielles ou mentales sont réduites ou
qui ne disposent pas de l’expérience ou du savoir nécessaires, sauf si celles-ci ont
au préalable été formées eu égard à l’utilisation de ce produit par une personne
responsable de leur sécurité.
• Les enfants doivent être encadrés an d’empêcher qu’ils ne jouent avec le
produit.
ATTENTION
Si vous ressentez une douleur ou si vous avez une sensation anormale, AR-
RÊTEZ VOTRE ENTRAÎNEMENT et consultez immédiatement votre médecin.
Entraînez-vous à votre niveau d’exercice recommandé. NE PAS s’entraîner jusqu’à
l’épuisement. Avant de commencer un programme d’exercice, vous devriez con-
sulter votre médecin. Il est recommandé de faire un examen physique complet.
Dans ce manuel, les mots “gauche” et “droit” sont utilisés en référence aux pièces
et au produit. Comme tels, les mots “gauche” et “droit” font respectivement ré-
férence aux côtés gauche et droit de l’exerciseur. De même pour plus de conci-
sion, le mot «vis» est utilisé dans certains cas où des rondelles, des vis et autres
matériels sont associés.

8
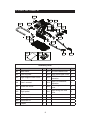
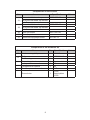
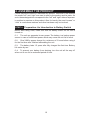
3. LIST OF PARTS
Assembly Parts
No. Name Qty. No. Name Qty.
A1 Main frame 1 A11 Left frame base cover 1
A2 Front leg tube 1 A12 Right frame base cover 1
A3 Right support lower cover 1 A13
Left PU handlebar
extension
1
A4 User’s manual 1 A14
Right PU handlebar
extension
1
A5 Pedal arm cover 2 A15
Left swing arm end
cover
2
A6
Right pedal 1 A16
Right swing arm end
cover
2
A7 Left pedal 1
A8 Left support lower cover 1
A9 Hardware kit 1
A10 Carpet 1
A1
A3
A5
A5
A14
A16
A15
A13
A8
A2
A10
A4
A9
A7
A11
A12
A6

9
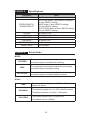
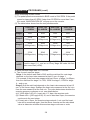
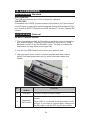
Components In the Hardware Kit
No. Name Qty. Specication Notes
12 Mushroom top philips screw 12 M4* L12
13
Philips screw 4 M5*P0.8*L10
Rubber stopper 4
Screwdriver shank 1 Hardware kit
L-shaped Allen wrench 2 M5
T-shaped Allen wrench 1 M4
Double open-end wrench 1 8*17mm
Ground wire 1
L1500
Green/yellow
L1500
Components on the Product
No. Name Specication Notes
31
Hex socket at head cap screw M8*P1.25*L20
M8 Socket at head cap washer
Axle B
33
Hex socket at head cap screw M8*P1.25*L20
M8 Socket at head cap washer
Axle C
35 Inner hex screw M8*P1.25*L20
36 Non-slip pad
37 Mushroom top philips screw M5*0.8*L12

10
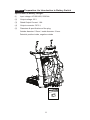
4. ASSEMBLE THE PRODUCT
Follow instructions below to assemble this product. Note that in this manual
the words “left” and “right” are used to refer to the product and its parts. As
such, these designations correspond to the “left” and “right” sides of a person
in position to exercise on this product. Also, for brevity, the word “screws” or
“nuts” is used where washers and other hardware may be involved.
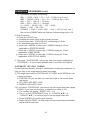
STEP 0 Preparation: An Introduction to Battery Switch
Before start using V886, make sure that the battery switch on the unit is
turned on.
0-1. The unit can generate its own power. The battery is a backup power
source in case of insufficient power which may cause the unit fail to work.
0-2. Give V886 a proper charge for a minimum of 2 hours before using it
for the first time after finished assembling the unit.
0-3. The battery lasts 1.5 years after fully charged the first time. Battery
life varies by use
0-4. To prevent your battery from draining, turn the unit all the way off
when not in use for an extended period of time.

11
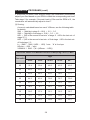
STEP 0 Preparation: An Introduction to Battery Switch
Specification of Battery Charger:
(1) Input voltage: AC100-240V, 50/60Hz
(2) Output voltage: 33 V
(3) Rated Output Current: 1.9A
(4) Output connector: DC:2.1,
(5) Diameters & specifications of the plug:
Outside diameter: 5.5mm / inside diameter: 2.1mm.
Potential: positive inside, negative outside

12
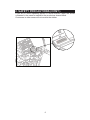
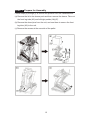
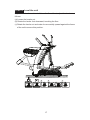
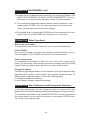
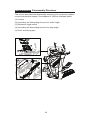
STEP 1 Prepare for Assembly
Follow steps (a) through (f) to remove the product from the cardboard box.
(a) Remove the lid to the sleeve pack and then remove the sleeve. Take out
the front leg tube (A2) and left/right pedals (A6)(A7).
(b) Remove the dowel pins from the unit, and use them to secure the front
leg tube (A2) to the unit.
(c) Remove the screws at the rear side of the pallet.

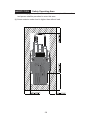
13
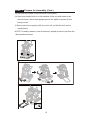
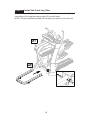
STEP 1 Prepare for Assembly (Cont.)
(d) Remove the screws on the front side of the pallet.
(e) Have two people hold on to the handles of the unit and rotate to the
side as shown. Have other people secure the pallet to prevent it from
being moved.
(f) Remove the front leg tube (A2) from the unit, so that the unit can be
moved freely.
NOTE: For safety reasons, have at least four people present to perform the
aforementioned steps.
A2
(d)
(e)
(f)

14
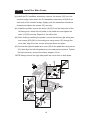
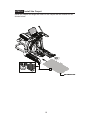
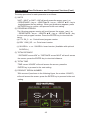
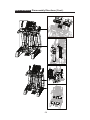
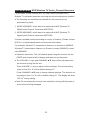
STEP 2 Install the Main Frame
Follow steps (a) through (d) to install the main frame components.
(a) Install the PU handlebar extensions: remove the screws (35) from the
console bridge, then attach the PU handlebar extensions (A13)(A14) on
each side of the console bridge, slightly push the handlebar extensions
forward and tighten the screws (35) securely.
(b1) Install the pedals: remove the axles (31)(33) from the lower side of the
left swing arm, attach the left pedal to the pedal arm and tighten the
axles (31)(33) securely. Repeat on the other side.
(b2) After finishing installing the pedals, secure the left and right swing arm
end covers (A15)(A16) to the swing arm using screw (12) through the
inner side, align the outer covers and press them into place.
(b3) Secure the right side pedal arm cover (A5) to the pedal arm using screw
(12), then align the left side pedal arm cover and press into place. Tighten
the bolts securely, and put the rubber stopper (13) on.
NOTE:Always secure the right side pedal arm cover first on both sides.
(a)
A13
A14
A6
A7
A16
(b)
31
12
A5
13
33
35
35
A15
31
12
33

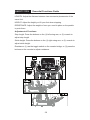
15
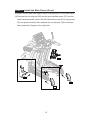
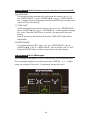
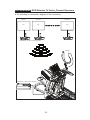
STEP 2 Install the Main Frame (Cont.)
(c) Attach the left and right support lower covers(A8)(A3) to the main frame.
(d) Remove the non-slip pad (36) and the pre-installed screw (37) from the
base frame assembly, secure the left frame base cover (A11) using screw
(37) and push forcefully, then reattach the non-slip pad (36) to the base
frame assembly. Repeat on the right side.
A8
A3
A11
A12
36
(c)
(d)
37

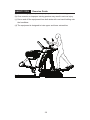
16
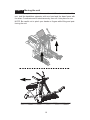
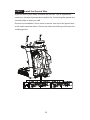
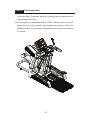
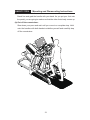
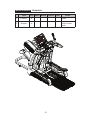
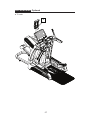
STEP 3 Moving the unit
At least two people are required to move the unit. Stand on each side of the
unit, hold the handlebar extension with one hand and the base frame with
the other. Coordinate and lift simultaneously, then roll it into place for use.
NOTE: Be careful not to pinch your hands or fingers while lifting and posi-
tioning the unit.

17
STEP 4 Level the unit
Inspect whether the unit rests flat on the floor. If not, adjust the levelers as
follows:
(a) Loosen the leveler nut.
(b) Rotate the leveler foot downward, touching the floor.
(c) Rotate the leveler nut and make it move axially upward against the frame
of the unit to secure this position.
a
b
c

18
STEP 5 Install the Front Leg Tube
Remove the pin (33) from the frame base, secure the front leg tube (A2) to the
main frame (A1) using the removed pin (33) on both ends.
NOTE: The pins should be pulled out first when you want to move the unit.

19
STEP 6 Install the Carpet
Install the carpet and align the notch on the carpet with the leveler nut as
shown below.
La page est en cours de chargement...
La page est en cours de chargement...
La page est en cours de chargement...
La page est en cours de chargement...
La page est en cours de chargement...
La page est en cours de chargement...
La page est en cours de chargement...
La page est en cours de chargement...
La page est en cours de chargement...
La page est en cours de chargement...
La page est en cours de chargement...
La page est en cours de chargement...
La page est en cours de chargement...
La page est en cours de chargement...
La page est en cours de chargement...
La page est en cours de chargement...
La page est en cours de chargement...
La page est en cours de chargement...
La page est en cours de chargement...
La page est en cours de chargement...
La page est en cours de chargement...
La page est en cours de chargement...
La page est en cours de chargement...
La page est en cours de chargement...
La page est en cours de chargement...
La page est en cours de chargement...
La page est en cours de chargement...
La page est en cours de chargement...
La page est en cours de chargement...
La page est en cours de chargement...
La page est en cours de chargement...
La page est en cours de chargement...
La page est en cours de chargement...
La page est en cours de chargement...
La page est en cours de chargement...
La page est en cours de chargement...
La page est en cours de chargement...
La page est en cours de chargement...
La page est en cours de chargement...
La page est en cours de chargement...
La page est en cours de chargement...
La page est en cours de chargement...
-
 1
1
-
 2
2
-
 3
3
-
 4
4
-
 5
5
-
 6
6
-
 7
7
-
 8
8
-
 9
9
-
 10
10
-
 11
11
-
 12
12
-
 13
13
-
 14
14
-
 15
15
-
 16
16
-
 17
17
-
 18
18
-
 19
19
-
 20
20
-
 21
21
-
 22
22
-
 23
23
-
 24
24
-
 25
25
-
 26
26
-
 27
27
-
 28
28
-
 29
29
-
 30
30
-
 31
31
-
 32
32
-
 33
33
-
 34
34
-
 35
35
-
 36
36
-
 37
37
-
 38
38
-
 39
39
-
 40
40
-
 41
41
-
 42
42
-
 43
43
-
 44
44
-
 45
45
-
 46
46
-
 47
47
-
 48
48
-
 49
49
-
 50
50
-
 51
51
-
 52
52
-
 53
53
-
 54
54
-
 55
55
-
 56
56
-
 57
57
-
 58
58
-
 59
59
-
 60
60
-
 61
61
-
 62
62


SportsArt V886 Le manuel du propriétaire
- Catégorie
- Tapis de course
- Taper
- Le manuel du propriétaire
dans d''autres langues
- English: SportsArt V886 Owner's manual
Documents connexes
-
SportsArt V886 Le manuel du propriétaire
-
-
-
-
-
-
-
-
-
