Toro 53cm Super Recycler Lawn Mower Manuel utilisateur
- Catégorie
- Tondeuses à gazon
- Taper
- Manuel utilisateur

FormNo.3409-191RevB
53cmSuperRecycler®Lawn
Mower
20792,20797
53cmSuperRecycler®
Rasenmäher
20792,20797
TondeuseSuperRecycler®53
cm
20792,20797
53cmSuperRecycler®
gazonmaaier
20792,20797
www.T oro.com.
*3409-191*B

CV
FormNo.3409-162RevB
53cmSuperRecycler
®
LawnMower
ModelNo.20792—SerialNo.400000000andUp
ModelNo.20797—SerialNo.400000000andUp
Operator'sManual
Introduction
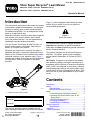
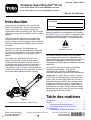
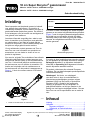
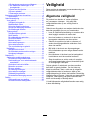
Thisrotary-blade,walk-behindlawnmowerisintended
tobeusedbyresidentialhomeowners.Itisdesigned
primarilyforcuttinggrassonwell-maintainedlawns
onresidentialproperties.Itisnotdesignedforcutting
brushorforagriculturaluses.
Readthisinformationcarefullytolearnhowtooperate
andmaintainyourproductproperlyandtoavoid
injuryandproductdamage.Youareresponsiblefor
operatingtheproductproperlyandsafely.
YoumaycontactT orodirectlyatwww.T oro.comfor
productandaccessoryinformation,helpndinga
dealer,ortoregisteryourproduct.
Wheneveryouneedservice,genuineToroparts,or
additionalinformation,contactanAuthorizedService
DealerorToroCustomerServiceandhavethemodel
andserialnumbersofyourmachineready.Figure1
identiesthelocationofthemodelandserialnumbers
ontheproduct.Writethenumbersinthespace
provided.
g187499
Figure1
1.Modelandserialnumberlocation
ModelNo.
SerialNo.
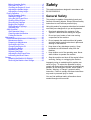
Thismanualidentiespotentialhazardsandhas
safetymessagesidentiedbythesafety-alertsymbol
(Figure2),whichsignalsahazardthatmaycause
seriousinjuryordeathifyoudonotfollowthe
recommendedprecautions.
g000502
Figure2
Safety-alertsymbol
Thismanualuses2wordstohighlightinformation.
Importantcallsattentiontospecialmechanical
informationandNoteemphasizesgeneralinformation
worthyofspecialattention.
ThisproductcomplieswithallrelevantEuropean
directives.Fordetails,pleaseseetheseparate
productspecicDeclarationofConformity(DOC)
sheet.
NetTorque:Thegrossornettorqueofthisengine
waslaboratoryratedbytheenginemanufacturerin
accordancewiththeSocietyofAutomotiveEngineers
(SAE)J1940.Asconguredtomeetsafety,emission,
andoperatingrequirements,theactualenginetorque
onthisclassofmowerwillbesignicantlylower.Goto
www.T oro.comtoviewspecicationsonyourmower
model.
Contents
Introduction...............................................................1
Safety.......................................................................2
GeneralSafety...................................................2
SafetyandInstructionalDecals..........................3
Setup........................................................................6
1AssemblingandUnfoldingtheHandle..............6
2InstallingtheRecoil-starterRopeinthe
RopeGuide.....................................................7
3FillingtheEnginewithOil.................................7
4ChargingtheBattery........................................7
5AssemblingtheGrassBag...............................8
ProductOverview.....................................................9
Specications....................................................9
Operation..................................................................9
BeforeOperation...................................................9
©2017—TheToro®Company
8111LyndaleAvenueSouth
Bloomington,MN55420
Registeratwww.T oro.com.
OriginalInstructions(EN)
PrintedinMexico
AllRightsReserved
*3409-162*B

BeforeOperationSafety.....................................9
FillingtheFuelT ank..........................................10
CheckingtheEngine-OilLevel..........................10
AdjustingtheHandleHeight..............................11
AdjustingtheCuttingHeight..............................11
DuringOperation..................................................11
DuringOperationSafety....................................11
StartingtheEngine...........................................12
UsingtheSelf-PropelDrive...............................13
ShuttingOfftheEngine.....................................14
RecyclingtheClippings....................................14
BaggingtheClippings.......................................15
DischargingtheClippings.................................16
OperatingTips.................................................17
AfterOperation....................................................18
AfterOperationSafety......................................18
CleaningundertheMachine.............................18
FoldingtheHandle...........................................19
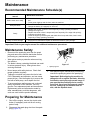
Maintenance...........................................................20
RecommendedMaintenanceSchedule(s)...........20
MaintenanceSafety..........................................20
PreparingforMaintenance...............................20
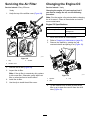
ServicingtheAirFilter.......................................21
ChangingtheEngineOil...................................21
ChargingtheBattery.........................................22
ReplacingtheFuse...........................................23
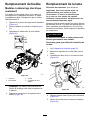
ReplacingtheBlade..........................................23
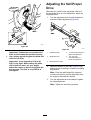
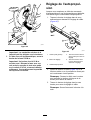
AdjustingtheSelf-PropelDrive.........................24
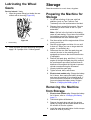
LubricatingtheWheelGears............................25
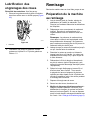
Storage...................................................................25
PreparingtheMachineforStorage...................25
RemovingtheMachinefromStorage................25
Safety
Thismachinehasbeendesignedinaccordancewith
ENISO5395:2013.
GeneralSafety
Thisproductiscapableofamputatinghandsand
feetandofthrowingobjects.Alwaysfollowallsafety
instructionstoavoidseriouspersonalinjury.
Usingthisproductforpurposesotherthanitsintended
usecouldprovedangeroustoyouandbystanders.
•Readandunderstandthecontentsofthis
Operator’sManualbeforestartingtheengine.
•Donotputyourhandsorfeetnearmoving
componentsofthemachine.
•Donotoperatethemachinewithoutallguards
andothersafetyprotectivedevicesinplaceand
workingonthemachine.
•Keepclearofanydischargeopening.Keep
bystandersasafedistanceawayfromthe
machine.
•Keepchildrenoutoftheoperatingarea.Never
allowchildrentooperatethemachine.
•Stopthemachineandshutofftheenginebefore
servicing,fueling,oruncloggingthemachine.
Improperlyusingormaintainingthismachinecan
resultininjury.Toreducethepotentialforinjury,
complywiththesesafetyinstructionsandalwayspay
attentiontothesafety-alertsymbol,whichmeans
Caution,Warning,orDanger—personalsafety
instruction.Failuretocomplywiththeseinstructions
mayresultinpersonalinjuryordeath.
Youcanndadditionalsafetyinformationwhere
neededthroughoutthismanual.
2

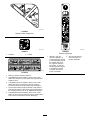
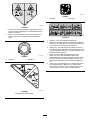
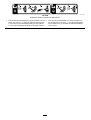
SafetyandInstructionalDecals
Safetydecalsandinstructionsareeasilyvisibletotheoperatorandarelocatednearanyarea
ofpotentialdanger.Replaceanydecalthatisdamagedormissing.
decaloemmarkt
Manufacturer'sMark
1.Thismarkindicatesthatthebladeisidentiedasapart
fromtheoriginalmachinemanufacturer.
decal104-7908
104-7908
1.Warning—donotoperatethemachinewithoutthe
rear-dischargeplugorbaginplace;donotoperatethe
machinewithouttheside-dischargecoverordeectorin
place.
decal104-7953
104-7953
Electric-StartModelOnly
1.Warning—readtheOperator'sManualforinformationonchargingthebattery;containslead;donotdiscard.
2.ReadtheOperator'sManual.
decal112-8760
112-8760
1.Thrownobjecthazard—keepbystandersasafedistance
awayfromthemachine.
2.Cutting/dismembermentofhandorfoot—stayawayfrom
movingparts.
decal112-8867
112-8867
1.Lock2.Unlock
3

decal115-2884
115-2884
HandlePositionAdjustment
decal115-8411
115-8411
1.Unlocked2.Locked
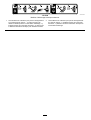
decal131-4514b
131-4514
1.Warning—readtheOperator'sManual.
2.Cutting/dismembermenthazardofhandorfoot,mower
blade—stayawayfrommovingparts;keepallguardsand
shieldsinplace.
3.Cutting/dismembermenthazardofhandorfoot,mower
blade—disconnectthespark-plugwireandreadthe
instructionsbeforeservicingorperformingmaintenance.
4.Thrownobjecthazard—keepbystandersasafedistance
awayfromthemachine;shutofftheenginebeforeleaving
theoperatingposition;pickupanydebrisbeforemowing.
5.Cutting/dismembermenthazardofhandorfoot,mower
blade—donotoperateupanddownslopes;operatesideto
sideonslopes;lookbehindyouwhenbackingup.
decal132-4470
132-4470
TractionAdjustment
1.Attention;readthe
Operator'sManual—1)
Loosentheknobbyturning
itcounterclockwise;2)Pull
thecable(s)awayfrom
theenginetodecrease
thetraction,orpushthe
cable(s)towardtheengine
toincreasethetraction;
3)Tightentheknobby
turningitclockwise.
2.ScantheQRcodefor
moreinformationon
tractionadjustment.
4

decal133-1900
133-1900
Electric-StartModelOnly
1.ReadtheOperator’sManualformoreinformationonstarting
theengine—1)Inserttheelectric-startbuttonintotheignition;
2)Engagetheblade-controlbar;3)Pushtheelectric-start
buttontostarttheengine.
2.ReadtheOperator’sManualformoreinformationonstopping
theengine—1)Releasetheblade-controlbar;2)Removethe
electric-startbuttonfromtheignition.
5

Setup
Important:Removeanddiscardtheprotective
plasticsheetthatcoverstheengineandanyother
plasticorwrappingonthemachine.
Important:Topreventaccidentalstarting,
donotinserttheelectric-startbuttonintothe
electric-startignitionuntilyouarereadytostart
theengine(electric-startmodelonly).
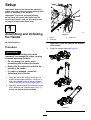
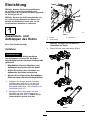
1
AssemblingandUnfolding
theHandle
NoPartsRequired
Procedure
WARNING
Assemblingandunfoldingthehandle
improperlycandamagethecables,causing
anunsafeoperatingcondition.
•Donotdamagethecableswhen
assemblingandunfoldingthehandle.
•Ensurethatthecablesareroutedtothe
outsideofthehandle.
•Ifacableisdamaged,contactan
AuthorizedServiceDealer.
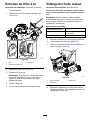
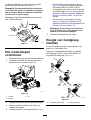
1.Raisetherearofthemachinehousingtoits
highestcutting-heightsettingbymovingthe2
rearcutting-heightleversallthewayforward.
RefertoAdjustingtheCuttingHeight(page11).
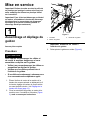
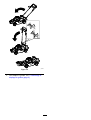
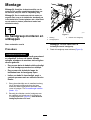
2.Attachthehandleendstothemachinehousing
with2washersand2handlebolts(Figure3),
butdonottightenthehandlebolts.
g187513
Figure3
1.Washer3.Handleend
2.Handlebolt
Important:Routethecablestotheoutside
ofthehandle.
3.Rotatethehandlerearward(Figure4).
g187600
Figure4
6

4.Lockthehandleatyourdesiredheight.Referto
AdjustingtheHandleHeight(page11).
5.Torquethehandleboltsto14to17N∙m(120
to160in-lb).
6.Adjustthecuttingheight.RefertoAdjustingthe
CuttingHeight(page11).
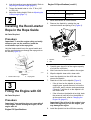
2
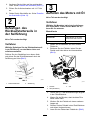
InstallingtheRecoil-starter
RopeintheRopeGuide
NoPartsRequired
Procedure
Important:Tostarttheenginesafelyandeasily
wheneveryouusethemachine,installthe
recoil-starterropeintheropeguide.
Holdtheblade-controlbartotheupperhandleand
pulltherecoil-starterropethroughtheropeguideon
thehandle(Figure5).
g003251
Figure5
1.Recoil-starterrope2.Ropeguide
3
FillingtheEnginewithOil
NoPartsRequired
Procedure
Important:Yourmachinedoesnotcomewithoil
intheengine.Beforestartingtheengine,llthe
enginewithoil.
EngineOilSpecications
EngineOilSpecications(cont'd.)
Engineoilcapacity
0.44L(15oz)
OilviscositySAE30orSAE10W-30
detergentoil
APIserviceclassicationSJorhigher
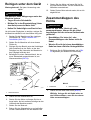
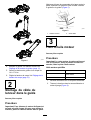
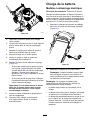
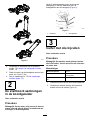
1.Movethemachinetoalevelsurface.
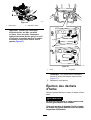
2.Removethedipstickbyrotatingthecap
counterclockwiseandpullingitout(Figure6).
g187518
Figure6
1.Dipstick3.Full
2.Add
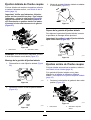
3.Carefullypourabout3/4oftheenginecapacity
ofoilintotheoil-lltube.
4.Wait3minutesfortheoiltosettleintheengine.
5.Wipethedipstickcleanwithacleancloth.
6.Insertthedipstickintotheoil-lltube,then
removethedipstick.
7.Readtheoillevelonthedipstick(Figure6).
•Iftheoillevelonthedipstickistoolow,
carefullypourasmallamountofoilintothe
oil-lltube,wait3minutes,andrepeatsteps
5through7untiltheoilonthedipstickisat
thecorrectlevel.
•Iftheoillevelonthedipstickistoohigh,drain
theexcessoiluntiltheoilonthedipstickis
atthecorrectlevel;refertoChangingthe
EngineOil(page21).
Important:Iftheoillevelintheengineistoo
lowortoohighandyouruntheengine,you
maydamagetheengine.
8.Installthedipstickintotheoil-lltubesecurely.
7

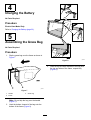
4
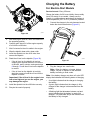
ChargingtheBattery
NoPartsRequired
Procedure
Electric-StartModelOnly
RefertoChargingtheBattery(page22).
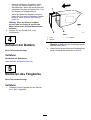
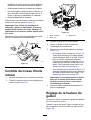
5
AssemblingtheGrassBag
NoPartsRequired
Procedure
1.Slipthegrassbagovertheframeasshownin
Figure7.
g027257
Figure7
1.Handle
3.Grassbag
2.Frame
Note:Donotslipthebagoverthehandle
(Figure7).
2.Hookthebottomchannelofthebagontothe
bottomoftheframe(Figure8).
g027258
Figure8
3.Hookthetopandsidechannelsofthebagonto
thetopandsidesoftheframe,respectively
(Figure8).
8

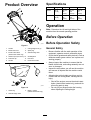
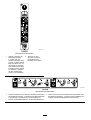
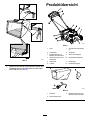
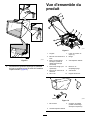
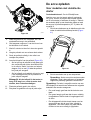
ProductOverview
g189753
Figure9
1.Handle
7.Cutting-heightlever(4)
2.Blade-controlbar
8.Sparkplug
3.Electric-startbutton
(electric-startmodelonly)
9.Side-dischargedoor
4.Washoutport(notshown)10.Oilll/dipstick
5.Fuel-tankcap11.Reardoor
6.Airlter
12.Recoil-starthandle
g009526
Figure10
1.Grassbag
3.Batterycharger
(electric-startmodelonly)
2.Side-dischargechute
Specications
ModelWeightLengthWidthHeight
2079236kg
(79lb)
165cm
(65
inches)
56cm
(22
inches)
104cm
(41
inches)
2079738kg
(83lb)
165cm
(65
inches)
56cm
(22
inches)
104cm
(41
inches)
Operation
Note:Determinetheleftandrightsidesofthe
machinefromthenormaloperatingposition.
BeforeOperation
BeforeOperationSafety
GeneralSafety
•Becomefamiliarwiththesafeoperationofthe
equipment,operatorcontrols,andsafetysigns.
•Checkthatallguardsandsafetydevices,suchas
deectorsand/orgrasscatcher,areinplaceand
workingproperly.
•Alwaysinspectthemachinetoensurethatthe
blades,bladebolts,andcuttingassemblyarenot
wornordamaged.
•Inspecttheareawhereyouwillusethemachine
andremoveallobjectsthatthemachinecould
throw.
•Adjustingthecuttingheightmaybringyouinto
contactwiththemovingblade,causingserious
injury.
–Shutofftheengine,removetheelectric-start
button(electric-startmodelonly),andwaitfor
allmovingpartstostop.
–Donotputyourngersunderthehousing
whenadjustingthecuttingheight.
9

FuelSafety
DANGER
Fuelisextremelyammableandhighly
explosive.Areorexplosionfromfuel
canburnyouandothersandcandamage
property.
•Topreventastaticchargefromignitingthe
fuel,placethecontainerand/ormachine
directlyonthegroundbeforelling,notin
avehicleoronanobject.
•Fillthefueltankoutdoors,inanopenarea,
whentheengineiscold.Wipeupanyfuel
thatspills.
•Donothandlefuelwhensmokingor
aroundanopenameorsparks.
•Storefuelinanapprovedcontainerand
keepitoutofthereachofchildren.
WARNING
Fuelisharmfulorfatalifswallowed.
Long-termexposuretovaporscancause
seriousinjuryandillness.
•Avoidprolongedbreathingofvapors.
•Keepyourhandsandfaceawayfromthe
nozzleandthefuel-tankopening.
•Keepfuelawayfromyoureyesandskin.
FillingtheFuelTank
•Forbestresults,useonlyclean,fresh,unleaded
gasolinewithanoctaneratingof87orhigher
((R+M)/2ratingmethod).
•Oxygenatedfuelwithupto10%ethanolor15%
MTBEbyvolumeisacceptable.
•Donotuseethanolblendsofgasoline,such
asE15orE85,withmorethan10%ethanolby
volume.Performanceproblemsand/orengine
damagemayresult,whichmaynotbecovered
underwarranty.
•Donotusegasolinecontainingmethanol.
•Donotstorefueleitherinthefueltankorinfuel
containersoverthewinterunlessfuelstabilizer
hasbeenaddedtothefuel.
•Donotaddoiltogasoline.
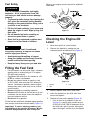
Fillthefueltankwithfreshunleadedregulargasoline
fromamajorname-brandservicestation(Figure11).
Important:Toreducestartingproblems,add
fuelstabilizertothegasolineallseason.Mixthe
stabilizerwithgasolinelessthan30daysold.
Refertoyourengineowner’smanualforadditional
information.
g027629
Figure11
CheckingtheEngine-Oil
Level
1.Movethemachinetoalevelsurface.
2.Removethedipstickbyrotatingthecap
counterclockwiseandpullingitout(Figure6).
g187518
Figure12
1.Dipstick3.Full
2.Add
3.Wipethedipstickcleanwithacleancloth.
4.Insertthedipstickintotheoil-lltube,then
removethedipstick.
5.Readtheoillevelonthedipstick(Figure12).
•Iftheoillevelonthedipstickistoolow
(Figure12),carefullypourasmallamount
ofSAE30orSAE10W-30detergentoilinto
theoil-lltube,wait3minutes,andrepeat
steps3through5untiltheoilonthedipstick
10

isatthecorrectlevel.Fortheoiltype,refer
toChangingtheEngineOil(page21).
•Iftheoillevelonthedipstickistoohigh
(Figure12),draintheexcessoiluntiltheoil
onthedipstickisatthecorrectlevel;referto
ChangingtheEngineOil(page21).
Important:Iftheoillevelintheengineistoo
lowortoohighandyouruntheengine,you
maydamagetheengine.
6.Installthedipstickintotheoil-lltubesecurely.
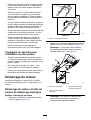
AdjustingtheHandle
Height
Youmayraiseorlowerthehandletoaposition
comfortableforyou.
Rotatethehandlelock,movethehandleto1of3
positions,andlockthehandleintoposition(Figure
13).
g007284
Figure13
1.Handlelock2.Handlepositions
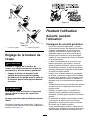
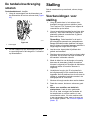
AdjustingtheCutting
Height
WARNING
Adjustingthecuttingheightmaybringyou
intocontactwiththemovingblade,causing
seriousinjury.
•Shutofftheengineandwaitforallmoving
partstostop.
•Donotputyourngersunderthehousing
whenadjustingthecuttingheight.
CAUTION
Iftheenginehasbeenrunning,themufer
willbehotandcanseverelyburnyou.
Keepawayfromthehotmufer.
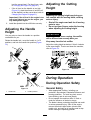
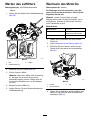
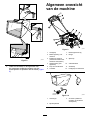
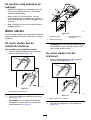
Adjustthecuttingheightasdesired.Setall4wheels
tothesameheight.T oraiseandlowerthemachine,
refertoFigure14.
g189041
Figure14
DuringOperation
DuringOperationSafety
GeneralSafety
•Wearappropriateclothing,includingeye
protection;slip-resistant,substantialfootwear;and
hearingprotection.Tiebacklonghair,secure
looseclothing,anddonotwearjewelry.
•Donotoperatethemachinewhileill,tired,or
undertheinuenceofalcoholordrugs.
•Thebladeissharp;contactingthebladecanresult
inseriouspersonalinjury.Shutofftheengine,
removetheelectric-startbutton(electric-start
modelonly),andwaitforallmovingpartstostop
beforeleavingtheoperatingposition.
11

•Whenyoureleasetheblade-controlbar,the
engineshouldshutoffandthebladeshouldstop
within3seconds.Ifnot,stopusingyourmachine
immediatelyandcontactanAuthorizedService
Dealer.
•Alwayslookdownandbehindyoubeforemoving
themachineinreverse.
•Operatethemachineonlyingoodvisibilityand
appropriateweatherconditions.Donotoperate
themachinewhenthereistheriskoflighting.
•Wetgrassorleavescancauseseriousinjuryif
youslipandcontacttheblade.Mowonlyindry
conditions.
•Useextremecarewhenapproachingblind
corners,shrubs,trees,orotherobjectsthatmay
blockyourview.
•Watchforholes,ruts,bumps,rocks,orother
hiddenobjects.Uneventerraincouldcausea
slip-and-fallaccident.
•Stopthemachineandinspectthebladesafter
strikinganobjectorifthereisanabnormal
vibrationinthemachine.Makeallnecessary
repairsbeforeresumingoperation.
•Beforeleavingtheoperatingposition,shutoff
theengine,removetheelectric-startbutton
(electric-startmodelonly),andwaitforallmoving
partstostop.
•Iftheenginehasbeenrunningthemuferwillbe
hotandcanseverelyburnyou.Keepawayfrom
thehotmufer.
•Checkthegrasscatchercomponentsandthe
dischargeguardfrequentlyandreplacethemwith
themanufacturer’srecommendedpartswhen
necessary.
•Useaccessoriesandattachmentsapprovedby
TheToro®Companyonly.
SlopeSafety
•Mowacrossthefaceofslopes;neverupand
down.Useextremecautionwhenchanging
directiononslopes.
•Donotmowonexcessivelysteepslopes.Poor
footingcouldcauseaslip-and-fallaccident.
•Mowwithcautionneardrop-offs,ditches,or
embankments.
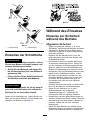
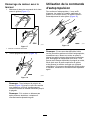
StartingtheEngine
Youcanstarttheengineusingeithertheelectric-start
button(ifequipped)ortherecoil-starthandle.
StartingtheEngineUsingthe
Electric-StartButton
ForElectric-StartModels
1.Holdtheblade-controlbaragainstthehandle
(Figure15).
g009546
Figure15
1.Blade-controlbar
2.Pushtheelectric-startbuttonuntiltheengine
starts(Figure16).
Note:Iftheelectric-startbuttonhasbeen
removed,insertitintheelectricstarter;referto
Figure16.
g020174
Figure16
1.Electricstarter3.Electric-startbutton
(installed)
2.Electric-startbutton
Note:Ifthemachinedoesnotstartafterseveral
attempts,contactanAuthorizedServiceDealer.
12

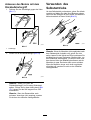
StartingtheEngineUsingthe
Recoil-StartHandle
1.Holdtheblade-controlbaragainstthehandle
(Figure17).
g009546
Figure17
1.Blade-controlbar
2.Pulltherecoil-starthandle(Figure18).
g009548
Figure18
Note:Whenyoupulltherecoil-starthandle,
pullitlightlyuntilyoufeelresistance,thenpullit
sharply(Figure18).Allowtheropetoreturnto
thehandleslowly.
Note:Ifthemachinedoesnotstartafterseveral
attempts,contactanAuthorizedServiceDealer.
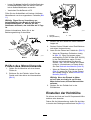
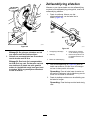
UsingtheSelf-PropelDrive
Tooperatetheself-propeldrive,simplywalkwithyour
handsontheupperhandleandyourelbowsatyour
sides,andthemachinewillautomaticallykeeppace
withyou(Figure19).
g009549
Figure19
Note:Ifthemachinedoesnotfreelyrollbackward
afterself-propelling,stopwalking,holdyourhands
inplace,andallowthemachinetorollacoupleof
centimeters(inches)forwardtodisengagethewheel
drive.Youcanalsotryreachingjustundertheupper
handletothemetalhandleandpushingthemachine
forwardacoupleofcentimeters(inches).Ifthe
machinestilldoesnotrollbackwardeasily,contactan
AuthorizedServiceDealer.
13

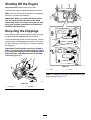
ShuttingOfftheEngine
ServiceInterval:Beforeeachuseordaily
Toshutofftheengine,releasetheblade-controlbar.
Note:Removetheelectric-startbutton(ifequipped)
wheneveryouleavethemachine.
Important:Whenyoureleasetheblade-control
bar,theengineshouldshutoffandtheblade
shouldstopwithin3seconds.Iftheydonot,stop
usingyourmachineimmediatelyandcontactan
AuthorizedServiceDealer.
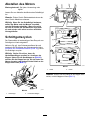
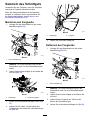
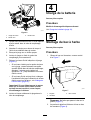
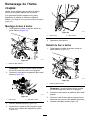
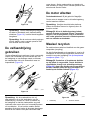
RecyclingtheClippings
Yourmachinecomesfromthefactoryreadytorecycle
thegrassandleafclippingsbackintothelawn.
Iftheside-dischargechuteisonthemachine,remove
itandlocktheside-dischargedoor;refertoRemoving
theSide-DischargeChute(page17)beforerecycling
theclippings.
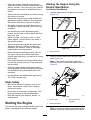
Important:Ensurethattherearplugislockedin
place.Tolocktheplug,raisethereardoor(Figure
20),rmlypushthepluginuntilitsnapsintoplace
behindthetabs,androtatetheleverontheplug
totheleft(Figure21).
g017463
Figure20
1.Reardoor2.Rearplug
g010084
Figure21
1.Lever2.Tabs
Note:Tounlocktherearplug,rotatetheleveronthe
plugtotheright(Figure21).
14

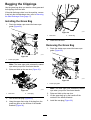
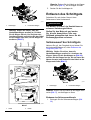
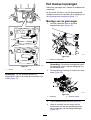
BaggingtheClippings
Usethegrassbagwhenyouwanttocollectgrassand
leafclippingsfromthelawn.
Iftheside-dischargechuteisonthemachine,remove
itandlocktheside-dischargedoor;refertoRemoving
theSide-DischargeChute(page17).
InstallingtheGrassBag
1.Routethestarterropearoundthelower-rope
guide(Figure22).
g187599
Figure22
1.Lower-ropeguide
Note:Thelower-ropeguidereleasesthestarter
ropewhenyoupulltherecoil-starthandle.
2.Raiseandholdupthereardoor(Figure23).
g187598
Figure23
1.Reardoor2.Rearplug
3.Pullouttherearplug(Figure23).
4.Hangtheupperfrontedgeofthebagfromthe
grass-bagpinsonthenotchesofthehandle
brackets(Figure24).
g189818
Figure24
1.Reardoor
2.Grassbag
5.Lowerthereardoor.
RemovingtheGrassBag
1.Routethestarterropearoundthelower-rope
guide(Figure25).
g187599
Figure25
1.Lower-ropeguide
Note:Thelower-ropeguidereleasesthestarter
ropewhenyoupulltherecoil-starthandle.
2.Raiseandholdupthereardoor.
3.Liftthegrassbagupbythehandleoffthe
notchesofthehandlebrackets.
4.Installtherearplug(Figure26).
15

g187597
Figure26
1.Reardoor2.Rearplug
Important:Ensurethattherearplugis
lockedinplace.Tolocktheplug,rmlypush
thepluginuntilitsnapsintoplacebehind
thetabs,androtatetheleverontheplugto
theleft(Figure27).
g010084
Figure27
1.Lever2.Tabs
Note:T ounlocktheplug,rotatetheleveron
theplugtotheright(Figure27).
5.Lowerthereardoor.
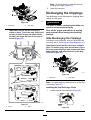
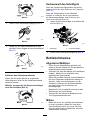
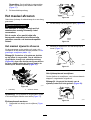
DischargingtheClippings
Side-dischargeorrear-dischargetheclippingswhen
cuttingverytallgrass.
WARNING
Thebladeissharp;contactingthebladecan
resultinseriouspersonalinjury.
Shutofftheengineandwaitforallmoving
partstostopbeforeleavingtheoperating
position.
Side-DischargingtheClippings
Ifthebagisonthemachine,removeitandinsertthe
rearplug;refertoRemovingtheGrassBag(page15).
Important:Ensurethattherearplugislockedin
place.Tolocktheplug,raisethereardoor(Figure
28),rmlypushthepluginuntilitsnapsintoplace
behindthetabs,androtatetheleverontheplug
totheleft(Figure27).
g187597
Figure28
1.Reardoor2.Rearplug
Note:T ounlocktheplug,rotatetheleverontheplug
totheright(Figure27).
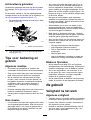
InstallingtheSide-DischargeChute
1.Unlocktheside-dischargedoor(Figure29).
g002590
Figure29
16

2.Liftopentheside-dischargedoor(Figure30).
g002591
Figure30
3.Installtheside-dischargechuteandclosethe
doorontothechute(Figure31).
g002592
Figure31
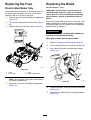
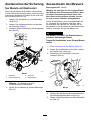
RemovingtheSide-DischargeChute
Toremovethesidedischargechute,reversethesteps
above.
Important:Locktheside-dischargedoorafter
youcloseit(Figure32).
g002593
Figure32
Rear-DischargingtheClippings
Ifthebagisonthemachine,removeit;referto
RemovingtheGrassBag(page15).
Ifthesidedischargechuteisonthemachine,remove
itandlocktheside-dischargedoor;refertoRemoving
theSide-DischargeChute(page17).
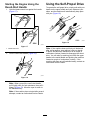
1.Raiseandholdupthereardoor(Figure33).
g187598
Figure33
1.Reardoor2.Rear-dischargeplug
2.Pullouttherear-dischargeplug(Figure33).
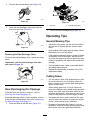
OperatingTips
GeneralMowingTips
•Inspecttheareawhereyouwillusethemachine
andremoveallobjectsthatthemachinecould
throw.
•Avoidstrikingsolidobjectswiththeblade.Never
deliberatelymowoveranyobject.
•Ifthemachinestrikesanobjectorstartstovibrate,
immediatelyshutofftheengine,disconnectthe
wirefromthesparkplug,removetheelectric-start
button(ifequipped),andexaminethemachinefor
damage.
•Forbestperformance,installanewbladebefore
thecuttingseasonbegins.
•ReplacethebladewhennecessarywithaT oro
replacementblade.
CuttingGrass
•Cutonlyaboutathirdofthegrassbladeatatime.
Donotcutbelow51mm(2inches)unlessthe
grassissparseoritislatefallwhengrassgrowth
beginstoslowdown.
•Whencuttinggrassover15cm(6inches)tall,
mowatthehighestcuttingheightsettingandwalk
slower;thenmowagainatalowersettingforthe
bestlawnappearance.Ifthegrassistoolong,the
machinemayplugandcausetheenginetostall.
•Wetgrassandleavestendtoclumpontheyard
andcancausethemachinetoplugortheengine
tostall.Avoidmowinginwetconditions.
•Beawareofapotentialrehazardinverydry
conditions,followalllocalrewarnings,andkeep
themachinefreeofdrygrassandleafdebris.
17

•Alternatethemowingdirection.Thishelps
dispersetheclippingsoverthelawnforeven
fertilization.
•Ifthenishedlawnappearanceisunsatisfactory,
try1ormoreofthefollowing:
–Replacethebladeorhaveitsharpened.
–Walkataslowerpacewhilemowing.
–Raisethecuttingheightonyourmachine.
–Cutthegrassmorefrequently.
–Overlapcuttingswathsinsteadofcuttingafull
swathwitheachpass.
CuttingLeaves
•Aftercuttingthelawn,ensurethathalfofthelawn
showsthroughthecutleafcover.Youmayneed
tomakemorethanasinglepassovertheleaves.
•Iftherearemorethan13cm(5inches)ofleaves
onthelawn,mowatahighercuttingheightand
thenagainatthedesiredcuttingheight.
•Slowdownyourmowingspeedifthemachine
doesnotcuttheleavesnelyenough.
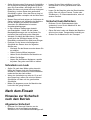
AfterOperation
AfterOperationSafety
GeneralSafety
•Cleangrassanddebrisfromthemachinetohelp
preventres.Cleanupoilorfuelspills.
•Allowtheenginetocoolbeforestoringthemachine
inanyenclosure.
•Neverstorethemachineorfuelcontainerwhere
thereisanopename,spark,orpilotlight,such
asonawaterheateroronotherappliances.
HaulingSafety
•Removetheelectric-startbutton(ifequipped)
beforeloadingthemachineforhauling.
•Usecarewhenloadingorunloadingthemachine.
•Securethemachinefromrolling.
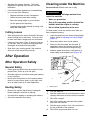
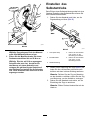
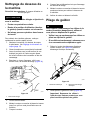
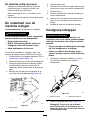
CleaningundertheMachine
ServiceInterval:Beforeeachuseordaily
WARNING
Themachinemaydislodgematerialfrom
underthemachine.
•Weareyeprotection.
•Stayintheoperatingposition(behindthe
handle)whentheengineisrunning.
•Donotallowbystandersinthearea.
Forbestresults,cleanthemachinesoonafteryou
havecompletedmowing.
1.Lowerthemachinetothelowestcutting-height
setting.RefertoAdjustingtheCuttingHeight
(page11).
2.Movethemachineontoalevelsurface.
3.Washouttheareaunderthereardoor(if
applicable)wheretheclippingsgofromthe
undersideofthemachinetothegrassbag.
4.Attachagardenhosethatisconnectedtoa
watersupplytothewashoutport(Figure34).
g005477
Figure34
1.Washoutport
5.Turnthewateron.
6.Starttheengineandrunituntiltherearenomore
clippingsthatcomeoutfromunderthemachine.
7.Shutofftheengine.
8.Shutoffthewateranddisconnectthegarden
hosefromthemachine.
9.Starttheengineandrunitforafewminutesto
drytheundersideofthemachine.
10.Shutofftheengineandallowittocool.
18

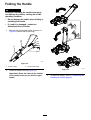
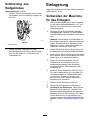
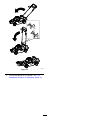
FoldingtheHandle
WARNING
Foldingorunfoldingthehandleimproperly
candamagethecables,causinganunsafe
operatingcondition.
•Donotdamagethecableswhenfoldingor
unfoldingthehandle.
•Ifacableisdamaged,contactan
AuthorizedServiceDealer.
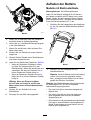
1.Removetheelectric-startbuttonasshownin
Figure35(electric-startmodelonly).
g186627
Figure35
1.Electricstarter2.Electric-startbutton
2.Rotatethehandleforward(Figure36).
Important:Routethecablestotheoutside
ofthehandleknobsasyoufoldtheupper
handle.
g187601
Figure36
3.Tounfoldthehandle,referto1Assemblingand
UnfoldingtheHandle(page6).
19
La page est en cours de chargement...
La page est en cours de chargement...
La page est en cours de chargement...
La page est en cours de chargement...
La page est en cours de chargement...
La page est en cours de chargement...
La page est en cours de chargement...
La page est en cours de chargement...
La page est en cours de chargement...
La page est en cours de chargement...
La page est en cours de chargement...
La page est en cours de chargement...
La page est en cours de chargement...
La page est en cours de chargement...
La page est en cours de chargement...
La page est en cours de chargement...
La page est en cours de chargement...
La page est en cours de chargement...
La page est en cours de chargement...
La page est en cours de chargement...
La page est en cours de chargement...
La page est en cours de chargement...
La page est en cours de chargement...
La page est en cours de chargement...
La page est en cours de chargement...
La page est en cours de chargement...
La page est en cours de chargement...
La page est en cours de chargement...
La page est en cours de chargement...
La page est en cours de chargement...
La page est en cours de chargement...
La page est en cours de chargement...
La page est en cours de chargement...
La page est en cours de chargement...
La page est en cours de chargement...
La page est en cours de chargement...
La page est en cours de chargement...
La page est en cours de chargement...
La page est en cours de chargement...
La page est en cours de chargement...
La page est en cours de chargement...
La page est en cours de chargement...
La page est en cours de chargement...
La page est en cours de chargement...
La page est en cours de chargement...
La page est en cours de chargement...
La page est en cours de chargement...
La page est en cours de chargement...
La page est en cours de chargement...
La page est en cours de chargement...
La page est en cours de chargement...
La page est en cours de chargement...
La page est en cours de chargement...
La page est en cours de chargement...
La page est en cours de chargement...
La page est en cours de chargement...
La page est en cours de chargement...
La page est en cours de chargement...
La page est en cours de chargement...
La page est en cours de chargement...
La page est en cours de chargement...
La page est en cours de chargement...
La page est en cours de chargement...
La page est en cours de chargement...
La page est en cours de chargement...
La page est en cours de chargement...
La page est en cours de chargement...
La page est en cours de chargement...
La page est en cours de chargement...
La page est en cours de chargement...
La page est en cours de chargement...
La page est en cours de chargement...
La page est en cours de chargement...
La page est en cours de chargement...
La page est en cours de chargement...
La page est en cours de chargement...
La page est en cours de chargement...
La page est en cours de chargement...
La page est en cours de chargement...
La page est en cours de chargement...
La page est en cours de chargement...
La page est en cours de chargement...
La page est en cours de chargement...
La page est en cours de chargement...
La page est en cours de chargement...
La page est en cours de chargement...
La page est en cours de chargement...
La page est en cours de chargement...
La page est en cours de chargement...
La page est en cours de chargement...
La page est en cours de chargement...
La page est en cours de chargement...
La page est en cours de chargement...
La page est en cours de chargement...
La page est en cours de chargement...
La page est en cours de chargement...
La page est en cours de chargement...
La page est en cours de chargement...
La page est en cours de chargement...
La page est en cours de chargement...
-
 1
1
-
 2
2
-
 3
3
-
 4
4
-
 5
5
-
 6
6
-
 7
7
-
 8
8
-
 9
9
-
 10
10
-
 11
11
-
 12
12
-
 13
13
-
 14
14
-
 15
15
-
 16
16
-
 17
17
-
 18
18
-
 19
19
-
 20
20
-
 21
21
-
 22
22
-
 23
23
-
 24
24
-
 25
25
-
 26
26
-
 27
27
-
 28
28
-
 29
29
-
 30
30
-
 31
31
-
 32
32
-
 33
33
-
 34
34
-
 35
35
-
 36
36
-
 37
37
-
 38
38
-
 39
39
-
 40
40
-
 41
41
-
 42
42
-
 43
43
-
 44
44
-
 45
45
-
 46
46
-
 47
47
-
 48
48
-
 49
49
-
 50
50
-
 51
51
-
 52
52
-
 53
53
-
 54
54
-
 55
55
-
 56
56
-
 57
57
-
 58
58
-
 59
59
-
 60
60
-
 61
61
-
 62
62
-
 63
63
-
 64
64
-
 65
65
-
 66
66
-
 67
67
-
 68
68
-
 69
69
-
 70
70
-
 71
71
-
 72
72
-
 73
73
-
 74
74
-
 75
75
-
 76
76
-
 77
77
-
 78
78
-
 79
79
-
 80
80
-
 81
81
-
 82
82
-
 83
83
-
 84
84
-
 85
85
-
 86
86
-
 87
87
-
 88
88
-
 89
89
-
 90
90
-
 91
91
-
 92
92
-
 93
93
-
 94
94
-
 95
95
-
 96
96
-
 97
97
-
 98
98
-
 99
99
-
 100
100
-
 101
101
-
 102
102
-
 103
103
-
 104
104
-
 105
105
-
 106
106
-
 107
107
-
 108
108
-
 109
109
-
 110
110
-
 111
111
-
 112
112
-
 113
113
-
 114
114
-
 115
115
-
 116
116
-
 117
117
-
 118
118
-
 119
119
-
 120
120


Toro 53cm Super Recycler Lawn Mower Manuel utilisateur
- Catégorie
- Tondeuses à gazon
- Taper
- Manuel utilisateur
dans d''autres langues
Documents connexes
-
Toro 53cm Super Recycler Lawn Mower Manuel utilisateur
-
-
-
-
-
Toro Super Recycler Lawn Mower Manuel utilisateur
-
Toro 22in Recycler Lawn Mower Manuel utilisateur
-