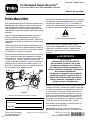
Toro Super Recycler Lawn Mower Manuel utilisateur
- Catégorie
- Tondeuses à gazon
- Taper
- Manuel utilisateur

FormNo.3409-284RevC
SuperRecycler®LawnMower
20383
CortacéspedSuperRecycler®
20383
TondeuseSuperRecycler®
20383
www.T oro.com.
*3409-284*C

CV
FormNo.3409-272RevC
SuperRecycler
®
LawnMower
ModelNo.20383—SerialNo.400000000andUp
Operator'sManual
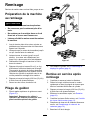
Introduction
Thisrotary-blade,walk-behindlawnmowerisintended
tobeusedbyresidentialhomeowners.Itisdesigned
primarilyforcuttinggrassonwell-maintainedlawns
onresidentialproperties.Itisnotdesignedforcutting
brushorforagriculturaluses.
Readthisinformationcarefullytolearnhowtooperate
andmaintainyourproductproperlyandtoavoid
injuryandproductdamage.Youareresponsiblefor
operatingtheproductproperlyandsafely.
YoumaycontactT orodirectlyatwww.T oro.comfor
productandaccessoryinformation,helpndinga
dealer,ortoregisteryourproduct.
Wheneveryouneedservice,genuineToroparts,or
additionalinformation,contactanAuthorizedService
DealerorToroCustomerServiceandhavethemodel
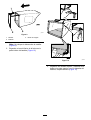
andserialnumbersofyourproductready.Figure1
identiesthelocationofthemodelandserialnumbers
ontheproduct.Writetheproductmodelandserial
numbersinthespaceprovided.
g195017
Figure1
1.Modelandserialnumberlocation
ModelNo.
SerialNo.
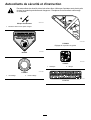
Thismanualidentiespotentialhazardsandhas
safetymessagesidentiedbythesafety-alertsymbol
(Figure2),whichsignalsahazardthatmaycause
seriousinjuryordeathifyoudonotfollowthe
recommendedprecautions.
g000502
Figure2
Safety-alertsymbol
Thismanualuses2wordstohighlightinformation.
Importantcallsattentiontospecialmechanical
informationandNoteemphasizesgeneralinformation
worthyofspecialattention.
WARNING
CALIFORNIA
Proposition65Warning
Thisproductcontainsachemical
orchemicalsknowntotheStateof
Californiatocausecancer,birthdefects,
orreproductiveharm.
Theengineexhaustfromthisproduct
containschemicalsknowntotheStateof
Californiatocausecancer,birthdefects,
orotherreproductiveharm.
ItisaviolationofCaliforniaPublicResourceCode
Section4442or4443touseoroperatetheengineon
anyforest-covered,brush-covered,orgrass-covered
landunlesstheengineisequippedwithaspark
arrester,asdenedinSection4442,maintainedin
effectiveworkingorderortheengineisconstructed,
equipped,andmaintainedforthepreventionofre.
ThissparkignitionsystemcomplieswithCanadian
ICES-002.
NetTorque:Thegrossornettorqueofthisengine
waslaboratoryratedbytheenginemanufacturerin
accordancewiththeSocietyofAutomotiveEngineers
(SAE)J1940.Asconguredtomeetsafety,emission,
andoperatingrequirements,theactualenginetorque
onthisclassofmowerwillbesignicantlylower.Goto
www.T oro.comtoviewspecicationsonyourmower
model.
Important:Ifyouareusingthismachineabove
1500m(5,000ft)foracontinuousperiod,ensure
thattheHighAltitudeKithasbeeninstalled
sothattheenginemeetsCARB/EPAemission
regulations.TheHighAltitudeKitincreases
engineperformancewhilepreventingspark-plug
©2017—TheToro®Company
8111LyndaleAvenueSouth
Bloomington,MN55420
Registeratwww.T oro.com.
OriginalInstructions(EN)
PrintedinMexico
AllRightsReserved
*3409-272*C

fouling,hardstarting,andincreasedemissions.
Onceyouhaveinstalledthekit,attachthe
high-altitudelabelnexttotheserialdecalonthe
machine.ContactanyAuthorizedToroService
DealertoobtaintheproperHighAltitudeKitand
high-altitudelabelforyourmachine.Tolocate
adealerconvenienttoyou,accessourwebsite
atwww.Toro.comorcontactourToroCustomer
CareDepartmentatthenumber(s)listedinyour
EmissionControlWarrantyStatement.
Removethekitfromtheengineandrestorethe
enginetoitsoriginalfactorycongurationwhen
runningtheengineunder1500m(5,000ft).Do
notoperateanenginethathasbeenconverted
forhigh-altitudeuseatloweraltitudes;otherwise,
youcouldoverheatanddamagetheengine.
Ifyouareunsurewhetherornotyourmachine
hasbeenconvertedforhigh-altitudeuse,lookfor
thefollowinglabel:
decal127-9363
Contents
Introduction...............................................................1
Safety.......................................................................3
GeneralSafety...................................................3
SafetyandInstructionalDecals..........................4
Setup........................................................................6
1InstallingtheBlade-ControlBar........................6
2AssemblingandUnfoldingtheHandle..............6
3InstallingtheRecoil-starterRopeinthe
RopeGuide.....................................................7
4FillingtheEnginewithOil.................................8
5AssemblingtheGrassBag...............................8
ProductOverview.....................................................9
Operation................................................................10
BeforeOperation.................................................10
BeforeOperationSafety...................................10
FillingtheFuelT ank..........................................10
CheckingtheEngine-OilLevel...........................11
AdjustingtheCuttingHeight..............................11
AdjustingtheHandleHeight.............................12
DuringOperation.................................................12
DuringOperatingSafety...................................12
StartingtheEngine...........................................13
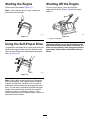
UsingtheSelf-PropelDrive...............................13
ShuttingOfftheEngine.....................................13
EngagingtheBlade..........................................14
DisengagingtheBlade......................................14
CheckingtheBlade-Brake-Clutch
Operation......................................................14
RecyclingtheClippings....................................15
BaggingtheClippings.......................................16
Side-DischargingtheClippings.........................18
OperatingTips.................................................18
AfterOperation....................................................19
AfterOperatingSafety......................................19
CleaningundertheMachine.............................19
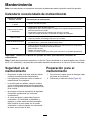
Maintenance...........................................................21
RecommendedMaintenanceSchedule(s)...........21
MaintenanceSafety..........................................21
PreparingforMaintenance...............................21
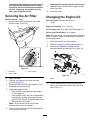
ServicingtheAirFilter.......................................22
ChangingtheEngineOil...................................22
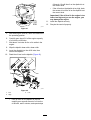
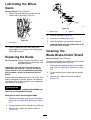
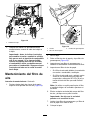
LubricatingtheWheelGears............................24
ReplacingtheBlade..........................................24
CleaningtheBlade-Brake-ClutchShield...........24
AdjustingtheSelf-PropelDrive.........................25
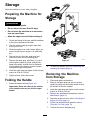
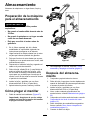
Storage...................................................................26
PreparingtheMachineforStorage...................26
FoldingtheHandle...........................................26
RemovingtheMachinefromStorage................26
2

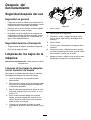
Safety
Thismachinehasbeendesignedinaccordancewith
ANSIB71.1-2012.
GeneralSafety
Thisproductiscapableofamputatinghandsand
feetandofthrowingobjects.Alwaysfollowallsafety
instructionstoavoidseriouspersonalinjury.
Usingthisproductforpurposesotherthanitsintended
usecouldprovedangeroustoyouandbystanders.
•Readandunderstandthecontentsofthis
Operator’sManualbeforestartingtheengine.
•Donotputyourhandsorfeetnearmoving
componentsofthemachine.
•Donotoperatethemachinewithoutallguards
andothersafetyprotectivedevicesinplaceand
workingonthemachine.
•Keepclearofanydischargeopening.Keep
bystandersasafedistanceawayfromthe
machine.
•Keepchildrenoutoftheoperatingarea.Never
allowchildrentooperatethemachine.
•Stopthemachineandshutofftheenginebefore
servicing,fueling,oruncloggingthemachine.
Improperlyusingormaintainingthismachinecan
resultininjury.Toreducethepotentialforinjury,
complywiththesesafetyinstructionsandalwayspay
attentiontothesafety-alertsymbol,whichmeans
Caution,Warning,orDanger—personalsafety
instruction.Failuretocomplywiththeseinstructions
mayresultinpersonalinjuryordeath.
Youcanndadditionalitemsofsafetyinformationin
theirrespectivesectionsthroughoutthismanual.
3

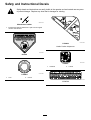
SafetyandInstructionalDecals
Safetydecalsandinstructionsareeasilyvisibletotheoperatorandarelocatednearanyarea
ofpotentialdanger.Replaceanydecalthatisdamagedormissing.
decaloemmarkt
Manufacturer'sMark
1.Indicatesthebladeisidentiedasapartfromtheoriginal
machinemanufacturer.
decal94-8072
94-8072
decal112-8867
112-8867
1.Lock2.Unlock
decal115-2884
115-2884
HandlePositionAdjustment
decal115-8411
115-8411
1.Unlocked2.Locked
decal117-2718
117–2718
4

decal125-5092
125–5092
1.Steponthedecktostarttheengine.
decal132-4470
132-4470
TractionAdjustment
1.Attention;readthe
Operator'sManual—1)
Loosentheknobbyturning
itcounterclockwise;2)Pull
thecable(s)awayfrom
theenginetodecrease
thetraction,orpushthe
cable(s)towardtheengine
toincreasethetraction;
3)Tightentheknobby
turningitclockwise.
2.ScantheQRcodefor
moreinformationon
tractionadjustment.
decal131-4514b
131-4514
1.Warning—readtheOperator'sManual.
2.Cutting/dismembermenthazardofhandorfoot,mower
blade—stayawayfrommovingparts;keepallguardsand
shieldsinplace.
3.Cutting/dismembermenthazardofhandorfoot,mower
blade—disconnectthespark-plugwireandreadthe
instructionsbeforeservicingorperformingmaintenance.
4.Thrownobjecthazard—keepbystandersasafedistance
awayfromthemachine;shutofftheenginebeforeleaving
theoperatingposition;pickupanydebrisbeforemowing.
5.Cutting/dismembermenthazardofhandorfoot,mower
blade—donotoperateupanddownslopes;operatesideto
sideonslopes;lookbehindyouwhenbackingup.
5

Setup
Important:Removeanddiscardtheprotective
plasticsheetthatcoverstheengineandanyother
plasticorwrappingonthemachine.
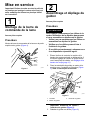
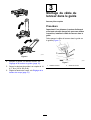
1
InstallingtheBlade-Control
Bar
NoPartsRequired
Procedure
Installtheblade-controlbarintotheupperhandle
(Figure4).
g003116
Figure4
2
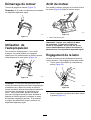
AssemblingandUnfolding
theHandle
NoPartsRequired
Procedure
WARNING
Assemblingandunfoldingthehandle
improperlycandamagethecables,causing
anunsafeoperatingcondition.
•Donotdamagethecableswhen
assemblingandunfoldingthehandle.
•Ensurethatthecablesareroutedtothe
outsideofthehandle.
•Ifacableisdamaged,contactan
AuthorizedServiceDealer.
1.Raisetherearofthemachinehousingtoits
highestcutting-heightsettingbymovingthe2
rearcutting-heightleversallthewayforward;
refertoAdjustingtheCuttingHeight(page11).
2.Attachthehandleendstothemachinehousing
with2washersand2handlebolts(Figure5),
butdonottightenthehandlebolts.
g017457
Figure5
1.Washer3.Handleend
2.Handlebolt
Important:Routethecablestotheoutside
ofthehandle(Figure5).
3.Rotatethehandlerearward(Figure6).
6

g017458
Figure6
4.Lockthehandleatyourdesiredheight;referto
AdjustingtheHandleHeight(page12).
5.Torquethehandleboltsto14to17N∙m(120
to160in-lb).
6.Adjustthecuttingheight;refertoAdjustingthe
CuttingHeight(page11).
3
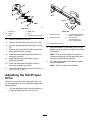
InstallingtheRecoil-starter
RopeintheRopeGuide
NoPartsRequired
Procedure
Important:Tostarttheenginesafelyandeasily
wheneveryouusethemachine,installthe
recoil-starterropeintheropeguide.
Pulltherecoil-starterropethroughtheropeguideon
thehandle(Figure7).
g003251
Figure7
1.Recoil-starterrope2.Ropeguide
7

4
FillingtheEnginewithOil
NoPartsRequired
Procedure
Important:Yourmachinedoesnotcomewithoil
intheengine.Beforestartingtheengine,llthe
enginewithoil.
Engineoilcapacity:0.5L(18oz)
Oilviscosity:SAE30orSAE10W-30detergentoil
APIserviceclassication:SJorhigher
1.Movethemachinetoalevelsurface.
2.Waitfor3to5minutesfortheoiltosettle.
3.Removethedipstick(Figure8)andpourabout
3/4ofthecrankcasecapacityofthespecied
oilintotheoil-lltube.
g195250
Figure8
1.Full3.Low
2.High
4.Wipeoffthedipstickendwithacleancloth.
5.Insertthedipstickintotheoil-lltube,butdonot
screwitin,thenremovethedipstick.
6.Readtheoillevelonthedipstick(Figure8).
•IftheoilisbelowtheAddmarkonthe
dipstick,slowlypourasmallamountofoil
intotheoil-lltube,wait3minutes,andthen
repeatsteps3through5untiltheoillevelis
attheFullmarkonthedipstick
•IftheoilisabovetheFullmarkonthe
dipstick,draintheexcessoiluntiltheoillevel
isattheFullmarkonthedipstick.T odrain
theexcessoil,refertoChangingtheEngine
Oil(page22).
Important:Iftheoillevelinthecrankcase
istoolowortoohighandyourunthe
engine,youmaydamagetheengine.
7.Installthedipstickintotheoil-lltubesecurely.
Important:Checktheengine-oillevelbefore
eachuseandaddoilasneeded;referto
CheckingtheEngine-OilLevel(page11).
5
AssemblingtheGrassBag
NoPartsRequired
Procedure
1.Slipthegrassbagovertheframeasshownin
Figure9.
g027257
Figure9
1.Handle
3.Grassbag
2.Frame
Note:Donotslipthebagoverthehandle
(Figure9).
2.Hookthebottomchannelofthebagontothe
bottomoftheframe(Figure10).
8

g027258
Figure10
3.Hookthetopandsidechannelsofthebagonto
thetopandsidesoftheframe,respectively
(Figure10).
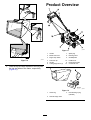
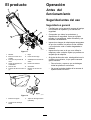
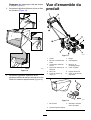
ProductOverview
g195016
Figure11
1.Handle
7.Sparkplug
2.Blade-controlbar8.Dischargedoor
3.Engine-stopswitch
9.Oilll/Dipstick
4.Fuel-tankcap10.Handlelever
5.Airlter
11.Recoil-starthandle
6.Cutting-heightlever(4)12.Control-barlock
g007407
Figure12
1.Grassbag
3.Rear-dischargeplug
(installed)
2.Side-dischargechute
9

Operation
BeforeOperation
BeforeOperationSafety
GeneralSafety
•Becomefamiliarwiththesafeoperationofthe
equipment,operatorcontrols,andsafetysigns.
•Checkthatallguardsandsafetydevices,such
asdoorsand/orgrasscatchers,areinplaceand
workingproperly.
•Alwaysinspectthemachinetoensurethatthe
blades,bladebolts,andcuttingassemblyarenot
wornordamaged.
•Inspecttheareawhereyouwillusethemachine
andremoveallobjectsthatthemachinecould
throw.
•Adjustingthecuttingheightmaybringyouinto
contactwiththemovingblade,causingserious
injury.
–Shutofftheengineandwaitforallmoving
partstostop.
–Donotputyourngersunderthehousing
whenadjustingthecuttingheight.
FuelSafety
DANGER
Fuelisextremelyammableandhighly
explosive.Areorexplosionfromfuel
canburnyouandothersandcandamage
property.
•Topreventastaticchargefromignitingthe
fuel,placethecontainerand/ormachine
directlyonthegroundbeforelling,notin
avehicleoronanobject.
•Fillthefueltankoutdoors,inanopenarea,
whentheengineiscold.Wipeupanyfuel
thatspills.
•Donothandlefuelwhensmokingor
aroundanopenameorsparks.
•Storefuelinanapprovedcontainerand
keepitoutofthereachofchildren.
WARNING
Fuelisharmfulorfatalifswallowed.
Long-termexposuretovaporscancause
seriousinjuryandillness.
•Avoidprolongedbreathingofvapors.
•Keepyourhandsandfaceawayfromthe
nozzleandthefuel-tankopening.
•Keepfuelawayfromyoureyesandskin.
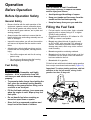
FillingtheFuelTank
•Forbestresults,useonlyclean,fresh,unleaded
gasolinewithanoctaneratingof87orhigher
((R+M)/2ratingmethod).
•Oxygenatedfuelwithupto10%ethanolor15%
MTBEbyvolumeisacceptable.
•Donotuseethanolblendsofgasoline,such
asE15orE85,withmorethan10%ethanolby
volume.Performanceproblemsand/orengine
damagemayresult,whichmaynotbecovered
underwarranty.
•Donotusegasolinecontainingmethanol.
•Donotstorefueleitherinthefueltankorinfuel
containersoverthewinterunlessfuelstabilizer
hasbeenaddedtothefuel.
•Donotaddoiltogasoline.
Fillthefueltankwithfreshunleadedregulargasoline
fromamajorname-brandservicestation(Figure13).
Important:Toreducestartingproblems,addfuel
stabilizertothefuelallseason,mixingitwith
gasolinelessthan30daysold.
g195251
Figure13
10

CheckingtheEngine-Oil
Level
ServiceInterval:Beforeeachuseordaily
Oilviscosity:SAE30orSAE10W-30detergentoil
APIserviceclassication:SJorhigher
1.Movethemachinetoalevelsurface.
2.Removethedipstick(Figure14).
g195250
Figure14
1.Full3.Low
2.High
3.Wipeoffthedipstickendwithacleancloth.
4.Insertthedipstickintotheoil-lltube,butdonot
screwitin,thenremovethedipstick.
5.Readtheoillevelonthedipstick(Figure14).
•IftheoilisbelowtheAddmarkonthe
dipstick,slowlypourasmallamountofoil
intotheoil-lltube,wait3minutes,andthen
repeatsteps3through5untiltheoillevelis
attheFullmarkonthedipstick
•IftheoilisabovetheFullmarkonthe
dipstick,draintheexcessoiluntiltheoillevel
isattheFullmarkonthedipstick.T odrain
theexcessoil,refertoChangingtheEngine
Oil(page22).
Important:Iftheoillevelinthecrankcase
istoolowortoohighandyourunthe
engine,youmaydamagetheengine.
6.Installthedipstickintotheoil-lltubesecurely.
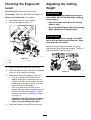
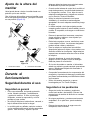
AdjustingtheCutting
Height
WARNING
Adjustingthecuttingheightmaybringyou
intocontactwiththemovingblade,causing
seriousinjury.
•Stoptheengineandwaitforallmoving
partstostop.
•Donotputyourngersunderthehousing
whenadjustingthecuttingheight.
CAUTION
Iftheenginehasbeenrunning,themufer
willbehotandcanseverelyburnyou.Keep
awayfromthehotmufer.
Adjustthecuttingheightasdesired.Setallthe
cutting-heightleverstothesameheight.Toraiseor
lowerthemachine,refertoFigure15.
g189041
Figure15
11

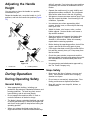
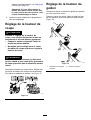
AdjustingtheHandle
Height
Youmayraiseorlowerthehandletoaposition
comfortableforyou.
Rotatethehandlelock,movethehandleto1of3
positions,andlockthehandleintoposition(Figure
16).
g007284
Figure16
1.Handlelock2.Handlepositions
DuringOperation
DuringOperatingSafety
GeneralSafety
•Wearappropriateclothing,includingeye
protection;slip-resistant,substantialfootwear;and
hearingprotection.Tiebacklonghair,secure
looseclothing,anddonotwearjewelry.
•Donotoperatethemachinewhileill,tired,or
undertheinuenceofalcoholordrugs.
•Thebladeissharp;contactingthebladecanresult
inseriouspersonalinjury.Shutofftheengineand
waitforallmovingpartstostopbeforeleavingthe
operatingposition.
•Whenyoureleasetheblade-controlbar,the
engineshouldshutoffandthebladeshouldstop
within3seconds.Ifnot,stopusingyourmachine
immediatelyandcontactanAuthorizedService
Dealer.
•Operatethemachineonlyingoodvisibilityand
appropriateweatherconditions.Donotoperate
themachinewhenthereistheriskoflightning.
•Wetgrassorleavescancauseseriousinjuryifyou
slipandcontacttheblade.Avoidmowinginwet
conditions,ifpossible.
•Useextremecarewhenapproachingblind
corners,shrubs,trees,orotherobjectsthatmay
blockyourview.
•Watchforholes,ruts,bumps,rocks,orother
hiddenobjects.Uneventerraincouldcausea
slip-and-fallaccident.
•Stopthemachineandinspectthebladesafter
strikinganobjectorifthereisanabnormal
vibrationinthemachine.Makeallnecessary
repairsbeforeresumingoperation.
•Beforeleavingtheoperatingposition,shutoffthe
engine,andwaitforallmovingpartstostop.
•Iftheenginehasbeenrunningthemuferwillbe
hotandcanseverelyburnyou.Keepawayfrom
thehotmufer.
•Checkthegrasscatchercomponentsandthe
dischargeguardfrequentlyandreplacethemwith
themanufacturer’srecommendedpartswhen
necessary.
•Useaccessoriesandattachmentsapprovedby
theTheT oro®Companyonly.
SlopeSafety
•Mowacrossthefaceofslopes;neverupand
down.Useextremecautionwhenchanging
directiononslopes.
•Donotmowonexcessivelysteepslopes.Poor
footingcouldcauseaslip-and-fallaccident.
•Mowwithcautionneardrop-offs,ditches,or
embankments.
12

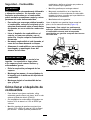
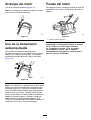
StartingtheEngine
Pulltherecoil-starthandle(Figure17).
Note:Ifthemachinedoesnotstart,contactan
AuthorizedServiceDealer.
g197126
Figure17
UsingtheSelf-PropelDrive
Tooperatetheself-propeldrive,simplywalkwithyour
handsontheupperhandleandyourelbowsatyour
sides,andthemachinewillautomaticallykeeppace
withyou(Figure18).
g003221
Figure18
Note:Ifthemachinedoesnotfreelyrollbackward
afterself-propelling,stopwalking,holdyourhands
inplace,andallowthemachinetorollacoupleof
centimeters(inches)forwardtodisengagethewheel
drive.Youcanalsotryreachingjustundertheupper
handletothemetalhandleandpushthemachine
forwardacoupleofcentimeters(inches).Ifthe
machinestilldoesnotrollbackwardeasily,contactan
AuthorizedServiceDealer.
ShuttingOfftheEngine
Toshutofftheengine,pressandholdthe
engine-shutoffbutton(Figure20)untiltheengine
shutsoff.
g017317
Figure19
1.Engine-shutoffbutton
Important:Whenyoureleasetheblade-control
bar,thebladeshouldstopwithin3seconds.Ifit
doesnotstopproperly,stopusingyourmachine
immediatelyandcontactanAuthorizedService
Dealer.
13

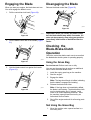
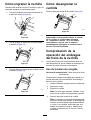
EngagingtheBlade
Whenyoustartyourengine,thebladedoesnotturn.
Youmustengagethebladetomow.
1.Pullthecontrol-barlockback(Figure20).
g003123
Figure20
2.Pulltheblade-controlbartothehandle(Figure
21).
g003124
Figure21
3.Holdtheblade-controlbaragainstthehandle
(Figure22).
g003125
Figure22
DisengagingtheBlade
Releasetheblade-controlbar(Figure23).
g003126
Figure23
Important:Whenyoureleasetheblade-control
bar,thebladeshouldstopwithin3seconds.Ifit
doesnotstopproperly,stopusingyourmachine
immediatelyandcontactanAuthorizedService
Dealer.
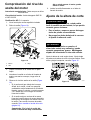
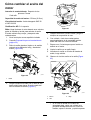
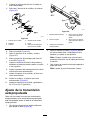
Checkingthe
Blade-Brake-Clutch
Operation
Checkthecontrolbarbeforeeachusetoensurethat
theblade-brake-clutchsystemisoperatingproperly.
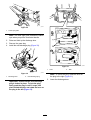
UsingtheGrassBag
ServiceInterval:Beforeeachuseordaily
Youcanusethegrassbagtoperformanadditional
testtochecktheblade-brakeclutch.
1.Installtheemptygrassbagonthemachine.
2.Starttheengine.
3.Engagetheblade.
Note:Thebagshouldbegintoinate,indicating
thatthebladeisengagedandrotating.
4.Releasetheblade-controlbar.
Note:Ifthebagdoesnotimmediatelydeate,
thebladeisstillrotating.Theblade-brakeclutch
maybedeterioratingand,ifignored,could
resultinanunsafeoperatingcondition.Have
themachineinspectedandservicedbyan
AuthorizedServiceDealer.
5.Shutofftheengineandwaitforallmovingparts
tostop.
NotUsingtheGrassBag
1.Movethemachineontoapavedsurfaceina
non-windyarea.
14

2.Setall4wheelstothe83mm(3-1/4inch)cut
setting.
3.Takeahalfsheetofnewspaperandcrumpleit
intoaballsmallenoughtogounderthemachine
housing(about76mmor3inchesindiameter).
4.Placethenewspaperballabout13cm(5inches)
infrontofthemachine.
5.Starttheengine.
6.Engagetheblade.
7.Releasetheblade-controlbar.
8.Immediatelypushthemachineoverthe
newspaperball.
9.Shutofftheengineandwaitforallmovingparts
tostop.
10.Gotothefrontofthemachineandcheckthe
newspaperball.
Note:Ifthenewspaperballdidnotgounder
themachine,repeatsteps4through10.
11.Ifthenewspaperisunravelledorshredded,the
bladedidnotstopproperly,whichcouldresult
inanunsafeoperatingcondition.Contactan
AuthorizedServiceDealer.
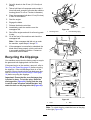
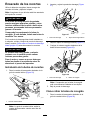
RecyclingtheClippings
Yourmachinecomesfromthefactoryreadytorecycle
thegrassandleafclippingsbackintothelawn.
Ifthegrassbagisonthemachine,removeit;referto
RemovingtheGrassBag(page16)beforerecycling
theclippings.Iftheside-dischargechuteisonthe
machine,removeitandlocktheside-dischargedoor;
refertoRemovingtheSide-DischargeChute(page
18)beforerecyclingtheclippings.
Important:Ensurethattherear-dischargeplug
islockedinplace.Tolocktheplug:Raisethe
dischargedoor(Figure24),rmlypushtheplug
inuntilitsnapsintoplacebehindthetabs,and
rotatetheleverontheplugtotheleft(Figure25).
g017463
Figure24
1.Dischargedoor2.Rear-dischargeplug
g010084
Figure25
1.Lever2.Tabs
Note:T ounlocktheplug,rotatetheleverontheplug
totheright(Figure25).
15

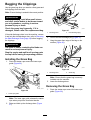
BaggingtheClippings
Usethegrassbagwhenyouwanttocollectgrassand
leafclippingsfromthelawn.
Note:Ensurethebagisseatedinthecorrectposition.
WARNING
Aworngrassbagcouldallowsmallstones
andothersimilardebristobethrowntoward
youorbystanders,resultinginserious
personalinjuryordeath.
Checkthegrassbagfrequently.Ifitis
damaged,installanewTororeplacementbag.
Iftheside-dischargechuteisonthemachine,remove
itandlocktheside-dischargedoor;refertoRemoving
theSide-DischargeChute(page18)beforebagging
theclippings.
WARNING
Thebladeissharp;contactingthebladecan
resultinseriouspersonalinjury.
Stoptheengineandwaitforallmovingparts
tostopbeforeleavingtheoperatingposition.
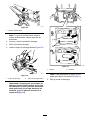
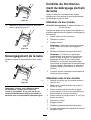
InstallingtheGrassBag
1.Routethestarterropearoundthelower-rope
guide(Figure26).
g017473
Figure26
1.Lower-ropeguide
Note:Thelower-ropeguidereleasesthestarter
ropewhenyoupulltherecoil-starthandle.
2.Raiseandholdupthedischargedoor(Figure
27).
g017464
Figure27
1.Dischargedoor2.Rear-dischargeplug
3.Pullouttherear-dischargeplug(Figure27).
4.Hangtheupperfrontedgeofthebagonthe
notches(Figure28).
g017474
Figure28
1.Dischargedoor
2.Grassbag
Note:Ensurethatthegrassbagissecurely
installedontothemachine.
5.Lowerthedischargedoor.
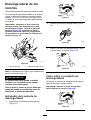
RemovingtheGrassBag
1.Routethestarterropearoundthelower-rope
guide(Figure29).
16

g017473
Figure29
1.Lower-ropeguide
Note:Thelower-ropeguidereleasesthestarter
ropewhenyoupulltherecoil-starthandle.
2.Raiseandholdupthedischargedoor.
3.Removethegrassbag.
4.Installtherear-dischargeplug(Figure30).
g017463
Figure30
1.Dischargedoor2.Rear-dischargeplug
Important:Ensurethattherear-discharge
plugislockedinplace.Tolocktheplug,
rmlypushthepluginuntilitsnapsinto
placebehindthetabs,androtatetheleveron
theplugtotheleft(Figure31).
g010084
Figure31
1.Lever2.Tabs
Note:Tounlocktheplug,rotatetheleveron
theplugtotheright(Figure31).
5.Lowerthedischargedoor.
17

Side-Dischargingthe
Clippings
Usetheside-dischargefeatureforcuttingverytall
grass.
Ifthebagisonthemachine,removeitandinsertthe
rear-dischargeplug;refertoRemovingtheGrassBag
(page16)beforeside-dischargingtheclippings.
Important:Ensurethattherear-dischargeplug
islockedinplace.Tolocktheplug:Raisethe
dischargedoor(Figure32),rmlypushtheplug
inuntilitsnapsintoplacebehindthetabs,and
rotatetheleverontheplugtotheleft(Figure31).
g017463
Figure32
1.Dischargedoor2.Rear-dischargeplug
Note:T ounlocktheplug,rotatetheleverontheplug
totheright(Figure31).
WARNING
Thebladeissharp;contactingthebladecan
resultinseriouspersonalinjury.
Stoptheengineandwaitforallmovingparts
tostopbeforeleavingtheoperatingposition.
InstallingtheSide-Discharge
Chute
1.Unlocktheside-dischargedoor(Figure33).
g002590
Figure33
2.Liftopentheside-dischargedoor(Figure34).
g002591
Figure34
3.Installtheside-dischargechuteandclosethe
doorontothechute(Figure35).
g002592
Figure35
RemovingtheSide-Discharge
Chute
Toremovetheside-dischargechute,reversethe
stepsabove.
Important:Locktheside-dischargedoorafter
youcloseit(Figure36).
g002593
Figure36
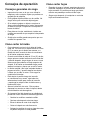
OperatingTips
GeneralMowingTips
•Inspecttheareawhereyouwillusethemachine
andremoveallobjectsthatthemachinecould
throw.
•Avoidstrikingsolidobjectswiththeblade.Never
deliberatelymowoveranyobject.
•Ifthemachinestrikesanobjectorstartstovibrate,
immediatelyshutofftheengine,disconnect
18

thewirefromthesparkplug,andexaminethe
machinefordamage.
•Forbestperformance,installanewbladebefore
thecuttingseasonbegins.
•ReplacethebladewhennecessarywithaT oro
replacementblade.
CuttingGrass
•Cutonlyaboutathirdofthegrassbladeatatime.
Donotcutbelowthe54mm(2-1/8inch)setting
unlessthegrassissparseoritislatefallwhen
grassgrowthbeginstoslowdown.
•Whencuttinggrassover15cm(6inches)tall,
mowatthehighestcuttingheightsettingandwalk
slower;thenmowagainatalowersettingforthe
bestlawnappearance.Ifthegrassistoolong,the
machinemayplugandcausetheenginetostall.
•Wetgrassandleavestendtoclumpontheyard
andcancausethemachinetoplugortheengine
tostall.Avoidmowinginwetconditions.
•Beawareofapotentialrehazardinverydry
conditions,followalllocalrewarnings,andkeep
themachinefreeofdrygrassandleafdebris.
•Alternatethemowingdirection.Thishelps
dispersetheclippingsoverthelawnforeven
fertilization.
•Ifthenishedlawnappearanceisunsatisfactory,
try1ormoreofthefollowing:
–Replacethebladeorhaveitsharpened.
–Walkataslowerpacewhilemowing.
–Raisethecuttingheightonyourmachine.
–Cutthegrassmorefrequently.
–Overlapcuttingswathsinsteadofcuttingafull
swathwitheachpass.
CuttingLeaves
•Aftercuttingthelawn,ensurethathalfofthelawn
showsthroughthecutleafcover.Youmayneed
tomakemorethanasinglepassovertheleaves.
•Slowdownyourmowingspeedifthemachine
doesnotcuttheleavesnelyenough.
AfterOperation
AfterOperatingSafety
GeneralSafety
•Cleangrassanddebrisfromthemachinetohelp
preventres.Cleanupoilorfuelspills.
•Allowtheenginetocoolbeforestoringthemachine
inanyenclosure.
•Neverstorethemachineorfuelcontainerwhere
thereisanopename,spark,orpilotlight,such
asonawaterheateroronotherappliances.
HaulingSafety
•Usecarewhenloadingorunloadingthemachine.
•Securethemachinefromrolling.
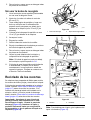
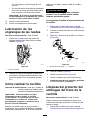
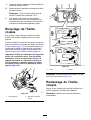
CleaningundertheMachine
ServiceInterval:Beforeeachuseordaily
CleaningundertheMachineUsing
theWashoutPort
Forbestresults,cleanthemachinesoonafteryou
havecompletedmowing.
1.Movethemachineontoaatpavedsurface.
2.Shutofftheengineandwaitforallmovingparts
tostopbeforeleavingtheoperatingposition.
3.Lowerthemachinetoitslowestcutting-height
setting;refertoAdjustingtheCuttingHeight
(page11).
4.Washouttheareaunderthereardoorwherethe
clippingsgofromtheundersideofthemachine
tothegrassbag.
5.Attachagardenhosethatisconnectedtoa
watersupplytothewashoutport(Figure37).
g195254
Figure37
1.Washoutport
19
La page est en cours de chargement...
La page est en cours de chargement...
La page est en cours de chargement...
La page est en cours de chargement...
La page est en cours de chargement...
La page est en cours de chargement...
La page est en cours de chargement...
La page est en cours de chargement...
La page est en cours de chargement...
La page est en cours de chargement...
La page est en cours de chargement...
La page est en cours de chargement...
La page est en cours de chargement...
La page est en cours de chargement...
La page est en cours de chargement...
La page est en cours de chargement...
La page est en cours de chargement...
La page est en cours de chargement...
La page est en cours de chargement...
La page est en cours de chargement...
La page est en cours de chargement...
La page est en cours de chargement...
La page est en cours de chargement...
La page est en cours de chargement...
La page est en cours de chargement...
La page est en cours de chargement...
La page est en cours de chargement...
La page est en cours de chargement...
La page est en cours de chargement...
La page est en cours de chargement...
La page est en cours de chargement...
La page est en cours de chargement...
La page est en cours de chargement...
La page est en cours de chargement...
La page est en cours de chargement...
La page est en cours de chargement...
La page est en cours de chargement...
La page est en cours de chargement...
La page est en cours de chargement...
La page est en cours de chargement...
La page est en cours de chargement...
La page est en cours de chargement...
La page est en cours de chargement...
La page est en cours de chargement...
La page est en cours de chargement...
La page est en cours de chargement...
La page est en cours de chargement...
La page est en cours de chargement...
La page est en cours de chargement...
La page est en cours de chargement...
La page est en cours de chargement...
La page est en cours de chargement...
La page est en cours de chargement...
La page est en cours de chargement...
La page est en cours de chargement...
La page est en cours de chargement...
La page est en cours de chargement...
La page est en cours de chargement...
La page est en cours de chargement...
La page est en cours de chargement...
La page est en cours de chargement...
La page est en cours de chargement...
La page est en cours de chargement...
La page est en cours de chargement...
-
 1
1
-
 2
2
-
 3
3
-
 4
4
-
 5
5
-
 6
6
-
 7
7
-
 8
8
-
 9
9
-
 10
10
-
 11
11
-
 12
12
-
 13
13
-
 14
14
-
 15
15
-
 16
16
-
 17
17
-
 18
18
-
 19
19
-
 20
20
-
 21
21
-
 22
22
-
 23
23
-
 24
24
-
 25
25
-
 26
26
-
 27
27
-
 28
28
-
 29
29
-
 30
30
-
 31
31
-
 32
32
-
 33
33
-
 34
34
-
 35
35
-
 36
36
-
 37
37
-
 38
38
-
 39
39
-
 40
40
-
 41
41
-
 42
42
-
 43
43
-
 44
44
-
 45
45
-
 46
46
-
 47
47
-
 48
48
-
 49
49
-
 50
50
-
 51
51
-
 52
52
-
 53
53
-
 54
54
-
 55
55
-
 56
56
-
 57
57
-
 58
58
-
 59
59
-
 60
60
-
 61
61
-
 62
62
-
 63
63
-
 64
64
-
 65
65
-
 66
66
-
 67
67
-
 68
68
-
 69
69
-
 70
70
-
 71
71
-
 72
72
-
 73
73
-
 74
74
-
 75
75
-
 76
76
-
 77
77
-
 78
78
-
 79
79
-
 80
80
-
 81
81
-
 82
82
-
 83
83
-
 84
84


Toro Super Recycler Lawn Mower Manuel utilisateur
- Catégorie
- Tondeuses à gazon
- Taper
- Manuel utilisateur
dans d''autres langues
Documents connexes
-
Toro 22in Recycler Lawn Mower Manuel utilisateur
-
-
-
-
-
-
Toro Super Recycler Lawn Mower Manuel utilisateur
-
Toro 53cm Super Recycler Lawn Mower Manuel utilisateur
-
-
Toro 76cm TurfMaster Walk-Behind Lawn Mower Manuel utilisateur