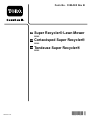
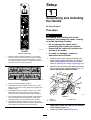
Toro Super Recycler Lawn Mower Manuel utilisateur
- Catégorie
- Tondeuses à gazon
- Taper
- Manuel utilisateur

FormNo.3389-585RevB
SuperRecycler®LawnMower
20382
CortacéspedSuperRecycler®
20382
TondeuseSuperRecycler®
20382
www.T oro.com.
*3389-585*B

CV
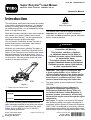
FormNo.3389-582RevB
SuperRecycler
®
LawnMower
ModelNo.20382—SerialNo.315000001andUp
Operator'sManual
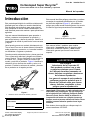
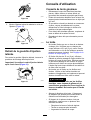
Introduction
Thisrotary-blade,walk-behindlawnmowerisintended
tobeusedbyresidentialhomeowners.Itisdesigned
primarilyforcuttinggrassonwell-maintainedlawns
onresidentialproperties.Itisnotdesignedforcutting
brushorforagriculturaluses.
Readthisinformationcarefullytolearnhowtooperate
andmaintainyourproductproperlyandtoavoid
injuryandproductdamage.Youareresponsiblefor
operatingtheproductproperlyandsafely.
YoumaycontactT orodirectlyatwww.T oro.comfor
productandaccessoryinformation,helpndinga
dealer,ortoregisteryourproduct.
Wheneveryouneedservice,genuineToroparts,or
additionalinformation,contactanAuthorizedService
DealerorToroCustomerServiceandhavethemodel
andserialnumbersofyourproductready.Figure1
identiesthelocationofthemodelandserialnumbers
ontheproduct.Writetheproductmodelandserial
numbersinthespaceprovided.
g017490
Figure1
1.Modelandserialnumberlocation
ModelNo.
SerialNo.
Thismanualidentiespotentialhazardsandhas
safetymessagesidentiedbythesafety-alertsymbol
(Figure2),whichsignalsahazardthatmaycause
seriousinjuryordeathifyoudonotfollowthe
recommendedprecautions.
g000502
Figure2
Safety-alertsymbol
Thismanualuses2wordstohighlightinformation.
Importantcallsattentiontospecialmechanical
informationandNoteemphasizesgeneralinformation
worthyofspecialattention.
WARNING
CALIFORNIA
Proposition65Warning
Thisproductcontainsachemical
orchemicalsknowntotheStateof
Californiatocausecancer,birthdefects,
orreproductiveharm.
Theengineexhaustfromthisproduct
containschemicalsknowntotheStateof
Californiatocausecancer,birthdefects,
orotherreproductiveharm.
Important:Thisengineisnotequippedwith
asparkarrestermufer.Itisaviolationof
CaliforniaPublicResourceCodeSection4442to
useoroperatetheengineonanyforest-covered,
brush-covered,orgrass-coveredland.Other
statesorfederalareasmayhavesimilarlaws.
ThissparkignitionsystemcomplieswithCanadian
ICES-002.
TheenclosedEngineOwner'sManualis
suppliedforinformationregardingtheUS
EnvironmentalProtectionAgency(EPA)and
theCaliforniaEmissionControlRegulationof
emissionsystems,maintenance,andwarranty.
Replacementsmaybeorderedthroughtheengine
manufacturer.
NetTorque:Thegrossornettorqueofthisengine
waslaboratoryratedbytheenginemanufacturerin
accordancewiththeSocietyofAutomotiveEngineers
(SAE)J1940.Asconguredtomeetsafety,emission,
andoperatingrequirements,theactualenginetorque
onthisclassofmowerwillbesignicantlylower.Goto
©2017—TheToro®Company
8111LyndaleAvenueSouth
Bloomington,MN55420
Registeratwww.T oro.com.
OriginalInstructions(EN)
PrintedinMexico
AllRightsReserved
*3389-582*B

www.T oro.comtoviewspecicationsonyourmower
model.
Contents
Introduction...............................................................1
Safety.......................................................................2
GeneralOperation..............................................2
SlopeOperation.................................................3
Children..............................................................3
Service...............................................................3
SafetyandInstructionalDecals..........................4
Setup........................................................................5
1AssemblingandUnfoldingtheHandle..............5
2InstallingtheRecoil-StarterRope.....................6
3FillingtheEnginewithOil.................................6
4AssemblingtheGrassBag...............................7
ProductOverview.....................................................8
Operation..................................................................9
FillingtheFuelT ank............................................9
CheckingtheEngine-OilLevel............................9
AdjustingtheCuttingHeight.............................10
AdjustingtheHandleHeight.............................10
StartingtheEngine...........................................10
UsingtheSelf-PropelDrive................................11
StoppingtheEngine..........................................11
RecyclingtheClippings.....................................11
BaggingtheClippings.......................................12
Side-DischargingtheClippings.........................14
OperatingTips.................................................15
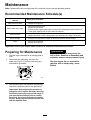
Maintenance...........................................................16
RecommendedMaintenanceSchedule(s)...........16
PreparingforMaintenance...............................16
ServicingtheAirCleaner..................................17
ChangingtheEngineOil...................................17
LubricatingtheWheelGears............................18
ReplacingtheBlade..........................................18
AdjustingtheSelf-PropelDrive.........................19
CleaningtheMachine.......................................20
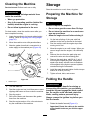
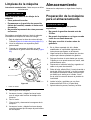
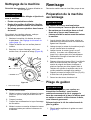
Storage...................................................................20
PreparingtheMachineforStorage...................20
FoldingtheHandle...........................................20
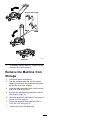
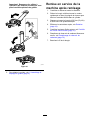
RemovetheMachinefromStorage...................21
Safety
ThislawnmowermeetsorexceedstheCPSCblade
safetyrequirementsforwalk-behindrotarylawn
mowersatthetimeofproduction.
Readandunderstandthecontentsofthismanual
beforeyoustarttheengine.
Thesafetyalertsymbol(Figure2)isusedtoalertyou
topotentialpersonalinjuryhazards.Obeyallsafety
messagesthatfollowthissymboltoavoidpossible
injuryordeath.Improperlyusingormaintainingthis
mowercouldresultininjuryordeath.Toreducethis
potential,complywiththefollowingsafetyinstructions.
Thefollowinginstructionshavebeenadaptedfrom
theANSI/OPEIstandardB71.1-2012.
Thiscuttingmachinecanamputatehandsand
feetandthrowobjects.Failuretoobservethe
followingsafetyinstructionscouldresultin
seriousinjuryordeath.
GeneralOperation
•Read,understand,andfollowallinstructionson
themachineandinthemanual(s)beforestarting
theengine.
•Donotputhandsorfeetnearorunderthe
machine.Keepclearofthedischargeopeningat
alltimes.
•Onlyallowresponsibleadultswhoarefamiliarwith
theinstructionstooperatethismachine.
•Cleartheareaofobjectssuchasrocks,wire,toys,
etc.,whichcouldbethrownbytheblade.Stay
behindthehandlewhentheengineisrunning.
•Besuretheareaisclearofbystandersbefore
operating.Stopmachineifanyoneentersthearea.
•Donotoperatethemachinebarefootedor
whilewearingsandals.Alwayswearsubstantial
footwear.
•Donotpullthemachinebackwardunlessitis
absolutelynecessary.Alwayslookdownand
behindbeforeandwhilemovingbackwardwith
themachine.
•Neverdirectdischargedmaterialtowardanyone.
Avoiddischargingmaterialagainstawallor
obstruction.Materialmayricochetbacktoward
youorbystanders.Stopthebladewhencrossing
gravelsurfaces.
•Donotoperatethemachinewithouttheentire
grasscatcher,dischargeguard,rearguard,or
othersafetyprotectivedevicesinplaceand
working.
•Neverleavearunningmachineunattended.
2

•Stoptheengineandwaituntilthebladecomes
toacompletestopbeforecleaningthemachine,
removinggrasscatcher,oruncloggingthe
dischargeguard.
•Operatethemachineonlyindaylightorgood
articiallight.
•Donotoperatethemachinewhileunderthe
inuenceofalcoholordrugs.
•Neveroperatethemachineinwetgrass.Always
besureofyourfooting;walk;neverrun.
•Disengagethedrivesystem,ifsoequipped,before
startingtheengine.
•Ifthemachineshouldstarttovibrateabnormally,
stoptheengineandcheckforthecause
immediately.Vibrationisgenerallyawarningof
trouble.
•Alwaysweareyeprotectionwhenoperatingthe
machine.
•Seethemanufacturer'sinstructionsforproper
operationandinstallationofaccessories.Useonly
accessoriesapprovedbythemanufacturer.
SlopeOperation
Slopesareamajorfactorrelatedtoslipandfall
accidents,whichcanresultinsevereinjury.Operation
onallslopesrequiresextracaution.Ifyoufeeluneasy
onaslope,donotmowit.
•Mowacrossthefaceofslopes;neverupand
down.Exerciseextremecautionwhenchanging
directiononslopes.
•Watchforholes,ruts,bumps,rocks,orother
hiddenobjects.Uneventerraincouldcause
aslip-and-fallaccident.Tallgrasscanhide
obstacles.
•Donotmowonwetgrassorexcessivelysteep
slopes.Poorfootingcouldcauseaslip-and-fall
accident.
•Donotmowneardrop-offs,ditches,or
embankments.Youcouldloseyourfootingor
balance.
Children
Tragicaccidentscanoccuriftheoperatorisnot
alerttothepresenceofchildren.Childrenareoften
attractedtothemachineandthemowingactivity.
Neverassumethatchildrenwillremainwhereyou
lastsawthem.
•Keepchildrenoutofthemowingareaandunder
thewatchfulcareofaresponsibleadultotherthan
theoperator.
•Bealertandturnthemachineoffifachildenters
thearea.
•Neverallowchildrentooperatethemachine.
•Useextracarewhenapproachingblindcorners,
shrubs,trees,orotherobjectsthatmayblockyour
viewofachild.
Service
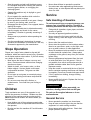
SafeHandlingofGasoline
Toavoidpersonalinjuryorpropertydamage,use
extremecareinhandlinggasoline.Gasolineis
extremelyammableandthevaporsareexplosive.
•Extinguishallcigarettes,cigars,pipes,andother
sourcesofignition.
•Useonlyanapprovedgasolinecontainer.
•Neverremovethefuelcaporaddfuelwiththe
enginerunning.Allowtheenginetocoolbefore
refueling.
•Neverrefuelthemachineindoors.
•Neverstorethemachineorfuelcontainerwhere
thereisanopename,spark,orpilotlight,such
asonawaterheateroronotherappliances.
•Neverllcontainersinsideavehicleoronatruck
ortrailerbedwithaplasticliner.Alwaysplace
containersontheground,awayfromyourvehicle
beforelling.
•Removegas-poweredequipmentfromthetruck
ortrailerandrefuelitontheground.Ifthisis
notpossible,thenrefuelsuchequipmentwitha
portablecontainerratherthanfromagasoline
dispensernozzle.
•Keepthenozzleincontactwiththerimofthefuel
tankorcontaineropeningatalltimesuntilfueling
iscomplete.Donotuseanozzlelock-opendevice.
•Iffuelisspilledonclothing,changeclothing
immediately.
•Neveroverllthefueltank.Replacethefuelcap
andtightenitsecurely.
WARNING
Exhaustcontainscarbonmonoxide,an
odorless,deadlypoisonthatcankillyou.
Donotruntheengineindoorsorinan
enclosedarea.
GeneralService
•Neveroperatethemachineinaclosedarea.
•Keepallnutsandboltstighttobesurethatthe
equipmentisinsafeworkingcondition.
•Nevertamperwithsafetydevices.Checktheir
properoperationregularly.
3

•Keepmachinefreeofgrass,leaves,orother
debrisbuild-up.Cleanupoilorfuelspillageand
removeanyfuel-soakeddebris.Allowthemachine
tocoolbeforestoringit.
•Ifyoustrikeaforeignobject,stopandinspectthe
machine.Repairthemachine,ifnecessary,before
startingit.
•Nevermakeanyadjustmentsorrepairswiththe
enginerunning.Disconnectthespark-plugwire
andgroundagainsttheenginetopreventitfrom
unintentionallystarting.
•Checkthegrasscatchercomponentsandthe
dischargeguardfrequentlyandreplacethemwith
themanufacturer'srecommendedpartswhen
necessary.
•Mowerbladesaresharp.Wrapthebladeorwear
gloves,anduseextracautionwhenservicing
them.
•Donotchangetheenginegovernorsettingor
overspeedtheengine.
•Maintainorreplacesafetyandinstructionlabels
asnecessary.
•Tobestprotectyourinvestmentandmaintain
optimalperformanceofyourT oroequipment,count
onT orogenuineparts.Whenitcomestoreliability,
Torodeliversreplacementpartsdesignedtothe
exactengineeringspecicationsofourequipment.
Forpeaceofmind,insistonT orogenuineparts.
SafetyandInstructionalDecals
Important:Safetyandinstructiondecalsarelocatednearareasofpotentialdanger.Replacedamaged
decals.
decaloemmarkt
Manufacturer'sMark
1.Indicatesthebladeisidentiedasapartfromtheoriginal
machinemanufacturer.
decal94-8072
94-8072
decal112-8867
112-8867
1.Lock2.Unlock
decal115-8411
115-8411
1.Unlocked2.Locked
4

decal131-0894
131-0894
TractionAdjustment
1.Attention;readtheOperator'sManual—1)Loosenthe
knobbyturningitcounterclockwise;2)Pullthecable(s)
awayfromtheenginetodecreasethetraction,orpush
thecable(s)towardtheenginetoincreasethetraction;3)
Tightentheknobbyturningitclockwise.
decal131-4514b
131–4514
1.Warning—readtheOperator'sManual.
2.Cutting/dismembermenthazardofhandorfoot,mower
blade—stayawayfrommovingparts;keepallguardsand
shieldsinplace.
3.Cutting/dismembermenthazardofhandorfoot,mower
blade—disconnectthespark-plugwireandreadthe
instructionsbeforeservicingorperformingmaintenance.
4.Thrownobjecthazard—keepbystandersasafedistance
fromthemachine;stoptheenginebeforeleavingthe
operatingposition;pickupanydebrisbeforemowing.
5.Cutting/dismembermenthazardofhandorfoot,mower
blade—donotoperateupanddownslopes;operatesideto
sideonslopes;lookbehindyouwhenbackingup.
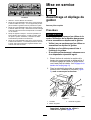
Setup
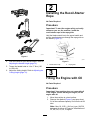
1
AssemblingandUnfolding
theHandle
NoPartsRequired
Procedure
WARNING
Assemblingandunfoldingthehandle
improperlycandamagethecables,causing
anunsafeoperatingcondition.
•Donotdamagethecableswhen
assemblingandunfoldingthehandle.
•Ensurethatthecablesareroutedtothe
outsideofthehandle.
•Ifacableisdamaged,contactan
AuthorizedServiceDealer.
1.Raisetherearofthemachinehousingtoits
highestcutting-heightsettingbymovingthe2
rearcutting-heightleversallthewayforward.
RefertoAdjustingtheCuttingHeight(page10).
2.Attachthehandleendstothemachinehousing
with2washersand2handlebolts(Figure3),
butdonottightenthehandlebolts.
g017457
Figure3
1.Washer3.Handleend
2.Handlebolt
Important:Routethecablestotheoutside
ofthehandle(Figure3).
3.Rotatethehandlerearward(Figure4).
5

g017479
Figure4
4.Lockthehandleatyourdesiredheight.Referto
AdjustingtheHandleHeight(page10).
5.Torquethehandleboltsto14to17N-m(120
to160in-lb).
6.Adjustthecuttingheight.RefertoAdjustingthe
CuttingHeight(page10).
2
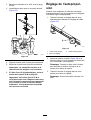
InstallingtheRecoil-Starter
Rope
NoPartsRequired
Procedure
Important:Tostarttheenginesafelyandeasily
wheneveryouusethemachine,installthe
recoil-starterropeintheropeguide.
Holdtheblade-controlbartotheupperhandleand
pulltherecoil-starterropethroughtheropeguideon
thehandle(Figure5).
g003251
Figure5
1.Recoil-starterrope2.Ropeguide
3
FillingtheEnginewithOil
NoPartsRequired
Procedure
Important:Yourmachinedoesnotcomewithoil
intheengine.Beforestartingtheengine,llthe
enginewithoil.
1.Movethemachinetoalevelsurface.
2.Removethedipstick(Figure6)andpourabout
3/4ofthecrankcasecapacityofoilintotheoil-ll
tube.
Note:Max.ll:0.55L(18.6oz),type:SAE30
detergentoilwithanAPIserviceclassicationof
SF,SG,SH,SJ,SL,orhigher.
6

g017491
Figure6
3.Wipeoffthedipstickendwithacleancloth.
4.Insertthedipstickintotheoil-lltube.
5.Removethedipstickandreadtheoillevelon
thedipstick(Figure6).
•Iftheoillevelistoolow,addasmallamount
ofoilslowlytotheoil-lltube,andthen
repeatsteps3through5untiltheoillevelon
thedipstickiscorrect.
•Iftheoillevelistoohigh,draintheexcessoil
untiltheoillevelonthedipstickiscorrect.T o
draintheexcessoil,refertoChangingthe
EngineOil(page17).
Important:Iftheoillevelinthecrankcase
istoolowortoohighandyourunthe
engine,youmaydamagetheengine.
6.Installthedipsticksecurely.
Important:Changetheengineoilafterthe
rst5operatinghours;changeityearly
thereafter.RefertoChangingtheEngineOil
(page17).
4
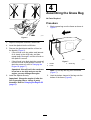
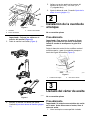
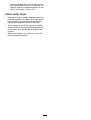
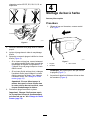
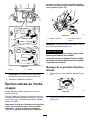
AssemblingtheGrassBag
NoPartsRequired
Procedure
1.Slipthegrassbagovertheframeasshownin
Figure7.
g027257
Figure7
1.Handle
3.Grassbag
2.Frame
Note:Donotslipthebagoverthehandle
(Figure7).
2.Hookthebottomchannelofthebagontothe
bottomoftheframe(Figure8).
7

g027258
Figure8
3.Hookthetopandsidechannelsofthebagonto
thetopandsidesoftheframe,respectively
(Figure8).
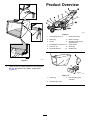
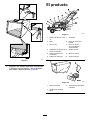
ProductOverview
g027628
Figure9
1.Cutting-heightlever(4)
7.Recoil-starthandle
2.Sparkplug
8.Blade-controlbar
3.Airlter9.Adjustmentknobforthe
self-propeldrive
4.Oilll/Dipstick(notshown)
10.Upperhandle
5.Fuel-tankcap
11.Grassbag
6.Dischargedeector
12.Washoutport
g007407
Figure10
1.Grassbag
3.Rear-dischargeplug
(installed)
2.Side-dischargechute
8

Operation
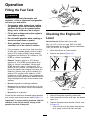
FillingtheFuelTank
DANGER
Gasolineisextremelyammableand
explosive.Areorexplosionfromgasoline
canburnyouandothers.
•Topreventastaticchargefromigniting
thegasoline,placethecontainerand/or
machinedirectlyonthegroundbefore
lling,notinavehicleoronanobject.
•Fillthetankoutdoorswhentheengineis
cold.Wipeupspills.
•Donothandlegasolinewhensmokingor
aroundanopenameorsparks.
•Storegasolineinanapprovedfuel
container,outofthereachofchildren.
•Forbestresults,useonlyclean,fresh(lessthan
30daysold),unleadedgasolinewithanoctane
ratingof87orhigher((R+M)/2ratingmethod).
•Oxygenatedfuelwithupto10%ethanolor15%
MTBEbyvolumeisacceptable.
•Ethanol:Gasolinewithupto10%ethanol
(gasohol)or15%MTBE(methyltertiarybutyl
ether)byvolumeisacceptable.Ethanoland
MTBEarenotthesame.Gasolinewith15%
ethanol(E15)byvolumeisnotapprovedforuse.
Neverusegasolinethatcontainsmorethan10%
ethanolbyvolume,suchasE15(contains15%
ethanol),E20(contains20%ethanol),orE85
(containsupto85%ethanol).Usingunapproved
gasolinemaycauseperformanceproblemsand/or
enginedamagewhichmaynotbecoveredunder
warranty.
•Donotusegasolinecontainingmethanol.
•Donotstorefueleitherinthefueltankorinfuel
containersoverthewinterunlessafuelstabilizer
isused.
•Donotaddoiltogasoline.
Fillthefueltankwithfreshunleadedregulargasoline
fromamajorname-brandservicestation(Figure11).
Important:Toreducestartingproblems,addfuel
stabilizertothefuelallseason,mixingitwith
gasolinelessthan30daysold.
g027629
Figure11
CheckingtheEngine-Oil
Level
ServiceInterval:Beforeeachuseordaily
Max.ll:0.55L(18.6oz),type:SAE30orSAE
10W-30detergentoilwithanAPIserviceclassication
ofSF,SG,SH,SJ,SL,orhigher.
1.Movethemachinetoalevelsurface.
2.Removethedipstick(Figure12).
g017491
Figure12
3.Wipeoffthedipstickendwithacleancloth.
4.Insertthedipstickintotheoil-lltube,butdonot
screwitin.
5.Removethedipstickandreadtheoillevel;refer
toFigure12.
•Iftheoillevelistoolow,addasmallamount
ofoilslowlytotheoil-lltube,andthen
9

repeatsteps3through5untiltheoillevelon
thedipstickiscorrect.
•Iftheoillevelistoohigh,draintheexcessoil
untiltheoillevelonthedipstickiscorrect.T o
draintheexcessoil,refertoChangingthe
EngineOil(page17).
Important:Iftheoillevelinthecrankcase
istoolowortoohighandyourunthe
engine,youmaydamagetheengine.
6.Installthedipsticksecurely.
AdjustingtheCutting
Height
WARNING
Adjustingthecuttingheightmaybringyou
intocontactwiththemovingblade,causing
seriousinjury.
•Stoptheengineandwaitforallmoving
partstostop.
•Donotputyourngersunderthehousing
whenadjustingthecuttingheight.
CAUTION
Iftheenginehasbeenrunning,themufer
willbehotandcanseverelyburnyou.Keep
awayfromthehotmufer.
Adjustthecuttingheightasdesired.Setall4wheels
tothesameheight.
Note:T oraisethemachine,moveall4cuttingheight
leversforward;tolowerthemachine,movethemall
rearward(Figure13).
g189041
Figure13
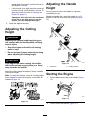
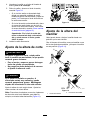
AdjustingtheHandle
Height
Youmayraiseorlowerthehandletoaposition
comfortableforyou.
Rotatethehandlelock,movethehandleto1of3
positions,andlockthehandleintoposition(Figure
14).
g007284
Figure14
1.Handlelock2.Handlepositions
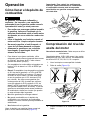
StartingtheEngine
1.Pulltheblade-controlbartothehandle(Figure
15).
g003124
Figure15
2.Pulltherecoil-starthandle(Figure16).
10

g003274
Figure16
Note:Ifthemachinedoesnotstart,contactan
AuthorizedServiceDealer.
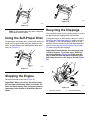
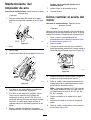
UsingtheSelf-PropelDrive
Tooperatetheself-propeldrive,simplywalkwithyour
handsontheupperhandleandyourelbowsatyour
sides,andthemachinewillautomaticallykeeppace
withyou(Figure17).
g003221
Figure17
StoppingtheEngine
Releasetheblade-controlbar(Figure18).
Important:Whenyoureleasetheblade-control
bar,thebladeshouldstopwithin3seconds.Ifit
doesnotstopproperly,stopusingyourmachine
immediatelyandcontactanAuthorizedService
Dealer.
g003126
Figure18
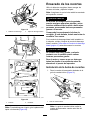
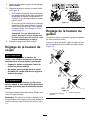
RecyclingtheClippings
Yourmachinecomesfromthefactoryreadytorecycle
thegrassandleafclippingsbackintothelawn.
Ifthegrassbagisonthemachine,removeit;referto
RemovingtheGrassBag(page13)beforerecycling
theclippings.Iftheside-dischargechuteisonthe
machine,removeitandlocktheside-dischargedoor;
refertoRemovingtheSide-DischargeChute(page
15)beforerecyclingtheclippings.
Important:Ensurethattherear-dischargeplug
islockedinplace.Tolocktheplug:Raisethe
dischargedeector(Figure19),rmlypushthe
pluginuntilitsnapsintoplacebehindthetabs,
androtatetheleverontheplugtotheleft(Figure
20).
g017463
Figure19
1.Dischargedeector
2.Rear-dischargeplug
11

g010084
Figure20
1.Lever2.Tabs
Note:T ounlocktheplug,rotatetheleverontheplug
totheright(Figure20).
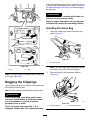
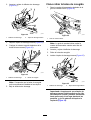
BaggingtheClippings
Usethegrassbagwhenyouwanttocollectgrassand
leafclippingsfromthelawn.
Note:Ensurethebagisseatedinthecorrectposition.
WARNING
Aworngrassbagcouldallowsmallstones
andothersimilardebristobethrowntoward
youorbystanders,resultinginserious
personalinjuryordeath.
Checkthegrassbagfrequently.Ifitis
damaged,installanewTororeplacementbag.
Iftheside-dischargechuteisonthemachine,remove
itandlocktheside-dischargedoor;refertoRemoving
theSide-DischargeChute(page15)beforebagging
theclippings.
WARNING
Thebladeissharp;contactingthebladecan
resultinseriouspersonalinjury.
Stoptheengineandwaitforallmovingparts
tostopbeforeleavingtheoperatingposition.
InstallingtheGrassBag
1.Routethestarterropearoundthelower-rope
guide(Figure21).
g017483
Figure21
1.Lower-ropeguide
Note:Thelower-ropeguidereleasesthestarter
ropewhenyoupulltherecoil-starthandle.
2.Raiseandholdupthedischargedeector
(Figure22).
g017464
Figure22
1.Dischargedeector
2.Rear-dischargeplug
12

3.Pullouttherear-dischargeplug(Figure22).
4.Hangtheupperfrontedgeofthebagonthe
notches(Figure23).
g017484
Figure23
1.Dischargedeector2.Grassbag
Note:Ensurethatthegrassbagissecurely
installedontothemachine.
5.Lowerthedischargedeector.
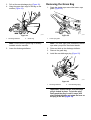
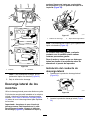
RemovingtheGrassBag
1.Routethestarterropearoundthelower-rope
guide(Figure24).
g017483
Figure24
1.Lower-ropeguide
Note:Thelower-ropeguidereleasesthestarter
ropewhenyoupulltherecoil-starthandle.
2.Raiseandholdupthedischargedeector.
3.Removethegrassbag.
4.Installtherear-dischargeplug(Figure25).
g017463
Figure25
1.Dischargedeector
2.Rear-dischargeplug
Important:Ensurethattherear-discharge
plugislockedinplace.Tolocktheplug,
rmlypushthepluginuntilitsnapsinto
placebehindthetabs,androtatetheleveron
theplugtotheleft(Figure26).
13

g010084
Figure26
1.Lever2.Tabs
Note:Tounlocktheplug,rotatetheleveron
theplugtotheright(Figure26).
5.Lowerthedischargedeector.
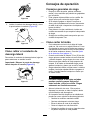
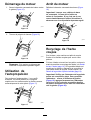
Side-Dischargingthe
Clippings
Usetheside-dischargefeatureforcuttingverytall
grass.
Ifthebagisonthemachine,removeitandinsertthe
rear-dischargeplug;refertoRemovingtheGrassBag
(page13)beforeside-dischargingtheclippings.
Important:Ensurethattherear-dischargeplug
islockedinplace.Tolocktheplug:Raisethe
dischargedeector(Figure27),rmlypushthe
pluginuntilitsnapsintoplacebehindthetabs,
androtatetheleverontheplugtotheleft(Figure
26).
g017463
Figure27
1.Dischargedeector
2.Rear-dischargeplug
Note:T ounlocktheplug,rotatetheleverontheplug
totheright(Figure26).
WARNING
Thebladeissharp;contactingthebladecan
resultinseriouspersonalinjury.
Stoptheengineandwaitforallmovingparts
tostopbeforeleavingtheoperatingposition.
InstallingtheSide-Discharge
Chute
1.Unlocktheside-dischargedoor(Figure28).
g002590
Figure28
2.Liftopentheside-dischargedoor(Figure29).
g002591
Figure29
3.Installtheside-dischargechuteandclosethe
doorontothechute(Figure30).
14

g002592
Figure30
RemovingtheSide-Discharge
Chute
Toremovetheside-dischargechute,reversethe
stepsabove.
Important:Locktheside-dischargedoorafter
youcloseit(Figure31).
g002593
Figure31
OperatingTips
GeneralMowingTips
•Cleartheareaofsticks,stones,wire,branches,
andotherdebristhatthebladecouldhit.
•Avoidstrikingsolidobjectswiththeblade.Never
deliberatelymowoveranyobject.
•Ifthemachinestrikesanobjectorstartstovibrate,
immediatelystoptheengine,disconnectthewire
fromthesparkplug,andexaminethemachinefor
damage.
•Forbestperformance,installanewbladebefore
thecuttingseasonbegins.
•ReplacethebladewhennecessarywithaT oro
replacementblade.
CuttingGrass
•Cutonlyaboutathirdofthegrassbladeatatime.
Donotcutbelowthe51mm(2inch)settingunless
thegrassissparseoritislatefallwhengrass
growthbeginstoslowdown.RefertoAdjusting
theCuttingHeight(page10).
•Whencuttinggrassover15cm(6inches)tall,
mowatthehighestcutting-heightsettingandwalk
slower;thenmowagainatalowersettingforthe
bestlawnappearance.Ifthegrassistoolong,the
machinemayplugandcausetheenginetostall.
•Mowonlydrygrassorleaves.Wetgrassand
leavestendtoclumpontheyardandcancause
themachinetoplugortheenginetostall.
WARNING
Wetgrassorleavescancauseserious
injuryifyouslipandcontacttheblade.
Mowonlyindryconditions.
•Alternatethemowingdirection.Thishelps
dispersetheclippingsoverthelawnforeven
fertilization.
•Ifthenishedlawnappearanceisunsatisfactory,
try1ormoreofthefollowing:
–Replacethebladeorhaveitsharpened.
–Walkataslowerpacewhilemowing.
–Raisethecuttingheightonyourmachine.
–Cutthegrassmorefrequently.
–Overlapcuttingswathsinsteadofcuttingafull
swathwitheachpass.
–Setthecuttingheightonthefrontwheelsa
notchlowerthantherearwheels.Forexample,
setthefrontwheelsat60mm(2-1/4inches)
andtherearwheelsat70mm(2-3/4inches).
CuttingLeaves
•Aftercuttingthelawn,ensurethathalfofthelawn
showsthroughthecutleafcover.Youmayneed
tomakemorethanasinglepassovertheleaves.
•Iftherearemorethan13cm(5inches)ofleaves
onthelawn,setthefrontcuttingheight1or2
notcheshigherthantherearcuttingheight.
•Slowdownyourmowingspeedifthemachine
doesnotcuttheleavesnelyenough.
15

Maintenance
Note:Determinetheleftandrightsidesofthemachinefromthenormaloperatingposition.
RecommendedMaintenanceSchedule(s)
MaintenanceService
Interval
MaintenanceProcedure
Aftertherst5hours
•Changetheengineoil.
Beforeeachuseordaily
•Checktheengineoillevel.
•Servicetheaircleaner.
•Ensurethattheenginestopswithin3secondsafterreleasingtheblade-controlbar.
•Cleangrassclippingsanddirtfromunderthemachine.
Every25hours
•Lubricatetherearwheelgears.
•Replacethebladeorhaveitsharpened(morefrequentlyiftheedgedullsquickly).
Beforestorage
•Emptythefueltankbeforerepairsasdirectedandbeforeannualstorage.
Yearly
•Servicetheaircleaner.
•Changetheengineoil.
Important:Refertoyourengineowner'smanualforadditionalmaintenanceprocedures.
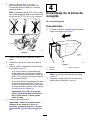
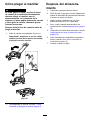
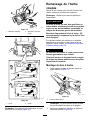
PreparingforMaintenance
1.Stoptheengineandwaitforallmovingpartsto
stop.
2.Disconnectthespark-plugwirefromthe
sparkplug(Figure32)beforeperformingany
maintenanceprocedure.
g002901
Figure32
3.Afterperformingthemaintenanceprocedure(s),
connectthespark-plugwiretothesparkplug.
Important:Beforetippingthemachineto
changetheoilorreplacetheblade,allowthe
fueltanktorundrythroughnormalusage.If
youmusttipthemachinepriortorunning
outoffuel,useahandfuelpumptoremove
thefuel.Alwaystipthemachineontoitsside
withthedipstickdown.
WARNING
Tippingthemachinemaycausethe
fueltoleak.Gasolineisammableand
explosiveandcancausepersonalinjury.
Runtheenginedryorremovethe
gasolinewithahandpump;never
siphon.
16

ServicingtheAirCleaner
ServiceInterval:Beforeeachuseordaily
Yearly
1.Pressdownonthelatchtabsontopoftheair
cleanercover(Figure33).
g002902
Figure33
1.Latchtabs
2.Openthecover.
3.Removethepaperairlter(Figure34).
g027630
Figure34
4.Iftheairlterisdamagedoriswetwithoilor
fuel,replaceit.
5.Iftheairlterisdirty,tapitonahardsurface
severaltimesorblowcompressedairlessthan
207kPa(30psi)throughthesideofthelter
thatfacestheengine.
Donotbrushthedirtoffthelter;brushingforces
dirtintothebers.
6.Removedirtfromtheaircleanerbodyandcover
usingamoistrag.Donotwipedirtintothe
airduct.
7.Installthelterintotheaircleaner.
8.Installthecover.
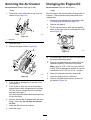
ChangingtheEngineOil
ServiceInterval:Aftertherst5hours
Yearly
Runtheengineafewminutesbeforechangingtheoil
towarmit.Warmoilowsbetterandcarriesmore
contaminants.
1.Performthepre-maintenanceprocedures;refer
toPreparingforMaintenance(page16).
2.Removethedipstick.
3.Tipthemachineontoitsside,withthedipstick
down,todraintheusedoiloutthroughtheoil-ll
tube(Figure35).
g017485
Figure35
4.Afterdrainingtheusedoil,returnthemachineto
thenormaloperatingposition.
5.Removethedipstickandpourabout3/4ofthe
crankcasecapacityofoilintotheoil-lltube.
Note:Max.ll:0.55L(18.6oz),type:SAE30
orSAE10W-30detergentoilwithanAPIservice
classicationofSF,SG,SH,SJ,SL,orhigher.
6.Wipeoffthedipstickendwithacleancloth.
7.Insertthedipstickintotheoil-lltube.
8.Removethedipstickandreadtheoillevelon
thedipstick(Figure36).
17

g017491
Figure36
•Iftheoillevelistoolow,addasmallamount
ofoilslowlytotheoil-lltube,andthen
repeatsteps6through8untiltheoillevelon
thedipstickiscorrect.
•Iftheoillevelistoohigh,draintheexcessoil
untiltheoillevelonthedipstickiscorrect.
Important:Iftheoillevelinthecrankcase
istoolowortoohighandyourunthe
engine,youmaydamagetheengine.
9.Installthedipsticksecurely.
10.Recycletheusedoilproperly.
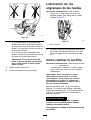
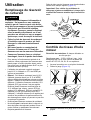
LubricatingtheWheel
Gears
ServiceInterval:Every25hours
1.Wipethegreasettingsjustinsidetherear
wheelswithacleanrag(Figure37).
g003234
Figure37
1.Greasetting
2.Installagreasegunontoeachttingand
gentlyapply2or3pumpsof#2multi-purpose,
lithium-basedgrease.
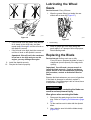
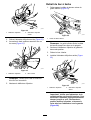
ReplacingtheBlade
ServiceInterval:Beforeeachuseordaily
Every25hours—Replacethebladeorhaveit
sharpened(morefrequentlyiftheedgedulls
quickly).
Important:Youwillneedatorquewrenchto
installthebladeproperly.Ifyoudonothavea
torquewrenchorareuncomfortableperforming
thisprocedure,contactanAuthorizedService
Dealer.
Examinethebladewheneveryourunoutofgasoline.
Ifthebladeisdamagedorcracked,replaceit
immediately.Ifthebladeedgeisdullornicked,have
itsharpenedorreplaceit.
WARNING
Thebladeissharp;contactingthebladecan
resultinseriouspersonalinjury.
Weargloveswhenservicingtheblade.
1.Disconnectthesparkplugwirefromthespark
plug.RefertoPreparingforMaintenance(page
16).
2.Tipthemachineontoitssidewiththedipstick
down.
3.Useablockawoodtoholdthebladesteady
(Figure38).
18

g003235
Figure38
4.Removetheblade,savingallmounting
hardware.
5.Installthenewbladeandallmountinghardware.
Important:Positionthecurvedendsofthe
bladetopointtowardthemachinehousing.
6.Useatorquewrenchtotightenthebladebolt
to82N-m(60ft-lb).
Important:Abolttorquedto82N-m(60
ft-lb)isverytight.Whileholdingtheblade
withablockofwood,putyourweight
behindtheratchetorwrenchandtightenthe
boltsecurely.Thisboltisverydifcultto
overtighten.
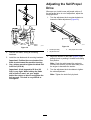
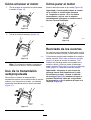
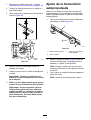
AdjustingtheSelf-Propel
Drive
Wheneveryouinstallanewself-propelcableorif
theself-propeldriveisoutofadjustment,adjustthe
self-propeldrive.
1.Turntheadjustmentknobcounterclockwiseto
loosenthecableadjustment(Figure39).
g027709
Figure39
1.Handle(leftside)3.Self-propel-drivecable
2.Adjustmentknob
2.Adjustthetensiononthecable(Figure39)by
pullingitbackorpushingitforwardandholding
thatposition.
Note:Pushthecabletowardtheengineto
increasethetraction;pullthecableawayfrom
theenginetodecreasethetraction.
3.Turntheadjustmentknobclockwisetotighten
thecableadjustment.
Note:Tightentheknobrmlybyhand.
19
La page est en cours de chargement...
La page est en cours de chargement...
La page est en cours de chargement...
La page est en cours de chargement...
La page est en cours de chargement...
La page est en cours de chargement...
La page est en cours de chargement...
La page est en cours de chargement...
La page est en cours de chargement...
La page est en cours de chargement...
La page est en cours de chargement...
La page est en cours de chargement...
La page est en cours de chargement...
La page est en cours de chargement...
La page est en cours de chargement...
La page est en cours de chargement...
La page est en cours de chargement...
La page est en cours de chargement...
La page est en cours de chargement...
La page est en cours de chargement...
La page est en cours de chargement...
La page est en cours de chargement...
La page est en cours de chargement...
La page est en cours de chargement...
La page est en cours de chargement...
La page est en cours de chargement...
La page est en cours de chargement...
La page est en cours de chargement...
La page est en cours de chargement...
La page est en cours de chargement...
La page est en cours de chargement...
La page est en cours de chargement...
La page est en cours de chargement...
La page est en cours de chargement...
La page est en cours de chargement...
La page est en cours de chargement...
La page est en cours de chargement...
La page est en cours de chargement...
La page est en cours de chargement...
La page est en cours de chargement...
La page est en cours de chargement...
La page est en cours de chargement...
La page est en cours de chargement...
La page est en cours de chargement...
La page est en cours de chargement...
La page est en cours de chargement...
La page est en cours de chargement...
La page est en cours de chargement...
La page est en cours de chargement...
La page est en cours de chargement...
La page est en cours de chargement...
La page est en cours de chargement...
-
 1
1
-
 2
2
-
 3
3
-
 4
4
-
 5
5
-
 6
6
-
 7
7
-
 8
8
-
 9
9
-
 10
10
-
 11
11
-
 12
12
-
 13
13
-
 14
14
-
 15
15
-
 16
16
-
 17
17
-
 18
18
-
 19
19
-
 20
20
-
 21
21
-
 22
22
-
 23
23
-
 24
24
-
 25
25
-
 26
26
-
 27
27
-
 28
28
-
 29
29
-
 30
30
-
 31
31
-
 32
32
-
 33
33
-
 34
34
-
 35
35
-
 36
36
-
 37
37
-
 38
38
-
 39
39
-
 40
40
-
 41
41
-
 42
42
-
 43
43
-
 44
44
-
 45
45
-
 46
46
-
 47
47
-
 48
48
-
 49
49
-
 50
50
-
 51
51
-
 52
52
-
 53
53
-
 54
54
-
 55
55
-
 56
56
-
 57
57
-
 58
58
-
 59
59
-
 60
60
-
 61
61
-
 62
62
-
 63
63
-
 64
64
-
 65
65
-
 66
66
-
 67
67
-
 68
68
-
 69
69
-
 70
70
-
 71
71
-
 72
72


Toro Super Recycler Lawn Mower Manuel utilisateur
- Catégorie
- Tondeuses à gazon
- Taper
- Manuel utilisateur
dans d''autres langues
Documents connexes
-
Toro TimeMaster 76cm Lawn Mower Manuel utilisateur
-
Toro Super Recycler Lawn Mower Manuel utilisateur
-
-
-
Toro 53cm Super Recycler Lawn Mower Manuel utilisateur
-
-
-
-
Toro 55cm Recycler Lawn Mower Manuel utilisateur
-