Toro Super Recycler Lawn Mower Manuel utilisateur
- Catégorie
- Tondeuses à gazon
- Taper
- Manuel utilisateur

FormNo.3408-878RevA
SuperRecycler®LawnMower
2038120384
CortacéspedSuperRecycler®
2038120384
TondeuseSuperRecycler®
2038120384
www.T oro.com.
*3408-878*A


CV
FormNo.3408-875RevA
SuperRecycler
®
LawnMower
ModelNo.20381—SerialNo.400000000andUp
ModelNo.20384—SerialNo.400000000andUp
Operator'sManual
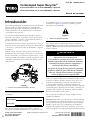
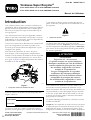
Introduction
Thisrotary-blade,walk-behindlawnmowerisintendedto
beusedbyresidentialhomeowners.Itisdesignedprimarily
forcuttinggrassonwell-maintainedlawnsonresidential
properties.Itisnotdesignedforcuttingbrushorfor
agriculturaluses.
Readthisinformationcarefullytolearnhowtooperateand
maintainyourproductproperlyandtoavoidinjuryand
productdamage.Youareresponsibleforoperatingthe
productproperlyandsafely.
YoumaycontactTorodirectlyatwww.Toro.comforproduct
andaccessoryinformation,helpndingadealer,ortoregister
yourproduct.
Wheneveryouneedservice,genuineToroparts,oradditional
information,contactanAuthorizedServiceDealerorToro
CustomerServiceandhavethemodelandserialnumbersof
yourproductready.Figure1identiesthelocationofthe
modelandserialnumbersontheproduct.
1
g026368
g026368
Figure1
1.Modelandserialnumberplate
Writetheproductmodelandserialnumbersinthespace
below:
ModelNo.
SerialNo.
Thismanualidentiespotentialhazardsandhassafety
messagesidentiedbythesafety-alertsymbol(Figure2),
whichsignalsahazardthatmaycauseseriousinjuryordeath
ifyoudonotfollowtherecommendedprecautions.
g000502
Figure2
1.Safety-alertsymbol
Thismanualuses2wordstohighlightinformation.
Importantcallsattentiontospecialmechanicalinformation
andNoteemphasizesgeneralinformationworthyofspecial
attention.
WARNING
CALIFORNIA
Proposition65Warning
Thisproductcontainsachemicalorchemicals
knowntotheStateofCaliforniatocausecancer,
birthdefects,orreproductiveharm.
Theengineexhaustfromthisproduct
containschemicalsknowntotheStateof
Californiatocausecancer,birthdefects,
orotherreproductiveharm.
ItisaviolationofCaliforniaPublicResourceCode
Section4442or4443touseoroperatetheengineonany
forest-covered,brush-covered,orgrass-coveredlandunless
theengineisequippedwithasparkarrester,asdenedin
Section4442,maintainedineffectiveworkingorderorthe
engineisconstructed,equipped,andmaintainedforthe
preventionofre.
ThissparkignitionsystemcomplieswithCanadianICES-002.
NetTorque:Thegrossornettorqueofthisenginewas
laboratoryratedbytheenginemanufacturerinaccordance
withtheSocietyofAutomotiveEngineers(SAE)J1940.
Asconguredtomeetsafety,emission,andoperating
requirements,theactualenginetorqueonthisclassofmower
willbesignicantlylower.Gotowww.Toro.comtoview
specicationsonyourmowermodel.
Important:Ifyouareusingthismachineabove1500m
(5,000ft)foracontinuousperiod,ensurethattheHigh
AltitudeKithasbeeninstalledsothattheenginemeets
CARB/EPAemissionregulations.TheHighAltitude
Kitincreasesengineperformancewhilepreventing
spark-plugfouling,hardstarting,andincreased
emissions.Onceyouhaveinstalledthekit,attach
thehigh-altitudelabelnexttotheserialdecalonthe
©2016—TheToro®Company
8111LyndaleAvenueSouth
Bloomington,MN55420
Registeratwww.T oro.com.
OriginalInstructions(EN)
PrintedintheUSA
AllRightsReserved
*3408-875*A

machine.ContactanyAuthorizedToroServiceDealer
toobtaintheproperHighAltitudeKitandhigh-altitude
labelforyourmachine.Tolocateadealerconvenientto
you,accessourwebsiteatwww.Toro.comorcontactour
ToroCustomerCareDepartmentatthenumber(s)listed
inyourEmissionControlWarrantyStatement.
Removethekitfromtheengineandrestoretheengine
toitsoriginalfactorycongurationwhenrunningthe
engineunder1500m(5,000ft).Donotoperateanengine
thathasbeenconvertedforhigh-altitudeuseatlower
altitudes;otherwise,youcouldoverheatanddamage
theengine.
Ifyouareunsurewhetherornotyourmachinehasbeen
convertedforhigh-altitudeuse,lookforthefollowing
label(Figure3).
decal127-9363
Figure3
Contents
Introduction..................................................................1
Safety...........................................................................2
GeneralSafety.........................................................2
SafetyandInstructionalDecals.................................3
Setup............................................................................5
1AssemblingandUnfoldingtheHandle.....................5
2InstallingtheRecoil-starterRopeintheRope
Guide.................................................................5
3FillingtheEnginewithOil......................................6
4ChargingtheBattery..............................................6
5AssemblingtheGrassBag......................................6
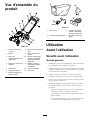
ProductOverview..........................................................8
Operation.....................................................................8
BeforeOperation.......................................................8
BeforeOperationSafety...........................................8
FillingtheFuelTank................................................9
CheckingtheEngine-OilLevel..................................9
AdjustingtheHandleHeight.....................................9
AdjustingtheCuttingHeight....................................10
DuringOperation.....................................................10
DuringOperatingSafety..........................................10
StartingtheEngine.................................................11
UsingtheSelf-PropelDrive.....................................12
ShuttingofftheEngine...........................................12
RecyclingtheClippings...........................................12
BaggingtheClippings.............................................13
OperatingTips......................................................15
AfterOperation........................................................16
AfterOperatingSafety............................................16
CleaningundertheMachine.....................................16
FoldingtheHandle.................................................16
Maintenance.................................................................18
RecommendedMaintenanceSchedule(s)......................18
MaintenanceSafety.................................................18
PreparingforMaintenance.......................................18
ReplacingtheAirCleaner........................................19
ChangingtheEngineOil.........................................19
ChargingtheBattery...............................................20
ReplacingtheFuse..................................................20
LubricatingtheWheelGears....................................21
ReplacingtheBlade................................................21
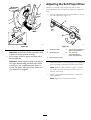
AdjustingtheSelf-PropelDrive................................22
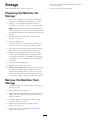
Storage........................................................................23
PreparingtheMachineforStorage............................23
RemovetheMachinefromStorage............................23
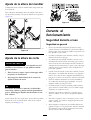
Safety
ThismachinehasbeendesignedinaccordancewithENISO
5395:2013andANSIB71.1-2012.
GeneralSafety
Thisproductiscapableofamputatinghandsandfeetand
ofthrowingobjects.Alwaysfollowallsafetyinstructionsto
avoidseriouspersonalinjury.
Usingthisproductforpurposesotherthanitsintendeduse
couldprovedangeroustoyouandbystanders.
•ReadandunderstandthecontentsofthisOperator’sManual
beforestartingtheengine.
•Donotputyourhandsorfeetnearmovingcomponents
ofthemachine.
•Donotoperatethemachinewithoutallguardsandother
safetyprotectivedevicesinplaceandworkingonthe
machine.
•Keepclearofanydischargeopening.Keepbystandersa
safedistanceawayfromthemachine.
•Keepchildrenoutoftheoperatingarea.Neverallow
childrentooperatethemachine.
•Stopthemachineandshutofftheenginebeforeservicing,
fueling,oruncloggingthemachine.
Improperlyusingormaintainingthismachinecanresult
ininjury.Toreducethepotentialforinjury,complywith
thesesafetyinstructionsandalwayspayattentiontothe
safety-alertsymbol,whichmeansCaution,Warning,or
Danger—personalsafetyinstruction.Failuretocomplywith
theseinstructionsmayresultinpersonalinjuryordeath.
Youcanndadditionalitemsofsafetyinformationintheir
respectivesectionsthroughoutthismanual.
2

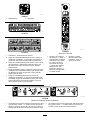
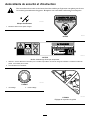
SafetyandInstructionalDecals
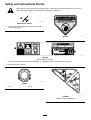
Safetydecalsandinstructionsareeasilyvisibletotheoperatorandarelocatednearanyareaof
potentialdanger.Replaceanydecalthatisdamagedormissing.
decaloemmarkt
Manufacturer'sMark
1.Indicatesthebladeisidentiedasapartfromtheoriginal
machinemanufacturer.
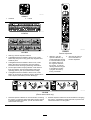
decal94-8072
94-8072
decal104-7953
104-7953
Electric-startmodelonly
1.Warning—readtheOperator'sManualforinformationonchargingthebattery;containslead;donotdiscard.
2.ReadtheOperator'sManual.
decal112-8867
112-8867
1.Lock2.Unlock
decal115-2884
115-2884
HandlePositionAdjustment
3

decal115-8411
115-8411
1.Unlocked2.Locked
decal117-2718
117-2718
decal131-4514b
131–4514
1.Warning—readtheOperator'sManual.
2.Cutting/dismembermenthazardofhandorfoot,mower
blade—stayawayfrommovingparts;keepallguardsand
shieldsinplace.
3.Cutting/dismembermenthazardofhandorfoot,mower
blade—disconnectthespark-plugwireandreadthe
instructionsbeforeservicingorperformingmaintenance.
4.Thrownobjecthazard—keepbystandersasafedistance
fromthemachine;stoptheenginebeforeleavingthe
operatingposition;pickupanydebrisbeforemowing.
5.Cutting/dismembermenthazardofhandorfoot,mower
blade—donotoperateupanddownslopes;operatesideto
sideonslopes;lookbehindyouwhenbackingup.
decal132-4470
132-4470
TractionAdjustment
1.Attention;readthe
Operator'sManual—1)
Loosentheknobbyturning
itcounterclockwise;2)Pull
thecable(s)awayfrom
theenginetodecrease
thetraction,orpushthe
cable(s)towardtheengine
toincreasethetraction;
3)Tightentheknobby
turningitclockwise.
2.ScantheQRcodefor
moreinformationon
tractionadjustment.
decal133-1900
133-1900
(Electric-startmodelsonly)
1.ReadtheOperator’sManualformoreinformationonstarting
theengine—1)Inserttheelectric-startbuttonintotheignition;
2)Engagetheblade-controlbar;3)Pushtheelectric-start
buttontostarttheengine.
2.ReadtheOperator’sManualformoreinformationonstopping
theengine—1)Releasetheblade-controlbar;2)Removethe
electric-startbuttonfromtheignition.
4

Setup
Important:Removeanddiscardtheprotectiveplastic
sheetthatcoverstheengineandanyotherplasticor
wrappingonthemachine.
Important:Topreventaccidentalstarting,donotinsert
theelectric-startbuttonintotheelectricstarterswitch
untilyouarereadytostarttheengine.
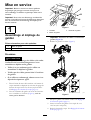
1
AssemblingandUnfoldingthe
Handle
Partsneededforthisprocedure:
2Handlebolt
2Washer
Procedure
WARNING
Assemblingandunfoldingthehandleimproperly
candamagethecables,causinganunsafeoperating
condition.
•Donotdamagethecableswhenassemblingand
unfoldingthehandle.
•Ensurethatthecablesareroutedtotheoutside
ofthehandle.
•Ifacableisdamaged,contactanAuthorized
ServiceDealer.
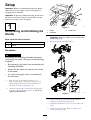
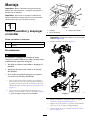
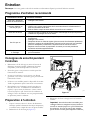
1.Raisetherearofthemachinehousingtoits
highestcutting-heightsettingbymovingthe2rear
cutting-heightleversallthewayforward.Referto
AdjustingtheCuttingHeight(page10).
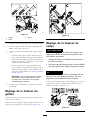
2.Attachthehandleendstothemachinehousingwith
2washersand2handlebolts(Figure4),butdonot
tightenthehandlebolts.
G017457
g017457
Figure4
1.Washer3.Handleend
2.Handlebolt
Important:Routethecablestothe
outside
ofthe
handle(Figure4).
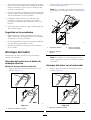
3.Rotatethehandlerearward(Figure5).
g189343
Figure5
4.Lockthehandleatyourdesiredheight.Referto
AdjustingtheHandleHeight(page9).
5.Torquethehandleboltsto14to17N∙m(120to160
in-lb).
6.Adjustthecuttingheight.RefertoAdjustingthe
CuttingHeight(page10).
5

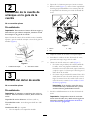
2
InstallingtheRecoil-starter
RopeintheRopeGuide
NoPartsRequired
Procedure
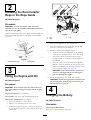
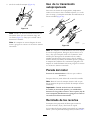
Important:Tostarttheenginesafelyandeasily
wheneveryouusethemachine,installtherecoil-starter
ropeintheropeguide.
Holdtheblade-controlbartotheupperhandleandpullthe
recoil-starterropethroughtheropeguideonthehandle
(Figure6).
g003251
Figure6
1.Recoil-starterrope2.Ropeguide
3
FillingtheEnginewithOil
NoPartsRequired
Procedure
Important:Yourmachinedoesnotcomewithoilin
theengine.Beforestartingtheengine,lltheengine
withoil.
Engineoilcapacity:0.5L(18.oz)
Oilviscosity:SAE30orSAE10W-30detergentoil
APIserviceclassication:SJorhigher
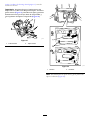
1.Movethemachinetoalevelsurface.
2.Waitfor3to5minutesfortheoiltosettle.
3.Removethedipstick(Figure7)andpourabout3/4
ofthecrankcasecapacityofthespeciedoilintothe
oil-lltube.
g186624
Figure7
1.Full3.Low
2.High
4.Wipeoffthedipstickendwithacleancloth.
5.Insertthedipstickintotheoil-lltube,butdonot
screwitin,thenremovethedipstick.
6.Readtheoillevelonthedipstick(Figure7).
•IftheoilisbelowtheAddmarkonthedipstick,
slowlypourasmallamountofoilintotheoil-ll
tube,wait3minutes,andthenrepeatsteps3
through5untiltheoillevelisattheFullmarkon
thedipstick
•IftheoilisabovetheFullmarkonthedipstick,
draintheexcessoiluntiltheoillevelisattheFull
markonthedipstick.Todraintheexcessoil,refer
toChangingtheEngineOil(page19).
Important:Iftheoillevelinthecrankcaseis
toolowortoohighandyouruntheengine,
youmaydamagetheengine.
7.Installthedipstickintotheoil-lltubesecurely.
Important:Checktheengine-oillevelbeforeeach
useandaddoilasneeded;refertoCheckingthe
Engine-OilLevel(page9).
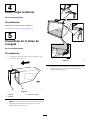
4
ChargingtheBattery
NoPartsRequired
Procedure
Electric-StartModelOnly
RefertoChargingtheBattery(page20).
6

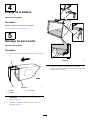
5
AssemblingtheGrassBag
NoPartsRequired
Procedure
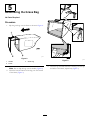
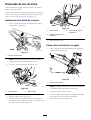
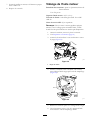
1.SlipthegrassbagovertheframeasshowninFigure8.
g027257
1
2
3
g027257
Figure8
1.Handle
3.Grassbag
2.Frame
Note:Donotslipthebagoverthehandle(Figure8).
2.Hookthebottomchannelofthebagontothebottom
oftheframe(Figure9).
g027258
g027258
Figure9
3.Hookthetopandsidechannelsofthebagontothetop
andsidesoftheframe,respectively(Figure9).
7

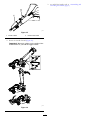
ProductOverview
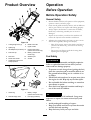
g189025
Figure10
1.Cutting-heightlever(4)
8.Blade-controlbar
2.Sparkplug
9.Upperhandle
3.Oilll/Dipstick(notshown)
10.Electric-startbutton
(electric-startmodelonly)
4.Fueltankcap
11.Battery(electric-start
modelonly)
5.Reardoor12.Washoutport
6.Recoilstarthandle
13.Airlter
7.Adjustmentknobforthe
self-propeldrive
g007283
Figure11
1.Grassbag
3.Batterycharger
(electric-startmodelonly)
2.Side-dischargechute4.Rearplug(installed)
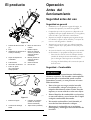
Operation
BeforeOperation
BeforeOperationSafety
GeneralSafety
•Becomefamiliarwiththesafeoperationoftheequipment,
operatorcontrols,andsafetysigns.
•Checkthatallguardsandsafetydevices,suchasdeectors
and/orgrasscatcher,areinplaceandworkingproperly.
•Alwaysinspectthemachinetoensurethattheblades,
bladebolts,andcuttingassemblyarenotwornor
damaged.
•Inspecttheareawhereyouwillusethemachineand
removeallobjectsthatthemachinecouldthrow .
•Adjustingthecuttingheightmaybringyouintocontact
withthemovingblade,causingseriousinjury.
–Shutofftheengine,removetheelectric-startbutton
(electric-startmodelonly),andwaitforallmoving
partstostop.
–Donotputyourngersunderthehousingwhen
adjustingthecuttingheight.
FuelSafety
DANGER
Fuelisextremelyammableandhighlyexplosive.
Areorexplosionfromfuelcanburnyouand
othersandcandamageproperty.
•Topreventastaticchargefromignitingthefuel,
placethecontainerand/ormachinedirectlyon
thegroundbeforelling,notinavehicleoron
anobject.
•Fillthefueltankoutdoors,inanopenarea,when
theengineiscold.Wipeupanyfuelthatspills.
•Donothandlefuelwhensmokingoraroundan
openameorsparks.
•Storefuelinanapprovedcontainerandkeepit
outofthereachofchildren.
WARNING
Fuelisharmfulorfatalifswallowed.Long-term
exposuretovaporscancauseseriousinjuryand
illness.
•Avoidprolongedbreathingofvapors.
•Keepyourhandsandfaceawayfromthenozzle
andthefuel-tankopening.
•Keepfuelawayfromyoureyesandskin.
8

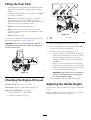
FillingtheFuelTank
•Forbestresults,useonlyclean,fresh,unleadedgasoline
withanoctaneratingof87orhigher((R+M)/2rating
method).
•Oxygenatedfuelwithupto10%ethanolor15%MTBE
byvolumeisacceptable.
•Donotuseethanolblendsofgasoline,suchasE15
orE85,withmorethan10%ethanolbyvolume.
Performanceproblemsand/orenginedamagemayresult,
whichmaynotbecoveredunderwarranty.
•Donotusegasolinecontainingmethanol.
•Donotstorefueleitherinthefueltankorinfuel
containersoverthewinterunlessfuelstabilizerhasbeen
addedtothefuel.
•Donotaddoiltogasoline.
Fillthefueltankwithfreshunleadedregulargasolinefroma
majorname-brandservicestation(Figure12).
Important:Toreducestartingproblems,addfuel
stabilizertothefuelallseason,mixingitwithgasoline
lessthan30daysold.
g186584
Figure12
CheckingtheEngine-OilLevel
ServiceInterval:Beforeeachuseordaily
Oilviscosity:SAE30orSAE10W-30detergentoil
APIserviceclassication:SJorhigher
1.Movethemachinetoalevelsurface.
2.Removethedipstick(Figure13).
g186624
Figure13
1.Full3.Low
2.High
3.Wipeoffthedipstickendwithacleancloth.
4.Insertthedipstickintotheoil-lltube,butdonot
screwitin,thenremovethedipstick.
5.Readtheoillevelonthedipstick(Figure13).
•IftheoilisbelowtheAddmarkonthedipstick,
slowlypourasmallamountofoilintotheoil-ll
tube,wait3minutes,andthenrepeatsteps3
through5untiltheoillevelisattheFullmarkon
thedipstick
•IftheoilisabovetheFullmarkonthedipstick,
draintheexcessoiluntiltheoillevelisattheFull
markonthedipstick.Todraintheexcessoil,refer
toChangingtheEngineOil(page19).
Important:Iftheoillevelinthecrankcaseis
toolowortoohighandyouruntheengine,
youmaydamagetheengine.
6.Installthedipstickintotheoil-lltubesecurely.
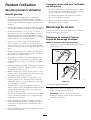
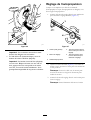
AdjustingtheHandleHeight
Youmayraiseorlowerthehandletoapositioncomfortable
foryou.
Rotatethehandlelock,movethehandleto1of3positions,
andlockthehandleintoposition(Figure14).
9

g188996
Figure14
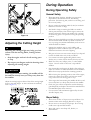
AdjustingtheCuttingHeight
WARNING
Adjustingthecuttingheightmaybringyouinto
contactwiththemovingblade,causingserious
injury.
•Stoptheengineandwaitforallmovingparts
tostop.
•Donotputyourngersunderthehousingwhen
adjustingthecuttingheight.
CAUTION
Iftheenginehasbeenrunning,themuferwillbe
hotandcanseverelyburnyou.Keepawayfromthe
hotmufer.
Adjustthecuttingheightasdesired.Setallthecutting-height
leverstothesameheight.Toraiseandlowerthemachine,
refertoFigure15).
g189041
Figure15
DuringOperation
DuringOperatingSafety
GeneralSafety
•Wearappropriateclothing,includingeyeprotection;
slip-resistant,substantialfootwear;andhearing
protection.Tiebacklonghair,securelooseclothing,and
donotwearjewelry.
•Donotoperatethemachinewhileill,tired,orunderthe
inuenceofalcoholordrugs.
•Thebladeissharp;contactingthebladecanresultin
seriouspersonalinjury.Shutofftheengine,removethe
electric-startbutton(electric-startmodelonly),andwait
forallmovingpartstostopbeforeleavingtheoperating
position.
•Whenyoureleasetheblade-controlbar,theengineshould
shutoffandthebladeshouldstopwithin3seconds.If
not,stopusingyourmachineimmediatelyandcontactan
AuthorizedServiceDealer.
•Operatethemachineonlyingoodvisibilityand
appropriateweatherconditions.Donotoperatethe
machinewhenthereistheriskoflighting.
•Wetgrassorleavescancauseseriousinjuryifyouslipand
contacttheblade.Mowonlyindryconditions.
•Useextremecarewhenapproachingblindcorners,
shrubs,trees,orotherobjectsthatmayblockyourview .
•Watchforholes,ruts,bumps,rocks,orotherhidden
objects.Uneventerraincouldcauseaslip-and-fall
accident.
•Stopthemachineandinspectthebladesafterstrikingan
objectorifthereisanabnormalvibrationinthemachine.
Makeallnecessaryrepairsbeforeresumingoperation.
•Beforeleavingtheoperatingposition,shutofftheengine,
removetheelectric-startbutton(electric-startmodel
only),andwaitforallmovingpartstostop.
•Iftheenginehasbeenrunningthemuferwillbehotand
canseverelyburnyou.Keepawayfromthehotmufer.
•Checkthegrasscatchercomponentsandthedischarge
guardfrequentlyandreplacethemwiththemanufacturer’s
recommendedpartswhennecessary.
•UseaccessoriesandattachmentsapprovedbytheThe
Toro®Companyonly.
SlopeSafety
•Mowacrossthefaceofslopes;neverupanddown.Use
extremecautionwhenchangingdirectiononslopes.
•Donotmowonexcessivelysteepslopes.Poorfooting
couldcauseaslip-and-fallaccident.
•Mowwithcautionneardrop-offs,ditches,or
embankments.
10

StartingtheEngine
Youcanstarttheengineusingeithertheelectric-startbutton
ortherecoil-starthandle.
StartingtheEngineUsingthe
Electric-StartButton
Electric-StartModelOnly
1.Holdtheblade-controlbaragainstthehandle(Figure
16).
g009546
Figure16
1.Blade-controlbar
2.Pushtheelectric-startbuttonuntiltheenginestarts
(Figure17).
Note:Iftheelectric-startbuttonhasbeenremoved,
insertitintheelectricstarter;refertoFigure17.
G020174
1
2
3
g020174
Figure17
1.Electricstarter3.Electric-startbutton
(installed)
2.Electric-startbutton
Note:Ifthemachinedoesnotstartafterseveral
attempts,contactanAuthorizedServiceDealer.
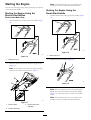
StartingtheEngineUsingthe
Recoil-StartHandle
1.Holdtheblade-controlbaragainstthehandle(Figure
18).
g009546
Figure18
1.Blade-controlbar
2.Pulltherecoil-starthandle(Figure19).
g009548
Figure19
Note:Whenyoupulltherecoil-starthandle,pullit
lightlyuntilyoufeelresistance,thenpullitsharply
(Figure19).Allowtheropetoreturntothehandle
slowly.
Note:Ifthemachinedoesnotstartafterseveral
attempts,contactanAuthorizedServiceDealer.
11

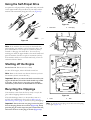
UsingtheSelf-PropelDrive
Tooperatetheself-propeldrive,simplywalkwithyourhands
ontheupperhandleandyourelbowsatyoursides,andthe
machinewillautomaticallykeeppacewithyou(Figure20).
g009549
Figure20
Note:Ifthemachinedoesnotfreelyrollbackwardafter
self-propelling,stopwalking,holdyourhandsinplace,and
allowthemachinetorollacoupleofcentimeters(inches)
forwardtodisengagethewheeldrive.Youcanalsotry
reachingjustundertheupperhandletothemetalhandleand
pushthemachineforwardacoupleofcentimeters(inches).
Ifthemachinestilldoesnotrollbackwardeasily,contactan
AuthorizedServiceDealer.
ShuttingofftheEngine
ServiceInterval:Beforeeachuseordaily
Toshutofftheengine,releasetheblade-controlbar.
Note:Removetheelectric-startbuttonwheneveryouleave
themachine(electric-startmodelonly).
Important:Whenyoureleasetheblade-controlbar,the
engineshouldshutoffandthebladeshouldstopwithin
3seconds.Iftheydonot,stopusingyourmachine
immediatelyandcontactanAuthorizedServiceDealer.
RecyclingtheClippings
Yourmachinecomesfromthefactoryreadytorecyclethe
grassandleafclippingsbackintothelawn.
Iftheside-dischargechuteisonthemachine,removeit
andlockthesidedischargedoor;refertoRemovingthe
Side-DischargeChute(page15)beforerecyclingtheclippings.
Important:Ensurethattherearplugislockedinplace.
Tolocktheplug:Raisethereardoor(Figure21),rmly
pushthepluginuntilitsnapsintoplacebehindthetabs,
androtatetheleverontheplugtotheleft(Figure22).
g007288
Figure21
1.Reardoor2.Rearplug
g010084
Figure22
1.Lever2.Tabs
Note:Tounlocktherearplug,rotatetheleverontheplug
totheright(Figure22).
12

BaggingtheClippings
Usethegrassbagwhenyouwanttocollectgrassandleaf
clippingsfromthelawn.
Iftheside-dischargechuteisonthemachine,removeit
andlocktheside-dischargedoor;refertoRemovingthe
Side-DischargeChute(page15).
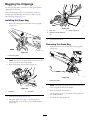
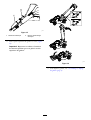
InstallingtheGrassBag
1.Routethestarterropearoundthelower-ropeguide
(Figure23).
g007650
Figure23
1.Lower-ropeguide
Note:Thelower-ropeguidereleasesthestarterrope
whenyoupulltherecoil-starthandle.
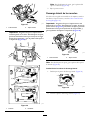
2.Raiseandholdupthereardoor(Figure24).
g007285
Figure24
1.Reardoor2.Rearplug
3.Pullouttherearplug(Figure24).
4.Hangtheupperfrontedgeofthebagfromthe
grass-bagpinsonthenotchesofthehandlebrackets
(Figure25).
g007287
Figure25
1.Reardoor
3.Grass-bagpin(2)
2.Notches—handlebrackets
(2)
5.Lowerthereardoor.
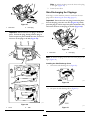
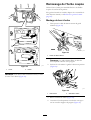
RemovingtheGrassBag
1.Routethestarterropearoundthelower-ropeguide
(Figure26).
g192196
Figure26
1.Lower-ropeguide
Note:Thelower-ropeguidereleasesthestarterrope
whenyoupulltherecoil-starthandle.
2.Raiseandholdupthereardoor.
3.Liftthegrassbagupbythehandleoffthenotchesof
thehandlebrackets.
4.Installtherearplug(Figure23).
13

g007288
Figure27
1.Reardoor2.Rearplug
Important:Ensurethattherearplugislockedin
place.Tolocktheplug,rmlypushtheplugin
untilitsnapsintoplacebehindthetabs,androtate
theleverontheplugtotheleft(Figure28).
g010084
Figure28
1.Lever2.Tabs
Note:Tounlocktheplug,rotatetheleverontheplug
totheright(Figure28).
5.Lowerthereardoor.
Side-DischargingtheClippings
Ifthebagisonthemachine,removeitandinserttherear
plug;refertoRemovingtheGrassBag(page13).
Important:Ensurethattherearplugislockedinplace.
Tolocktheplug,raisethereardoor(Figure29),rmly
pushthepluginuntilitsnapsintoplacebehindthetabs,
androtatetheleverontheplugtotheleft(Figure28).
g007288
Figure29
1.Reardoor2.Rearplug
Note:Tounlocktheplug,rotatetheleverontheplugtothe
right(Figure28).
InstallingtheSide-DischargeChute
1.Unlocktheside-dischargedoor(Figure30).
g002590
Figure30
2.Liftopentheside-dischargedoor(Figure31).
g007430
Figure31
14

3.Installtheside-dischargechuteandclosethedooronto
thechute(Figure32).
g002637
Figure32
RemovingtheSide-DischargeChute
Toremovethesidedischargechute,reversethestepsabove.
Important:Locktheside-dischargedoorafteryouclose
it(Figure33).
g002593
Figure33
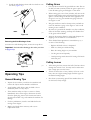
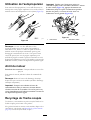
OperatingTips
GeneralMowingTips
•Inspecttheareawhereyouwillusethemachineand
removeallobjectsthatthemachinecouldthrow .
•Avoidstrikingsolidobjectswiththeblade.Never
deliberatelymowoveranyobject.
•Ifthemachinestrikesanobjectorstartstovibrate,
immediatelyshutofftheengine,disconnectthewire
fromthesparkplug,removetheelectric-startbutton
(electric-startmodelonly),andexaminethemachinefor
damage.
•Forbestperformance,installanewbladebeforethe
cuttingseasonbegins.
•ReplacethebladewhennecessarywithaToro
replacementblade.
CuttingGrass
•Cutonlyaboutathirdofthegrassbladeatatime.Donot
cutbelow51mm(2inches)unlessthegrassissparseorit
islatefallwhengrassgrowthbeginstoslowdown.
•Whencuttinggrassover15cm(6inches)tall,mowatthe
highestcuttingheightsettingandwalkslower;thenmow
againatalowersettingforthebestlawnappearance.If
thegrassistoolong,themachinemayplugandcause
theenginetostall.
•Wetgrassandleavestendtoclumpontheyardandcan
causethemachinetoplugortheenginetostall.Avoid
mowinginwetconditions.
•Beawareofapotentialrehazardinverydryconditions,
followalllocalrewarnings,andkeepthemachinefree
ofdrygrassandleafdebris.
•Alternatethemowingdirection.Thishelpsdispersethe
clippingsoverthelawnforevenfertilization.
•Ifthenishedlawnappearanceisunsatisfactory,try1
ormoreofthefollowing:
–Replacethebladeorhaveitsharpened.
–Walkataslowerpacewhilemowing.
–Raisethecuttingheightonyourmachine.
–Cutthegrassmorefrequently.
–Overlapcuttingswathsinsteadofcuttingafullswath
witheachpass.
CuttingLeaves
•Aftercuttingthelawn,ensurethathalfofthelawnshows
throughthecutleafcover.Youmayneedtomakemore
thanasinglepassovertheleaves.
•Iftherearemorethan13cm(5inches)ofleavesonthe
lawn,mowatahighercuttingheightandthenagainat
thedesiredcuttingheight.
•Slowdownyourmowingspeedifthemachinedoesnot
cuttheleavesnelyenough.
15

AfterOperation
AfterOperatingSafety
GeneralSafety
•Cleangrassanddebrisfromthemachinetohelpprevent
res.Cleanupoilorfuelspills.
•Allowtheenginetocoolbeforestoringthemachinein
anyenclosure.
•Neverstorethemachineorfuelcontainerwherethereis
anopename,spark,orpilotlight,suchasonawater
heateroronotherappliances.
HaulingSafety
•Removetheelectric-startbuttonbeforeloadingthe
machineforhauling(electric-startmodelonly).
•Usecarewhenloadingorunloadingthemachine.
•Securethemachinefromrolling.
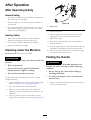
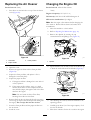
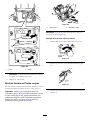
CleaningundertheMachine
ServiceInterval:Beforeeachuseordaily
WARNING
Themachinemaydislodgematerialfromunderthe
machine.
•Weareyeprotection.
•Stayintheoperatingposition(behindthe
handle)whentheengineisrunning.
•Donotallowbystandersinthearea.
Forbestresults,cleanthemachinesoonafteryouhave
completedmowing.
1.Lowerthemachinetothelowestcutting-heightsetting.
RefertoAdjustingtheCuttingHeight(page10).
2.Movethemachineontoaatpavedsurface.
3.Washouttheareaunderthereardoorwherethe
clippingsgofromtheundersideofthemachinetothe
grassbag.
4.Attachagardenhosethatisconnectedtoawater
supplytothewashoutportonthemachine(Figure34).
g189103
Figure34
1.Washoutport
5.Turnthewateron.
6.Starttheengineandrunituntiltherearenomore
clippingsthatcomeoutfromunderthemachine.
7.Shutofftheengine.
8.Shutoffthewateranddisconnectthegardenhose
fromthemachine.
9.Starttheengineandrunitforafewminutestodrythe
undersideofthemachinetopreventitfromrusting.
10.Shutofftheengineandallowittocoolbeforestoring
themachineinanenclosedarea.
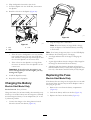
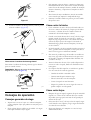
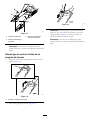
FoldingtheHandle
WARNING
Foldingorunfoldingthehandleimproperlycan
damagethecables,causinganunsafeoperating
condition.
•Donotdamagethecableswhenfoldingor
unfoldingthehandle.
•Ifacableisdamaged,contactanAuthorized
ServiceDealer.
1.Removetheelectric-startbuttonasshowninFigure35
(electric-startmodelonly).
16


Maintenance
Note:Determinetheleftandrightsidesofthemachinefromthenormaloperatingposition.
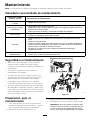
RecommendedMaintenanceSchedule(s)
MaintenanceService
Interval
MaintenanceProcedure
Aftertherst5hours
•Changetheengineoil.
Beforeeachuseordaily
•Checktheengineoillevel.
•Ensurethattheengineshutsoffwithin3secondsafterreleasingtheblade-control
bar.
•Cleangrassclippingsanddirtfromunderthemachine.
Every25hours
•Chargethebatteryfor24hours(electric-startmodelonly).
•Lubricatetherearwheelgears.
Yearly
•Replacetheairlter;replaceitmorefrequentlyindustyoperatingconditions.
•Changetheengineoil.
•Replacethebladeorhaveitsharpened(morefrequentlyiftheedgedullsquickly).
•Cleantheair-coolingsystem;cleanitmorefrequentlyindustyoperatingconditions.
Refertoyourenginemanual.
•Refertoyourenginemanualforanyadditionalyearlymaintenanceprocedures.
Yearlyorbeforestorage
•Emptythefueltankbeforerepairsasdirectedandbeforeyearlystorage.
MaintenanceSafety
•Disconnectthespark-plugwirefromthesparkplugand
removetheelectric-startbutton(electric-startmodelonly)
beforeperforminganymaintenanceprocedure.
•Wearglovesandeyeprotectionwhenservicingthe
machine.
•Thebladeissharp;contactingthebladecanresultin
seriouspersonalinjury.Weargloveswhenservicingthe
blade.
•Nevertamperwithsafetydevices.Checktheirproper
operationregularly.
•Tippingthemachinemaycausethefueltoleak.Fuelis
ammableandexplosive,andcancausepersonalinjury.
Runtheenginedrytoremovethefuelwithahandpump;
neversiphonthefuel.
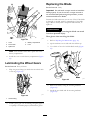
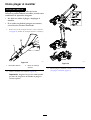
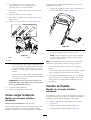
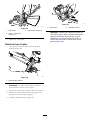
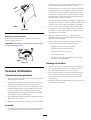
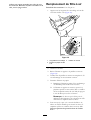
PreparingforMaintenance
1.Shutofftheengine,removetheelectric-startbutton
(electric-startmodelonly),andwaitforallmoving
partstostop.
2.Disconnectthespark-plugwirefromthesparkplug
(Figure37).
g189355
Figure37
3.Afterperformingthemaintenanceprocedure(s),
connectthespark-plugwiretothesparkplug.
Important:Beforetippingthemachinetochange
theoilorreplacetheblade,allowthefueltankto
rundrythroughnormalusage.Ifyoumusttip
themachinepriortorunningoutoffuel,usea
handfuelpumptoremovethefuel.Alwaystipthe
machineontoitsside,withthedipstickdown.
18
La page est en cours de chargement...
La page est en cours de chargement...
La page est en cours de chargement...
La page est en cours de chargement...
La page est en cours de chargement...
La page est en cours de chargement...
La page est en cours de chargement...
La page est en cours de chargement...
La page est en cours de chargement...
La page est en cours de chargement...
La page est en cours de chargement...
La page est en cours de chargement...
La page est en cours de chargement...
La page est en cours de chargement...
La page est en cours de chargement...
La page est en cours de chargement...
La page est en cours de chargement...
La page est en cours de chargement...
La page est en cours de chargement...
La page est en cours de chargement...
La page est en cours de chargement...
La page est en cours de chargement...
La page est en cours de chargement...
La page est en cours de chargement...
La page est en cours de chargement...
La page est en cours de chargement...
La page est en cours de chargement...
La page est en cours de chargement...
La page est en cours de chargement...
La page est en cours de chargement...
La page est en cours de chargement...
La page est en cours de chargement...
La page est en cours de chargement...
La page est en cours de chargement...
La page est en cours de chargement...
La page est en cours de chargement...
La page est en cours de chargement...
La page est en cours de chargement...
La page est en cours de chargement...
La page est en cours de chargement...
La page est en cours de chargement...
La page est en cours de chargement...
La page est en cours de chargement...
La page est en cours de chargement...
La page est en cours de chargement...
La page est en cours de chargement...
La page est en cours de chargement...
La page est en cours de chargement...
La page est en cours de chargement...
La page est en cours de chargement...
La page est en cours de chargement...
La page est en cours de chargement...
La page est en cours de chargement...
La page est en cours de chargement...
La page est en cours de chargement...
La page est en cours de chargement...
La page est en cours de chargement...
La page est en cours de chargement...
La page est en cours de chargement...
La page est en cours de chargement...
La page est en cours de chargement...
La page est en cours de chargement...
La page est en cours de chargement...
La page est en cours de chargement...
-
 1
1
-
 2
2
-
 3
3
-
 4
4
-
 5
5
-
 6
6
-
 7
7
-
 8
8
-
 9
9
-
 10
10
-
 11
11
-
 12
12
-
 13
13
-
 14
14
-
 15
15
-
 16
16
-
 17
17
-
 18
18
-
 19
19
-
 20
20
-
 21
21
-
 22
22
-
 23
23
-
 24
24
-
 25
25
-
 26
26
-
 27
27
-
 28
28
-
 29
29
-
 30
30
-
 31
31
-
 32
32
-
 33
33
-
 34
34
-
 35
35
-
 36
36
-
 37
37
-
 38
38
-
 39
39
-
 40
40
-
 41
41
-
 42
42
-
 43
43
-
 44
44
-
 45
45
-
 46
46
-
 47
47
-
 48
48
-
 49
49
-
 50
50
-
 51
51
-
 52
52
-
 53
53
-
 54
54
-
 55
55
-
 56
56
-
 57
57
-
 58
58
-
 59
59
-
 60
60
-
 61
61
-
 62
62
-
 63
63
-
 64
64
-
 65
65
-
 66
66
-
 67
67
-
 68
68
-
 69
69
-
 70
70
-
 71
71
-
 72
72
-
 73
73
-
 74
74
-
 75
75
-
 76
76
-
 77
77
-
 78
78
-
 79
79
-
 80
80
-
 81
81
-
 82
82
-
 83
83
-
 84
84


Toro Super Recycler Lawn Mower Manuel utilisateur
- Catégorie
- Tondeuses à gazon
- Taper
- Manuel utilisateur
dans d''autres langues
Documents connexes
-
Toro Super Recycler Lawn Mower Manuel utilisateur
-
Toro 21in Recycler/Rear Bagging Lawn Mower Manuel utilisateur
-
-
-
-
-
-
Toro 48cm Super Bagger Lawn Mower Manuel utilisateur
-
-
Toro 55cm Recycler Lawn Mower Manuel utilisateur