GE EDWF800P00BB Le manuel du propriétaire
- Catégorie
- Lave-vaisselle
- Taper
- Le manuel du propriétaire
Ce manuel convient également à

0
ge.com
Safety Instructions ........... 2,3
Operating Instructions
Core and Cleaning ................. 15
Control Panel and Settings ........ 4-6
Loading Place Settings ............. 14
Loading the Racks ............. 12-14
Recommended Dishwasher
Products ............................. 7
Using the Dishwasher ............ 8-11
Troubleshooting Tips ...... 16-18
Consumer Support
ConsumerSupport ................. 20
Worrontg .......................... 19
Stainless Steel
Tub Dishwashers
Write the model and serial
numbers here:
Model #
Serial #
Youcan find them on the tub wall
just insidethe door.
165D4700P381 49-55057 10-08 JR

IMPORTANT SAFETY INFORMATION.
READ ALL INSTRUCTIONS BEFORE USING --
SAVE THESEINSTRUCTIONS
WARNING!
For your safety, the information in this manual must be followed to minimize the risk of fire
or explosion, electric shock, and to prevent property damage, personal injury, or death.
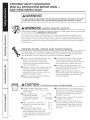
WARNING! WATER HEATER SAFETY
Under certain conditions, hydrogen gas may be produced in a water heater that has not been used
for two weeks or more. HYDROGEN GAS IS EXPLOSIVE.
Ifthe hot water has not been usedfor two weeks or more, prevent the possibility of damage or injury
by turning on all hot water faucets and allow them to run for several minutes. Dothis before usingany
electricalappliance which isconnected to the hot water system.This simple procedure will allow any built-
up hydrogen gas to escape.Sincethe gasisflammable, do not smokeor usean open flame or appliance
during this process.
%
PROPER INSTALLATION AND MAINTENANCE
This dishwasher must be properly installed and located in accordance with the Installation
Instructions before it is used. If you did not receive an Installation Instructions sheet with
your dishwasher, you can receive one by visiting our website at ge.com.
mConnect to a grounded metal, permanent wiring
system; or run an equipment-grounding
conductor with the circuit conductors and
connect to the equipment-grounding terminal
or lead of the appliance.
m Improper connection of the equipment-grounding
conductor can result in a risk of electricshock.
Checkwith a qualified electrician or service
representative if you are in doubt whether the
appliance isproperly grounded.
m Disposeof discarded appliances and shipping
or packing material properly.
Ill Donot attempt to repair or replace any part
of your dishwasher unlessit isspecifically
recommended inthis manual. Allother servicing
should be referredto a qualified technician.
raTa minimize the possibility of electric shock,
disconnect this appliance from the power supply
beforeattempting any maintenance.
NOTE:Turningthe dishwasher off doesnot
disconnect theappliance from thepower supply.
Werecommendhaving a qualifiedtechnician
servicegout appliance.
CAUTION: Topreventminorinjuryorpropertydamage
mContents washed in Anti-bacterial mode, if
available,may be hot to the touch. Usecare
before handling.
mUsing a detergent that is
not specifically designed
for dishwashers will cause
the dishwasher to fillwith
suds.
mIf your dishwasher is connected to a
wall switch, ensure that the switch is
on prior to use.
mOn dishwasherswith electronic
controls, if you choose to turn the wall
switch off between wash cycles,allow
5-!0 secondsafter turning the switch on before
touching START/RESETto allow the control to
reboot.
mNon-Dishware Items:Donot wash itemssuch
aselectronic air cleanerfilters, furnace filters and
paint brushes in your dishwasher.Damage to
dishwasher and discoloration or staining of
dishwasher may result.
mClosesupervisionis necessary ifthis appliance
isused by or near children.
mLoad light, plastic items so they will not
become dislodged and drop to the bottom
of the dishwasher-they might come into
contact with the heating element and be
damaged.

ge.com
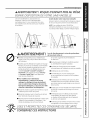
AI,WARNING! RISK OF CHILD ENTRAPMENT
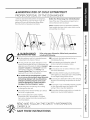
PROPER DISPOSAL OF THE DISHWASHER
Junked or abandoned dishwashers are dangerous...
even if they will sit for "just a few days." If you are
getting rid of your old dishwasher,pleasefollow
the instructions to help prevent accidents.
Before You Throw Away Your Old Dishwasher
Take off the door of the washing compartment or
remove the door latch (as shown).
NOTE:CDWgO00Series and PDW9200-PDW9900
Series models also have a latch screw which must be
removed (Step !) as shown.
Screw
(011some
models)
0
.4,WARNING!
When using your dishwasher, follow basic precautions,
including the following:
Usethis appliance only for its intended purpose
as described in this Owner's Manual.
m Useonly powder,tabs, liquid detergents or rinse
agents recommended for use in a dishwasher and
keepthem out of the reach of children.Cascade®,
Cascade ®Complete and Electrasol ®Automatic
Dishwashing Detergents,and Jet-Dry ®and
Cascade Crystal Clear_ rinse agents have been
approved for use in all GE dishwashers.
m On models with the SmartDispense TM sgstem,
do not mix ang chlorine bJeach-based automatic
dishwashing detergent with ang dishwashing
detergent containing enzgmes as this could
cause the detergents to congeal and lead to
blockage of the SmartDispense TM sgstem.
m Locate sharp items so that they are not likely
to damage the door seal.
m Load sharp knives with the handles up to reduce
the risk of cut-type injuries.
m Donot wash plastic items unlessmarked
dishwasher safe or the equivalent. Forplastic
items not so marked, checkthe manufacturer's
recommendations.
mDo not touch the heating element during or
immediately after use.
mDo not operate your dishwasher unlessall
enclosure panels are properly in place.
mDo not tamper with controls.
mDo not abuse,sit on or stand on the door or dish
rack of the dishwasher.
mDo not allow children to play around dishwasher
when opening or closing door due to the possibility
of small fingers being pinched in door.
mDo not discard a dishwasherwithout first removing
the door of the washing compartment or the door
latch.
mDo not store or usecombustible materials,gasoline
or other flammable vapors and liquidsin the
vicinity of this or any other appliance.
mDo not allow children to play with, on or insidethis
appliance or any discarded appliance.
READ AND FOLLOW THIS SAFETY INFORMATION
CAREFULLY.
SAVE THESE INSTRUCTIONS
3

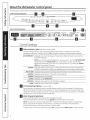
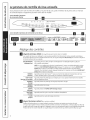
About the dishwasher control panel.
Youcanlocateyourmodelnumberonthetubwalljustinsidethedoor.Throughoutthismanual,featuresandappearancemayvaryfromyourmodel.
Front-Control Dishwashers a _
s_._...... _...... _...... _....... _ ...... _ Smart Disp ....* .................................................SELECTIONS QuietPower5 ENHANCEMENTS.............................................
.....
Top-Control Dishwashers
ENHANCEMENTS _ STATUS
_NT_OLS 0 LOWgETERGENT ODRYIHG
:, _ss ® SENSING 0 SANITIZEH
._TEOO_V
_ _R3SEC e WASHING OCLEAH
ControlSettings
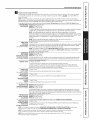
_ Status Lights (Indicatorsvartj by models)
Indicator
TheStatusdisplagtells you what ishappeningwhile the dishwasherisinoperation and may flash,
indicating a malfunction.Thelightswill comeONindicating the sequenceofthe dishwasheroperation.
m
le
LOWDETERGENTDisplagedwhen the SmartDispenseTM needsto be refilledwith liquid or gelautomatic
dishwasherdetergent.
NOTE:Ifgou are not usingSmartDispenseTM and gou want to turn the LOWDETERGENT
LEDlightoff,presstheADDEDHEATpad 5 timeswithin 3 seconds.Youwill hear3
beeps;then the lightwillgo off.Youcan turn the light backon bg pressingtheADDED
HEATpad5 timeswithin 3 seconds.
SENSINGDisplagedwhilethe CleanSensorTM ismeasuring the amount of soiland temperature
of water.Thedishwasherwilladjustthe selectedcgcle to achieveoptimal performance.
ADD-A-DISH Displagedduring prewash, indicating that dishes added now will still be cleaned.
WASHING Displagedduring prewash,main wash and rinseperiods.
RINSING Displagedduring rinse periods.
DRYING Displagedduring HEATEDDRY.
SANITIZED Displagedwhen cgcle has met sanitizationconditions.
CLEAN Displagedwhen a wash cgcleiscomplete.
Time Remaining Displag tonsome models)
Duringoperation,the displagshowsthe minutes remaininguntil thecgcle iscomplete.Thedisplagmag
adjust the remainingtime while the Sensinglightison.Thetime displagedat the start of eachcgcle mag
changefrom the factorg setting asthe unitcustomizes itselfto home use.Duringa delag start, the displag
willshow hoursof time remaining untilthe cgcle starts.
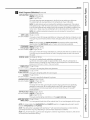
Wash Programs (Selections)
Front-Contro!Dishwashers:Pressthepad for thedesiredwash c_Icle.
Top-Contro!Dishwashers:Usethearrow pads _ !_ to scrol!throughthe wash cycles.
NOTE:Allcgcle times and water usageinformation contained in the following sectionare approximate
values.Actual resultswilldepend on severalfactors,includingbut not limited to inlettemperature,
householdwater pressureand amount ofsoilin the wash water.
Thelightaboveor nextto the selectedpad will beONto indicatewhich WASHCYCLEhasbeen selected.

ge.com
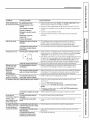
Wash Programs (Selections) (continued)
ANTI-BACTERIAHeavg 8.8gal.,105min.
Medium 7.5gal.,95 min.
Light 6.3gal.,85 min.
Thiscgcle raisesthewater temperature inthe final rinseto sanitizegour dishware.
Thecycle lengthwill varg dependingon the temperature ofgour inletwater.
NOTE:TheAnti-Bacteriacycleismonitored for sanitization requirements.Ifthe cycleis
interrupted during or after the main wash portion or ifthe incoming water temperature
issolow that adequatewater heatingcannot beachieved,the sanitizingconditionsmag
not be met. Inthese cases,the sanitizedlightwill not illuminate atthe end ofthe cgcle.
NOTE:NSF-certifiedresidentialdishwashersare not intendedfor licensedfood
establishments.
DEEP CLEAN
(on some models)
COOKWARE/
POTS & PANS
(on some models)
NORMAL WASH
SPEED CYCLE
(on some models)
HAND/GENTLE
(CHINA CRYSTAL)
GLASSES
(on some models)
PLASTICSCYCLE
(on some models)
TOP RACKONLY
(on some models)
RINSEAND HOLD
(RINSEONLY)
9.6gal.,111 min.
Thiscycle ismeant for heavil9soileddishesor cookware with dried-on or baked-on soils.
Thiscycle may not remove burned-on foods. Everydaydishesaresafe to be used inthis
cgcle.
NOTE:Onsome models,theSTEAHPRE-WASHenhancementwill be automaticallg
selectedwhen the DEEPCLEANcgcle ischosen,and cannot be de-selected.
Heavg 10.0gal.,80 min.
Medium 8.8gal.,70 min.
Light 7.5gal.,60 min.
Thiscgcle ismeant for heavilgsoileddishesor cookware with dried-on or baked-on soils.
Thiscgcle mag not remove burned-on foods. Evergdagdishesare safeto be usedin
this cgcle.
5.0-8.8gal.,47-90 min.
Thiscgcleisformedium/heavilgsoileddishesandglassware.
Cgcle time and water usage are approximate values. Results will depend on
several factors, including but not limited to inlet temperature, household water
pressure and amount of soil in the wash water.
7.5gal.,]5 min.
Thiscgcle isfor evergda9 dishesand glassware.
7.5gal.,]5 min.
Thiscgcle isfor lightlg soiledchina and crgstal.
7.5gal.,]0 min.
Thiscgcle isspecificallg designedfor glasses.
Heavg 8.8gal.,120 min.
Medium 7.5gal.,105 min.
Light 5.0gal.,90 min.
Thelonger time for this cgcle includes a built-in drging portion that is speciflcallg
designedto reducethe risk of melting plastic items and improve plasticdrging.
Forremoving red tomato-based stains,GErecommends the use of Cascade®
PlasticBoosterTM.
Heavg 8.2gal.,70 min.
Medium 7.0gal.,60 min.
Light 4.6gal.,50 min.
Thiscgcle washes lightlg soileddishes on the upper rack onlg.
2.5gal.,10 min.
Forrinsing partial loadsthat will be washed later.Donot usedetergent with this cgcle.
NOTE:Onsome models,the HAND/GENTLEand PLASTICSselectoris a toggle pad;pushpad to switch
between HAND/GENTLEand PLASTICS.
NOTE:Thisdishwasherisequipped with CleanSensoP_with automatic temperature contro!;therefore,
cyclelength and time may vary depending on sol! and water temperature conditions.
NOTE:Onl_ltheAnti-Bacteria ccjc/ehasbeendesignedto meet therequirementsof Section6,NSF!84 for
soi!removal and sanitization efficacy.

About the dishwasher control panel.
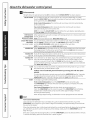
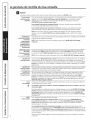
_ Enhancements
Thelight above the selected pad will be ON to indicate which ENHANCEHENThasbeen selected.
DELAY HOURS
Youcan delay the start of a wash cycle for up to 24 hours (dependingon model).
Pressthe DELAYSTARTpad to choose the number of hours you want to delay the start
of the cycle; then pressSTART/RESET.
Front-Control Dishwashers: The machine will count down and start automatically
at the correct time.
TEMP BOOST/
ADDED HEAT/
EXTRA HOT WASH
STEAN PRE-WASH/
PRE-WASH
(on some models)
HEATED DRY
HEATEDDRY
LightOff
HEATEDDRY
LightOn
LOCK
RESET
Top-Control Dishwashers: Afterclosingthe door,the machine will count down
and automatically start at the correct time.
NOTE:Tocancel the DELAYSTARTselection beforethe cycle begins,repeatedly press
the DELAYSTARTpad until the display isblank.
When selected,the cycle will run longer with heating element on to improve both wash
and dry performance.
NOTE:Cannot be selectedwith RINSEANDHOLD cycle.
Forusewith heavily soiledand/or dried-on, baked-on soils.Thisoption MUSTbe
selectedPRIORto starting the cycle. ThePRE-WASHoption adds 15 minutes
and theSTEAMPRE-WASHoption adds 26 minutes to the cycle time.
NOTE:Cannot be selectedwith RINSEANDHOLDcycle.
When HEATEDDRYisoff,disheswill air dry. Top-control models havea fan that assists
the drying process.Thefan will run up to/4 hours after the CLEANlight illuminates. If
desired,pressing any keypad will turn off the fan.
Shutsoffthe drying heat option. Disheswill air dry naturally (front-control dishwashers)
or fan dry (top-control dishwashers)to save energy.
Turnsthe heater on for faster drying. Thiswill extend the total cycle time between
8 and ]8 minutes depending on the cycle selected.Ontop-control models,a fan will
continue to run up to 2 hoursafter the CLEANlight illuminates to assist the drying
process.If desired,pressing any keypad will turn offthe fan. NOTE:Cannot be selected
with RINSEAND HOLD cycle.
Youcan lockthe controls to prevent any selections from being made. Or you can lock
the controls after you have started a cycle.
Children cannot accidentally start dishwasher bg touching pads with this option
selected.
Tounlock the dishwasher controls, pressand hold the HEATEDDRYpad for ] seconds.
Thelight above the lock pad will turn off.Tolock the dishwasher,pressand hold the
HEATEDDRYpad for ] seconds.The light abovethe LOCKpad will turn on.
Tochange a cycle after washing starts...
Front-Control Dishwashers: Touchthe START/RESETpad to cancelthe cycle.
TheSTART/RESETlightwillflash while the water ispumped out if needed.Thistakes
approximately 2 minutes.
Top-Control Dishwashers: Open the door slowlyto prevent splash-out.
Touchthe START/RESETpad to cancel the cycle. Ifthe START/RESETlight isflashing,
close the door until the water pumps out (thistakes approximately 2 minutes)
and the light stops flashing.
When the lightstops flashing,the dishwasher can be reprogrammed and restarted.
Start
Front-Control Dishwashers
Closeand latch the dishwasherdoor and selectthe cycle and desiredenhancements.Touch the
START/RESETpad to beginthe cycle. Water fill begins immediately, and approximately 60 secondslater
the wash action begins.
When the dishwasher door isfully closed and latched,the control panel lights will display the last settings
you selected.If you don't want to change any of the settings,simply touch the START/RESETpad to
begin the cycle.
If the door isclosed,the indicator lightswill turn off ifthe START/RESETpad isnot selectedwithin 5 minutes.
Toactivate the display,open and closethe door or pressany pad.

ge.com
Start (continued)
Top-Control Dishwashers
After selecting the cgcle and desiredenhancements, touch the START/RESETpad to readg the
dishwasher to begin the cgcle.Closethe door to start the cgcle or begin the DELAYSTARTcountdown.
When the cgcle starts,the water fill begins and approximatelg 60 secondslater the wash action begins.
Thedishwasher will olwags displag gour last selection and enhancements. If gou don'twant to change
the settings,simplg touch the START/RESETpad to readg the dishwasher and closethe door to begin
the cgcle.
Also,ifa power failure occurs NORMALand HEATEDDRYwill automaticallg be programmed. Make ang
new selections and touch the START/RESETpad to begin the new cgcle.
When the door isopened,the indicator lights will turn off ifthe START/RESETpad isnot selectedwithin
5 minutes. Toactivate the displag, open and close the door or touch ang pad.
Clean
Front-Control Dishwasher
TheCLEANlight will illuminate and a double beep will sound when a wash cgcle iscomplete. Onsome
models,the CLEANlightwill turn off when the door isopened.On other models,the CLEANlight will
remain on until the door isopened and then relatched or untilang kegpad ispressedwhile the door
islatched shut.
Top-Control Dishwasher
TheCLEANlight will illuminate and a double beep will sound when a wash cgcle iscomplete. TheCLEAN
light will remain on until the door isopened and then relatched or until ang kegis pressed.
ALL MODELS:Toturn off the audible end-of-cgcle signal (orre-activate it ifit was previouslg turned off),
pressthe HEATEDDRYpad 5 times within 3 seconds.A triple beep will sound to indicate the end-of-cgcle
beep option has been toggled.
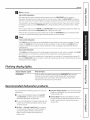
Flashing display lights.
Status Indicator Lights What It Means
START/RESET
Cgcle has been interrupted bg pressingthe START/RESETpad,or there
has been a power failure. Light will stop flashing offer the dishwasher
automaticallg drainsout the water.Thedishwasher will restart ifthe
interruption was the result of a power failure.
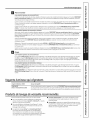
Recommended dishwasher products.
GErecommends the following products for use in its
dishwashers:
m
m
Forgour manual detergent dispenser,Cascade®
and Electrasol® powder,liquid or gel automatic
dishwasher detergents are approved.
Forgour SmartDispenseTM Detergent Dispenser,use
onlg the recommended detergents listed on page
10of this manual.
m
Jet Dry ®or CascadeCrystal Clear®rinseagents
to remove spots and prevent new film buildup on
gour dishes,glosses,flatware, cookware and
plastic. Using rinseagent also improves drg
performance.
m Cascade®Plastic BoosterTM to remove red staining
inside gour dishwasher that can come from some
tomato-based foods.
m Cerama Bryte ®StainlessSteelApplianceCleaner
to clean the exterior stainlesssteel panel of GEand
ProfileTM dishwashers (forstainlesssteel exterior
models onlg).

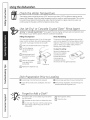
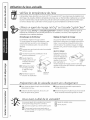
Using the dishwasher.
Check the Water Tern ture
The entering water should be at least 120°F and not more than 150°F for effective cleaning and to
prevent dish damage. Check the water temperature with a candy or meat thermometer. Turn on the
hot water faucet nearest the dishwasher, place the thermometer in a glass and let the water run
continuously into the glass until the temperature stops rising.
Use Jet-Dr ®or Cascade Cr stal Clear ®Rinse A ent
Jet-Org ®or Cascade Crgstal Clear ®rinse agent improves dr_ling, removes spots and prevents new
film buildup on _lour dishes, glasses, flatware, cookware and plastic.
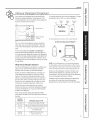
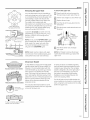
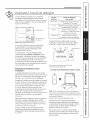
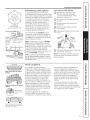
Filling the Dispenser Rinse Aid Setting
Therinseagent dispenser holds3.5oz.of rinseagent.
Under normal conditions,this will last approximately
one month.Try to keep it full,but do not overfill.
m
D
Make surethe dishwasher door isfully open.
Turnthe dispenser
cap to the left and
lift itout.
r_Add rinseagent until
the indicator window
looks full.
Cleanup any spilled
rinseagent with a Indicator
damp cloth, window Dispensercap
Theamount of rinseagent releasedinto the final
wash can be adjusted.Thefactory setting isat the
midpoint. Ifthere are ringsof calcium (hardwater)
spots on dishes,try a higher setting. If there is
foaming, use a lower setting.
Toadjust the setting:
Removethe dispenser cap _-_
then turn the adjuster
counterclockwise to
increase the amount \_x_ _'_-_ Rinseagent
of rinseagent or _ adjuster
clockwiseto reduce
the amount of rinseagent dispensed.
[] Replacethe dispenser cap.
Dish Pre oration Prior to Loadin
II Noprerinsing of normal food soilisrequired. II Removelarge quantities of any remaining food.
II Scrapeoff hard soils,bones,toothpicks, skinsand II Removeleafy vegetables, meat trimmings and
seeds, excessiveamounts of grease or oil.
Forget to Add a Dish?
A forgotten dish can be added any time before
the main wash.
E] Squeezethe door latch to release the door.
j-_J Do not open the door until the water spray
action stops. Steam may rise out of the
dishwasher.
r_l Add forgotten dishes.
E] Close the door.
8

ge.com
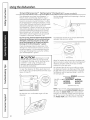
_'_f'_ Somemodelscomeequippedwithan automaticliquid
"" _ dishwasherdetergentdispenser(SmartDispenseTM) and
a manualdispenser.Youcanuseeitherofthesedispensers
butdon'tusebothatthesametime.
ent Dispenser
ForheavilUsoiledloads,usea bitmoredetergent.Forwater
temperaturesabove140%,useabitlessdetergent.
SmartDispense TM
Manual Detergent
Dispenser
Medium Medium Extremely
Soft Soft Hard Hard
Forheavilysoiledloads,usethePotsandPansorHeavyWashcycle.
Thecoverofthemanualdispenserwillopenduringthe
washcgcle.IfOouareusingSmartDispenseTM, leavethe
coverofthe manualdispenseropenbeforestartingthe
cocle.
Forthemanualdispenser,Cascade®and Electrasol®
AutomaticDishwashingDetergentshavebeenapproved.
Youmagusepowder,liquid,gelortabletsinthisdispenser.It
isimportanttokeeppowdereddetergentsandtabletsfresh
anddrgsotheUdon'tloseeffectiveness.Therefore,do not
putdetergentintothemanualdispenseruntilgouarereadg
towashdishes.
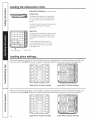
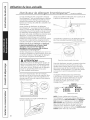
FflfingManual Detergent Dispenser
Theamountofdetergentto usedependsonwhethergour
waterishardor soft.Withhardwater,Oouneedextra
detergent.Withsoftwater,Oouneedlessdetergent.
Protectoourdishesanddishwasherbgcontactinggour
waterdepartmentand askinghowhardoourwateris.
Twelveor moregrainsisextremelUhardwater.Awater
softenerisrecommended.Withoutit,limecanbuildup in
thewatervalve,whichcouldstickwhileopenandcause
flooding.Toomuchdetergentwithsoftwatercancause
a permanentcloudinessofglassware,calledetching.
Usetheinformationinthetablebelowasa guideto
determinetheamountofautomaticdishwasherdetergent
toplaceinthedispenser.YoumaUusepowder,liquid,gel
ortabletsinthisdispenser.
Whenusingautomaticdishwashingdetergenttablets,
simplgplaceonetabletinthe mainwashsectionandclose
thecover.
Number
of Grains Detergent Cups to Fill
Less than 4 Fillcup to soft line (1/] full)
4 to 8 Fillcup to medium soft line (2/] full)
8 to 12 Fillcup to medium hard line
(completelg full)
Greater Fillboth main wash cup
than 12 and pre wash cup
DO NOTUSEHANDDISH DETERGENT
m
NOTE:Usinga detergent that isnot specificallgdesigned
fordishwasherswillcausethedishwasherto fillwithsuds.
Duringoperation,thesesudswillspilloutofthedishwasher
vents,coveringthekitchenfloorandmakingthefloorwet.
Becausesomangdetergentcontainerslookalike,store
thedishwasherdetergentina separatespacefromall
othercleaners.Showangonewhomagusethedishwasher
thecorrectdetergentandwhereitisstored.
Whiletherewillbenolastingdamagetothedishwasher,
gourdisheswillnotgetcleanusinga dishwashing
detergentthat isnotformulatedto workwith dishwashers.

Using the dishwasher.
10
SmartDis ent Dispenser (some models)
This dishwasher may have SmartDispenseTM,a
feature which automatically dispenses liquid
automatic dishwasher detergent into each cycle
based on soil level and water hardness. To utilize
the SmartDispenseTMDetergent Dispenser, it must
first be filled. Although any liquid or gel automatic
dishwashing detergent can be used in the
SmartDispenseTMsystem, all liquid or gel automatic
dishwashing detergents are not the same. Most
automatic dishwashing detergents are chlorine
bleach-based (such as Cascade®or Electrasol®)
while others contain enzymes (such as Cascade
Complete®or Electrasol®AdvancedTMGel).
Do not mix ann chlorine bleach-based automatic
dishwashing detergent with ang dishwashing
detergent containing enzymes as this could
cause the detergents to congeal and lead to
blockage of the SmartDispense TMsystem.
Check the detergent label to determine if the
detergent is chlorine bleach-based or one that
contains enzymes. It is recommended that the
same type of detergent be used when refilling
your SmartDispenseT' system.
CAUTION! Absolutely do not add
powder detergent, tablets or any liquid soap
or detergent normally used for washing hands
or dishes in a sink. Only use liquid or gel
detergent specifically designed for use in
an automatic dishwasher.
To open the dispenser for filling, push down and
turn the blue cap counterclockwise until the cap is
loose. Lift cap off.
Aim the detergent bottle at the opening in the door
and begin to fill.
i
i
i
The dispenser will hold 45 oz of liquid dishwasher
detergent (standard size bottle).
Turnclockwise.
\
When full, replace the cap and turn clockwise until
tight to ensure no water enters the SmartDispenseTM
dispenser.If residue is left on the door, it will be
washed off in the next cycle.
An indicator light will turn on to notify you when
the dispenser needs to be filled again. After filling,
the light will not turn off until the door isclosed. A
full dispenser will last approximately 1 month for
the average user.
STATUS
SmartDispense
LightWill_ LOWDETERGENT0 DRYING
TurnOn O SENSING 0 SANITIZED
When
• WASHING • CLEAN
Time to
Refill (appearancemayvary)
Setthe door at a comfortable angle to fill the
dispenser.
NOTE:If you are not using SmartDispense TMand
you want to turn the LOW DETERGENTLEDlight
off, press the ADDED HEATpad 5 times within 3
seconds. You will hear 3 beeps;then the light will
go off. You can turn the light back on by pressing
the ADDED HEATpad 5 times within 3 seconds.

ge.com
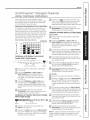
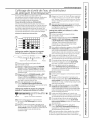
SmartDispense Detergent Dispenser
Water Hardness Calibration
Prior to the first use, the dishwasher needs
to be calibrated for water hardness. Pleasefollow
the directions below to calibrate the dishwasher
to the hardness of sour tap water.
Determine the Hardness of Your Tap Water
In the bag that contained these instructions, SOU
should find a water hardness test strip package.
Readthe instructions on the package, remove the
test strip and follow the instructions to determine
the hardness level of sour tap water. You will use
this information to calibrate sour dishwasher to
dispense the optimal amount of detergent.
Water hardness test strip indication, value to Enter
into Dishwasher
SOFT 0 RED _ 1
1 RED _ 2
2 RED _ 3
3 RED _ 4
HARD 4 RED _ 5
r_ Pressthe "Up"('Z_arrow pad to raisethe value
or the "Down"l_arrow pad to lower the value.
Setthe water hardnessvalue to the number
determined with the test strip and table at the left.
r_ once the water hardness isset, pressthe
START/RESETpad to savethe setting and return
the dishwasher to normal operation.
Calibration of Models Without a 3-Digit Displag
Front controls
r_ Closeand latch the door (lightson,dishwasher
not running).
rq
Calibration of 12-Button Front-Control E]
Models With 3-Digit Display
Pressat the same time. Display
r_ Closeand latch the door (lightson,dishwasher r_
not running).
[_ Pressthe COOKWAREor DEEPCLEANand
DELAYHOURSpads at the same time for Top
5 seconds.Thedisplag will show a number r_
from 1 to 5.Thisisthe water hardness value
currentlg set. r_
r_ Pressthe COOKWAREor DEEPCLEANpad to
raisethe value or the NORMALpad to lower
the value. Setthe water hardnessvalue to the
number determined with the test strip and table
above, r_
r_ once the water hardness isset, pressthe
START/RESETpadto savethe setting and return
the dishwasherto normal operation.
Calibration of 7-Button Top-Control Models
With 3-Digit Displag
!i!iiiii!!iiii!ii!!!!! ®
Display Pressat the same time.
Pressthe COOKWAREor DEEPCLEANand
DELAYHOURSpadstogether for 3 seconds.All
lights will light up and you will hear ! to 5 beeps.
Thenumber of beeps indicatesthe current
hardness value.
r_ open the door and touch a pad (otherthan
START)to turn lights on.
r_ Pressthe "Up"/fA'harrow padand DELAYHOURS
pad at the same time for 3 seconds.The displag
will show a number from 1 to 5.Thisisthe water
hardnessvalue currentlg set.
Tochange the setting, press the DELAYHOURS
pad the number of times that correspondsto the
water hardnessvalue determined at the left. The
control will beep each time SOUpressthe pad.
Oncefinished pressingthe pad,SOUwill hear a
confirmation with beepsfor the number of times
SOUpressedthe pad.
Ifthe number of beepsisnot what SOUdesire,
start pressingthe DELAYHOURSpad again to
reenter a new water hardness level.
Oncethe water hardness isset, pressthe
START/RESETpad to savethe setting and return
the dishwasher to normal operation.
controls
Open the door and touch a pad to turn lights on.
Pressthe "Up"(R'_arrow pad and DELAYHOURS
pad at the same time for 3 seconds.All lights
will light up and gou will hear 1 to 5 beeps.The
number of beeps indicatesthe current hardness
value.
r4]
Tochange the setting, press the DELAYHOURS
pad the number of times that correspondsto the
water hardnessvalue determined at the left. The
control will beep each time gou pressthe pad.
Oncefinished pressingthe pad,SOUwill hear a
confirmation with beepsfor the number of times
SOUpressedthe pad.
r_lf the number of beepsisnot what SOUdesire,
start pressingthe DELAYHOURSpad again to
reenter a new water hardness level.
r_ once the water hardness isset, pressthe
START/RESETpad to savethe setting and return
the dishwasher to normal operation.
NOTE:Youshould recalibrate the dishwasher control
if water conditions change;for example, ifa water
softener sgstem isadded or removed from sour
home. 22

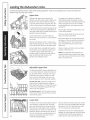
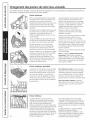
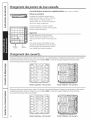
Loading the dishwasher racks.
For best dishwashing results, follow these loading guidelines. Features and appearance of racks and silverware
baskets may vary from your model.
Upper Rack
Although the upper rack isprimarily for
glasses,cups and saucers, pots and pans can
be placed inthis rack for effective cleaning.
Cupsand glassesfit best along the sides.This
isalso a secure place for dishwasher plastics.
Theutility shelf (somemodels)may be placed
in the up or down position to add flexibility.A
wine glass holder (somemodels)secureswine
glassesfor best washability.
Somemodels havecontoured metal cup
shelvesthat can secure up to 12wine glasses
(asshown).
Becausewine glassescome in various sizes,
after loading,slowly push in the rack to make
surethey will clearthe top of the dishwasher.
Somemodels havean Angled RackSystem,
which allows you to angle your dishes,such
as coffee mugs,for better cleaning and
quicker drying. To position the tines,pull the
leverforward then drop the tines into
position,then releasethe lever.
Theupper rack isgood for all kinds of
odd-shaped utensils.Saucepans,mixing
bowls and other items should be placed face
down. Fold-down tines (onsome models)
provide flexibility for extra-large and hard-
to-fit items.
Securelarger dishwasher-safe plastics over
2 tines when possible.
Makesure small plastic items are secure so
they can't fall onto the heater.
Besurethat items do not protrude through
the bottom of the rack and block rotation of
the middle spray arm. This could result in
poor wash performance for items in the
upper rack.
Checkto make surethat no items will block
rotation of the wash arm.
NOTE:TheSingle RackWash selection,on
models with this feature,washes the upper
rack only. If you usethis feature, do not load
items in the lower rack.
\
I II 11 II II II II II II II 11
Adjustable Upper Rack
Thestandard position of your adjustable rack
is"up" which allows for maximum clearance
for your taller items in the lower rack. If you
have taller wine glasses,tumblers or other
items to place inthe upper rack,you may
want to adjust the rack to the lower position.
Tolower the reck, support the weight of the
rack with your hands asshown and press
both finger pads about 1/4" toward the inside
of the rack as indicated and guide the rack
down to its lower position.
Toreise the reck to the "up" position,pull up
on the center of the rack sideframe until the
rack locksinto place.
12
Lower Rack
Thelower rack isbest usedfor plates,saucers
and cookware. Large items such as broiler
pans and baking racks shouldgo alongthe
left-hand side. Load platters, pots and bowls
along the sides,in corners orinthe back.The
soiledsideof items shouldface the center of
the rack. If necessary,oversizedglassesand
mugs can be placed inthe lower rack to
maximize loading flexibility.
Also,be careful notto let a portion of an item
such as a pot or dish handle extend through
the bottom rack.Thiscould blockthe wash
arm and cause poor washing results.
Fold-down tines (onsome models)provide
flexibility for extra-large and hard-to-fit items.
Thetines may be left inthe up position or
folded down to customize the lower rack.

go.corn
ShowerNozzleService
PartNumberWD12X10134
tab out Remove end cap
Removing the Upper Rack
Yournew dishwasher hasthe capabilitg to
wash extra large items in the lower rack.This
isaccomplished bg removing the upper rack
and installing a nozzleoverthe port that
normallg supplieswater to the upper rack.
The nozzleis not includedwith gour
dishwasher,but isavailable for purchase from
GE.CallGEat 1.800.626.2002or go to the GE
website ge.com and request NozzleSprag
Asm,part number WD12X10114.
Customers in Canada can order on-line at
geappliances.ca 24 hours everg dag, or bg
phone at 1.800.66!.!6!6 during normal
businesshours.
NOTE:Donot usethe TOPRACKONLYcgcle
(some models)with this feature. SingleRack
Wash cgcle isfor upper rack wash onlg.
The recommended cgcle for lower rack
onlg useisthe COOKWAREcgcle.
NOTE:Nozzlemust be in placewith upper
rack removed.If not installed properlg, poor
wash performance and noisewill result.
Toremove the upper rack:
E] Pressthumb tab out and remove the
front end caps on each sideofthe rail.
_1 Pullthe rack straight out and offthe rails.
r31 Replacethe end caps.
E] Pushthe railsall the wag back into the
dishwasher.
Slidethe shower nozzleattachment over
the spout.
"Showernozzle
attachment
@ Thenfillthe lower rack and begin
gour cgcle.
NOTE:Don'tforget to remove the shower
nozzleattachment before gou replace the
upper rack.
One-piece basket (oil some models)
Three-piece basket (oil some models)
Don't let any
item extend through
bottom.
Silverware Basket
Toload flatware, simplg pushthe adjustable
handle to either side(on some models).Put
flatware in the removable basketwith fork
and knife handles up to protect gour hands.
Placespoons in the basketwith handles
down. Mix knives,forks and spoons sotheg
don't nesttogether. Distribute evenlg.Small
plastic items, such as measuring spoons and
lidsfrom small containers should go in the
bottom ofthe silverware basketwith the
silverware on top.
Theone-piece silverware basket(on some
models)can be placed in the front, right side
or back of the lower rack.
A varietg of options isavailable regarding
the three-piece silverware basket(onsome
models)in gour dishwasher.Thecomplete
basket isdesignedto fit on the right sideof
the lower rack.Additionallg, each end of
the basket is removable to add loading
flexibilitg to accommodate flatware and
lower rack capacitg needs.
Thelidsof both end and middle baskets(on
some models)can be closedto contain small
items. Long items can be placed on the utilitg
shelf in the upper rack.
Toremove end baskets, grasp the basket at
opposite corners and slide apart.
13

Loading the dishwasher racks.
Extra Rack Features (onsome models)
Cutlery Tray
Thecutlers trag holdsup to 4 largeknifes
such as a carver,chef's knives,bread knife,
etc.,that ore too toll to fit inthe silverware
basket.
Hook the trog onto the rear of the upper rock.
Lag the knives between the guides
(asshown).
T eseti fold down
//
Bowl Tines
Thespecial large-bowl tines in the lower rack
add flexibility to uour loading pattern.Theg
are usefulfor serving bowls or other large
bowls.
Tousethe bowl tines,fold down the
2 rows of flex tines infront of the bowl
tines and load bowlsjust as Uouwould
in the upper rack.
Large-bowl tines
Loading place settings...
Follow these guidelines for loading JO place settings. Features and appearance of racks and silverware baskets ma_t
varbtfrom btour model. NOTE:Silverware should be individuallbt loaded into the slots on the silverware basket lid.
Upper Rack--lO place settings Lower Rack--lO place settings
Follow these guidelines for loading J2 place settings. Features and appearance of racks and silverware baskets may
vary from your model. NOTE:Silverware should be individually loaded into the slots on the silverware basket lid.
14 Upper Rack--12 place settings Lower Rack--12 place settings

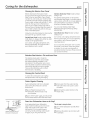
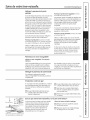
Caring for the dishwasher, ge.com
Cleaning the Exterior Door Panel
Beforecleaning the front panel,make
sure you know what type of panel you have.
Referto the last two lettersof your model
number. Youcan locate your model number
on the left-hand tub walljust insidethe door.
If your model number ends with BB,CC,WW,
SAor BG,then you have a PaintedDoor
panel. If your model number endswith SS,
then you havea StainlessSteelDoor panel.If
your model number ends with CS,then you
have a CleanSteelpanel.
Followthe instructions below for cleaning the
door panel for your specific model.
Painted Door Panel (modelnumbers ending
in BB-black,CC-bisque,WW-White, SA-silver
metallic or BG-gmphite black)
Usea clean, soft, lightly dampened cloth,
then dry thoroughly. Youmay also usea
good appliance wax or polish.
Stainless SteelDoor Panel (modelnumbers
ending in SS)
Thestainlesssteel panels can be cleaned
with StainlessStee!Magic or a similar product
using a clean,soft cloth. Donot useappliance
wax, polish,bleach or products containing
chlorine on StainlessSteeldoors.
Youcan order StainlessStee!Magic
#WXJOXJ5through GEParts by calling
800.626.2002.
CleanSteel Door Panel (model numbers
ending in CS)
Use a clean, soft, lightly dampened cloth,
then dry thoroughly. Do not use appliance
wax, polish or any chemical agent on
¢leanSteel doors.
Do not wipe the dishwasher with a soiled
dish cloth or wet towel Thesemay leave
a residue. Do not use scouring pads or
powdered cleaners because these products
can scratch the finish.
Stainless Steel Interior--Tub and Inner Door
Thestainlesssteel usedto make the
dishwasher tub and inner door provides
the highest reliability available in a GE
dishwasher.If the dishwasher tub or inner
door should be scratched or dented during
normal use,they will not rust or corrode.
Thesesurface blemisheswill not affect
their function or durability.
Cleaning the Control Panel
Tocleanthe control panel,usea lightly
dampened cloth.Then dry thoroughly.
Protect Against Freezing
If your dishwasher isleft in an unheated
place during the winter,ask a service
technician to:
r_cut off electrical power to the
dishwasher.Removefusesor trip
circuit breaker.
r_ Turnoff the water supply and disconnect
the water inlet linefrom the water valve.
r_ Drainwater from the water inlet line
and water valve.(Usea pan to catch
the water.)
r_ Reconnectthe water inlet lineto the
water valve.
Airgap _._L('L I.:_t_=___
Checktheairgapanytimeyour
dishwasherisn'tdrainingwell.
Does Your Dishwasher Have an Air Gap?
An air gap protects your dishwasher
against water backing up into it if a drain
clogs.The air gap is not a part of the
dishwasher.It isnot covered by your
warranty. Not all plumbing codes require
air gaps,so you may not have one.
The air gap is easy to clean.
r_ Turnoff the dishwasher and lift off the
cover.
Removethe plasticcap and clean with
r_a toothpick.
15

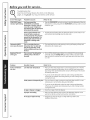
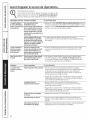
Before you call for service...
Error Nessages
START/RESETstatus
indicator light flashing
DishwasherBEEPS
onceevery30seconds
Beepingat theend
of thecycle
Troubleshooting Tips
Save time and money! Review the charts on the following
pages, or visit ge.com. You may not need to call for service.
Possible Causes What To Do
Youhavepressedthe
START/RESETpadwhilethe
dishwasherisrunning.Thiswill
cancelthecgcle.Thelightwill
stopflashingafter the dishwasher
drains(about90seconds).
PresstheSTART/RESETpadonlgonetimeto startthedishwasher.Whenthe
dishwasherisrunning,onlgpresstheSTART/RESETpadif gouwishto cancel
(reset)thecgcle.
Powerto thedishwasherwas
turnedoff whileacgclewas
runningand powerhasjust been
restoredto thedishwasher.The
blinkinglightsindicatethat the
dishwasherisdrainingwater
inside.
Thelightwillstopflashingafterthedishwasherdrainsoutthewater.Anew
cgclewillstartautomaticallgwhenthedrainends.
Thisisa reminderthat gour
dishwasherdoor hasbeenleft
openduring operation.It will
continuebeepinguntil youclose
thedoor.
,, Closeandlatchthedoorafteropeningit mid-cgcle.Beepingwillstopand
dishwasherwillcompletecgcle.
Thisisnormal.Thedishwasher
will beeptwiceat theendof
thecgcle.
• Toturnoffthedoublebeepindicator(orre-activateitifitwas previouslg
turnedoff),presstheHEATEDDRYpadStimeswithin3 seconds.Atriple
beepwillsoundto indicatetheend-of-cgclebeepoptionhasbeenturned
on oroff.
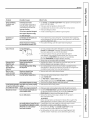
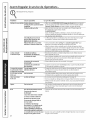
Problem
Dishesand flatware
nat clean
Possible Causes What ToDo
Lowinletwater temperature •
Water pressureistemporarilg low ,,
o
Makesureinletwatertemperatureiscorrect(seepage8).Turnonthehot
waterfaucetnearestthedishwasher;letrununtilthewatertemperature
stopsrising.Thenstartthedishwasherandturn offthefaucet.Thisensures
theenteringwaterishot.
Trgnottousethedishwasherwhenhotwaterisbeingusedelsewhere
inthehouse;forexample,whendoinglaundrUorwhena familUmember
isusingtheshower.
Turnon afaucet.Iswatercomingoutmoreslowlgthanusual?Ifso,wait
untilpressureisnormalbeforeusinggourdishwasher.
Trgnottousethedishwasherwhenhotwaterisbeingusedelsewhere
inthehouse;forexample,whendoinglaundrUorwhena familUmember
isusingtheshower.
Air gapordisposerisclogged • Cleantheair gaporflushthedisposer.
Improperrack loading • Makesurelargedishwaredoesnotblockthedetergentdispenserorthe
washarms.SeetheLoadingthedishwasherrackssection.
Noair gapor highdrain loop • VerifUthat gouhavean airgapora highdrainloop.Refertothe
InstallationInstructions.
16

ge.com
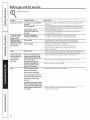
Problem Possible Causes What ToDo
Spotsand filming
onglossesand
flatware
Extremelyhardwater
Lowinletwater temperature
Overloadingthedishwasher
Improperloading
Oldor damppowderdetergent
Rinseagentdispenserempty
Toolittledetergent
• UseJet-Dry ®or Cascade Crystal Clear_rinse agents to remove spots and
prevent new filmbuildup.
• Hake sure water temperature isat least 120°F.
• Loaddishwasher as shown inthe LoadingPlaceSettingssection.
• Hakesuredetergentisfresh.
• Ifwaterisextremelyhard,asoftenermay berequired.
Cloudinessan Combinationof softwater and • Thisiscalledetchingandispermanent.Topreventthisfromhappening,
glassware too much detergent use lessdetergent ifyou have softwater. Wash glassware inthe shortest
cycle that willget them clean.
Water temperatureentering • Thiscouldbeetching.Lowerthewaterheatertemperature.
thedishwasherexceeds150°F
Sudsin thetub • Useonlyautomaticdishwasherdetergentsto avoidsudsing.
Detergent left in
dispenser cups
Water in the
SmartDispense T"
dispenser
Blackor gray
marks on dishes
Cascade®andElectrasol®AutomaticDishwashingDetergents
havebeenapprovedfor useinallGEdishwashers.
• Toremovesudsfromthetub,openthedishwasherandlet
sudsdissipate.Closeandlatchthedishwasherdoor.Pumpoutwater
bytouchingtheSTART/RESETpadonce;then30secondslater,
touchtheSTART/RESETpadagain.Repeatifnecessary.
Alwayswipeuprinseagentspillsimmediately.
Repositionthedishes,sothewaterfromthelowersprayarmcan
flushthedetergentcup.Seepages13and14.
Usea turkeybastertoremoveasmuchwateraspossiblefromthe
SmartDispenseT"dispenserandrefillitasnormal.Besuretotightenthe
capfullyto preventwaterfrom enteringthedispenser.
Removemarkswitha mild,abrasivecleaner.
Dishes don't dry
Rinseagentwasspilled
Dishesare blockingthe
detergentcup
Capnottightened after filling
thedispenser
Aluminumutensilshave
rubbedagainstdishes
Lowinletwater temperature
Rinseagentdispenserisempty
ContralpandrespondedDoorlatch may not beproperly
toinputsbutdishwasherseated
neverfilledwith water Water valvemay beturnedoff
Stainedtub interior Sometomato-basedfoodscan
causereddishstains
Teaor coffeestains
Anoverallyellowor brownfilm can •
becausedb_ _osits inwater
White film on insidesurface- •
hardwater minerals
• Hakesureinletwatertemperatureisat least120°R
• SelectHEATEDDRY.
UsePRE-WASHor ADDEDHEAToptions.
Selecta highercycle,suchasANTI-BACTERIAor COOKWARE.
Checktherinseagentdispenserandfillasrequired.
Hakesurethedoorisfirmlyclosed.
• Hakesurewatervalve(usuallylocatedunderthesink)isturnedon.
• Useofthe RINSEANDHOLDcycleafteraddingthedishtotheload
candecreasethelevelofstaining.GErecommendsCascade®
PlasticBoosterto helpremovethesetypesofstains.
• Removethestainby hand,usinga solutionof 1/2cupbleach
and] cupswarmwater.
WARNING
Beforecleaninginterior,waitatleast20minutesaftera cycleforthe
heatingelementstocooldown.Failuretodo socanresultin burns.
Aspecialfilterinthewatersupplylineistheonlyway tocorrect
thisproblem.Contacta watersoftenercorn an .
GErecommends Jet-Dry ®or Cascade Crystal Clear*to help
prevent hard water mineraldepositsfrom forming.
• Rundishwasherwithcitricacidto removemineraldeposits.Citric
acid(Partnumber:WD35X151)canbeorderedthroughGEParts.
17

Before gou call for service...
Troubleshooting Tips
\
Problem
Dishwasherwon't run
What ToDoPossible Causes
• Replacefuseorresetcircuitbreaker.Removeanyotherappliancesfrom
thecircuit.
• Insomeinstallations,thepowertothedishwasherisprovidedthrougha
wallswitch,oftenlocatednexttothedisposerswitch.Rakesureitison.
• Unlockcontrolpanel.Seepage6.
• Turnoffpowertothedishwasher(circuitbreakerorwallswitch)for
]0 seconds;thenturn backon.
Fuseis blown or circuit breaker
istripped
Power isturned off
Controlpanelislocked
Controlpanelneedsto be
rebooted
Controlpanellights Timetoo longbetween • EachpadmustbetouchedwithinSminutesoftheothers.
go offwhen you're touchingof selectedpads Torelight,touchanUpadagain,or unlockandrelatchdoor.
settingcontrols
Waterstanding in Thisisnormal • Asmallamountofcleanwateraroundtheoutletonthetub
thebottomof thetub bottomatthebackofthetub keepsthepumpseallubricated.
Waterwon't pump Drainisclogged • IfLlouhaveanairgap,cleanit.Seepage15.
outof thetub • Ifthedishwasherdrainsintoa disposer,rundisposerclear.
• Checktoseeifuourkitchensinkisdrainingwell.If not,Uou
malt needaplumber.
Steam Thisisnormal • Warm,moistaircomesthroughtheventbll thedoorlatchduringdrlling
andwhenwaterisbeingpumpedout.Thisisnecessarllfordrlling.
Sanitizedlight does Thedoorwasopenedand the • Donotinterruptthecllcleanlltimeduringor aftermainwash.
not illuminateat the cyclewasinterruptedduring
endofthecycle or after the mainwashportion
_Anti-Bacteria Theincomingwater • Raisethewaterheatertemperatureto between120°Fand140°F.
cycleonly) temperaturewastoo low
Thecycleiscompleteand • Thisisnormal.Noactionisrequired.
thedoor hasbeenopenfor
longerthan 60seconds
Noise Normaloperatingsounds • Theseareallnormal.Noactionisrequired.
Detergentcupopening
Water enteringdishwasher
Themotor stopsand starts at
varioustimesduringthecycle
Drainpumpsoundsduring
pumpout
Dryingfan runningfor 2-4 hours
after CLEANlight isilluminated
(TopControlPanelmodelsonly}
Rattlingdisheswhenthe spray
arm rotates
• Hakesuredishesareproperlllloaded.SeetheLoadingthe
dishwasherrackssection.
18

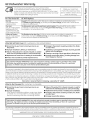
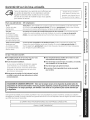
GE Dishwasher Warranty.
Al!warranty serviceprovidedby our Factory ServiceCenters,
or an authorizedCustomerCare®technician.Toscheduleservice,
on-l!ne,visitusat ge.com,or ca!!800.GE.CARES(800.452.2757)in the United
States.InCanada,ca!!!.800.56!.5544. Pleasehaveserialnumberand mode!
number availablewhen calling forservice.
Staple your receipt here.
Proof of the original purchase
date is needed to obtain service
under the warranty.
For The Period Of:
One Year
From the date of the
origina!purchase
Five Years
(onlyformodel numbers
beginning with PDW
or CDW)From thedate
of the origina!pumhose
Lifetime of Product
(onlyformodel numbers
beginning with PDW
or COW)
GE Will Replace:
Any part of the dishwasher which fails due to a defect in materials or workmanship. During
this limited one-year warranty, GEwill alsoprovide, freeof charge, all labor and in-home service
to replacethe defective part.
The dishwasher racks and the electronic control module ifthey should fail due to a defect
in materials or workmanship. During this five-year limited warranty, you will be responsible
for anu labor or in-home servicecosts.
TheStainlesstub ordoor liner, ifit fails to contain water due to a defect in materials or
workmanship. Duringthis limited warranty, GEwill also provide,free of charge, all labor and
in-home serviceto replacethe defective part.
What GE Will Not Cover (for customers in the United States):
Service trips to your home to teach you how to use
the product.
m Improper installation, delivery or maintenance.
m Failure of the product ifit is abused, misused, or used for
other than the intended purpose or used commemiallg.
m Replacement of house fuses or resetting ofcimuit breakers.
m Product not accessible to provide required service.
Ill Damage to the product caused by accident, fire, floods
or acts of God.
m Incidental or consequential damage caused by possible
defects with this appliance.
II Cleaningor servicingof the air gap device inthe drain line.
II Damage caused after delivery, including damage from
items dropped on the door.
EXCLUSION OF IMPLIED WARRANTIES--Your sole and exclusive remedy is product repair as provided in this Limited
Warrantg. Ang implied warranties, including the implied warranties of merchantabilitg or fitness for a particular
purpose, are limited to one gear or the shortest period allowed bg law.
Thiswarranty isextended tothe originalpurchaserand any succeedingowner for productspurchasedfor home usewithin the
USA.If the product islocated in an area whereserviceby a GEAuthorized Servicerisnot available,you may be responsiblefor a trip
chargeor you may be requiredto bring theproduct to anAuthorized GEServicelocation forservice.Proofof originalpurchasedate
isneededto obtain serviceunder the warranty. InAlaska,thewarranty excludesthe costofshipping or servicecallsto your home.
Somestates do not allow theexclusionor limitation of incidental or consequentialdamages.Thiswarranty givesyou specific lega!
rights, and you may alsohave other rights which vary from state to state. Toknow what your legal rights are,consultyour local
or stateconsumer affairsoffice or your state'sAttomeFGeneral.
Warrantor: General Electric Company. Louisville, KY 40225
What Is Not Covered (for customers in Canada):
m Service trips to your home to teachyou how to use
the product.
m Improper installation.
If you have an installation problem, contact your dealer
or installer. You are responsible for providing adequate
electrical, exhausting and other connecting facilities.
m Failure of the product if it is abused, misused, or used for
other than the intended purpose or used commemiallg.
m Replacement of house fuses or resetting ofdmuit breakers.
m Damage to the product caused by accident, fire, floods
or acts of God.
m Damage caused after delivery.
EXCLUSION OF IMPLIED WARRANTIES--Your sole and exclusive remedg is product repair as provided in this Limited
Warrantg. Ang implied warranties, including the implied warranties of merchantabilitg or fitness for a particular
purpose, are limited to one gear or the shortest period allowed bg law.
Thiswarranty isextended tothe origina!purchaser and any succeedingowner for productspurchasedin Canadafor home use
within Canada.Inhome warranty servicewi!!be providedin areaswhereit isavailableand deemedreasonableby Mabeto provide.
WARRANTOR IS NOT RESPONSIBLE FOR CONSEQUENTIAL DAMAGES.
Warrantor: MABE CANADA INC.
19

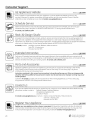
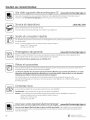
Consumer Support.
GEAppliances Website
Inthe U.S.:ge.com
Have a question or needassistancewith your appliance?Try the GEAppliancesWebsite 24hours a day,
any day ofthe gear! Forgreater convenience and faster service,you can now download Owner's Manuals,
order parts or evenschedule service on-line.In Canada: www.geappliances.ca
ScheduleService Inthe U.S.:ge.com
Expert GErepair service isonly one step away from your door.Geton-line and schedule your serviceat your
convenience any day of the gear! Orcall 800.GE.CARES(800.432.2737)during normal businesshours.
In Canada, call 1.800.561.3344
RealLifeDesignStudio Inthe u.s.:ge.com
GEsupports the UniversalDesignconcept-products, services and environments that can be usedby people of all
ages,sizesand capabilities.We recognizethe needto designfor a wide range of physical and mental abilities and
impairments. Fordetails of GE'sUniversalDesignapplications, including kitchen designideasfor people with disabilities,
check out our Websitetoday. Forthe hearing impaired, pleasecall800.TDD.GEAC(800.833./4322).
In Canada, contact: Manager,Consumer Relations,Mabe Canada Inc.
Suite3!0, ! Factory Lane
Moncton, N.B.EIC 9M3
Extended Warranties
In the U.S.:ge.com
Purchasea GEextended warranty and learn about special discounts that are available while your warranty isstill
in effect. You can purchase it on-line anytime, or call800.626.2224during normal businesshours. GEConsumer Home
Serviceswill still be there after your warranty expires.InCanada, call 1.888.261.2133
Parts and Accessories
In the U.S.:ge.com
Individualsqualified to servicetheir own appliances can have parts or accessoriessent directly to their homes
(VISA,MasterCardand Discovercards are accepted).Orderon-line today, 24 hours every day or by phone
at 800.626.2002during normal businesshours.
Instructions contained in this manual cover procedures to be performed by any user. Other servicing generally
should be referred to qualified service personnel Caution must be exercised, since improper servicing may cause
unsafe operation.
Customers in Canada can order parts and accessorieson-line at www.geappliances.ca,2/4hoursevery day,
or by phone at 1.800.661.1616during normal businesshours.
Contact Us
In the U.S.:ge.com
If you are not satisfiedwith the service you receivefrom GE,contact uson our Website with all the details including
your phone number,or write to: General Manager,Customer Relations
GEAppliances,Appliance Park
Louisville,KY40225
In Canada: www.geappliances.ca, or write to: Director,ConsumerRelations,MabeCanada Inc.
Suite310, 1 Factory Lane
Moncton, N.B.EIC 9M3
Register YourAppliance Inthe U.S.:ge.com
Register your new appliance on-line--at sour convenience! Timely product registration will allow for enhanced
communication and prompt serviceunder the terms of your warranty, should the need arise.You may also mail
in the pre-printed registration card included in the packing material.In Canada: www.geappliances.ca
20 _ Printed in the United States
.... Printed on Recycled Paper
La page charge ...
La page charge ...
La page charge ...
La page charge ...
La page charge ...
La page charge ...
La page charge ...
La page charge ...
La page charge ...
La page charge ...
La page charge ...
La page charge ...
La page charge ...
La page charge ...
La page charge ...
La page charge ...
La page charge ...
La page charge ...
La page charge ...
La page charge ...
-
 1
1
-
 2
2
-
 3
3
-
 4
4
-
 5
5
-
 6
6
-
 7
7
-
 8
8
-
 9
9
-
 10
10
-
 11
11
-
 12
12
-
 13
13
-
 14
14
-
 15
15
-
 16
16
-
 17
17
-
 18
18
-
 19
19
-
 20
20
-
 21
21
-
 22
22
-
 23
23
-
 24
24
-
 25
25
-
 26
26
-
 27
27
-
 28
28
-
 29
29
-
 30
30
-
 31
31
-
 32
32
-
 33
33
-
 34
34
-
 35
35
-
 36
36
-
 37
37
-
 38
38
-
 39
39
-
 40
40


GE EDWF800P00BB Le manuel du propriétaire
- Catégorie
- Lave-vaisselle
- Taper
- Le manuel du propriétaire
- Ce manuel convient également à
dans d''autres langues
- English: GE EDWF800P00BB Owner's manual
Documents connexes
-
GE Profile PDWF480PSS Manuel utilisateur
-
GE PDWT510PBB Manuel utilisateur
-
-
GE PDWF400P00WW Le manuel du propriétaire
-
-
-
GE PDWT400R30WW Le manuel du propriétaire
-
-
-
GE GHDF360R10SS Le manuel du propriétaire
