Sony CDP-CX455 Le manuel du propriétaire
- Catégorie
- Lecteur CD
- Taper
- Le manuel du propriétaire

4-238-112-26(1)
2002 Sony Corporation
CDP-CX455
Compact Disc
Player
GB
FR
Operating Instructions
Mode d’emploi

2
GB
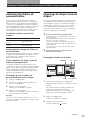
WARNING
To prevent fire or shock hazard, do not
expose the unit to rain or moisture.
To avoid electrical shock, do not open the cabinet. Refer
servicing to qualified personnel only.
This appliance is classified as a CLASS 1 LASER product.
This label is located on the rear exterior.
To prevent fire, do not Cover the ventilation of the apparatus with
newspapers, table-cloths, curtains, etc. And don’t place lighted candles
on the apparatus.
To prevent fire or shock hazard, do not place objects filled with liquids,
such as vases, on the apparatus.
Welcome!
Thank you for purchasing this Sony Compact Disc Player.
Before operating the unit, please read this manual thoroughly
and retain it for future reference.
About This Manual
The instructions in this manual are for model CDP-CX455.
Conventions
• Instructions in this manual describe the controls on the
player.
You can also use the controls on the remote if they have the
same or similar names as those on the player.
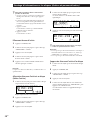
• The following icons are used in this manual:
Z
Indicates that you can do the task using the remote.
z
Indicates hints and tips for making the task easier.
Notes on CDs
On handling CDs
• To keep the disc clean, handle the disc carefully.
• Do not stick paper or tape on the disc.
Don’t throw away the battery with general house
waste, dispose of it correctly as chemical wastes.
For the customers in Canada
CAUTION
This Class B digital apparatus complies with Canadian ICES-
003.
CAUTION:
TO PREVENT ELECTRIC SHOCK, DO NOT USE THIS POLARIZED
AC PLUG WITH AN EXTENSION CORD, RECEPTACLE OR OTHER
OUTLET UNLESS THE BLADES CAN BE FULLY INSERTED TO
PREVENT BLADE EXPOSURE.
• Do not expose the disc to direct sunlight or heat sources
such as hot air ducts, nor leave it in a car parked in direct
sunlight as there can be considerable rise in temperature
inside the car.
• After removing a disc from the disc slot, store the disc in its
case.
On cleaning
• Before playing, clean the disc with a cleaning cloth. Wipe
the disc from the center out.
• Do not use solvents such as benzine, thinner, commercially
available cleaners or anti-static spray intended for vinyl
LPs.

3
GB
Notes on CD-R and CD-RW discs
This unit can play the following discs:
Type of discs Label on the disc
• Some CD-Rs/CD-RWs (depending on the equipment used
for their recording or the condition of the disc) may not
play on this player.
• You cannot play a CD-R/CD-RW that is not finalized*.
*A process necessary for a recorded CD-R/CD-RW disc to
be played on the audio CD player.
About MP3 files
MP3 (MPEG 1 Audio Layer-3) is a standard technology
and format for compressing a sound sequence. The file
is compressed to about 1/10 of its original size. Sounds
outside the range of human hearing are compressed
while the sounds we can hear are not compressed.
Playback of some MP3 files may not be possible,
depending on the encoding.
The encoding method (i.e., the bit rate selected for
encoding) will affect the sound quality of the MP3 files
created. The bit rate typically used for MP3 files is
128 kbps.
Audio CD
MP3 files
(continued)
GB
FR
Notes on discs
You can play MP3 files recorded on CD-ROMs, CD-Rs
(recordable CDs), and CD-RWs (rewritable CDs).
The disc must be in the ISO 9660*
1
level 1 or level 2
format, or Joliet or Romeo in the expansion format.
You can use a disc recorded in Multi Session*
2
.
*
1
ISO 9660 Format
The most common international standard for the
logical format of files and folders on a CD-ROM.
There are several specification levels. In Level 1, file
names must be in the 8.3 format (no more than eight
characters in the name, no more than three
characters in the extension “.MP3”) and in capital
letters. Folder names can be no longer than eight
characters. There can be no more than eight nested
folder levels. Level 2 specifications allow file names
up to 31 characters long.
Each folder can have up to 8 trees.
For Joliet or Romeo in the expansion format, make
sure of the contents of the writing software, etc.
*
2
Multi Session
This is a recording method that enables adding of
data using the Track-At-Once method. Conventional
CDs begin at a CD control area called the Lead-in
and end at an area called Lead-out. A Multi Session
CD is a CD having multiple sessions, with each
segment from Lead-in to Lead-out regarded as a
single session.
CD-EXTRA: A format in which CD-DA (audio) data
are recorded in the tracks of session 1 and computer
data in the tracks of session 2.
Mixed CD: A format in which computer data are
recorded in the first track and CD-DA (audio) data in
the following tracks within a session.

4
GB
The playback order of the MP3 files
The playback order of the folders and files is as
follows:
Notes
•A folder that does not include an MP3 file is skipped.
• When you insert a disc with many trees, it takes a longer
time to start playback.
We recommend that you make only one or two trees for
each disc.
• Maximum folder number: 150 (including root folder and
empty folders)
• Maximum total number of MP3 files and folders: 300
• The CD player can play the MP3 files in a folder whose
depth in the folder tree is up to 8.
Tip
To specify a desired playback order, before the folder or file
name, input the order by number (e.g., “01”, “02”), then
record contents onto a disc. (The order differs depending on
the writing software.)
Note on playback of MP3 files
Depending on the encoding/writing software, recording
device, or the recording media used at the time an MP3 file is
recorded, you may encounter such problems as disabled
playback, sound interruptions, and noise.
1
2
6
3
5
7
1
2
6
7
4
8
3
5
8
4
9
Folder (album)
MP3 file (tracks)
Tree 1 Tree 2 Tree 3 Tree 4 Tree 5
Notes
• With formats other than ISO 9660 level 1, folder names or
file names may not be displayed correctly.
• When naming, be sure to add the file extension “.MP3” to
the file name.
• If you up the extension “.MP3” to a file other than MP3, the
unit cannot recognize the file properly and will generate
random noise that could damage your speakers.
• The following discs take a longer time to start playback.
–a disc recorded with complicated tree structure.
–a disc recorded in Multi Session.
–a disc to which data can be added (non-finalized disc).
Cautions when playing a disc that is recorded in Multi
Session
CD-DA (audio) data or MP3 files stored on a Multi Session
CD may be subject to some restrictions on playback.
– If the disc begins with a CD-DA session, it is recognized
as a CD-DA (audio) disc, and playback continues until an
MP3 session is encountered.
– If the disc begins with an MP3 session, it is recognized as
an MP3 disc, and playback continues until a CD-DA
(audio) session is encountered.
– The playback range of an MP3 disc is determined by the
tree structure of files produced by analyzing of the disc.
–A disc with a mixed CD format will be recognized as a
CD-DA (audio) disc.

5
GB
TABLE OF CONTENTS
Getting Started
Unpacking.............................................................................................................................. 6
Hooking Up the System ....................................................................................................... 6
Connecting Another CD Player .......................................................................................... 8
Inserting CDs ......................................................................................................................... 9
Conserving power in standby mode................................................................................ 11
Playing CDs
Playing a CD ........................................................................................................................ 12
Using the Display ............................................................................................................... 13
Locating a Specific Disc ..................................................................................................... 15
Specifying the Next Disc to Play ...................................................................................... 17
Playing Discs (Album) in Various Modes (Repeat/Shuffle Play) ............................... 17
Creating Your Own Program (Program Play) ................................................................ 19
Using the Timer................................................................................................................... 22
Fading In or Out.................................................................................................................. 22
Storing Information About CDs (Custom Files)
What You Can Do With the Custom Files ....................................................................... 23
Labeling Discs (Disc Name) .............................................................................................. 23
Storing Custom File Information Using a Keyboard..................................................... 26
Classifying Discs According to Artist Name (Artist File) ............................................. 27
Playing discs assigned the same Artist Name with one-touch of a TOP ARTIST
button (Top Artist Play) ..................................................................................................... 29
Using the Player with Another Component
Controlling Another CD Player (Advanced Mega Control)......................................... 30
Playing Alternately (No-Delay Play/X-Fade Play) ....................................................... 31
Controlling the Player by Another Unit .......................................................................... 32
Additional Information
Using the CONTROL A1II control system ...................................................................... 33
Precautions........................................................................................................................... 34
Troubleshooting .................................................................................................................. 35
Specifications ....................................................................................................................... 36
Index
Index ..................................................................................................................................... 37

Getting Started
6
GB
Unpacking
Check that you received the following items:
• Audio cord (1)
• Monaural (2P) mini-plug cord (1) (Connecting cord
for CONTROL A1II) (supplied for Canadian models
only)
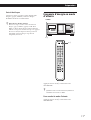
• Remote commander (remote) (1)
• Size AA (LR6) batteries (2)
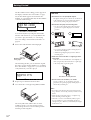
Inserting batteries into the remote
You can control the player using the supplied remote.
Insert two size AA (LR6) batteries (supplied) by
matching the + and – ends on the batteries to the
diagram inside the battery compartment.
Insert the negative (–) end first, then push in and down
until the positive (+) end clicks into position.
When using the remote, point it at the remote sensor
on the player.
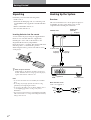
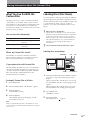
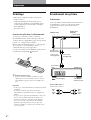
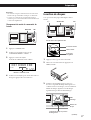
Hooking Up the System
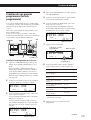
Overview
This section describes how to hook up the CD player to
an amplifier. Be sure to turn off the power of each
component before making the connections.
White
(L)
Red
(R)
White
(L)
Red
(R)
What cords will I need?
Audio cord (supplied) (1)
z When to replace batteries
With normal use, the batteries should last for about six
months. When the remote no longer operates the player,
replace all the batteries with new ones.
Notes
• Do not leave the remote near an extremely hot or humid
place.
• Do not drop any foreign object into the remote casing,
particularly when replacing the batteries.
• Do not expose the remote sensor to direct sunlight or leave
too near lighting apparatuses. Doing so may cause a
malfunction.
• If you do not use the remote for an extended period of time,
remove the batteries to avoid possible damage from battery
leakage and corrosion.
Getting Started
CD player
DIGITAL OUT
(OPTICAL)
Amplifier
To Analog
output (L)
To Analog
output (R)
To an AC outlet
: Signal flow
To audio input
To an AC outlet
CONTROL A1II

Getting StartedGetting Started
7
GB
Hookups
When connecting an audio cord, be sure to match the
color-coded cord to the appropriate jacks on the
components: Red (right) to Red and White (left) to
White. Be sure to connect firmly to avoid hum and
noise.
• If you have a digital component such as a digital
amplifier, D/A converter, DAT, or MD
Connect the component via the DIGITAL OUT (OPTICAL)
connector using an optical cable (not supplied). Take off the
cap and plug in the optical cable.
Note that you cannot use fading in or out (page 22).
z If you have a Sony component with the CONTROL
A1II (or CONTROL A1) jack
Connect the component via the CONTROL A1II (or
CONTROL A1) jack. You can simplify the operations of
audio systems composed of separate Sony components.
For details, see “Using the CONTROL A1II Control
System” on page 33.
Amplifier
CD player
Optical cable (not supplied)
Notes
• The playback from an MP3 file is not output from the
DIGITAL OUT (OPTICAL) connector.
CD player Digital component
Connecting the AC power cord
Connect the AC power cord to a wall outlet.
Note on placement of the player
Be sure to place the player on a flat, horizontal place.
If the player is left on a slanted position, it may cause a
malfunction or damage the player.
INPUT
CD
L
R
IN OUT
L
R
L
R
2ND CD ANALOG
DIGITAL
INPUT
OPTICAL
DIGITAL
OPTICAL
OUT
• When you connect via the DIGITAL OUT (OPTICAL)
connector, noise may occur when you play CD software
other than music, such as a CD-ROM.

Getting Started
8
GB
What cords will I need?
• Audio cord (1) (Use the cord supplied with the player to be
connected.)
• Monaural (2P) mini-plug cord (1) (supplied for Canadian
models only)
1 Connect the players with an audio cord (see also
“Hookups” on page 6).
2 Connect the players with a monaural (2P) mini-
plug cord.
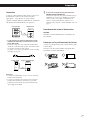
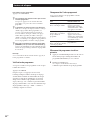
Connecting Another CD Player
If you have a Sony CD player in which 5, 50, 200, 300,
or 400 discs can be inserted and which is equipped
with the CONTROL A1II (or CONTROL A1) jack and
the command mode of that player can be set to CD3,
you can control that player as the second player with
this player. After connecting this player and an
amplifier, follow the procedure below.
Be sure to turn off the power of each player before
making this connection.
CDP-CX355, etc.
CDP-CX455
To 2ND CD IN
CDP-CX355, etc.
To an AC outlet
To an AC outlet
: Signal flow
To audio input
To audio output
To ANALOG OUT
Amplifier
CDP-CX455
For details on this connection, see “Using the
CONTROL A1II Control System” on page 33.
3 Set the command mode of this player to CD1
(factory setting) or CD2, and set that of the second
player to CD3.
Check the display for the current command mode
of this player, if the mode is CD3, change the mode
as described on the next page.
For details on how to operate the second player,
see “Controlling Another CD Player” on page 30
and “Playing Alternately” on page 31.
4 Connect the AC power cord of both players to an
AC outlet.
To an AC outlet
To
CONTROL A1II
Current command mode
IN OUT
L
R
L
R
2ND CD ANALOG
ANALOG
2ND CD
IN OUT
L
R
L
R
CONTROL A1II
CONTROL A1
CDP-CX355, etc.
CDP-CX455
1
SECSTEPMINART.
GROUPTRACK
HITART.NEXT2nd
CD2 CD3
1
GROUP
NO DELAY
TEXTCDMULTI
PROGRAM 1 2 3 X-FADE DELETE
REPEATSHUFFLE
DISC
*DISC-1 *** ***
CD1
ALL DISCS

Getting StartedGetting Started
9
GB
I / 1
Notes
• Do not connect any player other than the one used as the
second player to the 2ND CD IN jacks of this player.
• When connecting a second CD player, do not connect the
DIGITAL OUT (OPTICAL) connector of this player to the
amplifier.
Changing the command mode of the player
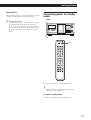
1 Press MENU/NO.
2 Turn the JOG dial until “COMMAND MODE?”
appears in the display.
3 Push the JOG dial.
The current command mode appears.
4 Turn the JOG dial to select CD1 or CD2, then push
the JOG dial again.
MENU/NO
SECSTEPMINART.
GROUPTRACK
HITART.NEXT2nd DISC
1
GROUP
NO DELAY
TEXTCDMULTI
PROGRAM 1 2 3 X-FADE DELETE
CD3
REPEATSHUFFLE1
CD1 CD2
ALL SDISC
* CD1[CD ]C2D3*
Current command mode
JOG
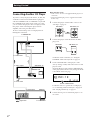
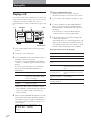
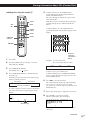
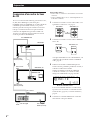
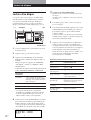
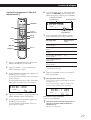
Inserting CDs
You can insert up to 400 discs into this player.
1 Press ?/1 to turn on the player.
2 Open the front cover by pressing OPEN/CLOSE.
3 Turn the JOG dial until you find the disc slot
where you want to insert a disc, while checking the
disc number (written beside every slot and also
indicated in the small display).
Rotary table
Loading position
Playing position
OPEN/CLOSE
JOG
?/1
Top view of the disc slot
Disc slot at the loading position
Disc number
(continued)
Small
display

Getting Started
10
GB
The disc number at the loading position appears in
the display. If the disc has a Disc Name (see page
23), the Disc Name appears instead of the disc
number. As you turn the JOG dial, the disc number
or the Disc Name changes.
You can classify discs by using the Artist Name
function. This feature lets you easily find the disc
you want to play. For details, see “Classifying
Discs According to Artist Name (Artist File)” on
page 27.
4 Insert a disc with the label side facing right.
After inserting the disc, you can enter the original
disc title to replace the disc number (see “Labeling
discs (Disc Name)” on page 23) so you can locate it
easily whenever you want to play it.
5 Repeat steps 3 and 4 to insert more discs.
6 Close the front cover by pressing OPEN/CLOSE.
The rotary table turns and the disc slot at the
loading position is set to the playing position.
Always keep the front cover closed except when
inserting or removing discs.
1
CD2
GROUP
NO DELAY
TEXTCDMULTI
PROGRAM 1 2 3 X-FADE DELETE
CD3
REPEATSHUFFLE 1
SECSTEPMINART.
GROUPTRACK
HITART.NEXT2nd
ALL SDISC
DISC
*DISC-2 **0 ***
CD1
Disc number or the Disc Name
With the label side
facing right
CAUTION
• Do not insert an 8 cm (3-inch) CD adaptor.
The player cannot play an 8 cm CD. Do not insert an
8 cm (3-inch) CD or an 8 cm (3-inch) CD adaptor
(CSA-8). It may damage the player and disc.
• Do not move the player after inserting discs.
• Be sure to place the player in a flat, horizontal
position. Do not place the player in a slanted
position.
• Do not move the player and avoid any physical
shock after inserting discs.
• When transporting the player, remove all discs
from the player.
• Make sure to insert the disc at a right angle to the
rotary table.
If the disc is not inserted into the slot completely (ex.
when you press A), reinsert the disc at a right angle
to the rotary table (or press A again).
• Do not attach seals or stickers, etc. to CDs.
If seals or stickers, etc. are attached to a CD, the
player may not operate properly and the player or
the disc may be damaged.
Notes
• If you drop a disc into the player and/or the CD does
not go into the slot correctly, consult your nearest Sony
dealer.
• Make sure the rotary table comes to a complete stop
before inserting or removing discs.
• The front cover closes automatically when you press
H. Be careful not to put your hand into the player
after pressing H, otherwise your hand may be caught
in the front cover.
Disc that is not fully inserted
CDTEXT
1
CD2
GROUP
NO DELAY
MULTI
PROGRAM 1 2 3 X-FADE DELETE
CD3
REPEATSHUFFLE 1
SECSTEPMINART.
GROUPTRACK
HITART.NEXT2nd
ALL SDISC
DISC
SONYHIT **S ***
CD1

Getting StartedGetting Started
11
GB
Removing CDs
After following steps 1 to 3 of “Inserting CDs” on page
9, remove the discs. Then close the front cover.
z To remove discs easily
After following steps 1 to 3 of “Inserting CDs” on page 9,
press A (DISC EJECT). The disc in the selected slot
moves up and you can remove the disc easily. When you
press A again, the disc returns to the loaded position. If
the disc does not return to the loaded position, reinsert
the disc.
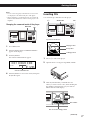
Conserving power in standby
mode
?/1
STANDBY
?/1
Press ?/1 on the player or on the remote once.
z
While the player is in standby mode, the STANDBY
indicator on the player lights up.
To cancel standby mode
Press ?/1 on the player or on the remote once.

Playing CDs
12
GB
Playing CDs
Playing a CD
You can play all the tracks or MP3 files on a disc in the
original order (Continuous Play). You can also play up
to 400 discs consecutively. Make sure you have
inserted the discs correctly as indicated on pages 9 and
10.
1 Turn on the amplifier and select the CD playing
position.
2 Press ?/1 to turn on the player.
3 Press CONTINUE to select ALL DISCS, 1 DISC, or
ALBUM Continuous Play mode.
Each time you press CONTINUE, “ALL DISCS”,
“1 DISC”, or “ALBUM” appears alternately in the
display.
Be sure to stop playback before you change the
play mode with CONTINUE, SHUFFLE, or
PROGRAM.
* When a disc that contains no albums is played
with “ALBUM” selected, the disc is played in the
same way as when “1 DISC Continuous Play”
mode is selected.
4 Make sure the ALBUM SELECT button is off, then
turn the JOG dial until the desired disc number or
Disc Name (see page 23) appears in the display to
select the first disc (ALL DISCS) or the disc you
want (1 DISC).
CONTINUE
JOG
?/1
H
1
CD2
GROUP
NO DELAY
TEXTCDMULTI
PROGRAM 1 2 3 X-FADE DELETE
CD3
REPEATSHUFFLE 1
SECSTEPMINART.
GROUPTRACK
HITART.NEXT2nd
ALL SDISC
DISC
*DISC-2 **0 ***
CD1
When you select
ALL DISCS
1 DISC
ALBUM*
The player plays
All discs in the player consecutively
in the order of disc number. Empty
disc slots are skipped.
Only the one disc you have selected.
Only the one album.
To
Stop playback
Pause
Resume playing after
pause
Go to the next disc Z
Go back to the
preceding disc Z
Go to the next album
Z
Go back to the
preceding album Z
Do this
Press x.
Press X.
Press X or H.
Press DISC + once.
Hold down the button to skip other
discs.
Press DISC – once.
Hold down the button to skip other
discs.
Press ALBUM +.
Press ALBUM –.
Operations you may want to do during play
z About the ALBUM SELECT button
While the button is off: The JOG dial selects discs.
While the button lights up: The JOG dial selects albums.
5 To play audio tracks, skip this step and go to step
7.
6 To select an album, press the ALBUM SELECT
button to cause it to light up, and then turn the
JOG dial until the desired album name appears in
the display.
Turn clockwise to select next album and turn
counterclockwise to select preceding album.
7 Push the JOG dial to start playing and adjust the
volume on the amplifier.
The selected disc is set to the playing position, and
the player plays all the discs from the selected one
(ALL DISCS), all the tracks once (1 DISC), or all the
MP3 files in the selected album once (ALBUM).
ALBUM SELECT

Playing CDs
Playing CDs
13
GB
(continued)
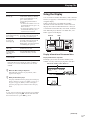
Using the Display
You can check stored disc information, such as the Disc
Names (see page 23) or Artist Names (see page 27), by
using the display.
Unlike a normal CD, a CD TEXT disc includes
information such as the disc title or artist name. The
display shows the CD TEXT information so that you
can check the current disc title, artist name, and track
title. When the player detects a CD TEXT disc, “CD
TEXT” appears in the display.
Display information of the normal discs
Display information in stop mode
The display shows the current disc number, total
number of tracks, and total playing time of the disc.
Total playing time
Current disc number or Disc Name etc.
Total number of tracks
Current disc number
1
CD2
GROUP
NO DELAY
TEXTCDMULTI
PROGRAM 1 2 3 X-FADE DELETE
CD3
REPEATSHUFFLE 1
SECSTEPMINART.
GROUPTRACK
HITART.NEXT2nd
ALL SDISC
DISC
*DISC-2 **0 ***
CD1
NEXT DISC
2nd PLAYER
DISC
DISPLAY TIME
To
Go to a specific track
directly Z
Go to a point in a
track while monitoring
the sound Z
Go to a point in a track
by observing
the display Z
Go to the next track
(MP3 file*)
Go back to the
preceding track
(MP3 file*)
Stop playing and
remove the disc
* When “ALL DISCS” or “1 DISC” is selected, you can locate
all the MP3 files in the selected disc. When “ALBUM” is
selected, you can locate all the MP3 files in the selected
ALBUM.
z When the TOC reading is completed
When MP3 files on the disc are played back, ”MP3”
appears in the display.
z When you turn off the player
The player remembers the last playing disc and the play
mode: Continuous (on page 12), Shuffle (on page 17), or
Program (on page 19). When you turn on the player
again, the player plays the same disc in the same play
mode.
Note
If “ ” appears in the large display, the disc has reached the
end while you were pressing M. Turn the l AMS L
dial counterclockwise or press m to go back.
Do this
Press the number button of the track
on the remote. When you directly
locate a track numbered over 10,
press >10 first, then the
corresponding number buttons.
Examples:
•To select track number 30 on a CD
recorded with 50 tracks, press >10,
then 3 and 10/0.
•To select track number 30 on a CD
recorded with 200 tracks, press
>10, then 10/0, 3 and 10/0.
Press m (backward)/M
(forward) on the remote and hold
down until you find the point.
Press m (backward)/M
(forward) on the remote and hold
down until you find the point
during pause. You will not hear the
sound during the operation.
Turn the l AMS L dial
clockwise by one click.
Turn the l AMS L dial
counterclockwise by one click.
Press OPEN/CLOSE.

Playing CDs
14
GB
Display information while playing a disc
The display shows the disc and track title alternately.
The information is displayed as follows (in stop mode):
• When the Artist Name is assigned to the current
disc
Disc title of CD TEXT/
Assigned Artist Name
• When no Artist Name is assigned to the current
disc
Disc title of CD TEXT/Artist name of CD TEXT
Each time you press DISPLAY, the display
changes as follows:
Disc title y Track title
Display information of MP3 discs
Display information in stop mode
The display shows the disc name or the album name,
total number of MP3 files in current album, total
number of albums*, and current disc number.
* When ALL DISCS or 1 DISC is selected.
Display information of the playing disc
While playing a disc, the display shows the current
disc number, track number, playing time of the track,
and the next disc number.
*
1
Each time you press TIME, the display changes as follows:
The information is displayed as follows (in stop mode):
• When the Artist Name is assigned to the current
disc
Disc Name/
Assigned Artist Name
When no disc name is assigned to the current
disc, the current disc number is displayed.
• When no Artist Name is assigned to the current
disc
Disc Name
When no disc name is assigned to the current
disc, the current disc number is displayed.
Display information of CD TEXT discs
Display information in stop mode
The display shows the disc title. When you assign the
Artist Name (see page 27), the artist name also appears
and scrolls in the display.
Playing time*
1
Current disc number or Disc Name etc.
Current track number
Current disc number
Next disc number
1
CD2NO DELAY
X-FADE
SHUFFLEPROGRAM 1 2 3 MP3 ID3
CD3
REPEATALBUM 1
FADE
TRACKALBUM
HITART.NEXT2nd
ALL SDISC
DISC
SONYHIT /HSite
CD1
CDTEXT
1
CD2
GROUP
NO DELAY
TEXTCDMULTI
PROGRAM 1 2 3 X-FADE DELETE
CD3
REPEATSHUFFLE 1
SECSTEPMINART.
GROUPTRACK
HITART.NEXT2nd
ALL SDISC
DISC
*DISC-2 **0 ***
CD1
2nd PLAYER
NEXT
DISC
DISC
1
CD2NO DELAY
TEXTCDMULTI
CD3
REPEATSHUFFLE 1
SECSTEPMINART.
GROUPTRACK
HITART.NEXT2nd
ALL SDISC
DISC
*DISC-2 **0 ***
MP3
Disc name or Album name
Total number of albums
Total number of MP3 files
in current album
NEXT DISC
2nd
DISC
ALBUM
Current disc number
ttt
Elapsed
playing time
of the track
Remaining
time of the
track
Remaining
time of the
disc

Playing CDs
Playing CDs
15
GB
ID3 tag
title/album/
artist
CD2
GROUP
NO DELAY
TEXTCDMULTI
CD3
SECSTEPMINART.HITART.NEXT2nd
SONG-1 ****
MP3
ALBUM
TRACK
NEXT DISC
2nd PLAYER
DISC
Current disc number
MP3 file name*
1
MP3 file number
Locating a Specific Disc
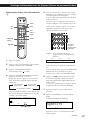
JOGNAME SEARCH +100
DISC
ENTER
HISTORY
MODE
H
Number
buttons
>10
Locating a disc on the player
Turn the JOG dial until the desired disc number or
Disc Name (see page 23) appears in the display. Push
the JOG dial to start play.
To skip discs quickly
Press +100. Each time you press +100, the player skips
100 discs.
HISTORY
Display information of the playing disc
The display shows the MP3 file name, MP3 file
number, playing time of the MP3 file, and current disc
number.
*
1
Each time you press DISPLAY, the display changes as
follows:
When the MP3 file does not have ID3 tag
t Disc name t Album (folder) name t MP3 file name
When the MP3 file has ID3 tag
t Disc name t Album (folder) name t
Notes on MP3
• ID3 tag applies only to version 1.
• The ID3 tag character codes comply with ASCII and ISO
standards. Joliet format discs can only be displayed in
ASCII. Incompatible characters will be displayed as “ ”.
• In the following cases, elapsed playing time and time of the
track remaining may not be displayed accurately.
– when an MP3 file of VBR (variable bit rate) is played.
– during fast-forward/reverse.
• When an MP3 file is played, the remaining time of the disc
is not displayed.
Playing time
(continued)

Playing CDs
16
GB
First character
Locating a disc directly using the remote Z
1 Press DISC.
2 Press the number button of the disc.
Example: To enter number 35
Press 3 then 5.
To enter number 100
Press 1, then 10/0 twice.
3 Press ENTER to start play.
Locating a disc by searching for a specific
Disc Name (Name Search)
You can search for and locate a desired disc by the first
character of the Disc Name (see page 23). The Name
Search function can display the Disc Name in
alphabetical order.
1 Press NAME SEARCH.
“NAME SEARCH” appears in the display.
2 Turn the JOG dial to find the desired disc.
As you turn the JOG dial, the Disc Names starting
with the input character appear in the display.
The following characters are displayed as the first
character.
A B C D E F G H I J K L M N O P Q R S T U V W X
Y Z 0 1 2 3 4 5 6 7 8 9
If “NOT FOUND” appears in the display while
inputting the first character with the JOG dial, no
disc has been labeled using the input character.
Notes
• When searching for input characters, blanks and
symbols before the first character in the Disc Name are
ignored.
• When searching for input characters, upper and lower
cases cannot be differentiated.
3 Push the JOG dial to select the disc.
In Program Play mode, the disc will be added to
the end of the program.
To cancel Name Search
Press NAME SEARCH again.
Note
The Name Search function on the player does not work
during ALL DISCS shuffle play.
Locating a disc searching in the playback
history (History Search)
The player automatically stores the playback history of
ten discs that are recently played back for 30 seconds or
over. You can search and play a desired disc in the
playback history.
1 Press HISTORY.
The indicator on the HISTORY button lights up
and the disc number or Disc Name of the disc that
is recently stored in the playback history appears
in the display (History Mode).
2 Turn the JOG dial to select a desired disc.
Turn clockwise to select a previously stored disc
and turn counterclockwise to select a recently
stored disc.
3 Push the JOG dial to start playing the selected disc.
The indicator on the HISTORY button goes off and
the History Mode is canceled.
Notes
• You cannot edit the playback history.
• The player stores a single disc in the playback history only
once even if the disc is played several times.
• The playback history is stored only when the disc is played
in Continuous or 1 DISC Shuffle Play mode.
• You can select History Mode only when the disc is being
played in the Continuous mode or 1 DISC Shuffle Play
mode.
DISC
CDTEXT
1
CD2
GROUP
NO DELAY
MULTI
PROGRAM 1 2 3 X-FADE DELETE
CD3
REPEATSHUFFLE 1
SECSTEPMINART.
GROUPTRACK
HITART.NEXT2nd
ALL SDISC
SONYHIT **S ***
CD1

Playing CDs
Playing CDs
17
GB
Specifying the Next Disc to
Play
You can specify the next disc to play while playing a
disc in Continuous Play mode.
While playing a disc, turn the JOG dial. “NEXT DISC”
flashes in the display and the disc number or Disc
Name (see page 23) changes as you turn the JOG dial.
When the desired disc number or Disc Name appears
in the display, stop turning the JOG dial.
After the current disc is played, the next disc you have
specified starts playing.
If you want to skip to the next disc right away, push
the JOG dial while playing the current disc.
Playing Discs (Album) in
Various Modes (Repeat/Shuffle
Play)
You can play discs or tracks (MP3 files) repeatedly
(Repeat Play) in any play mode.
You can also have the player “shuffle” the tracks (MP3
files) and play in random order (Shuffle Play). The
player shuffles all the tracks on all discs or on the disc
you specify.
2nd PLAYER
NEXT
DISC
DISC
CD TEXT
1
CD2
GROUP
NO DELAY
MULTI
PROGRAM 1 2 3 X-FADE DELETE
CD3
REPEATSHUFFLE 1
SECSTEPMINART.
GROUPTRACK
HITART.2nd
ALL SDISC
DISC
*DISC-3 **8 ***
CD1
NEXT
Next disc number or the Disc Name
Current disc number
REPEAT
SHUFFLE JOGH
(continued)
H
REPEAT
SHUFFLE
DISC +/–
Number
buttons
DISC
ENTER
ALBUM –/+

Playing CDs
18
GB
Playing all tracks (MP3 files) on a specified
disc (album) in random order
1
Press SHUFFLE repeatedly until “1 DISC”
(“ALBUM”) and “SHUFFLE” appear in the
display.
2 Turn the JOG dial until the desired disc (album)
number appears in the display.
When using the remote, first press DISC, press the
number button of the disc, and then press ENTER,
or press ALBUM –/+ repeatedly.
3 Press H.
1 DISC (ALBUM) Shuffle Play starts.
“
” appears in the display while the player is
shuffling the tracks.
To cancel Shuffle Play
Press CONTINUE.
z You can go to the next disc during 1 DISC Shuffle
Play Z
Press DISC +.
Note
You cannot specify the next disc to play during Shuffle Play.
To cancel Repeat Play
Press REPEAT twice.
To repeat the current track (MP3 file)
While the track (MP3 file) you want is being played,
press REPEAT one or more times until “REPEAT 1”
appears in the display.
To cancel REPEAT 1 Play
Press REPEAT.
Notes on Repeat Play
• In all Repeat Play modes other than “REPEAT1,” playback
is repeated five times, and then stops.
• During “ALL DISCS SHUFFLE PLAY” mode, the only
Repeat Play mode that can be selected is “REPEAT1.”
Playing all tracks on all discs in random
order
1 Press SHUFFLE repeatedly until “ALL DISCS” and
“SHUFFLE” appear in the display.
2 Press H.
ALL DISCS Shuffle Play starts.
“
” appears in the display while the player is
shuffling the discs or the tracks.
Note
Even if ALL DISCS Random Play mode is selected, the player
may playback a single track two or more times.
Playing repeatedly (Repeat Play)
Press REPEAT while playing a disc.
“REPEAT” appears in the display. The player repeats
the discs/tracks (MP3 files) as follows:
When the disc is played in
ALL DISCS Continuous
Play (page 12)
1 DISC Continuous Play
(page 12)
ALBUM Continuous Play
(page 12)
1 DISC Shuffle Play
(this page)
ALBUM Shuffle Play (this
page)
Program Play (page 19)
The player repeats
All tracks on all discs
All tracks on the current disc
All tracks on the current
album.
All tracks on the current disc
in random order
All tracks on the current album
in random order
The same program

Playing CDs
Playing CDs
19
GB
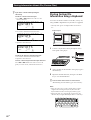
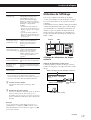
Creating Your Own Program
(Program Play)
You can arrange the order of the tracks (MP3 files),
and/or discs (albums) to create three different
programs. A program can contain up to 32 “steps.”
One “step” may contain a track (file) or a whole disc
(album).
You can make programs using the controls on the
remote or on the player. However, the programming
procedures are different.
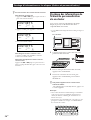
Creating a program on the player
1 Press PROGRAM until the desired program
number (PROGRAM 1, 2, or 3) appears in the
display.
If a program is already stored in the selected
program number, the last step of the program
appears in the display. When you want to erase the
whole program, hold down CLEAR until
“CLEAR” appears in the display (see page 20).
2 Turn the JOG dial until the desired disc number
appears in the display.
3 To program a whole disc, skip this step and go to
step 7.
To program a whole album or an MP3 file, go to
step 4.
To program an audio track, turn the l AMS
L dial until the desired track number appears in
the display and go to step 7.
SDISCALL
NEXT
CDTEXT
1
CD2
GROUP
NO DELAY
MULTI
CD3
REPEATSHUFFLE 1
SECSTEPMINART.
GROUPTRACK
HITART.2nd DISC
*DISC-2 **0 ***
CD1
PROGRAM 1
(continued)
SDISCALL
NEXT
CDTEXT
1
CD2
GROUP
NO DELAY
MULTI
CD3
REPEATSHUFFLE 1
SECSTEPMINART.
GROUPTRACK
HITART.2nd DISC
*DISC-2 **0 ***
CD1
PROGRAM 1
Track number
4 If the ALBUM SELECT button is off, press ALBUM
SELECT.
5 Turn the JOG dial until the desired album number
or album name appears in the display.
6 To program a whole album, skip this step and go
to step 7.
To program an MP3 file, turn the l AMS L
dial until the desired MP3 file number appears in
the display.
7 Push the JOG dial.
8 To program other discs (albums)/tracks (MP3
files), do the following:
To program
All tracks of another disc(s)
Other tracks on the same disc
Other tracks on other discs
All MP3 files of another
album(s)*
Other MP3 files on the same
album*
Other MP3 files on other
albums*
* To select MP3 files on another disc, be sure to perform
step 2 first.
9 Press H to start Program Play.
Repeat Step(s)
2 and 7
3 and 7
2, 3, and 7
4, 5, and 7
6 and 7
4, 5, 6, and 7
The track
being programmed
SDISCALL
NEXT
CDTEXT
1
CD2
GROUP
NO DELAY
MULTI
CD3
REPEATSHUFFLE 1
SECSTEPMINART.
GROUPTRACK
HITART.2nd DISC
*DISC-2 **0 ***
CD1
PROGRAM 1
Playing order
The disc being
programmed
SDISCALL
NEXT
CDTEXT
1
CD2
GROUP
NO DELAY
MULTI
CD3
REPEATSHUFFLE 1
SECSTEPMINART.
GROUPTRACK
HITART.2nd DISC
*DISC-2 **0 ***
CD1
PROGRAM 1
File number
CHECK
PROGRAM
JOG
H
CLEAR
l AMS L
ALBUM SELECT

Playing CDs
20
GB
Changing the programmed order
You can change your program before you start playing.
To
Erase a track (MP3 file) or disc
(album)
Erase the last track (MP3 file)
or disc (album) in the
program
Add tracks (MP3 file) or discs
(albums) to the end of the
program
You need to
Press CHECK until the track
(MP3 file) or disc (album)
you don’t want appears in
the display, then press
CLEAR.
Press CLEAR. Each time you
press the button, the last
programmed track (MP3 file)
or disc (album) will be
cleared.
Follow the programming
procedure.
Erasing the program stored in memory
1 Press PROGRAM repeatedly in stop mode until
the program number (PROGRAM 1, 2, or 3) you
want to erase appears in the display.
2 Press and hold CLEAR.
The “steps” will be erased one at a time, starting
with the last step in the program.
To cancel Program Play
Press CONTINUE.
z The programs remain even after Program Play ends
When you press H in Program Play mode, you can play
the same program again.
z The program remains until erased
Even if you replace discs, the programmed disc (album)
and track (MP3 file) numbers remain. Therefore, the
player will play the new disc (album) and track (MP3
file) numbers. However, the programmed disc (album)
and track (MP3 file) numbers that are not found in the
player or on the disc are deleted from the program, and
the rest of the program is played in the programmed
order.
z You can select the program number (PROGRAM 1,2,
or 3) by using the remote Z
Press PROGRAM on the remote repeatedly until the
desired program number appears in the display.
Note
If you select Artist Play mode (on page 29), Program Play will
be canceled.
Checking the programmed order
You can check your program before or after you start
playing.
Press CHECK.
Each time you press this button, the display shows the
disc and track number (album name and MP3 file
number) of each step in the programmed order. (When
a whole disc (album) is programmed as one step, “AL”
appears instead of the track (MP3 file) number.) After
the last step in the program, the display shows “– END
–” and returns to the original display.
La page est en cours de chargement...
La page est en cours de chargement...
La page est en cours de chargement...
La page est en cours de chargement...
La page est en cours de chargement...
La page est en cours de chargement...
La page est en cours de chargement...
La page est en cours de chargement...
La page est en cours de chargement...
La page est en cours de chargement...
La page est en cours de chargement...
La page est en cours de chargement...
La page est en cours de chargement...
La page est en cours de chargement...
La page est en cours de chargement...
La page est en cours de chargement...
La page est en cours de chargement...
La page est en cours de chargement...
La page est en cours de chargement...
La page est en cours de chargement...
La page est en cours de chargement...
La page est en cours de chargement...
La page est en cours de chargement...
La page est en cours de chargement...
La page est en cours de chargement...
La page est en cours de chargement...
La page est en cours de chargement...
La page est en cours de chargement...
La page est en cours de chargement...
La page est en cours de chargement...
La page est en cours de chargement...
La page est en cours de chargement...
La page est en cours de chargement...
La page est en cours de chargement...
La page est en cours de chargement...
La page est en cours de chargement...
La page est en cours de chargement...
La page est en cours de chargement...
La page est en cours de chargement...
La page est en cours de chargement...
La page est en cours de chargement...
La page est en cours de chargement...
La page est en cours de chargement...
La page est en cours de chargement...
La page est en cours de chargement...
La page est en cours de chargement...
La page est en cours de chargement...
La page est en cours de chargement...
La page est en cours de chargement...
La page est en cours de chargement...
La page est en cours de chargement...
La page est en cours de chargement...
La page est en cours de chargement...
La page est en cours de chargement...
La page est en cours de chargement...
La page est en cours de chargement...
-
 1
1
-
 2
2
-
 3
3
-
 4
4
-
 5
5
-
 6
6
-
 7
7
-
 8
8
-
 9
9
-
 10
10
-
 11
11
-
 12
12
-
 13
13
-
 14
14
-
 15
15
-
 16
16
-
 17
17
-
 18
18
-
 19
19
-
 20
20
-
 21
21
-
 22
22
-
 23
23
-
 24
24
-
 25
25
-
 26
26
-
 27
27
-
 28
28
-
 29
29
-
 30
30
-
 31
31
-
 32
32
-
 33
33
-
 34
34
-
 35
35
-
 36
36
-
 37
37
-
 38
38
-
 39
39
-
 40
40
-
 41
41
-
 42
42
-
 43
43
-
 44
44
-
 45
45
-
 46
46
-
 47
47
-
 48
48
-
 49
49
-
 50
50
-
 51
51
-
 52
52
-
 53
53
-
 54
54
-
 55
55
-
 56
56
-
 57
57
-
 58
58
-
 59
59
-
 60
60
-
 61
61
-
 62
62
-
 63
63
-
 64
64
-
 65
65
-
 66
66
-
 67
67
-
 68
68
-
 69
69
-
 70
70
-
 71
71
-
 72
72
-
 73
73
-
 74
74
-
 75
75
-
 76
76


Sony CDP-CX455 Le manuel du propriétaire
- Catégorie
- Lecteur CD
- Taper
- Le manuel du propriétaire
dans d''autres langues
- English: Sony CDP-CX455 Owner's manual
Documents connexes
-
Sony CDP-CE545 Le manuel du propriétaire
-
Sony CDP-CX450 Le manuel du propriétaire
-
Sony CDP-XE570B Le manuel du propriétaire
-
-
Sony RCD-W100 Mode d'emploi
-
Sony CDP-CE575 Manuel utilisateur
-
-
-
-