
STIL - 254 rue Foch – Vaux le pénil – France
www.stil.fr
FR. Notice d’utilisation : thermomètre DUO 5513
1. Caractéristiques principales
Max / Min / Hold fonction
Émissivité réglable: 0.1 ~ 1.0
Résolution: 0.1 ℃ (0.1 ℉)
Fonction de maintien automatique des données
Auto-Off 3 minutes
3. Utilisation de l’appareil
1. Pointez l'avant du lecteur vers la surface à mesurer.
2. Appuyez sur le bouton « IR » : la température infrarouge apparaît dans la zone « IR Temp » en haut de l’écran et mesure la température de
surface.
3. Insérer la sonde en acier dans l'objet à tester. Appuyez sur le bouton « TC » : la température de la sonde apparaît dans la zone « TC Temp »
en bas de l’écran et mesure la température à cœur.
4. En mode « HOLD » : l'appareil s'éteint automatiquement après 3 minutes d'inactivité.
Remarque:
En mode IR, les lectures de TC seront enregistrées automatiquement et inversement. Hold s’affiche en dessous de l’unité de mesure sur l’écran,
en haut et en bas.
4. Réglages de l’appareil :
1. Bouton « IR »: Appuyer sur le bouton « IR » pour allumer le thermomètre, appuyez de nouveau sur le bouton pour faire une mesure
infrarouge.
2. Bouton « TC »: Appuyez sur le bouton « TC » pour allumer le thermomètre, appuyez de nouveau sur le bouton pour prendre une mesure
avec la sonde de pénétration
3. Bouton « SET » en mode de mesure : Appuyer sur « SET » pour changer l’unité de température (°C/°F).
4. Bouton « MODE » en mode « HOLD » : Appuyer sur « MODE » : choix de plusieurs modes : max, min, lock et émissivité. Appuyer sur « mode »
pour passer de l’un à l’autre. Appuyer à nouveau sur le bouton pour revenir au mode de mesure classique :
« MAX » : l’appareil passe en mode « MAX ». Appuyer sur le bouton « IR » et seule la température maximale détectée apparaîtra sur l’écran.
« MIN » : l'appareil passe en mode « MIN ». Appuyer sur le bouton « IR » et seule la température minimale détectée apparaîtra sur l’écran.
« LOCK » : l'appareil passe en mode « LOCK », le compteur prendra alors une température infrarouge sans appuyer sur le bouton IR de façon
continue.
Choix de l’émissivité : 0.95
E
apparait à l’écran, il s’agit de l’émissivité de base. Appuyer sur « SET » pour ajuster la valeur d'émissivité.
Remplacement de batterie
Lorsque l'icône de pile faible apparaît, remplacez la pile. Pour cela, ouvrir le compartiment des piles et remplacer la pile 3V et refermer.
5. A propos
Champ de vision :
Plus l'objet cible est petit, plus le thermomètre IR doit être proche de lui pour une mesure précise.
L’objet à tester doit être plus grand que la taille du point calculée par le diagramme du champ de vision (voir au dos de l’appareil).
Remarque :
Non recommandé pour mesurer des surfaces métalliques brillantes ou polies comme l'acier inoxydable, l'aluminium...
Ne pas utiliser pour effectuer des mesures à travers des surfaces transparentes telles que le verre.
Si la surface de l'objet à tester est couverte de givre, d'huile, de crasse, etc. : nettoyez-la avant de prendre la mesure.
Maintenance
Ne pas utiliser de liquides pour nettoyer l'appareil, essuyez-le avec un chiffon doux et sec
Ne pas démonter l'appareil
Ne l'immergez pas dans l'eau.
Ne le stockez pas à haute température ou à l’humidité.
User’s Manual
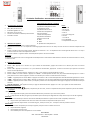
Ecran :
1. Capteur IR
2. Ecran LCD
3. Touche SET
4. Clé TC
5. Trou pour dragonne
6. Sonde
7. Touche IR
8. Touche MODE
9. Compartiment de la pile
2. Description de l’appareil cf. schémas
1. Température IR
2. Symbole de température sonde
3. Température sonde
4. Symbole d'attente de TC
5. Unités de la température
6. IR hold symbole
7. Unités de température
8. Symbole de la batterie
9. Mesure continue IR
10. MIN
11. MAX
12. Symbole de la température IR

STIL - 254 rue Foch – Vaux le pénil – France
www.stil.fr
2 IN 1
IR and Contact Infrared Thermometer
1. Introduction
This unit can provide fast, easy and accurate temperature readings.
It is a 2 in 1 thermometer with both non-contact infrared and foldable contact penetration probe;
it is mainly used for measuring temperature of food and liquid.
2. Features
◆Fast and precise non-contact infrared and contact measurement ◆Max/Min/Hold function
◆Non-contact continuous measuring ◆Adjustable emissivity: 0.1~1.0
◆Resolution:0.1℃ (0.1℉) ◆Auto data hold function
◆Auto power off2.
3. Field of View
The meter's field of view is 4:1, for example, if the meter is 4 inches from the target spot, the diameter of the target must be at least 1 inch. Other distance ratios are show below in
the field of view diagram.
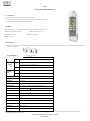
Range
IR
-35~330°C/-31~626°F
Probe
-20~260°C/-4~500°F
Accuracy
IR
-35~0°C/-31~32°F:±4°C/7.2°F
0~330°C /32°F:±2% of reading±2°C/3.6°F
Probe
-20~260°C/-4~500°F:±1% of reading±1.5°C/3.6°F
Response
Time
IR
﹤250 ms
Probe
﹤10s
Optical Resolution
4:1
Emissivity
Adjustable: 0.1~1.0
Resolution
0.1℃(0.1℉)
Spectral Response
8~14um
Polarity Display
Auto display, "-" indicates negative, positive has no sign.
Over-range Indication
LO
HI
Automatic Power Off
After 3 minutes of inactivity
Operating Temp.
0°C to 50°C / 32°F to 122°F
Storage Temp.
-20°C to 60°C / -4°F to 140°F
Relative Humidity
Operating::10 to 95%RH Storage::<80% RH
Power Supply
One “CR2032” 3.0V battery
Weight
70g
Probe Size
Ø3.5×108mm
Dimensions(L*W*H)
151×41×20mm
Measurement Note:If the meter is being used in an ambient temperature environment with wide temperature change, please leave the meter for 30 minutes to adjust to the
environment before taking measurements.
4. Specifications

STIL - 254 rue Foch – Vaux le pénil – France
www.stil.fr
5. Meter Description
1. IR Sensor
2. LCD Display
3. SET Key
4. TC Key
5. String hole
6. Probe
7. IR Key
8. MODE Key
9. Battery cover
6. LCD Description
1. IR reading
7. Temperature units
2. TC temperature symbol
8. Battery symbol
3. TC reading
9. IR continuous measuring
4. TC hold symbol
10. MIN symbol
5. Temperature units
11. MAX symbol
6. IR hold symbol
12. IR temperature symbol
7. Operating Instruction
1. Operating steps:
1.1 Point the front of the meter towards the surface to be measured.
1.2 Press“ ” button, infra-red temperature appears in the IR Temp area, on the top half of the LCD display.
1.3 Insert the steel probe into the object to be tested. Press“ ”button,TC temperature appears in the TC Temp area on the bottom half of the display.
1.4 Under “HOLD” mode, meter will power off automatically after 3 minutes of no activity
Notes:Under IR mode, TC readings will be held automatically
Under TC mode, IR readings will be held automatically
2.Button Function
2.1 Button: under measuring mode. Press “ ” button to change the temperature units.
2.2 Button: under “HOLD” mode, press“ ”button,meter enters into step by step, press button again to return to normal measuring mode
2.3 Press“ ”button, “MAX” appears on the LCD, meter enters into“ ” mode. Press“ ” button and only the maximum temperature detected will appear on the display
2.4 Press“ ” button,“MIN” appears on the LCD, meter enters into“ ” mode. Press“ ” button and only the minimum temperature detected will appear on the display
2.5Press“ ” button,“LOCK” appears on the LCD, meter enters into“ ” mode. This means the meter will continuously take an infra-red temperature without pressing the IR
button
2.6 Press “ ”, “ ” appears on the LCD. Press “ ” to adjust the emissivity value
2.7 Button: Press “ ” button to turn the meter on,press“ ” button again to take an infra-red reading
2.8 Button: Press“ ”button to turn the meter on, press TC to take a temperature reading with the penetration probe
3.Battery Replacement
3.1 When the low battery icon“ ”appears, replace the battery.
3.2 Open the battery compartment, replace the 3V battery and close the battery compartment
8. Notes
1)Field of View
The smaller the target object is, the closer the meter should be to it for accurate measuring.
When accuracy is critical, make sure the target is at least twice as large as the spot size.

STIL - 254 rue Foch – Vaux le pénil – France
www.stil.fr
As distance (D) from the object increases, the spot size (S) of the area measured by the unit should become larger.
2)Locating a hot spot
To find a hot spot, first aim the thermometer to the outside of target area, then scan across in an up and down motion until the hot spot is located.
3) Notice
Not recommend for measuring shiny or polished metal surfaces like stainless steel, aluminum, etc.
Do not use to take measurements through transparent surfaces such as glass.
If the surface of the object under test is covered with frost, oil, grime, etc., clean it before taking measurement.
4)Maintenance
Do not use volatile liquids to clean the unit, wipe it with dry soft cloth
Do not disassemble the unit
Do not immerse it in water.
Do not store it in high temperature or humidity.
9. Accessories
User’s manual
One “CR2032” 3.0V battery
-
 1
1
-
 2
2
-
 3
3
-
 4
4


dans d''autres langues
- English: STIL DUO 5513
Autres documents
-
Klein Tools IR10 Manuel utilisateur
-
Greenlee Greenlee TG-2000 Manuel utilisateur
-
 RayTek RAYST81 Le manuel du propriétaire
-
MasterCool 52227 Mode d'emploi
-
Digi-Sense 35625-40 Le manuel du propriétaire
-
Milwaukee 2276-21 Manuel utilisateur
-
IDEAL INDUSTRIES 61-685 Manuel utilisateur
-
Ideal 61-827 Manuel utilisateur
-
Hendi 271254 Manuel utilisateur
