Dremel PC10 Mode d'emploi
- Catégorie
- Outils électroportatifs
- Taper
- Mode d'emploi

IMPORTANT: IMPORTANT : IMPORTANTE:
Read Before Using Lire avant usage Leer antes de usar
Operating/Safety Instructions
Consignes de sécurité/d’utilisation
Instrucciones de funcionamiento y seguridad
For English Version Version française Versión en español
See page 2 Voir page 24 Ver la página 46
1-800-4-DREMEL (1-800-437-3635) www.dremel.com
P.O. Box 081126 Racine, WI 53408-1126
PC10
1600A018W0AA 02-18 PC10.qxp_Layout 1 2/7/18 7:28 AM Page 1

2
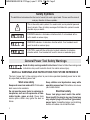
Safety Symbols
The definitions below describe the level of severity for each signal word. Please read the manual
and pay attention to these symbols.
!
This is the safety alert symbol. It is used to alert you to potential personal
injury hazards. Obey all safety messages that follow this symbol to avoid
possible injury or death.
DANGER indicates a hazardous situation which, if not avoided, will re-
sult in death or serious injury.
WARNING indicates a hazardous situation which, if not avoided, could
result in death or serious injury.
CAUTION, used with the safety alert symbol, indicates a hazardous
situation which, if not avoided, will result in minor or moderate injury.
Read all safety warnings and all instructions. Failure to follow the warnings and
instructions may result in electric shock, fire and/or serious injury.
SAVE ALL WARNINGS AND INSTRUCTIONS FOR FUTURE REFERENCE
The term “power tool” in the warnings refers to your mains-operated (corded) power tool or bat-
tery-operated (cordless) power tool.
General Power Tool Safety Warnings
Work area safety
Keep work area clean and well lit. Cluttered or
dark areas invite accidents.
Do not operate power tools in explosive at-
mospheres, such as in the presence of flam-
mable liquids, gases or dust. Power tools
create sparks which may ignite the dust or
fumes.
Keep children and bystanders away while
operating a power tool. Distractions can cause
you to lose control.
Electrical safety
Power tool plugs must match the outlet.
Never modify the plug in any way. Do not use
any adapter plugs with earthed (grounded)
power tools. Unmodified plugs and matching
outlets will reduce risk of electric shock.
1600A018W0AA 02-18 PC10.qxp_Layout 1 2/7/18 7:28 AM Page 2

3
Avoid body contact with earthed or grounded
surfaces such as pipes, radiators, ranges
and refrigerators. There is an increased risk of
electric shock if your body is earthed or
grounded.
Do not expose power tools to rain or wet
conditions. Water entering a power tool will in-
crease the risk of electric shock.
Do not abuse the cord. Never use the cord
for carrying, pulling or unplugging the power
tool. Keep cord away from heat, oil, sharp
edges or moving parts. Damaged or entangled
cords increase the risk of electric shock.
When operating a power tool outdoors, use
an extension cord suitable for outdoor use.
Use of a cord suitable for outdoor use reduces
the risk of electric shock.
If operating a power tool in a damp location is
unavoidable, use a Ground Fault Circuit In-
terrupter (GFCI) protected supply. Use of an
GFCI reduces the risk of electric shock.
Personal safety
Stay alert, watch what you are doing and use
common sense when operating a power tool.
Do not use a power tool while you are tired or
under the influence of drugs, alcohol or med-
ication. A moment of inattention while operating
power tools may result in serious personal injury.
Use personal protective equipment. Always
wear eye protection. Protective equipment
such as dust mask, non-skid safety shoes, hard
hat, or hearing protection used for appropriate
conditions will reduce personal injuries.
Prevent unintentional starting. Ensure the
switch is in the off-position before connecting
to power source and / or battery pack, picking
up or carrying the tool. Carrying power tools
with your finger on the switch or energizing power
tools that have the switch on invites accidents.
Remove any adjusting key or wrench before
turning the power tool on. A wrench or a key
left attached to a rotating part of the power tool
may result in personal injury.
Do not overreach. Keep proper footing and
balance at all times. This enables better control
of the power tool in unexpected situations.
Dress properly. Do not wear loose clothing
or jewelry. Keep your hair, clothing and
gloves away from moving parts. Loose
clothes, jewelry or long hair can be caught in
moving parts.
If devices are provided for the connection of
dust extraction and collection facilities, en-
sure these are connected and properly used.
Use of dust collection can reduce dust-related
hazards.
Power tool use and care
Do not force the power tool. Use the correct
power tool for your application. The correct
power tool will do the job better and safer at the
rate for which it was designed.
Do not use the power tool if the switch does
not turn it on and off. Any power tool that can-
not be controlled with the switch is dangerous
and must be repaired.
Disconnect the plug from the power source
and/or the battery pack from the power tool
before making any adjustments, changing
accessories, or storing power tools. Such
preventive safety measures reduce the risk of
starting the power tool accidentally.
1600A018W0AA 02-18 PC10.qxp_Layout 1 2/7/18 7:28 AM Page 3

4
Store idle power tools out of the reach of
children and do not allow persons unfamiliar
with the power tool or these instructions to
operate the power tool. Power tools are dan-
gerous in the hands of untrained users.
Maintain power tools. Check for misalignment
or binding of moving parts, breakage of parts
and any other condition that may affect the
power tool’s operation. If damaged, have the
power tool repaired before use. Many acci-
dents are caused by poorly maintained power
tools.
Keep cutting tools sharp and clean. Properly
maintained cutting tools with sharp cutting edges
are less likely to bind and are easier to control.
Use the power tool, accessories and tool
bits etc. in accordance with these instructions,
taking into account the working conditions
and the work to be performed. Use of the
power tool for operations different from those in-
tended could result in a hazardous situation.
Service
Have your power tool serviced by a qualified
repair person using only identical replace-
ment parts. This will ensure that the safety of
the power tool is maintained.
Safety Warnings Common for
Sanding or Polishing Operations
This power tool is intended to function as a
sander or polisher. Read all safety warnings,
instructions, illustrations and specifications
provided with this power tool. Failure to follow
all instructions listed below may result in electric
shock, fire and/or serious injury.
Operations such as grinding, wire brushing,
or cutting-off are not recommended to be
performed with this power tool. Operations for
which the power tool was not designed may cre-
ate a hazard and cause personal injury.
Do not use accessories which are not specif-
ically designed and recommended by the
tool manufacturer. Just because the accessory
can be attached to your power tool, it does not
assure safe operation.
The rated speed of the accessory must be at
least equal to the maximum speed marked
on the power tool. Accessories running faster
than their rated speed can break and fly apart.
The outside diameter and the thickness of
your accessory must be within the capacity
rating of your power tool. Incorrectly sized ac-
cessories cannot be adequately guarded or con-
trolled.
Threaded mounting of accessories must
match the grinder spindle thread. For acces-
sories mounted by flanges, the arbour hole
of the accessory must fit the locating diame-
ter of the flange.Accessories that do not match
the mounting hardware of the power tool will run
out of balance, vibrate excessively and may
cause loss of control.
Do not use a damaged accessory. Before
each use inspect the accessory such as
abrasive wheels for chips and cracks, back-
ing pad for cracks, tear or excess wear, wire
brush for loose or cracked wires. If power
tool or accessory is dropped, inspect for
1600A018W0AA 02-18 PC10.qxp_Layout 1 2/7/18 7:28 AM Page 4

5
damage or install an undamaged accessory.
After inspecting and installing an accessory,
position yourself and bystanders away from
the plane of the rotating accessory and run
the power tool at maximum no-load speed
for one minute. Damaged accessories will nor-
mally break apart during this test time.
Wear personal protective equipment. De-
pending on application, use face shield,
safety goggles or safety glasses. As appro-
priate, wear dust mask, hearing protectors,
gloves and workshop apron capable of stop-
ping small abrasive or workpiece fragments.
The eye protection must be capable of stopping
flying debris generated by various operations.
The dust mask or respirator must be capable of
filtrating particles generated by your operation.
Prolonged exposure to high intensity noise may
cause hearing loss.
Keep bystanders a safe distance away from
work area. Anyone entering the work area
must wear personal protective equipment.
Fragments of workpiece or of a broken acces-
sory may fly away and cause injury beyond im-
mediate area of operation.
Never lay the power tool down until the ac-
cessory has come to a complete stop. The
spinning accessory may grab the surface and
pull the power tool out of your control.
Do not run the power tool while carrying it at
your side. Accidental contact with the spinning
accessory could snag your clothing, pulling the
accessory into your body.
Regularly clean the power tool’s air vents.
The motor’s fan will draw the dust inside the
housing and excessive accumulation of pow-
dered metal may cause electrical hazards.
Do not operate the power tool near flammable
materials. Sparks could ignite these materials.
Do not use accessories that require liquid
coolants. Using water or other liquid coolants
may result in electrocution or shock.
Kickback and Related Warnings
Kickback is a sudden reaction to a pinched or
snagged rotating wheel, backing pad, brush or
any other accessory. Pinching or snagging
causes rapid stalling of the rotating accessory
which in turn causes the uncontrolled power tool
to be forced in the direction opposite of the ac-
cessory’s rotation at the point of the binding.
For example, if an abrasive wheel is snagged or
pinched by the workpiece, the edge of the wheel
that is entering into the pinch point can dig into
the surface of the material causing the wheel to
climb out or kick out. The wheel may either jump
toward or away from the operator, depending on
direction of the wheel’s movement at the point
of pinching. Abrasive wheels may also break
under these conditions.
Kickback is the result of power tool misuse
and/or incorrect operating procedures or condi-
tions and can be avoided by taking proper pre-
cautions as given below.
a) Maintain a firm grip on the power tool and
position your body and arm to allow you to
1600A018W0AA 02-18 PC10.qxp_Layout 1 2/7/18 7:28 AM Page 5

resist kickback forces. Always use auxiliary
handle, if provided, for maximum control
over kickback or torque reaction during
start-up. The operator can control torque reac-
tions or kickback forces, if proper precautions
are taken.
b) Never place your hand near the rotating
accessory. Accessory may kickback over your
hand.
c) Do not position your body in the area
where power tool will move if kickback oc-
curs. Kickback will propel the tool in direction
opposite to the wheel’s movement at the point
of snagging.
d) Use special care when working corners,
sharp edges etc. Avoid bouncing and snag-
ging the accessory. Corners, sharp edges or
bouncing have a tendency to snag the rotating
accessory and cause loss of control or kickback.
e) Do not attach a saw chain woodcarving
blade or toothed saw blade. Such blades cre-
ate frequent kickback and loss of control.
Safety Warnings Specific for
Sanding Operations
Do not use excessively oversized sanding
disc paper. Follow manufacturers recom-
mendations, when selecting sanding paper.
Larger sanding paper extending beyond the
sanding pad presents a laceration hazard and
may cause snagging, tearing of the disc or kick-
back.
Safety Warnings Specific for
Polishing Operations
Do not allow any loose portion of the polish-
ing bonnet or its attachment strings to spin
freely. Tuck away or trim any loose attach-
ment strings. Loose and spinning attachment
strings can entangle your fingers or snag on the
workpiece.
6
1600A018W0AA 02-18 PC10.qxp_Layout 1 2/7/18 7:28 AM Page 6

7
Additional Safety Warnings
GFCI and personal protection devices like elec-
trician’s rubber gloves and footwear will further
enhance your personal safety.
Do not use AC only rated tools with a DC
power supply. While the tool may appear to
work, the electrical components of the AC rated
tool are likely to fail and create a hazard to the
operator.
Keep handles dry, clean and free from oil and
grease. Slippery hands cannot safely control the
power tool.
Develop a periodic maintenance schedule for
your tool. When cleaning a tool be careful not
to disassemble any portion of the tool since
internal wires may be misplaced or pinched
or safety guard return springs may be im-
properly mounted. Certain cleaning agents such
as gasoline, carbon tetrachloride, ammonia, etc.
may damage plastic parts.
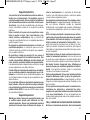
Some dust created by
power sanding, sawing,
grinding, drilling, and other construction ac-
tivities contains chemicals known to cause
cancer, birth defects or other reproductive
harm. Some examples of these chemicals
are:
• Lead from lead-based paints,
• Crystalline silica from bricks and cement and
other masonry products, and
• Arsenic and chromium from chemically-
treated lumber.
Your risk from these exposures varies, depend-
ing on how often you do this type of work. To re-
duce your exposure to these chemicals: work in
a well ventilated area, and work with approved
safety equipment, such as those dust masks
that are specially designed to filter out micro-
scopic particles.
Charger Safety Rules
Read and understand all instructions. Failure to follow all instructions listed
below, may result in electric shock, fire and/or serious personal injury.
IMPORTANT SAFETY AND OPERATING INSTRUCTIONS
SAVE THESE INSTRUCTIONS
This manual contains instructions for battery
charger model 510. Do not substitute any other
charger.
Before using battery charger, read all instruc-
tions and cautionary markings on battery
charger and product using battery.
1600A018W0AA 02-18 PC10.qxp_Layout 1 2/7/18 7:28 AM Page 7

8
Charge only Dremel Versa. Other types of cord-
less tools may burst causing personal injury and
damage.
Charge tool in temperatures above +32 de-
grees F (0 degrees C) and below +113 degrees
F (45 degrees C). Store tool in locations where
temperatures will not exceed 120 degrees F
(49 degrees C). This is important to prevent se-
rious damage to the battery cells.
Do not recharge tool in damp or wet environ-
ment. Do not expose charger to rain or snow.
Water entering battery charger may result in elec-
tric shock or fire.
Battery leakage may occur under extreme
usage or temperature conditions. Avoid con-
tact with skin and eyes. The battery liquid is
caustic and could cause chemical burns to tis-
sues. If liquid comes in contact with skin, wash
quickly with soap and water. If the liquid contacts
your eyes, flush them with water for a minimum
of 10 minutes and seek medical attention.
Place charger on flat nonflammable surfaces
and away from flammable materials when
recharging tool. Carpeting and other heat insu-
lating surfaces block proper air circulation which
may cause overheating of the charger and tool. If
smoke or melting of the charger or tool is ob-
served, unplug the charger immediately and do
not use the tool or charger. Contact customer
service immediately.
Make sure cord is located so that it will not be
stepped on, tripped over, or otherwise sub-
jected to damage or stress. Damaged plug and
cord may result in electric shock or fire.
Disconnect the charger by pulling the plug
rather than the cord. Do not operate charger
with damaged cord or plug; have them re-
placed immediately. Damaged plug or cord may
result in electric shock or fire.
Do not insert tool in charger if tool housing is
cracked. Using damaged tool may result in elec-
tric shock or fire.
Do not disassemble charger or operate the
charger if it has received a sharp blow, been
dropped or otherwise damaged in anyway. In-
correct reassembly or damage may result in elec-
tric shock or fire.
Before each use, check the battery charger,
cable and plug. If damage is detected, do not
use the battery charger. Never open the bat-
tery charger yourself, take it to a Dremel Fac-
tory Service Center, or qualified serviceman
only using original spare parts. Incorrect re-
assembly may result in electric shock or fire.
Do not use attachments not recommended or
sold by Dremel. Using attachments not recom-
mended may result in electric shock or fire.
Do not store tool in charger. Tool stored in
charger over a long period of time could lead to
battery pack damage and fire.
Unplug charger from outlet before storage, at-
tempting any maintenance or cleaning. Such
preventive safety measures reduce the risk of
electric shock or fire.
Keep the battery charger clean by wiping the
charger housing with a damp cloth. Contami-
nation may result in electric shock or fire.
1600A018W0AA 02-18 PC10.qxp_Layout 1 2/7/18 7:28 AM Page 8

9
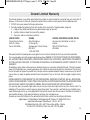
Battery Disposal
Do not attempt to disas-
semble the tool or remove
any com ponent projecting from the tool. Fire
or injury may result. Prior to disposal, protect ex-
posed terminals with heavy insulating tape to
prevent shorting.
LITHIUM-ION BATTERIES
If equipped with a lithium-ion battery, the battery
must be collected, recycled or disposed of in an
environ mentally sound manner.
“The EPA certified RBRC Bat-
tery Recycling Seal on the
lithium-ion (Li-ion) battery indi-
cates Robert Bosch Tool Corpo-
ration is voluntarily
participating in an industry pro-
gram to collect and recycle these batteries at the
end of their useful life, when taken out of service
in the United States or Canada. The RBRC pro-
gram provides a convenient alterative to placing
used Li-ion batteries into the trash or the munici -
pal waste stream, which may be illegal in your
area.
Please call 1-800-8-BATTERY for information on
Li-ion battery recycling and disposal bans/re-
strictions in your area, or return your batteries to
a Bosch/Dremel Service Center for recycling.
Robert Bosch Tool Corporation’s involvement in
this program is part of our commitment to pre-
serving our environment and conserving our nat-
ural resources.”
Do not open the tool or at-
tempt to remove battery
from your tool. Dispose of tool through your
local waste removal authority or a
Bosch/Dremel Service Center.
1600A018W0AA 02-18 PC10.qxp_Layout 1 2/7/18 7:28 AM Page 9

10
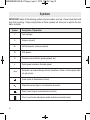
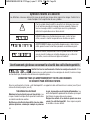
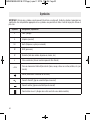
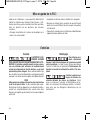
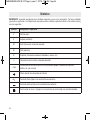
Symbols
IMPORTANT: Some of the following symbols may be used on your tool. Please study them and
learn their meaning. Proper interpretation of these symbols will allow you to operate the tool
better and safer.
Symbol Designation / Explanation
V Volts (voltage)
A Amperes (current)
Hz Hertz (frequency, cycles per second)
W Watt (power)
⌀
Diameter (size of drill bits, grinding wheels, etc.)
n Rated speed (maximum attainable speed)
.../min
Revolutions or reciprocation per minute (revolutions, strokes, surface speed, orbits
etc. per minute)
Arrow (action in the direction of arrow)
Alternating current (type or a characteristic of current)
Direct current (type or a characteristic of current)
Class II construction (designates double insulated construction tools)
1600A018W0AA 02-18 PC10.qxp_Layout 1 2/7/18 7:28 AM Page 10

11
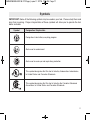
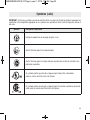
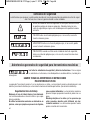
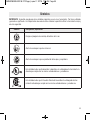
Symbols
IMPORTANT: Some of the following symbols may be used on your tool. Please study them and
learn their meaning. Proper interpretation of these symbols will allow you to operate the tool
better and safer.
Symbol Designation / Explanation
Designates Li-ion battery recycling program
Alerts user to read manual
Alerts user to wear eye and respiratory protection
This symbol designates that this tool is listed by Underwriters Laboratories,
to United States and Canadian Standards.
This symbol designates that this tool is listed by the Canadian Standards
Association, to United States and Canadian Standards.
1600A018W0AA 02-18 PC10.qxp_Layout 1 2/7/18 7:28 AM Page 11

12
HIGH SPEED
The tool runs at 2200 RPM max, making it the
fastest powered cleaning tool in the market.
The higher speed allows for faster and more
aggressive cleaning/removal, which helps elim-
inate much of the manual effort typically re-
quired for the user applications. Standard
powered cleaners spin around 300/min with
low-speed, high torque. These tools still require
extensive manual effort for cleaning applica-
tions. The Dremel Versa is the opposite – a
high-speed, low torque tool. The difference to
the user is that with the Dremel high-speed tool,
the speed combined with the accessory does
the work for you, without having to apply heavy
pressure. Simply hold the tool and guide it.
POWERFUL LITHIUM-ION
BATTERY TECHNOLOGY
Power is another great benefit you will experi-
ence while working with the Dremel Versa. The
combination of a compact and highly efficient
DC motor, smaller Lithium-ion battery cells and
smart electronics allow for tough applications.
Utilizing the cutting edge Lithium Technology
batteries benefits the user by giving them
greater consistency of power through a single
charge. It will not slowly loose performance dur-
ing use (like with AA batteries or NiCad).
Recharging is fast and easy with the micro USB
charger. You will not have to constantly replace
batteries. The charge time is also extremely
short (~2hr charge time, when charged with the
provided Dremel 510 1Amp USB power
adapter) so the tool can be ready when you
need it.
VERSATILE
There will be 4 different accessory attach-
ments: foam eraser pad, non-scratch scrub
pad, abrasive heavy-duty scrub pad, and nylon
bristle brush. These 4 accessories allow the
tool to be used on multiple surfaces to remove
dirt/build-up/material. The different levels of
abrasiveness of the pads and brush give the
user the ability to complete a wide spectrum of
applications. The hook-and-loop attachment
system allows the user to quickly change be-
tween the different accessories. The accessory
change mechanism is tool-less for ease-of-use
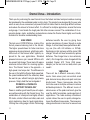
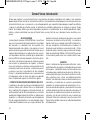
Dremel Versa – Introduction
Thank you for purchasing the new Dremel Versa, the fastest and most compact cordless cleaning
tool produced by the worldwide leader in rotary tools. This product was designed for the user who
wants an easy to use, convenient yet powerful tool that allows them to clean/prep difficult surfaces
and reduce the amount of manual effort. It is efficient for multiple applications around the home
and garage. It can handle the tough jobs that other cleaners cannot. The combination of its er-
gonomic design, motor, and battery and electronics makes the Dremel Versa highly user friendly
and ideal for versatile and demanding tasks.
1600A018W0AA 02-18 PC10.qxp_Layout 1 2/7/18 7:28 AM Page 12

13
and “frustration-free” operation for the user. The
Dremel Versa kit also comes with a splash
guard attachment.
COMPACT SIZE
The tool is designed so that it can be operated
with one hand. The overmolding on the top
helps the user grip the tool to give more control
in use, especially in wet applications. The small
size allows the user to clean in tight areas, and
also being cordless it is easy to take virtually
anywhere, indoor and outdoor.
WATER RESISTANT
The Dremel Versa is fully sealed so that it can
be safely used in wet applications. However, it
is not meant to be completely submerged in liq-
uid.
Battery tools are always in an operative condition. To reduce the risk of pos-
sible hazards do not operate the tool before reading the operating instructions.
SAVE THESE INSTRUCTIONS
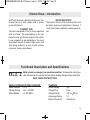
Functional Description and Specifications
VERSA CORDLESS POWER CLEANER
Model Number PC10
Voltage Rating 3.6V / 4V MAX
Rated Speed n 2,200 RPM
CHARGER
Model Number 510
Charge Time 2 Hrs
Voltage Rating 120 V 60 Hz
Amperage Rating 1A
Battery Chemistry Lithium-Ion
Dremel Versa – Introduction
1600A018W0AA 02-18 PC10.qxp_Layout 1 2/7/18 7:28 AM Page 13

14
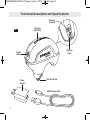
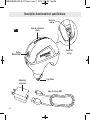
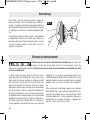
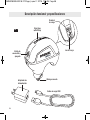
FIG. 1
On/Off
Button
Threaded Shank
Grip Zone
w/Soft Grip
Charging
Terminal
Power
Adapter
USB Charging Cable
Charging
Light
Functional Description and Specifications
1600A018W0AA 02-18 PC10.qxp_Layout 1 2/7/18 7:28 AM Page 14

15
To reduce the risk of injury,
always be sure the tool is
turned “OFF” before changing accessories,
changing backing pad, removing splash
guard, or servicing your cordless rotary
tool.
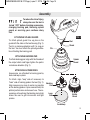
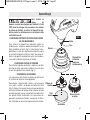
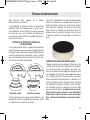
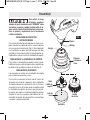
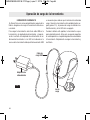
ATTACHING SPLASH GUARD
To attach splash guard: line up pins on the
guard with the slots on the tool housing (Fig. 2).
Twist in a clockwise direction until it is snug on
the tool. You must attach the splash guard be-
fore attaching the backing pad.
ATTACHING BACKING PAD
To attach backing pad: align with the threads of
the output shank and finger tighten the pad in
a clockwise direction (Fig. 2).
ATTACHING ACCESSORIES
Accessories are attached to backing pad by
hook-and-loop system.
To attach: align “loop” side of accessory to
“hook” side of backing pad on the tool (Fig. 2).
Align accessory as close to center as possible
on the backing pad so it spins concentrically for
optimal performance and ease of use. The ac-
cessories will overhang the backing pad, which
allows the user to get into corners and tight
spaces.
Assembly
Pin
Slot
Shank
Backing
Pad
Bristle
Brush
Accessory
Splash
Guard
Loop
Side
FIG. 2
1600A018W0AA 02-18 PC10.qxp_Layout 1 2/7/18 7:28 AM Page 15

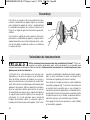
16
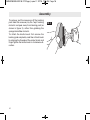
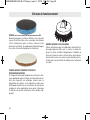
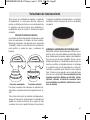
To remove: pull the accessory off the backing
pad. Hold the accessory by the “loop” backing
material and peel away from backing pad (as
shown in figure 3), rather than grabbing the
sponge/microfiber material.
To attach the bristle brush: first remove the
backing pad completely and then attach brush
by aligning the threads of the output shank and
finger tighten the bristle brush in a clockwise di-
rection.
FIG. 3
Assembly
1600A018W0AA 02-18 PC10.qxp_Layout 1 2/7/18 7:28 AM Page 16

The Dremel Versa is designed to work with
spray, foam, gel, or liquid cleaners. Before
using cleaning solutions please read and follow
manufacturer’s warnings and instructions for
use. Cover the surrounding area that you are
cleaning to protect from spray. Use splash
guard on open surfaces to contain spray. Rec-
ommended to apply water and cleaning agent
to the surface that needs cleaning and/or to the
accessory directly. If applying water or cleaning
agent directly on accessory, shake excess liq-
uid off or “pulse” the tool by quickly turning it
“on” and then “off” in a contained areas (i.e.
bucket or sink) to reduce spray.
To start cleaning, press and release the On/Off
button (Fig. 1) while the accessory is in contact
with the surface to be cleaned. The tool will
come up to speed quickly. Gently press to the
surface to be cleaned, do not press too hard,
let the tool do the work.
To turn the tool off, press and release the on/off
button.
The kit includes a backing pad, splash guard,
and 4 different accessories. Spot-test a small
section of the surface that you intend to clean
for acceptability before cleaning entire job.
SPLASH GUARD
It is recommended to use the splash guard for
all wet cleaning applications. Keep splash
guard in the “extended” position while tool is
running to contain the spray of water and clean-
ing solutions.
To get into tighter spaces, the splash guard can
be retracted into the “up” position.
To remove the splash guard entirely, turn the
tool off, unscrew the backing pad (counter-
clockwise when looking at the bottom of the
tool), then twist the splash guard a quarter turn
to remove. Screw the backing pad back on.
17
Use only Dremel
®
, high-performance accessories. Other accessories are not
designed for this tool and may lead to personal injury or property damage. Store
accessories in a dry and temperate environment to avoid deterioration.
VERSAVERSA
Extended Position Retracted Position
Operating Instructions
1600A018W0AA 02-18 PC10.qxp_Layout 1 2/7/18 7:28 AM Page 17

18
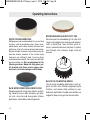
WHITE FOAM ERASER PAD
Multipurpose pad recommended for use on hard
surfaces, such as countertops, glass, floors, base-
boards, doors, walls, shoes, and non-stainless steel
appliances. Due to the micro-abrasive technology,
the pad will help to remove stains without using an
abrasive cleaner; however, if the surface being
cleaned is not sufficiently hard, it may be finely
scratched by the material. Test small area with light
pressure before use. Not recommended for the
following surfaces: Wood with high gloss, pol-
ish, brushed, satin, Faux, or bare; copper; stain-
less steel; non-stick coating or vehicle body.
BLUE MICROFIBER NON-SCRATCH PAD
Recommended for tough jobs without scratch-
ing. Good for use on pots and pans, grill exte-
rior, sink, stove top and stove grates, kitchen
appliances, and outdoor tools/equipment.
BROWN ABRASIVE HEAVY-DUTY PAD
Abrasive pad has embedded grit for jobs that
require more aggressive cleaning and removal,
such as metal prep, lawn furniture, paint re-
moval, uncoated cookware and more. It quickly
cuts through and removes tough stuck-on
messes.
BLACK NYLON BRISTLE BRUSH
Use for tough scrubbing applications, such as:
grout, tire rims, sinks, fixtures, equipment, patio
furniture, and various other surfaces in your
bathroom and kitchen. Durable nylon bristles are
angled to allow you to get into corners better.
Operating Instructions
1600A018W0AA 02-18 PC10.qxp_Layout 1 2/7/18 7:28 AM Page 18

19
ELECTRONIC MONITORING
Your tool is equipped with an internal electronic
monitoring system that helps to maximize
motor and battery performance by limiting the
current to the tool when overload and stall con-
ditions occur.
If you stall the tool for too long the tool will au-
tomatically turn off. Once this happens, simply
press and release the on/off button twice to
start the tool again, and continue using it.
When the battery becomes close to empty, the
tool may shut down automatically more fre-
quent than normal. If this happens, it is time to
recharge the tool.
Operating Instructions
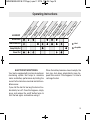
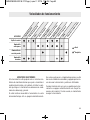
=
Ideal
=
Acceptable
ACCESSORY
Bristle Brush
Non-Scratch Pad
Heavy Duty Pad
Eraser Pad
H
a
r
d
S
ur
f
a
c
e
s
P
a
i
n
t
e
d
S
u
r
f
a
c
e
s
F
ab
r
i
c
s
S
t
ai
n
l
es
s
S
t
e
e
l
e
C
a
s
t
I
r
o
n
C
e
r
a
m
i
c
&
P
or
c
e
l
ain
A
l
u
mi
n
um
&
Me
t
a
l
Pl
a
s
t
i
c
&
L
a
m
i
n
at
e
Gl
a
s
s
P
a
i
n
t
&
R
u
s
t Re
m
o
v
a
l
1600A018W0AA 02-18 PC10.qxp_Layout 1 2/7/18 7:28 AM Page 19

20
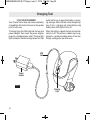
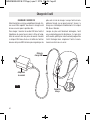
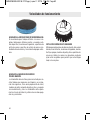
510 2 HOUR CHARGER
Your Dremel Versa does not come completely
charged from the factory. Be sure to charge tool
prior to initial use.
To charge: plug the USB cord into the tool and
power adapter, then insert the power adapter
plug into a standard power outlet. The blue LED
light located on the tool housing below the USB
outlet will turn on to signal the battery is receiv-
ing a charge. When the tool is fully charged (ap-
prox 2 Hrs.), charging will automatically stop
and the blue LED light will turn off.
When the battery is dead, the tool will automat-
ically turn off. This will be a sudden stop as op-
posed to a gradual winding down of the tool.
Simply recharge the tool and reuse.
Charging Tool
Power
Adapter
FIG. 4
Charging
Light
USB
Cord
1600A018W0AA 02-18 PC10.qxp_Layout 1 2/7/18 7:28 AM Page 20
La page est en cours de chargement...
La page est en cours de chargement...
La page est en cours de chargement...
La page est en cours de chargement...
La page est en cours de chargement...
La page est en cours de chargement...
La page est en cours de chargement...
La page est en cours de chargement...
La page est en cours de chargement...
La page est en cours de chargement...
La page est en cours de chargement...
La page est en cours de chargement...
La page est en cours de chargement...
La page est en cours de chargement...
La page est en cours de chargement...
La page est en cours de chargement...
La page est en cours de chargement...
La page est en cours de chargement...
La page est en cours de chargement...
La page est en cours de chargement...
La page est en cours de chargement...
La page est en cours de chargement...
La page est en cours de chargement...
La page est en cours de chargement...
La page est en cours de chargement...
La page est en cours de chargement...
La page est en cours de chargement...
La page est en cours de chargement...
La page est en cours de chargement...
La page est en cours de chargement...
La page est en cours de chargement...
La page est en cours de chargement...
La page est en cours de chargement...
La page est en cours de chargement...
La page est en cours de chargement...
La page est en cours de chargement...
La page est en cours de chargement...
La page est en cours de chargement...
La page est en cours de chargement...
La page est en cours de chargement...
La page est en cours de chargement...
La page est en cours de chargement...
La page est en cours de chargement...
La page est en cours de chargement...
La page est en cours de chargement...
La page est en cours de chargement...
La page est en cours de chargement...
La page est en cours de chargement...
-
 1
1
-
 2
2
-
 3
3
-
 4
4
-
 5
5
-
 6
6
-
 7
7
-
 8
8
-
 9
9
-
 10
10
-
 11
11
-
 12
12
-
 13
13
-
 14
14
-
 15
15
-
 16
16
-
 17
17
-
 18
18
-
 19
19
-
 20
20
-
 21
21
-
 22
22
-
 23
23
-
 24
24
-
 25
25
-
 26
26
-
 27
27
-
 28
28
-
 29
29
-
 30
30
-
 31
31
-
 32
32
-
 33
33
-
 34
34
-
 35
35
-
 36
36
-
 37
37
-
 38
38
-
 39
39
-
 40
40
-
 41
41
-
 42
42
-
 43
43
-
 44
44
-
 45
45
-
 46
46
-
 47
47
-
 48
48
-
 49
49
-
 50
50
-
 51
51
-
 52
52
-
 53
53
-
 54
54
-
 55
55
-
 56
56
-
 57
57
-
 58
58
-
 59
59
-
 60
60
-
 61
61
-
 62
62
-
 63
63
-
 64
64
-
 65
65
-
 66
66
-
 67
67
-
 68
68


Dremel PC10 Mode d'emploi
- Catégorie
- Outils électroportatifs
- Taper
- Mode d'emploi
dans d''autres langues
- English: Dremel PC10 Operating instructions
- español: Dremel PC10 Instrucciones de operación
Documents connexes
-
Dremel HSGP-01 Manuel utilisateur
-
Dremel 8300 Manuel utilisateur
-
Dremel Lite 7760 Operating/Safety Instructions Manual
-
-
Dremel Outil Rotatif Multifonction 8220 Sans-fil 12V Manuel utilisateur
-
-