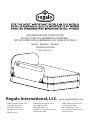
Regalo 4022HD Manuel utilisateur
- Catégorie
- Meubles de bébé
- Taper
- Manuel utilisateur
Ce manuel convient également à

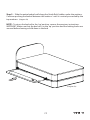
HIDE AWAY BED RAIL INSTRUCTIONS
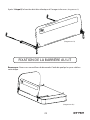
INSTRUCTIONS DE LA BARRIÈRE ESCAMOTABLE
INSTRUCCIONES PARA LA BARANDILLA DE CAMA OCULTABLE
Modèles : Modelo:Model :
4022HD & 5022HD
...........................................................................
Regalo International, LLC.
www.regalo-baby.com
3200 Corporate Center Drive,
Suite 100, Burnsville,
MN 55306-9803, USA
Toll Free: 866-272-5274
Made in China
3200 Corporate Center Drive,
Suite 100, Burnsville,
MN 55306-9803, É.-U.
Numéro sans frais: 866-272-5274
Fabriqué en Chine
3200 Corporate Center Drive,
Suite 100, Burnsville,
MN 55306-9803, EE. UU.
Llame gratis al: 866-272-5274
Hecha en China
07/24/2013_DC


1
WARNING:
-SUFFOCATION AND STRANGULATION HAZARD.
-Gaps in and around bed rails have entrapped young children
and killed infants.
-NEVER use with children younger than 2 years old. Use
ONLY with older children who can get in and out of adult bed
without help. NEVER use in place of crib.
-NEVER use unless bed rail is tight against mattress, without
gaps, and at least 9 in. from headboard and footboard. Do not
fill gaps with pillows, blankets, or other items that can suffocate
children.
-NEVER use on toddler bed, bunk bed, water bed, or bed with
inflatable mattress.
-Use ONLY on adult bed.
-Use ONLY on adult bed with box spring and mattress.
-Use ONLY on a bed ranging in size from twin size to queen size.
-
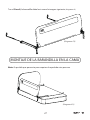
THIS BED RAIL IS NOT RECOMMENDED TO BE USED ON A
PLATFORM STYLE OR SIMILAR STYLE BED
-Discontinue use if damaged, broken or if parts are missing.
IMPORTANT ! KEEP FOR FUTURE REFERENCE !
• Failure to follow these instructions for the assembly and use of your
bed rail could result in serious injury or death.
• This bed rail is intended for use with children 2 years to 5 years of age.
WARNING:

2
IMPORTANT! CONSERVER POUR CONSULTATION FUTURE!
• Négliger les instructions de ce guide de montage et d’utilisation
de la barrière pourrait entraîner de graves blessures ou la mort.
• L’utilisation de cette barrière est réservée à des enfants de 2 à 5 ans.
AVERTISSEMENT :
AVERTISSEMENT :
-DANGER DE SUFFOCATION ET D'ÉTRANGLEMENT.
-De jeunes enfants se sont coincés dans l’écart à l’intérieur
et autour des barrières du lit, et des nourrissons en sont morts.
-NE JAMAIS utiliser avec des enfants de moins 2 ans. Utiliser
UNIQUEMENT avec des enfants capables de se coucher dans
un lit pour adulte et d’en sortir seuls, sans aide. NE JAMAIS
utiliser à la place d’un lit de bébé.
-NE JAMAIS utiliser si la barrière n’est pas appuyée fermement
contre le matelas, sans aucun écart, et éloignée d’au moins 23
cm (9 po) de la tête et du pied de lit. Ne pas combler l’écart avec
des oreillers, des couvertures ou d’autres articles risquant
d’étouffer l’enfant.
-NE JAMAIS utiliser sur un lit pour tout-petit, un lit superposé, un
lit d’eau ou un lit avec un matelas gonflable.
-Utiliser UNIQUEMENT sur un lit pour adulte.
-Utiliser uniquement sur un lit d'adulte avec sommier et matelas.
-Utiliser uniquement sur un lit de dimension lit simple à grand lit.
-
L'UTILISATION DE CETTE BARRIÈRE EST DÉCONSEILLÉE SUR
UN LIT À PLATEFORME OU DE STYLE SIMILAIRE
-Ne plus utiliser en cas de pièces endommagées, cassées ou
manquantes.

3
ADVERTENCIA:
¡IMPORTANTE! ¡CONSERVE ESTA
INFORMACIÓN COMO REFERENCIA FUTURA!
• El no seguir estas instrucciones de montaje y uso de la barandilla
podría causar lesiones graves o letales.
• Esta barandilla está diseñada para usarse con niños de 2 a 5 años
de edad.
ADVERTENCIA:
-PELIGRO DE ASFIXIA Y ESTRANGULACIÓN.
-Las separaciones en y alrededor de las barandillas han
atrapado a niños pequeños y causado la muerte a bebés.
-NUNCA use la barandilla con niños menores de 2 años. Úsela
SOLAMENTE con niños mayores que puedan subirse y bajarse
de una cama para adultos sin ayuda. NUNCA la use en lugar de
la cuna.
-NUNCA la use a menos que esté firmemente apretada contra el
colchón, si no hay separaciones y está a por lo menos a 9 pulg.
(23 cm) de la cabecera o el pie de cama. No cubra las
separaciones con almohadas, sábanas ni otros artículos que
puedan asfixiar a los niños.
-NUNCA la use en una cama para niños, litera, cama de agua
ni cama con colchón inflable.
-Úsela SOLAMENTE en una cama para adultos.
-Use solamente en una cama para adultos que tenga base y
colchón.
-Use solamente en una cama de tamaño individual o tamaño
“queen”.
-NO SE RECOMIENDA USAR ESTA BARANDILLA EN UNA CAMA
ESTILO PLATAFORMA O DE ESTILO SIMILAR.
-
Suspenda su uso si está dañado, roto o si hay piezas faltantes.

5 - 13...32
14 - 22...32
23 - 32
4

5
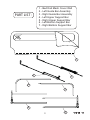
PART LIST :
1 - Bed Rail Mesh Cover Wall
2 - Left Guide Bar Assembly
3 - Right Guide Bar Assembly
4 - Left Upper Support Bar
5 - Right Upper Support Bar
6 - Left Bottom Support Bar
7 - Right Bottom Support Bar
1
3
2
4
5
6
7

6
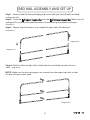
Step 1 : Remove bed rail from packaging and ensure that you have all parts included
in the parts list.
Step 3 : Repeat Step 2 directions to assemble the right side of the bed rail.
(Diagram A2)
Step 2 : Insert the Left Upper Support Bar into the Left Bottom Support Bar. Make sure the
spring pin fits securely into opposing hole so that the two pieces cannot pull apart.
(Diagram A1)
BED RAIL ASSEMBLY AND SET UP
Step 4 : With the left and right sides of the bed rail assembled, connect the two
sides.
(Diagram A3)
NOTE : Make sure that the spring pins are secured into the opposing holes so that
the bed rail cannot pull apart.
(Diagram A1)
(Diagram A2)
(Diagram A3)

7
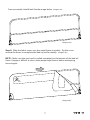
Frame assembly should look like the image below. (Diagram A4)
(Diagram A4)
(Diagram B1)
Step 5: Slide the fabric cover over the metal frame assembly. Zip the cover
around the frame to complete the bed rail wall assembly. (Diagram B1)
NOTE : Make sure the mesh wall is pulled completely to the bottom of the bed rail
frame. If zipper is diffcult to close, make proper adjustments before attempting
closure again.

8
Step 6: Lay the frame assembly flat, and allign the guide pins with the guide track
on the Left Guide Bar Assembly. Slide the frame assembly into the guide track (Diagram C1)
Step 7: Repeat step 6 with the Right Guide Bar Assembly ensuring that the Guide Bar
Assemblies are in the proper orientation in relation to the frame assembly. (Diagram C2)
Step 8:
The frame assembly should slide freely along the guide tracks of the guide bar
assembly pieces. Slide the frame assembly to the end of the guide tracks, and pivot the
frame assembly into an upright position. (Diagram C3)
(Diagram C1)
(Diagram C2)
NOTE : The frame assembly should lock in place in it’s upright poisition. Ensure that the
locking mechanism is working properly. (Diagram C4)
(Diagram C3)
(Diagram C4)

9
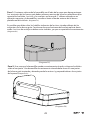
After Step 8, the bedrail should look like the below image. (Diagram C5)
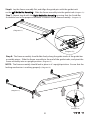
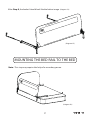
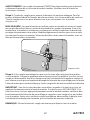
MOUNTING THE BED RAIL TO THE BED
Note : This step may require the help of a secondary person.
(Diagram D1)
(Diagram C5)

10
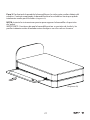
(Diagram D3)
Step 1 : Start by placing the bed rail on the side of the bed that you would like
to have protected. The Guide Bar Assemblies should be placed on top of the box
spring or platform that will support the mattress. The ‘ L’ shaped Anchors and straps
should be extended opposite the bedrail and mounted to the outer edge of the box
spring or platform. (Diagram D1)
You may need to release the strap locking buckles located on the under side of the
Guide Bar Assemblies. Ensure that the end of the anchor is pointing up. The
anchoring straps should not be twisted. If twisted, the anchoring straps will not tighten
properly. (Diagram D2)
(Diagram D2)
Step 2: Once the bed rail is properly placed, place the mattress on top of the
assembly. A properly placed bed rail should have the left and right Guide
Bar Assemblies parallel to one another, and perpendicular to the wall assenbly.
(Diagram D3)

11
Step 4 : If the strap does not pull through smoothly, the strap may be twisted under
the mattress. Correct this before continuing with the installation.
Once you have taken the slack out of the straps, give one final pull on the strap end,
hold it, and lock the locking tab on the locking buckle by pushing up on the thumb
tab. Use the same procedure for each side to properly secure the bed rail.
IMPORTANT : After locking both buckles, check to make sure that the mesh wall of
the bed rail is firmly up against the side of the mattress. There should be NO GAPS.
If the mesh wall is not firmly against the side of the mattress, check to make sure
the locking buckle is functioning properly and that the strap is not twisted beneath
the mattress. Once this has been checked and corrected if needed, unlock the
buckle, pull on the end of the strap to tightly and lock the buckle again.
NOTE : Store the excess anchoring strap material by tucking it under the mattress.
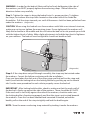
WARNING : In order for the bed rail fabric wall to be firmly held against the side of
the mattress you MUST properly tighten the anchoring straps. Please follow the
directions below very carefully.
Step 3 : Tighten the straps to bring the bedrail into it’s proper position. To tighten
the straps, first release the strap locks located on the under side of the Guide Bar
Assemblies. Pull the straps towards you until all the excess slack has been pulled out from
under the mattress.
(Diagram D4)
CAUTION: When using this bed rail on a foam mattress with little or no internal structure,
make sure not to over tighten the mounting straps. If over-tightened, the mattress will
likely fold or buckle in the middle and this will cause the bed rail to not provide your child
with the highest level of safety. Make slight adjustments to find the best level of tightness
on your mattress. The bed rail must be tight but should not buckle or fold.
(Diagram D4)

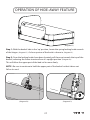
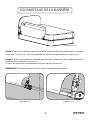
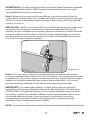
Step 1: With the bedrail side in the ‘up’ position, locate the spring locking knob on each
of the hinges. (Diagram E1) A close up view of the knob is shown in (Diagram E2).
Step 2: Once the locking knobs have been located, pull them up towards the top of the
bedrail, releasing the frame structure from it’s upright position. (Diagram E3)
This will allow the upper part of the bed rail to move freely.
NOTE : Be sure to continue to hold the upper part of the bedrail so that it does not
fall on its own!
OPERATION OF HIDE-AWAY FEATURE
12
(Diagram E1)
(Diagram E3)
(Diagram E2)

13
(Diagram E4)
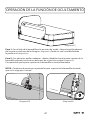
Step 3 : Slide the entire bedrail wall along the Guide Rails hidden under the mattress.
Continue pushing the bedrail between the mattress’ until it is entirely conceiled by the
top mattress. (Diagram E4)
NOTE : To return the bed rail to the ‘up’ position, reverse the previous instructions.
IMPORANT: Make sure that the bed rail is in the ‘up’ position and the locking knobs are
secured before leaving a child alone in the bed.

14
LILISTE DES PIÈCES :
1 - Housse de la barrière
2 - Ensemble de coulisse de gauche
3 - Ensemble de coulisse de droite
4 - Barre de support supérieure de gauche
5 - Barre de support supérieure de droite
6 - Barre de support inférieure de gauche
7 - Barre de support inférieure de droite
1
3
2
4
5
6
7

15
(Diagramme A1)
(Diagramme A2)
(Diagramme A3)
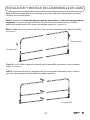
MONTAGE ET MISE EN PLACE DE LA BARRIÈRE
Étape 1 : Sortez la barrière de l’emballage et vérifiez que toutes les pièces indiquées dans
la liste sont présentes.
Étape 2 : Insérez la barre de support supérieure de gauche dans la barre de
support inférieure de gauche. Assurez-vous que la goupille à ressort est bien insérée
dans le trou opposé pour verrouiller les deux pièces.
(Diagramme A1)
Étape 3 : Répétez l’étape 2 pour assembler le côté de droit de la barrière.
(Diagramme A2)
Étape 4 :
Enclenchez les sections gauche et droite que vous venez de former pour les
joindre.
(Diagramme A3)
REMARQUE :
Assurez-vous que la goupille à ressort est bien insérée dans le trou
opposé pour verrouiller les deux pièces.

16
(Diagramme A4)
(Diagramme B1)
Le cadre de la barrière assemblée doit être identique à l’image ci-dessous.
(Diagramme A4)
Étape 5 :
Glissez la housse de tissu sur le cadre métallique. Fermez la fermeture éclair
autour du cadre pour terminer l’assemblage de la barrière.
(Diagramme B1)
REMARQUE : Le filet doit recouvrir entièrement le cadre, jusqu'à sa partie inférieure.
Si la fermeture éclair bloque, ne forcez pas : faites les ajustements nécessaires avant
d'essayer de fermer de nouveau la housse.

(Diagramme C1)
(
Diagramme C2)
17
Étape 6 :
Déposez le cadre à plat et alignez les chevilles de guide sur les rainures de
guide de l’
ensemble de coulisse de gauche
. Glissez le cadre dans la rainure de guide
(Diagramme C1)
Étape 7 :
Répétez l’étape 6 avec l’
ensemble de coulisse de droite
en vous assurant que
les coulisses sont correctement orientées avec le cadre. (Diagramme C2)
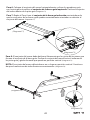
Étape 8 :
Le cadre doit coulisser librement dans les rainures de guide de l’ensemble de
coulisse. Glissez le cadre à l’extrémité des rainures de guide et faites pivoter le cadre à la
verticale. (Diagramme C3)
REMARQUE :
L’ensemble de cadre doit se verrouiller en place à la position verticale.
Assurez-vous que le mécanisme de blocage fonctionne correctement. (Diagramme C4)
(Diagramme C3)
(
Diagramme C4)

18
(Diagramme C5)
(
Diagramme D1)
FIXATION DE LA BARRIÈRE AU LIT
Après l’étape 8, la barrière doit être identique à l’image ci-dessous. (Diagramme C5)
Remarque : Nous vous conseillons de demander l’aide de quelqu’un pour réaliser
cette étape.
La page est en cours de chargement...
La page est en cours de chargement...
La page est en cours de chargement...
La page est en cours de chargement...
La page est en cours de chargement...
La page est en cours de chargement...
La page est en cours de chargement...
La page est en cours de chargement...
La page est en cours de chargement...
La page est en cours de chargement...
La page est en cours de chargement...
La page est en cours de chargement...
La page est en cours de chargement...
La page est en cours de chargement...
La page est en cours de chargement...
La page est en cours de chargement...
-
 1
1
-
 2
2
-
 3
3
-
 4
4
-
 5
5
-
 6
6
-
 7
7
-
 8
8
-
 9
9
-
 10
10
-
 11
11
-
 12
12
-
 13
13
-
 14
14
-
 15
15
-
 16
16
-
 17
17
-
 18
18
-
 19
19
-
 20
20
-
 21
21
-
 22
22
-
 23
23
-
 24
24
-
 25
25
-
 26
26
-
 27
27
-
 28
28
-
 29
29
-
 30
30
-
 31
31
-
 32
32
-
 33
33
-
 34
34
-
 35
35
-
 36
36


Regalo 4022HD Manuel utilisateur
- Catégorie
- Meubles de bébé
- Taper
- Manuel utilisateur
- Ce manuel convient également à
dans d''autres langues
- English: Regalo 4022HD User manual
- español: Regalo 4022HD Manual de usuario
Documents connexes
Autres documents
-
Munchkin Crib Manuel utilisateur
-
 Delta Children Essington 4-in-1 Crib Assembly Instructions
-
 Delta Children Emery 4-in-1 Crib Assembly Instructions
-
 Delta Children Abby Crib N Changer Assembly Instructions
-
 Delta Children Monterey Crib 'N' More Assembly Instructions
-
 Delta Children Monterey Crib 'N' More Assembly Instructions
-
 Delta Children Abby Crib N Changer Assembly Instructions
-
 Delta Children Emerson 4-in-1 Crib Assembly Instructions
-
Baninni Letto Gray Le manuel du propriétaire
-


