Frigidaire GRSC2352AD Mode d'emploi
- Catégorie
- Frigos
- Taper
- Mode d'emploi
Ce manuel convient également à

Frigidaire.com USA 1-800-374-4432 Frigidaire.ca Canada 1-800-265-8352
use
&
care
REFRIGERATOR
A19894604 (November 2020)
Introduction .......................................................2
Important Safety Information ....................3
Features ............................................................6
Installation .........................................................7
Door Removal ................................................10
Door Handle Installation ............................. 12
Water Supply Connection .......................... 13
Controls and Settings ................................. 15
Automatic Ice and Water Dispenser ...... 19
Storage Features ........................................... 21
Normal Operating Sounds ........................ 22
Filter Replacement ...................................... 23
Care and Cleaning ....................................... 25
Troubleshooting .......................................... 29
Limited Warranty ......................................... 33

2
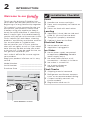
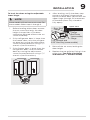
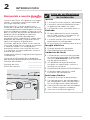
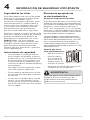
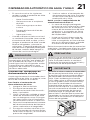
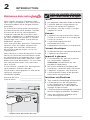
INTRODUCTION
Doors
Handles are secure and tight
Door seals completely to cabinet on
all sides
Doors are level with each other.
Leveling
Appliance is level side-to-side and
tilted ¼" (6 mm) front-to-back
Toe grille is properly attached.
Cabinet is level on the floor.
Electrical Power
House power turned on
Appliance is plugged in
Ice Maker
House water supply connected
to appliance (Warning: Potable
water supply only.)
No water leaks present at all
connections - recheck in 24 hours
Ice maker is turned ON
Ice & water dispenser
operates correctly
Final Checks
Shipping material removed
Refrigerator and freezer tempera-
tures set to recommended setting
Crisper humidity controls set
(some models)
Registration card sent in
Installation Checklist
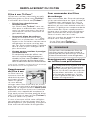
Welcome to our
family
Thank you for bringing Frigidaire into
your home! We see your purchase as the
beginning of a long relationship together.
This manual is your resource for the use
and care of your product. Please read
it before using your appliance. Keep it
handy for quick reference. If something
doesn’t seem right, the troubleshooting
section will help you with common issues.
FAQs, helpful tips and videos, cleaning
products, and kitchen and home accesso-
ries are available at Frigidaire.com.
We are here for you! Visit our website,
chat with an agent, or call us if you need
help. We may be able to help you avoid
a service visit. If you do need service, we
can get that started for you.
Let’s make it ocial! Be sure to register
your product.
Keep your product info here so it’s easy
to find.
Model Number ____________________
Serial Number ____________________
Purchase Date ____________________
Lorem ipsum Lorem ipsumLorem i
psumLorem ipsumLorem ipsumLore
m ipsumLorem ipsum
Lorem ipsum Lorem ipsumLorem i
psumLorem ipsumLorem ipsumLore
m ipsumLorem ipsum
Lorem ipsum Lorem ipsumLorem
Serial Number Location

3
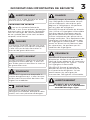
WARNING
WARNING indicates a potentially haz-
ardous situation which, if not avoided,
could result in death or serious injury.
IMPORTANT
IMPORTANT indicates installation, oper-
ation or maintenance information which
is important but not hazard-related.
DANGER
DANGER indicates an imminently haz-
ardous situation which, if not avoided,
will result in death or serious injury.
CAUTION
CAUTION indicates a potentially haz-
ardous situation which, if not avoided,
may result in minor or moderate injury.
Safety Definitions
This is the safety alert symbol. It is
used to alert of potential personal injury
hazards. Obey all safety messages that
follow this symbol to avoid possible injury
or death.
WARNING
Please read all instructions before using
this appliance.
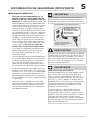
IMPORTANT SAFETY INFORMATION
DANGER
DANGER Risk of fire or explosion.
Flammable refrigerant used. Do not use
mechanical devices to defrost refrigera-
tor. Do not puncture refrigerant tubing.
DANGER Risk of fire or explosion.
Flammable refrigerant used. To be re-
paired only by trained service person-
nel. Use only manufacturer-authorized
service parts. Any repair equipment
used must be designed for flammable
refrigerants. Follow all manufacturer
repair instructions. Do not puncture
refrigerant tubing.
CAUTION
CAUTION Risk of fire or explosion.
Dispose of refrigerator properly
in accordance with the applicable
federal or local regulations. Flammable
refrigerant used.
CAUTION Risk of fire or explosion
due to puncture of refrigerant tubing.
Follow handling instructions carefully.
Flammable refrigerant used.
WARNING
CALIFORNIA RESIDENTS ONLY
Cancer and Reproductive Harm
www.P65Warnings.ca.gov

4
IMPORTANT SAFETY INFORMATION
WARNING
These guidelines must be followed to
ensure that safety mechanisms in this
unit will operate properly.
Proper Disposal of your Appliance
Risk of child entrapment
Child entrapment and suocation are
not problems of the past. Junked or
abandoned appliances are still dangerous
– even if they will sit for “just a few days”.
If you are getting rid of your old unit,
please follow the instructions below to
help prevent accidents.
We strongly encourage responsible appli-
ance recycling/disposal methods. Check
with your utility company or visit
energystar.gov/recycle for more informa-
tion on recycling your old appliance.
Safety Instructions
• DO NOT store or use gasoline, or
other flammable liquids, or aerosols
within or in the vicinity of this or any
other appliance. Read product labels
for warnings regarding flammability
and other hazards.
• DO NOT operate the unit in the
presence of explosive fumes.
• Avoid contact with any moving parts
of automatic ice maker.
• Remove all staples from the carton.
Staples can cause severe cuts, and also
destroy finishes if they come in contact
with other appliances or furniture.
Child Safety
This appliance is not intended for use by
persons (including children) with reduced
physical, sensory or mental capabilities,
or lack of experience and knowledge,
unless they have been given supervision
or instruction concerning use of the
appliance by a person responsible for
their safety.
Destroy or recycle the carton, plastic
bags, and any exterior wrapping material
immediately after the appliance is
unpacked. Children should never use
these items to play. Cartons covered with
rugs, bedspreads, plastic sheets or stretch
wrap may become airtight chambers, and
can quickly cause suocation.
Before you throw away your appliance:
• Remove doors.
• Leave shelves in
place so children
may not easily
climb inside.
• Have refrigerant
removed by a
qualified service
technician.

5
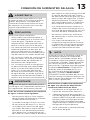
Electrical information
• The appliance must be plugged into
its own dedicated 115 Volt, 60 Hz.,
15 Amp, AC only electrical outlet.
The power cord of the appliance
is equipped with a three-prong
grounding plug for your protection
against electrical shock hazards.
It must be plugged directly into a
properly grounded 3-prong recepta-
cle. The receptacle must be installed
in accordance with local codes and
ordinances. Consult a qualified elec-
trician. Avoid connecting the unit to a
Ground Fault Interrupter (GFI) circuit.
Do not use an extension cord or
adapter plug.
• If the power cord is damaged, it
should be replaced by an authorized
service technician to prevent any risk.
• Never unplug the appliance by pull-
ing on the power cord. Always grip
the plug firmly, and pull straight out
from the receptacle to prevent dam-
aging the power cord.
• Performance may be aected if the
voltage varies by 10% or more. Oper-
ating the appliance with insucient
power can damage the compressor.
Such damage is not covered under
your warranty.
• Do not plug the unit into an electrical
outlet controlled by a wall switch or
pull cord to prevent the unit from
being turned o accidentally.
Grounding type wall receptacle
Power cord with
3-prong grounded plug
Do not, under
any circumstances,
cut, remove,
or bypass the
grounding prong.
IMPORTANT
CFC/HCFC Disposal
Your old unit may have a cooling system
that used CFCs or HCFCs (chlorofluoro-
carbons or hydrochlorofluorocarbons).
CFCs and HCFCs are believed to harm
stratospheric ozone if released to the
atmosphere. Other refrigerants may
also cause harm to the environment if
released to the atmosphere.
If you are throwing away your old ap-
pliance, make sure the refrigerant is re-
moved for proper disposal by a qualified
technician. If you intentionally release
refrigerant, you may be subject to fines
and imprisonment under provisions of
environmental legislation.
IMPORTANT SAFETY INFORMATION
CAUTION
To avoid personal injury or property
damage, handle tempered glass shelves
carefully. Shelves may break suddenly
if nicked, scratched, or exposed to sud-
den temperature change.
IMPORTANT
Turn o power to your appliance you
must unplug the power cord from the
electrical outlet.

6
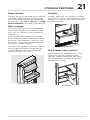
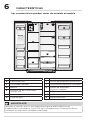
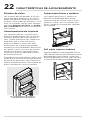
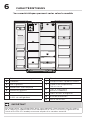
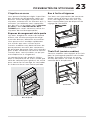
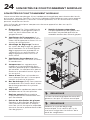
A Fixed Door Bins
B Ice Maker
C Ice Container
D Shelves
E Damper/Air Filter Housing
F LED Lights
G Water Filter
H Dairy Compartment
I Temperature Sensor/Thermistor
J Adjustable Door Bins
K Deli Drawer (some models)
L Crisper Drawers
M Toe Grille
N Slide-Out Basket
*Features may vary according to model
L
M
N
B
C
D
E
F G
H
I
J
K
A
F
F
F
F
FEATURES
IMPORTANT
Accessories are available for your appliance and may be purchased at
Frigidaire.com or by calling 1-800-374-4432 (Frigidaire.ca or 1-800-265-8352 in
Canada) or from an authorized seller.

7
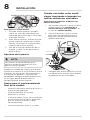
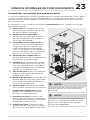
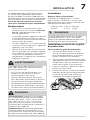
INSTALLATION
NOTE
If your unit is placed with the door hinge
side against a wall, you may have to
allow additional space for the handle so
the door can be opened wider.
This Use & Care Manual provides general
operating instructions for your model. Use
the unit only as instructed in this Use &
Care Manual. Before starting the appli-
ance, follow these important first steps.
Installation
Installation clearances
• Allow the following clearances for ease
of installation, proper air circulation, and
plumbing and electrical connections:
Sides & Top ⅜"
Back 1"
Location
• Choose a place that is near a ground-
ed electrical outlet. Do Not use an
extension cord or an adapter plug.
• If possible, place the unit out of direct
sunlight and away from the range,
dishwasher or other heat sources.
• Install the appliance on a floor that is
level and strong enough to support a
fully loaded unit.
• Consider water supply availability for
models equipped with an automat-
ic ice maker. If you do not hook up
water to the appliance, remember to
turn the ice maker o.
CAUTION
Do Not install the unit where the tem-
perature will drop below 55°F (13°C) or
rise above 110°F (43°C). The compres-
sor will not be able to maintain proper
temperatures inside the appliance.
Do Not block the toe grille on the lower
front of your unit. Sucient air circula-
tion is essential for the proper opera-
tion of your appliance.
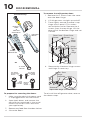
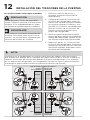
Toe Grille Installation and Removal
To install toe grille
1. Open both doors. Slide the left and
right sides of the toe grille over the
lower hinges of the appliance.
2. While pushing the toe grille firmly
against cabinet, fasten the bottom
clips of toe grille to the cabinet.
3. Fasten the top clips to the cabinet.
4. Close the doors. Fasten the right
and left side clips into the groove of
the bottom hinge.
To remove the toe grille
1. With both doors closed, unfasten
the right and left side clips of toe
grille from the bottom hinge groove.
2. Open both doors. Press firmly on the
top of the toe grille until the top of
the toe grille pops o.
3. Pull the toe grille outward toward
your body and o of the lower hinges.
1
2
3
2
3
1
4
4
Installing Toe Grille
1
2
3
2
3
1
Removing Toe Grille
WARNING
This appliance is intended to be used
in household and similar applications
such as:
• sta kitchen areas in shops, oces
and other working environments;
• farm houses and by clients in hotels,
motels and other residential type
environments;
• bed and breakfast type
environments;
• catering and similar non-retail
applications.

8
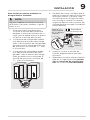
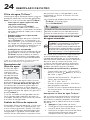
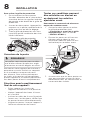
INSTALLATION
Door Opening
Position your unit to allow easy access to
a counter or table when removing food.
For the best use of drawers and freezer
baskets, position the appliance where
both doors can fully open.
Guidelines for final positioning
of your unit:
• Rest all 4 corners of the cabinet
firmly on the floor.
• Level the cabinet at the front and rear.
• Tilt the sides ¼" (6 mm) from front
to back (to ensure the doors close
and seal properly).
• Align the doors with each other
and level.
Meet all of these conditions by
raising or lowering the adjust-
able front rollers.
To level the cabinet using the front rollers:
1. Open both doors and remove the
toe grille (see “Toe Grille Installation
and Removal” in INSTALLATION).
2. Close the doors and use a wrench
to raise (clockwise) or lower
(counterclockwise) the front rollers.
3. Ensure both doors are bind-free with
their seals touching the cabinet on all
4 sides.
NOTE
The doors are designed to shut by
themselves within a 20 degree opening.

9
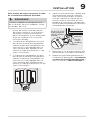
Set Screw
(some models)
Hinge
Hinge
Flange
Open Door
7/16" Wrench and
3/32" Hex Key (some models)
Door Stop
Flange
5. Reinstall the set screw, locking the
door height.
6. Replace the toe grille by fitting it into
place (see “Toe Grille Installation
and Removal” in INSTALLATION).
4. After leveling, verify the door stop
contacts the lower hinge and the
top of the door does not contact the
upper hinge through full movement
of the door (from fully closed to
fully open).
INSTALLATION
To level the doors using the adjustable
lower hinge:
1. Before leveling either door, remove
the set screw that locks the door
height into position. (The door
cannot be adjusted without the set
screw removed).
2. If the refrigerator door is lower than
the freezer door, raise the refrigera-
tor door by turning the adjustment
screw counterclockwise using a
7
/
16
"
wrench. (See illustration.)
3. If the freezer door is lower than the
refrigerator door, raise the freezer
door by turning the adjustment
screw counterclockwise using a
7
/
16
"
wrench. (See illustration.)
NOTE
Some models will not have a set screw. For
those models follow steps 2 through 4.

10
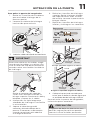
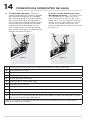
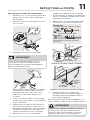
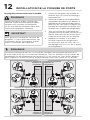
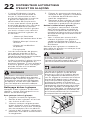
DOOR REMOVAL
To prepare for removing the doors:
1. Make sure the electrical power cord
is unplugged from the wall outlet.
2. Open both doors and remove the
toe grille (as explained in the Instal-
lation Instructions that came with
your appliance).
3. Remove any food from the door shelves.
4. Close the doors.
To remove the refrigerator door:
1. Remove the 3 screws from the cover
over the door hinge.
2. Lift hinge cover straight up and o.
3. Trace lightly around the door’s top
hinge with a pencil. This makes
reinstallation easier. Remove the 2
screws from the top hinge. Lift the
door o of the bottom hinge and set
it aside.
Rear Cover
Screw
Front Cover
Screws
Top
Hinge
Cover
Hinge
Screws
Top
Hinge
Socket
Wrench Set
Adjustable
Wrench
Top Hinge
Cover Front
Screw
Top
Hinge
Screw
Bottom
Hinge
Screw
Top Hinge
Cover Rear
Screw
Phillips™
Head
Tools Necessary:
or
or
⅜" Fixed
Wrench
Phillips™
Head
&
Flathead
Screwdriver
To reinstall the refrigerator door, reverse
the above steps.
Door
Hinge
Assembly
Closer
Pin
Hinge
Screws
Adjustable Hinge (some models)
4. Remove the 2 bottom hinge screws
and hinge if necessary.

11
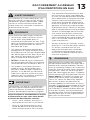
DOOR REMOVAL
CAUTION
Be sure doors are set aside in a secure
position where they cannot fall and
cause personal injury.
Door
Hinge
Assembly
Screws
Water
Line
Tubing
Non-Adjusting Hinge (some models)
Closer
Pin
Hinge
Door
Water
Line
Tubing
Screws
Hinge
Assembly
Adjustable Hinge (some models)
To remove the freezer door:
1. Remove the 3 screws from the cover
over the top door hinge.
2. Lift hinge cover straight up and o.
3. Release the wires from the routing clip.
Disconnect the multi-wire cable
connector located above the top
hinge. Press the cable and lock and
separate the 2 cables.
4. Trace lightly around the hinge with a
pencil. This makes reinstallation easier.
5. Detach the water tube from the
connector located below the freezer
door. The connector releases when
you press its outer sleeve inward.
6. Remove the 2 screws from the top
hinge. Remove the hinge pulling the
multi-wire cable through it. Lift the
door o the bottom hinge.
7. Remove the 2 bottom hinge screws
and hinge if necessary.
8. Lay the door on its side to avoid
damage to the water tube extending
from the bottom hinge.
To reinstall the freezer door, reverse the
above steps.
To Disconnect
1. Press outer ring against face of
fitting
2. Pull to
remove tube
Insert tube and push until mark
touches face of fitting
To Connect
IMPORTANT
To prevent wire damage, ensure the
wires are rerouted through the routing
clip when reassembling the hinge cover.

12
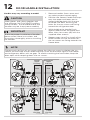
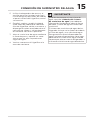
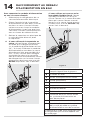
DOOR HANDLE INSTALLATION
1. Remove handles from carton and
any other protective packaging.
2. Position the freezer handle end caps
over the upper and lower pre-in-
stalled shoulder bolts (A) that are
fastened into door, ensuring the
holes for the set screws are facing
toward the refrigerator door.
3. While holding the handle firmly
against door, fasten the upper and
lower Allen set screws (B) with the
supplied Allen wrench.
4. Repeat steps 2 and 3 to install refrig-
erator handle. Ensure the holes for
the set screws are facing towards the
freezer door.
Freezer
Upper
End Cap
Door
Refrigerator
Upper
End Cap
Door
Refrigerator
Lower
End Cap
Door
Freezer
Lower
End Cap
Door
Ensure Handle Set Screws are Facing Each Other with Doors Closed
CAUTION
Wear gloves and safety goggles and
use extreme CAUTION when installing
these handles. The rounded end of the
handles may be sharp (some models).
NOTE
Tighten and sub-flush all set screws (place the Allen set screw just below the sur-
face of the end cap) of the handle end cap. Draw the end caps tight to the freezer
and refrigerator doors with no gaps. To avoid scratching the metal door, keep the
door open while torquing down the set screws.
IMPORTANT
To ensure proper installation of handles,
please review these instructions and
illustrations thoroughly prior to installing
the handles.
Handles may vary according to model

13
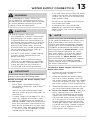
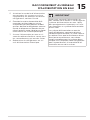
WATER SUPPLY CONNECTION
Before Installing The Water Supply Line,
You Will Need:
• Basic Tools: adjustable wrench,
flat-blade screwdriver, and Phillips
TM
screwdriver
• Access to a household cold water
line with water pressure between 30
and 100 psi.
• A water supply line made of ¼" (6.4
mm) OD, copper or stainless steel
tubing. To determine the length of
tubing needed, measure the distance
from the ice maker inlet valve at the
back of the refrigerator to your cold
water pipe. Then add approximately
7� (2.1 m), so the refrigerator can be
moved out for cleaning.
To Connect Water Supply Line To Ice
Maker Inlet Valve
1. Disconnect the refrigerator from
electrical power source.
2. Place the end of the water supply
line into a sink or bucket. Turn ON
the water supply and flush the supply
line until the water is clear. Turn OFF
the water supply at the shuto valve.
3. Remove the plastic cap from the wa-
ter valve inlet and discard the cap.
4. If you use copper tubing - Slide the
brass compression nut, and then
the ferrule (sleeve) onto the water
supply line. Push the water supply
line into the water valve inlet as far
as it will go (¼"/6.4 mm). Slide the
ferrule (sleeve) into the valve inlet
and finger tighten the compression
nut onto the valve. Tighten another
half turn with a wrench; DO NOT
overtighten. See Figure 1.
• A shuto valve to connect the water
supply line to your household water
system. DO NOT use a self-piercing
type shuto valve.
• Do not reuse compression fitting or
use thread seal tape.
• A compression nut and ferrule
(sleeve) for connecting a copper
water supply line to the ice maker
inlet valve.
WARNING
To avoid electric shock, which can
cause death or severe personal injury,
disconnect the unit from electrical pow-
er source before connecting a water
supply line to the appliance.
CAUTION
To Avoid Property Damage:
• Use Copper or Stainless Steel braid-
ed tubing for the water supply line.
Frigidaire does not recommend wa-
ter supply tubing made of ¼" plastic.
Plastic tubing greatly increases the
potential for water leaks, and the
manufacturer will not be responsible
for any damage if plastic tubing is
used for the supply line.
• DO NOT install water supply tubing
in areas where temperatures fall
below freezing.
• Chemicals from a malfunctioning
softener can damage the ice maker.
If the ice maker is connected to soft
water, ensure that the softener is
maintained and working properly.
NOTE
Check with your local building authori-
ty for recommendations on water lines
and associated materials prior to in-
stalling your new refrigerator
. Depend-
ing on your local/state building codes,
Frigidaire recommends for homes with
existing valves its Smart Choice
®
water
line kit 5304490728 (with a 6�Stain-
less Steel Water Line) and for homes
without an existing valve, Frigidaire
recommends its Smart Choice
®
water
line kit 5304490717 (with a 20�copper
water line with self-tapping saddle
valve). Please refer to Frigidaire.com
for more information.
IMPORTANT
Ensure your water supply line connections
comply with all local plumbing codes.

14
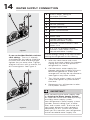
WATER SUPPLY CONNECTION
If you use braided flexible stainless
steel tubing - The nut is already
assembled on the tubing. Slide the
nut onto the valve inlet and finger
tighten the nut onto valve. Tighten
another half turn with a wrench; DO
NOT overtighten. See Figure 2.
IMPORTANT
After connecting the water supply, refer
to “Priming the Water Supply System”
for important information about priming
an empty water supply system.
Your refrigerator’s water supply system
includes several tubing lines, a water
filter, and a water valve. To ensure that
your water dispenser works properly,
completely fill this system with water
when you first connect your refrigerator
to the household water supply line.
5. With the steel clamp and screw,
secure the water supply line (copper
tubing only) to the rear panel of
refrigerator as shown.
6. Coil the excess water supply line
(copper tubing only), about 2½ turns,
behind refrigerator as shown and
arrange coils so they do not vibrate or
wear against any other surface.
7. Turn ON the water supply at shuto
valve and tighten any connections
that leak.
8. Reconnect the refrigerator to elec-
trical power source.
A B
C
D
E
F
G
H
I
Figure 1
A Plastic Water Tubing to
Ice Maker Fill Tube
B Steel Clamp
C Brass Compression Nut
D Ferrule (Sleeve)
E Copper Water Line
F Water Valve Bracket
G Valve Inlet
H Water Valve
I Copper Water Line from
Household Water Supply*
J Braided Flexible Stainless Steel
Water Line
K 6 ft. (1.8 m) Braided Flexible
Stainless Steel Water Line from
Household Water Supply*
*Include enough tubing in the loop to allow
moving the refrigerator out for cleaning
A B
J
F
G
H
K
Figure 2

15
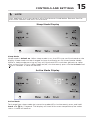
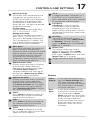
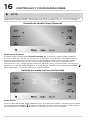
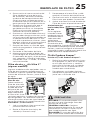
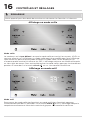
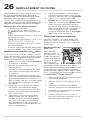
CONTROLS AND SETTINGS
Sleep Mode
Sleep mode is default on. When sleep mode is on, the LEDs are not illuminated on the
display. Sleep mode can be changed to have the display on full time (Awake Mode).
While in sleep mode pressing any key will illuminate LEDs and then go back to sleep
after a short time. To turn sleep mode on/o, simultaneously press and hold Crush and
for 5 seconds. A tone will confirm.
Active Mode Display
Sleep Mode Display
Active Mode
To change from sleep mode (on) to active mode (o), simultaneously press and hold
Crush and for 5 seconds. The display will show the current temperature/ice maker
status. A tone will confirm.
NOTE
Your appliance may have some or all of the features listed below. Become familiar
with these features and their use and care.

16
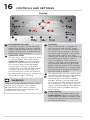
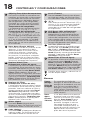
CONTROLS AND SETTINGS
WARNING
When using the cold drink timer, make
sure to remove drinks from freezer
compartment when alarm sounds.
Carbonated drinks may explode if left
in freezer for too long.
1
Freeze Boost (on/o)
Activates a faster rate for freezing
food in the freezer. Use this feature
when loading several items into the
freezer at one time. It automatically
deactivates after 12 hours.
2
Cold Drink Timer
Quickly chills a drink inside the freez-
er compartment. To enable, touch
Cold Drink Timer. A time value will
appear on the freezer temp display
(in minutes) and can be changed
using the +/- buttons. A tone will
sound when the time has been input.
It ranges from 20-45 minutes in 5
minute intervals. Drinks will freeze if
the temperature setting is too low or
the timer setting is too long.
3
Ice Maker
Press and hold for 3 seconds to
turn the ice maker on/o. When
the indicator is lit, the ice maker is
on. When the ice maker is o, the
ice maker o indicator is lit. When
the ice maker is o, it will stop
making ice. While o, ice dispensing
can continue as long as there is
ice in the bucket. When the ice
maker is o and ice is dispensing,
the indicator above the ice maker
button and ice maker OFF will both
blink. If the display is in sleep mode,
you will have to wake it to confirm
the ice maker is on/o.
4
The lock button can be used to lock
the display preventing it from being
used in certain situations. Press
and hold for 3 seconds to enable/
disable. While in the locked state,
no changes can be made to settings
on the display. Dispensing ice and
water will be disabled. The indicator
will flash and an audible warning
tone sounds.
5
Power Outage
In the event of a power failure, the
Power Outage alert will illuminate
once power has been restored, and
a tone will sound. Press any button
to silence the tone.
Display
1
2
3
4
5
6
7
8 9
10 11 12
13
14
15
16
17

17
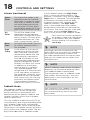
CONTROLS AND SETTINGS
°F/°C
To toggle between Fahrenheit (°F)
and Celsius (°C), simultaneously
press and hold + and - for 5 seconds
on refrigerator side of display.
Chill Boost
Chill Boost is a faster rate for
chilling food in the refrigerator
compartment. Use this feature
when loading several items into the
refrigerator at one time. Deactivates
after 6 hours.
Air Filter
The display shows the current
status of the air filter (Good, Order,
or Replace). To reset the filter
status to Good, press and hold Air
Filter for 3 seconds.
Water Filter
The display shows the current
status of the water filter (Good,
Order, or Replace). To reset the
filter status to Good, press and hold
Water Filter for 3 seconds.
Toggles dispenser light On and O.
13
14
15
16
17
Power
Outage
In the event of a power out-
age, the Power Outage alert
will illuminate once power
has been restored and a tone
will sound. Press any button
to silence the tone.
Door
Open
If you leave a door open for
5 minutes or more, an alarm
will sound and the Door
Open indicator will illuminate
on the display. Turn the alarm
o by closing the door or
pressing any key. The control
panel will return to normal
operations after you close
the door.
Alarms
6
Adjusting Temp
Illuminates when temperatures are
changed on the display and will
remain illuminated until the desired
temperatures are reached inside
the refrigerator and freezer. Press
either the + or - to adjust to desired
temperature setting.
Freezer temp
Control temperatures range from
-6°F / -21°C to +4°F / -15°C.
Refrigerator temp
The Control temperature ranges
from +33°F / +1°C to +43°F / +7°C.
This unit is designed to operate at
39°F refrigerator/0°F freezer. The
unit should stabilize temperatures
within 24 hours of installation.
Door Open
Illuminates whenever the doors are
open. If a door is left open for 5
minutes or more, an alarm will sound
and the display will be illuminated
until the doors are shut. Pressing
any button will mute the alarm
temporarily. Check to make sure no
food is blocking the doorway.
Replace Water Filter
Display illuminates every 6 months
or when filter needs replacing.
Replace filter and then press and
hold Reset Water Filter for 3
seconds to deactivate warning on
display. See “Replacing the Filter”
section for more information.
Replace Air Filter
Display illuminates every 6 months
or when filter needs replacing.
Replace filter and then press and
hold Reset Air Filter for 3 seconds
to deactivate warning on display.
See “Replacing the Filter” section
for more information.
Water
Press Water to dispense water. An
indicator light will be illuminated
above the active feature.
Cube
Press Cube to dispense cubed ice.
An indicator light will illuminate
above the active feature.
Crush
Press Crush to dispense crushed
ice. An indicator light will illuminate
above the active feature.
7
8
9
10
11
12

18
CONTROLS AND SETTINGS
Sabbath Mode
The Sabbath mode is a feature that
disables portions of the refrigerator
and its controls in accordance with
observance of the weekly Sabbath and
religious holidays within the Orthodox
Jewish community.
Turn the Sabbath mode ON and OFF by
simultaneously pressing and holding both
the - (freezer side) and + (refrigerator
side) for 5 seconds. Other than the High
Temp alarm, no audible sounds will occur
until you exit the Sabbath mode. The dis-
play shows Sb while in Sabbath mode.
Water
Filter
The water filter needs to be
replaced when the indicator
illuminates. Change the water
filter every 6 months or after
you have dispensed 120 gal-
lons of water. To reset, press
and hold the button for 3 sec-
onds. A tone will then sound.
Air
Filter
The air filter needs to be
replaced when the indicator
illuminates. Change the air filter
every 6 months. To reset, press
and hold the button for 3 sec-
onds. A tone will then sound.
Error
Tone
An alarm will sound if you try
to make a selection that is
not available.
High
Temp
In the event of the internal
temperature of the refriger-
ator rising and staying at a
temperature above the safe
temp zone for a period of
time, HI will display on the
corresponding compartment
display (refrigerator and/or
freezer). An alarm will sound
in addition to the display
warning every 10 seconds
until acknowledged. The
refrigerator will automatically
try to cool down to improve
the condition. However, if the
temperature has not cooled
after some time, the warning
and alarm will appear again.
If the problem continues
please call 1 (800) 374-4432.
In the Sabbath mode, the High Temp
alarm is active for health reasons. For
example, if the door is left ajar the High
Temp alarm is activated. The refrigerator
will function normally once the door
is closed, without any violation of the
Sabbath/Holidays. The High Temp
alarm is permitted when the cabinet
temperature is outside the safe zone for
20 minutes. The alarm silences itself after
10 minutes while the High Temp icon
stays lit until you exit the Sabbath mode.
For further assistance, guidelines
for proper usage and a complete
list of models with the Sabbath
feature, please visit the web at
star-k.org.
Alarms (continued)
NOTE
Although you have initiated the Sab-
bath mode, the ice maker will complete
the cycle it had already started. The
ice cube compartment will remain cold
and you can make new ice cubes with
standard trays.
NOTE
While in Sabbath mode, neither the lights,
dispenser, nor the control panel will work
until Sabbath Mode is deactivated.
The refrigerator stays in Sabbath mode
after power failure recovery. You must
deactivate it with the buttons on the
control panel.
NOTE
You should exit the Sabbath mode at
your earliest convenience as the unit
runs more eciently out of the Sab-
bath mode.

19
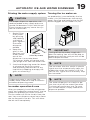
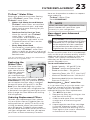
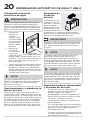
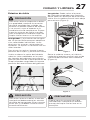
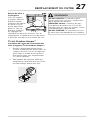
AUTOMATIC ICE AND WATER DISPENSER
Priming the water supply system
Ice maker operation & care
After you properly install the refrigerator
and it has cooled for several hours, the ice
maker can produce ice within 24hours.
The ice maker will fill the ice bin from the
rear. You must dispense some ice to force
the ice forward in the bin. This will allow
the bin to fill completely.
1. Begin filling
the system
by pressing
and holding
a drinking
glass against
the water
dispenser
paddle.
2. Keep the
glass in this
position until
water comes
out of the
dispenser. It may take about
1½ minutes. Water will sputter until
you purge all air from the water lines.
3. Continue dispensing water for about
4 minutes to flush the system
and plumbing connections of any
impurities (stopping to empty the
glass as necessary).
Power Outage
Cube
ICE
WATER
Crush
Door Open
High Temp
Replace Water Filter
Replace Air Filter
Dispenser
(varies by model)
CAUTION
For proper dispenser operation, the
recommended water supply pressure
should fall between 30psi and 100psi.
Excessive pressure may cause the sys-
tem to malfunction.
Turning the ice maker on
Ice production is controlled by the ice
maker's On/O feature on the control
panel. Pressing and holding the On/O
button toggles the ice maker On/O.
NOTE
Dispensed water is not chilled. For
colder water, add ice to cup or contain-
er before dispensing water.
NOTE
The ice maker also has a built-in plastic
signal arm that automatically stops ice
production when the ice bin is full. Do
not use this signal arm to manually stop
the ice maker.
NOTE
The water dispenser has a built-in de-
vice that shuts o the water flow after
3 minutes of continuous use. To reset
this shuto device, simply release the
dispenser paddle.
IMPORTANT
Turning o the ice maker simply dis-
ables ice making. You will still be able to
dispense existing ice, and you will still be
able to dispense water.

20
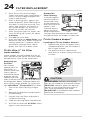
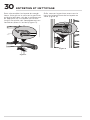
Ice Maker/Dispenser Tips
• Ice cubes stored too long may
develop an odd flavor. Empty the ice
container as explained in Cleaning the
Ice Storage Bin.
• Occasionally shake the ice container
to keep ice separated.
• If your refrigerator is not connected to
a water supply or the water supply is
turned o, turn O the ice maker.
• If you need a large quantity of ice
at one time, it is best to get cubes
directly from the ice container.
• The following sounds are normal
when the ice maker is operating:
- Motor running
- Ice dropping into ice container
- Water valve opening or closing
- Ice loosening from tray
- Running water
• When dispensing ice, you will hear a
snapping or clicking sound when the
ice chute opens and closes.
• Turn O the ice maker when cleaning
the freezer and during vacations. If
you turn O the ice maker for a long
period of time, you should also turn
o the water supply valve.
Cleaning the Ice Storage Bin
Clean the ice storage bin at regular
intervals, particularly before you take a
vacation or move.
To clean the ice storage bin:
1. Turn O the ice maker.
2. Remove the ice storage bin by lifting
up and out.
3. Empty and carefully clean the ice
storage bin with mild detergent.
Rinse with clear water. Do not use
harsh or abrasive cleaners.
CAUTION
Chemicals from a malfunctioning water
softener can damage the ice maker. If
the water supply to your refrigerator is
softened, be sure the softener is main-
tained to work properly.
CAUTION
NEVER use an ice pick or similar sharp
instrument to break up the ice. This
could damage the ice storage bin and
dispenser mechanism.
4. Allow the ice storage bin to dry com-
pletely before replacing it in the freezer.
5. Remove ice chips and clean the ice
storage bin, shelf and the freezer
door chute.
6. Replace the ice storage bin. Turn On
the ice maker to resume ice production.
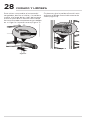
Remove and empty the ice storage bin if:
• An extended power failure (1 hour or
longer) causes ice cubes in the ice
storage bin to melt and freeze togeth-
er, jamming the dispenser mechanism.
• You do not use the ice dispenser
frequently. Ice cubes will freeze
together in the bin, jamming the
dispenser mechanism.
Remove the ice storage bin and shake
to loosen the cubes or clean as
explained above.
AUTOMATIC ICE AND WATER DISPENSER
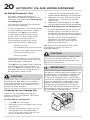
Auger
IMPORTANT
When removing or replacing the ice
storage bin, avoid rotating the auger in the
ice storage bin. If the auger is accidentally
rotated, you must realign the auger by
turning it in 45 degree turns (see below)
until the ice storage bin fits into place with
the drive mechanism If the auger is not
properly aligned when replacing the ice
storage bin, the refrigerator will not dis-
pense ice. The freezer door also may not
close properly causing warm air to leak
into the freezer compartment.
La page est en cours de chargement...
La page est en cours de chargement...
La page est en cours de chargement...
La page est en cours de chargement...
La page est en cours de chargement...
La page est en cours de chargement...
La page est en cours de chargement...
La page est en cours de chargement...
La page est en cours de chargement...
La page est en cours de chargement...
La page est en cours de chargement...
La page est en cours de chargement...
La page est en cours de chargement...
La page est en cours de chargement...
La page est en cours de chargement...
La page est en cours de chargement...
La page est en cours de chargement...
La page est en cours de chargement...
La page est en cours de chargement...
La page est en cours de chargement...
La page est en cours de chargement...
La page est en cours de chargement...
La page est en cours de chargement...
La page est en cours de chargement...
La page est en cours de chargement...
La page est en cours de chargement...
La page est en cours de chargement...
La page est en cours de chargement...
La page est en cours de chargement...
La page est en cours de chargement...
La page est en cours de chargement...
La page est en cours de chargement...
La page est en cours de chargement...
La page est en cours de chargement...
La page est en cours de chargement...
La page est en cours de chargement...
La page est en cours de chargement...
La page est en cours de chargement...
La page est en cours de chargement...
La page est en cours de chargement...
La page est en cours de chargement...
La page est en cours de chargement...
La page est en cours de chargement...
La page est en cours de chargement...
La page est en cours de chargement...
La page est en cours de chargement...
La page est en cours de chargement...
La page est en cours de chargement...
La page est en cours de chargement...
La page est en cours de chargement...
La page est en cours de chargement...
La page est en cours de chargement...
La page est en cours de chargement...
La page est en cours de chargement...
La page est en cours de chargement...
La page est en cours de chargement...
La page est en cours de chargement...
La page est en cours de chargement...
La page est en cours de chargement...
La page est en cours de chargement...
La page est en cours de chargement...
La page est en cours de chargement...
La page est en cours de chargement...
La page est en cours de chargement...
La page est en cours de chargement...
La page est en cours de chargement...
La page est en cours de chargement...
La page est en cours de chargement...
La page est en cours de chargement...
La page est en cours de chargement...
La page est en cours de chargement...
La page est en cours de chargement...
La page est en cours de chargement...
La page est en cours de chargement...
La page est en cours de chargement...
La page est en cours de chargement...
La page est en cours de chargement...
La page est en cours de chargement...
La page est en cours de chargement...
La page est en cours de chargement...
La page est en cours de chargement...
La page est en cours de chargement...
La page est en cours de chargement...
La page est en cours de chargement...
La page est en cours de chargement...
La page est en cours de chargement...
La page est en cours de chargement...
La page est en cours de chargement...
-
 1
1
-
 2
2
-
 3
3
-
 4
4
-
 5
5
-
 6
6
-
 7
7
-
 8
8
-
 9
9
-
 10
10
-
 11
11
-
 12
12
-
 13
13
-
 14
14
-
 15
15
-
 16
16
-
 17
17
-
 18
18
-
 19
19
-
 20
20
-
 21
21
-
 22
22
-
 23
23
-
 24
24
-
 25
25
-
 26
26
-
 27
27
-
 28
28
-
 29
29
-
 30
30
-
 31
31
-
 32
32
-
 33
33
-
 34
34
-
 35
35
-
 36
36
-
 37
37
-
 38
38
-
 39
39
-
 40
40
-
 41
41
-
 42
42
-
 43
43
-
 44
44
-
 45
45
-
 46
46
-
 47
47
-
 48
48
-
 49
49
-
 50
50
-
 51
51
-
 52
52
-
 53
53
-
 54
54
-
 55
55
-
 56
56
-
 57
57
-
 58
58
-
 59
59
-
 60
60
-
 61
61
-
 62
62
-
 63
63
-
 64
64
-
 65
65
-
 66
66
-
 67
67
-
 68
68
-
 69
69
-
 70
70
-
 71
71
-
 72
72
-
 73
73
-
 74
74
-
 75
75
-
 76
76
-
 77
77
-
 78
78
-
 79
79
-
 80
80
-
 81
81
-
 82
82
-
 83
83
-
 84
84
-
 85
85
-
 86
86
-
 87
87
-
 88
88
-
 89
89
-
 90
90
-
 91
91
-
 92
92
-
 93
93
-
 94
94
-
 95
95
-
 96
96
-
 97
97
-
 98
98
-
 99
99
-
 100
100
-
 101
101
-
 102
102
-
 103
103
-
 104
104
-
 105
105
-
 106
106
-
 107
107
-
 108
108


Frigidaire GRSC2352AD Mode d'emploi
- Catégorie
- Frigos
- Taper
- Mode d'emploi
- Ce manuel convient également à
dans d''autres langues
- English: Frigidaire GRSC2352AD User guide
- español: Frigidaire GRSC2352AD Guía del usuario
Documents connexes
-
Frigidaire FRSS2323AW Manuel utilisateur
-
Frigidaire FRFG1723AVxx Manuel utilisateur
-
Frigidaire FRS23HF5AQ2 Manuel utilisateur
-
Frigidaire Gallery FG4H2272UF Guide d'installation
-
-
Frigidaire FFTR2021QB6A Le manuel du propriétaire
-
-
White-Westinghouse FRTX18N5BW0 Le manuel du propriétaire
-
Frigidaire FFHB2750TD Guide d'installation
-
Frigidaire FFTR2045VW Guide d'installation
Autres documents
-
Frigidaire Gallery FGRU19F6QF Le manuel du propriétaire
-
Electrolux ERMC2295AS Guide d'installation
-
-
-
Frigidaire Professional FPBS2778UF Guide d'installation
-
Electrolux EI15IM55GS - 15 Inch Ice Maker Manuel utilisateur
-
IKEA STJARNSTATUS Refrigerator Guide d'installation
-
Electrolux E32AF85PQS Guide d'installation
-
Sunbeam 701 Le manuel du propriétaire
-
Castorama Easyhome PurAir Compact PREMIUM Manuel utilisateur