Power Fist Air Nibbler Manuel utilisateur
- Catégorie
- Outils électroportatifs
- Taper
- Manuel utilisateur
Ce manuel convient également à


3
Visit www.princessauto.com for more information
8036216V 2.8
Air Nibbler
SPECIFICATIONS
Max Cutting Capacity 16 Gauge
Max Sheet Metal Cutting Capacity 17 Gauge
Air Inlet 1/4 in. NPT
Average Air Consumption 4 CFM @ 90 PSI
Maximum Air Pressure 100 PSI
No Load Speed 3,200 Strokes per Minute
Min Hose Size 3/8 in.
IMPORTANT SAFETY PRECAUTIONS
WARNING! Read and understand all instructions before using this tool. The operator must follow basic
precautions to reduce the risk of personal injury and / or damage to the equipment. Before allowing someone
else to use this tool, make sure they are aware of all safety information.
WARNING! The warnings, cautions and instructions discussed in this instruction manual cannot cover all
possible conditions and situations that may occur. Common sense and caution are factors that cannot be built
into this product, but must be supplied by the operator.
NOTE: Keep this manual for the safety warnings, precautions and operating, inspection and maintenance
instructions. When this manual refers to a part number, it refers to the included parts list.
WORK AREA
1. Operate in a safe work environment. Keep your work area clean and well lit.
2. Do not use in the presence of flammable gases, dust or liquids.
3. Keep anyone not wearing the appropriate safety equipment away from the work area.
NOTE: Minimize distractions in the work environment. Distractions can cause you to lose control of the tool.
4. Always lock up tools and keep them out of the reach of children.

Air Nibbler
4For technical questions call 1-800-665-8685
8036216
V 2.8
PERSONAL SAFETY
CAUTION! Wear protective equipment approved by the Canadian Standards Association (CSA) or American
National Standards Institute (ANSI) when using the air nibbler.
1. Dress properly, wear protective equipment. Use breathing, ear, eye, face, foot, hand, and head protection.
Always wear ANSI approved impact safety goggles, which must provide both frontal and side protection.
Protect your hands with suitable gloves. Wear a full face shield if your work creates metal filings or wood
chips. Protect your head from falling objects by wearing a hard hat. Wear an ANSI approved dust mask or
respirator when working around metal, wood and chemical dusts and mists. Wear ANSI approved earplugs.
Protective, electrically non-conductive clothes and non-skid footwear are recommended when working. Wear
steel-toed boots to prevent injury from falling objects.
2. Control the tool, personal movement and the work environment to avoid personal injury or damage to the
tool. Stay alert, watch what you are doing and use your common sense.
3. Keep articles of clothing, jewelry, hair, etc., away from moving parts to avoid entanglement with tool.
4. Do not operate any machine / tool when tired or under the influence of drugs, alcohol or medications.
5. Do not overreach when operating a tool. Proper footing and balance enables better control of a tool in
unexpected situations.
6. Use clamps or other practical ways to support or secure the work piece to a stable platform. Holding the
work piece by hand or against your body is not stable and may lead to loss of control and injury.

Air Nibbler
5
Visit www.princessauto.com for more information
8036216 V 2.8
SPECIFIC SAFETY PRECAUTIONS
1. Keep hands and fingers away from the cutting area. Any body part coming in contact with moving parts
could cause injury.
2. When operating the air nibbler, use proper eye and hearing protection as well as protective heavy
work gloves.
3. To maintain complete control, firmly hold your air nibbler with both hands. Do not place hands over air
vents. Proper cooling of the motor is necessary to ensure normal life of the tool.
4. Never point the cutter towards yourself. If it should slip, part of your body could come in contact with
moving parts.
5. Never force the tool. Excessive pressure could bend or break the blades, resulting in damage to the tool,
your work piece or serious personal injury. If your air nibbler runs smoothly under no load, but does not run
smoothly under load, then excessive pressure is being used.
6. This tool will not stop moving immediately. Do not lay the tool down or leave it unattended until it has come
to a complete stop. A part that is moving could make the tool jump or grab a surface and pull the tool out of
your control.
7. Contact with a “live” wire will make exposed metal parts of the tool “live” and shock the operator.
8. After changing the die and cutter or making adjustments, make sure the die, cutter and any other adjustment
devices are securely tightened.
9. Remove adjusting keys and wrenches before turning the tool on. A wrench or a key that is left attached to a
rotating part of the tool increases the risk of personal injury.
10. Always check the die and cutter for damage before each use. A damaged die and cutter can break during use
and cause serious injury.
11. Never use a dull or damaged die and cutter. The die and cutter must be handled with care. A damaged die
and cutter can snap during use. A dull die and cutter requires more force to push the tool, possibly causing
the bit to break.
12. Never touch the die and cutter during or immediately after use. After use, the die and cutter will be too hot to
be touched by bare hands.
13. Always keep the air line away from moving parts on the tool.

Air Nibbler
6For technical questions call 1-800-665-8685
8036216
V 2.8
VIBRATION PRECAUTIONS
This tool vibrates during use. Repeated or long-term exposure to vibration may cause temporary or permanent
physical injury, particularly to the hands, arms and shoulders.
1. Anyone using vibrating tools regularly or for an extended period should first be examined by a doctor and
then have regular medical checkups to ensure medial problems are not being caused by or worsened from
tool use. Pregnant women or people who have impaired blood circulation to the hands, past hand injuries,
nervous system disorders, diabetes or Raynaud’s Disease should not use this tool. If you feel any medical
symptoms related to vibrations (such as tingling, numbness, and white or blue fingers), seek medical
attention as soon as possible.
2. Do not smoke during use. Nicotine reduces the blood flow to the hands and fingers, increasing the risk of
vibration-related injury.
3. Wear suitable gloves to reduce the vibration effects on the user.
4. Use tools with the lowest amount of vibration when there is a choice between different processes.
5. Do not use for extended periods. Take frequent breaks when using this tool.
6. Let the tool do the work. Grip the tool as lightly as possible (while still keeping safe control of it).
7. To reduce vibrations, maintain the tool as explained in this manual. If abnormal vibrations occur, stop using
this tool immediately.
TOOL USE AND CARE
WARNING! Do not use the tool if the trigger does not function properly. Any tool that cannot be controlled with
the ON / OFF switch is dangerous and must be repaired.
WARNING! Do not exceed the maximum 16 gauge thickness when cutting metal with this tool.
1. Use the correct tool for the job. Maximize tool performance and safety by using the tool for its intended task.
2. Do not modify this tool or use for a purpose for which it was not designed.
3. This tool was designed for a specific function.
Do Not:
a. Modify or alter the air nibbler; all parts and accessories are designed with built-it safety features that may
be compromised if altered.
b. Use the air nibbler in a way for which it was not designed.
4. Avoid unintentional starts. Be sure the trigger is in the off position when not in use and before connecting it
to any air source.
5. Only use the lubricants supplied with the tool or specified by the manufacturer. Other lubricants may not be
suitable and may damage the tool or even make the tool explode.
6. When not in use for an extended period, apply a thin coat of lubricant to the steel parts to avoid rust.
7. Maintain the label and nameplate on the tool. These carry important information. If unreadable or missing,
contact Princess Auto for a replacement.

Air Nibbler
7
Visit www.princessauto.com for more information
8036216 V 2.8
AIR COMPRESSOR
Ensure the compressor used with the air nibbler can supply the required Cubic Feet per Minute at the required
PSI (see Specifications).
1. Use proper size and type of air pressure line and fittings
2. Use only clean, dry, regulated compressed air at the
rated range as marked on the tool.
CAUTION! Do not use an air source besides an air compressor
to power this tool.
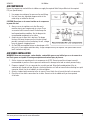
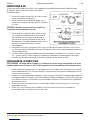
3. Always use an air regulator, an in-line filter and a
moisture trap in your compressed air system. These
accessories will increase the tool’s life and keeps the
tool in good working condition. See the diagram for
recommended components of an airline.
4. Avoid using an air hose that is too long. The longer
the hose, the lower the pressure that reaches the tool,
possibly causing it to cease functioning. As well, a longer
hose can become a tripping hazard.
5. Air Tool CFM consumption ratings are based upon a 25%
duty cycle. If you require continuous duty, a larger compressor may be required. See Specifications for the
tool’s continuous duty limit.
AIR SOURCE INSTALLATION
WARNING! Never use pure oxygen, carbon dioxide, combustible gases or any bottled gas as an air source for a
tool. Such gases are capable of causing an explosion and serious injury to persons.
1. Set the air pressure regulator on the air compressor to 90 PSI. Do not exceed the air impact wrench’s
recommended air pressure. Excess pressure could result in damage to the tool or serious personal injury.
2. Prepare a standard 1/4 in. air connector for use with your tool. Wrap the threaded portion of the air
connector with thread seal tape. Wrap in a clockwise direction so it will not unravel when attaching to a quick
connector. Attach it to the air nibbler’s air inlet and tighten.
3. Attach a standard quick connector to the air source’s hose. Attach the air hose to the tool’s air connector.
4. Check the air line and its connections for air leaks. Do not use the air nibbler until you have repaired
all air leaks.

Air Nibbler
8For technical questions call 1-800-665-8685
8036216
V 2.8
DISCONNECTING AIR SOURCE
WARNING! Failure to follow these steps could result in severe injury, tool or property damage.
Disconnect the air nibbler from the air source before cleaning, servicing, changing parts / accessories or
when not in use.
1. Turn the air regulator to the OFF or L position.
2. Turn off the air compressor.
3. Disconnect the air pressure hose.
4. Discharge any residual pressure inside the air nibbler.
LUBRICATION
1. It is very important that the tool be properly lubricated. Without proper lubrication, the tool will not work
properly and parts will wear prematurely. Manually dropping a drop or two of air tool oil once a day into
the tool’s male connector is better than using an automatic in-line lubricator, which should only be required
when there are multiple users of the same tool.
2. Keep the air line lubricator filled and correctly adjusted. The in-line lubricator should be regularly checked
and filled with air tool oil. Proper adjustment of the in-line lubricator is performed by placing a sheet of paper
next to the exhaust ports and holding the throttle open approximately 30 seconds. The lubricator is properly
set when a light stain of oil collects on the paper. Excessive amounts of oil should be avoided.
3. Air tool oil is the only recommended lubricant for use in all air tools. Do not try to use other types of
lubricants to oil your tools. Using the wrong lubricant will cause premature tool failure and / or loss of
power. Use only recommended lubricants, specially made for pneumatic applications. Substitutes may harm
the rubber compounds in the tool’s O-rings and other rubber parts.
4. Oiling your air tool regularly is important, but it is also important not to over oil your air tool. Over oiling
can cause premature tool failure. Your tool may not be ruined, but it will begin to experience loss of power
that will continually get worse until it no longer works. The tool then has to be taken apart and cleaned of
excess oil.
5. All air tools are packed in grease to prevent corrosion of internal parts during shipping and storage. We
recommend you clean this out to have optimum performance from your new air tool. Add a generous
amount of air tool oil in the air inlet, and then run the tool under no load until exhaust is clear to remove
packing grease. To maintain, add only one or two drops daily.
6. In the event that it becomes necessary to store the tool for an extended period of time (overnight,
weekend, etc.), it should receive a generous amount of lubrication at that time. The tool should be run for
approximately 30 seconds to ensure oil has been evenly distributed throughout the tool. The tool should be
stored in a clean and dry environment.
WARNING! Never use penetrating oil to clean or lubricate your air tool. Penetrating oils are a solvent that will
break down the internal grease and cause the air tool to seize up.

Air Nibbler
9
Visit www.princessauto.com for more information
8036216 V 2.8
UNPACKING
1. Carefully remove the air nibbler from the package.
a. Retain packing material until you have carefully inspected and satisfactorily installed or operated
the air nibbler.
2. Make sure that all items in the parts list are included.
3. Inspect the parts carefully to make sure the air nibbler was not damaged while shipping.
OPERATION
NOTE: It is a good idea to make a practice cut on a piece of scrap material before cutting the work material. This will
allow you to be sure you are familiar with the way the tool operates, and that the cut can be made properly.
1. Follow all safety precautions already discussed.
2. Mark the line or shape to be cut on the work piece.
3. Ensure that your work piece is properly secure with clamps or other practical ways to support or secure the
work piece.
4. Grip the air nibbler firmly, and depress the throttle lever to begin cutting.
5. Introduce the sheet metal into the slot in the end of the die. Apply light pressure only to move the tool in the
desired direction through the material.
NOTE: If the air nibbler stalls while cutting, release the pressure on the throttle lever to turn off the tool.
Then, back the air nibbler out an inch and restart the cutting process.
6. If the air nibbler requires more force to accomplish the task, verify that the tool receives sufficient
unobstructed airflow (CFM) and increase the pressure (PSI) output of the regulator up to the maximum air
pressure rating of the air nibbler.
CAUTION! Do not exceed the tool’s maximum air pressure rating. If the tool still does not have sufficient force at
the maximum pressure and sufficient airflow, then a larger tool may be required.
7. Do not allow the air nibbler to run freely for any length of time, as this will damage the bearings.
8. To prevent accidents, turn off the tool, detach the air supply, safely discharge any residual air pressure in
the tool, and release the throttle and / or turn the switch to its off position after use. Clean external surfaces
of the tool with a clean, dry cloth, and apply a thin coat of tool oil. Then store the air nibbler indoors out of
children’s reach.

Air Nibbler
10 For technical questions call 1-800-665-8685
8036216
V 2.8
MAINTENANCE
WARNING! Disconnect the air nibbler from the air supply before changing accessories, servicing or
performing maintenance. Replace or repair damaged parts. Use genuine parts only. Non-authorized parts
may be dangerous.
1. Every three months, have the internal mechanism cleaned, inspected, and lubricated by a
qualified technician.
2. Check for damaged parts. Before using any tool, any part that appears to be damaged should be carefully
checked to determine that it would operate properly and perform its intended functions. Check for alignment
and binding of moving parts, for broken parts or mounting fixtures, or for any other condition that may affect
proper operation. Any part that is damaged should be repaired or replaced by a qualified technician.
3. When servicing, use only identical replacement parts. Only use accessories intended for use with this tool.
Replace damaged parts immediately.
4. Keep the tool clean. Wipe the tool with a clean cloth and periodically blow out all areas with compressed air.
If compressed air is not available, use a brush to remove dust from all areas. Do not use harsh chemicals or
solvents to clean the tool.
5. Regularly inspect all mountings and screws to ensure tightness. Should any screws become loose,
tighten immediately.
6. If repairs are required, bring your tool to an authorized service center.
7. Wipe the air nibbler with a lint free cloth after each use.
8. Make sure the anvil is clear of dirt or debris. If possible, spray it with compressed air before and after
each use.
9. If an inline oil / filter system is not used; lubricate the tool daily by holding it so that the air inlet is facing up.
Squeeze the trigger and place one or two drops of air tool oil into the air inlet. Squeezing the trigger allows
the oil to circulate in the motor.
CHANGING THE DIE AND CUTTER
1. Unscrew and remove the die (32), the nut (33) and the retaining screw (31).
2. Pull the cutter (30) out of the pushing rod (29).
3. Replace the cutter (30), making sure the tip of the cutting edge fits snugly into the pushing rod (29).
4. To reassemble the air nibbler, reverse the above steps.
STORAGE
In the event that it becomes necessary to store the tool for an extended period of time (overnight, weekend, etc.,)
it should receive a generous amount of lubrication at that time. The tool should be run for approximately 30 seconds
to ensure oil has been evenly distributed. The tool should be stored in a clean and dry environment.
DISPOSING OF THE TOOL
If your air nibbler has become damaged beyond repair, do not throw it out. Take it to the appropriate
recycling facility.

Air Nibbler
11
Visit www.princessauto.com for more information
8036216 V 2.8
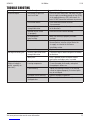
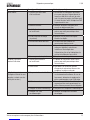
TROUBLE SHOOTING
Problem(s) Possible Cause(s) Suggested Solution(s)
Decreased output. 1. Not enough air pressure
and / or air flow
1. Check for loose connections and make sure that
the air supply is providing enough air flow (CFM)
at the required pressure (PSI) to the tool’s air
inlet. DO NOT exceed the maximum air pressure.
2. Obstructed throttle. 2. Clean around the throttle to ensure
free movement.
3. Incorrect lubrication or not
enough lubrication.
3. Lubricate using air tool oil and grease according
to the directions.
4. Blocked air inlet screen
(if equipped).
4. Clean the air inlet screen of buildup.
5. Air leaking from
loose housing.
5. Make sure housing is properly assemble
and tight.
6. Mechanism is contaminated. 6. Have a qualified technician clean and lubricate
the mechanism. Install an in-line filter in the
air supply as stated in the Air Source
Installation section.
7. Vane wear damage. 7. Replace all vanes.
Housing heats during use. 1. Incorrect lubrication or not
enough lubrication.
1. Lubricate using air tool oil and grease according
to directions.
2. Worn parts. 2. Have a qualified technician inspect internal
mechanism and replace parts as needed.
Severe air leakage.
(Slight air leakage is
normal, especially on
older tools.)
1. Cross-threaded
housing components.
1. Check for incorrect alignment and uneven gasp.
If cross-threaded, disassembly and replace
damaged parts before use.
2. Loose housing. 2. Tighten the housing assembly. If the housing
cannot be tightened properly, the internal parts
may be misaligned.
3. Damaged valve or housing. 3. Replace damaged components.
4. Dirty, worn or
damaged valve.
4. Clean or replace the valve assembly.

Air Nibbler
12 For technical questions call 1-800-665-8685
8036216
V 2.8
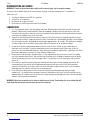
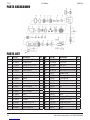
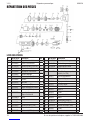
PARTS BREAKDOWN
PARTS LIST
No. Parts No. Description Qty.
1 AR-38001 Air Inlet Bushing 1
2 AR-38005 Throttle Lever 1
3 SP-25220 Spring Pin (2.5 x 22) 1
4 AR-38C11 Throttle Handle 1
5 AR-38035 Valve Throttle 1
7 AR-38003 Valve Stem 1
8 ORP-0032 O-ring (3 x 2) 1
9 AR-38002 Spring 1
10 AR-38012 Plug 1
11 ORP-0080 O-ring (P8) 1
12 AR-38021 Rear End Plate 1
13 BB-06262 Bearing (626 zz) 1
14 AR-38050 End Plate Cap 1
15 AR-38A24 Rotor 1
16 AR-38025 Rotor Blade 4
17 AR-38023 Cylinder 1
18 Sp-20060 Spring Pin (2 x 6) 1
19 AR-38028 Front End Plate 1
20 BB-06082 Bearing (608 zz) 1
No. Parts No. Description Qty.
21 AR-38T46 Exhaust Cover 1
23 AR-38C45 Gear Case 1
24 AR-38042 Idle Gear 3
25 304025 Rear Spindle 1
26 NR-40138 Idler Gear Pin (4 x 13.8) 3
27 304027 Nibbler Head 1
28 304028 Pushing Rod Bushing 1
29 304029 Pushing Rod 1
30 302A10 Cutter 1
31 302A09 Retaining Screw 1
32 304032 Die 1
33 304033 Nut 1
34 304034 Drive Bushing 1
35 304035 Shaft 1
36 BB-62002 Bearing (6200 zz) 2
37 304037 Washer (10 x 22) 1
39 RTW-030 Snap Ring (R30) 1
40 304040 Nut 1
41 304041 Plug 1


3
Visitez www.princessauto.com pour plus d'informations
8036216V 2,8
Grignoteuse
pneumatique
SPÉCIFICATIONS (TITLE)
Capacité maximale de coupe Calibre 16
Capacité maximale de coupe de tôle Calibre 17
Entrée d’air 1/4 po NPT
Consommation d’air moyenne 4 pi cubes/min à 90 lb/po carré
Pression d’air maximale 100 lb/po carré
Vitesse à vide 3 200 cycles par minute
Diamètre min. de tuyau 3/8 po
CONSIGNES DE SÉCURITÉ IMPORTANTES
AVERTISSEMENT ! Veuillez lire et comprendre toutes les instructions avant d’utiliser cet outil. L’utilisateur
doit respecter les précautions de base lorsqu’il utilise cet outil afin de réduire le risque de blessure et/ou de
dommage à l’équipement. Avant de permettre à un autre individu d’utiliser cet outil, assurez-vous qu’il est
avisé de toutes les consignes de sécurité.
AVERTISSEMENT ! Les avertissements, les mises en garde et les instructions mentionnés dans ce manuel
d’instructions ne peuvent couvrir toutes les conditions et situations pouvant se produire. L’opérateur doit faire
preuve de bon sens et prendre toutes les précautions nécessaires afin d’utiliser l’outil en toute sécurité.
REMARQUE : Conservez ce manuel qui contient les avertissements de sécurité, les précautions et les instructions de
fonctionnement, d’inspection et d’entretien. Lorsque ce manuel fait référence à un numéro de pièce, il fait référence
à la liste des pièces comprises.
AIRE DE TRAVAIL
1. Travaillez dans un environnement de travail sécuritaire. Gardez votre aire de travail propre et bien éclairée.
2. N’utilisez pas d’outils en présence de poussière, de gaz ou de liquides inflammables.
3. Assurez-vous que les personnes qui ne portent pas l’équipement de sécurité approprié ne se trouvent pas à
proximité de l’aire de travail.
REMARQUE : Minimisez les distractions au sein de l’environnement de travail. Les distractions peuvent
causer une perte de contrôle de l’outil.
4. Gardez toujours les outils dans un endroit verrouillé et hors de la portée des enfants.

Grignoteuse pneumatique
4En cas de questions techniques, appelez le 1-800-665-8685
8036216
V 2,8
SÉCURITÉ PERSONNELLE
ATTENTION ! Portez un équipement de protection approuvé par l’Association canadienne de normalisation (CSA)
ou l’American National Standards Institute (ANSI) quand vous utilisez la grignoteuse pneumatique.
1. Portez des vêtements appropriés et de l’équipement de protection. Utilisez des protections pour les voies
respiratoires, les oreilles, les yeux, le visage, les pieds, les mains et la tête. Portez toujours des lunettes de
sécurité étanches approuvées par l’ANSI qui offrent une protection frontale et latérale. Protégez-vous les
mains à l’aide de gants appropriés. Portez un écran facial panoramique si votre travail produit des limailles
ou des copeaux de bois. Protégez-vous la tête de la chute d’objets en portant un casque de protection.
Portez un masque antipoussières ou un appareil respiratoire approuvé par l’ANSI lorsque vous travaillez
où il y a des poussières et des vapeurs provenant du métal, du bois ou de produits chimiques. Portez des
bouchons d’oreille approuvés par l’ANSI. Des vêtements de protection non conducteurs d’électricité et des
chaussures antidérapantes sont recommandés pour le travail. Pour éviter les blessures dues aux chutes
d’objets, portez des chaussures à embout d’acier.
2. Gardez le contrôle de l’outil, de vos mouvements et de l’environnement de travail pour éviter les blessures
ou le bris de l’outil. Restez alerte, portez attention à vos gestes et faites preuve de bon sens.
3. Tenez les vêtements, les bijoux, les cheveux, etc. à l’écart des pièces mobiles pour éviter de les faire coincer
par l’outil.
4. N’utilisez pas d’appareil ou d’outil si vous êtes fatigué ou sous l’effet de drogues, d’alcool ou
de médicaments.
5. N’utilisez pas l’outil si vous devez étirer les bras pour vous en servir. Une stabilité et un équilibre appropriés
sont nécessaires afin d’avoir un meilleur contrôle de l’outil en cas de situations inattendues.
6. Utilisez des serre-joints ou un autre moyen pratique pour fixer la pièce à travailler sur une plate-forme stable.
Une pièce à travailler tenue dans les mains ou appuyée contre le corps n’est pas stable et risque d’entraîner
une perte de contrôle et des blessures.

Grignoteuse pneumatique
5
Visitez www.princessauto.com pour plus d'informations
8036216 V 2,8
CONSIGNES DE SÉCURITÉ SPÉCIFIQUES
1. Gardez vos mains et vos doigts éloignés de la zone de coupe. Toute partie du corps venant en contact avec
des pièces mobiles peut être sujette à des blessures.
2. Lors de l’utilisation de la grignoteuse pneumatique, protégez correctement vos yeux et vos oreilles et portez
des gants de travail épais comme protection.
3. Pour maintenir un contrôle complet, bien tenir la grignoteuse pneumatique avec les deux mains. Ne placez
jamais une main par-dessus un évent. Pour assurer à l’outil sa durée de vie utile normale, le moteur doit
toujours être suffisamment refroidi.
4. Ne dirigez jamais la pointe de l’outil vers votre personne. En cas de glissement, une partie de votre corps
pourrait venir en contact avec des pièces mobiles.
5. Ne forcez jamais l’outil. Une pression excessive pourrait recourber ou casser les lames, ce qui causerait des
dommages de l’outil ou de la pièce de travail ainsi que des blessures graves. Si la grignoteuse pneumatique
fonctionne bien sans charge, mais si le fonctionnement devient erratique sous charge, ceci indique
l’utilisation d’une pression excessive.
6. L’outil ne s’arrêtera pas immédiatement. Ne posez pas l’outil sur une surface ou ne le laissez pas sans
surveillance avant qu’il ne s’immobilise. Une pièce mobile pourrait faire sauter l’outil ou s’agripper à une
surface et vous pourriez perdre la maîtrise de l’outil.
7. Le contact avec un fil électrique « sous tension » rend les pièces métalliques de l’outil exposées «
conductrices » et l’opérateur risque de ressentir un choc.
8. Après avoir changé le poinçon et l’outil de coupe ou après avoir effectué des réglages, assurez-vous que le
poinçon, l’outil de coupe et tout autre dispositif de réglage sont bien serrés.
9. Avant de mettre l’outil en marche, retirez les clavettes et les clés de réglage. Une clé ou clavette laissée en
place sur une pièce rotative augmente le risque de blessure.
10. Inspectez toujours la lame et l’outil de coupe pour y rechercher des dommages avant chaque utilisation.
Un poinçon et un outil de coupe endommagés peuvent se casser pendant l’utilisation et causer des
blessures graves.
11. Ne jamais utiliser de poinçon et d’outil de coupe émoussés ou endommagés. Le poinçon et l’outil de coupe
doivent être manipulés avec soin. Un poinçon et un outil de coupe endommagés peuvent se briser pendant
l’utilisation. Un poinçon et un outil de coupe émoussés nécessitent davantage de force pour pousser l’outil,
ce qui pourrait provoquer la rupture de l’embout.
12. Ne jamais toucher le poinçon et l’outil de coupe lors de leur utilisation ou immédiatement après leur
utilisation. Après utilisation, le poinçon et l’outil de coupe sont trop chauds pour être touchés avec
les mains nues.
13. Toujours maintenir la conduite d’air loin des pièces mobiles sur l’outil.

Grignoteuse pneumatique
6En cas de questions techniques, appelez le 1-800-665-8685
8036216
V 2,8
PRÉCAUTIONS RELATIVES AUX VIBRATIONS
Cet outil vibre pendant son usage. Une exposition répétitive ou prolongée aux vibrations peut causer des blessures
temporaires ou permanentes, surtout aux mains, aux bras et aux épaules.
1. Toute personne qui utilise des outils vibrateurs de façon régulière ou pendant des périodes prolongées
doit d’abord consulter un médecin et se prêter régulièrement à des examens médicaux pour s’assurer que
des problèmes de santé ne sont pas causés ou aggravés par l’usage de tels outils. Les femmes enceintes
ou les personnes qui souffrent d’une mauvaise circulation sanguine aux mains, qui ont subi de blessures
antérieures aux mains et qui souffrent de troubles neurologiques, de diabète ou de la maladie de Raynaud
ne doivent pas utiliser cet outil. Si vous ressentez des symptômes reliés aux vibrations (comme un
fourmillement, un engourdissement, des doigts blancs ou bleus), consultez un médecin le plus tôt possible.
2. Ne fumez pas pendant l’utilisation de l’outil. La nicotine réduit la circulation sanguine vers les mains et les
doigts et augmente le risque de blessure reliée aux vibrations.
3. Portez des gants appropriés pour réduire les effets de vibration sur l’utilisateur.
4. Utilisez les outils qui produisent le moins de vibration possible si vous pouvez choisir entre
différents processus.
5. N’utilisez pas l’outil pendant des périodes prolongées. Prenez souvent des pauses lorsque vous
utilisez cet outil.
6. Laissez l’outil faire le travail. Tenez l’outil le moins serré possible (tout en le contrôlant de
manière sécuritaire).
7. Pour réduire les vibrations, entretenez l’outil selon les directives figurant dans ce manuel. En cas de
vibrations anormales, cessez d’utiliser cet outil immédiatement.
UTILISATION ET ENTRETIEN DE L’OUTIL
AVERTISSEMENT ! N’utilisez pas cet outil si la gâchette ne fonctionne pas correctement. L’utilisation de tout
outil qui ne peut pas être contrôlé à l’aide de l’interrupteur MARCHE/ARRÊT est dangereuse et l’outil doit
être réparé.
AVERTISSEMENT ! Ne dépassez pas une épaisseur max. de calibre 16 lors du découpage de métal avec
cet outil.
1. Utilisez le bon outil pour la tâche à effectuer. Maximisez la performance de l’outil et la sécurité en utilisant
l’outil pour des travaux pour lesquels il a été conçu.
2. Ne modifiez pas cet outil et ne l’utilisez pas à des fins pour lesquelles il n’a pas été conçu.
3. Cet outil a été conçu pour une utilisation spécifique.
Il ne faut pas :
a. Modifier ou altérer la grignoteuse pneumatique; toutes les pièces et tous les accessoires sont conçus
avec des dispositifs de sécurité intégrés qui risquent d’être endommagés en cas de modification.
b. Utiliser la grignoteuse pneumatique à d’autres fins que celles pour lesquelles elle a été conçue.
4. Évitez les mises en marche involontaires. Assurez-vous que la gâchette est en position d’arrêt lorsque l’outil
n’est pas utilisé et avant de le brancher à une source d’air quelconque.
5. Utilisez seulement les lubrifiants fournis avec l’outil ou spécifiés par le fabricant. Les autres lubrifiants
peuvent ne pas convenir et endommager l’outil ou même causer son explosion.
6. Si l’outil n’est pas utilisé pendant une période prolongée, appliquez une mince couche de lubrifiant sur les
pièces en acier pour éviter qu’elles ne rouillent.
7. Veillez à ce que l’étiquette et la plaque signalétique de l’outil demeurent intactes. Elles comportent des
renseignements importants. Si elles sont illisibles ou perdues, communiquez avec Princess Auto
pour les remplacer.

Grignoteuse pneumatique
7
Visitez www.princessauto.com pour plus d'informations
8036216 V 2,8
COMPRESSEUR D’AIR
Assurez-vous que le compresseur utilisé avec la grignoteuse pneumatique puisse fournir le débit volumique
(pi cube/min) requis à la pression (lb/po carré) requise
(voir Spécifications).
1. Utilisez une conduite de pression d’air et des raccords
de type et de dimension appropriés.
2. Utilisez seulement de l’air comprimé propre, sec et
certifié dans la plage nominale prescrite, tel qu’indiqué
sur l’outil.
ATTENTION ! N’utilisez pas une source d’air en plus d’un
compresseur d’air pour alimenter cet outil.
3. Utilisez toujours un régulateur d’air, un filtre en ligne
et un purgeur de condensation dans votre système
d’air comprimé. Ces accessoires augmenteront la
durée de vie de l’outil et le garderont en bon état de
fonctionnement. Consultez le diagramme pour voir les
composants recommandés pour le système
d’air comprimé.
4. Évitez d’utiliser un tuyau à air trop long. Plus le tuyau est long, plus la pression d’air qui se rend à l’outil
sera basse, au point où l’outil pourrait cesser de fonctionner. De plus, un tuyau plus long peut constituer un
risque de trébuchement.
5. Les taux de débit volumique (pi cube/min) de l’outil pneumatique sont fondés sur un cycle de service de
25 %. Si vous voulez un service continu, un compresseur de dimension supérieure pourrait être requis.
Consultez la section Spécifications pour connaître la limite de service continu de l’outil.
INSTALLATION DE LA SOURCE D’AIR
AVERTISSEMENT ! N’utilisez jamais d’oxygène pur, de dioxyde de carbone, de gaz combustibles ou de gaz en
bouteille comme source d’air pour un outil. De tels gaz peuvent causer une explosion et des blessures graves.
1. Réglez le régulateur de pression d’air sur le compresseur d’air à 90 lb/po carré. Ne dépassez pas la pression
d’air recommandée de la clé à chocs pneumatique. Une pression excessive pourrait endommager l’outil ou
causer des blessures graves.
2. Préparez un raccord pneumatique standard de 1/4 po convenant à votre outil. Enveloppez la partie filetée du
raccord pneumatique à l’aide d’un ruban d’étanchéité pour filetage. Enveloppez en sens horaire de façon qu’il
ne se déroule pas lors du raccordement à un raccord rapide. Attachez-le sur l’entrée d’air de la grignoteuse
pneumatique et serrez.
3. Raccordez le tuyau de la source d’air à un raccord rapide standard. Raccordez le tuyau à air au raccord
pneumatique de l’outil.
4. Vérifiez s’il y a des fuites d’air dans la conduite d’air et les raccords. N’utilisez pas la grignoteuse
pneumatique avant d’avoir réparé toutes les fuites d’air.

Grignoteuse pneumatique
8En cas de questions techniques, appelez le 1-800-665-8685
8036216
V 2,8
DÉBRANCHEMENT DE LA SOURCE D’AIR
AVERTISSEMENT ! Le non-respect de ces étapes pourrait entraîner des blessures graves ou des dommages à
l’outil ou au matériel.
Débranchez la grignoteuse pneumatique de la source d’air avant de nettoyer, de réparer ou de remplacer des pièces/
accessoires ou lorsqu’elle n’est pas utilisée.
1. Amenez le régulateur pneumatique à la position OFF (arrêt) ou L.
2. Éteignez le compresseur d’air.
3. Déconnectez le tuyau d’air comprimé.
4. Évacuez toute pression résiduelle de l’intérieur de la grignoteuse pneumatique.
LUBRIFICATION
1. Il est très important que l’outil soit proprement lubrifié. Sans une bonne lubrification, l’outil ne fonctionnera
pas correctement et ses pièces s’useront prématurément. Le fait d’ajouter quelques gouttes d’huile pour
outils pneumatiques chaque jour, dans le connecteur mâle de l’outil, est préférable à l’utilisation d’un
lubrificateur en ligne pour outils pneumatiques, lequel ne devrait être requis que lorsque plusieurs personnes
se servent du même outil.
2. Gardez le lubrificateur de conduite d’air rempli d’huile et réglé correctement. Le lubrificateur en ligne devrait
être vérifié et rempli régulièrement d’huile pour outils pneumatiques. Pour bien ajuster le lubrificateur en
ligne, placez une feuille de papier à côté des orifices d’échappement et gardez l’accélérateur ouvert pendant
environ 30 secondes. Le lubrificateur est correctement réglé lorsqu’une légère tache d’huile est visible sur le
papier. Évitez de mettre trop d’huile dans l’outil.
3. L’huile pour outils pneumatiques est le seul lubrifiant recommandé pour tout outil pneumatique. Ne tentez
jamais d’utiliser un autre lubrifiant pour lubrifier vos outils. En utilisant un lubrifiant inadéquat, vous
causerez une panne prématurée ou une perte de puissance. Utilisez seulement les lubrifiants recommandés
et fabriqués spécifiquement pour les outils pneumatiques. Des produits de substitution pourraient
endommager le caoutchouc dans les joints toriques de l’outil, ainsi que d’autres pièces en caoutchouc.
4. Il est important que votre outil pneumatique soit lubrifié régulièrement, mais il est tout aussi important de
ne pas le lubrifier excessivement. Une lubrification excessive pourrait provoquer une panne prématurée de
l’outil. Dans un tel cas, votre outil ne serait peut-être pas abîmé, mais il pourrait commencer à subir une
perte de puissance qui empirera continuellement, jusqu’à ce qu’il cesse de fonctionner. L’outil doit être
ensuite démonté pour être ensuite nettoyé afin d’éliminer tout excédent d’huile.
5. Tous les outils pneumatiques sont emballés dans de la graisse pour empêcher la corrosion des pièces
internes lors du transport et de l’entreposage. Nous vous conseillons d’enlever cette graisse pour optimiser
le rendement de votre nouvel outil pneumatique. Pour enlever la graisse d’empaquetage, versez une bonne
quantité d’huile pour outils pneumatiques dans l’entrée d’air, puis faites marcher l’outil à vide jusqu’à ce que
les gaz d’échappement soient transparents. Pour l’entretien régulier, ajoutez seulement une ou deux gouttes
d’huile chaque jour.
6. S’il est nécessaire d’entreposer l’outil durant une longue période (toute une nuit, une fin de semaine, etc.),
le lubrifier généreusement avant de l’entreposer. Faites fonctionner l’outil pendant environ 30 secondes
pour vous assurer que l’huile a été répartie uniformément dans l’outil. L’outil doit être rangé dans un endroit
propre et sec.
AVERTISSEMENT ! N’utilisez jamais d’huile pénétrante pour nettoyer ou lubrifier votre outil pneumatique. Les
huiles pénétrantes sont un solvant qui provoquera la décomposition de la graisse interne et, par conséquent, le
grippage de votre outil pneumatique.
La page est en cours de chargement...
La page est en cours de chargement...
La page est en cours de chargement...
La page est en cours de chargement...
-
 1
1
-
 2
2
-
 3
3
-
 4
4
-
 5
5
-
 6
6
-
 7
7
-
 8
8
-
 9
9
-
 10
10
-
 11
11
-
 12
12
-
 13
13
-
 14
14
-
 15
15
-
 16
16
-
 17
17
-
 18
18
-
 19
19
-
 20
20
-
 21
21
-
 22
22
-
 23
23
-
 24
24


Power Fist Air Nibbler Manuel utilisateur
- Catégorie
- Outils électroportatifs
- Taper
- Manuel utilisateur
- Ce manuel convient également à
dans d''autres langues
- English: Power Fist Air Nibbler User manual
Documents connexes
Autres documents
-
 SIOUX SSH10S18 ¹ Le manuel du propriétaire
-
Parkside PDBS 6.2 A1 Operation and Safety Notes
-
Bosch Power Tools 1529B Manuel utilisateur
-
-
-
DeWalt DW896 Manuel utilisateur
-
-
-
-
PROPOINT 8380180 Le manuel du propriétaire
