LG LBN20517BK Le manuel du propriétaire
- Catégorie
- Frigos
- Taper
- Le manuel du propriétaire

Model Name/Nom du Modèle **= color number/numéro de couleur
LBN20517**
LBN20518**
P/No. MFL61944135
OWNER’S MANUAL
BOTTOM FREEZER
REFRIGERATOR
Please read this manual carefully before operating
your set and retain it for future reference.
MANUEL D’UTILISATEUR
RÉFRIGÉRATEUR
A CONGÉLATEUR INFÉRIEUR
Veuillez lire ce manuel en entier avant de mettre
en marche l’unité et conservez-le à portée de la
main pour le consulter à tout moment.
LDN20718**
ENGLISH FRANÇAIS
www.lg.com

1
LG ELECTRONICS CANADA, INC.
LG REFRIGERATOR LIMITED WARRANTY - Canada
WARRANTY: Should your LG Refrigerator (“Product”) fail due to a defect in material or workmanship under normal home use during the
warranty period set forth below, LG Canada will at its option repair or replace the Product upon receipt of proof of original retail purchase.
This warranty is valid only to the original retail purchaser of the product and applies only to a Product distributed in Canada by LG
Canada or an authorized Canadian distributor. The warranty only applies to Products located and used within Canada.
WARRANTY PERIOD: (Note: If the original date of purchase can not be veried, the warranty will begin sixty
(60) days from the date of manufacture).
Refrigerator/Freezer Sealed System (Compressor, Condenser, and Evaporator only)
One (1) year from the date of original
retail purchase
One (1) year from the date of original
retail purchase
Seven (7) years from the date of
original retail purchase
Parts and Labor
(internal/functional parts only)
Parts and Labor Parts only
(Consumer will be charged for labor).
* Replacement products and parts are warranted for the remaining portion of the original warranty period or ninety (90) days, whichever
is greater.
* Replacement products and parts may be new or remanufactured.
* LG Authorized Service Center warranties their repair work for thirty (30) days.
LG CANADA´S SOLE LIABILITY IS LIMITED TO THE WARRANTY SET OUT ABOVE. EXCEPT AS EXPRESSLY PROVIDED
ABOVE, LG CANADA MAKES NO AND HEREBY DISCLAIMS ALL OTHER WARRANTIES AND CONDITIONS RESPECTING THE
PRODUCT, WHETHER EXPRESS OR IMPLIED, INCLUDING, BUT NOT LIMITED TO, ANY IMPLIED WARRANTY OR CONDITION
OF MERCHANTABILITY OR FITNESS FOR A PARTICULAR PURPOSE AND NO REPRESENTATIONS SHALL BE BINDING ON
LG CANADA. LG CANADA DOES NOT AUTHORIZE ANY PERSON TO CREATE OR ASSUME FOR IT ANY OTHER WARRANTY
OBLIGATION OR LIABILITY IN CONNECTION WITH THE PRODUCT. TO THE EXTENT THAT ANY WARRANTY OR CONDITION
IS IMPLIED BY LAW, IT IS LIMITED TO THE EXPRESS WARRANTY PERIOD ABOVE. LG CANADA, THE MANUFACTURER OR
DISTRIBUTOR SHALL NOT BE LIABLE FOR ANY INCIDENTAL, CONSEQUENTIAL, SPECIAL, DIRECT OR INDIRECT DAMAGES,
LOSS OF GOODWILL, LOST PROFITS, PUNITIVE OR EXEMPLARY DAMAGES OR ANY OTHER DAMAGE, WHETHER ARISING
DIRECTLY OR INDIRECTLY FROM ANY CONTRACTUAL BREACH, FUNDAMENTAL OR OTHERWISE, OR FROM ANY ACTS OR
OMISSIONS, TORT, OR OTHERWISE.
This warranty gives you specic legal rights. You may have other rights which may vary from province to province depending on
applicable provincial laws. Any term of this warranty that negates or varies any implied condition or warranty under provincial law is
severable where it conicts with provincial law without affecting the remainder of this warranty’s terms.
THIS LIMITED WARRANTY DOES NOT COVER:
1. Service trips to deliver, pick up, or install the product; instructing a customer on operation of the product; repair or replacement of fuses or
correction of wiring, or correction of unauthorized repairs/installation.
2. Failure of the product to perform during power failures and interruptions or inadequate electrical service.
3. Damage caused by leaky or broken water pipes, frozen water pipes, restricted drain lines, inadequate or interrupted water supply or
inadequate supply of air.
4. Damage resulting from operating the Product in a corrosive atmosphere or contrary to the instructions outlined in the Product owner’s
manual.
5. Damage to the Product caused by accidents, pests and vermin, lightning, wind, re, oods, or acts of God.
6. Damage resulting from the misuse, abuse, improper installation, repair, or maintenance of the Product. Improper repair includes use of parts
not approved or specied by LG Canada.
7. Damage or product failure caused by unauthorized modication or alteration, or use for other than its intended purpose, or resulting from
any water leakage due to improper installation.
8. Damage or Product failure caused by incorrect electrical current, voltage, commercial or industrial use, or use of accessories, components,
or cleaning products that are not approved by LG Canada.
9. Damage caused by transportation and handling, including scratches, dents, chips, and/or other damage to the nish of your product, unless
such damage results from defects in materials or workmanship and is reported within one (1) week of delivery.
10. Damage or missing items to any display, open box, discounted, or refurbished Product.
11. Products with original serial numbers that have been removed, altered, or cannot be readily determined. Model and Serial numbers, along
with original retail sales receipt, are required for warranty validation.
12. Increases in utility costs and additional utility expenses.
13. Replacement of light bulbs, lters, or any consumable parts.
14. Repairs when your Product is used in other than normal and usual household use (including, without limitation, commercial use, in ofces
or recreational facilities) or contrary to the instructions outlined in the Product owner’s manual.
15. Costs associated with removal of the Product from your home for repairs.
16. The removal and reinstallation of the Product if it is installed in an inaccessible location or is not installed in accordance with published
installation instructions, including the Product owner’s and installation manuals.
17. Accessories to the Product such as door bins, drawers, handles, shelves, etc. Also excluded are parts besides those that were originally
included with the Product.
All costs associated with the above excluded circumstances shall be borne by the consumer.
For complete warranty details and customer assistance, Write your warranty information below:
please call or visit our website: Product Registration Information:
Call 1-888-542-2623 (24 hours a day, 35 days a year) and select the Model:
appropriate option from the menu or visit our website at http://www.lg.com Serial Number:
Date of Purchase:
WARRANTY

2
LG ELECTRONICS CANADA, INC.
GARANTIE LIMITEE DU REFRIGERATEUR LG – CANADA
GARANTIE : Si votre réfrigérateur s’avère être défectueux en raison d’un défaut de matériau ou de fabrication, lors d’une utilisation correcte à domicile,
pendant la période de garantie spéciée ci-après, LG Electronics réparera ou remplacera le produit sur réception de la preuve d’achat d’origine fournie par
le détaillant. Cette garantie est valable uniquement pour l’acheteur original du produit et s’applique uniquement aux produits distribués au Canada par LG
Electronics Canada ou par un distributeur canadien autorisé.
PÉRIODE DE GARANTIE : (Remarque : Si la date d’achat d’origine ne peut pas être vérié », la garantie débutera soixante (60)
jours à partir de la date de fabrication).
Réfrigérateur/congélateur Système scellé (compresseur, condensateur et évaporateur seulement)
Un (1) an à partir de la date d’achat
d’origine.
Un (1) an à partir de la date
d’achat d’origine.
Sept (7) ans à partir de la date d’achat d’origine.
Pièces et main-d’œuvre (pièces
internes fonctionnelles seulement)
Pièces et main-d’oeuvre. Pièces seulement (Le coût de la main d’œuvre sera à la charge
du consommateur)
* Les produits et les pièces de remplacement sont garantis pour la portion restante de la période de garantie originale ou pour quatre-vingt-dix
(90) jours.
* Les produits et les pièces de remplacement peuvent être neufs ou manufacturés.
* Le centre de service autorisé par LG Electronics garantit les réparations pendant trente (30) jours.
LA RESPONSABILITÉ DE LG CANADA SE LIMITE À LA GARANTIE CI-DESSUS. SAUF TEL QU’IL EST EXPLICITEMENT INDIQUÉ CI-DESSUS, LG
CANADA NE FOURNIT AUCUNE AUTRE GARANTIE ET REJETTE TOUTES LES AUTRES GARANTIES ET CONDITIONS EXPLICITES OU IMPLICITES À
L’ÉGARD DU PRODUIT, CE QUI INCLUT, SANS TOUTEFOIS S’Y LIMITER, TOUTE GARANTIE ET CONDITION IMPLICITE DE QUALITÉ MARCHANDE OU
DE CONVENANCE À UN USAGE PARTICULIER ET AUCUNE DÉCLARATION NE LIERA LG CANADA. LG CANADA N’AUTORISE PERSONNE À CRÉER
NI À ASSUMER AUCUNE AUTRE PROVISION POUR GARANTIES EN RELATION AVEC CE PRODUIT. SI UNE GARANTIE OU CONDITION IMPLICITE
EST REQUISE PAR LA LOI, SA PÉRIODE SE LIMITE À CELLE DE LA GARANTIE EXPLICITE SUSMENTIONNÉE.
LG CANADA, LE FABRICANT ET LE DISTRIBUTEUR NE POURRONT ÊTRE TENUS RESPONSABLES D’AUCUN DOMMAGE ACCESSOIRE,
CONSÉCUTIF, SPÉCIAL, DIRECT OU INDIRECT, D’AUCUNE PERTE D’ACHALANDAGE OU DE PROFITS, D’AUCUN DOMMAGE PUNITIF, EXEMPLAIRE
OU AUTRE, DIRECTEMENT OU INDIRECTEMENT ATTRIBUABLE À TOUTE VIOLATION CONTRACTUELLE, FONDAMENTALE OU AUTRE, OU À UNE
ACTION, UNE OMISSION, UN DÉLIT OU TOUTE AUTRE CHOSE.
La présente garantie vous confère des droits légaux spéciques. Vous pourriez disposer d’autres droits, suivant les lois provinciales applicables. Toute clause
de la présente garantie qui invalide ou modie une condition ou garantie implicite aux termes d’une loi provinciale est dissociable si elle entre en conit avec la
loi provinciale, et ce, sans affecter les autres clauses de la garantie.
LA PRÉSENTE GARANTIE LIMITÉE NE COUVRE PAS CE QUI SUIT:
1. Un appel de service pour livrer, ramasser ou installer le produit; renseigner un client sur le fonctionnement du produit; réparer ou remplacer des fusibles
ou rectier le câblage; ou corriger une réparation ou installation non autorisée.
2. La défaillance du produit durant une panne ou interruption de courant ou en raison d’un service électrique inadéquat.
3. Des dommages occasionnés par la fuite ou le bris de conduites d’eau, le gel de conduites d’eau, des tuyaux de drainage restreints, une alimentation en
eau inadéquate ou interrompue ou une alimentation en air inadéquate.
4. Des dommages attribuables à l’utilisation du produit dans une atmosphère corrosive ou contraire aux instructions spéciées dans le manuel d’utilisation
de produit.
5. Des dommages au produit causés par un accident, des animaux nuisibles ou des vermines, la foudre, le vent, un incendie, une inondation ou une
catastrophe naturelle.
6. Les dommages attribuables à une mauvaise utilisation, une utilisation abusive ou à une installation, une réparation ou un entretien inapproprié du produit.
Les réparations inappropriées incluent l’utilisation de pièces ni aprouvées ni recommandées par LG Canada.
7. La détérioration ou la défaillance du produit causée par une modication ou un changement non autorisé ou une utilisation autre que celle prévue, ou
résultant d’ une fuite d’eau occasionée par une mauvaise installation.
8. La détérioration ou la défaillance du produit causée par un courant ou un voltage électrique incorrect, une utilisation commerciale ou industrielle, ou
l’utilisation d’accessoires, d’éléments ou de produits nettoyants non approuvés par LG Canada.
9. Les dommages causés par le transport et la manipulation, notamment les égratignures, les bosses, les écaillures et / ou tout autre dommage à la nition
du produit, à moins que ces dommages ne soient attribuables à des défauts de matériaux ou de fabrication et qu’ils ne soient signalés dans un délai d’une
(1) semaine de la livraison.
10. Des dommages ou des pièces manquantes à tout produit exposé, déballé, soldé ou remis à neuf.
11. Des produits dont le numéro de série original a été retiré, modié ou ne peut être facilement déterminé. Le modèle et le numéro de série, ainsi que le reçu
de vente original du détaillant, sont requis pour valider la garantie.
12. L’augmentation des coûts et de la consommation des services publics.
13. Le remplacement des ampoules électriques, des ltres et de toute pièce non durable.
14. Les réparations requises si le produit ne sert pas à une utilisation domestique normale et habituelle (y compris, sans toutefois s’y limiter, une utilisation
commerciale, dans un bureau ou un centre récréatif) ou est utilisé contrairement aux instructions spéciées dans le manuel d’utilisation du produit.
15. Les coûts associés à l’enlèvement du produit de votre résidence aux ns de réparation.
16. L’enlèvement et la réinstallation du produit, s’il est installé à un endroit inaccesible ou contrairement aux instructions publiées, y compris dans le manuel
d’utilisation et le manuel d’installation du produit.
17. Les accesoires du produit, tels que les balconnets, les tiroirs, les poignées, les tablettes, etc. Sont également exclues les pièces non incluses initialement
avec le produit.
Tous les coûts associés aux circonstances exclues ci-dessus seront assumés par le consommateur.
Pour obtenir tous les détails sur la garantie et Écrivez vos renseignements de garantie ci-dessous:
accéder au service à la clientèle, téléphonez-nous
visitez notre site Web: Renseignements sur l’enregistrement du produit:
Composez le 1-888-542-2623 (24 h sur 24, 365 jours par année) et Modèle:
Sélectionnez l’option de menu appropriée, ou visitez notre site Web
au: http://www.lg.com Numéro de série:
Date d’achat:
GARANTIE

3
ALEJANDRA
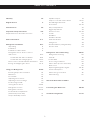
Warranty 1-2
English Version 3
French Version 34
Important Safety Instructions 4-5
Requirements for Ground Connection 5
Parts and Features 6-7
Refrigerator Installation 8-17
Unpacking 8
Installation 8
Installation of Base Grille 8
Refrigerator Doors: How to remove
and reverse 9-16
For Models with Pull-out Drawer 9-10
For Models with Swinging Door 13-16
How to remove and Install Pull-Out Drawer 11-12
Closing and Aligning the doors 16-17
Using your Refrigerator 18-24
Ensuring Proper Air Circulation 18
Multi Flow 18
Door Alarm 18
Adjusting the Controls 18
Adjusting Control Settings 19
Food Storage Guide 19
Storing Frozen Food 19-20
Refrigerator Section 20-23
Refrigerator Shelves 20-21
Frozen Meat Compartment
(Chef Fresh/Snack Pan) 21
Crisper Humidity Control 21
Optibin Crispers 21
Crisper cover with interior lattice 21-22
Fixed Refrigerator Rack 22
Door Racks 22-23
Dairy Compartment 23
Egg Compartment 23
Freezer Section 23-24
Ice Bin 23
DuraBase 23
Durabase Divider 23
Glide Out Drawer 24
Tilting Door 24
Wired Durabase (Swing Models) 24
Freezer Shelf 24
Refrigerator Care and Cleaning 25-26
Refrigerator Cleaning 25
Outside 25
Inside Walls 25
Door Lining & Gaskets 25
Plastic Parts (Covers and Panel) 25
Back Cover 25
Replacing Refrigerator Lights 25-26
Power Interruptions 26
When Going on Vacation 26
When Moving 26
About the Automatic Ice Maker 27
Connecting the Water Line 28-30
Troubleshooting Guide 31-33
TABLE OF CONTENTSGARANTIE

4
This manual contains several important safety notices. Always read and obey all of the following safety messages.
This is the safety alert symbol. This symbol is a warning to potential dangers that could cause death, injury
or damage to you, others or the product. All safety messages will follow after this warning symbol and the
word “DANGER”, “CAUTION” or “WARNING”. These words mean:
You may be killed or suffer fatal damage if you do not follow instructions.
You may be killed or seriously injured if you do not follow instructions.
Indicates a potentially hazardous situation which, if not avoided, may result in minor injury
or damage to the product.
All safety messages inform you of potential danger, advise you on how to reduce the risk of injury and tell you what
can occur if the instructions are not followed.
To reduce the risk of fire, electrical shock or personal
injury, the following precaution measures should be
followed:
•NEVER disconnect the refrigerator by pulling the
power cord, always grip the plug firmly and disconnect
it directly from the outlet.
•Immediately repair or replace all faulty or damaged
service cables. Do not use cords that have cracks or
abrasion damage on the length of the cord or on the
plug.
•When moving your refrigerator, take care not to roll
over the electrical cord.
•DO NOT store or use gasoline or other combustible
liquids or vapors in proximity with this or any other
electrical appliance.
•DO NOT permit children to climb, stand or swing from
the doors or shelves of the refrigerator. This can cause
serious injury to them and damage to the product.
•Keep your fingers away from areas in which they
can become caught, such as the doors, hinges and
cabinets. Be careful closing the doors when children
are near.
•Unplug the refrigerator before cleaning or repairing.
NOTE: We strongly recommend that any repair
services be performed by a qualified professional.
•Before replacing a burned-out light bulb, unplug the
refrigerator or shut down the circuit breaker to avoid
contact with a live wire (the bulb could break while
being replaced). NOTE: Setting the control to the OFF
position does not disconnect the power from the light
bulb circuit.
•Do not keep bottles in the freezer compartment, they
could explode after freezing and cause damage.
•For your safety, this product should be properly
grounded. Have a qualified professional check the
electrical circuit and outlet to ensure a proper ground
connection.
•Read all instructions before utilizing the product. Use
this product only as explicitly expressed in this guide.
•Once the refrigerator is operating, avoid touching cold
surfaces of the freezer with damp or wet hands; the
skin could become adhered to these surfaces.
•In refrigerators with an automatic ice dispenser, avoid
contact with moving parts of the ejector mechanism
or with the heating mechanism that discharges the
cubes. DO NOT place your fingers or hands in the
ice dispenser mechanism while the refrigerator is
connected.
•DO NOT refreeze foods which have already thawed.
The Department of Agriculture of the United States, in
your Bulletin of Home and Gardens No. 69 establishes
that:
“...You can refreeze food that has thawed if they contain
ice crystals or are cold and below 40 °F (4 °C)”.
“...Ground beef, perishable food or seafood that is
discolored or has an unpleasant odor should not be
frozen or consumed. Consumption of melted ice cream
should also be avoided. If the odor or color of food is
questionable, discard it. The food may be dangerous to
consume”.
“Partial thawing or refreezing reduces the quality of the
food, especially fruit, vegetables and prepared meals.
The quality of red meat is less affected than other foods.
Use refrozen products as soon as possible in order to
maintain their quality”.
KEEP THESE INSTRUCTIONS
IMPORTANT SAFETY INSTRUCTIONS
SAFETY MESSAGES
WARNING
DANGER
WARNING
CAUTION

5
This appliance is not intended for use by children, persons with physical or mental disabilities, persons with reduced
sensory or mental capacity, or persons with lack of experience or know-how, unless they have supervision or instruction
in relation to the use of the appliance by the person responsible for their safety. Children should be supervised to
assure that they do not play with the appliance.
Children becoming trapped or suffocated is not
a problem of the past. Discarded and abandoned
refrigerators are a hazard, even if they remain there
“for just a few days”. If you would like to dispose of your
old refrigerator, please follow the instructions below to
prevent any accidents.
BEFORE DISPOSING YOUR REFRIGERATOR
OR FREEZER WHEN NO LONGER IN USE:
•Remove the doors.
•Leave the shelves in place so that children
cannot easily become stuck in them.
Your old refrigerator may have a cooling system that
uses CFC’s (chlorofluorocarbons). CFC affects the
stratospheric layer of the ozone.
If you decide to throw out your old refrigerator, ensure
that CFC contaminants are properly disposed of by a
qualified professional. If you intentionally remove the
CFC refrigerant, you could be subject to fines or prison
in accordance with environmental legislation in effect.
IMPORTANT: Attentively read the following.
TO CONNECT ELECTRICITY
WARNING
ELECTRICAL SHOCK HAZARD
FOR YOUR PERSONAL SAFETY, this appliance must
be properly grounded. Have a qualified electrician check
your wall outlet to ensure that the plug is grounded
properly.
3 prong
grounding type
wall receptacle
3 prong Ensure proper
grounding ground exists
plug before use
RECOMMENDED GROUNDING METHOD
Your refrigerator must always be plugged to its own
outlet which is adequately grounded. The energy current
should only be 115 V, 60 Hz, A.C. and fused at 15 or 20
A. This provides the best performance and prevents an
overload which could cause a fire from the overheating
of the cables. It is recommended that a separate circuit
be used for this appliance, as well as a receptacle that
cannot be disconnected with a switch.
Do not use an extension cable.
It is your responsibility and obligation to replace two-
prong outlets with that of an adequately grounded three-
prong outlet.
Do not, under any circumstance, cut or extract the third
prong from the plug.
NOTE: Before installation, cleaning or replacing light
bulbs, you must disconnect the appliance from the
power source. When finished, plug the appliance back in
and adjust the thermostat to the desired position.
USE OF EXTENSION CABLES
We do not recommend the use of extension cables.
However, if you still choose to utilize an extension cable,
it is absolutely necessary that it is listed in the UL (in
the United States) or CSA (in Canada), that it supports
three-pronged plugs and that the electrical current
support a minimum of 15 A and 120 V.
The use of an extension cable will increase the amount
of space needed behind the refrigerator.
WARNING
REPLACING ELECTRICAL CABLE
If the power cord is damaged, it must be replaced by
our service center or qualified LG technician to avoid
any risk.
IMPORTANT SAFETY INSTRUCTIONS
CAUTION
DANGER: CHILDREN MAY BECOME TRAPPED
CFC DISPOSAL
REQUIREMENTS FOR GROUND CONNECTION

6
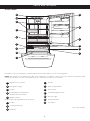
Drawer Model
Read this section to familiarize yourself with the parts and features of your new refrigerator.
NOTE: This guide covers different models. Your refrigerator could have some or all of the features and parts listed
below. The location of some of the parts may not correspond to that of your model.
Digital Sensor Control
Refrigerator Light
Shelves
Frozen Meat Compartment
(Chef Fresh/Snack Pan) *
Optibin Crisper
Keeps fruits and vegetable fresh and crisp
Ice Bin
Ice Tray (Inside H) *
Durabase
Divider
Dairy Compartment
Door Racks
Fixed Refrigerator Rack
Freezer Light
Pull Out Drawer
Ice maker *
* On some models
K
L
O
N
M
PARTS AND FEATURES PARTS AND FEATURES
J
K
L
O
N
M
A
B
A
B
C
H
I
F
G
E
D
A
B
C
H
F
G
E
D
J
K
L
O
N
M
I

7
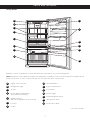
Swing Model
Read this section to familiarize yourself with the parts and features of your new refrigerator.
NOTE: This guide covers different models. Your refrigerator could have some or all of the features and parts listed
below. The location of some of the parts may not correspond to that of your model.
Digital Sensor Control
Refrigerator Light
Shelves
Frozen Meat Compartment
(Chef Fresh/Snack Pan)*
Optibin Crisper
Keeps fruits and vegetables fresh and crisp
Ice Tray *
Ice Bin
Wired Durabase
Dairy Compartment
Door Racks
Freezer Light
Fixed Refrigerator Rack
Wire Freezer Shelf
Freezer Door Rack
* On some models
PARTS AND FEATURES PARTS AND FEATURES
A
B
C
H
I
F
G
E
D
J
K
L
N
M
A
B
C
H
F
G
E
D
I
N
M
J
K
L

8
WARNING
EXCESSIVE WEIGHT HAZARD
Use the assistance of two or more persons to move or
install the refrigerator. Not following these instructions
may cause injury to the back and other parts of the
body.
UNPACKING
Before installing your refrigerator, remove any tape
or temporary stickers. Do not remove any stickers
that feature warnings, the model serial number or the
technical label of the product located on the back of the
refrigerator.
To remove adhesive tape residue, rub it well with your
fingers and a little liquid detergent. Clean with warm
water and let dry.
Do not use sharp instruments, rubbing alcohol, flammable
liquids or abrasive cleaning products to remove the
adhesive tape or glue. These products can damage the
surface of your refrigerator. For more information, see
the section on “Important Safety Instructions”.
The shelves come already installed in their factory
position. Remove the shelves and replace them
according to your spacing needs.
Moving Your Refrigerator:
Your refrigerator is extremely heavy. Make sure you
protect the floor when moving your refrigerator for
cleaning or servicing. Always pull your refrigerator
straight out when moving it. Do not shift from side
to side or “walk” the refrigerator when attempting to
move it as this can cause damage to the floor.
WARNING
EXPLOSION HAZARD
Keep all flammable materials and vapors (such as
gasoline) away from the refrigerator. Not following
these instructions may cause death, explosion or fire.
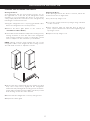
INSTALLATION
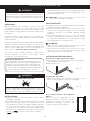
1. Avoid placing the unit near heat sources, direct
sunlight, or humidity.
2. To avoid vibration, the unit should be leveled. If needed,
adjust the leveling screws to compensate for an
unleveled floor. The front should be slightly taller than
the rear to ensure that the doors close properly. The
leveling screws can easily be turned by slightly tilting
the front of the refrigerator, turning the leveling screws
clockwise ( ) to raise it and counter-clockwise
( ) to lower it.
3. Install the refrigerator in an area between 55 ° F (13
°C) and 110° F (43 °C). If the surrounding temperature
is lower or higher than previously mentioned, it can
adversely affect the unit.
CAUTION: Avoid placing the unit near heat
sources, direct sunlight or humidity.
ONCE INSTALLED
1. Carefully clean your refrigerator and remove and dust
accumulated during shipping.
2. Install accessories such as the ice bin, door racks,
shelves, etc., in their proper places. These are already
packed to prevent any possible damage during
shipping.
3. Leave your refrigerator on for 2 to 3 hours before
storing food inside. Verify that there is a flow of cold air
in the freezer compartment to ensure proper cooling.
Your refrigerator is now ready for use.
WARNING:
•Take care when working with the hinges, base cover
and stops, etc. You may injure yourself.
•DO not place your hands or any tools in the air vents,
the base cover or in the bottom of the refrigerator. This
may cause injury or electrical shock.
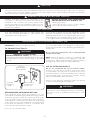
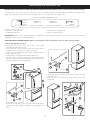
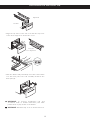
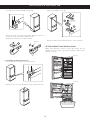
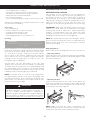
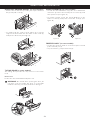
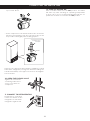
INSTALLATION OF BASE GRILLE
Uninstalling or Replacing the Base Grille
1. Remove the 2 screws from the bottom front part of
your refrigerator (see Figure A).
2. Take off the cover.
Figure A
Installing the Base Grille
1. Align the bottom cover and place in position. Insert
the 2 screws and twist in place (see Figure B).
Figure B
Keep a Proper Distance from Adjacent
Objects
Please keep the refrigerator at an
adequate distance from other objects.
Insufficient spacing can reduce the
refrigerator’s freezing efficiency and
increase electricity consumption.
(5.08 cm) 2”
REFRIGERATOR INSTALLATION REFRIGERATOR INSTALLATION

9
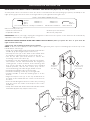
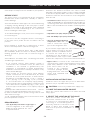
REFRIGERATOR DOORS: HOW TO REMOVE AND REVERSE (Optional) For models with Pull Out Drawer
You may find it more convenient to have the doors converted from the left-opening type (factory installed) to the
right-opening type. Directions refer to the right side as your right when facing the unit.
TOOLS YOU MIGHT NEED OR USE
10 mm
1/4 in 1/4 in
3/8 in 3/32 in
Hex Socket Wrench Phillips Screwdriver Flat Head Screwdriver Allen Wrench
Other necessary tools are:
•1/4 inch socket wrench
•Adjustable Wrench
•10 mm open-end wrench
•Flat 2 inch putty knife
IMPORTANT: Before you begin, unplug the refrigerator or disconnect the power source. Remove all food and any
adjustable racks from the refrigerator doors.
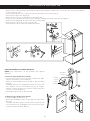
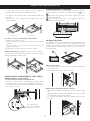
HOW TO REVERSE DOOR SWING (when converting from left-opening side mode to right-opening mode).
1. Removing Refrigerator Door
•Gently pry the top hinge cover with a flat head
screwdriver and remove it (1).
•Using 10 mm socket wrench, remove the three bolts
and lift off the top hinge. Set parts aside (2).
•Remove the pivot (3) and the cap (4) and place them
in the opposite side.
•Gently lift the refrigerator door (5) and remove.
•Once the door has been removed, remove the screws
(6), the stopper (7) and the hinge pin (8) located below
the door and remove the hinge (9).
•Install the hinge (10) on the opposite side of the door,
replace the screws (11), the stopper (12) and hinge pin
(13).
•Using the 1/4 inch socket wrench, loosen the pin (14)
and remove it.
•Remove the four screws (15 & 16) and remove the
hinge (17).
5
1
2
3
4
6
7
8
9
10
13
12
11
14
15
16
17
REFRIGERATOR INSTALLATION REFRIGERATOR INSTALLATION

10
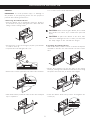
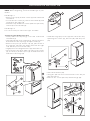
2. Installing Refrigerator Door
•Remove the cover (1) using a flat head screwdriver (this requires a little force), loosen the two screws (2) and place
on the opposite side.
•Place the hinge (3) on the opposite side and install the four screws (4 & 5).
•Insert the pin (6) in the hinge (3).
•Remove the cover (7) and install it on the right side.
•Place the door and line up with the pin holes (8), making sure that both parts are aligned.
•Place the top hinge (9) and insert the three screws (10).
•Position the cover of the hinge over this (11).
•Check that the door has been installed correctly.
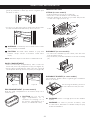
HOW TO REMOVE THE DOOR HANDLES
NOTE: The appearance of the handle may appear
different.
3. Removing the Refrigerator Handle
•Loosen the fixation screws (1) with a 3/32 inch Allen
Wrench and remove the handle (2).
•Remove the assembly screws (3) with a 1/4 inch Allen
Wrench.
•Carefully remove the plug buttons from the door (4).
The buttons can be unscrewed using your fingers,
turning counter-clockwise. Continue turning until the
screw is loose and falls out.
•Install the buttons (4) on the left side.
4. Replacing the Refrigerator Handle
•Rotate handle upside down (1).
•Insert the assembly screws on the opposite side of the
door (2).
•Hold the handle in place with the holes lined up with
the screw holes (3) and tighten the screws (4) in place
with the 3/32 inch Allen Wrench.
1
3
2
4
4
1
2
3
4
Assembly
Screws
Fixation
Screws
Allen
Wrench
2
5
1
6
3
4
8
11
10
9
REFRIGERATOR INSTALLATION REFRIGERATOR INSTALLATION
7
1

11
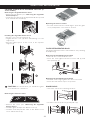
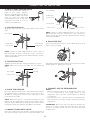
HOW TO REMOVE AND INSTALL THE PULL OUT
DRAWER
IMPORTANT: To avoid possible injury or damage to
the product or your property, please use two people to
perform the following instructions:
1. Removing the Pull Out Drawer
•Pull the drawer out to maximum extension. Remove
the bottom rack (1) by tilting it back a little and then
lifting it off the railing tracks.
•Put pressure on the two hangers (2) with your thumbs
in order to lift it up.
•Separate the left and right rail cover.
•Remove the screws (3) from both sides of the rail track.
•With both hands, hold both sides of the door and pull
up to separate it.
•With both hands, hold the center of the bar and push
it in so that it is fit to both rails simultaneously.
CAUTION: When removing the drawer, do not hold
the handle. If it comes off, it could cause personal
injury.
CAUTION: To place the drawer on the floor, take
care not to damage the floor or hurt your feet with
the sharp edges on the side with the hinges.
2. Installing the Pull Out Drawer
•With both hands, hold the center of the bar and pull it
outward so that the two rails extend out at the same
time.
•Mount door supports (1) into the tabs on the railing
track (2), starting in the back first and then connecting
the part in the front last, as shown in the figure.
•Push the drawer down into position and tighten the
screws (3).
1
2
3
1
2
REFRIGERATOR INSTALLATION REFRIGERATOR INSTALLATION
3

12
•Compare the left and right rail covers on each side.
Right Rail
Left Rail
•Align the top holes of the rail cover with the top holes
of the door supports to mount the cover.
Verify the
hole’s alignment
•With the drawer fully extended, insert the lower basket
over the front part of the rail assembly and then the
back part (4).
WARNING: To prevent entrapment risk and
accidental child or animal suffocation, DO NOT
permit them to play inside of the drawer.
WARNING: DO NOT step or sit on the Freezer Door.
4
REFRIGERATOR INSTALLATION REFRIGERATOR INSTALLATION

13
REFRIGERATOR DOORS: HOW TO REMOVE AND REVERSE (Optional) For Swing models
You may find it more convenient to have the doors converted from the left-opening type (factory installed) to the
right-opening type. Directions refer to the right side as your right when facing the unit.
TOOLS YOU MIGHT NEED OR USE
10 mm
1/4 in 1/4 in
3/8 in 3/32 in
Hex Socket Wrench Phillips Screwdriver Flat Head Screwdriver Allen Wrench
Other necessary tools are:
•1/4 inch socket wrench
•Adjustable Wrench
•10 mm open-end wrench
•Flat 2 inch putty knife
IMPORTANT: Before you begin, unplug the refrigerator or disconnect the power source. Remove all food and any
adjustable racks from the refrigerator doors.
REVERSING DOOR OPENING DIRECTION FROM LEFT TO RIGHT (when you prefer the door to open from the
right instead of the left)
1. Removing and Installing the Refrigerator Handles
NOTE: To assist in the installation of the handles on the right side, place a piece of masking tape near the top of the
handle before removing it.
•Grasp the handle firmly with both hands and slide the
handle up (1) (this might require some force).
•The keyhole slots (2) on the back of the handle allow
the handle to separate from the screws in the door.
•Use the 10 mm open-end wrench to remove the
mounting screws in the door (3).
•Carefully loosen the plug buttons (4) with your fingers.
The buttons can be unscrewed with the fingers by
rotating them counter-clockwise and continuing until
they loosen and fall out The buttons were installed
without pressure, and for this reason, they can be
unscrewed using your index finger, thumb or both.
•Install the plug buttons (5) on the left side.
•Install the mounting screws (6) on the right side.
•Hold the handle so that the masking tape is at the
bottom.
•Align the keyhole slots (7) on the top and bottom of
the back of the handle with the screws on the front of
the door.
•Press the handle against the front of the door, ensuring
that the screws are inside of the keyhole slots of the
handle (8).
•Grasp the handle with both hands and slide the handle
downward (9) (this may require some force).
Mounting Keyhole slots
screws in in the back of
the door the handle
Alignment of
the keyhole slots
with the screws
1
3
2
6
8
9
7
5
4
REFRIGERATOR INSTALLATION REFRIGERATOR INSTALLATION

14
2. Removing and Installing the Freezer Handle
NOTE: Before beginning, check the handle type of your
model.
Handle Type 1
•Remove the cap (1) and two screws (2) with a flat head
screwdriver.
•Loosen the two screws (3), remove the handle (4) and
install all on the right side.
•Attach the cap and the two screws (that were previously
removed) on the left side (5).
Handle Type 2
It is not necessary to remove this type of handle.
Handle Type 1 Handle Type 2
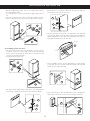
3. Removing the Refrigerator Door
•Gently remove the top hinge cover with a flat head
screwdriver (1).
•Using the 10 mm open-end wrench, remove the three
bolts and raise the top hinge and place aside (2).
•Remove the pivot (3) and the cap (4), place them in
the opposite side (the cap will be placed in the right
side and the pivot on the left side).
•Slightly raise the refrigerator door (5) and remove it.
•Once the door has been taken off, remove the screws
(6), the bolt (7) and the pivot (8) located below this
and remove the hinge (9).
•Install the hinge (10) on the opposite side of the door,
replacing the screws (11), the bolt (12) and the pivot
(13).
•Take off the washer (14).
•Using the 1/4 inch hex socket wrench loosen the pin
(15) and remove.
•Remove the screws (16 & 17) and the hinge (18).
2
3
1
5
4
5
1
2
3
4
6
7
8
9
10
13
12
11
14
16
17
18
15
REFRIGERATOR INSTALLATION REFRIGERATOR INSTALLATION

15
4. Removing the Freezer Door
•Before beginning, make sure you completely remove
the refrigerator door.
•Loosen the two screws from the base grille and remove
(1).
•Loosen and remove the two screws (2) and the pin (3).
•Raise and remove the freezer door (4) and set aside.
5. Installing the Freezer Door
•On the bottom left side, you will find a screw, remove
it and re-screw it in on the right side. In the remaining
space, place the hinge (1) and connect it with the two
screws (2) and the bolt (3).
•Install the base grille (4).
•On the bottom right side of the door, you will find two
screws (5), a bolt (6) and 1 pivot (7). Remove them.
•Reinstall the pivot (8), the bolt (9) and screws (10) on
the bottom left side of the door.
•On the top part of the door, you will find a cap (11) and
a pivot (12). Remove them with a flat head screwdriver
and install them on the opposite side (the cap stays on
the right and the pivot on the left).
Pivot
Cap
•In the middle section of the refrigerator, you will find a
screw (13) and a cover (14). Remove them and reinstall
them on the right side (15).
•Place the hinge in the middle part of the refrigerator
and install the four screws into the hinge (16 & 17).
4
3
2
1
6
5
7
8
10
9
11
12
17
16
REFRIGERATOR INSTALLATION REFRIGERATOR INSTALLATION
4
3
2
1
13
14
15

16
•Take the freezer door and align the pivot holes up with
the bolt holes and assemble them (18).
•Insert the pin into the hinge (19). (Ensure that it is
between the pivot and the freezer door).
•Replace the washer over the pin (20).
Washer
6. Installing the Refrigerator Door
•Insert the door over the axis of the pin (1).
•Remove the cover (2) and place on the opposite side.
•Install the hinge (3), assemble the three screws (4) and
replace the hinge cover (5).
•Check to make sure that both doors close correctly.
AFTER COMPLETING INSTALLATION
Make sure that the corners of the door seals are not
folded over. To ensure a good seal, apply a little silicon
grease on them.
Corners
Corners
18
19
20
1
2
3
5
4
REFRIGERATOR INSTALLATION REFRIGERATOR INSTALLATION

17
CLOSING AND ALIGNING THE DOORS
Closing the Doors
Your refrigerator has two front leveling screws, one on
the right and one on the left. If your refrigerator seems
unstable or if you would like the doors to close more
easily, simply adjust the inclination of the refrigerator by
following the instructions below:
1. Plug the refrigerator into a 3 prong grounded outlet.
Move the refrigerator into its final position.
2. Remove the base grille (Refer to the section on
“Installation of Base Grille”).
3. Use a flat head screwdriver to adjust the leveling screws,
turning clockwise to raise the side of the refrigerator
and counter-clockwise to lower it. It may take several
turns to adjust it to the inclination you would like.
NOTE: Having someone push against the top of the
refrigerator takes some weight off the leveling screws.
This will make it easier to adjust the screws.
4. Open both doors again and check to make sure that
they close easily. If not, slightly tilt the refrigerator
further back by turning both leveling screws clockwise.
It may take several more turns. Make sure that you turn
both leveling screws the same amount.
5. Ensure that the refrigerator is even by using a level.
6. Replace the base grille.
Aligning the Doors
If the spacing between the doors is uneven, follow the
instructions below to align them:
1. Pry off the top hinge cover.
2. Loosen the screws from the top hinge using a 10 mm
socket or wrench.
3. Have someone help you hold the door in place or
place a spacer between the doors while tightening the
top hinge screws.
4. Replace the top hinge cover.
REFRIGERATOR INSTALLATION REFRIGERATOR INSTALLATION

18
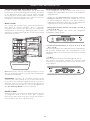
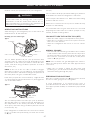
ENSURING PROPER AIR CIRCULATION
In order to obtain stable temperature, the air must flow
between the freezer and refrigerator sections. As shown
in the illustration below, the cold air enters through
the bottom part and circulates upward. This air returns
below the freezer floor and the rest of the air enters the
refrigerator section through the top vent.
MULTI FLOW
The cooling fan operates more powerful and effective
than when in normal operation. This is especially
noticeable when new food is placed in the refrigerator
compartment. If the lining is damaged, water or other
substances could enter through the cool air vent causing
decreased efficiency.
Do not block any of these vents with packages of food.
This can interrupt the flow of air and cause temperature
and moisture problems.
IMPORTANT: Because air circulates between both
sections, any odors formed in one section will transfer
to the other. You must thoroughly clean both sections to
eliminate odors. To prevent odor transfer and drying out
of food, make sure you wrap or cover foods tightly (See
the “Food Storage Guide” section for details).
DOOR ALARM
With this feature you will hear an alarm when the freezer
or refrigerator door is ajar for more than 1 minute.
These tones will repeat every 30 seconds. The alarm is
cancelled when the door is properly shut.
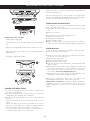
ADJUSTING THE CONTROLS
•Your refrigerator has two controls that allow you to
regulate the temperature the freezer and refrigerator
compartments.
•Initially set the REFRIGERATOR CONTROL and the
FREEZER CONTROL at position number “4”. Leave it
on these settings for 24 hours (one day) in order to
stabilize the refrigerator. After this you may adjust the
compartments to your desired temperature.
•Refrigerator Control: Position 1 to 7 (32 ° F to 47 °F
or 0 °C to 8 °C)
The lower the degree, the colder the refrigerator
compartment will become.
•Freezer Control: Position 1 to 7 (-6 °F to 9 °F or -21
°C to -13 °C)
The lower the degree, the colder the freezer compartment
will become. Despite this, the compartment of the
refrigerator will be less cold because air flows in smaller
quantities.
•Ice Plus
Press the button Ice Plus. The LED light will turn on.
This function will remain activated for 24 hours and
intensify the cooling speed of the freezer and increase
ice production.
USING YOUR REFRIGERATOR USING YOUR REFRIGERATOR

19
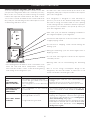
ADJUSTING CONTROL SETTINGS
Give the refrigerator time to cool down completely before
adding food. It is best to wait 24 hours before adding
food to the refrigerator. The mid-settings indicated in the
previous section should be correct for normal household
refrigerator usage. The controls are set correctly when
milk or juice is cold to your liking and ice cream is firm.
The refrigerator control functions as the thermostat for
the entire appliance. The higher the number setting, the
longer the compressor will run to keep the temperature
colder. The freezer control adjusts the cold air flow from
the freezer to the refrigerator. Setting the freezer control
to a lower temperature keeps more cold air in the freezer
compartment to make it colder.
If you need to adjust the temperature in the refrigerator
or freezer, begin by adjusting the refrigerator first. Wait
24 hours after the refrigerator adjustment to check the
freezer temperature. If it is too warm or too cold, then
adjust the freezer control as well.
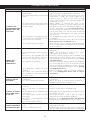
Use the settings listed in the table below as a guide.
CONDITION/REASON: RECOMMENDED
ADJUSTMENT:
REFRIGERATOR section
is too warm
•Opening the door often
•Adding a large amount
of food
•Room temperature is
very warm
Adjust the
REFRIGERATOR setting
to the next highest
number and wait 24
hours, then check.
FREEZER section is too
warm/ ice is made too
slowly
•Opening the door often
•Adding a large amount
of food
•Room temperature is
very low (not cycling
often enough)
•Using ice frequently
•Air vents blocked by
objects
Adjust the FREEZER
setting to the next
highest number and wait
24 hours, then check.
Remove any objects
blocking air flow.
REFRIGERATOR section
is too cold
•Controls not set
correctly for your
conditions
Adjust the
REFRIGERATOR setting
to the next lowest
number and wait 24
hours, then check.
FREEZER section is too
cold
•Controls not set
correctly for your
conditions
Adjust the FREEZER
setting to the next lowest
number and wait 24
hours, then check.
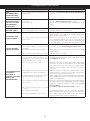
FOOD STORAGE GUIDE
ITEMS HOW TO STORE
Storing Fresh Food Wrap or store food in the
refrigerator in airtight and
moisture-proof material unless
otherwise noted. This prevents
food odor and taste transfer
throughout the refrigerator. For
dated products, check date code
to ensure freshness.
Butter or
margarine
Store opened butter in a covered
dish or in a closed compartment.
When storing a larger quantity,
wrap in freezer packing and
freeze.
Cheese Store in original packaging until
you are ready to use it. Once
opened, tightly rewrap with
plastic wrap or aluminum foil.
Vegetables with
skins (carrots,
peppers)
Place in bags or plastic containers
inside the crisper.
Fruit Wash and let dry; store in plastic
bags in the refrigerator. Do not
wash or pit berries until you
are ready to eat them. Berries
should be selected and kept in
their original packaging (if there
is any) or in a paper bag closed
halfway and set on a shelf.
Leafy Vegetables Remove original packaging and
trim any dirty or discolored parts.
Wash in cold water and drain.
Place in a plastic bag or plastic
container and store in the crisper.
Fish Consume fish or seafood the
same day purchased.
Chef Fresh Store any meat in original airtight,
moisture-proof packaging.
Rewrap if necessary
Leftovers Cover leftovers with plastic
wrap or aluminum foil. Plastic
containers with airtight lids can
also be used.
STORING FROZEN FOOD
NOTE: For more information on how to prepare food to
be frozen such in a way to see the period they can be
stored consult a frozen food guide or cook book.
Packaging
A great freezing depends on how great you package the
food. When you seal the package make sure you remove
all excess air and do not allow humidity. A package that
is incorrectly sealed will result in the transmission of bad
odors, contaminants inside your refrigerator and will
cause your foods to dry.
USING YOUR REFRIGERATOR USING YOUR REFRIGERATOR
La page est en cours de chargement...
La page est en cours de chargement...
La page est en cours de chargement...
La page est en cours de chargement...
La page est en cours de chargement...
La page est en cours de chargement...
La page est en cours de chargement...
La page est en cours de chargement...
La page est en cours de chargement...
La page est en cours de chargement...
La page est en cours de chargement...
La page est en cours de chargement...
La page est en cours de chargement...
La page est en cours de chargement...
La page est en cours de chargement...
-
 1
1
-
 2
2
-
 3
3
-
 4
4
-
 5
5
-
 6
6
-
 7
7
-
 8
8
-
 9
9
-
 10
10
-
 11
11
-
 12
12
-
 13
13
-
 14
14
-
 15
15
-
 16
16
-
 17
17
-
 18
18
-
 19
19
-
 20
20
-
 21
21
-
 22
22
-
 23
23
-
 24
24
-
 25
25
-
 26
26
-
 27
27
-
 28
28
-
 29
29
-
 30
30
-
 31
31
-
 32
32
-
 33
33
-
 34
34
-
 35
35


LG LBN20517BK Le manuel du propriétaire
- Catégorie
- Frigos
- Taper
- Le manuel du propriétaire
dans d''autres langues
- English: LG LBN20517BK Owner's manual
Documents connexes
-
LG LBC20514TT/00 Le manuel du propriétaire
-
LG LFD23860SW Le manuel du propriétaire
-
-
LG LFC25765SB Le manuel du propriétaire
-
LG GR-726RW Le manuel du propriétaire
-
-
LG LFCS25663 Serie Le manuel du propriétaire
-
-
-
LG LRTN22310SW Le manuel du propriétaire
Autres documents
-
Hotpoint HQ9I MO1L UK Mode d'emploi
-
HOTPOINT/ARISTON HAQ9I MO1L Mode d'emploi
-
Maytag 913478 Mode d'emploi
-
Haier HBP18 Series Manuel utilisateur
-
Kenmore 795.7756 Manuel utilisateur
-
Frigidaire PLRU1778ES3 Le manuel du propriétaire
-
Haier HFZ248AA Le manuel du propriétaire
-
LEC DF152 Le manuel du propriétaire
-
Tripp Lite SRCOOL60KCW Le manuel du propriétaire
-
 Seville Classics WEBK257 Manuel utilisateur
