Vitamix VM0185B Manuel utilisateur
- Catégorie
- Mélangeurs
- Taper
- Manuel utilisateur

Venturist®
V1200 HigH-Performance Blenders
VM0185B
Your Adventure Awaits
vitamix.com
Sy m b o l S
Sp e c i f i c at i o n S
Voltage: 120 V
Height (with 64 oz. (2 L) container on blender
base): 17 inches
Frequency:
50 - 60 Hz
Width: 8 inches
Amps: 12 Amps Depth: 11 inches
Warning and Caution
NEVER touch moving parts. Keep hands and utensils out of
the container
Electric Shock Hazard
High temperature when blending hot liquids
Unplug while not in use, before cleaning, changing
accessories or touching parts that move while the blender
is in use
Operate with the lid and lid plug in place
Read and understand owner’s manual
DO NOT immerse
Parts will become hot with extended use. DO NOT touch the
drive socket in the blender base or the drive spline in the
blade base
DO NOT use your 20 oz. (0.6 L) cup or 8 oz. (225 ml) bowl to
heat ingredients or to blend hot liquids.
I/O On/Off
IStart/Stop
Pulse
• This device complies with part 15 of the FCC Rules. Operation is subject to the
following two conditions: (1) This device may not cause harmful interference, and
(2) this device must accept any interference received, including interference that
may cause undesired operation.
• This device complies with Industry Canada licence-exempt RSS standard(s).
Operation is subject to the following two conditions: (1) this device may not
cause interference, and (2) this device must accept any interference, including
interference that may cause undesired operation of the device.
• This device complies with Health Canada’s Safety Code. The installer of this
device should ensure that RF radiation is not emitted in excess of the Health
Canada’s requirement. Information can be obtained at http://www.hc-sc.gc.ca/
ewh-semt/pubs/radiation/radio_guide-lignes_direct/index-eng.php.
CAUTION
Changes or modifications not expressly approved by the party
responsible for compliance could void the user’s authority to operate
this equipment.

2
im p o r ta n t Sa f e g ua r d S
WARNING: To avoid the risk of serious injury when using your Vitamix® blender, basic safety precautions should be followed, including
the following
.
READ ALL INSTRUCTIONS, SAFEGUARDS, AND WARNINGS BEFORE OPERATING BLENDER.
1. Read all instructions.
2. Do not use blender for other than
intended use.
3. Not intended for use by or near children
or persons with reduced physical,
sensory, or mental capabilities or lack
of experience and knowledge. Close
supervision is necessary when any
blender is used by or near children or
incapacitated persons. Children should
be supervised to ensure that they do not
play with the blender.
4. WARNING: To avoid inadvertent
activation, turn o and unplug before
cleaning.
5. CAUTION: In order to avoid a hazard
due to inadvertent resetting of the
thermal cut-out, power to this blender
must not be supplied through an
external switching device, such as a
timer, or connected to a circuit that is
regularly switched on and o by the
utility.
6. To protect against risk of electrical
shock, do not put the blender base in
water or other liquid.
7. Unplug from outlet when not in use,
before putting on or taking o parts,
and before cleaning.
8. Always check that the blender is OFF
before plugging cord into wall outlet. To
disconnect, turn OFF the blender, then
remove plug from wall outlet.
9. Illuminated icons and numbers on the
control panel indicates ready to operate.
Avoid inadvertent contact with the
touch screen.
10. Avoid contacting moving parts.
11. Do not operate any blender with a
damaged cord or plug or after the
blender malfunctions, or is dropped or
damaged in any manner. Call Vitamix
Customer Service at 1.800.848.2649
or 1.440.235.4840 or email service@
vitamix.com at once for examination,
repair, replacement, or adjustment. If
purchased outside the U.S.A. or Canada,
contact your local Vitamix dealer.
12. GFI circuit breakers might be installed
in your kitchen. Look for them in outlets
near sinks. If the blender won’t operate,
unplug the blender. Reset the wall outlet
or circuit breaker. If the circuit breaker
continues to trip, unplug the blender
from the outlet. Allow the blender to
sit for 24 hours before attempting to
use it again. Contact Vitamix Customer
Service if the problem persists.
13. Alteration or modification of any part
of the blender, including the use of
any part or parts that are not genuine
authorized Vitamix parts, may cause
fire, electric shock, or injury and will void
your warranty.
14. The use of attachments not expressly
authorized or sold by Vitamix for use
with this blender, including canning jars,
may cause fire, electric shock, or injury.
Use in this way will void your warranty.
15. Do not use outdoors.
16. Do not let cord hang over edge of table
or counter.
17. Do not place on or near a hot gas or
electric burner, in or on a heated oven.
18. Keep hands and utensils out of container
while blending to reduce the risk of
severe injury to persons or damage to
the blender. A rubber scraper or spatula
may be used, but only when the blender
is not running.

3
WARNING
To Avoid Injury.
Read and understand instruction
manual before using this machine.
IMPORTANT INSTRUCTIONS FOR SAFE USE
This product is intended for HOUSEHOLD USE ONLY and is not intended to be used for commercial purposes.
Do not leave your Vitamix blender unattended when operating.
Any repair, servicing, or replacement of parts must be performed by Vitamix or a Vitamix authorized service
representative.
NOTICE: THE FAILURE TO FOLLOW ANY OF THE IMPORTANT SAFEGUARDS AND IMPORTANT INSTRUCTIONS
FOR SAFE USE IS A MISUSE OF YOUR VITAMIX BLENDER THAT CAN VOID YOUR WARRANTY AND CREATE
THE RISK OF SERIOUS INJURY.
WARNING
Electrical Shock Hazard.
Use grounded outlet only.
DO NOT remove ground.
DO NOT use an adapter.
DO NOT use an extension cord.
Always unplug before cleaning the
blender base or when not in use.
Do not put the blender base in
water or otherliquid.
Failure to follow instructions can
cause death or electrical shock.
SAVE THESE INSTRUCTIONS
19. The tamper provided must be used only
when the main part of the lid is in place.
20. Blades are sharp. Clean around the
blade assembly in the container with
extreme care to avoid injury. To reduce
the risk of injury, never place a blade
assembly on the blender base unless
assembled to the Vitamix container.
21. Care should be taken when handling
the sharp cutting blades, emptying the
container and during cleaning.
22. Do not leave foreign objects, such as
spoons, forks, knives or the lid plug, in
the container as this will damage the
blades and other components when
starting the blender and may cause
injury.
23. Never attempt to operate with
damaged blades.
24. Never attempt to operate with the
centering pad removed.
25. Always operate blender with lid and
lid plug firmly in place. The lid plug
should be removed only when adding
ingredients and when using the tamper.
26. When blending hot liquids or
ingredients in the 64 oz. (2 L) container,
use caution; spray or escaping steam
may cause burns. Do not fill container
to the maximum capacity. Always begin
processing on the lowest speed setting,
variable speed 1. Keep hands and other
exposed skin away from lid opening to
prevent possible burns.
27. DO NOT use your 20 oz. (0.6 L) cup or
8 oz. (225 ml) bowl to heat ingredients
or to blend hot liquids. Heated
ingredients and liquids may create
internal pressure which could cause the
cup to burst and cause injury.
28. DO NOT continuously use your machine
for more than 75 seconds for the 20 oz.
(0.6 L) cup or 8 oz. (225 ml) bowl.
29. If a cup becomes warm to the touch
or steams or vents, immediately stop
blending ingredients and turn o or
unplug blender.
30. When making nut butters or oil-based
foods, do not process for more than
one minute after the mixture starts to
circulate in the container. Processing for
longer periods can cause overheating.
31. Make sure that the container or cup and
blade base are flush with the centering
pad to ensure that the drive spline is
engaged with the drive socket before
operating.
32. Make sure to use the seal on the blade
base and tighten the cup adequately to
the blade base before blending.
33. Never place the blade base onto the
blender base without the cup attached.

4
pa r t S a n d featureS
OFF
ON
On/O Switch
Blender with Variable Speed
Pulse
Technology - The blender, containers and cups communicate through wireless technology.
Each container is programmed to run on the blender base for optimum performance
according to it’s size and functionality.
Legacy Vitamix Containers - Legacy Vitamix containers will not work with your Venturist
blender base. Legacy machines are Vitamix C Series, G Series and S Series. For more
information about Vitamix products, please go to vitamix.com.
On /O (I/O) Switch - The On/O switch (I/O) is located on the right side of the blender base.
The On/O switch controls power to the machine.
Sleep Mode - The blender will enter sleep mode if the control panel is not used after
30 seconds. The screen will dim. To exit sleep mode, rotate the variable speed dial to the
desired speed for your next blend.
Container Detect - Three dashes (- - -) will display on the control panel if a container is not
on the blender base. Once a container is placed, 0:00 will show on the display.
Start/Stop ( I ) - Stop the blender at any time by pressing Start/Stop ( I) .
Variable Speed Dial - The Variable Speed Dial gives you manual control from Variable 1
(slowest) to 10 (highest).
Pulse ( ) - The blades will rotate at the speed displayed on the control panel when
pressed.
Display - The timer will count up when using variable speed until Start/Stop is pressed.
Each container is programmed with a specific maximum run time. The blender will shut
down automatically when the maximum run time has elapsed.
Error Codes - If you see an error code on the display make note of the numbers on the
display after the error code. Call Vitamix Customer Service for help with the issue.. Recording
the numbers isn’t necessary, but will give the Customer Service team more information to
help with the issue.
Motor - The motor is designed to protect itself from overheating. If the blender will not start
immediately check to make sure you have plugged the unit in and the On/O switch is On.
If the motor has overheated, allow the motor to cool for 20-45 minutes.
Tips to prevent ‘overloading’ your blender:
Process only Vitamix recipes when learning to use the blender. Do not process recipes at lower
speeds than recommended. Do not process recipes at higher speeds than recommended.
Do not process recipes for longer than recommended. Use your tamper to process thicker
mixtures and keep ingredients moving around and through the blades.
Tamper - Lids and tampers are not interchangeable between dierent container styles,
types and sizes. Use the tamper that was supplied with your blender.
The container should not be more than two-thirds full when the tamper is used.
Variable
Speed Dial
Start/
Stop
Timer

5
Container, Lid, Lid Plug and Tamper
• Always use the lid and the lid plug when operating the blender.
• Never operate the blender without checking to make sure that
the lid is securely locked in place.
• The lid plug is marked so it can be used as a measuring cup.
• Ounces (oz), Liters (L), Milliliters (ml) and Cups (c) are clearly
marked.
• Insert the lid plug through the lid plug opening. Lock the plug in
place by turning clockwise. To remove, turn counter-clockwise
and lift out.
• Remove the lid plug to use the tamper or to add ingredients.
• Legacy Vitamix containers (C, G and S Series) will not work on
the Venturist blender base.
• The container, lid, lid plug and tamper are dishwasher safe.
64 oz. (2 L) Low
Profile Container
2-Part Lid
Centering Pad
Lid
Lid Plug (in place)
CAUTION
Rotating Blades Can Cause Damage.
Lids and tampers are not interchangeable between dierent
container styles, types and sizes. Use the container and tamper that
was supplied with your blender.
pa r t S a n d fe at u r e S
Blender
motor base
Tamper
WARNING
To Avoid Injury. NEVER TOUCH MOVING PARTS.
Keep hands and utensils out of containers and cups during blender operation.
DO NOT insert fingers or utensils around the blades while the blades are spinning.
The blades will continue to spin until they come to a complete stop at the end of the blend
cycle. Allow the blades to come to a complete stop before handling the blade base and cups.
Firmly tighten the blade base onto the cup or bowl before blending.
If the cup becomes un-threaded from the blade base during operation, turn the machine OFF
and wait until the motor and blades come to a complete stop before attempting to remove
the cup and blade base from the motor base.
WARNING
To Avoid Possible Burns, Never Start on Speeds Above 1 when Processing Hot Liquids in a Large Container.
Escaping steam, splashes or contents may burn. Always start on Variable 1, then slowly increase to 10.
DO NOT use your 20 oz. (0.6 L) cup or 8 oz. (225 ml) bowl to heat ingredients or to blend hot liquids. Heated
ingredients and liquids may create internal pressure which could cause the cup to burst and cause injury.
DO NOT continuously use your machine for more than 75 seconds for the 20 oz. (0.6 L) cup or 8 oz. (225 ml) bowl.
If a cup becomes warm to the touch or steams or vents, immediately stop blending ingredients and turn o or unplug
blender. Allow the cup and ingredients to cool to room temperature before removing the blade base.
Parts will become hot with extended use.
DO NOT touch the drive socket in the blender base or the drive spline in the blade base.
To avoid damage or personal injury, DO NOT use the cups (including the blade base or lids) in the microwave.

6
bl e n d i n g
1. The On/O switch is on the right hand side of the blender base. Press the On/O switch to the On (I) position.
2. Load your container according to your recipe or the load order in the illustration here. Note: Recipe ingredients for cups load in the opposite
order of the large containers. DO NOT blend hot liquids in the 20 oz. (0.6 L) cup or 8 oz. (225 ml) bowl.
IMPORTANT! Always use the lid and the lid plug on the Large Container when the machine is in operation. Never operate the blender without checking
Loading Large Containers
Liquids
Dry Goods
Leafy Greens
Fruits & Veggies
Ice & Frozen
Ingredients
to make sure that the lid and lid plug are securely locked in place.
3. Perform one of the following:
• Large Containers - Put the lid onto the container. Push the lid down into place until the two tabs snap onto the lip of the container. Insert the
Loading the 20 oz. (0.6 L) cup
Liquids
DO NOT blend hot liquids!
Dry Goods
Leafy Greens
Fruits & Veggies
Ice & Frozen
Ingredients
lid plug. Turn the lid plug clockwise to lock.
• 20 oz. (0.6 L) cup or 8 oz. (225 ml) bowl -
a. Put a seal on the bottom thread of the blade base. The seal should fit snugly and
evenly around the thread.
b. Thread the blade base onto the cup or bowl in a clockwise direction. Firmly tighten
the blade base onto the cup or bowl before blending.
4. Put the container (or cup and blade base) onto the blender base. 0:00 will display
when a container/cup is detected and the blender is ready to operate.
If the motor base does not recognize the cup or bowl, tighten the blade base further
onto the cup or bowl and place it back on the motor base. If the problem continues, contact
Vitamix Customer Service for support.
5. Variable speed:
a. Turn the variable speed dial to Variable Speed 1.
b. Press Start/Stop. The blades will begin to turn and the timer will count the
minutes and seconds that the blend has been processing. To set a blend time,
use the +/- icons on the controls.
c. Rotate the Variable Speed Dial between 1 and 10 during the blending cycle to
increase or decrease the speed of the blades.
d. At the end of the blend, rotate the Variable Speed Dial counter-clockwise to
Variable 1. Press Start/Stop.
6. If the mixture stops circulating:
• Large Containers - Insert the tamper through the lid plug and stir until it ‘burps’. If this does not work, press the On/O switch to stop the motor. Remove
the container from the blender base and use a rubber spatula to press the air bubble away from the blades. Add liquid if necessary. Replace the lid and lid
plug. Return the container to the blender base and continue blending.
• 20 oz. (0.6 L) cup or 8 oz. (225 ml) bowl - Press the On/O switch to stop the motor. Wait until the blades stop rotating. Remove the cup and
blade base from the blender base. Turn the cup over. Unthread the blade base from the cup. Stir the ingredients. Add liquid if necessary.
Reattach the blade base, place on blender base and continue blending.
7. After blending, wait until the blades completely stop before removing the lid or container/cup from the blender base.
8. If necessary, use the Blade Scraper to remove salsa, jelly, jam, peanut butter, and other thick ingredients from under the blades only after the
blender has been turned o and the container has been removed from the motor base.
WARNING
To Avoid Injury. NEVER TOUCH MOVING PARTS.
Keep hands and utensils out of containers and cups during blender operation.
DO NOT insert fingers or utensils around the blades while the blades are spinning.
The blades will continue to spin until they come to a complete stop at the end of the blend cycle. Allow the blades to
come to a complete stop before handling the blade base and cups.
If the cup becomes un-threaded from the blade base during operation, turn the machine OFF and wait until the motor
and blades come to a complete stop before attempting to remove the cup and blade base from the motor base.

7
ca r e a n d cl e a n i n g
In-Place Cleaning: (8 oz. bowl [0.6-litre] and 20 oz. [225 ml] cups)
1. Fill the container half full with water and add a couple of drops of washing-up liquid.
DO NOT BLEND HOT WATER.
2. Put a seal on the bottom thread of the adapter. The seal should fit snugly and evenly
around the thread. Thread the adapter onto the cup in a clockwise direction just until
tight.
3. Put the cup and adapter onto the base.
4. Press Start / Stop. Slowly increase variable speed to 10.
5. Run the machine for 30 to 60 seconds.
6. Rotate the Variable-Speed dial back to Variable 1. Press Start / Stop.
7. Rinse and drain all pieces.
To Sanitize: (Bleach) (8 oz. [0.6-litre] bowl and 20 oz. [225 ml] cups)
1. Follow the cleaning instructions above.
2. Fill the container half full with water and 1/2 teaspoon of liquid bleach.
DO NOT BLEND HOT WATER.
3. Put a seal on the bottom thread of the adapter. The seal should fit snugly
and evenly around the thread. Thread the adapter onto the cup in a
clockwise direction just until tight.
4. Put the cup and adapter onto the base.
5. Press Start / Stop.
6. Slowly increase variable speed to 10.
7. Run the machine for 30 to 60 seconds.
8. Rotate the Variable-Speed dial back to Variable 1. Press Start / Stop.
9. Allow the mixture to stand in the container for an additional 1 ½ minutes.
10. Pour out the bleach mixture. Allow the container to air dry. Do not rinse
after sanitizing.
To Sanitize the 8 oz. [0.6-litre] bowl and 20 oz. [225 ml] cups with Vinegar
(minimum 5% acidity):
Note:
If the vinegar has greater acidity, the water can be increased to get a minimum 2.5%
solution. For example, for 10% acidity use 1 part vinegar and 3 parts water.
1. Follow the cleaning instructions above.
2. Fill the container 150 ml with water and 150 ml white vinegar (60 ml with water and 60
ml white vinegar). DO NOT BLEND HOT WATER.
3. Put a seal on the bottom thread of the adapter. The seal should fit snugly and evenly
around the thread. Thread the adapter onto the cup in a clockwise direction just until
tight. Put the cup and adapter onto the base.
4. Variable Speed:
a. Make sure the Variable Speed dial is set to Variable Speed 1.
b. Press the Start / Stop.
c. Slowly increase variable speed to 10.
d. Run the machine for 30 to 60 seconds.
e. Rotate the Variable Speed dial back to Variable 1.
5. Allow the mixture to stand in the container for an additional 4 minutes (5 minutes total
contacttime).
6. Pour the vinegar mixture out. Allow the container to air dry. Do not rinse after sanitising.
WARNING
Electrical Shock Hazard.
Always unplug before cleaning the blender base or when not in use.
Do not put the blender base in water or otherliquid.
Failure to follow instructions can cause death or electric shock.
WARNING
To Avoid Injury and Damage.
To avoid inadvertent activation, turn o and unplug the blender before cleaning.
BEFORE FIRST USE:
1. Wipe the base with a warm damp cloth and wipe clean with a dry, soft cloth.
Wash the container, cups, lids, lid plug and tamper with warm, soapy water.
Rinse all parts. Wipe dry with a dry, soft cloth.
2. Choose a space on the counter that is level, dry and clean. Plug the blender into
an grounded, 3-prong outlet.
Note: Your Vitamix container is designed to be completely cleanable without
removing the retainer nut and blade assembly. DO NOT attempt to remove the
retainer nut or blade assembly from the container. Our Normal Cleaning and
Sanitising procedures or a dishwasher cleaning cycle will ensure a complete and
thorough cleaning of your container and its components. If your container is
damaged, please do not use. Contact Vitamix Customer Service IMMEDIATELY.
Care and Cleaning of Large Containers:
To Clean:
1. Fill the container half full with warm water and add a couple of drops of
dishwashing liquid.
2. Snap or push the complete 2-Part lid into the locked position.
3. Variable Speed:
a. Make sure the Variable Speed dial is set to Variable Speed 1.
b. Press the Start / Stop.
c. Slowly increase variable speed to 10.
d. Run the machine for 30 to 60 seconds.
e. Rotate the Variable Speed dial back to Variable 1.
4. Rinse and drain all pieces.
To Sanitize: (Bleach) (Full-size Containers)
1. Follow the cleaning instructions above.
2. Fill the container half full of water and add 1 ½ teaspoons of liquid bleach.
3. Snap or push the complete 2-part lid into the locked position.
4. Variable Speed:
a. Make sure the Variable Speed dial is set to Variable Speed 1.
b. Press the Start / Stop.
c. Slowly increase variable speed to 10.
d. Run the machine for 30 to 60 seconds.
e. Rotate the Variable Speed dial back to Variable 1.
5. Allow the mixture to stand in the container for an additional 1 ½ minutes.
6. Pour out the bleach mixture. Allow the container to air dry. Do not rinse after
sanitizing.
To Sanitize: (Vinegar) (Full-size Containers)
1. Follow the cleaning instructions above.
2. Prepare the vinegar solution: for the 2-litre container, dilute 475 ml of vinegar
in 475mlwater.
3. Snap or push the complete 2-part lid into the locked position.
4. Variable Speed:
a. Make sure the Variable Speed dial is set to Variable Speed 1.
b. Press the Start / Stop.
c. Slowly increase variable speed to 10.
d. Run the machine for 30 to 60 seconds.
e. Rotate the Variable Speed dial back to Variable 1.
5. Allow the mixture to stand in the container for an additional 3 full minutes.
Total contact time of the vinegar solution in the container should equal 5
minutes.
6. Pour the vinegar solution out of the container over the inside surface of the
2-part lid. Repeat the sanitization procedure a second time.
7. Allow the container and lid to air dry. Do not rinse after sanitising. If necessary,
rinse immediately before the next use.
Lids, Lid Plug, Centring Pad and Tamper
The parts are dishwasher-safe. If preferred, wash the parts in warm soapy water.
Rinse clean under running water, then dry.
Blender Base
1. Turn o and unplug the blender.
2. Wash the outside surface with a damp, soft cloth or sponge that has been rinsed in
a mild solution of washing-up liquid and warm water. Do not place the blender base
in water. The centring pad can be removed for more thorough cleaning.
3. Immediately dry all surfaces and polish with a soft cloth.

8
together) fails within 10 years from the date of purchase due to a defect in material or workmanship or as a result of normal wear and tear from ordinary
household use, Vitamix will, within 30 days of receipt of the returned blender, repair the failed Blender or component part of the Blender free of charge.
If, in Vitamix’s sole discretion, the failed Blender or component part of the Blender cannot be repaired, Vitamix will elect to either (A) replace the Blender
free of charge or (B) refund the full purchase price to the owner, unless Vitamix receives prior written notice of the owner’s preference.
4. WHAT IS NOT COVERED.
This Warranty does not apply to Blenders used commercially or in non-household applications. This Warranty does not cover cosmetic changes that do
not aect performance, such as discoloration or the eects of the use of abrasives or cleaners or food build up. This Warranty is only valid if the Blender
is used and maintained in accordance with the instructions, warnings and safeguards contained in the owner’s manual.
Containers: Processing certain herbs and spices in the container/cup will result in cosmetic marring of the container/cup and may cause the blades
to wear prematurely. Traces of sand, coarse gritty and abrasive herbs will also cause the blades to wear prematurely. Herbs may contain volatile oils,
cause the container/cup to retain the oils and cause permanent discoloration.
Vitamix will not be responsible for the cost of any unauthorized warranty repairs.
REPAIR, REPLACEMENT OR REFUND OF THE PURCHASE PRICE ARE THE EXCLUSIVE REMEDIES OF PURCHASER AND THE SOLE LIABILITY OF
VITAMIX UNDER THIS WARRANTY. NO EMPLOYEE OR REPRESENTATIVE OF VITAMIX IS AUTHORIZED TO MAKE ANY ADDITIONAL WARRANTY
OR ANY MODIFICATION TO THIS WARRANTY WHICH MAY BE BINDING UPON VITAMIX. ACCORDINGLY, PURCHASER SHOULD NOT RELY UPON
ANY ADDITIONAL STATEMENTS MADE BY ANY EMPLOYEE OR REPRESENTATIVE OF VITAMIX. IN NO EVENT, WHETHER BASED ON CONTRACT,
INDEMNITY, WARRANTY, TORT (INCLUDING NEGLIGENCE), STRICT LIABILITY OR OTHERWISE, SHALL VITAMIX BE LIABLE FOR ANY SPECIAL,
INDIRECT, INCIDENTAL OR CONSEQUENTIAL DAMAGES, INCLUDING, WITHOUT LIMITATION, LOSS OF PROFIT OR REVENUE.
Some states do not allow limits on warranties. In such states, the above limitations may not apply to you. Outside the U.S.A. and Canada, other warranties
may apply.
5. WHAT VOIDS THIS WARRANTY.
Abuse, misuse, negligent use, alteration of the Blender, exposure to abnormal or extreme conditions, or failure to follow the operating instructions in this
manual will void this Warranty.
The Warranty is also void if repairs to the Blender or any component part of the Blender are performed by someone other than either Vitamix or an
authorized Vitamix Service Provider or if any component part of a Blender subject to this Warranty is used in combination with a blender base or
container that is not expressly authorized by Vitamix.
6. HOW TO OBTAIN RETURN AUTHORIZATION UNDER THIS WARRANTY.
In the event that you need service or repair, please call Vitamix Customer Service at 1.800.848.2649 or 1.440.235.4840. You will be asked to provide
a date of purchase and proof of purchase for any blender that has not been registered with Vitamix. For blenders subject to this Warranty you will be
provided with a return authorization number, up-to-date shipping instructions and a pre-paid return pick up label. Vitamix will pay standard shipping
costs on the return of a Blender for warranty service and repair and for return shipment of the blender to you after the warranty repair or replacement.
Purchaser is responsible for the costs of special shipping requests.
Within the U.S.A. and Canada, this Warranty is honored directly through the Vita-Mix Corporation.
United States Canada
Vita-Mix Corporation Vita-Mix Corporation
8615 Usher Road 200-1701 Shepherd Street East
Cleveland, Ohio 44138-2199 Windsor, Ontario N8Y 4Y5
1-800-848-2649 1-800-848-2649
service@vitamix.com service@vitamix.com
You will be deemed to have accepted the returned product “as is” upon delivery unless you notify Vitamix of any problem, including shipment
damage, within 48 hours of delivery.
10-Year full Machine Warranty
1. PRODUCT REGISTRATION.
Vita-Mix Corporation (“Vitamix”) strongly encourages you to register your purchase by completing and returning the product registration card that came
with this Blender. You can register online at vitamix.com/warranty; or by calling our Customer Service Department at 1.800.848.2649 or 1.440.235.4840.
Failure to register your product purchase will not diminish your warranty rights. However, registering your purchase will allow Vitamix to better serve
you with any of your customer service needs.
2. WHO CAN SEEK WARRANTY COVERAGE.
This Warranty is extended by Vitamix to the owner of this Blender for personal household use only. This Warranty does not apply to products used
for commercial, rental or re-sale purposes. Should ownership of the blender change during the 10-year period, please update the Blender’s owner
information at vitamix.com.
3. WHAT IS COVERED.
Vitamix warrants to the owner that if this Blender (a “Blender” consists of a motor blender base, any container(s), lids and tamper(s) purchased
Wa r r a n t y a n d Se r v i c e

9
cupS, lidS, blade baSe and Seal
WARNING
To Avoid Injury. NEVER TOUCH MOVING PARTS.
Keep hands and utensils out of containers and cups during blender operation.
DO NOT insert fingers or utensils around the blades while the blades are spinning.
The blades will continue to spin until they come to a complete stop at the end of the blend
cycle. Allow the blades to come to a complete stop before handling the blade base and cups.
Firmly tighten the blade base onto the cup or bowl before blending.
If the cup becomes un-threaded from the blade base during operation, turn the machine OFF
and wait until the motor and blades come to a complete stop before attempting to remove
the cup and blade base from the motor base.
WARNING
To Avoid Possible Burns, Never Start on Speeds Above 1 when Processing Hot Liquids in a Large Container.
Escaping steam, splashes or contents may burn. Always start on Variable 1, then slowly increase to 10.
DO NOT use your 20 oz. (0.6 L) cup or 8 oz. (225 ml) bowl to heat ingredients or to blend hot liquids. Heated
ingredients and liquids may create internal pressure which could cause the cup to burst and cause injury.
DO NOT continuously use your machine for more than 75 seconds for the 20 oz. (0.6 L) cup or 8 oz. (225 ml) bowl.
If a cup becomes warm to the touch or steams or vents, immediately stop blending ingredients and turn o or unplug
blender. Allow the cup and ingredients to cool to room temperature before removing the blade base.
Parts will become hot with extended use.
DO NOT touch the drive socket in the blender base or the drive spline in the blade base.
To avoid damage or personal injury, DO NOT use the cups (including the blade base or lids) in the microwave.
USE
See BLENDING
CARE
See CARE and CLEANING
SCALE 1.000
Seal
Travel Lid
Seal
Blending Adapter
20 oz. Cup and Travel Lid
Storage Lid
8 oz. cup

10
The following accessories are compatible to use with Venturist blenders. Refer to vitamix.com for more information.
• Self-Detect 48 oz. (1.4 L) Wet and Dry Containers
• Self-Detect 8 oz. Bowl (225 ml) and Blade Base*
• Self-Detect 20 oz. (0.6 L) Cup and Blade Base*
• Tamper Holder Assembly*
• Blade Scraper
ap p e n d i x 1 - ac c e S S o r i e S
Tamper Holder use and care insTrucTions
Note: When properly installed, the tamper holder will not interfere
with blender operation. The tamper holder can be installed on the
left or right side of the motor base.
1. Clean the parts by hand with warm, soapy water or in the top rack
in the dishwasher before assembling.
2. Choose a side of the motor base to install the tamper holder.
3. Put the tamper holder cup onto the tamper holder base. Twist the
tamper holder cup clockwise to lock into place.
4. Lift up the blender base. Plug the tab in the tamper holder base
into the slot in the motor base. Lower the blender base back onto
the work surface or counter.
5. Make sure the blender is sitting flat and steady (no rocking side
to side) before blending. When installed properly, the inside flat
surface of the tamper holder cup will sit flush with the side of the
blender (See illustration).
6. Remove the tamper holder from the blender regularly to clean. To
remove the tamper holder cup, rotate the cup counter-clockwise.
7. To remove the base, lift up on the motor base and remove the
tamper holder base.
Blade scraper use and care insTrucTions
1. Clean the parts by hand with warm, soapy water or in the top rack in the dishwasher before use.
2. Use the blade scraper to remove thick ingredients like jam and peanut butter from under the blades only after the
container has been removed from the motor base.
Keep hands and utensils out of container while blending to reduce the risk of severe injury to
persons or damage to the blender. A rubber scraper, spatula or blade scraper may be used,
but only when the blender is not running and after the container has been removed from the
motor base.
Do not leave foreign objects, such as spoons, forks, knives, scrapers, spatulas or the lid plug,
in the container as this will damage the blades and other components when starting the
blender and may cause injury
.
IMPORTANT!
Proper installation
(flush against motor base)
The tab on the
tamper holder base
can be plugged into
the motor base here
or here
Tab on Tamper
Holder Base
Blender
Motor Base

11
result of normal wear and tear from ordinary household use, Vitamix will, within 30 days of receipt of the returned Accessory, repair the failed Accessory
or component part free of charge.
If, in Vitamix’s sole discretion, the failed Accessory cannot be repaired, Vitamix will elect to either (A) replace the Accessory free of charge or (B) refund
the full purchase price to the owner, unless Vitamix receives prior written notice of the owner’s preference.
4. WHAT IS NOT COVERED.
This Warranty does not apply to Accessory used commercially or in non-household applications. This Warranty does not cover cosmetic changes that
do not aect performance, such as discoloration or the eects of the use of abrasives or cleaners or food build up. This Warranty is only valid if the
Accessory is used and maintained in accordance with the instructions, warnings and safeguards contained in the owner’s manual.
Vitamix will not be responsible for the cost of any unauthorized warranty repairs.
REPAIR, REPLACEMENT OR REFUND OF THE PURCHASE PRICE ARE THE EXCLUSIVE REMEDIES OF PURCHASER AND THE SOLE LIABILITY OF
VITAMIX UNDER THIS WARRANTY. NO EMPLOYEE OR REPRESENTATIVE OF VITAMIX IS AUTHORIZED TO MAKE ANY ADDITIONAL WARRANTY
OR ANY MODIFICATION TO THIS WARRANTY WHICH MAY BE BINDING UPON VITAMIX. ACCORDINGLY, PURCHASER SHOULD NOT RELY UPON
ANY ADDITIONAL STATEMENTS MADE BY ANY EMPLOYEE OR REPRESENTATIVE OF VITAMIX. IN NO EVENT, WHETHER BASED ON CONTRACT,
INDEMNITY, WARRANTY, TORT (INCLUDING NEGLIGENCE), STRICT LIABILITY OR OTHERWISE, SHALL VITAMIX BE LIABLE FOR ANY SPECIAL,
INDIRECT, INCIDENTAL OR CONSEQUENTIAL DAMAGES, INCLUDING, WITHOUT LIMITATION, LOSS OF PROFIT OR REVENUE.
Some states do not allow limits on warranties. In such states, the above limitations may not apply to you. Outside the U.S.A. and Canada, other warranties
may apply.
5. WHAT VOIDS THIS WARRANTY.
Abuse, misuse, negligent use, alteration of the Accessory, exposure to abnormal or extreme conditions, or failure to follow the operating instructions in
this manual will void this Warranty.
The Warranty is also void if repairs to the Accessory are performed by someone other than either Vitamix or an authorized Vitamix Service Provider or
if any component part of a Blender subject to this Warranty is used in combination with a blender base or container that is not expressly authorized by
Vitamix.
6. HOW TO OBTAIN RETURN AUTHORIZATION UNDER THIS WARRANTY.
In the event that you need service or repair, please call Vitamix Customer Service at 1.800.848.2649 or 1.440.235.4840.
Within the U.S.A. and Canada, this Warranty is honored directly through the Vita-Mix Corporation.
United States Canada
Vita-Mix Corporation Vita-Mix Corporation
8615 Usher Road 200-1701 Shepherd Street East
Cleveland, Ohio 44138-2199 Windsor, Ontario N8Y 4Y5
1-800-848-2649 1-800-848-2649
service@vitamix.com service@vitamix.com
You will be deemed to have accepted the returned product “as is” upon delivery unless you notify Vitamix of any problem, including shipment
damage, within 48 hours of delivery.
1-Year Accessory Warranty
1. WHAT IS COVERED
Vita-Mix Corporation (“Vitamix”) warrants that the accessory (tamper holder, underblade scraper) will be free from defects in material or workmanship
and will withstand wear and tear from ordinary household use for 1 year from the date of purchase. Vitamix will, within 30 days of receipt of the returned
product, repair the failed Accessory free of charge. If, in Vitamix’s sole discretion, the failed Container or Container Component cannot be repaired,
Vitamix will elect to either (A) replace the Accessory free of charge or (B) refund the full purchase price to the owner, unless Vitamix receives prior
written notice of the owner’s preference.
2. WHO CAN SEEK WARRANTY COVERAGE.
This Warranty is extended by Vitamix to the owner of this Accessory for personal household use only. This Warranty does not apply to products used
for commercial, rental or re-sale purposes.
3. WHAT IS COVERED.
Vitamix warrants to the owner that if this Accessory fails within 1 years from the date of purchase due to a defect in material or workmanship or as a
ac c e SS o r y Wa r r a n t y

12
To see the complete line of Vitamix® products, visit vitamix.com.
Vita-Mix® Corporation
8615 Usher Road
Cleveland, OH 44138-2103 U.S.A.
1.800.848.2649 / 1.440.235.4840
vitamix.com
©2022 Vita-Mix Corporation. No part of this publication may be reproduced or transmitted in any form or by any means, or stored in a database or
retrieval system, without the written permission of Vita-Mix Corporation.
When applicable:

Venturist®
mélangeursà Haute PerformanceV1200
VM0185B
Une aventure vous
attend.
Vitamix.com
SymboleS
Sp é c i f i c at i o n S
Tension: 120V
Hauteur (avec le récipient de 2L [64oz] sur le
socle du mélangeur): 17po
Fréquence:
50 –
60Hz
Largeur: 8po
Intensité
électrique:
12A Profondeur: 11po
Avertissement et mise en garde
NE JAMAIS toucher les pièces en mouvement. Garder les
mains et les ustensiles hors du récipient.
Risque de décharge électrique
Température élevée lors du mélange de liquides chauds
Débrancher l'appareil lorsqu'il n'est pas utilisé, avant le
nettoyage, avant de changer des accessoires ou avant de
toucher des pièces en mouvement lorsque le mélangeur
fonctionne.
Utiliser l'appareil lorsque le couvercle et la prise du
couvercle sont en place.
Lire et bien comprendre le guide d'utilisation.
NE PAS immerger.
Les pièces deviennent chaudes après une utilisation
prolongée. NE PAS toucher la prise d'entraînement sur le
socle du mélangeur ou la cannelure d'entraînement sur la
base de la lame
NE PAS utiliser la tasse de 0,6L (20oz) ou le bol de 225ml
(8oz) pour chauffer des ingrédients ou pour mélanger des
liquides chauds.
I/O Marche/Arrêt
IDémarrer/Arrêter
Pulse
• Cet appareil est conforme à la partie15 du règlement de la FCC. Son utilisation est soumise
aux deux conditions suivantes: 1) cet appareil n'engendre pas d'interférences nuisibles; et
2) cet appareil doit tolérer tout type d'interférences reçues, notamment les interférences
pouvant provoquer une utilisation non désirée de l'appareil.
• Cet appareil est conforme aux normesRSS exemptes de licence d'IndustrieCanada.
Son utilisation est soumise aux deux conditions suivantes: 1) cet appareil n'engendre pas
d'interférences; et 2) cet appareil doit tolérer tout type d'interférences, notamment les
interférences pouvant provoquer une utilisation non désirée de l'appareil.
• Cet appareil est conforme au Code de sécurité de SantéCanada. L'installateur de cet
appareil doit s'assurer que les radiofréquences émises ne dépassent pas le seuil autorisé par
SantéCanada. De plus amples renseignements se trouvent au http://www.hc-sc.gc.ca/ewh-
semt/pubs/radiation/radio_guide-lignes_direct/index-fra.php
.
MISE EN GARDE
Les changements ou les modifications qui ne sont pas expressément
approuvés par la partie responsable de la conformité sont susceptibles
de révoquer les droits d’utilisation de cet équipement.

14
me S u r e S d e S é c u r i t é i m p o r ta n t e S
AVERTISSEMENT: Afin d'éviter les risques de blessures graves lors de l'utilisation de votre mélangeurVitamix®, adoptez des mesures de sécurité essentielles, notamment celles
qui suivent
.
LIRE LES DIRECTIVES, LES MESURES DE SÉCURITÉ ET LES AVERTISSEMENTS EN ENTIER AVANT D'UTILISER LE MÉLANGEUR.
1. Lisez toutes les directives.
2. N'utilisez le mélangeur qu'aux fins auxquelles il est
prévu.
3. Cet appareil n'est pas conçu pour être utilisé par
des enfants, des personnes dont les capacités
physiques, sensorielles ou mentales sont réduites,
ou qui n'ont pas suffisamment d'expérience et de
connaissances, ni pour être utilisé à proximité de
ces personnes. Une surveillance étroite est requise
lorsqu'un mélangeur est utilisé par des enfants ou
des personnes à capacités réduites, ou à proximité
de ceux-ci. Surveillez les enfants afin d'éviter qu'ils
jouent avec le mélangeur.
4. AVERTISSEMENT: Pour éviter qu'il soit activé par
inadvertance, éteignez et débranchez le mélangeur
avant le nettoyage.
5. MISE EN GARDE : Afin d'éviter un risque lié à la
réinitialisation par inadvertance du coupe-circuit
thermique, l'alimentation de ce mélangeur ne doit
pas provenir d'un appareil de connexion externe,
comme une minuterie, ou être connectée à un
circuit qui est souvent activé et désactivé par le
fournisseur.
6. Pour prévenir les risques de décharge électrique,
ne placez pas le socle du mélangeur dans l'eau ou
tout autre liquide.
7. Débranchez l'appareil lorsqu'il n'est pas utilisé,
avant d'installer ou de retirer des pièces, ou avant
de le nettoyer.
8. Vérifiez toujours que le mélangeur est éteint avant
de brancher le cordon dans la prise murale. Pour le
débrancher, éteignez-le avant de retirer la fiche de
la prise murale.
9. Les icônes et les chiffres illuminés sur le panneau
de commande indiquent que l'appareil est
opérationnel. Évitez tout contact accidentel avec
l'écran tactile.
10. Évitez tout contact avec les pièces en mouvement.
11. N'utilisez jamais un mélangeur dont le cordon
ou la fiche sont endommagés, ni un appareil qui
ne fonctionne pas correctement, qui est tombé
ou qui est endommagé de quelque façon que
ce soit. Appelez le service à la clientèle Vitamix
au 1 800 848-2649 ou au 1 440 235-4840, ou
envoyez un courriel à servic[email protected]om pour
un examen, une réparation, un remplacement ou
un ajustement. Si l'appareil a été acheté à l'extérieur
des États-Unis ou du Canada, communiquez avec
votre détaillant localVitamix.
12. Votre cuisine pourrait être équipée de
disjoncteurs DDFT. Vous les trouverez dans les
prises situées près des éviers. Si le mélangeur ne
fonctionne pas, débranchez-le, puis réarmez la prise
murale ou le disjoncteur. Si le disjoncteur continue
de se déclencher, débranchez le mélangeur de la
prise. Laissez-le reposer pendant 24heures avant
de le réutiliser. Communiquez avec le service à la
clientèleVitamix si le problème persiste.
13. L'altération ou la modification de toute pièce du
mélangeur, y compris l'utilisation de pièces qui ne
sont pas des pièces authentiques et autorisées
par Vitamix, peuvent provoquer un incendie, une
décharge électrique ou des blessures, et annuleront
votre garantie.
14. L'utilisation d'accessoires qui ne sont pas
expressément autorisés ou vendus par Vitamix
pour être utilisés avec ce mélangeur, y compris les
contenants de mise en conserve, peut provoquer un
incendie, une décharge électrique ou des blessures.
Une telle utilisation annulera votre garantie.
15. N'utilisez pas l'appareil à l'extérieur.
16. Ne laissez pas le cordon pendre de la table ou du
comptoir.
17. Ne placez jamais l'appareil sur un brûleur à gaz ou
un brûleur électrique chaud, ou à proximité de ceux-
ci, ni dans un four en marche ou sur le dessus de
celui-ci.
18. Gardez les mains et les ustensiles hors du récipient
pendant l'utilisation afin de réduire le risque de
blessures corporelles graves ou de dommages au
mélangeur. Vous pouvez utiliser un grattoir ou une
spatule en caoutchouc, mais uniquement lorsque

15
ATTENTION
Afin d'éviter toute blessure,
lisez attentivement le guide d'utilisation
avant d'utiliser cet appareil.
DIRECTIVES IMPORTANTES POUR UNE UTILISATION SÉCURITAIRE
Ce produit est conçu pour un USAGE DOMESTIQUE SEULEMENT et n'est pas destiné à un usage commercial.
Ne laissez pas votre mélangeurVitamix sans surveillance lorsqu'il est en marche.
L'entretien, les réparations et le remplacement des pièces doivent être eectués par Vitamix ou par un
représentant de serviceVitamix autorisé.
AVIS : LE NON-RESPECT DE TOUTE MESURE DE SÉCURITÉ OU DIRECTIVE IMPORTANTE VISANT UNE
UTILISATION SÉCURITAIRE CONSTITUE UNE UTILISATION INAPPROPRIÉE DE VOTRE MÉLANGEURVITAMIX,
CE QUI EST SUSCEPTIBLE D'ANNULER VOTRE GARANTIE ET DE PROVOQUER DES BLESSURES GRAVES.
ATTENTION
Risque de décharge électrique.
Utilisez uniquement une prise avec mise à
la terre.
NE RETIREZ PAS la mise à la terre.
N'UTILISEZ AUCUNadaptateur.
N'UTILISEZ AUCUNE rallonge électrique.
Débranchez toujours le mélangeur avant de
nettoyer le socle ou lorsqu'il n'est pas en
marche.
N'immergez pas le socle du mélangeur dans
l'eau ou dans d'autres liquides.
Le non-respect de ces directives peut
causer la mort ou une décharge électrique.
CONSERVEZ CES DIRECTIVES.
le mélangeur ne fonctionne pas.
19. Le pilon doit être utilisé uniquement lorsque la
partie principale du couvercle est en place.
20. Les lames sont tranchantes. Nettoyez l'assemblage
de lames dans le récipient avec précaution pour
éviter les blessures. Afin de réduire les risques de
blessures, ne placez jamais un assemblage de lames
sur le socle, sauf s'il est fixé au récipientVitamix.
21. Soyez très prudent lorsque vous manipulez les
lames tranchantes et que vous videz et nettoyez le
récipient.
22. Ne laissez aucun objet extérieur dans le récipient,
comme des cuillères, des fourchettes, des
couteaux ou la prise du couvercle, car ils pourraient
endommager les lames ainsi que d'autres
composantes au démarrage de l'appareil et
provoquer des blessures.
23. N'utilisez jamais l'appareil si les lames sont
endommagées.
24. N'utilisez jamais l'appareil si le coussinet de
positionnement est retiré.
25. Utilisez l'appareil en vous assurant chaque fois que
le couvercle et la prise du couvercle sont bien en
place. Retirez uniquement la prise du couvercle
pour ajouter des ingrédients et utiliser le pilon.
26. Lorsque vous mélangez des liquides ou des
ingrédients chauds dans le récipient de 2 L
(64oz), soyez prudent, car le jet ou la vapeur qui
s'échappent peuvent provoquer des blessures. Ne
remplissez pas le récipient à sa capacité maximale.
Commencez toujours à mélanger au réglage de
vitesse le plus bas, soit la vitesse variable1. Gardez
les mains et la peau exposée loin de l'ouverture du
couvercle pour éviter les brûlures éventuelles.
27. N'utilisez PAS votre tasse de 0,6L (20oz) ou votre
bol de 225ml (8oz) pour chauffer des ingrédients
ou pour mélanger des liquides chauds. Les
ingrédients et les liquides chauds peuvent créer
une pression interne qui risque de faire éclater la
tasse et de provoquer des blessures.
28. N'utilisez PAS votre appareil en continu pendant
plus de 75secondes avec la tasse de 0,6L (20oz)
ou le bol de 225ml (8oz).
29. Si une tasse devient chaude au toucher, que de la
vapeur s'en échappe ou que le contenu tend à sortir,
arrêtez immédiatement de mélanger les ingrédients
et éteignez ou débranchez le mélangeur.
30. Lors de la préparation de beurres de noix ou
d'aliments à base d'huile, ne faites pas fonctionner
l'appareil plus d'une minute après que le mélange
a commencé à circuler dans le récipient. Le
fonctionnement de l'appareil pendant de longues
périodes peut causer une surchauffe.
31. Assurez-vous que le récipient ou la tasse et la
base de lames sont bien alignés avec le coussinet
de positionnement, afin que la cannelure
d'entraînement soit enclenchée avec la prise
d'entraînement avant la mise en marche.
32. Assurez-vous d'utiliser le joint sur la base de lames
et de resserrer adéquatement la tasse sur la base
de lames avant de mélanger.
33. Ne placez jamais la base de lames sur le socle du
mélangeur sans avoir installé la tasse.

16
pi è c e S e t c a r ac t é r i S t i q u e S
OFF
ON
InterrupteurMarche/Arrêt
Pulse
Technologie – Le mélangeur, les récipients et les tasses communiquent à l'aide de la
technologie sans fil. Chaque récipient est programmé pour fonctionner sur le socle du
mélangeur à une performance optimale selon sa taille et sa fonctionnalité.
Anciens récipientsVitamix– Les anciens récipientsVitamix ne fonctionneront pas avec le
socle de votre mélangeurVenturist. Les anciens appareils sont les Vitamix des sériesC, G et S.
Pour en savoir plus sur les produitsVitamix, veuillez visiter vitamix.com.
InterrupteurMarche/Arrêt (I/O)– L'interrupteurMarche/Arrêt (I/O) se trouve sur le côté
droit du socle du mélangeur. Il contrôle l'alimentation de l'appareil.
ModeVeille – Le mélangeur se mettra en veille si le panneau de commande n'est pas utilisé
après 30secondes. La luminosité de l'écran faiblira. Pour quitter le modeVeille, faites tourner le
cadran de vitesse variable jusqu'à la vitesse désiré pour votre prochain mélange.
Détection du récipient – Trois tirets (- - -) apparaissent sur le panneau de commande s'il n'y a
pas de récipient sur le socle du mélangeur. Une fois le récipient installé, l'écran ache «0:00».
Démarrer/Arrêter ( I ) – Arrêtez le mélangeur à tout moment en appuyant sur le
boutonDémarrer/Arrêter ( I).
Cadran de vitesse variable– Le cadran de vitesse variable vous ore un contrôle manuel des
variables1 (basse) à 10 (haute).
Pulse ( )– Appuyer sur cette fonction de pulsation fait tourner les lames à la vitesse achée
sur le panneau de commande.
Achage– Lorsque vous utilisez une vitesse variable, la minuterie compte jusqu'à ce que
vous appuyez sur le boutonDémarrer/Arrêter. Le mélangeur s'arrêtera automatiquement
lorsque le temps de fonctionnement maximal sera écoulé.
Codes d'erreur– Si vous voyez un code d'erreur à l'écran, prenez en note les chires achés
après le code d'erreur, puis appelez le service à la clientèleVitamix pour obtenir de l'aide. Les
chires ne sont pas nécessaires, mais ils donneront à l'équipe du service à la clientèle plus de
détails pour vous aider.
Moteur– Le moteur est conçu pour se protéger de la surchaue. Si le mélangeur ne fonctionne
pas immédiatement, vérifiez qu'il soit bien branché et que l'interrupteur Marche/Arrêt soit
réglé à Marche. Si le moteur a surchaué, laissez-le refroidir pendant 20 à 45minutes.
Conseils pour éviter de surcharger votre mélangeur:
Préparez uniquement des recettes Vitamix lorsque vous apprenez à vous servir de votre
mélangeur. Ne mélangez pas de recettes à des vitesses inférieures à celles recommandées.
Ne mélangez pas de recettes à des vitesses supérieures à celles recommandées.
Ne mélangez pas de recettes plus longtemps que le temps recommandé. Utilisez votre pilon
pour préparer des mélanges épais et faire circuler les ingrédients autour des lames.
Pilon– Les couvercles et les pilons ne sont pas interchangeables entre les diérents styles,
types et formats de récipients. Utilisez le pilon fourni avec votre mélangeur.
Le récipient ne doit pas être rempli à plus des deux tiers de sa capacité lorsque le pilon est
utilisé.
Afin d'éviter la surchauffe, n'utilisez PAS le pilon pendant plus de 30secondes consécutives.
Cadran
de vitesse
variable
Démarrer/
Arrêter
Minuterie

17
pi è c e S e t c a r ac t é r i S t i q u e S
InterrupteurMarche/Arrêt
Récipient, couvercle, prise du couvercle et pilon
• Utilisez toujours le couvercle et la prise du couvercle lorsque le
mélangeur est en marche.
• N'utilisez jamais le mélangeur sans vérifier que le couvercle est bien
verrouillé.
• La prise du couvercle comporte des marques afin de pouvoir servir de
tasse à mesurer.
• Les litres (L), les millilitres (ml), les onces (oz) et les tasses (c) sont
clairement indiqués.
• Insérez la prise du couvercle dans l'ouverture prévue à cet eet.
Verrouillez la prise du couvercle en la tournant dans le sens horaire.
Pour la retirer, tournez-la dans le sens antihoraire avant de la soulever.
• Retirez la prise du couvercle pour utiliser le pilon ou ajouter des
ingrédients.
• Les anciens récipientsVitamix (sériesC, G et S) ne fonctionneront pas
sur la base du mélangeurVenturist.
Récipient à profil bas
de 2L (64oz)
Couvercle à deux pièces
Coussinet de
positionnement
Couvercle
Prise du couvercle (en place)
MISE EN GARDE
Les lames rotatives peuvent causer des dommages.
Les couvercles et les pilons ne sont pas interchangeables entre les
diérents styles, types et formats de récipients. Utilisez le pilon et
le couvercle fournis avec votre mélangeur.
pi è c e S e t c a r ac t é r i S t i q u e S
Base pour
mélangeur
Pilon
ATTENTION
Pour éviter les brûlures potentielles, ne commencez jamais à mélanger des liquides chauds dans un grand récipient à une vitesse supérieure à 1.
La vapeur, les éclaboussures et le contenu qui s'échappent peuvent brûler. Commencez toujours à mélanger à la Variable1, puis augmentez lentement jusqu'à 10.
N'utilisez PAS votre tasse de 0,6L (20oz) ou votre bol de 225ml (8oz) pour chauer des ingrédients ou pour mélanger des liquides chauds. Les ingrédients et
les liquides chauds peuvent créer une pression interne qui risque de faire éclater la tasse et de provoquer des blessures.
N'utilisez PAS votre appareil en continue pendant plus de 75secondes avec la tasse de 0,6L (20oz) ou le bol de 225ml (8oz).
Si une tasse devient chaude au toucher, que de la vapeur s'en échappe ou que le contenu tend à sortir, arrêtez immédiatement de mélanger les ingrédients et
éteignez ou débranchez le mélangeur. Laissez la tasse et les ingrédients refroidir à la température ambiante avant de retirer la base de la lame.
Les pièces deviennent chaudes après une utilisation prolongée.
NE TOUCHEZ PAS la prise d'entraînement sur le socle du mélangeur ou la cannelure d'entraînement sur la base de lames.
Pour éviter les dommages ou les blessures corporelles, n'utilisez PAS les tasses (y compris la base de lames ou les couvercles) dans le micro-ondes.
ADVERTISSEMENT
Afin d’éviter toute blessure, NE touchez JAMAIS les pièces mobiles.
Tenez vos mains et les ustensiles éloignés des récipients et des tasses lorsque le blender fonctionne.
N’insérez PAS de doigts ou d’ustensiles près des lames pendant que celles-ci tournent.
À la fin du cycle de mélange, les lames continueront de tourner pendant quelques instants avant de
s’arrêter complètement. Veuillez attendre que les lames soient à l’arrêt avant de manipuler la base et les
tasses.
Assurez-vous que la base de lame est bien serrée dans le bol ou la tasse avant de procéder au mélange.
Si la tasse se déplace de la base de lame durant l’utilisation, ÉTEIGNEZ l’appareil et attendez que le moteur
et les lames parviennent à un arrêt complet avant de tenter de retirer la tasse et la base de lame du socle-
moteur.

18
mé l a n g e r
1. L'interrupteurMarche/Arrêt se trouve sur le côté droit du socle du mélangeur. Mettez l'interrupteur en positionMarche (I).
2. Remplissez votre récipient selon votre recette ou l'ordre de remplissage illustré ici. Remarque: Les ingrédients des recettes pour les tasses doivent être insérés dans l'ordre inverse
de celle pour les grands récipients. NE mélangez PAS de liquides chauds dans la tasse de 0,6L (20oz) ou le bol de 225ml (8oz).
Remplissage des grands récipients
Liquides
Ingrédients secs
Légumes-feuilles
Fruits et légumes
Glace et
ingrédients
surgelés
IMPORTANT! Utilisez toujours le couvercle et la prise du couvercle sur le grand récipient lorsque l'appareil fonctionne. N'utilisez
jamais le mélangeur sans vérifier que le couvercle et la prise du couvercle sont bien verrouillés.
3. Eectuez une des opérations suivantes:
Remplissage de la tasse de 0,6L (20onces)
Liquides
NE mélangez PAS des
liquides chauds!
Ingrédients secs
Légumes-feuilles
Fruits et légumes
Glace et
ingrédients
surgelés
• Grands récipients– Placez le couvercle sur le récipient. Abaissez le couvercle jusqu'à ce que les deux
onglets se referment sur le rebord du récipient. Insérez la prise du couvercle. Tournez la prise du
couvercle dans le sens horaire pour la verrouiller.
• Tasse de 0,6L (20oz) ou bol de 225ml (8oz)–
a. Placez un joint d'étanchéité sur le fil inférieur de la base de lames. Le joint devrait bien s'ajuster
autour du fil.
b. Vissez la base de lames sur la tasse en tournant dans le sens horaire. Serrez fermement la base de
lame sur la tasse ou le bol avant de procéder au mélange.
Si la base de lame ne reconnaît pas la tasse ou le bol, serrez la base de lame plus
profondément dans la tasse ou le bol et replacez-la sur le socle-moteur. Si le problème
persiste, communiquez avec le Service à la clientèle de Vitamix pour obtenir de l’aide.
4. Placez le récipient (ou la tasse et la base de lames) sur le socle du mélangeur. L'écran ache «0:00»
lorsqu'un récipient ou une tasse est détectée et que le mélangeur est opérationnel.
5. Pour utiliser la vitesse variable:
a. Réglez le cadran de vitesse variable à 1.
b. Appuyez sur le bouton Démarrer/Arrêter. Les lames commenceront à tourner et la minuterie
comptera la durée du mélange en minutes et en secondes. Pour régler la durée du mélange, utilisez
les icônes+/- des commandes.
c. Faites tourner le cadran de vitesse variable de1 à 10pendant le cycle du mélangeur afin d'augmenter
ou de diminuer la vitesse des lames.
d. À la fin du cycle, faites tourner le cadran de vitesse variable dans le sens antihoraire jusqu'à 1, puis
appuyez sur le boutonDémarrer/Arrêter.
ADVERTISSEMENT
6. Si le mélange cesse de bouger:
• Grands récipients– Insérez le pilon par la prise du couvercle et remuez jusqu'à ce que l'air s'échappe. Si cette méthode ne fonctionne pas, appuyez sur l'interrupteurMarche/
Arrêt pour arrêter le moteur. Retirez le récipient du socle du mélangeur et utilisez une spatule de caoutchouc pour faire éclater la bulle d'air autour des lames. Ajoutez du
liquide, au besoin. Replacer le couvercle et la prise du couvercle. Remettez le récipient sur le socle du mélangeur et continuez à mélanger.
• Tasse de 0,6L (20oz) ou bol de 225ml (8oz)– Appuyez sur l'interrupteurMarche/Arrêt pour arrêter le moteur. Attendez que les lames arrêtent de tourner. Retirez la tasse et
la base de lames du socle du mélangeur. Retournez la tasse. Dévissez la base de lames de la tasse. Remuez les ingrédients. Ajoutez du liquide, au besoin. Revissez la base de
lames, placez-la sur le socle du mélangeur et continuez à mélanger.
7. Après le mélange, attendez que les lames s'arrêtent complètement avant de retirer le couvercle, le récipient ou la tasse du socle du mélangeur.
8. Au besoin, utilisez le racloir à lame pour enlever la salsa, la gelée, la confiture, le beurre d'arachides ou d'autres ingrédients épais de sous les lames, uniquement après avoir éteint
le mélangeur et retiré le récipient du socle-moteur.
Afin d'éviter toute blessure, NE touchez JAMAIS les pièces mobiles.
Tenez vos mains et les ustensiles éloignés des récipients et des tasses lorsque le blender fonctionne.
N'insérez PAS de doigts ou d'ustensiles près des lames pendant que celles-ci tournent.
À la fin du cycle de mélange, les lames continueront de tourner pendant quelques instants avant de s'arrêter complètement. Veuillez
attendre que les lames soient à l'arrêt avant de manipuler la base et les tasses.
Si la tasse se déplace de la base de lame durant l'utilisation, ÉTEIGNEZ l'appareil et attendez que le moteur et les lames parviennent à
un arrêt complet avant de tenter de retirer la tasse et la base de lame du socle-moteur.

19
en t r e t i e n e t n e t toyag e
Nettoyage en place : [Tasse de 20 oz (0,6 L) ou récipient de 8 oz (225 ml)]
1. Remplissez à moitié le bol avec de l’eau et ajoutez-y quelques gouttes de liquide vaisselle.
N’INSÉREZ PAS D’EAU CHAUDE DANS LE BLENDER.
2. Placez un joint sur le filetage au bas du socle du couteau. Le joint doit être installé uniformément
autour du filetage. Vissez le socle du couteau sur la tasse dans le sens horaire jusqu’à ce qu’il soit
susamment serré.
3. Placez la tasse et le socle du couteau sur la base.
4. Appuyez sur Start/Stop (Démarrer/Arrêter). Augmentez progressivement la vitesse variable
jusqu’au niveau 10.
5. Laissez tourner l’appareil pendant 30 à 60 secondes.
6. Alignez de nouveau le repère de vitesse variable sur la vitesse variable 1. Appuyez sur Start/Stop
(Démarrer/Arrêter).
7. Rincez et égouttez toutes les pièces.
Pour désinfecter : (Eau de Javel) [Tasse de 20 oz (0,6 L) ou récipient de 8 oz (225 ml)]
1. Suivez les instructions de nettoyage ci-dessus.
2. Remplissez à moitié le bol avec de l’eau et une cuillerée à thé et demie d’eau de Javel.
N’INSÉREZ PAS D’EAU CHAUDE DANS LE BLENDER.
3. Placez un joint sur le filetage au bas du socle du couteau. Le joint doit être installé uniformément
autour du filetage. Vissez le socle du couteau sur la tasse dans le sens horaire jusqu’à ce qu’il soit
susamment serré.
4. Placez la tasse et le socle du couteau sur la base.
5. Assurez-vous de régler le cadran de vitesse variable à 1.
6. Appuyez sur Démarrer/Arrêter.
7. Augmentez la vitesse graduellement jusqu’à la Variable10.
8. Faites fonctionner l’appareil pendant 30à 60secondes.
9. Alignez de nouveau le repère de vitesse variable sur la vitesse variable 1.
10. Laissez reposer le mélange dans le bol pendant 1minute ½ supplémentaire.
11. Videz le mélange javellisé. Laissez sécher le bol à l’air libre. Ne rincez pas après désinfection.
Pour désinfecter la tasse de 20 oz (0,6 L) ou le récipient de 8 oz (225 ml) avec du vinaigre (acidité
minimale de 5 %) :
Remarque : Si l’acidité est plus importante, la quantité d’eau peut être augmentée pour obtenir
une solution minimale de 2,5%. Par exemple, pour obtenir 10% d’acidité, utilisez 1 volume de
vinaigre et 3 d’eau.
1. Suivez les instructions de nettoyage ci-dessus.
2. Remplissez le récipient de 5oz (0,15L) d’eau et 5oz (0,15L) de vinaigre blanc (2 oz [0,06L] d’eau
et 2oz [0,06L] de vinaigre blanc). N’INSÉREZ PAS D’EAU CHAUDE DANS LE BLENDER.
3. Placez un joint sur le filetage au bas du socle du couteau. Le joint doit être installé uniformément
autour du filetage. Vissez le socle du couteau sur la tasse dans le sens horaire jusqu’à ce qu’il soit
susamment serré. Placez la tasse et le socle du couteau sur la base.
4. Vitesse variable:
a. Assurez-vous de régler le cadran de vitesse variable à 1.
b. Appuyez sur Démarrer/Arrêter.
c. Augmentez la vitesse graduellement jusqu’à la Variable10.
d. Faites fonctionner l’appareil pendant 30à 60secondes.
e. Alignez de nouveau le repère de vitesse variable sur la vitesse variable 1.
5. Laissez reposer le mélange dans le récipient pendant 4minutes supplémentaires (5minutes de
contact au total).
6. Videz le mélange au vinaigre. Laissez sécher le bol à l’air libre. Ne rincez pas après désinfection.
AVERTISSEMENT
Risque d’électrocution.
Débranchez toujours le blender avant de nettoyer sa base ou lorsque l’appareil n’est pas utilisé.
N’immergez pas la base du blender dans l’eau ou dans tout autre liquide.
Le non-respect des instructions fournies peut provoquer un risque d’électrocution, voire la mort.
AVERTISSEMENT
Pour éviter toute blessure ou tout dommage.
Pour éviter une activation accidentelle, éteignez et débranchez le blender avant de le nettoyer.
AVANT LA PREMIÈRE UTILISATION :
1. Essuyez la base avec un chion humide tiède puis nettoyez-la avec un chion sec et doux.
Lavez le récipient, les tasses, les couvercles, le bouchon couvercle et le pilon avec de l’eau
chaude savonneuse. Rincez toutes les pièces. Essuyez avec un chion sec et doux.
2. Choisissez un espace sur le comptoir qui soit plane, sec et propre. Branchez le blender dans
une prise à 3 broches mise à la terre.
Remarque : Votre récipient Vitamix est conçu pour être entièrement nettoyable sans avoir
àenlever l’ensemble composé de l’écrou de retenue et des couteaux. NE tentez PAS de retirer
l’ensemble composé de l’écrou de retenue et des couteaux du récipient. Nos procédures
normales de nettoyage et de désinfection ou un cycle de lavage au lave-vaisselle assureront un
nettoyage complet et minutieux de votre récipient et de ses composants. Si votre récipient est
endommagé, ne l’utilisez pas. Contactez immédiatement le service client Vitamix.
Entretien et nettoyage des grands récipients :
Pour nettoyer :
1. Remplissez le récipient à moitié plein avec de l’eau chaude et ajoutez quelques gouttes de
liquide vaisselle.
2. Refermez ou poussez le couvercle en 2parties (avec son bouchon) en position verrouillée.
3. Vitesse variable:
a. Assurez-vous de régler le cadran de vitesse variable à 1.
b. Appuyez sur Démarrer/Arrêter.
c. Augmentez la vitesse graduellement jusqu’à la Variable10.
d. Faites fonctionner l’appareil pendant 30à 60secondes.
e. Alignez de nouveau le repère de vitesse variable sur la vitesse variable 1.
4. Rincez et égouttez toutes les pièces.
Pour désinfecter : (Eau de Javel) (Récipients de grand format)
1. Suivez les instructions de nettoyage ci-dessus.
2. Remplissez à moitié le récipient avec de l’eau et une cuillerée à café et demie d’eau de Javel.
3. Refermez ou poussez le couvercle en 2parties (avec son bouchon) en position verrouillée.
4. Vitesse variable:
a. Assurez-vous de régler le cadran de vitesse variable à 1.
b. Appuyez sur Démarrer/Arrêter.
c. Augmentez la vitesse graduellement jusqu’à la Variable10.
d. Faites fonctionner l’appareil pendant 30à 60secondes.
e. Alignez de nouveau le repère de vitesse variable sur la vitesse variable 1.
5. Laissez reposer le mélange dans le bol pendant 1minute ½ supplémentaire.
6. Videz le mélange javellisé. Laissez sécher le bol à l’air libre. Ne rincez pas après désinfection.
Pour désinfecter : (Vinaigre) (Récipients de grand format)
1. Suivez les instructions de nettoyage ci-dessus.
2. Préparez la solution au vinaigre: Pour le récipient de 64 onces (2L), diluez 16 onces
(473ml) de vinaigre dans 16 onces (473ml) d’eau.
3. Refermez ou poussez le couvercle en 2parties (avec son bouchon) en position verrouillée.
4. Vitesse variable:
a. Assurez-vous de régler le cadran de vitesse variable à 1.
b. Appuyez sur Démarrer/Arrêter.
c. Augmentez la vitesse graduellement jusqu’à la Variable10.
d. Faites fonctionner l’appareil pendant 30à 60secondes.
e. Alignez de nouveau le repère de vitesse variable sur la vitesse variable 1.
5. Laissez le mélange reposer dans le récipient pendant 3 minutes complètes
supplémentaires. Le temps total de contact de la solution au vinaigre dans le récipient doit
être égal à 5minutes.
6. Videz la solution au vinaigre hors du récipient sur l’intérieur de la surface du couvercle en
2parties. Renouvelez la procédure de désinfection une deuxième fois.
7. Laissez le récipient et le couvercle sécher à l’air libre. Ne rincez pas après désinfection.
Sinécessaire, rincez immédiatement avant l’utilisation suivante.
Couvercles, bouchon du couvercle, bague de centrage et pilon
Les pièces vont au lave-vaisselle. Si vous préférez, vous pouvez laver les pièces à l’eau
savonneuse. Rincez bien à l’eau courante, puis séchez.
Base du blender
1. Éteignez et débranchez le blender.
2. Lavez la partie externe avec une éponge ou un chion doux humide, rincé avec une solution
légère de liquide vaisselle et d’eau chaude. N’immergez pas la base du moteur dans l’eau.
Vous pouvez retirer le tampon de centrage pour un nettoyage plus méticuleux.
3. Séchez immédiatement toutes les surfaces et essuyez-les avec un chion doux.

20
ensemble) comporte une défaillance attribuable à un défaut matériel, de fabrication ou à l'usure due à un usage domestique normal dans les 10années
suivant la date d'achat, Vitamix réparera sans frais le mélangeur ou la composante défectueuse dans les 30jours suivant la réception du produit retourné.
Si, à la seule discrétion de Vitamix, la composante ou le mélangeur défectueux ne peut être réparé, Vitamix choisira A) de remplacer le mélangeur gratuitement,
ou B) de rembourser le prix d'achat intégral au propriétaire, à moins que Vitamix ne reçoive un avis écrit préalable à propos de la préférence du propriétaire.
4. CE QUI N'EST PAS COUVERT.
Cette garantie ne s'applique pas aux mélangeurs qui ont été utilisés pour des applications commerciales ou usages autres que domestiques. Elle ne couvre
pas les changements d'ordre esthétique qui n'aectent pas la performance tels que la décoloration, les eets de l'utilisation d'abrasifs ou de nettoyants, ou
des accumulations de nourriture. Cette garantie n'est valable que si le mélangeur est utilisé et entretenu conformément aux directives, aux mises en garde et
aux mesures de sécurité contenues dans le guide d'utilisation.
Récipients: Broyer certaines herbes et épices dans le récipient ou la tasse peut causer des rayures esthétiques sur le récipient ou la tasse et provoquer
l'usure prématurée des lames. Des traces de sable et d'herbes grossières, granuleuses et abrasives provoqueront également l'usure prématurée des
lames. Les herbes peuvent contenir des huiles volatiles et, puisque le récipient et la tasse peuvent retenir les huiles, celles-ci peuvent entraîner une
décoloration permanente.
Vitamix ne sera pas responsable du coût de toutes réparations non autorisées.
LA RÉPARATION, LE REMPLACEMENT OU LE REMBOURSEMENT DU PRIX D'ACHAT DE L'APPAREIL CONSTITUENT LES RECOURS EXCLUSIFS DE
L'ACHETEUR ET LA SEULE RESPONSABILITÉ DE VITAMIX SOUS CETTE GARANTIE. AUCUN EMPLOYÉ OU REPRÉSENTANT DE VITAMIX N'EST AUTORISÉ
À OFFRIR UNE GARANTIE SUPPLÉMENTAIRE OU À APPORTER UNE MODIFICATION À LA PRÉSENTE GARANTIE QUI POURRAIT ENGAGER VITAMIX.
PAR CONSÉQUENT, L'ACHETEUR NE DOIT SE FIER À AUCUNE AUTRE DÉCLARATION FAITE PAR UN EMPLOYÉ OU UN REPRÉSENTANT DE VITAMIX.
EN AUCUN CAS, QUE CE SOIT EN RAISON D'UN CONTRAT, D'UNE INDEMNITÉ, D'UNE GARANTIE, D'UN DÉLIT (NOTAMMENT LA NÉGLIGENCE), D'UNE
RESPONSABILITÉ ABSOLUE OU AUTRE, VITAMIX NE POURRA ÊTRE RESPONSABLE DE DOMMAGES PARTICULIERS, INDIRECTS, ACCIDENTELS OU
IMMATÉRIELS, NOTAMMENT, MAIS SANS S'Y LIMITER, LA PERTE D'UN PROFIT OU D'UN REVENU.
Certains États ne permettent pas les restrictions sur les garanties. Dans ces États, les restrictions susmentionnées pourraient ne pas s'appliquer à vous. À
l'extérieur des États-Unis et du Canada, d'autres garanties peuvent s'appliquer.
5. CE QUI ANNULE CETTE GARANTIE.
L'utilisation abusive, inappropriée ou négligente, l'altération du mélangeur, l'exposition à des conditions anormales ou extrêmes et le non-respect des
directives d'utilisation contenues dans ce guide annulent la présente garantie.
La présente garantie s'annule également si des réparations sont eectuées sur le mélangeur ou l'une de ses composantes par une autre personne ou entité
que Vitamix ou un fournisseur de service autorisé par Vitamix, ou si une composante du mélangeur couverte par cette garantie est utilisée en combinaison
avec un socle de mélangeur ou un récipient qui n'est pas expressément autorisé par Vitamix.
6. COMMENT OBTENIR UNE AUTORISATION DE RETOUR EN VERTU DE CETTE GARANTIE.
Si vous avez besoin d'un service ou d'une réparation, veuillez téléphoner au service à la clientèle Vitamix au 1800848-2649 ou au 1440235-4840. Vous
devrez fournir une date d'achat ainsi qu'une preuve d'achat pour tout mélangeur qui n'a pas été enregistré auprès de Vitamix. Pour les mélangeurs couverts
par la présente garantie, vous recevrez un numéro d'autorisation de retour, des instructions d'expédition à jour et une étiquette de retour prépayée. Vitamix
paiera les coûts d'expédition standards du retour d'un mélangeur pour les services et les réparations sous garantie, ainsi que pour le renvoi du mélangeur au
propriétaire après la réparation ou le remplacement. L'acheteur est responsable des coûts pour les requêtes d'expédition spéciales.
Aux États-Unis et au Canada, la présente garantie est directement honorée par Vita-Mix Corporation.
États-Unis Canada
Vita-Mix Corporation Vita-Mix Corporation
8615 Usher Road 200-1701 Shepherd Street East
Cleveland, Ohio 44138-2199 Windsor (Ontario)N8Y4Y5
1800848-2649 1800848-2649
service@vitamix.com service@vitamix.com
Il sera considéré que vous avez accepté le produit retourné «tel quel» lors de la livraison, sauf si vous informez Vitamix de tout problème, y compris les
dommages causés lors de l'expédition, dans les 48heures suivant la livraison.
Garantie complète de l'appareil de 10ans
1. ENREGISTREMENT DU PRODUIT.
Vita-Mix Corporation («Vitamix») vous encourage fortement à enregistrer votre achat en remplissant et en retournant la carte d'enregistrement du produit
qui accompagne ce mélangeur. Vous pouvez enregistrer votre produit en ligne à vitamix.com/garantie ou en communiquant avec notre service à la clientèle
au 1800848-2649 ou au 1440235-4840. Ne pas enregistrer l'achat de votre produit ne restreint pas vos droits relatifs à la garantie. Par contre, enregistrer
votre achat permettra à Vitamix de vous orir un meilleur service à la clientèle et de mieux répondre à tous vos besoins.
2. PERSONNES POUVANT BÉNÉFICIER DE LA COUVERTURE DE CETTE GARANTIE.
La présente garantie est oerte par Vitamix au propriétaire de ce mélangeur et s'applique uniquement à un usage domestique personnel. Cette garantie ne
s'applique pas aux produits utilisés à des fins commerciales, de location ou de revente. S'il y a un changement de propriétaire du mélangeur au cours de la
période de 10ans, veuillez mettre à jour les renseignements du propriétaire de l'appareil à vitamix.com.
3. CE QUI EST COUVERT.
Vitamix garantit au propriétaire que si ce mélangeur (un « mélangeur » consiste en un socle-moteur et tous récipients, couvercles et pilons achetés
ga r a n t i e e t S e r v i c e
La page est en cours de chargement...
La page est en cours de chargement...
La page est en cours de chargement...
La page est en cours de chargement...
La page est en cours de chargement...
La page est en cours de chargement...
La page est en cours de chargement...
La page est en cours de chargement...
La page est en cours de chargement...
La page est en cours de chargement...
La page est en cours de chargement...
La page est en cours de chargement...
La page est en cours de chargement...
La page est en cours de chargement...
La page est en cours de chargement...
La page est en cours de chargement...
-
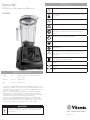 1
1
-
 2
2
-
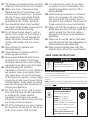 3
3
-
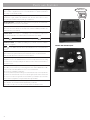 4
4
-
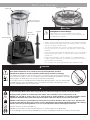 5
5
-
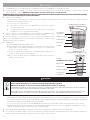 6
6
-
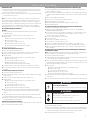 7
7
-
 8
8
-
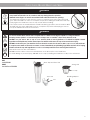 9
9
-
 10
10
-
 11
11
-
 12
12
-
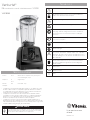 13
13
-
 14
14
-
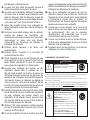 15
15
-
 16
16
-
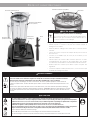 17
17
-
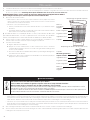 18
18
-
 19
19
-
 20
20
-
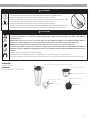 21
21
-
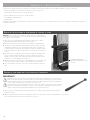 22
22
-
 23
23
-
 24
24
-
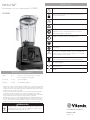 25
25
-
 26
26
-
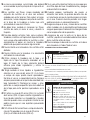 27
27
-
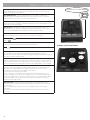 28
28
-
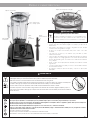 29
29
-
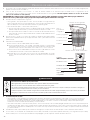 30
30
-
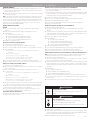 31
31
-
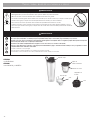 32
32
-
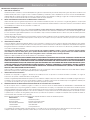 33
33
-
 34
34
-
 35
35
-
 36
36


Vitamix VM0185B Manuel utilisateur
- Catégorie
- Mélangeurs
- Taper
- Manuel utilisateur
dans d''autres langues
- English: Vitamix VM0185B User manual
- español: Vitamix VM0185B Manual de usuario
- português: Vitamix VM0185B Manual do usuário
Documents connexes
-
Vitamix Venturist V1200/Certified Reconditioned Venturist V1200 Le manuel du propriétaire
-
Vitamix VM0185 Le manuel du propriétaire
-
Vitamix A3300 Manuel utilisateur
-
-
Vitamix A3500 Le manuel du propriétaire
-
-
-
-
-