PROPOINT 9075300 Le manuel du propriétaire
- Catégorie
- Coupe-bordures
- Taper
- Le manuel du propriétaire

V1.0 9075300
Please read and understand all instructions before use. Retain this manual for future reference.
DISC SANDER
12 IN.

This page is intentionally left blank.

SPECIFICATIONS
Voltage Rating 120V AC
Amperage Rating 8A
Frequency Rating 60Hz
Phase 1
Horsepower 1.2 HP
Disc Size 12 in.
No Load Speed 1,725 RPM
Switch Type Model HY7
Weight 66 lb
INTRODUCTION
The disc sander is ideal for small sanding projects. Perfect for the
DIYer or professional woodworker. It features an angle-adjustable work
table, a mitre gauge, a built-in dust-collection port and a removeable
safety switch.
SAFETY
WARNING! Read and understand all instructions before
using this tool. The operator must follow basic precautions
to reduce the risk of personal injury and/or damage to the
equipment.
HAZARD DEFINITIONS
Please familiarize yourself with the hazard notices found in this manual.
A notice is an alert that there is a possibility of property damage, injury
or death if certain instructions are not followed.
DANGER! This notice indicates an immediate and specific hazard that will
result in severe personal injury or death if the proper precautions
are not taken.
WARNING! This notice indicates a specific hazard or unsafe practice that could
result in a serious injury if the proper precautions are not taken.
CAUTION! This notice indicates a potentially hazardous situation that may
result in minor or moderate injury if proper practices are not taken.
V1.0 DISC SANDER 9075300
Page 3 Assistance available at www.princessauto.com or 1-800-665-8685

NOTICE! This notice indicates that a specific hazard or unsafe practice will
result in equipment or property damage, but not personal injury.
WORK AREA
1. Operate in a safe work environment. Keep your work area clean,
well-lit and free of distractions. Place lights so you are not working
in a shadow.
2. Keep anyone not wearing the appropriate safety equipment away
from the work area.
3. Store unused tools properly in a dry, safe and secure location to
prevent rust, damage or misuse.
4. Do not install or use in the presence of flammable gases, dust or
liquids.
PERSONAL SAFETY
WARNING! Wear personal protective equipment approved
by the Canadian Standards Association (CSA) or American
National Standards Institute (ANSI).
PERSONAL PROTECTIVE EQUIPMENT
1. Always wear impact safety goggles that provide front and side
protection for the eyes. Eye protection equipment should comply
with CSA Z94.3-07 or ANSI Z87.1 standards based on the type of
work performed.
2. Wear the appropriate type of full-face shield in addition to safety
googles, as the work can create chips, abrasive or particulate
matter.
3. Wear protective clothing designed for the work environment and
tool.
a. Do not wear gloves when operating a tool that can snag the
material and pull the hand into the tool.
4. Non-skid footwear is recommended to maintain footing and
balance in the work environment.
5. Wear the appropriate rated dust mask or respirator. Wear a NIOSH
approved respirator when working on materials that produce
hazardous fumes, dust or particulate matter.
9075300 DISC SANDER V1.0
Assistance available at www.princessauto.com or 1-800-665-8685 Page 4

a. The dust generated while sanding certain wood species
and wood products can be injurious to your health. Always
operate your sander in a well ventilated area and provide for
proper dust removal. Dust collection systems should be used
whenever possible. Splinters, airborne debris and dust can
cause irritation, injury, and/or illness.
PERSONAL PRECAUTIONS
Control the tool, personal movement and the work environment to avoid
personal injury or damage to tool.
1. Do not operate any tool when tired or under the influence of drugs,
alcohol or medications.
2. Avoid wearing clothes or jewelry that can become entangled with
the moving parts of a tool. Keep long hair covered or bound.
3. Do not overreach when operating a tool. Proper footing and
balance enables better control in unexpected situations.
SPECIFIC SAFETY
WARNING! DO NOT let comfort or familiarity with product
(gained from repeated use) replace strict adherence to the
tool safety rules. If you use this tool unsafely or incorrectly,
you can suffer serious personal injury.
WARNING! Some surfaces contain materials which can
be toxic. When working on materials that may contain
lead, asbestos, copper chromium arsenate or other toxic
materials, extra care should be taken to avoid inhalation and
minimize skin contact.
1. Use the correct tool for the job. This tool was designed for a
specific function. Do not modify or alter this tool or use it for an
unintended purpose.
2. The sanding disc is active when power is applied. Keep hands and
fingers away from the sanding area. Any body part coming into
contact with the tool's moving parts could cause an injury.
3. Only sand one workpiece at a time.
4. Remove any debris between the disc and work table before
operating the tool.
V1.0 DISC SANDER 9075300
Page 5 Assistance available at www.princessauto.com or 1-800-665-8685

5. Do not sand workpieces that are too small, too large or awkward to
hold with this tool.
6. You must clean all sawdust from the tool, including the dust port,
before sanding metal. Sparks can ignite any sawdust left in the
tool.
POWER TOOL PRECAUTIONS
1. Do not use any power tool with a malfunctioning power switch
or control. A power tool that fails to respond to the controls is
dangerous and can cause an injury. A qualified technician must
repair and verify the power tool is operating correctly, before it can
be used.
2. Shut the power off and disconnect the disc sander from the power
supply (if possible) before making any adjustments, changing
accessories, cleaning, servicing or when storing. Such preventive
safety measures reduce the risk of starting the tool accidentally.
3. Never force the tool. Excessive pressure could damage to the tool,
your workpiece or cause serious personal injury. If the disc sander
runs smoothly under no load, but does not run smoothly under
load, then excessive pressure is being used.
4. Check if the disc sander's moving parts are misaligned or binding
before each use. Correct the issue before using the disc sander to
avoid an injury or damage to the tool.
5. Always be aware of the position of your hands relative to the disc
sander. Avoid awkward hand positions where a sudden slip could
cause a hand to move into the sanding disc. Never reach behind or
beneath the disc sander.
6. Only use accessories that are specifically designed for use with
the disc sander. Ensure the sanding disc is tightly installed.
7. Only use a sanding disc that exceeds the Speed rating (see
Specifications).
8. Before using the disc sander on a workpiece, test the disc sander
by running it at the highest speed rating for at least 30 seconds in
a safe position. Stop immediately if there is any abnormal vibration
or wobbling. Check the tool to determine the cause.
9075300 DISC SANDER V1.0
Assistance available at www.princessauto.com or 1-800-665-8685 Page 6

9. Never touch the sanding disc or workpiece during or immediately
after use. They may be hot and could inflict a burn injury.
10. The material and the motor housing can get very hot during
operation. Stop work until the tool cools down to a safe
temperature.
11. Do not cover the air vents. Proper cooling of the motor is
necessary to ensure normal life of the tool.
12. Never use a tool with a sanding disc that is cracked or worn.
Change the sanding disc before using it.
ELECTRICAL SAFETY
WARNING! Do not touch or handle a live tool with any
part of your body that is wet or damp. Wet skin reduces
resistance to electrical current, increasing the danger of a
serious or fatal shock.
WARNING! To reduce risk of electric shock, be certain that
the plug is connected to a properly grounded receptacle.
1. Do not alter any parts of the tool or accessories. All parts and
accessories are designed with built-in safety features that may be
compromised if altered.
2. Protect yourself against electric shocks when working on electrical
equipment. Avoid body contact with grounded surfaces. There is
an increased chance of electrical shock if your body is grounded.
3. Do not expose the disc sander to rain, snow, frost or any other
damp or wet conditions. Water entering a tool will increase the risk
of electric shock.
4. In the event of a power failure, turn off or unplug the machine
as soon as the power is interrupted. The possibility of accidental
injury could occur if the power returns and the unit is not switched
off.
5. Make certain the power source conforms to requirements of your
equipment (see Specifications).
6. This tool is only for use on 120 V (single phase) and is equipped
with a three-prong grounded power supply cord and plug. Check
with a qualified electrician if you are in doubt as to whether
V1.0 DISC SANDER 9075300
Page 7 Assistance available at www.princessauto.com or 1-800-665-8685

the outlet is properly grounded. If the tool should electronically
malfunction or break down, grounding provides a low resistance
path to carry electricity away from the user.
a. Never remove the grounding prong or modify the plug in any
way, as this will render the tool unsafe.
b. Do not use any adapter plugs.
POWER CORD SAFETY
1. Insert the power cord plug directly to the power supply whenever
possible. Use extension cords or surge protectors only when the
tool's power cord cannot reach a power supply from the work area.
a. When operating a tool outside, use an outdoor extension cord
marked W-A or W. These cords are rated for outdoor use and
reduce the risk of electric shock.
b. Use in conjunction with a Ground Fault Circuit Interrupter
(GFCI). It is recommended that the GFCI should have a rated
residual current of 30 mA or less.
2. Do not operate this tool if the power cord is frayed, damaged
or poorly spliced, as an electric shock may occur, resulting in
personal injury or property damage.
3. Discontinue use if a power cord feels more than comfortably warm
while operating the tool.
4. Keep all connections dry and off the ground to reduce the risk of
electric shock. Do not touch the plug or wiring with wet hands.
5. Prevent damage to the power cord by observing the following:
a. Place the power cord in a position that prevents it from coming
into contact with the tool or getting caught by the workpiece.
The cord should always stay behind the tool.
b. Do not pull on the cord to disconnect the plug from an outlet.
c. Keep the cord away from heat, oil, sharp edges or moving
parts.
6. Position the cord so it is not be stepped on, tripped over or
otherwise subjected to damage or stress.
7. Do not wrap the cord around the tool, as sharp edges may cut
insulation or cause cracks if wound too tight. Gently coil cord and
9075300 DISC SANDER V1.0
Assistance available at www.princessauto.com or 1-800-665-8685 Page 8

either hang on a hook or fasten with a device to keep cord together
during storage.
KICKBACK PRECAUTIONS
Kickback is a sudden reaction when a sanding disc snags or is caught
on the material. If kickback occurs:
•The sanding disc may contact a body part, causing a serious injury
• The material can be ejected and inflict a serious injury on the user
or a bystander.
•Kickback can also damage the tool or workpiece.
Kickback can be avoided by taking proper precautions:
1. Maintain a firm grip on the material and position your body and
arms to allow you to resist a kickback. Kickback can propel the
material in the direction of the disc sander's rotation.
a. Use a clamp to hold the material if the tool includes a
clamping system.
2. Only use a sanding disc designed for the tool.
3. Maintain control of a long workpiece or large panel by placing
supports under the material on either side of the disc sander.
UNPACKING
WARNING! Do not operate the tool if any part is missing.
Replace the missing part before operating. Failure to do so
could result in a malfunction and personal injury.
Remove the parts and accessories from the packaging and inspect for
damage.
Contents:
• Disc Sander • Sanding Discs • Mitre Gauge
V1.0 DISC SANDER 9075300
Page 9 Assistance available at www.princessauto.com or 1-800-665-8685

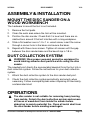
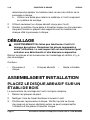
ASSEMBLY & INSTALLATION
MOUNT THE DISC SANDER ON A
WOOD WORKBENCH
The hardware to mount the tool is not included.
1. Remove the foot pads.
2. Clean the work area where the tool will be mounted.
3. Position the disc sander. Check that it is level and there are no
obstructions around it that will interfere with a long workpiece.
4. Slide a flat washer over a 1/4 x 1 in. wood screw, insert the screw
through a corner hole in the base and secure the base.
5. Repeat with three more screws. Tighten all screws until the gap
between the disc sander base and the bench top is 1/8 in.
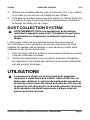
DUST COLLECTION SYSTEM
WARNING! Wear proper personal protective equipment to
avoid inhaling airborne dust particles while using the disc
sander.
The sawdust port directs the accumulated sawdust from the tool into a
dust collection system. Follow the instructions for your dust collection
system.
1. Attach the dust collection system to the disc sander dust port.
2. Check the dust collection system periodically and empty when
necessary. Follow municipal bylaws when disposing of chemically-
contaminated dust.
OPERATIONS
The disc sander is not suitable for removing heavy burring
from metals. Detach the dust collection system and remove
all traces of wood dust from inside the sander before
deburring to avoid a potential fire. Clean all metal dust from
the disc sander before sanding wood again.
9075300 DISC SANDER V1.0
Assistance available at www.princessauto.com or 1-800-665-8685 Page 10

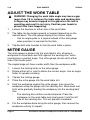
ADJUST THE WORK TABLE
WARNING! Changing the work table angle may leave a gap
larger than 1/8 in. between the table edge and sanding disc.
A finger may become trapped in this gap when the tool is
operating and result in an injury. Position your hands to
prevent this from happening.
1. Loosen the handles on either side of the work table.
2. The table can be angled upward or lowered depending on the
desired bevel. The side gauge displays the chosen angle.
• Use an angle guide or a square instead of the side gauge
when precision is required for the task.
3. Tighten both side handles to lock the work table in place.
MITRE GAUGE
The mitre gauge is placed into the work table’s slot, allowing a
workpiece to move back and forth against the sanding disc, while
maintaining a constant angle. The mitre gauge can be set to either
side of the center point.
The angled edge will have a wider width than the workpiece width.
1. Loosen the locking knob on the mitre gauge.
2. Rotate either left or right to obtain the correct angle. Use an angle
finder for greater accuracy.
3. Tighten the locking gauge.
4. Place the mitre gauge into the work table slot.
5. Hold the workpiece against the mitre gauge, then move the
workpiece along the gauge into the sanding disc. Move back and
forth while gradually feeding the workpiece into the sanding belt/
disc.
• The sanding disc rotates counterclockwise. Place the
workpiece on the work table and slowly push it into the left
side of the sanding disc. This will prevent a kickback.
6. Pull the workpiece back along the mitre gauge, then remove the
workpiece entirely to inspect.
V1.0 DISC SANDER 9075300
Page 11 Assistance available at www.princessauto.com or 1-800-665-8685

7. Use the mitre gauge with small workpieces to better retain control
while sanding.
MANUAL BRAKE
Press the manual brake down to stop the sanding
wheel quickly. Only use the manual brake when
the motor is turned off.
SANDING
1. Check that the work surface is free from
debris before sanding.
2. Start the disc sander and allow it to attain full speed.
3. The sanding disc rotates counterclockwise. Place the workpiece
on the work table and slowly push it into the left side of the
sanding disc. This will prevent a kickback.
4. Keep the material in motion. Pausing in one spot will allow the
sander to eat into the work, creating an uneven surface.
5. Move towards the sanding disc’s outer edge to remove more
material and closer to the center to remove less material.
6. Sand outer curves on the sanding disc, using the work table as
support.
7. Switch the tool OFF once the current task is complete.
CARE & MAINTENANCE
1. Maintain the tool with care. A tool in good condition is efficient,
easier to control and will have fewer problems.
2. Inspect the tool components periodically. Repair or replace
damaged or worn components.. Only use identical replacement
parts when servicing.
3. Only use accessories intended for use with this tool. Follow
instructions for changing accessories.
4. Keep the tool handles or gripping surfaces clean and dry.
Figure 1.
9075300 DISC SANDER V1.0
Assistance available at www.princessauto.com or 1-800-665-8685 Page 12

5. Maintain the tool’s labels and name plates. These carry important
information. If unreadable or missing, contact Princess Auto Ltd.
for replacements.
WARNING! Only qualified service personnel should repair
the tool. An improperly repaired tool may present a hazard
to the user and/or others.
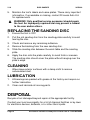
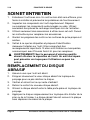
REPLACING THE SANDING DISC
1. Ensure the tool is OFF.
2. Pull the old sanding disc from the sanding plate carefully to avoid
tearing the disc.
3. Check and remove any remaining adhesive.
4. Remove the backing from the new sanding disc.
5. Slide the sanding disc between the work table and the sanding
plate.
6. Apply the disc onto the plate carefully to avoid folds or creases.
The sanding disc should cover the plate without hanging over the
plate’s edge.
CLEANING
• Wipe down exterior surfaces with a damp cloth to remove
accumulated dust.
LUBRICATION
1. All bearings are packed with grease at the factory and require no
further lubrication.
2. Clean and lubricate all moving parts.
DISPOSAL
Recycle a tool damaged beyond repair at the appropriate facility.
Contact your local municipality for a list of disposal facilities or by-laws
for electronic devices, batteries, oil or other toxic liquids.
V1.0 DISC SANDER 9075300
Page 13 Assistance available at www.princessauto.com or 1-800-665-8685

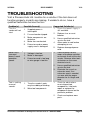
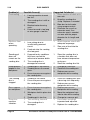
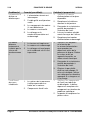
TROUBLESHOOTING
Visit a Princess Auto Ltd. location for a solution if the tool does not
function properly or parts are missing. If unable to do so, have a
qualified technician service the tool.
Problem(s) Possible Cause(s) Suggested Solution(s)
The disc
sander will not
start.
1. Supplied power is
interrupted.
2. Fuse or breaker tripped.
3. Motor components are
defective.
4. Motor has overheated.
5. Extension cord or power
supply cord is damaged.
1. Check that power supply is
still available.
2. Replace fuse or reset
breaker.
3. Have a qualified technician
service the tool.
4. Allow motor to cool before
attempting to use.
5. Replace damaged power
cord.
Motor starts
slow and
doesn't reach
operation
speed.
1. Voltage is too low.
2. Motor is damaged.
3. Extension cord is too long
or wire gauge is too thin.
1. Confirm power source
amps and voltage matches
or exceeds those of the disc
sander. Remove other tools
or devices on the same
electrical circuit.
2. Have a qualified technician
service the tool.
3. Eliminate the use of an
extension cord. If an
extension cord is needed,
use one with the proper
diameter for its length and
load.
Tool is making
unusual
sounds.
1. The disc sander's parts
may be rubbing or binding.
2. Worn tool components
1. Check for obstructions
or misaligned tool
components. Lubricate,
repair or replace the
components based on the
particular problem.
2. Check and replace worn
parts.
9075300 DISC SANDER V1.0
Assistance available at www.princessauto.com or 1-800-665-8685 Page 14

Problem(s) Possible Cause(s) Suggested Solution(s)
Overheating 1. Forcing machine to work
too fast.
2. The sanding disc is dull or
damaged
3. Blocked motor housing
vents.
4. Extension cord is too long
or wire gauge is too thin.
1. Allow machine to work at its
own rate.
2. Keep the sanding disc
sharp. Replace as needed
3. Blow dust out of motor
using compressed air.
4. Eliminate the use of an
extension cord. If an
extension cord is needed,
use one with the proper
diameter for its length and
load.
Machine slows
when
operating.
1. Low voltage due to
insufficiently powered
circuit.
2. Feed rate into the sanding
disc too great.
1. Attach to power circuit with
adequate amperage.
2. Slow rate of feed into the
sanding disc.
Sanding grit
does not
remain on the
sanding disc.
1. Exposed to dry conditions
that have caused the
adhesive to become brittle.
2. The sanding disc is
damaged or creased.
1. Store the sanding disc in
a location that does not
have extreme temperature
or dryness.
2. Store the sanding disc flat.
Deep grooves
appear in the
workpiece.
1. Sanding grit is too coarse.
2. Sanding across the wood
grain.
3. Excessive pressure against
the sanding disc.
1. Change to a finer grit.
2. Sand with the wood grain.
3. Reduce pressure on
workpiece while sanding.
The sanding
disc is
clogged.
1. Sanding a soft wood.
2. Excessive pressure against
the sanding disc.
1. Clean the sanding disc with
a dressing stick frequently.
2. Reduce pressure on
workpiece while sanding.
Burns appear
on workpiece.
1. Excessive pressure against
the sanding disc.
2. Workpiece held in place too
long.
3. Sanding grit is too fine.
1. Reduce pressure on
workpiece while sanding.
2. Move the workpiece from
side to side while sanding.
3. Change to a coarser grit.
Excessive
machine
vibration.
1. Tool mounting incorrect.
2. The sanding disc is
damaged.
1. Have motor mountings
inspected and adjusted.
2. Replace the sanding disc.
V1.0 DISC SANDER 9075300
Page 15 Assistance available at www.princessauto.com or 1-800-665-8685

Workpiece is
pulled out of
your hands.
1. Workpiece is not supported.
2. Workpiece is too small.
1. Use the work guard or
work table to support the
workpiece.
2. Hold the workpiece with a
jig or clamping tool. Also
use a work table and mitre
gauge for support.
Workpiece is
kicking back.
Sanding on the right-hand side
of disc coming up from the
table.
Sand on the left-hand side of
the disc that is going down
into the table. See Kickback
Precautions and Operation
sections.
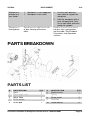
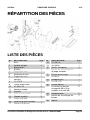
PARTS BREAKDOWN
PARTS LIST
#DESCRIPTION QTY
1 Base 1
2 Bevel angle scale 2
3 Work Table 1
4 Brake handle 1
5 Brake pad 1
# DESCRIPTION QTY
6 Brake bracket 1
7 Spring 1
8 Screw m4x8 3
9 Dust Port 1
10 Screw M6x20 6
9075300 DISC SANDER V1.0
Assistance available at www.princessauto.com or 1-800-665-8685 Page 16

# DESCRIPTION QTY
11 Angle pointer 1
12 Pin 2
13 Rubber Foot 4
14 Large washer 5
15 Mitre gauge bar 1
16 Miter gauge body 1
17 Bevel pointer 1
18 Screw M5x8 1
19 Screw m4x8 1
20 Hex Bolt 4
21 Miter gauge lock knob 1
# DESCRIPTION QTY
22 Sanding Plate 1
23 Washer 1
24 Lock washer 1
25 Screw M6x20 1
26 Sanding Disc 1
27 Hex bolt M6x10 and spring
washer M6 assembly
6
28 Flat washer 2
29 Bevel Lock Knob 2
30 Motor 1
V1.0 DISC SANDER 9075300
Page 17 Assistance available at www.princessauto.com or 1-800-665-8685

This page is intentionally left blank.

This page is intentionally left blank.

This page is intentionally left blank.
La page est en cours de chargement...
La page est en cours de chargement...
La page est en cours de chargement...
La page est en cours de chargement...
La page est en cours de chargement...
La page est en cours de chargement...
La page est en cours de chargement...
La page est en cours de chargement...
La page est en cours de chargement...
La page est en cours de chargement...
La page est en cours de chargement...
La page est en cours de chargement...
La page est en cours de chargement...
La page est en cours de chargement...
La page est en cours de chargement...
La page est en cours de chargement...
La page est en cours de chargement...
La page est en cours de chargement...
La page est en cours de chargement...
La page est en cours de chargement...
-
 1
1
-
 2
2
-
 3
3
-
 4
4
-
 5
5
-
 6
6
-
 7
7
-
 8
8
-
 9
9
-
 10
10
-
 11
11
-
 12
12
-
 13
13
-
 14
14
-
 15
15
-
 16
16
-
 17
17
-
 18
18
-
 19
19
-
 20
20
-
 21
21
-
 22
22
-
 23
23
-
 24
24
-
 25
25
-
 26
26
-
 27
27
-
 28
28
-
 29
29
-
 30
30
-
 31
31
-
 32
32
-
 33
33
-
 34
34
-
 35
35
-
 36
36
-
 37
37
-
 38
38
-
 39
39
-
 40
40


PROPOINT 9075300 Le manuel du propriétaire
- Catégorie
- Coupe-bordures
- Taper
- Le manuel du propriétaire
dans d''autres langues
- English: PROPOINT 9075300 Owner's manual
Documents connexes
Autres documents
-
Power Fist 9038589 Le manuel du propriétaire
-
-
Powerfist 9073925 Le manuel du propriétaire
-
-
-
-
-
-
-