Sony Série NEX-EA50UH Manuel utilisateur
- Taper
- Manuel utilisateur

4-466-686-01(1)
Interchangeable Lens Digital HD
Video Camera
Recorder
NEX-EA50JH/EA50UH/EA50EH/EA50CH/EA50H/EA50CK/EA50K
JP
Firmware update GB
Mise à jour du
micrologiciel
FR
Firmware-Update DE
Actualización de
firmware
ES
Aggiornamento del
firmware
IT
CS

2
JP
HD MPEG-4 AVC/H.264 SD MPEG-2 PS
2
DV
[REC SET] [DV MODE] [YES] DV
b
•DV Class 6 SD
DV
DV
•
– ASSIGN DV
•
•
– [PROTECT]
•
– [DIVIDE]
•
– DV
– [COPY]
•
•MODE
–
–
DV
CAMERA SET
– GAIN/ISO SEL
– ISO SET*
– AUTO ISO LIMIT*
– FLASH SET
REC/OUT SET
– / SET
–REC FORMAT
– SIMULTANEOUS REC
– REC BUTTON SET
–WIDE REC
DV MODE DV

3
JP
– IMAGE SIZE
– FILE NUMBER
– WIDE CONVERT
AUDIO SET
– AUDIO FORMAT
*
b
•DV [ AUDIO FORMAT] LPCM [LPCM]
DV
REC/OUT SET
– SIMULTANEOUS REC
–WIDE REC
– CANCEL DV MODE
– WIDE CONVERT
b
•
2GB 1
[REC SET] [CANCEL DV MODE] [YES]
DV
DV
• GAIN/ISO SEL
• / SET
•REC FORMAT
• SIMULTANEOUS REC
• REC BUTTON SET
•WIDE REC
• MEDIA SELECT
• AUDIO FORMAT
CANCEL DV MODE DV
JP

4
JP
DV
A
B
C
D
E
z
• SCAN/SLOW
•DV 5
• DV F
b
•DV
•DV
DV

5
JP
[REC SET] [ REC BUTTON SET]
/
• REC BUTTON
[] [ ]
• HANDLE REC BUTTON
[] [ ]
MENU SEL/PUSH EXEC REC/OUT SET
[REC SET] [ REC BUTTON SET]
[ REC BUTTON SET] 1 [ / SET] [] 2
[ SIMULATANEOUS REC] [ON]
[][] OFF
z
•
•
•
• [ REC BUTTON SET]
[ REC BUTTON SET]
[MEDIA SELECT]
REC BUTTON SET
REC BUTTON SET
REC BUTTON: [ ] [ ]
HANDLE REC BUTTON:
[] [ ]
/
REC BUTTON: [ ]
HANDLE REC BUTTON: [ ]
/
REC BUTTON: [ ]
HANDLE REC BUTTON: [ ]
/

6
JP
DV [ SIMULATANEOUS REC]
[ SIMULATANEOUS REC]
b
• MEDIA FULL MEDIA FULL
[?]
DV GAIN ISO
DV [FACE DETECTION] [ON] [OFF]
[ON] DV
GPS
DV
– SCAN/SLOW
b
•
5
DV [WIDE REC][WIDE REC]
DV [ WIDE CONVERT] [ WIDE CONVERT]
[ WIDE CONVERT] [ WIDE CONVERT]
SIMULTANEOUS REC
GAIN/ISO SEL /ISO
FACE DETECTION
GPS
WIDE REC
WIDE CONVERT

7
JP
DV [REC FORMAT]
60i : 480/60i
50i : 576/50i
720 480 60i
720
576 50i
z
• 24 30
DV
/
* SD SDHC SDXC
** PRO
/
DV
DV
16GB 70
32GB 140
64GB 280
128GB 585

2
GB
New functions have been added to your camcorder by the firmware update. The new functions
and their respective operations are described here.
Please refer to the Operating Guide of your camcorder.
In addition to the existing two types of image quality/format, high-definition (HD, MPEG-4
AVC/H.264) and standard (SD, MPEG-2 PS), the firmware update this time enabled
recording and playback of movies in standard image quality for DV format on this camcorder.
When you select [DV MODE] on the [REC SET] menu and press [YES], the camcorder
restarts in DV mode.
b Notes
• Use SD cards of Class 6 or faster in DV mode.
When the camcorder is set to DV mode, the following items cannot be used.
If you want to use these items, cancel DV mode.
• Reviewing the most recently recorded scene (Last Scene Review)
– You can assign this function to an ASSIGN button. However, it cannot be used in DV mode.
• Viewing still images
• Protecting recorded movies and still images (Protect)
– [PROTECT] is not displayed on the [EDIT] menu.
• Dividing a movie
– [DIVIDE] is not displayed on the [EDIT] menu.
• Copying movies and still images
– DV files cannot be copied, including copies onto external media.
– [COPY] is not displayed on the [EDIT] menu.
• Capturing still images from a movie
• MODE button
– You cannot switch to photo mode.
– You also cannot record or view photos.
Menu items which cannot be used in DV mode
(CAMERA SET)
– GAIN/ISO SEL
– ISO SET*
– AUTO ISO LIMIT*
– FLASH SET
(REC/OUT SET)
–/ SET
– REC FORMAT
– SIMULTANEOUS REC
– REC BUTTON SET
– WIDE REC
– IMAGE SIZE
– FILE NUMBER
– WIDE CONVERT
English
DV MODE

3
GB
(AUDIO SET)
– AUDIO FORMAT
* Not displayed on the screen.
b Notes
• When you select DV mode, [ AUDIO FORMAT] is fixed to [LINEAR PCM], and [ LPCM] is
not displayed on the screen.
When the camcorder is set to DV mode, the following items can be used.
(REC/OUT SET)
– SIMULTANEOUS REC
– WIDE REC
– CANCEL DV MODE
– WIDE CONVERT
b Notes
• When you switch from DV mode to another, settings made in DV mode are initialized. If a movie file
exceeds 2 GB during recording, the camcorder divides the recording into separate files by creating a new
file(s) automatically. However, the divided files are displayed as a single movie on the screen of the
camcorder.
When you select [CANCEL DV MODE] on the [REC SET] menu and press [YES], the
camcorder cancels DV mode and restarts.
When DV mode is canceled, the following settings return to the default.
• GAIN/ISO SEL
•/ SET
• REC FORMAT
• SIMULTANEOUS REC
• REC BUTTON SET
• WIDE REC
•MEDIA SELECT
• AUDIO FORMAT
CANCEL DV MODE
GB

4
GB
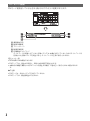
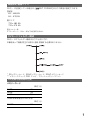
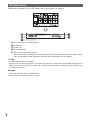
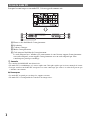
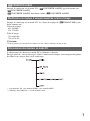
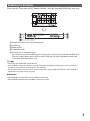
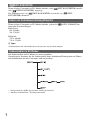
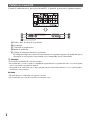
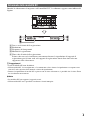
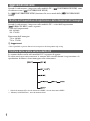
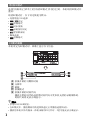
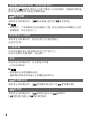
When the camcorder is set to DV mode, the screen appears as follows.
A Date and time of recording started
B Resolution
C Frame rate
D Recording mode
E Time code of recording started
Time code will not be displayed correctly when you play back recording media with no time
code, or recording media with time code that your camcorder does not support.
z Tips
• SCAN/SLOW buttons are disabled.
• In DV mode, fast forward and fast reverse during playback are 5 times faster than normal playback speed.
• When you play back a DV file recorded with a camcorder other than this camcorder, the F value may not
be displayed correctly.
b Notes
• DV mode does not support external media.
• In DV mode, still images cannot be viewed.
DV mode screen

5
GB
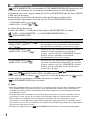
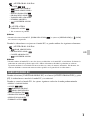
[ REC BUTTON SET] is added to the [REC SET] menu, and you can start and stop
recording on different recording media at different times by operating the START/STOP
button or the handle START/STOP button.
In the default setting, movies are recorded on both the memory card and the flash memory unit
at the same time when either START/STOP button is pressed.
• REC BUTTON: [ ] [ ]
• HANDLE REC BUTTON: [ ] [ ]
To change the setting
Press MENU t select (REC/OUT SET) menu t [REC SET] t [ REC BUTTON
SET] with the SEL/PUSH EXEC dial.
You can use [ REC BUTTON SET] when (1) [ / SET] is set to [ ] and (2)
[ SIMULTANEOUS REC] is set to [ON].
When the camera is set to [ ] mode, when [ ] image quality is selected, or simultaneous
recording is set to off, [ REC BUTTON SET] cannot be used.
z Tips
• Using this function, you can, for example, perform usual recording to a memory card (using the START/
STOP button), while also recording non-stop to a backup high-capacity flash memory unit - started by the
handle START/STOP button - until the end of shooting.
• While recording on the flash memory unit, if you start a separate recording on a memory card, use a
memory card that has been formatted by this camcorder.
• While recordings on a flash unit and memory card are in progress, if a recording error occurs on the
memory card and recording stops, you cannot restart recording on the memory card unless you stop
recording on the flash memory unit and reformat the memory card.
• You can check the setting value of [ REC BUTTON SET] with the status check function.
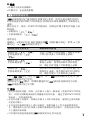
When recording on both media separately by setting [ REC BUTTON SET], the last
scene recorded on the media selected in [MEDIA SELECT] will be played back.
REC BUTTON SET
The setting of REC BUTTON SET The recording media and button
REC BUTTON: [ ] [ ]
HANDLE REC BUTTON:
[] [ ]
Recording on both the memory card and the flash
memory unit starts and stops at the same time when
either START/STOP button is pressed.
REC BUTTON: [ ]
HANDLE REC BUTTON: [ ]
Recording on the memory card starts and stops when
the START/STOP button is pressed, and on the flash
memory unit when the handle START/STOP button is
pressed.
REC BUTTON: [ ]
HANDLE REC BUTTON: [ ]
Recording on the flash memory unit starts and stops
when the START/STOP button is pressed, and on the
memory card when the handle START/STOP button is
pressed.
Reviewing the most recently recorded scene (Last Scene Review)

6
GB
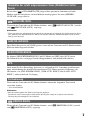
When the camcorder is set to DV mode, [ SIMULTANEOUS REC] appears as
[ SIMULTANEOUS REC].
b Notes
• If one of the recording media becomes full during simultaneous recording, thumbnails of contents on that
recording media cannot be created and [?] is displayed.
This setting is fixed to [GAIN] when the camcorder is set to DV mode.
ISO cannot be set.
You can set [FACE DETECTION] to [ON] or [OFF] in DV mode.
However the priority face frame (double frame) is not enabled.
Even with this setting on, DV recording specifications do not provide for current location
information to be recorded on DV movies. However, functions using GPS such as [GPS
INFORMATION], [AUTO CLOCK ADJ] and [AUTO AREA ADJ] are available.
When the camcorder is set to DV mode, the following buttons cannot be used.
– SCAN/SLOW button
b Notes
• You cannot play back movies slowly during pause.
Fast forward and fast reverse during playback are 5 times faster than normal playback speed.
When the camcorder is set to DV mode, [ WIDE REC] appears as [ WIDE REC].
When the camcorder is set to DV mode, [ WIDE CONVERT] appears as [ WIDE
CONVERT].
[ WIDE CONVERT] functions the same as [ WIDE CONVERT].
SIMULTANEOUS REC
GAIN/ISO SEL
FACE DETECTION
GPS
Remote Control
WIDE REC
WIDE CONVERT

7
GB
When the camcorder is set to DV mode, the setting values of [ REC FORMAT] are fixed
as follows.
Setting value
60i: 480/60i
50i: 576/50i
Image size
720 × 480 60i
720 × 576 50i
z Tips
• You cannot record movies in 24p or 30p frame rate.
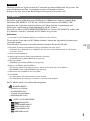
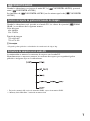
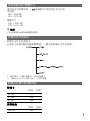
The DV mode folder structure is shown below.
You do not usually need to acknowledge the folder structure, when recording/playing back
movies and still images on the camcorder.
* SD memory card, SDHC memory card, SDXC memory card
** “Memory Stick PRO Duo” media, flash memory unit
Memory card
(unit: minute)
Flash memory unit
(unit: minute)
Changing the recording setting/image size
DV mode folder structure
Estimated recording time in DV mode
16 GB 70
32 GB 140
64 GB 280
128 GB 585

2
FR
De nouvelles fonctions ont été ajoutées à votre caméscope par la mise à jour du micrologiciel.
Ces nouvelles fonctions et leurs opérations respectives sont décrites ici.
Veuillez vous reporter au Mode d’emploi/Mode d’emploi du caméscope de votre caméscope.
Outre les deux types de qualité/format d’image existants, à savoir la haute définition (HD,
MPEG-4 AVC/H.264) et le standard (SD, MPEG-2 PS), la mise à jour du micrologiciel a
activé l’enregistrement et la lecture de films en qualité d’image standard pour le format DV
sur ce caméscope.
Lorsque vous sélectionnez [MODE DV] sur le menu [RÉGLAGE ENREG.]/[REGLAGE
ENREG.], puis appuyez sur [OUI], le caméscope redémarre en mode DV.
b Remarques
• Utilisez des cartes SD de Classe 6 ou plus rapides en mode DV.
Lorsque le caméscope est en mode DV, les éléments suivants sont indisponibles.
Si vous souhaitez utiliser ces éléments, annulez le mode DV.
• Visualisation de la scène la plus récemment enregistrée (Visualisation de la dernière scène)
– Vous pouvez affecter cette fonction à une touche ASSIGN. Néanmoins, celle-ci est indisponible en
mode DV.
• Visualisation d’images fixes
• Protection des films et images fixes enregistrés (Protection)
– [PROTECTION] ne s’affiche pas dans le menu [MONT].
• Division d’un film
– [DIVISER] ne s’affiche pas dans le menu [MONT].
• Copie de films et d’images fixes
– Il est impossible de copier des fichiers DV, y compris d’effectuer des copies sur des supports externes.
– [COPIER] ne s’affiche pas dans le menu [MONT].
• Capture d’images fixes d’un film
• Touche MODE
– Vous ne pouvez pas passer en mode photo.
– Vous ne pouvez pas non plus enregistrer ou visualiser des photos.
Éléments de menu indisponibles en mode DV
(RÉGL. CAMÉS./REGL. CAMES.)
– SÉLECTION GAIN/ISO
– RÉGLAGE ISO*
– LIMITE ISO AUTO*
– RÉGLAGES FLASH
(RÉGLAGE ENR. /SORTIE / REGLAGE ENR. /SORTIE)
– RÉGLAGE / / REGLAGE /
– FORMAT ENREGISTR.
– ENREG. SIMULTANÉ
– TOUCHE ENR /TOUCHE ENR.
– ENR. GD ÉCRAN/ENR. 16/9-4/3
– TAILLE D’IMAGE/TAILLE IMAGE
Français
MODE DV

3
FR
– NUMÉROTAGE FICHIERS/NUMÉRO DE FICHIER
– CONVERTIR LARGE
(RÉGL. AUDIO/REGL. AUDIO)
– FORMAT SON
* Ne s’affiche pas à l’écran.
b Remarques
• Lorsque vous sélectionnez le mode DV, [FORMAT SON ] est fixé sur [LINEAR PCM] et
[ LPCM] ne s’affiche pas à l’écran.
Lorsque le caméscope est en mode DV, les éléments suivants sont disponibles.
(RÉGLAGE ENR. /SORTIE / REGLAGE ENR. /SORTIE)
– ENREG. SIMULTANÉ
– ENR. GD ÉCRAN/ENR. 16/9-4/3
– ANNULER LE MODE DV
– CONVERTIR LARGE
b Remarques
• Lorsque vous passez du mode DV à un autre mode, les réglages effectué en mode DV sont initialisés. Si le
fichier d’un film dépasse 2 Go pendant l’enregistrement, le caméscope divise l’enregistrement en fichiers
séparés, en créant automatiquement un ou plusieurs nouveaux fichiers. Cependant, les fichiers divisés
s’affichent en un seul film sur l’écran du caméscope.
Lorsque vous sélectionnez [ANNULER LE MODE DV] dans le menu [RÉGLAGE
ENREG.]/[REGLAGE ENREG.], puis appuyez sur [OUI], le caméscope annule le mode DV,
puis redémarre.
Une fois le mode DV annulé, les réglages par défaut suivants sont rétablis.
• SÉLECTION GAIN/ISO
• RÉGLAGE / /REGLAGE /
• FORMAT ENREGISTR.
• ENREG. SIMULTANÉ
• TOUCHE ENR /TOUCHE ENR.
• ENR. GD ÉCRAN/ENR. 16/9-4/3
• SÉLECTION SUPPORT
• FORMAT SON
ANNULER LE MODE DV
FR

4
FR
Lorsque le caméscope est en mode DV, l’écran apparaît comme suit.
A Heure et date du début de l’enregistrement
B Résolution
C Cadence d’images
D Mode d’enregistrement
E Code temporel du début de l’enregistrement
Le code temporel ne s’affichera pas correctement si vous lisez un support d’enregistrement
sans code temporel, ou un support d’enregistrement avec un code temporel que votre
caméscope ne prend pas en charge.
z Conseils
• Les touches SCAN/SLOW sont désactivées.
• En mode DV, le rembobinage et l’avance rapide sont 5 fois plus rapides que la vitesse normale de lecture.
• Lorsque vous lisez un fichier DV enregistré avec autre caméscope que celui-ci, la valeur de F peut ne pas
s’afficher correctement.
b Remarques
• Le mode DV ne prend pas en charge les supports externes.
• En mode DV, il est impossible de visualiser des images fixes.
Écran du mode DV

5
FR
[TOUCHE ENR ]/[TOUCHE ENR. ] est ajouté au menu [RÉGLAGE ENREG.]/
[REGLAGE ENREG.] et vous pouvez démarrer et arrêter l’enregistrement sur différents
supports d’enregistrement à différents moments en actionnant la touche START/STOP ou la
touche START/STOP de la poignée.
Dans le réglage par défaut, les films sont enregistrés simultanément sur la carte mémoire et le
lecteur mémoire flash lorsque la touche START/STOP est enfoncée.
• TOUCHE ENR: [ ] [ ]/TOUCHE ENR.: [ ] [ ]
• TOUCHE ENR POIGNÉE: [ ] [ ]/TOUCH. ENR. POIGN.: [ ] [ ]
Pour modifier le réglage
Appuyez sur MENU t sélectionnez le menu (RÉGLAGE ENR. /SORTIE / REGLAGE
ENR. /SORTIE) t [RÉGLAGE ENREG.]/[REGLAGE ENREG.] t [TOUCHE ENR ]/
[TOUCHE ENR. ] avec la molette SEL/PUSH EXEC.
Vous pouvez utiliser [TOUCHE ENR ]/[TOUCHE ENR. ] lorsque (1) [RÉGLAGE
/ ]/[REGLAGE / ] est réglé sur [ ] et (2) [ ENREG. SIMULTANÉ]
est réglé sur [MARCHE].
Lorsque la caméra est en mode [ ], lorsque la qualité d’image [ ] est sélectionnée ou
lorsque l’enregistrement simultané est désactivé, [TOUCHE ENR ]/[TOUCHE
ENR. ] est indisponible.
z Conseils
• Grâce à cette fonction, vous pouvez par exemple effectuer un enregistrement normal sur une carte
mémoire (avec la touche START/STOP), en même temps qu’un enregistrement sans interruption sur un
lecteur mémoire flash de secours haute capacité – démarré par la touche START/STOP de la poignée –
jusqu’à la fin du tournage.
• Pendant l’enregistrement sur le lecteur mémoire flash, si vous démarrez un autre enregistrement sur une
carte mémoire, utilisez une carte mémoire ayant été formatée avec ce caméscope.
• Lorsque des enregistrements sur un lecteur mémoire flash et une carte mémoire sont en cours, si une
erreur d’enregistrement se produit sur la carte mémoire et que l’enregistrement s’arrête, vous ne pouvez
pas redémarrer l’enregistrement sur la carte mémoire à moins d’arrêter l’enregistrement sur le lecteur
mémoire flash et de reformater la carte mémoire.
• Vous pouvez vérifier la valeur de réglage de [TOUCHE ENR ]/[TOUCHE ENR. ] à l’aide de la
fonction de contrôle d’état.
TOUCHE ENR /TOUCHE ENR.
Réglage de TOUCHE ENR/TOUCHE ENR. Support d’enregistrement et touche
TOUCHE ENR: [ ] [ ]/
TOUCHE ENR.: [ ] [ ]
TOUCHE ENR POIGNÉE:
[] [ ]/
TOUCH. ENR. POIGN.: [ ] [ ]
L’enregistrement sur la carte mémoire et le lecteur
mémoire flash démarre et s’arrête simultanément
lorsque la touche START/STOP est enfoncée.
TOUCHE ENR: [ ]/
TOUCHE ENR.: [ ]
TOUCHE ENR POIGNÉE: [ ]/
TOUCH. ENR. POIGN.: [ ]
L’enregistrement sur la carte mémoire démarre et
s’arrête lorsque la touche START/STOP est enfoncée,
puis sur le lecteur mémoire flash lorsque la touche
START/STOP de la poignée est enfoncée.
TOUCHE ENR: [ ]/
TOUCHE ENR.: [ ]
TOUCHE ENR POIGNÉE: [ ]/
TOUCH. ENR. POIGN.: [ ]
L’enregistrement sur le lecteur mémoire flash démarre
et s’arrête lorsque la touche START/STOP est
enfoncée, puis sur la carte mémoire lorsque la touche
START/STOP de la poignée est enfoncée.

6
FR
Dans le cas d’un enregistrement sur deux supports séparés en sélectionnant [TOUCHE
ENR ]/[TOUCHE ENR. ], c’est la dernière scène enregistrée sur le support
sélectionné sous [SÉLECTION SUPPORT] qui sera lue.
Lorsque le caméscope est en mode DV, [ ENREG. SIMULTANÉ] apparaît comme suit :
[ ENREG. SIMULTANÉ].
b Remarques
• Si la mémoire de l’un des supports d’enregistrement est saturée pendant l’enregistrement simultané, il est
impossible de créer les vignettes du contenu de ce support d’enregistrement et [?] s’affiche.
Ce réglage est fixé à [GAIN] lorsque le caméscope est en mode DV.
ISO est indisponible.
Vous pouvez régler [DÉTECTION DE VISAGE]/[DETECTION DE VISAGE] sur
[MARCHE] ou [ARRÊT]/[ARRET] en mode DV.
Le cadre du visage qui a la priorité (cadre double) n’est toutefois pas activé.
Même lorsque ce réglage est activé, les spécifications de l’enregistrement DV ne fournissent
pas les informations sur la localisation en cours à enregistrer sur les films DV. Cependant, les
fonctions utilisant le GPS, telles que [INFORMATION GPS], [RÉGL. HORL. AUTO]/
[REGL. HORL. AUTO] et [RÉGL. ZONE AUTO]/[REGL. ZONE AUTO], sont disponibles.
Lorsque le caméscope est en mode DV, les touches suivantes sont indisponibles.
– Touche SCAN/SLOW
b Remarques
• Il n’est pas possible de lire des films au ralenti en pause.
Pendant la lecture, le rembobinage et l’avance rapide sont 5 fois plus rapides que la vitesse normale de
lecture.
Lorsque le caméscope est en mode DV, [ENR. GD ÉCRAN]/[ENR. 16/9-4/3 ]
apparaît comme suit : [ENR. GD ÉCRAN]/[ENR. 16/9-4/3 ].
Visualisation de la scène la plus récemment enregistrée (Visualisation
de la dernière scène)
ENREG. SIMULTANÉ
SÉLECTION GAIN/ISO
DÉTECTION DE VISAGE/DETECTION DE VISAGE
GPS
Télécommande
ENR. GD ÉCRAN/ENR. 16/9-4/3

7
FR
Lorsque le caméscope est en mode DV, [ CONVERTIR LARGE] apparaît comme suit :
[ CONVERTIR LARGE].
[ CONVERTIR LARGE] fonctionne comme [ CONVERTIR LARGE].
Lorsque le caméscope est en mode DV, les valeurs de réglage de [ FORMAT ENR.] sont
fixées comme suit :
Valeur de réglage
60i : 480/60i
50i : 576/50i
Taille d’image
720 × 480 60i
720 × 576 50i
z Conseils
• Vous ne pouvez pas enregistrer des films avec une cadence d’images de 24p ou 30p.
L’arborescence des dossiers en mode DV est illustrée ci-dessous.
En règle générale, vous ne devez pas valider l’arborescence lorsque vous enregistrez/regardez
des films et des images fixes sur le caméscope.
* Carte mémoire SD, carte mémoire SDHC, carte mémoire SDXC
** « Memory Stick PRO Duo », lecteur mémoire flash
CONVERTIR LARGE
Modification du réglage d’enregistrement/de la taille d’image
Arborescence des dossiers en mode DV

8
FR
Carte mémoire
(unité : minute)
Lecteur mémoire flash
(unité : minute)
Estimation de la durée d’enregistrement en mode DV
16 GB 70
32 GB 140
64 GB 280
128 GB 585
La page est en cours de chargement...
La page est en cours de chargement...
La page est en cours de chargement...
La page est en cours de chargement...
La page est en cours de chargement...
La page est en cours de chargement...
La page est en cours de chargement...
La page est en cours de chargement...
La page est en cours de chargement...
La page est en cours de chargement...
La page est en cours de chargement...
La page est en cours de chargement...
La page est en cours de chargement...
La page est en cours de chargement...
La page est en cours de chargement...
La page est en cours de chargement...
La page est en cours de chargement...
La page est en cours de chargement...
La page est en cours de chargement...
La page est en cours de chargement...
La page est en cours de chargement...
La page est en cours de chargement...
La page est en cours de chargement...
La page est en cours de chargement...
La page est en cours de chargement...
La page est en cours de chargement...
La page est en cours de chargement...
La page est en cours de chargement...
-
 1
1
-
 2
2
-
 3
3
-
 4
4
-
 5
5
-
 6
6
-
 7
7
-
 8
8
-
 9
9
-
 10
10
-
 11
11
-
 12
12
-
 13
13
-
 14
14
-
 15
15
-
 16
16
-
 17
17
-
 18
18
-
 19
19
-
 20
20
-
 21
21
-
 22
22
-
 23
23
-
 24
24
-
 25
25
-
 26
26
-
 27
27
-
 28
28
-
 29
29
-
 30
30
-
 31
31
-
 32
32
-
 33
33
-
 34
34
-
 35
35
-
 36
36
-
 37
37
-
 38
38
-
 39
39
-
 40
40
-
 41
41
-
 42
42
-
 43
43
-
 44
44
-
 45
45
-
 46
46
-
 47
47
-
 48
48


Sony Série NEX-EA50UH Manuel utilisateur
- Taper
- Manuel utilisateur
dans d''autres langues
- italiano: Sony Série NEX-EA50UH Manuale utente
- español: Sony Série NEX-EA50UH Manual de usuario
- Deutsch: Sony Série NEX-EA50UH Benutzerhandbuch
- 日本語: Sony Série NEX-EA50UH ユーザーマニュアル
Autres documents
-
Sony NEX-FS100C Mode d'emploi
-
Leica V-Lux 30 Manuel utilisateur
-
Mode V-Lux 5 Mode d'emploi
-
Sony HDR-AS15 Le manuel du propriétaire
-
Fujifilm X-S10 18-55mm Manuel utilisateur
-
Sony DCR-PC330E Manuel utilisateur
-
Samsung SCD 5000 Manuel utilisateur
-
-
HP f310 Car Camcorder Guide de démarrage rapide