Oracle Netra SPARC S7-2 Guide d'installation
- Catégorie
- Les serveurs
- Taper
- Guide d'installation

Netra SPARC S7-2 Server Installation
Guide
Part No: E73206-03
January 2017


Netra SPARC S7-2 Server Installation Guide
Part No: E73206-03
Copyright © 2016, 2017, Oracle and/or its affiliates. All rights reserved.
This software and related documentation are provided under a license agreement containing restrictions on use and disclosure and are protected by intellectual property laws. Except
as expressly permitted in your license agreement or allowed by law, you may not use, copy, reproduce, translate, broadcast, modify, license, transmit, distribute, exhibit, perform,
publish, or display any part, in any form, or by any means. Reverse engineering, disassembly, or decompilation of this software, unless required by law for interoperability, is
prohibited.
The information contained herein is subject to change without notice and is not warranted to be error-free. If you find any errors, please report them to us in writing.
If this is software or related documentation that is delivered to the U.S. Government or anyone licensing it on behalf of the U.S. Government, then the following notice is applicable:
U.S. GOVERNMENT END USERS. Oracle programs, including any operating system, integrated software, any programs installed on the hardware, and/or documentation, delivered
to U.S. Government end users are "commercial computer software" pursuant to the applicable Federal Acquisition Regulation and agency-specific supplemental regulations. As
such, use, duplication, disclosure, modification, and adaptation of the programs, including any operating system, integrated software, any programs installed on the hardware, and/or
documentation, shall be subject to license terms and license restrictions applicable to the programs. No other rights are granted to the U.S. Government.
This software or hardware is developed for general use in a variety of information management applications. It is not developed or intended for use in any inherently dangerous
applications, including applications that may create a risk of personal injury. If you use this software or hardware in dangerous applications, then you shall be responsible to take all
appropriate fail-safe, backup, redundancy, and other measures to ensure its safe use. Oracle Corporation and its affiliates disclaim any liability for any damages caused by use of this
software or hardware in dangerous applications.
Oracle and Java are registered trademarks of Oracle and/or its affiliates. Other names may be trademarks of their respective owners.
Intel and Intel Xeon are trademarks or registered trademarks of Intel Corporation. All SPARC trademarks are used under license and are trademarks or registered trademarks of
SPARC International, Inc. AMD, Opteron, the AMD logo, and the AMD Opteron logo are trademarks or registered trademarks of Advanced Micro Devices. UNIX is a registered
trademark of The Open Group.
This software or hardware and documentation may provide access to or information about content, products, and services from third parties. Oracle Corporation and its affiliates are
not responsible for and expressly disclaim all warranties of any kind with respect to third-party content, products, and services unless otherwise set forth in an applicable agreement
between you and Oracle. Oracle Corporation and its affiliates will not be responsible for any loss, costs, or damages incurred due to your access to or use of third-party content,
products, or services, except as set forth in an applicable agreement between you and Oracle.
Documentation Accessibility
For information about Oracle's commitment to accessibility, visit the Oracle Accessibility Program website at http://www.oracle.com/pls/topic/lookup?ctx=acc&id=docacc.
Access to Oracle Support
Oracle customers that have purchased support have access to electronic support through My Oracle Support. For information, visit http://www.oracle.com/pls/topic/lookup?
ctx=acc&id=info or visit http://www.oracle.com/pls/topic/lookup?ctx=acc&id=trs if you are hearing impaired.

Référence: E73206-03
Copyright © 2016, 2017, Oracle et/ou ses affiliés. Tous droits réservés.
Ce logiciel et la documentation qui l’accompagne sont protégés par les lois sur la propriété intellectuelle. Ils sont concédés sous licence et soumis à des restrictions d’utilisation et
de divulgation. Sauf stipulation expresse de votre contrat de licence ou de la loi, vous ne pouvez pas copier, reproduire, traduire, diffuser, modifier, accorder de licence, transmettre,
distribuer, exposer, exécuter, publier ou afficher le logiciel, même partiellement, sous quelque forme et par quelque procédé que ce soit. Par ailleurs, il est interdit de procéder à toute
ingénierie inverse du logiciel, de le désassembler ou de le décompiler, excepté à des fins d’interopérabilité avec des logiciels tiers ou tel que prescrit par la loi.
Les informations fournies dans ce document sont susceptibles de modification sans préavis. Par ailleurs, Oracle Corporation ne garantit pas qu’elles soient exemptes d’erreurs et vous
invite, le cas échéant, à lui en faire part par écrit.
Si ce logiciel, ou la documentation qui l’accompagne, est livré sous licence au Gouvernement des Etats-Unis, ou à quiconque qui aurait souscrit la licence de ce logiciel pour le
compte du Gouvernement des Etats-Unis, la notice suivante s’applique:
U.S. GOVERNMENT END USERS. Oracle programs, including any operating system, integrated software, any programs installed on the hardware, and/or documentation, delivered
to U.S. Government end users are "commercial computer software" pursuant to the applicable Federal Acquisition Regulation and agency-specific supplemental regulations. As
such, use, duplication, disclosure, modification, and adaptation of the programs, including any operating system, integrated software, any programs installed on the hardware, and/or
documentation, shall be subject to license terms and license restrictions applicable to the programs. No other rights are granted to the U.S. Government.
Ce logiciel ou matériel a été développé pour un usage général dans le cadre d’applications de gestion des informations. Ce logiciel ou matériel n’est pas conçu ni n’est destiné
à être utilisé dans des applications à risque, notamment dans des applications pouvant causer des dommages corporels. Si vous utilisez ce logiciel ou matériel dans le cadre d’
applications dangereuses, il est de votre responsabilité de prendre toutes les mesures de secours, de sauvegarde, de redondance et autres mesures nécessaires à son utilisation dans des
conditions optimales de sécurité. Oracle Corporation et ses affiliés déclinent toute responsabilité quant aux dommages causés par l’utilisation de ce logiciel ou matériel pour ce type
d’applications.
Oracle et Java sont des marques déposées d’Oracle Corporation et/ou de ses affiliés. Tout autre nom mentionné peut correspondre à des marques appartenant à d’autres propriétaires
qu’Oracle.
Intel et Intel Xeon sont des marques ou des marques déposées d’Intel Corporation. Toutes les marques SPARC sont utilisées sous licence et sont des marques ou des marques
déposées de SPARC International, Inc. AMD, Opteron, le logo AMD et le logo AMD Opteron sont des marques ou des marques déposées d’Advanced Micro Devices. UNIX est une
marque déposée d’The Open Group.
Ce logiciel ou matériel et la documentation qui l’accompagne peuvent fournir des informations ou des liens donnant accès à des contenus, des produits et des services émanant de
tiers. Oracle Corporation et ses affiliés déclinent toute responsabilité ou garantie expresse quant aux contenus, produits ou services émanant de tiers, sauf mention contraire stipulée
dans un contrat entre vous et Oracle. En aucun cas, Oracle Corporation et ses affiliés ne sauraient être tenus pour responsables des pertes subies, des coûts occasionnés ou des
dommages causés par l’accès à des contenus, produits ou services tiers, ou à leur utilisation, sauf mention contraire stipulée dans un contrat entre vous et Oracle.
Accessibilité de la documentation
Pour plus d’informations sur l’engagement d’Oracle pour l’accessibilité à la documentation, visitez le site Web Oracle Accessibility Program, à l’adresse http://www.oracle.com/
pls/topic/lookup?ctx=acc&id=docacc.
Accès aux services de support Oracle
Les clients Oracle qui ont souscrit un contrat de support ont accès au support électronique via My Oracle Support. Pour plus d’informations, visitez le site http://www.oracle.com/
pls/topic/lookup?ctx=acc&id=info ou le site http://www.oracle.com/pls/topic/lookup?ctx=acc&id=trs si vous êtes malentendant.

Contents
Using This Documentation ................................................................................. 9
Understanding the Server ................................................................................. 11
Installation Task Overview .............................................................................. 11
Server Overview ........................................................................................... 12
Front Panel Components (Installation) ............................................................... 14
Rear Panel Components (Installation) ............................................................... 15
Confirming Specifications ................................................................................. 17
Physical Specifications ................................................................................... 17
Electrical Specifications .................................................................................. 18
Input Power Information ................................................................................. 19
Overcurrent Protection Requirements ................................................................ 20
DC Power Source, Power Connection, and Grounding Requirements ...................... 21
Environmental Requirements ........................................................................... 22
Acoustic Noise Emissions ............................................................................... 23
Airflow Precautions ....................................................................................... 24
Preparing for Installation .................................................................................. 27
Shipping Kit Inventory ................................................................................... 27
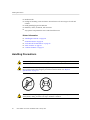
Handling Precautions ..................................................................................... 28
ESD Precautions ........................................................................................... 29
Tools Needed for Installation ........................................................................... 29
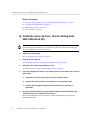
Installing the Server .......................................................................................... 31
Optional Components ..................................................................................... 31
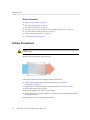
Rack Cautions .............................................................................................. 32
▼ Stabilize the Rack .................................................................................... 33
5

Contents
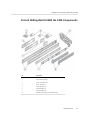
Installing the Standard 19-Inch Hardmount Kit (4-Post Rack) ................................ 33
19-Inch Hardmount Kit (4-Post Rack) Components ..................................... 35
▼ Install the Server (4-Post, 19-Inch Hardmount Rack Kit) .......................... 36
Installing the 19-Inch Sliding Rail Kit With the CMA .......................................... 40
19-Inch Sliding Rail Kit With the CMA Components ................................... 41
▼ Install the Server (4-Post, 19-Inch Sliding Rails With CMA Rack Kit) ........ 42
Installing the 19-Inch Hardmount Kit (2-Post Rack) ............................................ 51
19-Inch Hardmount Rack Kit (2-Post Rack) Components .............................. 52
▼ Install the Server (2-Post, 19-Inch Hardmount Rack Kit) .......................... 53
Connecting Cables ............................................................................................ 61
Available Connections .................................................................................... 61
Connecting Data and Management Cables ......................................................... 63
▼ Cable the SP ................................................................................... 64
▼ Cable the Ethernet Ports .................................................................... 64
▼ Connect Other Data Cables ................................................................ 65
Identifying Ports ............................................................................................ 65
SER MGT Port ..................................................................................... 66
NET MGT Port ..................................................................................... 67
10 Gigabit Ethernet Ports ........................................................................ 68
USB Ports ............................................................................................ 69
Powering On the Server for the First Time ....................................................... 71
▼ Connect the Chassis Ground Wire ............................................................... 72
▼ Connect AC Power Cords .......................................................................... 74
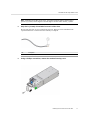
Assembling and Connecting DC Power Cords .................................................... 75
▼ Assemble the DC Input Power Cords ................................................... 76
▼ Connect DC Power Source ................................................................ 80
▼ Connect a Terminal or Emulator to the SER MGT Port ................................... 81
Oracle ILOM System Console ......................................................................... 82
▼ Power on the Server for the First Time ........................................................ 83
▼ Disable NEBS Mode ................................................................................ 85
Installing the OS ........................................................................................... 86
▼ Configure the Preinstalled OS ............................................................ 86
▼ Reach a State to Install a Fresh OS (Oracle ILOM CLI) ........................... 87
▼ Reach a State to Install a Fresh OS (Oracle ILOM Web Interface) .............. 88
Oracle Solaris OS Configuration Parameters ...................................................... 91
6 Netra SPARC S7-2 Server Installation Guide • January 2017

Contents
▼ Assign a Static IP Address to the NET MGT Port .......................................... 92
Oracle Auto Service Request Software Activation ............................................... 94
Index .................................................................................................................. 97
7

8 Netra SPARC S7-2 Server Installation Guide • January 2017

Using This Documentation
■
Overview – Provides specifications and describes how to install and power on Oracle's
Netra SPARC S7-2 server for the first time.
■
Audience – Technicians, system administrators, and authorized service providers.
■
Required knowledge – Experience installing hardware.
Product Documentation Library
Documentation and resources for this product and related products are available at http://www.
oracle.com/goto/netra-s7-2/docs.
Feedback
Provide feedback about this documentation at http://www.oracle.com/goto/docfeedback.
Using This Documentation 9

10 Netra SPARC S7-2 Server Installation Guide • January 2017

Understanding the Server
These topics provide an installation overview and information about the server features.
■
“Installation Task Overview” on page 11
■
“Server Overview” on page 12
■
“Front Panel Components (Installation)” on page 14
■
“Rear Panel Components (Installation)” on page 15
Related Information
■
“Confirming Specifications” on page 17
■
“Preparing for Installation” on page 27
■
“Installing the Server” on page 31
■
“Connecting Cables” on page 61
■
“Powering On the Server for the First Time” on page 71
Installation Task Overview
Perform the following tasks to install and configure the server.
Step Description Links
1. Review the product notes for any late-breaking news about the
server.
Netra SPARC S7-2 Server Product Notes
2. Review the server features and familiarize yourself with the
server components.
“Server Overview” on page 12
“Front Panel Components (Installation)” on page 14
“Rear Panel Components (Installation)” on page 15
3. Review the server specifications and the site requirements. “Confirming Specifications” on page 17
Understanding the Server 11

Server Overview
Step Description Links
4. Confirm that you received all the items you ordered. “Shipping Kit Inventory” on page 27
5. Review safety and ESD precautions. “Handling Precautions” on page 28
“ESD Precautions” on page 29
6. Gather the required tools. “Tools Needed for Installation” on page 29
7. Install any optional components that you ordered. “Optional Components” on page 31
8. Review the rack cautions. “Rack Cautions” on page 32
9. Install the server in a 4-post or 2-post rack. “Installing the Server” on page 31
10. Review cabling requirements and port information. Attach data
and management cables to the server.
“Connecting Cables” on page 61
11. Prepare the power cords, apply power, and start the server for
the first time.
“Powering On the Server for the First Time” on page 71
Related Information
■
“Server Overview” on page 12
■
“Front Panel Components (Installation)” on page 14
■
“Rear Panel Components (Installation)” on page 15
■
Netra SPARC S7-2 Server Service Manual
Server Overview
The server is a carrier-grade, NEBS-certified, 2U server. This table summarizes the server's
components. For detailed information about the server's features, go to http://www.oracle.
com/goto/netra-s7-2.
Component Description
Processor Up to two SPARC 4.26 GHz CPUs (3.0 GHz in NEBS mode) with the following:
■ 4x integrated memory controllers per CPU
■ 8-cores and 64 threads per CPU
■ 2x Database Accelerator (DAX) per CPU
■ Integrated memory controller
Note - The CPU configuration is set at the factory. A single CPU server cannot be upgraded to a dual
CPU configuration.
Memory The number of DDR4-2400MHz DIMM slots depends on the CPU configuration..
12 Netra SPARC S7-2 Server Installation Guide • January 2017

Server Overview
Component Description
■ Single Processor – 8 slots that support 16-GB, 32-GB, or 64-GB capacities.
■ Dual Processor – 16 slots (8 slots per CPU) that support 16-GB, 32-GB, or 64-GB capacities.
Note - The quantity and capacity of installed memory varies based on what was ordered.
Storage ■ Eight SFF slots for a maximum of eight SAS HDDs/SDDs
■ Four of the SFF slots can be used for NVMe SDDs
Service processor On the motherboard, an internal SP with cryptographic acceleration that supports industry standard
security ciphers. The SP runs Oracle ILOM firmware with provisions for:
■ Oracle ILOM 3.2.4
■ Serial management (RJ-45)
■ Network management (10/100/1000BASE-T Ethernet RJ-45)
Ethernet ports Four 100/1000Mb/10Gb BASE-T Ethernet (RJ-45) with integrated link LEDs.
PCIe slots Six PCIe x8 Gen3 slots. Two are usable as x16 Gen3 slots, however, the electrical max remains x8, up
to 25 watts per card. All PCIe expansion slots support PCIe 3.0 / Gen3 (PCIe3) signaling levels.
PCIe internal HBA card (Optional) One internal SAS HBA PCIe controller card.
USB ports Two front 2.0 USB ports, and one rear 3.0 USB port.
eUSB flash drive One internal eUSB drive.
Indicators and switches ■ Power button switch
■ Locate button switch with integrated LED
■ System OK LED
■ System Fault LED
■ Alarm LEDs - Critical (Red), Major (Red), Minor (Amber), User (Amber)
■ Rear PS fault LED
Power supplies Depending on the model, one of the following configurations:
■ 2 hot-swappable AC supplies (Oracle model A266)
■ 2 hot-swappable DC supplies (Oracle model D258)
Note - Mixing of AC and DC power supplies is not allowed.
Cooling Front-to-back forced air, with high efficiency active fan speed control.
Related Information
■
“Installation Task Overview” on page 11
■
“Front Panel Components (Installation)” on page 14
■
“Rear Panel Components (Installation)” on page 15
■
Netra SPARC S7-2 Server Service Manual
Understanding the Server 13

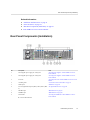
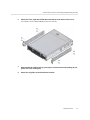
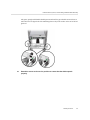
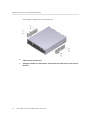
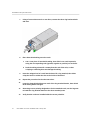
Front Panel Components (Installation)
Front Panel Components (Installation)
No. Description Links
1 Power button “Powering On the Server for the First
Time” on page 71
Status indicators, top to bottom:
■ Locator LED and button
■ Service Required LED
■ System OK LED
■ Power button
■ Rear PS fault LED
Telco alarm indicators:
■ Critical LED
■ Major LED
■ Minor LED
■ User LED
“Interpreting LEDs” in Netra SPARC S7-2 Server
Service Manual
2 Locate button “Rear Panel LEDs” in Netra SPARC S7-2 Server
Service Manual
3 and 4 Eight SAS drive slots, of which four can be used as NMVe
slots
“Servicing SAS Drives” in Netra SPARC S7-2 Server
Service Manual
5 Two USB 2.0 ports “USB Ports” on page 69
6 Serial number and manufacturing information “Find the Server Serial Number” in Netra SPARC S7-2
Server Service Manual
14 Netra SPARC S7-2 Server Installation Guide • January 2017

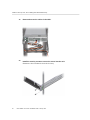
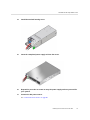
Rear Panel Components (Installation)
Related Information
■
“Installation Task Overview” on page 11
■
“Server Overview” on page 12
■
“Rear Panel Components (Installation)” on page 15
■
Netra SPARC S7-2 Server Service Manual
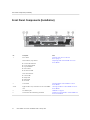
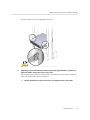
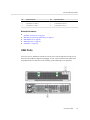
Rear Panel Components (Installation)
No. Description Links
1 Hot-swappable power supply (AC or DC), PS1 “Servicing Power Supplies” in Netra SPARC S7-2 Server
Service Manual
2 Hot-swappable power supply (AC or DC), PS0 “Servicing Power Supplies” in Netra SPARC S7-2 Server
Service Manual
3 PCIe slots “Servicing PCIe Cards” in Netra SPARC S7-2 Server Service
Manual
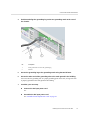
4 Grounding studs “Connect the Chassis Ground Wire” on page 72
5 USB 3.0 port “USB Ports” on page 69
6 Four 10 Gigabit Ethernet ports (NET 3, NET 2, NET 1, NET
0)
“10 Gigabit Ethernet Ports” on page 68
7 NET MGT port “NET MGT Port” on page 67
8 SER MGT port “SER MGT Port” on page 66
9 Status LEDs:
■ Locator LED and button
“Servicing the LED Board” in Netra SPARC S7-2 Server
Service Manual
Understanding the Server 15

Rear Panel Components (Installation)
No. Description Links
■ Service Required LED
■ Main Power OK LED
Related Information
■
“Installation Task Overview” on page 11
■
“Server Overview” on page 12
■
“Front Panel Components (Installation)” on page 14
■
Netra SPARC S7-2 Server Service Manual
16 Netra SPARC S7-2 Server Installation Guide • January 2017

Confirming Specifications
These topics provide information about the server specifications.
■
“Physical Specifications” on page 17
■
“Electrical Specifications” on page 18
■
“Input Power Information” on page 19
■
“DC Power Source, Power Connection, and Grounding Requirements” on page 21
■
“Overcurrent Protection Requirements” on page 20
■
“Environmental Requirements” on page 22
■
“Acoustic Noise Emissions” on page 23
■
“Airflow Precautions” on page 24
Related Information
■
“Understanding the Server” on page 11
■
“Preparing for Installation” on page 27
■
“Installing the Server” on page 31
■
“Connecting Cables” on page 61
■
“Powering On the Server for the First Time” on page 71
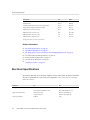
Physical Specifications
Description U.S. Metric
Rack units 2U 2U
Height 3.46 in. 88 mm
Width (chassis) 16.73 in. 425 mm
Confirming Specifications 17

Electrical Specifications
Description U.S. Metric
Maximum Width (from bezel front to rear protrusions) 17.52 in. 445 mm
Depth (chassis)
Maximum Depth (from bezel front to rear protrusions)
23.9 in.
25.2 in.
608 mm
640 mm
Weight (fully configured without PCIe cards)
†
47.3 lb 21.5 kg
Minimum service clearance (front) 36 in. 914.4 mm
Minimum service clearance (rear) 36 in. 914.4 mm
Minimum airflow clearance (front) 2 in. 50.8 mm
Minimum airflow clearance (rear) 3 in. 76.2 mm
†
Weight specifications vary based on internal options.
Related Information
■
“Electrical Specifications” on page 18
■
“Input Power Information” on page 19
■
“DC Power Source, Power Connection, and Grounding Requirements” on page 21
■
“Overcurrent Protection Requirements” on page 20
■
“Environmental Requirements” on page 22
■
“Acoustic Noise Emissions” on page 23
■
“Airflow Precautions” on page 24
Electrical Specifications
The values in this table are for the power supplies. Use the online power calculator to determine
the power consumption of a server with your configuration: http://www.oracle.com/goto/
powercalculators.
Parameter AC DC
Voltage (nominal) 100-127 VAC (800W max out)
200 to 240 VAC (1200W max out)
-48/-60 VDC (1200W max out)
40-47 VDC (900W max out)
Input current (maximum) 10A (100-127 VAC)
7A (200-240 VAC)
36A max @ -48 VDC bus
28A max @ -60 VDC bus
Frequency (nominal) 50/60 Hz 0 Hz
18 Netra SPARC S7-2 Server Installation Guide • January 2017

Input Power Information
Parameter AC DC
Input treatment N/A Isolated DC Return (DC-I)
Caution - The ports of this equipment or subassembly are suitable for connection to intra-
building or unexposed wiring or cabling only. The intra-building port(s) of the equipment or
subassembly must not be metallically connected to interfaces that connect to the outside plant
wiring. These interfaces are designed for use as intra-building interfaces only (Type 2 or Type 4
ports as described in GR-1089-CORE, Issue 6) and require isolation from the exposed outside
plant cabling. The addition of primary protectors is not sufficient protection in order to connect
these interfaces metallically to outside plant wiring.
Caution - The intra-building port(s) of the equipment or subassembly must use shielded intra-
building cabling or wiring that is grounded at both ends, except the ethernet ports.
Caution - Mixing power supply types (AC and DC) is not allowed.
Related Information
■
“Physical Specifications” on page 17
■
“Input Power Information” on page 19
■
“DC Power Source, Power Connection, and Grounding Requirements” on page 21
■
“Overcurrent Protection Requirements” on page 20
■
“Environmental Requirements” on page 22
■
“Acoustic Noise Emissions” on page 23
■
“Airflow Precautions” on page 24
Input Power Information
The total input power for the server is divided equally among the power supplies in operation.
Reversing the positive and negative inputs to the power supplies of a DC input server will not
cause damage. However, the power supplies with reversed input will not operate.
The inputs to a power supply are isolated from the server chassis and the other power supply
inputs. The AC or DC power inputs might be at different voltages within the acceptable range
and might have different offset voltages relative to the server chassis.
Confirming Specifications 19

Overcurrent Protection Requirements
Note - The server does not require an additional surge protector for the AC power
configurations if the facility has a surge protector that limits voltage surges to less than 2000V.
You can, however, install a surge protector if your site requires an additional protector.
Note - Converting power supply types (AC to DC or DC to AC) is allowed. However, power
supplies cannot be mixed within a server or within the same rackmounted system.
Related Information
■
“Physical Specifications” on page 17
■
“Electrical Specifications” on page 18
■
“Overcurrent Protection Requirements” on page 20
■
“Environmental Requirements” on page 22
■
“Acoustic Noise Emissions” on page 23
■
“Airflow Precautions” on page 24
Overcurrent Protection Requirements
This product does not provide branch circuit overcurrent protection as defined by the U.S.
NEC. To comply with the U.S. NEC, you must install this product on branch circuits that have
overcurrent protection as defined by Article 240 of the U.S. NEC.
■
Product power inputs with a current ratings of 16A or less must have a branch circuit, or a
supplementary overcurrent protection device, rated at no more than 20A.
■
Product power inputs with current rating of more than 16A must have a branch circuit, or
a supplementary overcurrent protection device, rated at no more than 160% of the product
input current rating.
■
Other national or local electrical codes might apply to the installation of this product.
■
For the DC input configuration, power is fed to the PSU via customer-provided double-pole
50A DC circuit breaker.
As a general guideline, overcurrent protection devices should be rated at a minimum of 125% of
the product input current rating in order to provide reliable power under high temperature and
transient voltage disturbance conditions. However, you must consider the characteristics of the
protection device and the applicable electrical codes when selecting the rating of a protection
device for the product installation.
20 Netra SPARC S7-2 Server Installation Guide • January 2017
La page est en cours de chargement...
La page est en cours de chargement...
La page est en cours de chargement...
La page est en cours de chargement...
La page est en cours de chargement...
La page est en cours de chargement...
La page est en cours de chargement...
La page est en cours de chargement...
La page est en cours de chargement...
La page est en cours de chargement...
La page est en cours de chargement...
La page est en cours de chargement...
La page est en cours de chargement...
La page est en cours de chargement...
La page est en cours de chargement...
La page est en cours de chargement...
La page est en cours de chargement...
La page est en cours de chargement...
La page est en cours de chargement...
La page est en cours de chargement...
La page est en cours de chargement...
La page est en cours de chargement...
La page est en cours de chargement...
La page est en cours de chargement...
La page est en cours de chargement...
La page est en cours de chargement...
La page est en cours de chargement...
La page est en cours de chargement...
La page est en cours de chargement...
La page est en cours de chargement...
La page est en cours de chargement...
La page est en cours de chargement...
La page est en cours de chargement...
La page est en cours de chargement...
La page est en cours de chargement...
La page est en cours de chargement...
La page est en cours de chargement...
La page est en cours de chargement...
La page est en cours de chargement...
La page est en cours de chargement...
La page est en cours de chargement...
La page est en cours de chargement...
La page est en cours de chargement...
La page est en cours de chargement...
La page est en cours de chargement...
La page est en cours de chargement...
La page est en cours de chargement...
La page est en cours de chargement...
La page est en cours de chargement...
La page est en cours de chargement...
La page est en cours de chargement...
La page est en cours de chargement...
La page est en cours de chargement...
La page est en cours de chargement...
La page est en cours de chargement...
La page est en cours de chargement...
La page est en cours de chargement...
La page est en cours de chargement...
La page est en cours de chargement...
La page est en cours de chargement...
La page est en cours de chargement...
La page est en cours de chargement...
La page est en cours de chargement...
La page est en cours de chargement...
La page est en cours de chargement...
La page est en cours de chargement...
La page est en cours de chargement...
La page est en cours de chargement...
La page est en cours de chargement...
La page est en cours de chargement...
La page est en cours de chargement...
La page est en cours de chargement...
La page est en cours de chargement...
La page est en cours de chargement...
La page est en cours de chargement...
La page est en cours de chargement...
La page est en cours de chargement...
La page est en cours de chargement...
La page est en cours de chargement...
La page est en cours de chargement...
La page est en cours de chargement...
La page est en cours de chargement...
-
 1
1
-
 2
2
-
 3
3
-
 4
4
-
 5
5
-
 6
6
-
 7
7
-
 8
8
-
 9
9
-
 10
10
-
 11
11
-
 12
12
-
 13
13
-
 14
14
-
 15
15
-
 16
16
-
 17
17
-
 18
18
-
 19
19
-
 20
20
-
 21
21
-
 22
22
-
 23
23
-
 24
24
-
 25
25
-
 26
26
-
 27
27
-
 28
28
-
 29
29
-
 30
30
-
 31
31
-
 32
32
-
 33
33
-
 34
34
-
 35
35
-
 36
36
-
 37
37
-
 38
38
-
 39
39
-
 40
40
-
 41
41
-
 42
42
-
 43
43
-
 44
44
-
 45
45
-
 46
46
-
 47
47
-
 48
48
-
 49
49
-
 50
50
-
 51
51
-
 52
52
-
 53
53
-
 54
54
-
 55
55
-
 56
56
-
 57
57
-
 58
58
-
 59
59
-
 60
60
-
 61
61
-
 62
62
-
 63
63
-
 64
64
-
 65
65
-
 66
66
-
 67
67
-
 68
68
-
 69
69
-
 70
70
-
 71
71
-
 72
72
-
 73
73
-
 74
74
-
 75
75
-
 76
76
-
 77
77
-
 78
78
-
 79
79
-
 80
80
-
 81
81
-
 82
82
-
 83
83
-
 84
84
-
 85
85
-
 86
86
-
 87
87
-
 88
88
-
 89
89
-
 90
90
-
 91
91
-
 92
92
-
 93
93
-
 94
94
-
 95
95
-
 96
96
-
 97
97
-
 98
98
-
 99
99
-
 100
100
-
 101
101
-
 102
102


Oracle Netra SPARC S7-2 Guide d'installation
- Catégorie
- Les serveurs
- Taper
- Guide d'installation
dans d''autres langues
Documents connexes
-
Oracle SPARC T7-4 Guide d'installation
-
-
-
-
-
-
-
-
-