LG LMG820UM2 Le manuel du propriétaire
- Catégorie
- Téléphones portables
- Taper
- Le manuel du propriétaire
Ce manuel convient également à

MFL71696001 (1.0)
Copyright ©2020 LG Electronics Inc. All rights reserved.
www.lg.com
ENGLISH
USER GUIDE
LM-G820UM
FRANÇAIS

1
About this user guide
Thank you for choosing this LG product. Please carefully read this user
guide before using the device for the first time to ensure safe and proper
use.
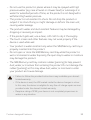
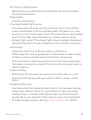
• Always use genuine LG accessories. The supplied items are designed
only for this device and may not be compatible with other devices.
• Descriptions are based on the device default settings.
• Default apps on the device are subject to updates, and support for
these apps may be withdrawn without prior notice. If you have any
questions about an app provided with the device, please contact an
LG Service Centre. For user-installed apps, please contact the relevant
service provider.
• Modifying the device’s operating system or installing software from
unofficial sources may damage the device and lead to data corruption
or data loss. Such actions will violate your LG licence agreement and
void your warranty.
• Some content and illustrations may differ from your device, depending
on the area, service provider, software version, or OS version, and are
subject to change without prior notice.
• Software, audio, wallpaper, images, and other media supplied with
your device are licenced for limited use. If you extract and use these
materials for commercial or other purposes, you may be infringing
copyright laws. As a user, you are fully responsible for the illegal use of
media.
• Additional charges may incur for data services, such as messaging,
uploading, downloading, auto-syncing and location services. To avoid
additional charges, select a data plan suitable to your needs. Contact
your service provider to obtain additional details.
• Failure to follow the instructions in this guide and improper use may
damage the device.
ENGLISH

2About this user guide
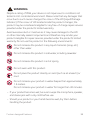
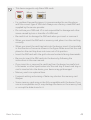
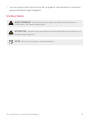
Instructional notices
WARNING: Situations that could cause injury to the user and third
parties.
CAUTION: Situations that may cause minor injury or damage to the
device.
NOTE: Notices or additional information.

3
Table of contents
01
Custom-designed
Features
7 Air Motion
12 Camera features
19 Floating Bar
20 Google Assistant
22 HD Audio recording features
23 Face Unlock
26 Hand ID
28 Fingerprint recognition
32 AOD (always-on display)
33 Quick Help
33 Notes on Water Resistant
Properties
02
Basic Functions
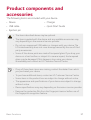
37 Product components and
accessories
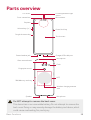
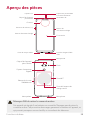
38 Parts overview
41 Turning the power on or off
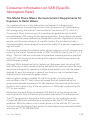
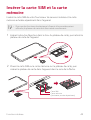
42 Installing the SIM card and
memory card
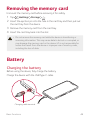
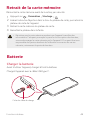
44 Removing the memory card
44 Battery
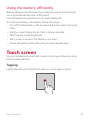
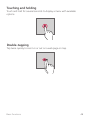
47 Touch screen
51 Home screen
60 Screen lock
64 Memory card encryption
66 Entering text
68 Content sharing
70 Do not disturb

4Table of contents
03
Useful Apps
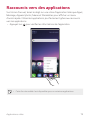
72 Installing and uninstalling apps
74 App Shortcuts
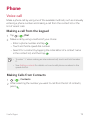
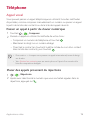
75 Phone
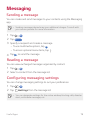
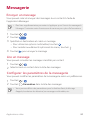
79 Messaging
80 Camera
105 Gallery
109 QuickMemo+
112 Clock
113 Contacts
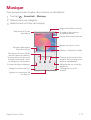
116 Music
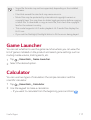
117 Game Launcher
117 Calculator
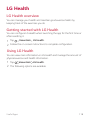
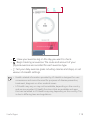
118 LG Health
120 Smart cleaning
120 LG Mobile Switch
120 App trash
121 SmartWorld
122 RemoteCall Service
122 Google apps
04
Settings
126 Settings
126 Network & internet
133 Connected devices
138 Sound
140 Display
142 Lock screen & security
143 Privacy
144 Location
145 Extensions
149 Digital Wellbeing & parental
controls
149 Apps & notifications
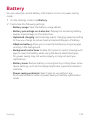
150 Battery
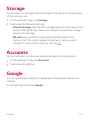
151 Storage
151 Accounts
151 Google
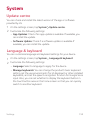
152 System
156 Accessibility
158 Support

5Table of contents
05
Appendix
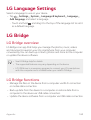
160 LG Language Settings
160 LG Bridge
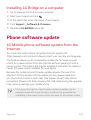
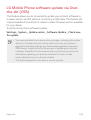
161 Phone software update
163 Anti-Theft Guide
164 Open Source Software Notice
Information
164 Regulatory information(FCC/IC
ID number, etc.)
165 Trademarks
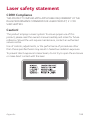
166 Laser safety statement
167 More information
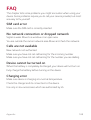
169 FAQ
06
For Your Safety
07
LIMITED WARRANTY
198 LIMITED WARRANTY
STATEMENT

Custom-designed
Features
01

Custom-designed Features 7
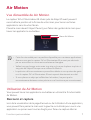
Air Motion
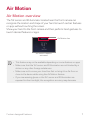
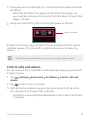
Air Motion overview
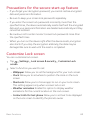
The ToF sensor and IR illuminator located near the front camera can
recognize the location and shape of your hand to launch certain features
or apps without touching the screen.
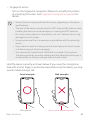
Show your hand to the front camera and then perform hand gestures to
launch desired features or apps.
Air Motion feature
activated
Air Motion bar
• This feature may not be available depending on some features or apps.
• Make sure that the ToF sensor and IR illuminator are not blocked by a
sticker or any other foreign substances.
• Make sure not to move your hand too fast or bring it too far from or
close to the device while using the Air Motion feature.
• If you are wearing gloves or the ToF sensor and IR illuminator are
exposed to direct sunlight, the recognition accuracy may decrease.

Custom-designed Features 8
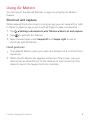
Using Air Motion
You can launch the desired features or apps by using the Air Motion
feature.
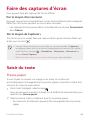
Shortcut and capture
While viewing the Home screen or using an app, you can swipe left or right
in the air to open an app or pinch with all fingers to take a screenshot.
1
Tap Settings Extensions Air Motion Shortcut and capture.
2
Tap to activate this feature.
3
Select desired apps under Swipe left and Swipe right to use as
shortcuts with Air Motion.
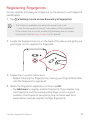
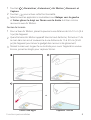
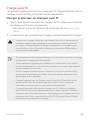
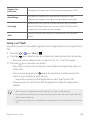
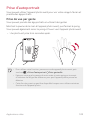
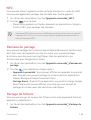
Hand gestures
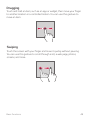
1
To enable Air Motion, place your palm at a distance of 2-5 inches from
the device.
2
When the Air Motion bar appears at the top of the screen, cup your
hand in the air while lifting it to the distance of 6-8 inches from the
device to launch the Swipe shortcuts controller.

Custom-designed Features 9
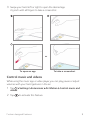
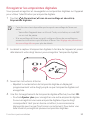
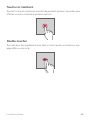
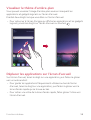
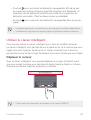
3
Swipe your hand left or right to open the desired app.
Or, pinch with all fingers to take a screenshot.
To open an app To take a screenshot
or
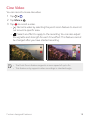
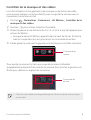
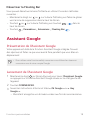
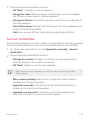
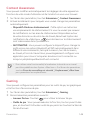
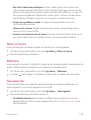
Control music and videos
While using the music app or video player, you can play, pause or adjust
volumes with your hand gestures in the air.
1
Tap Settings Extensions Air Motion Control music and
videos.
2
Tap to activate this feature.

Custom-designed Features 10
3
Place your palm at a distance of 2-5 inches from the device to enable
Air Motion.
• When the Air Motion bar appears at the top of the screen, cup
your hand at a distance of 6-8 inches from the device to launch the
Player controller.
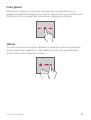
4
Swipe your hand left or right to control the player as desired.
Player controller
To adjust the volume, cup your hand in the air and wait until the volume
controller appears. Then, turn left or right to decrease or increase the
volume.
• This feature is available only on the music or video player screen.
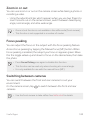
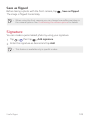
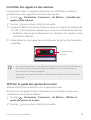
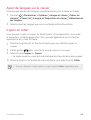
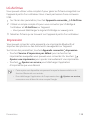
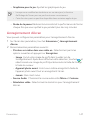
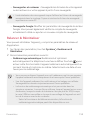
Control calls and alarms
You can receive a call or stop alarms and timers by swiping your hand left
or right in the air.
1
Tap Settings Extensions Air Motion Control calls and
alarms.
2
Tap of each menu to activate.
3
With Air Motion enabled, cup your hand at a distance of 6-8 inches
from the device to to launch the controller.
• Air Motion is automatically enabled when a call or alarm notification
is received.

Custom-designed Features 11
4
Swipe your hand left or right to control as desired.
Alarms controller
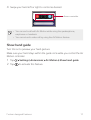
• You can end a call with Air Motion while using the speakerphone,
earphones or headsets.
• You cannot end a video call by using the Air Motion feature.
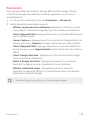
Show hand guide
Turn this on to preview your hand gesture.
Make sure your hand stays within the guide circle while you control the Air
Motion controller.
1
Tap Settings Extensions Air Motion Show hand guide.
2
Tap to activate this feature.

Custom-designed Features 12
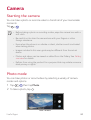
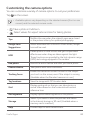
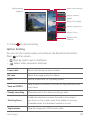
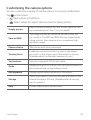
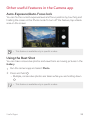
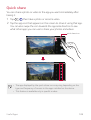
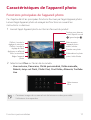
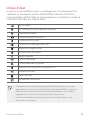
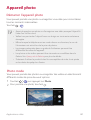
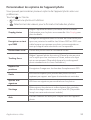
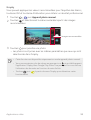
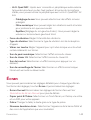
Camera features
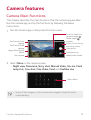
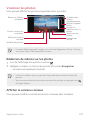
Camera Main Functions
This chapter describes the main functions that the camera app provides.
Run the camera app, and try the functions by following the below
instructions.
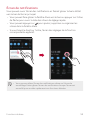
1
Run the camera app on the product’s home screen.
Preview photo
taken/video filmed
Touch to switch to
general-angle
/wide-angle
camera
Take photo
Switch to front-facing/
rear-facing camera
Set camera
Apply filter/sticker
effect
Set/Cancel flash
setting
Set/Cancel timer
setting
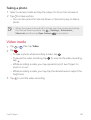
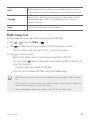
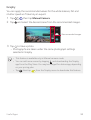
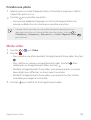
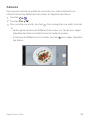
2
Select More on the camera screen.
• Night view, Panorama, Story shot, Manual Video, Slo-mo, Flash
Jump-Cut, Cine shot, Cine Video, Food and YouTube Live.
Select More
• Some of the images on this manual were staged to help the user’s
understanding.

Custom-designed Features 13
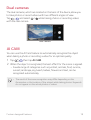
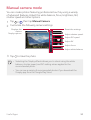
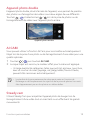
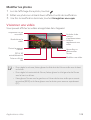
Dual cameras
The dual cameras, which are located on the back of the device, allow you
to take photos or record videos with two different angles of view.
Tap
, and select / while taking photos or recording videos
with the rear camera.
Rear Camera
AI CAM
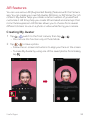
You can use the AI Cam feature to automatically recognize the object
when taking a photo or recording a video for an optimal quality.
1
Tap , then tap AI CAM.
2
When the object is recognized, the best effect for the scene is applied.
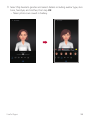
• A wide range of categories such as portrait, animals, food, sunrise,
sunset, landscape, sky, beach, babies, flowers and text, can be
recognized automatically.
• The result of the scene recognition may differ depending on the
illumination or the location of the subject while taking photos. Keywords
do not appear on the actual photos or videos.

Custom-designed Features 14
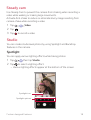
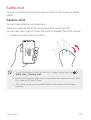
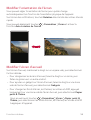
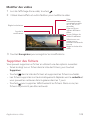
Steady cam
Use Steady Cam to prevent the camera from shaking when recording a
video while walking or making large movements.
Activate Anti-shake to reduce or eliminate blurry image resulting from
camera shake while recording a video.
1
Tap
Video.
2
Tap .
3
Tap to record a video.
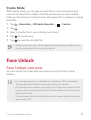
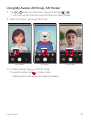
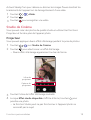
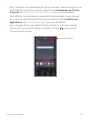
Studio
You can create studio level photos by using Spotlight and Backdrop
features in the camera.
Spotlight
You can apply various lighting effects while taking photos.
1
Tap , then tap Studio.
2
Tap to select a lighting effect.
• Various lighting effects appear at the bottom of the screen.
Spotlight icon
Spotlight options

Custom-designed Features 15
3
Tap the desired lighting effect icon.
4
When Studio effect is available appears on the screen, tap to
take a photo.
• The Studio feature may not work if the camera cannot recognize
the subject.
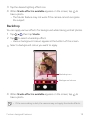
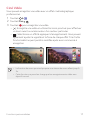
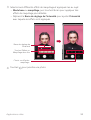
Backdrop
You can apply various effects for background while taking portrait photos.
1
Tap , then tap Studio.
2
Tap to select a backdrop effect.
• Various background colours appear at the bottom of the screen.
3
Select a background colour you want to apply.
Backdrop icon
Background colours
4
When Studio effect is available appears on the screen, tap to
take a photo.
• If the surrounding is dark, the camera may not apply the studio effects.

Custom-designed Features 16
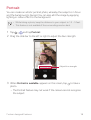
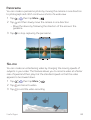
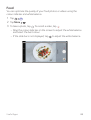
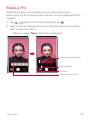
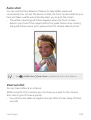
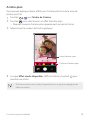
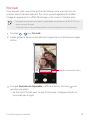
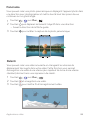
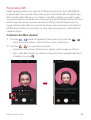
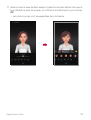
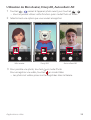
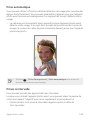
Portrait
You can create an artistic portrait photo, whereby the subject is in focus
and the background is blurred. You can also edit the image by applying
lighting or colour effect to the background.
• While taking a photo, keep the distance to your subject to 1.3 ~ 5 feet.
• This feature is not available if the surroundings are too dark.
1
Tap , and tap Portrait.
2
Drag the slide bar to the left or right to adjust the blur strength.
Adjust blur strength.
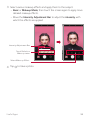
3
When Portrait is available. appears on the screen, tap to take a
photo.
• The Portrait feature may not work if the camera cannot recognize
the subject.

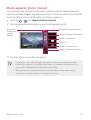
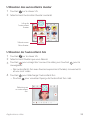
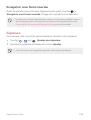
Custom-designed Features 17
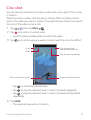
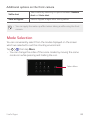
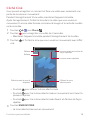
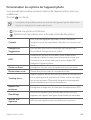
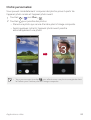
Cine shot
You can record a moment and make a video with only a part of the scene
in motion.
While recording a video, hold the device steady. After recorded, rub the
area in the video you want in motion. The selected area starts moving and
the rest of the video remains still.
1
Tap , then tap More .
2
Tap
to record a 3 second video.
• Hold the device steady while recording the video.
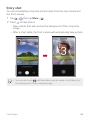
3
Tap and rub the area you want in motion with the cine shot effect.
Play forward and
backward repeatedly.
Play forward repeatedly.
Undo
Redo
Select the area to move. Erase the selected area.
• Tap to erase the selected area.
• Tap
to play the selected area in motion forward repeatedly.
• Tap
to play the selected area in motion forward and backward
repeatedly.
4
Tap SAVE.
• The selected area will be in motion.

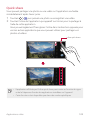
Custom-designed Features 18
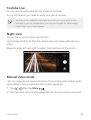
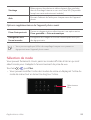
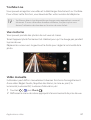
Cine Video
You can record a movie-like video.
1
Tap .
2
Tap More .
3
Tap
to record a video.
•
: Record a video by selecting the point zoom feature to zoom in/
out around a specific area.
•
: Select an effect to apply to the recording. You can also adjust
the vignette and strength for each Cine effect. This feature cannot
be changed after you have started recording.
• The Point Zoom feature supports a zoom speed of up to 3x.
• This feature only supports video recordings in standard angle.

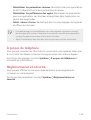
Custom-designed Features 19
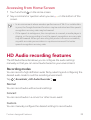
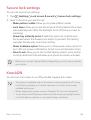
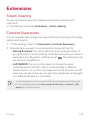
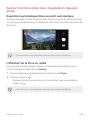
Sound quality and effects features
DTS:X 3D Surround
You can play a song or video in three-dimensional, immersive and vivid
sound. To use this feature, connect earphones, speaker or other external
audio devices to your device.
Tap
Settings Sound Sound quality and effects, then tap DTS:X
3D Surround
to activate this feature.
• You can bring down the status bar in the upper part of the screen and
press the icon for DTS:X 3D Surround to activate the function.
If you connect external sound devices such as earphones and speakers
to the product, a pop up appears where you can turn on the DTS:X 3D
Surround or Hi-Fi Quad DAC function.
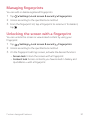
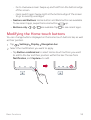
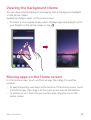
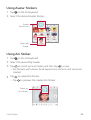
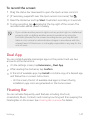
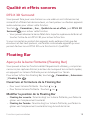
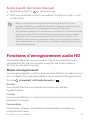
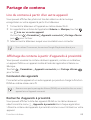
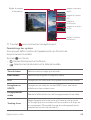
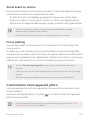
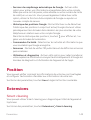
Floating Bar
Floating Bar overview
You can activate frequently used features, including shortcuts, screen
capture, music player, and quick contacts, by touching and then swiping
the Floating Bar on the screen.
To enable the Floating Bar feature, tap
Settings Extensions
Floating Bar
.
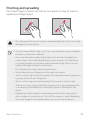
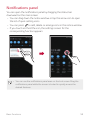
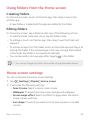
Opening and closing the Floating Bar
• To open the Floating Bar: Tap or .
• To close the Floating Bar: Tap
or .
La page charge ...
La page charge ...
La page charge ...
La page charge ...
La page charge ...
La page charge ...
La page charge ...
La page charge ...
La page charge ...
La page charge ...
La page charge ...
La page charge ...
La page charge ...
La page charge ...
La page charge ...
La page charge ...
La page charge ...
La page charge ...
La page charge ...
La page charge ...
La page charge ...
La page charge ...
La page charge ...
La page charge ...
La page charge ...
La page charge ...
La page charge ...
La page charge ...
La page charge ...
La page charge ...
La page charge ...
La page charge ...
La page charge ...
La page charge ...
La page charge ...
La page charge ...
La page charge ...
La page charge ...
La page charge ...
La page charge ...
La page charge ...
La page charge ...
La page charge ...
La page charge ...
La page charge ...
La page charge ...
La page charge ...
La page charge ...
La page charge ...
La page charge ...
La page charge ...
La page charge ...
La page charge ...
La page charge ...
La page charge ...
La page charge ...
La page charge ...
La page charge ...
La page charge ...
La page charge ...
La page charge ...
La page charge ...
La page charge ...
La page charge ...
La page charge ...
La page charge ...
La page charge ...
La page charge ...
La page charge ...
La page charge ...
La page charge ...
La page charge ...
La page charge ...
La page charge ...
La page charge ...
La page charge ...
La page charge ...
La page charge ...
La page charge ...
La page charge ...
La page charge ...
La page charge ...
La page charge ...
La page charge ...
La page charge ...
La page charge ...
La page charge ...
La page charge ...
La page charge ...
La page charge ...
La page charge ...
La page charge ...
La page charge ...
La page charge ...
La page charge ...
La page charge ...
La page charge ...
La page charge ...
La page charge ...
La page charge ...
La page charge ...
La page charge ...
La page charge ...
La page charge ...
La page charge ...
La page charge ...
La page charge ...
La page charge ...
La page charge ...
La page charge ...
La page charge ...
La page charge ...
La page charge ...
La page charge ...
La page charge ...
La page charge ...
La page charge ...
La page charge ...
La page charge ...
La page charge ...
La page charge ...
La page charge ...
La page charge ...
La page charge ...
La page charge ...
La page charge ...
La page charge ...
La page charge ...
La page charge ...
La page charge ...
La page charge ...
La page charge ...
La page charge ...
La page charge ...
La page charge ...
La page charge ...
La page charge ...
La page charge ...
La page charge ...
La page charge ...
La page charge ...
La page charge ...
La page charge ...
La page charge ...
La page charge ...
La page charge ...
La page charge ...
La page charge ...
La page charge ...
La page charge ...
La page charge ...
La page charge ...
La page charge ...
La page charge ...
La page charge ...
La page charge ...
La page charge ...
La page charge ...
La page charge ...
La page charge ...
La page charge ...
La page charge ...
La page charge ...
La page charge ...
La page charge ...
La page charge ...
La page charge ...
La page charge ...
La page charge ...
La page charge ...
La page charge ...
La page charge ...
La page charge ...
La page charge ...
La page charge ...
La page charge ...
La page charge ...
La page charge ...
La page charge ...
La page charge ...
La page charge ...
La page charge ...
La page charge ...
La page charge ...
La page charge ...
La page charge ...
La page charge ...
La page charge ...
La page charge ...
La page charge ...
La page charge ...
La page charge ...
La page charge ...
La page charge ...
La page charge ...
La page charge ...
La page charge ...
La page charge ...
La page charge ...
La page charge ...
La page charge ...
La page charge ...
La page charge ...
La page charge ...
La page charge ...
La page charge ...
La page charge ...
La page charge ...
La page charge ...
La page charge ...
La page charge ...
La page charge ...
La page charge ...
La page charge ...
La page charge ...
La page charge ...
La page charge ...
La page charge ...
La page charge ...
La page charge ...
La page charge ...
La page charge ...
La page charge ...
La page charge ...
La page charge ...
La page charge ...
La page charge ...
La page charge ...
La page charge ...
La page charge ...
La page charge ...
La page charge ...
La page charge ...
La page charge ...
La page charge ...
La page charge ...
La page charge ...
La page charge ...
La page charge ...
La page charge ...
La page charge ...
La page charge ...
La page charge ...
La page charge ...
La page charge ...
La page charge ...
La page charge ...
La page charge ...
La page charge ...
La page charge ...
La page charge ...
La page charge ...
La page charge ...
La page charge ...
La page charge ...
La page charge ...
La page charge ...
La page charge ...
La page charge ...
La page charge ...
La page charge ...
La page charge ...
La page charge ...
La page charge ...
La page charge ...
La page charge ...
La page charge ...
La page charge ...
La page charge ...
La page charge ...
La page charge ...
La page charge ...
La page charge ...
La page charge ...
La page charge ...
La page charge ...
La page charge ...
La page charge ...
La page charge ...
La page charge ...
La page charge ...
La page charge ...
La page charge ...
La page charge ...
La page charge ...
La page charge ...
La page charge ...
La page charge ...
La page charge ...
La page charge ...
La page charge ...
La page charge ...
La page charge ...
La page charge ...
La page charge ...
La page charge ...
La page charge ...
La page charge ...
La page charge ...
La page charge ...
La page charge ...
La page charge ...
La page charge ...
La page charge ...
La page charge ...
La page charge ...
La page charge ...
La page charge ...
La page charge ...
La page charge ...
La page charge ...
La page charge ...
La page charge ...
La page charge ...
La page charge ...
La page charge ...
La page charge ...
La page charge ...
La page charge ...
La page charge ...
La page charge ...
La page charge ...
La page charge ...
La page charge ...
La page charge ...
La page charge ...
La page charge ...
La page charge ...
La page charge ...
La page charge ...
La page charge ...
La page charge ...
La page charge ...
La page charge ...
La page charge ...
La page charge ...
La page charge ...
La page charge ...
La page charge ...
La page charge ...
La page charge ...
La page charge ...
La page charge ...
La page charge ...
La page charge ...
La page charge ...
La page charge ...
La page charge ...
La page charge ...
La page charge ...
La page charge ...
La page charge ...
La page charge ...
La page charge ...
La page charge ...
La page charge ...
La page charge ...
La page charge ...
La page charge ...
La page charge ...
La page charge ...
La page charge ...
La page charge ...
La page charge ...
La page charge ...
La page charge ...
La page charge ...
La page charge ...
La page charge ...
La page charge ...
La page charge ...
La page charge ...
La page charge ...
La page charge ...
La page charge ...
La page charge ...
La page charge ...
La page charge ...
La page charge ...
La page charge ...
La page charge ...
La page charge ...
La page charge ...
La page charge ...
La page charge ...
La page charge ...
La page charge ...
La page charge ...
La page charge ...
La page charge ...
La page charge ...
La page charge ...
La page charge ...
-
 1
1
-
 2
2
-
 3
3
-
 4
4
-
 5
5
-
 6
6
-
 7
7
-
 8
8
-
 9
9
-
 10
10
-
 11
11
-
 12
12
-
 13
13
-
 14
14
-
 15
15
-
 16
16
-
 17
17
-
 18
18
-
 19
19
-
 20
20
-
 21
21
-
 22
22
-
 23
23
-
 24
24
-
 25
25
-
 26
26
-
 27
27
-
 28
28
-
 29
29
-
 30
30
-
 31
31
-
 32
32
-
 33
33
-
 34
34
-
 35
35
-
 36
36
-
 37
37
-
 38
38
-
 39
39
-
 40
40
-
 41
41
-
 42
42
-
 43
43
-
 44
44
-
 45
45
-
 46
46
-
 47
47
-
 48
48
-
 49
49
-
 50
50
-
 51
51
-
 52
52
-
 53
53
-
 54
54
-
 55
55
-
 56
56
-
 57
57
-
 58
58
-
 59
59
-
 60
60
-
 61
61
-
 62
62
-
 63
63
-
 64
64
-
 65
65
-
 66
66
-
 67
67
-
 68
68
-
 69
69
-
 70
70
-
 71
71
-
 72
72
-
 73
73
-
 74
74
-
 75
75
-
 76
76
-
 77
77
-
 78
78
-
 79
79
-
 80
80
-
 81
81
-
 82
82
-
 83
83
-
 84
84
-
 85
85
-
 86
86
-
 87
87
-
 88
88
-
 89
89
-
 90
90
-
 91
91
-
 92
92
-
 93
93
-
 94
94
-
 95
95
-
 96
96
-
 97
97
-
 98
98
-
 99
99
-
 100
100
-
 101
101
-
 102
102
-
 103
103
-
 104
104
-
 105
105
-
 106
106
-
 107
107
-
 108
108
-
 109
109
-
 110
110
-
 111
111
-
 112
112
-
 113
113
-
 114
114
-
 115
115
-
 116
116
-
 117
117
-
 118
118
-
 119
119
-
 120
120
-
 121
121
-
 122
122
-
 123
123
-
 124
124
-
 125
125
-
 126
126
-
 127
127
-
 128
128
-
 129
129
-
 130
130
-
 131
131
-
 132
132
-
 133
133
-
 134
134
-
 135
135
-
 136
136
-
 137
137
-
 138
138
-
 139
139
-
 140
140
-
 141
141
-
 142
142
-
 143
143
-
 144
144
-
 145
145
-
 146
146
-
 147
147
-
 148
148
-
 149
149
-
 150
150
-
 151
151
-
 152
152
-
 153
153
-
 154
154
-
 155
155
-
 156
156
-
 157
157
-
 158
158
-
 159
159
-
 160
160
-
 161
161
-
 162
162
-
 163
163
-
 164
164
-
 165
165
-
 166
166
-
 167
167
-
 168
168
-
 169
169
-
 170
170
-
 171
171
-
 172
172
-
 173
173
-
 174
174
-
 175
175
-
 176
176
-
 177
177
-
 178
178
-
 179
179
-
 180
180
-
 181
181
-
 182
182
-
 183
183
-
 184
184
-
 185
185
-
 186
186
-
 187
187
-
 188
188
-
 189
189
-
 190
190
-
 191
191
-
 192
192
-
 193
193
-
 194
194
-
 195
195
-
 196
196
-
 197
197
-
 198
198
-
 199
199
-
 200
200
-
 201
201
-
 202
202
-
 203
203
-
 204
204
-
 205
205
-
 206
206
-
 207
207
-
 208
208
-
 209
209
-
 210
210
-
 211
211
-
 212
212
-
 213
213
-
 214
214
-
 215
215
-
 216
216
-
 217
217
-
 218
218
-
 219
219
-
 220
220
-
 221
221
-
 222
222
-
 223
223
-
 224
224
-
 225
225
-
 226
226
-
 227
227
-
 228
228
-
 229
229
-
 230
230
-
 231
231
-
 232
232
-
 233
233
-
 234
234
-
 235
235
-
 236
236
-
 237
237
-
 238
238
-
 239
239
-
 240
240
-
 241
241
-
 242
242
-
 243
243
-
 244
244
-
 245
245
-
 246
246
-
 247
247
-
 248
248
-
 249
249
-
 250
250
-
 251
251
-
 252
252
-
 253
253
-
 254
254
-
 255
255
-
 256
256
-
 257
257
-
 258
258
-
 259
259
-
 260
260
-
 261
261
-
 262
262
-
 263
263
-
 264
264
-
 265
265
-
 266
266
-
 267
267
-
 268
268
-
 269
269
-
 270
270
-
 271
271
-
 272
272
-
 273
273
-
 274
274
-
 275
275
-
 276
276
-
 277
277
-
 278
278
-
 279
279
-
 280
280
-
 281
281
-
 282
282
-
 283
283
-
 284
284
-
 285
285
-
 286
286
-
 287
287
-
 288
288
-
 289
289
-
 290
290
-
 291
291
-
 292
292
-
 293
293
-
 294
294
-
 295
295
-
 296
296
-
 297
297
-
 298
298
-
 299
299
-
 300
300
-
 301
301
-
 302
302
-
 303
303
-
 304
304
-
 305
305
-
 306
306
-
 307
307
-
 308
308
-
 309
309
-
 310
310
-
 311
311
-
 312
312
-
 313
313
-
 314
314
-
 315
315
-
 316
316
-
 317
317
-
 318
318
-
 319
319
-
 320
320
-
 321
321
-
 322
322
-
 323
323
-
 324
324
-
 325
325
-
 326
326
-
 327
327
-
 328
328
-
 329
329
-
 330
330
-
 331
331
-
 332
332
-
 333
333
-
 334
334
-
 335
335
-
 336
336
-
 337
337
-
 338
338
-
 339
339
-
 340
340
-
 341
341
-
 342
342
-
 343
343
-
 344
344
-
 345
345
-
 346
346
-
 347
347
-
 348
348
-
 349
349
-
 350
350
-
 351
351
-
 352
352
-
 353
353
-
 354
354
-
 355
355
-
 356
356
-
 357
357
-
 358
358
-
 359
359
-
 360
360
-
 361
361
-
 362
362
-
 363
363
-
 364
364
-
 365
365
-
 366
366
-
 367
367
-
 368
368
-
 369
369
-
 370
370
-
 371
371
-
 372
372
-
 373
373
-
 374
374
-
 375
375
-
 376
376
-
 377
377
-
 378
378
-
 379
379
-
 380
380
-
 381
381
-
 382
382
-
 383
383
-
 384
384
-
 385
385
-
 386
386
-
 387
387
-
 388
388
-
 389
389
-
 390
390
-
 391
391
-
 392
392
-
 393
393
-
 394
394
-
 395
395
-
 396
396
-
 397
397
-
 398
398
-
 399
399
-
 400
400
-
 401
401
-
 402
402
-
 403
403
-
 404
404
-
 405
405
-
 406
406
-
 407
407
-
 408
408
-
 409
409
-
 410
410
-
 411
411
-
 412
412
-
 413
413


LG LMG820UM2 Le manuel du propriétaire
- Catégorie
- Téléphones portables
- Taper
- Le manuel du propriétaire
- Ce manuel convient également à
dans d''autres langues
- English: LG LMG820UM2 Owner's manual
Documents connexes
-
LG LMV500EM Mode d'emploi
-
LG V30 Manuel utilisateur
-
-
LG LGH930.AFRABL Manuel utilisateur
-
-
-
-
-
-
