Haier HDBL865ATS Manuel utilisateur
- Catégorie
- Lave-vaisselle
- Taper
- Manuel utilisateur

24” Built-In Dishwasher
Lave-Vaisselle Incorpere 24”
Lavavajillas Empotrado 24”
User Manual
Guide de l’utilisateur
Manual del usuario
HDBL865ATS
Part # XXXXXXXXXX


1
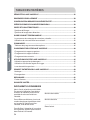
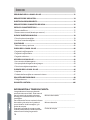
TABLE OF CONTENTS
DISHWASHER SAFETY ........................................................................................ 2
LOCATION REQUIREMENTS ................................................................................5
ELECTRICAL REQUIREMENTS .............................................................................6
WATER SUPPLY REQUIREMENTS .........................................................................6
PARTS AND FEATURES .......................................................................................7
Filter System .................................................................................................................. 8
Sensor Wash System .....................................................................................................8
START UP GUIDE .................................................................................................9
How Your Dishwasher Cleans .......................................................................................9
Using Your New Dishwasher..........................................................................................9
CONTROLS ...................................................................................................... 10
Cycle and Option Charts .............................................................................................13
DISHWASHER LOADING ...................................................................................15
Loading Upper Rack .....................................................................................................17
Loading Lower Rack .....................................................................................................18
Loading Silverware ......................................................................................................20
DISHWASHER USE ............................................................................................ 22
Proper Use of Detergent ............................................................................................. 22
Proper Use of Rinse Aid ...............................................................................................23
Washing Special Items .................................................................................................24
DISHWASHER CARE .......................................................................................... 25
Cleaning .......................................................................................................................25
Storing .......................................................................................................................... 26
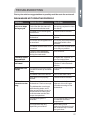
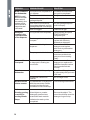
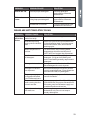
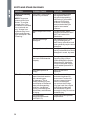
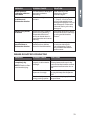
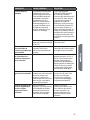
TROUBLESHOOTING ........................................................................................ 27
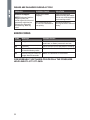
Error Codes ..................................................................................................................32
LIMITED WARRANTY ........................................................................................ 33
RECORD KEEPING
Thank you for purchasing this Haier
product. This user manual will help you
get the best performance from your
new dishwasher.
For future reference, record the model
and serial number located on the inside
frame of the dishwasher, and the date
of purchase.
Staple your proof of purchase to this
manual to aid in obtaining warranty
service if needed.
___________________________________
Model number
___________________________________
Serial number
___________________________________
Date of purchase

2
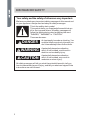
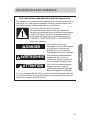
DISHWASHER SAFETY
Your safety and the safety of others are very important.
We have provided many important safety messages in this manual and
on your appliance. Always read and obey all safety messages.
DANGER
WARNING
CAUTION
This is the safety alert symbol.
This symbol alerts you to potential hazards that can
kill or hurt you and others. All safety messages will
follow the safety alert symbol and either the word
“DANGER,” “WARNING” or “CAUTION.”
These words mean:
An imminently hazardous situation. You
could be killed or seriously injured if you
don’t immediately follow instructions.
A potentially hazardous situation
which, if not avoided, could result in
death or serious bodily injury.
A potentially hazardous situation
which, if not avoided, may result in
moderate or minor injury.
All safety messages will tell you what the potential hazard is, tell you
how to reduce the chance of injury, and tell you what can happen if the
instructions are not followed.

3
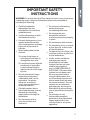
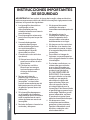
IMPORTANT SAFETY
INSTRUCTIONS
WARNING:
or damage when using the dishwasher, follow basic precautions,
including the following:
•
dishwashers are not
intended for licensed food
establishments.
•
Use the dishwasher only for
its intended function.
•
Use only detergents or rinse
agents recommended for
use in a dishwasher, and keep
them out of the reach of
children.
•
When loading items to be
washed:
1) Locate sharp items so
that they are not likely to
damage the door seal;
2) Load sharp knives with the
in the silverware tray to
reduce the risk of cut-type
•
Do not wash plastic items
unless they are marked
“dishwasher safe” or the
equivalent. For plastic
items not so marked,
check the manufacturer’s
recommendations.
•
If the dishwasher drains
into a food disposer, ensure
disposer is completely
empty before running the
dishwasher.
•
Do not tamper with or
override controls and
interlocks.
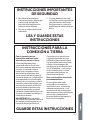
•
Do not touch the heating
element during or
immediately after use.
•
Do not operate the
dishwasher unless all
enclosure panels are properly
in place.
•
Do not tamper with controls.
•
Do not abuse, sit on, or stand
on the door, lid, or dish racks
of the dishwasher.
•
not allow children to play in or
on the dishwasher.
•
Under certain conditions,
hydrogen gas may be
produced in a hot water
system that has not been
used for two weeks or
more. HYDROGEN GAS IS
EXPLOSIVE. If the hot water
system has not been used
for such a period, before
using the dishwasher turn
on all hot water faucets and
for several minutes, This will
release any accumulated
hydrogen gas. As the gas is
time.
•
Do not store or use
combustible materials,
vapors and liquids in the
vicinity of this or any other
appliance.

4
IMPORTANT SAFETY
INSTRUCTIONS
•
Do not use the dishwasher
if it has a damaged power
line, or plug. Do not plug the
dishwasher into a damaged
outlet.
•
Do not use an extension cord.
•
When disposing of an old
dishwasher, remove the
door from the washing
compartment. This will
reduce the possibility of
danger to children.
READ AND SAVE THESE
INSTRUCTIONS
GROUNDING INSTRUCTIONS
For a grounded, cord-connected
dishwasher:
The dishwasher must be
grounded. In the event of a
malfunction or breakdown,
grounding will reduce the risk of
electric shock by providing a path
of least resistance for electric
current. If the dishwasher is to
be connected with a power cord
the cord must have an equipment
grounding conductor and a
grounding plug. The plug must be
plugged into an appropriate outlet
that is installed and grounded in
accordance with all local codes
and ordinances.
WARNING: Improper connection
of the equipment-grounding
conductor can result in a risk of
electric shock.
or service representative if
you are in doubt whether the
dishwasher is properly grounded.
Do not modify the plug provided
with the dishwasher; if it will not
For a permanently connected
dishwasher:
The dishwasher must be
connected to a grounded metal,
permanent wiring system, or an
equipment-grounding conductor
must be run with the circuit
conductors and connected to the
equipment-grounding terminal or
lead on the dishwasher.
SAVE THESE INSTRUCTIONS

5
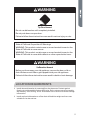
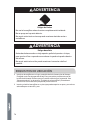
WARNING
Tip Over Hazard
Do not use dishwasher until completely installed.
Do not push down on open door.
Failure to follow these instructions can result in serious injury or cuts.
State of California Proposition 65 Warnings:
WARNING: This product contains one or more chemicals known to the
State of California to cause cancer.
WARNING: This product contains one or more chemicals known to the
State of California to cause birth defects or other reproductive harm.
WARNING
Suffocation Hazard
Before you throw away your old appliance, remove the door or lid so
that children cannot hide or get trapped inside your old appliance.
Failure to follow these instructions can result in death or brain damage.
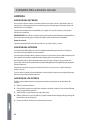
LOCATION REQUIREMENTS
•
Install where dishwasher is protected from the elements. Protect against
the warranty. See “Storing” in the “Dishwasher Care” section for winter storage
information.
•
suitable for its size and use.

6
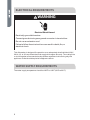
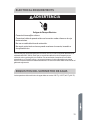
ELECTRICAL REQUIREMENTS
WARNING
Electrical Shock Hazard
Electrically ground dishwasher.
Connect ground wire to green ground connector in terminal box.
Do not use an extension cord.
Failure to follow these instructions can result in death, fire, or
electrical shock.
This dishwasher is designed for operation on an adequately wired individual 120 V,
60 Hz, 15- or 20-amp fused electrical supply with copper wire only. Time-delay fuse
or circuit breaker recommended, and provide a separate circuit serving only this
WATER SUPPLY REQUIREMENTS
The water supply temperature should be 120°F to 150°F (49°C to 66°C).

7
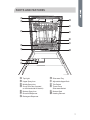
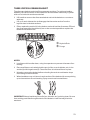
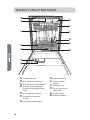
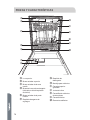
PARTS AND FEATURES
a
c
d
e
f
g
i
j
k
l
m
b
h
a Top Light
b Upper Spray Arm
c Middle Spray Arm
d Scrub Zone Arm (located
e Bottom Spray Arm
f Rinse Aid Dispenser
g Detergent Dispenser
h Silverware Tray
i
j Tub Gasket
k Three-Piece
Silverware Basket
l Bottom Rack
m Heating Element

8
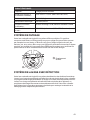
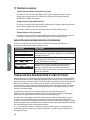
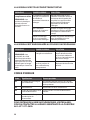
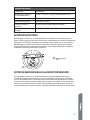
SPECIFICATIONS
Capacity: 14 Place Settings
Dimensions (WxDxH):
Weight Unpacked: 94 lb (42.5 kg)
Power Supply: 120 volts, 60 Hz
Rated Power Usage: Wash motor 50 W Heater 840 W
Water Feed Pressure: 20 ~ 120 psi (138 ~ 828 kPa)
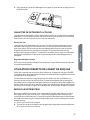
FILTER SYSTEM
allowing your dishwasher to perform better while using less water and energy.
a
a Filter Location
SENSOR WASH SYSTEM
Your dishwasher has a food soil sensing system. When a partial load of lightly
soiled dishes is placed in the dishwasher, a wash cycle similar to a short wash
will automatically be activated. When a full load of heavily soiled dishes is placed
in the unit, a heavy wash cycle will automatically be activated. Your dishwasher
can determine the type of cycle required to clean the dishes and will clean more

9
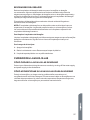
START UP GUIDE
IMPORTANT:
•
Properly dispose of/recycle all packing material.
•
useful operating tips.
HOW YOUR DISHWASHER CLEANS
Your dishwasher cleans by spraying a mixture of hot water and detergent through
the spray arms against soiled surfaces.
drain as the water is pumped out and replaced with clean water.
cycle being used.
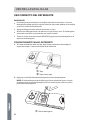
USING YOUR NEW DISHWASHER
1. Load dishwasher. See “Dishwasher Loading.”
2. Add detergent . See “Proper Use of Detergent.”
3. Add rinse aid. See “Proper Use of Rinse Aid.”
4. Select desired CYCLE. See “Cycle and Option Charts.” The indicator light above
the Cycle will illuminate when selected.
5. Select desired OPTIONS. See “Cycle and Option Charts.” The indicator light
above the Option will illuminate when selected.
6. Turn on the hot water faucet nearest the dishwasher until water is hot. Turn
7. Press the Start/Cancel button.
8.
NOTE: The dishwasher is programmed to remember the last cycle so you do not
have to reset each time. To start the dishwasher using the same cycle and options

10
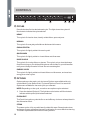
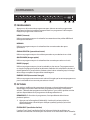
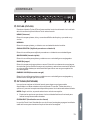
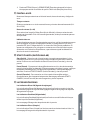
CONTROLS
Normal
China/
Crystal
Quick
Wash
Rinse &
Hold
Energy
Saver
Fresh
Vent
Steam
Scrub
Zone
Heated
Dry
Sanitize
Hi Temp
Wash
Delay
Start
Rinse Aid
Sanitized
Clean
child lock
OptionsCycles
Start/
Cancel
ea
bc
d
Heavy
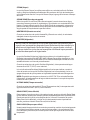
a CYCLES
Press the button for the desired wash cycle. The light above the cycle will
illuminate to indicate the cycle selected.
HEAVY
This cycle is for hard to clean, heavily soiled dishes, pots and pans.
NORMAL
This cycle is for everyday soiled dinner dishes and silverware.
CHINA/CRYSTAL
This cycle is for lightly soiled china and crystal.
QUICK WASH
This cycle is for lightly soiled or rinsed dishes and silverware.
RINSE & HOLD
This cycle is for rinsing dishes or glasses. This cycle is only a rinse that keeps
food from drying on your dishes and reduces odor buildup in your dishwasher
until you are ready to wash a full load. Do not use detergent.
ENERGY SAVER
This cycle is for lightly soiled and rinsed dishes and silverware, and uses less
energy than other cycles.
b OPTIONS
Options enhance the wash cycle, but some Options are available with only
certain Wash Cycles. Refer to the “Cycle and Options Charts” to see which
Options are available for the wash cycle you selected.
NOTE: Depending on the cycle, more than one option may be selected.
•
Press the desired Option(s). The light above the button will illuminate to
indicate which option(s) have been selected.
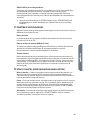
FRESH VENT
the dishwasher fresh.
STEAM
The steam option is for use with heavily soiled dish ware. Steam breaks down

11
SCRUB ZONE
Use the Scrub Zone option when you want to wash pots and pans, durable
serving bowls, and other large dirty hard to clean dishes. When using the Scrub
Zone option place the dishes face down directly above the Scrub Zone arm in
the back left corner of the lower rack.
HEATED DRY
When the Heated Dry option is selected, the heater will work during the drying
process.
SANITIZE
WARNING: Only sanitizing cycles have been designed to meet the
requirements of 6 for soil removal and sanitization efficacy. There is no
intention, either directly or indirectly, that all cycles on a certified
machine have passed the sanitization performance test.
The sanitize option sanitizes dishes and glassware in accordance with NSF
residential dishwashers are not intended for use in licensed food establishments.
When the Sanitize option is selected, the water temperature will reach 158°F
(70°C) maximum.
The Sanitized indicator light illuminates to indicate when the Wash cycle with
opened for 30 seconds.
NOTE: It is possible that the water will not reach 158°F (70°C) in the Sanitize
mode, if the temperature of the incoming hot water does not meet the minimum
requirement of 120°F (49°C).
HI TEMP WASH
When the Hi Temp option is selected, the water temperature will be maintained
at 140°F (60°C) maximum.
DELAY START
To delay the start of the selected cycle press DELAY START until the desired
delay time is shown in the LED display. The Delay option allows you to
automatically start the dishwasher with a 1 to 24 hour delay. To cancel the Delay
Start option and begin the cycle before the delay period is over press START/
CANCEL.
CHILD LOCK
You can lock all controls to avoid unintentionally changing the dishwasher cycle
or starting the dishwasher. The light next to Child Lock will illuminate to indicate
the Child Lock is activated and the Control panel is locked.
•
Press STEAM and SCRUB ZONE at the same time to either activate or cancel
the Child Lock option.
c LED DISPLAY WINDOW
Displays the Time Remaining in the selected Cycle, Delay Hours, and Error
Codes.
Time Remaining
Time remaining in a cycle will show hours and minutes alternately (1H-2H or
0-59).

12
Delay Hours (1 to 24)
If the Delay Start option is selected, the selected time shows in the display
window. If the cycle is running, the time remaining shows in the display window.
Error Indicator
In situations, which are critical to dishwasher function and safe operation, the
control will shut down and indicate an Error code (Er) in the LED display window.
See “Error Codes” in the Troubleshooting section. If an Error code is displayed,
contact Service for assistance with troubleshooting the problem, or for help
locating an authorized service technician.
d START/CANCEL
Start - Select the desired wash cycle and options. The indicator light next to
the cycle and options selected will be lit when activated. Press the Start/Cancel
button once, and close the door.
Pause - To pause the dishwasher during a cycle open the door slowly, the
dishwasher will stop. If you wish to add items to the load check the detergent
dispenser. If the dispenser is closed you can add items. Press START/CANCEL
and close the door.
Cancel - To cancel a cycle when the dishwasher is running, open the door slowly.
Press and hold START/CANCEL for 3 seconds and close the door.
e INDICATOR LIGHTS
Rinse Aid Indicator Light
The Rinse Aid indicator light is illuminated when the rinse aid level is low. Rinse
Aid should be added to the Rinse Aid dispenser.
Sanitized Indicator Light
The Sanitized indicator light illuminates when the cycle using the Sanitize option
Clean Indicator Light
30 seconds after the door is opened.
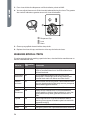
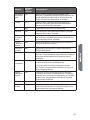
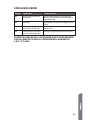
CYCLE PROGRESS INDICATOR
Located on the right side of the front of the dishwasher. These lights indicate the
progress of the current wash cycle.
Cycle Description
WASH
When the diswasher is in a wash or rinse stage of a
cycle, the Wash light is illuminated.
DRY
When the dishwasher is in a drying stage of a cycle,
the Wash and Dry lights are illuminated.
CLEAN
After the dishwasher has completed all stages of a
cycle , all indicator lights are illuminated. If you open
the door when the Clean lights are illuminated, all the

13
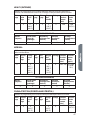
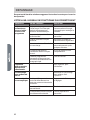
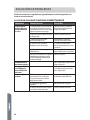
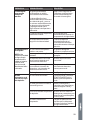
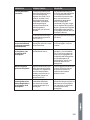
CYCLE AND OPTION CHARTS
Select the wash cycle and options desired. Unless you select a delay wash, the
soak interval. During this time, dried and baked on soil is softened for easier removal
later in the cycle.
Cycle times are approximate and will vary with options selected. Hot water is
necessary to activate dishwasher detergent and melt fatty food soils.
An automatic sensor will check the incoming water temperature and if it is not hot
enough, the cycle may be delayed to heat the water during the main wash. This also
happens when HI-TEMP WASH is selected and a hotter temperature is required to
wash heavier soil loads.
A “
•” shows what steps are in each cycle. Temperatures indicate where extra heat is
added. Water usage is shown in U.S. gallons/liters.
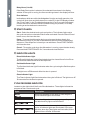
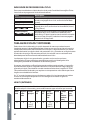
HEAVY
Use this cycle for hard to clean, baked on, cookware and harder than normal water
conditions.
Pre-
Wash
Second
Pre-
Wash
Main
Wash
Rinse Rinse Final
Heated
Rinse
Dry Running
Time
(min)
Water
Usage
(gal/L)
• • •
118°F
(48°C)
• • •
136°F
(58°C)
•
140 6 gal.
(22.8 L)
AVAILABLE OPTIONS
Steam Scrub Zone Heated Dry Sanitize Hi Temp
X
X
X
X X
NORMAL
Use this cycle for loads with normal amounts of food soil.
Pre-
Wash
Second
Pre-
Wash
Main
Wash
Rinse Rinse Final
Heated
Rinse
Dry Running
Time
(min)
Water
Usage
(gal/L)
• •
107° -
118°F
(42° -
48°C)
•
122° -
136°F
(50° -
58°C)
•
105-135 3 to
(10.8 -
23 L)
AVAILABLE OPTIONS
Steam Scrub Zone Heated Dry Sanitize Hi Temp
X X X X X

14
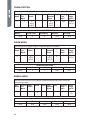
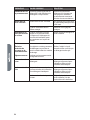
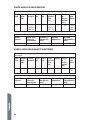
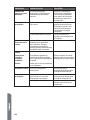
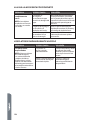
CHINA/CRYSTAL
Pre-
Wash
Second
Pre-
Wash
Main
Wash
Rinse Rinse Final
Heated
Rinse
Dry Running
Time
(min)
Water
Usage
(gal/L)
• • •
118°F
(48°C)
•
136°F
(58°C)
•
120 5 gal./
(19.3 L)
AVAILABLE OPTIONS
Steam Scrub Zone Heated Dry Sanitize Hi Temp
N/A
X X
N/A N/A
QUICK WASH
Use this cycle for lightly soiled or rinsed dishes and silverware.
Pre-
Wash
Second
Pre-
Wash
Main
Wash
Rinse Rinse Final
Heated
Rinse
Dry Running
Time
(min)
Water
Usage
(gal/L)
• •
104°F
(40°C)
•
122° F
(50° C)
•
60 7.9 gal./
15.5 L
AVAILABLE OPTIONS
Steam Scrub Zone Heated Dry Sanitize Hi Temp
N/A
X X
N/A N/A
RINSE & HOLD
Use this rinse cycle for rinsing dishes, glasses and silverware that will not be
washed right away.
Pre-
Wash
Second
Pre-
Wash
Main
Wash
Rinse Rinse Final
Heated
Rinse
Dry Running
Time
(min)
Water
Usage
(gal/L)
•
20 2 gal./
8 L
AVAILABLE OPTIONS
Steam Scrub Zone Heated Dry Sanitize Hi Temp
N/A N/A N/A N/A N/A

15
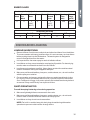
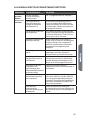
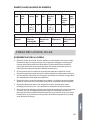
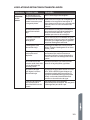
ENERGY SAVER
Use this cycle for lightly soiled or rinsed dishes and silverware.
Pre-
Wash
Second
Pre-
Wash
Main
Wash
Rinse Rinse Final
Heated
Rinse
Dry Running
Time
(min)
Water
Usage
(gal/L)
• • •
104°F
(40°C)
• •
122° F
(50° C)
105 5 gal./
19.3 L
AVAILABLE OPTIONS
Steam Scrub Zone Heated Dry Sanitize Hi Temp
X X X X X
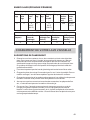
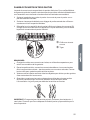
DISHWASHER LOADING
LOADING SUGGESTIONS
•
Remove leftover food, bones, toothpicks and other hard items from the dishes.
To conserve water and energy, and save time, it is not necessary to rinse dishes
before putting them into the dishwasher. The wash system is designed to
remove food particles from the water.
•
It is important for the water spray to reach all soiled surfaces.
•
Load dishes so they are not stacked or overlapping if possible. For best drying
results, water must be able to drain from all surfaces.
•
Load heavy pots and pans carefully. Heavy items can dent the stainless steel
interior of the door if they are dropped or bumped.
•
Make sure pot lids and handles, pizza pans, cookie sheets, etc., do not interfere
with the spray arm rotation.
•
Conserve water and energy, and save the time you would spend hand-rinsing
by running a rinse cycle to keep dishes moist, if you do not plan to wash them
soon. Foods such as eggs, rice, pasta, spinach and cooked cereals may be hard
to remove if they are left to dry over a period of time.
QUIET OPERATING TIPS
To avoid thumping/clattering noises during operation:
•
Make sure lightweight items are secured in the racks.
•
Make sure pot lids and handles, pizza pans, cookie sheets, etc., do not touch
interior walls or interfere with the rotation of the spray arm.
•
Load dishes so they do not touch one another.
NOTE: For built-in models, keep sink drain plugs closed during dishwasher
operation to prevent noise transfer through drains.

16
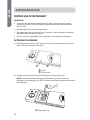
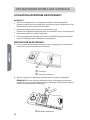
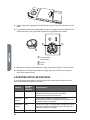
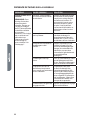
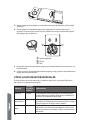
ADJUST UPPER RACK
in either rack.
IMPORTANT:
To accommodate taller dishes in the bottom rack:
1. Grasp each side and lift up to raise the upper rack.
To accommodate taller dishes in the upper rack:
1.

17
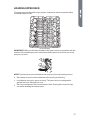
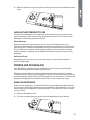
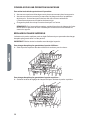
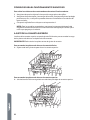
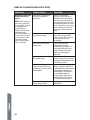
LOADING UPPER RACK
The upper rack is designed for cups, glasses, small plates, bowls and plastic items
marked dishwasher safe.
14 Place Setting
IMPORTANT: Make sure the dishes loaded in the upper rack do not interfere with the
rotation of the middle spray arm located beneath the upper rack. Check by turning
spray arm by hand.
NOTE: The features on your dishwasher rack may vary from the drawings shown.
•
Place items so open ends face downward for cleaning and draining.
•
Load glasses and cups in upper rack only. The lower rack is not designed for
glasses and cups. Damage can occur.
•
Place cups and glasses in the rows between tines. Placing them over the tines
can lead to breakage and water spots.

18
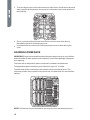
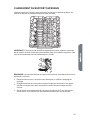
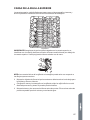
•
To avoid chipping, do not let stemware touch other items. Small bowls, pans and
other utensils can be placed in the top rack. Load bowls in the center section for
best stability.
•
China, crystal and other delicate items must not touch each other during
dishwasher operation. Damage may occur.
•
Load plastic items so the force of the spray does not move them during the
cycle.
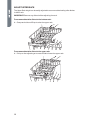
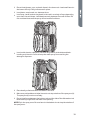
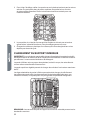
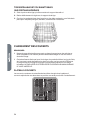
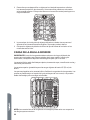
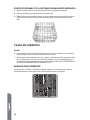
LOADING LOWER RACK
IMPORTANT: Large items should be placed along the edge so they do not interfere
with the middle or lower spray arm turning freely, or block the detergent dispenser
from opening.
The lower rack is designed for plates, soup bowls, cookware and bakeware.
The fold-down tines in the bottom rack make it easier to load large items. The
loading.
NOTE: The features on your dishwasher rack may vary from the drawings shown.
La page est en cours de chargement...
La page est en cours de chargement...
La page est en cours de chargement...
La page est en cours de chargement...
La page est en cours de chargement...
La page est en cours de chargement...
La page est en cours de chargement...
La page est en cours de chargement...
La page est en cours de chargement...
La page est en cours de chargement...
La page est en cours de chargement...
La page est en cours de chargement...
La page est en cours de chargement...
La page est en cours de chargement...
La page est en cours de chargement...
La page est en cours de chargement...
La page est en cours de chargement...
La page est en cours de chargement...
La page est en cours de chargement...
La page est en cours de chargement...
La page est en cours de chargement...
La page est en cours de chargement...
La page est en cours de chargement...
La page est en cours de chargement...
La page est en cours de chargement...
La page est en cours de chargement...
La page est en cours de chargement...
La page est en cours de chargement...
La page est en cours de chargement...
La page est en cours de chargement...
La page est en cours de chargement...
La page est en cours de chargement...
La page est en cours de chargement...
La page est en cours de chargement...
La page est en cours de chargement...
La page est en cours de chargement...
La page est en cours de chargement...
La page est en cours de chargement...
La page est en cours de chargement...
La page est en cours de chargement...
La page est en cours de chargement...
La page est en cours de chargement...
La page est en cours de chargement...
La page est en cours de chargement...
La page est en cours de chargement...
La page est en cours de chargement...
La page est en cours de chargement...
La page est en cours de chargement...
La page est en cours de chargement...
La page est en cours de chargement...
La page est en cours de chargement...
La page est en cours de chargement...
La page est en cours de chargement...
La page est en cours de chargement...
La page est en cours de chargement...
La page est en cours de chargement...
La page est en cours de chargement...
La page est en cours de chargement...
La page est en cours de chargement...
La page est en cours de chargement...
La page est en cours de chargement...
La page est en cours de chargement...
La page est en cours de chargement...
La page est en cours de chargement...
La page est en cours de chargement...
La page est en cours de chargement...
La page est en cours de chargement...
La page est en cours de chargement...
La page est en cours de chargement...
La page est en cours de chargement...
La page est en cours de chargement...
La page est en cours de chargement...
La page est en cours de chargement...
La page est en cours de chargement...
La page est en cours de chargement...
La page est en cours de chargement...
La page est en cours de chargement...
La page est en cours de chargement...
La page est en cours de chargement...
La page est en cours de chargement...
La page est en cours de chargement...
La page est en cours de chargement...
La page est en cours de chargement...
La page est en cours de chargement...
La page est en cours de chargement...
La page est en cours de chargement...
La page est en cours de chargement...
La page est en cours de chargement...
La page est en cours de chargement...
La page est en cours de chargement...
La page est en cours de chargement...
La page est en cours de chargement...
-
 1
1
-
 2
2
-
 3
3
-
 4
4
-
 5
5
-
 6
6
-
 7
7
-
 8
8
-
 9
9
-
 10
10
-
 11
11
-
 12
12
-
 13
13
-
 14
14
-
 15
15
-
 16
16
-
 17
17
-
 18
18
-
 19
19
-
 20
20
-
 21
21
-
 22
22
-
 23
23
-
 24
24
-
 25
25
-
 26
26
-
 27
27
-
 28
28
-
 29
29
-
 30
30
-
 31
31
-
 32
32
-
 33
33
-
 34
34
-
 35
35
-
 36
36
-
 37
37
-
 38
38
-
 39
39
-
 40
40
-
 41
41
-
 42
42
-
 43
43
-
 44
44
-
 45
45
-
 46
46
-
 47
47
-
 48
48
-
 49
49
-
 50
50
-
 51
51
-
 52
52
-
 53
53
-
 54
54
-
 55
55
-
 56
56
-
 57
57
-
 58
58
-
 59
59
-
 60
60
-
 61
61
-
 62
62
-
 63
63
-
 64
64
-
 65
65
-
 66
66
-
 67
67
-
 68
68
-
 69
69
-
 70
70
-
 71
71
-
 72
72
-
 73
73
-
 74
74
-
 75
75
-
 76
76
-
 77
77
-
 78
78
-
 79
79
-
 80
80
-
 81
81
-
 82
82
-
 83
83
-
 84
84
-
 85
85
-
 86
86
-
 87
87
-
 88
88
-
 89
89
-
 90
90
-
 91
91
-
 92
92
-
 93
93
-
 94
94
-
 95
95
-
 96
96
-
 97
97
-
 98
98
-
 99
99
-
 100
100
-
 101
101
-
 102
102
-
 103
103
-
 104
104
-
 105
105
-
 106
106
-
 107
107
-
 108
108
-
 109
109
-
 110
110
-
 111
111
-
 112
112


Haier HDBL865ATS Manuel utilisateur
- Catégorie
- Lave-vaisselle
- Taper
- Manuel utilisateur
dans d''autres langues
- English: Haier HDBL865ATS User manual
- español: Haier HDBL865ATS Manual de usuario
Documents connexes
Autres documents
-
Midea MDF24P1BST Manuel utilisateur
-
KitchenAid KUDU03FTSS3 Manuel utilisateur
-
-
Whirlpool GU1200XTLB0 Mode d'emploi
-
-
-
Bosch Benchmark SHX88PW55N Guide d'installation
-
-
-