Midea MDT24H3AST Manuel utilisateur
- Catégorie
- Lave-vaisselle
- Taper
- Manuel utilisateur
Ce manuel convient également à

Dishwasher
version A - 11 - 2019
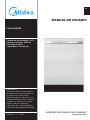
MODEL NUMBER MDT24H3AST
www.midea.com
USER MANUAL
en
Warning:
Before using this product,
please read this manual carefully
and keep it for future reference.
The design and specifications
are subject to change without
prior notice for product
improvement. Consult with your
dealer or manufacturer for
details.
Power supply: 120 V
Rated power: 1000 W
Frequency: 60Hz
Capacity: 14 Place Settings

Dear user
THANK YOU and CONGRATULATIONS on your purchase of this
high-quality Midea product. Your Midea dishwasher represents
the state of the art, and is designed for reliable, trouble-free
performance. Please take a moment to register your new
dishwasher.
Register your new dishwasher at https://us.midea.com/support
under the Support tab.
For future reference, record your product model and serial
numbers located on the inside frame of the dishwasher.
Model Number________________________________________
Serial Number_________________________________________
DISHWASHER SAFETY .....................................................................3
OPERATING REQUIREMENTS ..........................................................7
Location Requirements ..........................................................................7
Water Supply Requirements ................................................................7
PARTS AND FEATURES ....................................................................8
Filter System ..............................................................................................9
Smart Wash System ................................................................................9
Adjustable Upper Rack ........................................................................10
START UP GUIDE ..............................................................................11
How your Dishwasher Cleans ............................................................. 11
Before Using Your Dishwasher ........................................................... 11
Using Your New Dishwasher ............................................................... 11
CONTROLS ....................................................................................... 12
LED Indicator Lights.............................................................................. 15
Cycle and Option Charts ..................................................................... 16
Loading Suggestions ............................................................................ 19
Upper Rack .............................................................................................20
Load Upper Rack ................................................................................... 22
Lower Rack .............................................................................................. 23
Loading Silverware ............................................................................... 25
Recommended Load Patterns .......................................................... 27

3
Safety
Precautions
Operating
Requirements
Parts and
Features
Start Up
Guide
Controls
Dishwasher
Loading
Dishwasher
Use
Dishwasher
Care
Troubleshooting
DISHWASHER USE ......................................................................... 29
Proper Use of Rinse Aid ......................................................................30
Washing Special Items ........................................................................ 32
DISHWASHER CARE .......................................................................33
Storing ....................................................................................................... 35
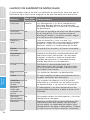
TROUBLESHOOTING ..................................................................... 36
Error Codes ............................................................................................... 41
WARRANTY ..................................................................................... 42
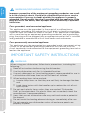
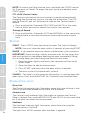
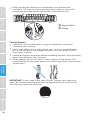
DISHWASHER SAFETY
YOUR SAFETY AND THE SAFETY OF OTHERS ARE VERY
IMPORTANT
To prevent injury to the user or other people and property damage, the
instructions shown here must be followed. Incorrect operation due to
ignoring of instructions may cause harm or damage, including death.
The level of risk is shown by the following indications.
CAUTION
WARNINGWARNING
WARNING
This symbol indicates the possibility of dangerous voltage
constituting a risk of electrical shock is present that could
result in death or serious injury.
This symbol indicates the possibility of injury or damage to
property.
This symbol indicates the possibility of death or serious
injury.

4
Safety
Precautions
Operating
Requirements
Parts and
Features
Start Up
Guide
Controls
Dishwasher
Loading
Dishwasher
Use
Dishwasher
Care
Troubleshooting
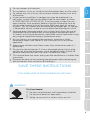
WARNING/GROUNDING INSTRUCTIONS
Improper connection of the equipment-grounding conductor can result
in a risk of electric shock. Check with a qualified electrician or service
representative if you are in doubt whether the appliance is properly
grounded. Do not modify the plug if provided with the appliance. If the
plug will not fit the outlet, have a proper outlet installed by a qualified
electrician.
For a grounded, cord-connected appliance:
This appliance must be grounded. In the event of a malfunction or
breakdown, grounding will reduce the risk of electric shock by providing
a path of least resistance for electric current. If this appliance is equipped
with a cord having an equipment-grounding conductor and a grounding
plug, the plug must be plugged into an appropriate outlet that is installed
and grounded in accordance with all local codes and ordinances.
For a permanently connected appliance:
This appliance must be connected to a grounded metal, permanent wiring
system, or an equipment-grounding conductor must be run with the
circuit conductors and connected to the equipment-grounding terminal or
lead on the appliance.
IMPORTANT SAFETY INSTRUCTIONS
WARNING
When using your dishwasher, follow basic precautions, including the
following:
•
Read all instructions before using the dishwasher.
•
Use the dishwasher only for its intended function.
•
Use only detergents or rinse/wetting agents recommended for use in
a dishwasher and keep them out of the reach of children.
•
When loading items to be washed:
•
Locate sharp items so that they are not likely to damage the door
seal.
•
Load sharp knives with the handles up to reduce the risk of cut-
type injuries.
•
Do not wash plastic items unless they are marked “Dishwasher
Safe” or the equivalent. For plastic items not so marked, check the
manufacturer’s recommendations.
•
Items that are not dishwasher safe may melt and create a potential
fire hazard.
•
Do not touch the heating element during or immediately after use.
•
Do not operate your dishwasher unless all enclosure panels are
properly in place.

5
Safety
Precautions
Operating
Requirements
Parts and
Features
Start Up
Guide
Controls
Dishwasher
Loading
Dishwasher
Use
Dishwasher
Care
Troubleshooting
•
Do not tamper with controls.
•
Do not abuse, sit on, or stand on the dishwasher door, or dish racks.
•
To reduce the risk of injury, do not allow children to play in or on a
dishwasher.
•
Under certain conditions, hydrogen gas may be produced in a
hot-water system that has not been used for two weeks or more.
HYDROGEN GAS IS EXPLOSIVE. If the hot-water system has not
been used for such a period, before using the dishwasher turn on
all hot-water faucets and let the water flow from each for several
minutes. This will release any accumulated hydrogen gas. As the gas
is flammable, do not smoke or use an open flame during this time.
•
Severe product damage and/or injury could result from the use of
unqualified service technicians or non-original replacement parts.
All repairs must be performed by a qualified service technician using
only original equipment factory replacement parts.
•
Do not store or use combustible materials, gasoline or other
flammable vapors and liquids in the vicinity of this or any other
appliance.
•
Keep young children and infants away from dishwasher when it is
operating.
•
Do not use the dishwasher if it has a damaged power line or plug,
and do not plug the dishwasher into a damaged outlet. Failure to
observe these instructions may result in electrical shock.
•
This manual does not cover every possible condition or situation that
may occur.
•
Remove the door to the washing compartment when removing an
old dishwasher from service or discarding it.
SAVE THESE INSTRUCTIONS
THIS APPLIANCE IS FOR HOUSEHOLD USE ONLY
WARNING
Tip Over Hazard
•
Do not use dishwasher until completely installed.
•
Do not push down on open door.
•
Doing so can result in serious injury or cuts.

6
Safety
Precautions
Operating
Requirements
Parts and
Features
Start Up
Guide
Controls
Dishwasher
Loading
Dishwasher
Use
Dishwasher
Care
Troubleshooting
State of California Proposition 65 Warnings:
WARNING: Cancer and Reproductive Harm
-www.P65Warnings.ca.gov.
WARNING
Suffocation Hazard
•
Before you throw away your old appliance, remove the door or lid so
that children cannot hide or get trapped inside your old appliance.
•
Failure to follow these instructions can result in death or brain
damage.
CAUTION
•
Never use harsh chemicals to clean your dishwasher. Some chloride-
containing products can damage your dishwasher and may present
health hazards!
•
Never use steam cleaning products to clean your dishwasher. The
manufacturer will not be responsible for the possible damages or
consequences.
•
To avoid possible dishwasher damage, do not use harsh chemicals,
abrasive cleaners, scouring pads (metal or plastic), or abrasive
cloths/paper towels to clean your dishwasher’s exterior door panel.
Your dishwasher’s exterior door panel can be damaged by doing so.
•
It is highly recommended that the user become familiar with the
procedure to shut off the incoming water supply and the procedure
to shut off the incoming power supply. See the Installation
Instructions or contact your installer for more information.
•
If the dishwasher drains into a food disposer, make sure disposer is
completely empty before running dishwasher.
•
NSF/ANSI 184 Certified residential dishwashers are not intended for
licensed food establishments.
•
Protect your dishwasher from the elements. Protect against freezing
to avoid possible damage to the fill valve. Damage caused by
freezing is not covered by the warranty.
•
Not for outdoor use.

7
Safety
Precautions
Operating
Requirements
Parts and
Features
Start Up
Guide
Controls
Dishwasher
Loading
Dishwasher
Use
Dishwasher
Care
Troubleshooting
OPERATING REQUIREMENTS
ELECTRICAL REQUIREMENTS
WARNING
Electrical Shock Hazard
•
Electrically ground dishwasher.
•
Connect ground wire to green ground connector in terminal box.
•
Do not use an extension cord.
•
Failure to follow these instructions can result in death, fire, or
electrical shock.
This dishwasher is designed for operation on an adequately wired
individual 120 V, 60 Hz, 15- or 20-amp fused electrical supply with copper
wire only. It is recommended that a time-delay fuse or circuit breaker is
used, and that a separate circuit serving only this appliance is provided. If
an outlet is used, the outlet should be placed in adjacent cabinet.
LOCATION REQUIREMENTS
•
Install where dishwasher is protected from the elements. Protect
against freezing to avoid possible rupture of fill valve. Such ruptures
are not covered by the warranty. For winter storage information, see
“Storing” in the “Dishwasher Care” section.
•
Install and level dishwasher on a floor that will hold the weight and in
an area suitable for its size and use.
WATER SUPPLY REQUIREMENTS
•
The water supply temperature should be 120°F to 150°F (49°C to
66°C).
•
The water supply must maintain water pressure between 20 and 80 psi
for sufficient flow.

8
Safety
Precautions
Operating
Requirements
Parts and
Features
Start Up
Guide
Controls
Dishwasher
Loading
Dishwasher
Use
Dishwasher
Care
Troubleshooting
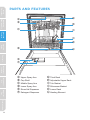
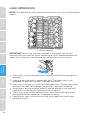
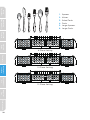
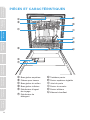
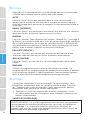
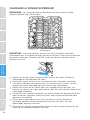
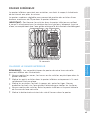
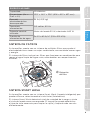
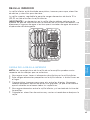
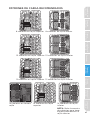
PARTS AND FEATURES
a
b
c
h
i
j
k
l
g
d
e
f
a Upper Spray Arm
b Cup Shelf
c Middle Spray Arm
d Lower Spray Arm
e Rinse Aid Dispenser
f Detergent Dispenser
g Third Rack
h Adjustable Upper Rack
i Tub Gasket
j Silverware Basket
k Lower Rack
l Heating Element

9
Safety
Precautions
Operating
Requirements
Parts and
Features
Start Up
Guide
Controls
Dishwasher
Loading
Dishwasher
Use
Dishwasher
Care
Troubleshooting
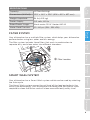
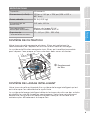
SPECIFICATIONS
Capacity: 14 Place Settings
Dimensions (WxDxH): 23
7/8 " x 241/2" x 333/4 " (606 x 623 x 857 mm)
Weight Unpacked: 94 lb (42.5 kg)
Power Supply: 120 volts, 60 Hz
Rated Power Usage: Wash motor 50 W Heater 840 W
Water Feed Pressure: 20 - 80 psi (138 - 552 kPA)
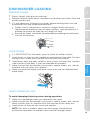
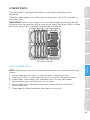
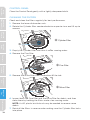
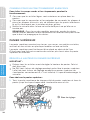
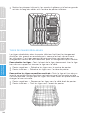
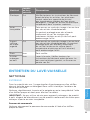
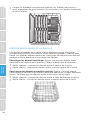
FILTER SYSTEM
Your dishwasher has a multiple filter system, which helps your dishwasher
perform better using less water and less energy.
The filter system includes three filters that work in combination to
separate dirty and clean water into different chambers.
a
a Filter Location
SMART WASH SYSTEM
Your dishwasher has a Smart Wash system which can be used by selecting
the Auto cycle.
The Smart Wash system senses the soil level of the load and adjusts the
wash cycle accordingly. Your dishwasher can determine the type of cycle
required to clean the dishes and will clean more efficiently every time.

10
Safety
Precautions
Operating
Requirements
Parts and
Features
Start Up
Guide
Controls
Dishwasher
Loading
Dishwasher
Use
Dishwasher
Care
Troubleshooting
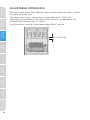
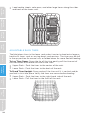
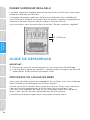
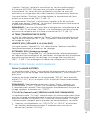
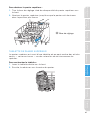
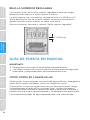
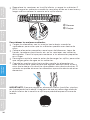
ADJUSTABLE UPPER RACK
The Adjustable Upper Rack feature allows you to load taller items in either
the upper or lower rack.
The upper rack of your dishwasher can be adjusted 2" (5.08 cm).
Adjusting the clearance of the Upper Rack increases or decreases the
clearance of the lower rack, as shown.
For instructions, see the “Adjustable Upper Rack” section.
2" (5.08 cm)

11
Safety
Precautions
Operating
Requirements
Parts and
Features
Start Up
Guide
Controls
Dishwasher
Loading
Dishwasher
Use
Dishwasher
Care
Troubleshooting
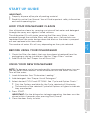
START UP GUIDE
IMPORTANT:
•
Properly dispose of/recycle all packing material.
•
Read this entire User Manual. You will find important safety information
and useful operating tips.
HOW YOUR DISHWASHER CLEANS
Your dishwasher cleans by spraying a mixture of hot water and detergent
through the spray arms against soiled surfaces.
The dishwasher fills with water covering the filter area. Water is then
pumped through the multiple filters and spray arms. Soil particles are
separated from the water and go down the drain as the water is pumped
out and replaced with clean water.
The number of water fills will vary depending on the cycle selected.
BEFORE USING YOUR DISHWASHER
1. Check the filters for debris that may have been introduced from the
packaging or during installation. See the “Clean Filters” section.
2. Add Rinse Aid. See “Proper Use of Rinse Aid.”
USING YOUR NEW DISHWASHER
NOTE: To decrease cycle time and possibly improve performance, turn on
the hot water faucet nearest to the dishwasher until the water runs hot.
Turn off the water.
1. Load dishwasher. See “Dishwasher Loading.”
2. Add detergent. See “Proper Use of Detergent.”
3. Select desired CYCLE and OPTIONS. See “Cycle and Option Charts.”
•
Only the Options available for the Cycle selected will illuminate.
•
The controls of the selected Cycle and Options will glow to indicate
they are selected.
4. Press START.
IMPORTANT: For the dishwasher to begin operating, the door must be
closed within 4 seconds after pressing Start/Cancel.
5. Close the door firmly to latch.

12
Safety
Precautions
Operating
Requirements
Parts and
Features
Start Up
Guide
Controls
Dishwasher
Loading
Dishwasher
Use
Dishwasher
Care
Troubleshooting
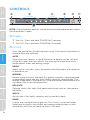
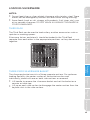
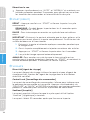
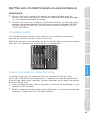
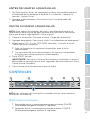
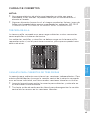
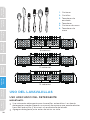
CONTROLS
a e fb c d
d
NOTE: The dishwasher controls can be accessed and operated only when
the dishwasher is open.
a POWER
•
Turn On - Press and hold POWER for 3 seconds
•
Turn Off - Press and hold POWER for 3 seconds
b CYCLES
Press the control for the desired wash cycle. The control illuminates to
indicate the cycle selected.
AUTO
Auto cycle uses sensors in the dishwasher to determine the soil level
of the dish load, and then adjusts the wash cycle to optimize wash
performance, water and energy usage.
HEAVY
Heavy cycle is for pots, pans, casseroles and dinnerware with dried-on
or baked on soil.
NORMAL
Normal cycle with only the Heat Dry option selected is recommended
to completely wash and dry a full load of normally soiled dishes. The
energy usage label is based on this cycle and option combination with
the upper rack in the raised position.
DELICATE
Delicate cycle is for items that need special care such as stemware or
porcelain.
QUICK
Quick cycle is for lightly soiled or well-rinsed dish loads.
RINSE
Use for pre-rinsing dishes or glasses. This is only a rinse that keeps
food from drying on your dishes and reduces odor buildup in your
dishwasher until you are ready to wash a full load.

13
Safety
Precautions
Operating
Requirements
Parts and
Features
Start Up
Guide
Controls
Dishwasher
Loading
Dishwasher
Use
Dishwasher
Care
Troubleshooting
c OPTIONS
Options enhance the wash cycle. Some Options are available with only
certain Wash Cycles. Refer to the “Cycle and Options Charts” to see
which Options are available for the wash cycle you selected.
•
Press the desired Option control(s). The Option control(s)
illuminates to indicate which option(s) have been selected.
SANITIZE
WARNING: Only sanitizing cycles have been designed to meet the
requirements for soil removal and sanitization efficacy. There is no
intention, either directly or indirectly, that all cycles on a certified
machine have passed the sanitization performance test.
The sanitize option sanitizes dishes and glassware in accordance with
NSF International NSF/ANSI Standard 184 for Residential Dishwashers.
Certified residential dishwashers are not intended for use in licensed
food establishments.
When the Sanitize option is selected, the water temperature will reach
156.2°F (69°C) maximum.
The Sanitize Control illuminates to indicate when the Wash cycle with
the Sanitize option is completed. The light will turn off after the door
has been opened for 30 seconds.
NOTE: It is possible that the water will not reach 156°F (69°C) in the
Sanitize mode, if the temperature of the incoming hot water does not
meet the minimum requirement of 120°F (49°C).
HI TEMP
When the Hi Temp option is selected, the water temperature will be
maintained at 136°F (58°C) maximum during the wash portion of the
cycle.
HEATED DRY
When the Heated Dry option is selected, the heater will work during
the drying process.
EXTENDED DRY
When the Extended Dry option is selected, the heater and fan
operation will be extended to further improve drying performance.
The final rinse will be elevated to 156.2°F (69°C) and extend the Dry by
42 minutes.
d ADDITIONAL FEATURES
DELAY
The Delay Time feature allows you to program the dishwasher to begin
the selected wash cycle 2, 4 or 8 hours later.
Press the DELAY control repeatedly to toggle between (2h / 4h / 8h).
The LED next to the selected time will illuminate.

14
Safety
Precautions
Operating
Requirements
Parts and
Features
Start Up
Guide
Controls
Dishwasher
Loading
Dishwasher
Use
Dishwasher
Care
Troubleshooting
NOTE: To cancel the Delay feature, press and hold the START control
for 3 seconds to Cancel. To begin the wash cycle immediately, press
START again.
CTL LOCK (Control Lock)
The Control Lock feature locks all controls to avoid unintentionally
changing the dishwasher cycle or starting the dishwasher. The LED
next to Control Lock will illuminate to indicate the Control panel is
locked.
•
Press and hold for 3 seconds DELICATE and QUICK at the same
time to either activate or cancel the Control Lock option.
Turning off Sound
•
Press and hold for 3 seconds AUTO and NORMAL at the same time
to deactivate or activate the control tones and the end of cycle
tone.
e START
START - Press START once and close the door. The cycle will begin.
NOTE: You must close the door within 4 seconds of pressing START.
PAUSE - If you need to pause or cancel a dishwasher cycle in process:
IMPORTANT: Open the door slightly, and then wait for the spray arms
and wash action to stop before opening the door completely. Doing
this will help keep you from being splashed with hot water.
1. Open the door slightly and wait a few seconds until the wash
action stops.
2. Open the door to add or remove items.
3. Press START, and then close the door within 4 seconds.
4. The wash cycle will automatically resume.
CANCEL - To cancel a cycle when the dishwasher is running, open the
door slowly. Press and hold START for 3 seconds and close the door.
f INDICATOR LIGHTS
Rinse Aid
The Rinse Aid indicator light illuminates when the rinse aid level is low.
Rinse Aid should be added to the Rinse Aid dispenser.
Control Lock
The Control Lock indicator light illuminates to indicate the Control
Panel is locked. Press and hold DELICATE and QUICK at the same time
for 3 seconds to unlock the control panel.
Sanitized
The Sanitized indicator light illuminates when the cycle using the
Sanitize option is finished.
The light turns off 30 seconds after the door is opened.

15
Safety
Precautions
Operating
Requirements
Parts and
Features
Start Up
Guide
Controls
Dishwasher
Loading
Dishwasher
Use
Dishwasher
Care
Troubleshooting
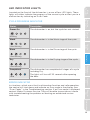
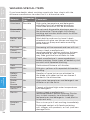
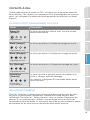
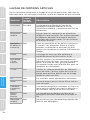
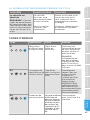
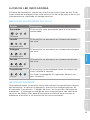
LED INDICATOR LIGHTS
Located on the front of the dishwasher is a row of four LED lights. These
lights will either indicate the progress of the current cycle or alert you to a
malfunction by indicating an Error Code.
CYCLE PROGRESS INDICATOR
Status Description
Power On
Blinking
The dishwasher is on, but the cycle has not started.
Wash
Slow Blinking
The dishwasher is in the Wash stage of the cycle.
Rinse
Slow Blinking
The dishwasher is in the Rinse stage of the cycle.
Dry
Slow Blinking
The dishwasher is in the Drying stage of the cycle.
Completed
Solid
The dishwasher has completed all stages of a cycle
including Dry.
The lights will turn off 30 seconds after opening
the door.
ERROR INDICATOR
In situations, which are critical to dishwasher function and safe operation,
the control will shut down and indicate an Error code in the display. See
“Error Codes” in the Troubleshooting section. If an Error code is displayed,
contact Midea Customer Service. They will be able to provide assistance
with troubleshooting the problem or locating an authorized service
technician.

16
Safety
Precautions
Operating
Requirements
Parts and
Features
Start Up
Guide
Controls
Dishwasher
Loading
Dishwasher
Use
Dishwasher
Care
Troubleshooting
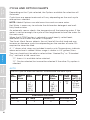
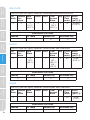
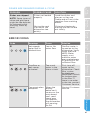
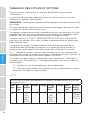
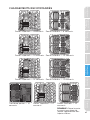
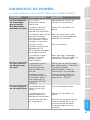
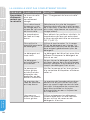
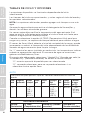
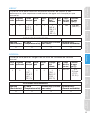
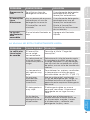
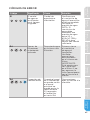
CYCLE AND OPTION CHARTS
Depending on the Cycle selected, the Options available for selection will
illuminate.
Cycle times are approximate and will vary depending on the wash cycle
and options selected.
NOTE: Added Options can add more time and use more water.
Hot Water is necessary to activate the dishwasher detergent and melt
fatty food residue.
An automatic sensor checks the temperature of the incoming water. If the
water is not hot enough, the cycle will be lengthened to heat the water for
the main wash.
When the HI-TEMP option is selected to wash heavily soiled loads,
additional time to heat the water is required.
The Smart Wash Sensor detects the soil level of the dish load and may
increase or decrease cycle time depending on the number of water fills
required to clean the load.
A “
•” shows what steps are included in each cycle. Temperatures indicate
where extra heat is added. Water usage is shown in U.S. gallons/liters.
The user should only be able to select either “Heated Dry” or “Extended
Dry”, not both at the same time.
“X”: shows it is available to be selected
“O”: Can be selected, but cannot be selected if the other Dry option is
selected
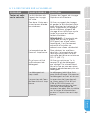
AUTO
Use this cycle to allow the sensors to determine the wash cycle.
Pre
Wash
Second
Pre-
Wash
Main
Wash
Rinse Rinse Final
Heated
Rinse
Dry Cycle
Time
(min)
Water
Usage
(gal. [L])
• •
118° -
126°F
(48° -
52°C)
•
136° -
156.2°F
(58° -
69°C)
•
90–
121
3 to
5.9 gal.
(11.4 to
22.5 L)
AVAILABLE OPTIONS
Sanitize Hi Temp Heated Dry Extended Dry
X X O O

17
Safety
Precautions
Operating
Requirements
Parts and
Features
Start Up
Guide
Controls
Dishwasher
Loading
Dishwasher
Use
Dishwasher
Care
Troubleshooting
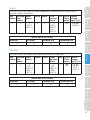
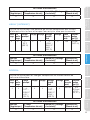
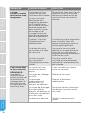
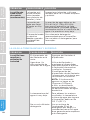
HEAVY
Use this cycle for hard to clean, baked on, cookware and harder than
normal water conditions.
Pre
Wash
Second
Pre-
Wash
Main
Wash
Rinse Rinse Final
Heated
Rinse
Dry Cycle
Time
(min)
Water
Usage
(gal. [L])
• • •
131°F
(55°C)
• • •
143.6° -
156.2°F
(62° -
69°C)
•
134 6.9 gal.
(26.2 L)
AVAILABLE OPTIONS
Sanitize Hi Temp Heated Dry Extended Dry
X X O O
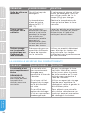
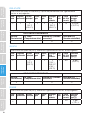
NORMAL
Use this cycle for loads with normal amounts of food soil.
Pre
Wash
Second
Pre-
Wash
Main
Wash
Rinse Rinse Final
Heated
Rinse
Dry Cycle
Time
(min)
Water
Usage
(gal. [L])
• • •
107° -
125.6°F
(42° -
52°C)
•
136° -
156.2°F
(58° -
69°C)
•
96-
116
3 to
5.9 gal.
(11.4 -
22.5 L)
AVAILABLE OPTIONS
Sanitize Hi Temp Heated Dry Extended Dry
X X O O

18
Safety
Precautions
Operating
Requirements
Parts and
Features
Start Up
Guide
Controls
Dishwasher
Loading
Dishwasher
Use
Dishwasher
Care
Troubleshooting
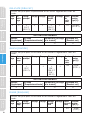
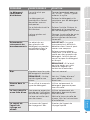
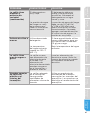
DELICATE
Use this cycle for lightly soiled or rinsed glassware and fine china.
Pre
Wash
Second
Pre-
Wash
Main
Wash
Rinse Rinse Final
Heated
Rinse
Dry Cycle
Time
(min)
Water
Usage
(gal. [L])
• • •
122°F
(50°C)
• • •
136°F
(58°C)
•
111 5.9 gal.
(22.5 L)
AVAILABLE OPTIONS
Sanitize Hi Temp Heated Dry Extended Dry
O O
QUICK
Use this cycle for lightly soiled or rinsed dishes and silverware.
Pre
Wash
Second
Pre-
Wash
Main
Wash
Rinse Rinse Final
Heated
Rinse
Dry Cycle
Time
(min)
Water
Usage
(gal. [L])
• •
131°F
(55°C)
• •
136° -
156.2°F
(58° -
69°C)
•
60 4 gal.
(15.5 L)
AVAILABLE OPTIONS
Sanitize Hi Temp Heated Dry Extended Dry
X O O
RINSE
Use this cycle for lightly soiled or rinsed dishes and silverware.
Pre
Wash
Second
Pre-
Wash
Main
Wash
Rinse Rinse Final
Heated
Rinse
Dry Cycle
Time
(min)
Water
Usage
(gal. [L])
•
20 2 gal.
(7.5 L)
AVAILABLE OPTIONS
Sanitize Hi Temp Heated Dry Extended Dry

19
Safety
Precautions
Operating
Requirements
Parts and
Features
Start Up
Guide
Controls
Dishwasher
Loading
Dishwasher
Use
Dishwasher
Care
Troubleshooting
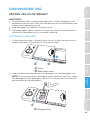
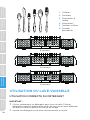
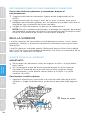
DISHWASHER LOADING
PREPARE DISHES
•
Empty liquids from glasses and cups.
•
Remove leftover food, bones, toothpicks and other hard items from the
dishes and discard.
•
It is not necessary to hand-rinse dishes before loading them into the
dishwasher with the following exceptions:
•
Foods such as mayonnaise, mustard, vinegar, lemon juice and
tomato-based products may discolor stainless steel and plastics if
allowed to remain on them for any length of time.
•
Burned-on foods should be loosened before loading the cookware
into the dishwasher.
LOAD DISHES
•
It is IMPORTANT for the water spray to reach all soiled surfaces.
•
Load dishes so they are not stacked or overlapping if possible. For best
drying results, water must be able to drain from all surfaces.
•
Load heavy pots and pans carefully. Heavy items can dent the stainless
steel interior of the door if they are dropped or bumped.
•
Make sure pot lids and handles, pizza pans, cookie sheets, etc., do not
interfere with the spray arm rotation.
•
Make sure both the upper and lower spray arms are not blocked and
move freely.
QUIET OPERATING TIPS
To avoid thumping/clattering noises during operation:
•
Make sure lightweight items are secured in the racks.
•
Make sure pot lids and handles, pizza pans, cookie sheets, etc., do not
touch interior walls or interfere with the rotation of the spray arm.
•
Load dishes so they do not touch one another.
NOTE: For built-in models, keep sink drain plugs closed during
dishwasher operation to prevent noise transfer through drains.

20
Safety
Precautions
Operating
Requirements
Parts and
Features
Start Up
Guide
Controls
Dishwasher
Loading
Dishwasher
Use
Dishwasher
Care
Troubleshooting
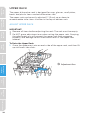
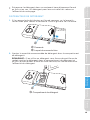
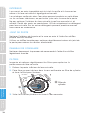
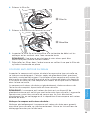
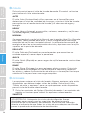
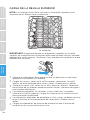
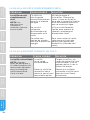
UPPER RACK
The upper dishwasher rack is designed for cups, glasses, small plates,
bowls and plastic items marked dishwasher safe.
The upper rack can be easily adjusted 2" (5 cm) up or down to
accommodate taller items in either in the top or bottom rack.
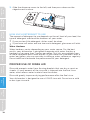
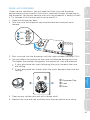
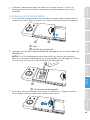
ADJUST UPPER RACK
IMPORTANT:
•
Remove all items before adjusting the rack. The rack must be empty.
•
Do NOT grasp adjustment arm when raising the upper rack. Grasping
the adjustment arm will prevent the upper rack from engaging
properly, and damage to dish ware could result if the upper rack
releases.
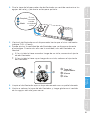
To Raise the Upper Rack:
1. Grasp the uppermost wire on each side of the upper rack, and then lift
up until each side clicks.
a
a Adjustment Arm
La page est en cours de chargement...
La page est en cours de chargement...
La page est en cours de chargement...
La page est en cours de chargement...
La page est en cours de chargement...
La page est en cours de chargement...
La page est en cours de chargement...
La page est en cours de chargement...
La page est en cours de chargement...
La page est en cours de chargement...
La page est en cours de chargement...
La page est en cours de chargement...
La page est en cours de chargement...
La page est en cours de chargement...
La page est en cours de chargement...
La page est en cours de chargement...
La page est en cours de chargement...
La page est en cours de chargement...
La page est en cours de chargement...
La page est en cours de chargement...
La page est en cours de chargement...
La page est en cours de chargement...
La page est en cours de chargement...
La page est en cours de chargement...
La page est en cours de chargement...
La page est en cours de chargement...
La page est en cours de chargement...
La page est en cours de chargement...
La page est en cours de chargement...
La page est en cours de chargement...
La page est en cours de chargement...
La page est en cours de chargement...
La page est en cours de chargement...
La page est en cours de chargement...
La page est en cours de chargement...
La page est en cours de chargement...
La page est en cours de chargement...
La page est en cours de chargement...
La page est en cours de chargement...
La page est en cours de chargement...
La page est en cours de chargement...
La page est en cours de chargement...
La page est en cours de chargement...
La page est en cours de chargement...
La page est en cours de chargement...
La page est en cours de chargement...
La page est en cours de chargement...
La page est en cours de chargement...
La page est en cours de chargement...
La page est en cours de chargement...
La page est en cours de chargement...
La page est en cours de chargement...
La page est en cours de chargement...
La page est en cours de chargement...
La page est en cours de chargement...
La page est en cours de chargement...
La page est en cours de chargement...
La page est en cours de chargement...
La page est en cours de chargement...
La page est en cours de chargement...
La page est en cours de chargement...
La page est en cours de chargement...
La page est en cours de chargement...
La page est en cours de chargement...
La page est en cours de chargement...
La page est en cours de chargement...
La page est en cours de chargement...
La page est en cours de chargement...
La page est en cours de chargement...
La page est en cours de chargement...
La page est en cours de chargement...
La page est en cours de chargement...
La page est en cours de chargement...
La page est en cours de chargement...
La page est en cours de chargement...
La page est en cours de chargement...
La page est en cours de chargement...
La page est en cours de chargement...
La page est en cours de chargement...
La page est en cours de chargement...
La page est en cours de chargement...
La page est en cours de chargement...
La page est en cours de chargement...
La page est en cours de chargement...
La page est en cours de chargement...
La page est en cours de chargement...
La page est en cours de chargement...
La page est en cours de chargement...
La page est en cours de chargement...
La page est en cours de chargement...
La page est en cours de chargement...
La page est en cours de chargement...
La page est en cours de chargement...
La page est en cours de chargement...
La page est en cours de chargement...
La page est en cours de chargement...
La page est en cours de chargement...
La page est en cours de chargement...
La page est en cours de chargement...
La page est en cours de chargement...
La page est en cours de chargement...
La page est en cours de chargement...
La page est en cours de chargement...
La page est en cours de chargement...
La page est en cours de chargement...
La page est en cours de chargement...
La page est en cours de chargement...
La page est en cours de chargement...
La page est en cours de chargement...
La page est en cours de chargement...
La page est en cours de chargement...
La page est en cours de chargement...
La page est en cours de chargement...
La page est en cours de chargement...
La page est en cours de chargement...
La page est en cours de chargement...
-
 1
1
-
 2
2
-
 3
3
-
 4
4
-
 5
5
-
 6
6
-
 7
7
-
 8
8
-
 9
9
-
 10
10
-
 11
11
-
 12
12
-
 13
13
-
 14
14
-
 15
15
-
 16
16
-
 17
17
-
 18
18
-
 19
19
-
 20
20
-
 21
21
-
 22
22
-
 23
23
-
 24
24
-
 25
25
-
 26
26
-
 27
27
-
 28
28
-
 29
29
-
 30
30
-
 31
31
-
 32
32
-
 33
33
-
 34
34
-
 35
35
-
 36
36
-
 37
37
-
 38
38
-
 39
39
-
 40
40
-
 41
41
-
 42
42
-
 43
43
-
 44
44
-
 45
45
-
 46
46
-
 47
47
-
 48
48
-
 49
49
-
 50
50
-
 51
51
-
 52
52
-
 53
53
-
 54
54
-
 55
55
-
 56
56
-
 57
57
-
 58
58
-
 59
59
-
 60
60
-
 61
61
-
 62
62
-
 63
63
-
 64
64
-
 65
65
-
 66
66
-
 67
67
-
 68
68
-
 69
69
-
 70
70
-
 71
71
-
 72
72
-
 73
73
-
 74
74
-
 75
75
-
 76
76
-
 77
77
-
 78
78
-
 79
79
-
 80
80
-
 81
81
-
 82
82
-
 83
83
-
 84
84
-
 85
85
-
 86
86
-
 87
87
-
 88
88
-
 89
89
-
 90
90
-
 91
91
-
 92
92
-
 93
93
-
 94
94
-
 95
95
-
 96
96
-
 97
97
-
 98
98
-
 99
99
-
 100
100
-
 101
101
-
 102
102
-
 103
103
-
 104
104
-
 105
105
-
 106
106
-
 107
107
-
 108
108
-
 109
109
-
 110
110
-
 111
111
-
 112
112
-
 113
113
-
 114
114
-
 115
115
-
 116
116
-
 117
117
-
 118
118
-
 119
119
-
 120
120
-
 121
121
-
 122
122
-
 123
123
-
 124
124
-
 125
125
-
 126
126
-
 127
127
-
 128
128
-
 129
129
-
 130
130
-
 131
131
-
 132
132
-
 133
133
-
 134
134
-
 135
135
-
 136
136


Midea MDT24H3AST Manuel utilisateur
- Catégorie
- Lave-vaisselle
- Taper
- Manuel utilisateur
- Ce manuel convient également à
dans d''autres langues
- English: Midea MDT24H3AST User manual
- español: Midea MDT24H3AST Manual de usuario
Autres documents
-
Haier HDBL865ATS Manuel utilisateur
-
Haier HDBL655AFB Manuel utilisateur
-
Whirlpool Ikea IUD8000R Troubleshooting guide
-
IKEA IUD8000WS0 Le manuel du propriétaire
-
-
Yes 1150610 Le manuel du propriétaire
-
Kenmore Elite 58714683200A Le manuel du propriétaire
-
Kenmore 587.1468 Manuel utilisateur