Black & Decker BESTA510 Manuel utilisateur
- Catégorie
- Coupe-herbe
- Taper
- Manuel utilisateur

Please read before returning this product for anyreason.
àLIRE avant de retourner ce produit pour quelque raison que cesoit.
LEA EL MANUAL antes de devolver este producto por cualquiermotivo.
INSTRUCTION MANUAL
MODE D’EMPLOI
MANUAL DE INSTRUCCIONES
STRING TRIMMER/EDGER
TAILLE-BORDURE STRING
DESBROZADORA/BORDEADORA
DE CUERDA
BESTA510
final page size: 8.5 x 5.5 in

ENGLISH
English (original instructions) 1
Français (traduction de la notice d’instructions originale) 11
Español (traducido de las instrucciones originales) 22
To register your new product, visit
www.BlackandDecker.com/NewOwner
Consulter le site Web www.BlackandDecker.com/NewOwner
pour enregistrer votre nouveau produit.
Visite www.BlackandDecker.com/NewOwner para registrar su
nuevo producto.
Thank you for choosing BLACK+DECKER!
If you have a question or experience a problem with your
BLACK+DECKER purchase, go to: http://www.blackanddecker.com/
instantanswers
If you can’t find the answer or do not have access to the Internet,
call 1-800-544-6986 from 8 a.m. to 5 p.m. EST Mon. – Fri. to speak
with an agent. Please have the CATALOG NUMBER available when
you call.

1
2
5
6
8
7 9
4
3
ENGLISH
1
English (original instructions)
Definitions: Safety Alert Symbols and Words
This instruction manual uses the following safety alert symbols and words to alert you to hazardous situations and your risk
of personal injury or property damage.
DANGER: Indicates an imminently hazardous situation which, if not avoided, will result in death or seriousinjury.
WARNING: Indicates a potentially hazardous situation which, if not avoided, could result in death or seriousinjury.
CAUTION: Indicates a potentially hazardous situation which, if not avoided, may result in minor or moderateinjury.
(Used without word) Indicates a safety related message.
NOTICE: Indicates a practice not related to personal injury which, if not avoided, may result in propertydamage.
WARNING! Read all safety warnings and all
instructions. Failure to follow the warnings and
instructions may result in electric shock, fire and/or
seriousinjury.
WARNING: To reduce the risk of injury, read the
instructionmanual.
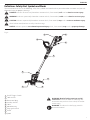
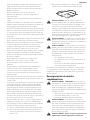
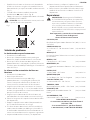
1
On/Off Trigger Switch
2
Cord retainer
3
Power cord plug
4
Auxillary handle
5
Collar
6
Motor housing
7
Edge guide wheel
8
Guard
9
Spool
Fig. A

ENGLISH
2
Important Safety Warnings
WARNING: When using electric gardening
appliances, basic safety precautions should always
be followed to reduce risk of fire, electric shock, and
personal injury, including thefollowing.
WARNING: Do not remove guard. The guard must be
attached during use. Operating this trimmer without
the guard will violate the product warranty.
CAUTION: When replacing the line, use only 0.065
inch (1.65mm) diameter round line. Other diameters
or shapes may degrade performance or cause
damage to the trimmer.
READ ALL INSTRUCTIONS
• ALWAYS WEAR EYE PROTECTION – Wear safety spectacles
or goggles at all times when plugged in. These items are
available forpurchase.
• GUARD - Do not use this appliance without the
guardattached.
• DRESS PROPERLY – Do not wear loose clothing or
jewelry. They can be caught in moving parts. Gloves and
substantial rubber soled footwear are recommended
when working outdoors. Don’t operate the appliance
when barefoot or wearing open sandals. Wear heavy long
pants to protect your legs. Wear protective hair covering
to contain longhair.
• NYLON LINE – Keep face, hands and feet clear of rotating
nylon line at alltimes.
• THE ROTATING LINE PERFORMS A CUTTING FUNCTION
– Use care when trimming around screens and
desirableplantings.
• DO NOT USE materials not recommended, such as metal
wire, rope, and thelike.
• KEEP ALL BYSTANDERS AWAY – at a safe distance from
work area, especiallychildren.
• MAKE SURE that other persons and pets are at least 100
feet (30m)away.
• TO REDUCE THE RISK of rebound (ricochet) injury, work
going away from any nearby solid object such as wall,
steps, large stone, tree, etc. Use great care when working
close to solid objects and where necessary, do trimming
byhand.
• AVOID ACCIDENTALLY STARTING – Don’t carry plugged-in
trimmer with finger on trigger.
• USE THE RIGHT appliance – Do not use this appliance for
any job except that for which it isintended.
• DON’T OVERREACH – Keep proper footing and balance at
alltimes.
• Don’t Force Appliance – It will do the job better and with
less likelihood of a risk of injury at the rate for which it
wasdesigned
• DAMAGE TO UNIT – If you strike or become entangled
with a foreign object, stop appliance immediately, unplug,
check for damage and have any damage repaired before
further operation is attempted. Do not operate with a
broken hub orspool.
• DAMAGE TO CORD – Keep power cord away from rotating
line. If you damage the cord, unplug it from the power
supply before moving the tool or examining the damage. A
damaged cord must be replaced before further use.
• SECURE EXTENSION CORD using the cord retainer shown in
in this manual.
• DISCONNECT TRIMMER – when not in use, when replacing
line, or prior to cleaning.
• AVOID DANGEROUS ENVIRONMENTAL CONDITIONS – Do
not use electric appliances in damp or wet locations.
Follow all instructions in this Instruction Manual for proper
operation of your appliance. Don’t use the appliance in
therain.
• DO NOT OPERATE portable electric appliances in gaseous
or explosive atmospheres. Motors in these appliances
normally spark, and the sparks might ignitefumes.
• STORE IDLE applianceS INDOORS – When not in use,
appliances should be stored indoors in a dry, locked-up
place out of reach ofchildren.
• STAY ALERT – Do not operate this unit when you are tired,
ill, or under the influence of alcohol, drugs, ormedication.
• MAINTAIN APPLIANCES WITH CARE – Follow instructions
in maintenance section. Keep handles dry, clean and free
from oil andgrease.
• GROUND FAULT CIRCUIT INTERRUPTER (GFCI) protection
should be provided on the circuit(s) or outlet(s) to be
used for the trimmer. Receptacles are available having
built-in GFCI protection and may be used for this measure
ofsafety.
• CHECK DAMAGED PARTS – Before further use of the
appliance, a guard or other part that is damaged should
be carefully checked to determine that it will operate
properly and perform its intended function. Check for
alignment of moving parts, binding of moving parts,
breakage of parts, mounting, and any other condition
that may affect its operation. A guard or other part that
is damaged should be properly repaired or replaced by
an authorized service center unless otherwise indicated
elsewhere in thismanual.
• DO NOT immerse appliance in water or squirt it with a
hose. DO NOT allow any liquid to get insideit.
• DO NOT store the appliance on or adjacent to fertilizers
orchemicals.
• DO NOT clean with a pressurewasher.
• Keep guards in place and in workingorder.
• Keep hands and feet away from cuttingarea.
• KEEP CHILDREN, BYSTANDERS AND ANIMALS AWAY from
the work area a minimum of 30 feet (10 meters) when
starting or operating theunit.
• INSPECT THE AREA before using the unit. Remove all debris
and hard objects such as rocks, glass, wire, etc. that can
ricochet, be thrown, or otherwise cause injury or damage
duringoperation.
• Do not leave appliance when plugged in. Unplug from
outlet when not in use and beforeservicing.
• DO NOT use with damaged cord or plug. If appliance is
not working as it should, has been dropped, damaged,

ENGLISH
3
left outdoors, or dropped into water, return it to a
servicecenter.
• DO NOT pull or carry by cord, use cord as a handle, or pull
cord around sharp edges or corners. Keep cord away from
heatedsurfaces.
• DO NOT unplug by pulling on cord. To unplug, grasp the
plug, not thecord.
• Do not handle plug or appliance with wethands.
• Turn off all controls beforeunplugging.
• This appliance is provided with double insulation. Use only
identical replacement parts. See instructions for Servicing
of Double-InsulatedAppliances.
• To reduce the risk of electric shock, use only with an
extension cord intended for outdoor use, such as SJW
orSJTW.
• Make sure your extension cord is in good condition and
is the correct size for your appliance. The Minimum
Gauge for Cord Sets chart below shows the correct size
to use depending on cord length and nameplate ampere
rating. If in doubt, use the next heavier gage. The smaller
the gage number, the heavier the cord. An undersized
extension cord will cause a drop in line voltage resulting in
loss of power and overheating
• Maintain Appliance With Care – Inspect extension cords
periodically and replace ifdamaged.
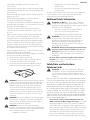
• To reduce the risk of disconnection of appliance cord from
the extension cord during operating:
a ) Make a knot as shown in below; OR
b ) Use one of the plug-receptacle retaining straps or
connectors described in this manual; OR
c ) Secure the extension cord to the appliance plug as
shown or described in the OperatingInstructions.
WARNING: To reduce the risk of personal injury due to
a loose electrical connection between the appliance’s
plug and extension cord, firmly and fully attach the
appliance plug to the extension cord. Periodically
check the connection while operating to ensure it
is fully attached. Do not use an extension cord that
provides a loose connection. A loose connection may
result in overheating, fire, and increases the risk of
aburning.
WARNING: Do not use appliance if the switch trigger
does not turn the appliance on or off. Any appliance
that can not be controlled with the switch trigger is
dangerous and must berepaired.
WARNING: Some dust created by this product
contains chemicals known to the State of California to
cause cancer, birth defects or other reproductive harm.
Some examples of these chemicals are:
• compounds in fertilizers
• compounds in insecticides, herbicides
andpesticides
• arsenic and chromium from chemically
treatedlumber
To reduce your exposure to these chemicals, wear approved
safety equipment such as dust masks that are specially
designed to filter out microscopicparticles.
Additional Safety Information
WARNING: ALWAYS use safety glasses. Everyday
eyeglasses are NOT safety glasses. Also use face or
dust mask if cutting operation is dusty. ALWAYS WEAR
CERTIFIED SAFETYEQUIPMENT:
• ANSI Z87.1 eye protection (CAN/CSA Z94.3),
• ANSI S12.6 (S3.19) hearing protection,
• NIOSH/OSHA/MSHA respiratoryprotection.
WARNING: Use of this tool can generate and/
or disperse dust, which may cause serious and
permanent respiratory or other injury. Always use
NIOSH/OSHA approved respiratory protection
appropriate for the dust exposure. Direct particles
away from face andbody.
WARNING: Always wear proper personal hearing
protection that conforms to ANSI S12.6 (S3.19)
during use. Under some conditions and duration
of use, noise from this product may contribute to
hearingloss.
• Air vents often cover moving parts and should be
avoided. Loose clothes, jewelry or long hair can be
caught in movingparts.
Safety Rules and Instructions:
Extension Cords
WARNING: To reduce the risk of electric shock, use
only with an extension cord intended for outdoor
use, such as an extension cord of cord type SW-A,
SOW-A, STW-A, STOW-A, SJW-A, SJOW-A, SJTW-A. or
SJTOW-A.
Make sure your extension cord is in good condition. When
using an extension cord, be sure to use one heavy enough
to carry the current your product will draw. An undersized
cord will cause a drop in line voltage resulting in loss of
power and overheating. The table shows the correct size
to use depending on cord length and nameplate ampere
rating. If in doubt, use the next heavier gauge. The smaller
the gauge number, the heavier the cord. If the extension
will be used outside, the cord must be suitable for outdoor
work. The letters “WA” on the cord jacket indicate that the
cord is suitable for outdoor use.
• An extension cord must have adequate wire size
(AWG or American Wire Gauge) for safety. The smaller
the gauge number of the wire, the greater the capacity
of the cable, that is, 16 gauge has more capacity than 18
gauge. An undersized cord will cause a drop in line voltage
resulting in loss of power and overheating. When using
more than one extension to make up the total length,
be sure each individual extension contains at least the
minimum wire size. The following table shows the correct

ENGLISH
4
size to use depending on cord length and nameplate
ampere rating. If in doubt, use the next heavier gauge. The
lower the gauge number, the heavier thecord.
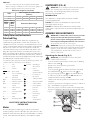
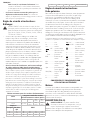
Minimum Gauge for Cord Sets
Volts
Total Length of Cord in Feet
(meters)
120 V 25 (7.6) 50 (15.2) 100 (30.5) 150 (45.7)
240 V 50 (15.2) 100 (30.5) 200 (61.0) 300 (91.4)
Ampere Rating
American Wire Gauge
More
Than
Not
More
Than
0 6 18 16 16 14
6 10 18 16 14 12
10 12 16 16 14 12
12 16 14 12 Not Recommended
Safety Rules and Instructions:
Polarized Plug
To reduce the risk of electric shock, this equipment has
a polarized plug (one blade is wider than the other). This
equipment must be used with a suitable polarized 2 wire or
3 wire extension cord. Polarized connections will fit together
only one way. Make sure that the receptacle end of the
extension cord has large and small blade slot widths. If the
plug does not fit fully into the extension cord, reverse the
plug. If it still does not fit, obtain a suitable extension cord. If
the extension cord does not fit fully into the outlet, contact a
qualified electrician to install the proper outlet. Do not change
the tool plug or extension cord in anyway.
The label on your tool may include the following symbols. The
symbols and their definitions are asfollows:
V ......................... volts
Hz .......................hertz
min ..................... minutes
or DC ......direct current
...................... Class I Construction
(grounded)
…/min ..............per minute
BPM .................... beats per minute
IPM ..................... impacts per minute
RPM .................... revolutions per
minute
sfpm ................... surface feet per
minute
SPM .................... strokes per minute
A ......................... amperes
W ........................watts
or AC ...........alternating current
or AC/DC .... alternating or
direct current
...................... Class II
Construction
(double insulated)
n
o
.......................no load speed
n .........................rated speed
......................earthing terminal
.....................safety alert symbol
.....................visible radiation
..................... wear respiratory
protection
..................... wear eye
protection
..................... wear hearing
protection
..................... read all
documentation
SAVE THESE INSTRUCTIONS FOR
FUTURE USE
Motor
Be sure your power supply agrees with the nameplate
marking. Voltage decrease of more than 10% will cause loss
of power and overheating. BLACK+DECKER tools are factory
tested; if this tool does not operate, check powersupply.
COMPONENTS (FIG. A)
WARNING: Never modify the power tool or any part
of it. Damage or personal injury couldresult.
Refer to Fig. A at the beginning of this manual for a
complete list ofcomponents.
Intended Use
This appliance is designed for residential outdoor
trimmingapplications.
DO NOT use under wet conditions or in presence of
flammable liquids orgases.
DO NOT let children come into contact with the tool.
Supervision is required when inexperienced operators use
thistool.
ASSEMBLY AND ADJUSTMENTS
WARNING: To reduce the risk of serious personal
injury, turn unit off and disconnect it from
power source before making any adjustments or
removing/installing attachments or accessories.
An accidental start-up can causeinjury.
WARNING: Unplug the trimmer before attempting
to attach the guard, EDGE GUIDE OR HANDLE. NEVER
OPERATE TOOL WITHOUT GUARD FIRMLY IN PLACE.
THE GUARD MUST ALWAYS BE ON THE TOOL TO
PROTECT THEUSER.
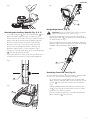
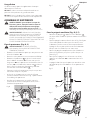
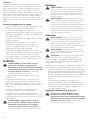
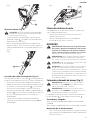
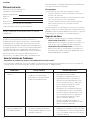
Attaching the Guard (Fig. B, C)
WARNING: NEVER OPERATE trimmer WITHOUT
GUARD FIRMLY IN PLACE.
• Turn the trimmer upside down so that you are looking
down at the spool
9
.
• Remove the screw from the guard with a
phillipsscrewdriver.
• Turn the guard
8
upside down and slide it fully onto
the motor housing
6
. Make sure the tabs
10
on
the guard engage the ribs
11
on the motor housing
as shown in Fig. B. The locking tab
25
should have
snapped into the housing slot
26
.
• Continue to slide the guard on until you hear it “snap”
intoplace.
• Insert the guard screw and tighten securely as shown in
Fig. C to complete the guardassembly.
• Once the guard is installed, remove the covering from
the line cut-off blade, located on the edge of theguard.
Fig. B
8
9
25
26
6
10
11

ENGLISH
5
Fig. C
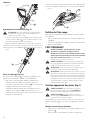
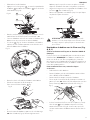
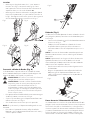
Attaching the Auxiliary Handle (Fig. D, E, F)
• To attach the handle
4
, press in on the buttons
12
on
both sides of the upper housing as shown in Fig. D.
• Position the handle as shown in Fig. E, matching up the
grooved side of the handle with the grooved button.
Partially push the handle on so that it will hold the
buttons in when you release them with your hand.
• Push the handle completely onto the housing and
position it slightly until it “snaps” into place (Fig. F).
• To adjust the handle up or down, press in on the button
13
and raise or lower the handle.
• The handle should be adjusted so that your front arm is
straight when the trimmer is in the workingposition.
•
Fig. D
12
Fig. E
4
Fig. F
13
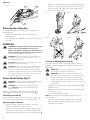
Height Adjustment (Fig. G)
CAUTION: Adjust the length of the trimmer to obtain
proper working positions as shown in Fig.I.
• The overall height of the trimmer can be adjusted by
loosening the collar
5
and rotating it in the direction of
the arrow shown in Fig. G.
• Move the upper housing straight up or down. When the
desired height is achieved, tighten the collar by rotating
it opposite of the direction shown in Fig.G.
Fig. G
5
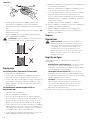
Attaching Extension Cord (Fig. H)
An extension cord retainer
2
is built into the switch handle
that prevents the cord from comingunplugged.
• To use this feature, simply double the extension cord
about 8 inches (203mm) from the end, and insert it into
the slot
14
in the end of the handle area as shown in
Fig.H.
• Hook the loop formed by doubling the cord over the
tab
2
. Gently tug on the cord to insure that it is firmly
retained in the trimmer’shandle.
• Plug the receptacle end of the extension cord into the
power cord plug
3
in the trimmer.

ENGLISH
6
Fig. H
2
14
3
Releasing the cutting line
For shipping purposes, the cutting line is taped to the
spoolhousing.
• Remove the tape holding the cutting line to the
spoolhousing.
• See "Replacing the Spool" for instructions for removing
the spool
OPERATION
WARNING: To reduce the risk of serious personal
injury, turn unit off and disconnect it from
power source before making any adjustments or
removing/installing attachments or accessories.
An accidental start-up can causeinjury.
WARNING: Always use proper eye protection that
conforms to ANSI Z87.1 (CAN/CSA Z94.3) while
operating this appliance.
CAUTION: Before you begin trimming, only use the
appropriate type of cutting line.
CAUTION: Inspect area to be trimmed and remove
any wire, cord, or string-like objects which could
become entangled in the rotating line or spool. Be
particularly careful to avoid any wire which might be
bent outwardly into the path of the trimmer, such as
barbs at the base of a chain linkfence.
Proper Hand Position (Fig. I)
WARNING: To reduce the risk of serious personal injury,
ALWAYS use proper hand position as shown.
WARNING: To reduce the risk of serious personal
injury, ALWAYS hold securely in anticipation of a
suddenreaction.
Proper hand position requires one hand on the main
handle
3
and one hand on the auxiliary handle
5
.
Switching on and off
To switch the trimmer on, squeeze the trigger switch
1
.
To switch the trimmer off, release the triggerswitch.
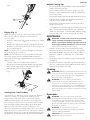
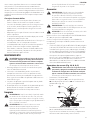
Operating the Trimmer
• With the unit on, angle unit and slowly swing the
trimmer side to side as shown in Fig. I.
• Maintain a cutting angle of 5° to 10° as shown in Fig. I1.
Do not exceed 10° (Fig. I2). Cut with the tip of the line.
To keep distance from hard surfaces use edgewheel
7
.
• Maintain a minimum distance of 24 inches (609.6 mm)
between the guard and your feet as shown in Fig. I. To
acheive this distance adjust the overall height of the
trimmer as shown in Fig.G.
Fig. I Fig. I1
Fig. I2 Fig. I3
Convert to Edging Mode (Fig. K)
The trimmer can be used in trimming mode or edging
mode to trim overhanging grass along lawn edges and
flowerbeds.
WARNING: Disconnect the plug from the power
source before making anyadjustments.
WARNING: When being used as an Edger, stones,
pieces of metal and other objects can be thrown out
at high speed by the line. The trimmer and guard
are designed to reduce the danger. However, MAKE
SURE that other persons and pets are at least 100 feet
(30m)away.
• To operate as a maintenance edger, turn the collar
5
as
shown in Fig. K.
• Hold the metal shaft and rotate the lower housing 180°
as shown in Fig. K.
• Turn the collar back untiltight.
NOTE: The metal shaft and housing will only rotate in
onedirection.
• To return to the trimming position, loosen the lock
collar and rotate the lower housing back 180° and
retightening thecollar.

ENGLISH
7
Fig. K
5
Edging (Fig. L)
Optimum cutting results are achieved on edges deeper
than 2 inches (50 mm). Do not use this trimmer to
createtrenches.
• Using the edging wheel
7
, guide the trimmer as shown
in Fig.L.
• Position the edging wheel on the edge of the sidewalk
or abrasive surface so the cutting line is over the grass or
dirt area to beedged.
NOTE: The Auto Feed System may not operate correctly if
wheeled edge guide is notused.
NOTE: You will experience faster than normal cutting line
wear if the edging wheel is positioned too far from the
edge with the cutting line positioned over the sidewalk or
abrasivesurface.
• To make a closer cut, slightly tilt thetrimmer.
• Return to the trimming postion by loosening the lock
collar and rotating the lower housing back 180°. The
tool will lock in the trimmerposition.
Fig. L
Cutting Line / Line Feeding
Your trimmer uses .065 inch (1.65 mm) diameter, ROUND
nylon line. During use, the tips of the nylon lines will
become frayed and worn and the special self feeding
spool will automatically feed and trim a fresh length of
line. Cutting line will wear faster and require more feeding
if the cutting or edging is done along sidewalks or other
abrasive surfaces or heavier weeds are being cut. The
advanced automatic line feeding mechanism senses when
more cutting line is needed and feeds and trims the correct
length of line whenever it’s required. Do not bump trimmer
on ground in attempt to feed line or for any otherpurposes.
Helpful Cutting Tips
• Use the tip of the string to do the cutting; do not force
string head into uncutgrass.
• Wire and picket fences cause extra string wear, even
breakage. Stone and brick walls, curbs, and wood may
wear stringrapidly.
• Do not allow spool cap to drag on ground or othersurfaces.
• In long growth, cut from the top down and do not
exceed 12 inches (304.8 mm)high.
• Keep trimmer tilted toward the area being cut; this is
the best cuttingarea.
• The trimmer cuts when passing the unit from the left to
right. This will avoid throwing debris at theoperator.
• Avoid trees and shrubs. Tree bark, wood moldings, siding,
and fence posts can easily be damaged by thestring.
MAINTENANCE
WARNING: To reduce the risk of serious personal
injury, turn unit off and disconnect it from
power source before making any adjustments or
removing/installing attachments or accessories.
An accidental start-up can causeinjury.
1. Keep the air intake slots clean to avoidoverheating.
2. Your trimmer line can dry out over time. To keep your
line in top condition, store spare pre-wound spools or
bulk line in a plastic, sealable bag with a tablespoon
ofwater.
3. Plastic parts may be cleaned by using a mild soap and
a damprag.
4. The line cutter on the edge of the guard can dull over
time. It is recommended you periodically touch-up the
sharpness of the blade with afile.
Cleaning
WARNING: Blow dirt and dust out of all air vents with
clean, dry air at least once a week. To minimize the risk
of eye injury, always wear ANSI Z87.1 approved eye
protection when performingthis.
WARNING: Never use solvents or other harsh
chemicals for cleaning the non-metallic parts of
the tool. These chemicals may weaken the plastic
materials used in these parts. Use a cloth dampened
only with water and mild soap. Never let any liquid
get inside the tool; never immerse any part of the tool
into aliquid.
Accessories
WARNING: Since accessories, other than those
offered by BLACK+DECKER, have not been tested with
this product, use of such accessories with this tool
could be hazardous. To reduce the risk of injury, only
BLACK+DECKER recommended accessories should be
used with thisproduct.
WARNING: The use of any accessory not
recommended by BLACK+DECKER for use with this
trimmer could behazardous.
CAUTION: Before you begin trimming, only use the
appropriate type of cutting line.

ENGLISH
8
Use BLACK+DECKER replacement spool Model No. AF-100,
and replacement cap RC-100.
Reload nylon line (either bulk or prewound replacement
spool) as shown in thismanual.
• USE ONLY .065 inch (1.65 mm) DIAMETER ROUND
NYLON LINE. Do not use serrated or heavier gauge line,
as they will overload the motor and cause overheating.
This line is available at your local dealer or authorized
servicecenter.
• Other replacement parts (guards, spool caps, etc.) are
available through BLACK+DECKER service centers. To
find your local service location call: 1-800-544-6986 or
visit www.blackanddecker.com.
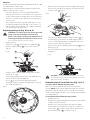
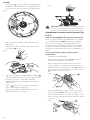
Replacing the Spool (Fig. M, N, O, P)
WARNING: To reduce the risk of serious personal
injury, turn unit off and disconnect it from
power source before making any adjustments or
removing/installing attachments or accessories.
An accidental start-up can causeinjury.
• Unplugtrimmer.
• Depress the tabs
15
and remove the spool cap
25
from the spool housing
16
in the trimmer head
(Fig. M).
Fig. M
16
25
15
• For best results, replace spool with BLACK+DECKER
model no. AF-100.
• Grasp empty spool with one hand and spool housing
with other hand and pull spoolout.
• If lever
17
(Fig. N) in base of housing becomes
dislodged, replace in correct position before inserting
new spool intohousing.
Fig. N
17
18
19
• Remove any dirt and grass from the spool andhousing.
• Unfasten the end of the cutting line and guide the line
into the eyelet
19
Fig. O.
Fig. O
19
• Take the new spool and push it onto the boss
18
in
the housing (Fig. N). Rotate the spool slightly until it is
seated. The line should protrude approximately 5-3/8
inches (136mm) from thehousing.
• Align the tabs on the spool cap with the slots
20
in the
housing (Fig. P).
• Push the cap onto the housing until it snaps securely
intoplace.
Fig. P
20
CAUTION: To avoid trimmer damage, if the cutting
line protrudes beyond the trimming blade, cut it off so
that it just reaches theblade.
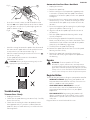
Rewinding Spool From Bulk Line (Fig. Q, R, S)
(use only .065 in. ROUND diameter line)
Bulk line is also available for purchase from your local
retailer. NOTE: Hand wound spools from bulk line are likely
to become tangled more frequently than BLACK+DECKER
factory wound spools. For best results, factory wound spools
arerecommended.
To install bulk line, follow the steps below:
• Unplugtrimmer.
• Remove the empty spool from the trimmer as described
in “REPLACING THE SPOOL”.
• Remove any remaining cutting line from thespool.
• Make a fold at the end of the cutting line at about 3/4
inch (19mm)
21
. Feed the cutting line into one of the
line anchoring slots
22
as shown in Fig.O.
1
On/Off Trigger Switch
2
Cord retainer
3
Power cord plug
4
Auxillary handle
5
Collar
6
Motor housing
7
Edge guide wheel
8
Guard
9
Spool
10
tabs
11
ribs
12
buttons
13
buttons
14
slot
15
tabs
16
spool housing
17
lever
18
boss
19
eyelet
20
slots
21
3/4 " cutting line
22
anchoring slots
23
hole
24
recesses
25
locking tab (spool cap)
26
housing slot

ENGLISH
9
Fig. Q
22
21
• Insert the 3/4 inch (19mm) end of the bulk line into
the hole
23
in the spool adjacent to the slot as shown
in Fig. R. Make sure the line is pulled tight against the
spool as shown in Fig.S.
Fig. R
24 23
• Wind the cutting line onto the spool in the direction of
the arrow on the spool. Make sure to wind the line on
neatly and in layers. Do not crisscross (Fig. S).
• When the wound cutting line reaches the recesses
24
,
cut the line. (Fig. R).
• Fit the spool onto the trimmer as described in
“REPLACING THE SPOOL”.
CAUTION: Before you begin trimming, only use the
appropriate type of cutting line.
Fig. S
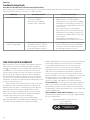
Troubleshooting
Trimmer Runs Slowly
1. Unplug thetrimmer.
2. Check that the spool housing can rotate freely. Carefully
clean it ifnecessary.
3. Check that the cutting line does not protrude more
than approximately 5-3/8 inches (136mm) from the
spool. If it does, cut it off so that it just reaches the line
trimmingblade.
Automatic Line Feed Does Not Work
1. Unplug thetrimmer.
2. Remove the spoolcap.
3. Pull the cutting line until it protrudes approximately
5-3/8 inches (136mm) from the spool. If insufficient
cutting line is left on the spool, install a new spool of
cutting line.
4. Ensure that the line is not crisscrossed on the spool as
detailed in Fig. S. If it is, unwind the cutting line, then
wind it back on the spool neatly so that the lines do
notcross.
5. Ensure the beginning of the cutting line is pulled tight
against the spool as shown in Fig.S.
6. Align the tabs on the spool cap with the cut outs in
thehousing.
7. Push the spool cap onto the housing until it snaps
securely intoplace.
8. If the cutting line protrudes beyond the trimming
blade, cut it off so that it just reaches the blade. If the
automatic line feed still does not work or the spool is
jammed, try the following suggestions:
9. Carefully clean the spool andhousing.
10. Remove the spool and check if the lever in the spool
housing can movefreely.
11. Remove the spool and unwind the cutting line,
then wind it on neatly again. Replace the spool into
thehousing.
Repairs
WARNING: To assure product SAFETY and
RELIABILITY, repairs, maintenance and adjustment
(including brush inspection and replacement, when
applicable) should be performed by a BLACK+DECKER
factory service center or a BLACK+DECKER authorized
service center. Always use identical replacementparts.
Register Online
Thank you for your purchase. Register your product nowfor:
• WARRANTY SERVICE: Registering your product will
help you obtain more efficient warranty service in case
there is a problem with yourproduct.
• CONFIRMATION OF OWNERSHIP: In case of
an insurance loss, such as fire, flood or theft, your
registration of ownership will serve as your proof
ofpurchase.
• FOR YOUR SAFETY: Registering your product will
allow us to contact you in the unlikely event a safety
notification is required under the Federal Consumer
SafetyAct.
Register online at www.blackanddecker.com

ENGLISH
10
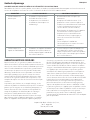
Troubleshooting Guide
BE SURE TO FOLLOW SAFETY RULES AND INSTRUCTIONS
For assistance with your product, visit our website at www.blackanddecker.com for a list of service centers, or call the
BLACK+DECKER Customer Care Center at 1-800-544-6986.
PROBLEM POSSIBLE CAUSE POSSIBLE SOLUTION
• Trimmer will notstart. • Cord is not pluggedin.
• Circuit fuse isblown.
• Circuit breaker istripped.
• Cord or switch isdamaged.
• Plug tool into a workingoutlet.
• Replace circuit fuse. (If the product
repeatedly causes the circuit fuse to blow,
discontinue use immediately and have it
serviced by an authorized BLACK+DECKER
servicecenter.
• Reset circuit breaker. (If the product
repeatedly causes the circuit breaker trip,
discontinue use immediately and have it
serviced by an authorized BLACK+DECKER
servicecenter.
• Have cord or switch replaced at an
authorized BLACK+DECKER servicecenter.
• Cutting line is consumed
quickly in edgemode.
• Edging too far from edge of
sidewalks or abrasivesurfaces.
• The cutting line is hitting the
sidewalk or abrasivesurfaces.
• Ensure edging wheel is on the edge of the
surface and the cutting line is positioned
in the grass or dirt area to be edged, not
the sidewalk or abrasivesurface.
TWO-YEAR LIMITED WARRANTY
Black & Decker (U.S.) Inc. warranties this product to be free
from defects in material or workmanship for a period of
two 2 years following the date of purchase, provided that
the product is used in a home environment. This limited
warranty does not cover failures due to abuse, accidental
damage or when repairs have been made or attempted
by anyone other than BLACK+DECKER and its Authorized
Service Centers. A defective product meeting the warranty
conditions set forth herein will be replaced or repaired at no
charge in either of two ways:
The first, which will result in exchanges only, is to return
the product to the retailer from whom it was purchased
(provided that the store is a participating retailer). Returns
should be made within the time period of the retailer’s
policy for exchanges. Proof of purchase may be required.
Please check with the retailer for its specific return policy
regarding time limits for returns orexchanges.
The second option is to take or send the product
(prepaid) to a BLACK+DECKER owned or authorized Service
Center for repair or replacement at BLACK+DECKER’s
option. Proof of purchase may be required. BLACK+DECKER
owned and authorized service centers are listed online
at www.blackanddecker.com. This warranty does not
apply to accessories. This warranty gives you specific
legal rights aand you may have other rights which vary
from state to state or province to province. Should you
have any questions, contact the manager of your nearest
BLACK+DECKER Service Center. This product is not intended
for commercial use, and accordingly, such commercial
use of this product will void this warranty. All other
guarantees, express or implied, are hereby disclaimed.
LATIN AMERICA: This warranty does not apply to products
sold in Latin America. For products sold in Latin America,
check country specific warranty information contained in
the packaging, call the local company or see the website for
warrantyinformation.
FREE WARNING LABEL REPLACEMENT: If your warning
labels become illegible or are missing, call 1-800-544-6986
for a free replacement..
Imported by Black & Decker (U.S.) Inc.,
701 E. Joppa Rd.
Towson, MD 21286
BlackandDecker.com
1-800-544-6986

1
2
5
6
8
7 9
4
3
FRANÇAIS
11
Définitions : symboles et termes d'alarmes sécurité
Ces guides d'utilisation utilisent les symboles et termes d'alarmes sécurité suivants pour vous prévenir de situations
dangereuses et de risques de dommages corporels ou matériels.
DANGER: indique une situation dangereuse imminente qui, si elle n’est pas évitée, entraînera la mort ou des
blessuresgraves.
AVERTISSEMENT: indique une situation potentiellement dangereuse qui, si elle n’est pas évitée, pourrait entraîner la
mort ou des blessuresgraves.
ATTENTION: indique une situation potentiellement dangereuse qui, si elle n’est pas évitée, pourrait entraîner des
blessures légères oumodérées.
(Si utilisé sans aucun terme) Indique un message propre à la sécurité.
AVIS : indique une pratique ne posant aucun risque de dommages corporels mais qui par contre, si rien n’est fait
pour l’éviter, pourrait poser des risques de dommages matériels.
AVERTISSEMENT! lire tous les avertissements de
sécurité et toutes les directives. Le non-respect
des avertissements et des directives pourrait se
solder par un choc électrique, un incendie et/ou une
blessuregrave.
AVERTISSEMENT : afin de réduire le risque de
blessures, lire le mode d’emploi del’outil.
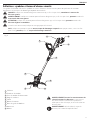
1
Gâchette
2
Enrouleur du cordon
3
Prise du cordon d’alimentation
4
Poignée auxiliaire
5
Collier
6
Boîtier du moteur
7
Roue du guide de bordure
8
Protecteur
9
Bobine
Français (traduction de la notice d’instructions originale)
Fig. A

FRANÇAIS
12
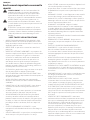
Avertissements importants concernant la
sécurité
AVERTISSEMENT: Lors de l’utilisation d’outils de
jardinage électriques, les mesures de précaution
de base devraient toujours être prises pour réduire
la possibilité d’incendie, de choc électrique et de
blessures, en suivant les recommandations suivantes.
AVERTISSEMENT: Ne pas retirer le protecteur. Le
protecteur doit être fixé durant l’utilisation. Utiliser
ce taille-bordure sans le protecteur porte atteinte à la
garantie du produit.
ATTENTION: Lorsque vous remplacez le fil, utilisez
seulement un fil rond d’un diamètre de 0,065 pouce
(1,65mm). D’autres diamètres ou formes pourraient
réduire la performance ou endommager le taille-
bordure.
LISEZ TOUTES LES INSTRUCTIONS
• PORTEZ TOUJOURS UNE PROTECTION POUR LES YEUX :
portez des lunettes de sécurité ou de protection en tout
temps aussitôt que vous branchez l’outil. Ces articles sont
disponibles pour un achat.
• PROTECTEUR : ne pas utiliser cet outil sans avoir fixé le
protecteur.
• PORTEZ DES VÊTEMENTS APPROPRIÉS : ne pas porter des
vêtements amples ou des bijoux. Il peuvent se coincer dans
les pièces qui se déplacent. Les gants et les chaussures
à semelles en caoutchouc solides sont recommandés
lorsque vous travaillez à l’extérieur. Ne pas utiliser cet
outil lorsque vous êtes pieds nus ou que vous portez
des sandales ouvertes. Portez des pantalons longs pour
protéger vos jambes. Pour les cheveux longs, attacher en
retrait ou porter un filet à cheveux.
• FIL EN NYLON : gardez votre visage, vos mains et vos pieds
hors de portez du fil en rotation en tout temps.
• LE FIL EN ROTATION A UNE FONCTION DE COUPE : faites
attention lorsque vous coupez autour des moustiquaires et
des plantes désirables.
• NE PAS UTILISER des matériaux non recommandés,
comme un fil de métal, une corde et d’autres matériaux
semblables.
• GARDEZ TOUS LES PASSANTS ÉLOIGNÉS : à une distance
sécuritaire de la zone de travail, particulièrement les
enfants.
• ASSUREZ-VOUS que les autres personnes et les animaux
sont à une distance d’au moins 100 pieds (30 m).
• AFIN DE RÉDUIRE LE RISQUE de blessures par rebond
(ricochet), travaillez à distance de tout objet solide à
proximité comme un mur, des marches, une grosse pierre,
un arbre, etc. Faites très attention lorsque vous travaillez
près d’objets solides et au besoin, faites une coupe à la
main.
• ÉVITEZ LES DÉMARRAGES ACCIDENTELS : ne pas
transporter le taille-bordure branché avec votre doigt sur
la gâchette.
• UTILISEZ LE BON OUTIL : ne pas utiliser cet outil pour toute
tâche autre que celles pour lesquelles il est conçu.
• NE PAS S’ÉTIRER : maintenez vos pieds bien d’aplomb sur le
sol et un bon équilibre en tout temps.
• Ne pas forcer l’outil : le travail sera mieux fait et avec moins
de probabilité de risque à la vitesse pour laquelle il a été
conçu.
• DOMMAGES À L’OUTIL : si vous frappez ou si vous emmêlé
avec un objet étranger, arrêtez immédiatement l’outil,
débranchez-le, vérifiez les dommages et faites réparer les
dommages avant de tenter de le réutiliser. Ne pas l’utiliser
avec un moyeu ou une bobine brisé.
• DOMMAGES AU CORDON : éloignez le cordon
d’alimentation du fil en rotation. Si vous endommagez
le cordon, débranchez-le de l’alimentation électrique
avant de déplacer l’outil ou d’examiner les dommages.
Un cordon endommagé doit être remplacé avant toute
utilisation ultérieure.
• SÉCURISEZ LA RALLONGE à l’aide de l’enrouleur du cordon
illustré dans ce manuel.
• DÉBRANCHEZ LE TAILLE-BORDURE : lorsque vous ne
l’utilisez pas, lorsque vous remplacez le fil ou avant de le
nettoyer.
• ÉVITEZ LES CONDITIONS ENVIRONNEMENTALES
DANGEREUSES :ne pas utiliser des outils électriques
dans des endroits humides ou mouillés. Suivez toutes
les instructions dans le manuel d’instructions pour une
utilisation appropriée de votre outil. Ne pas utiliser l’outil
sous la pluie.
• NE PAS UTILISER les outils électriques portatifs dans une
atmosphère gazeuse ou explosive. Les moteurs de ces
outils produisent des étincelles et ces étincelles pourraient
enflammer les vapeurs.
• ENTREPOSEZ LES OUTILS ARRÊTÉS À L’INTÉRIEUR : lorsqu’ils
ne sont pas utilisés, les outils doivent être entreposés à
l’intérieur dans un endroit sec et verrouillé hors de portée
des enfants.
• DEMEUREZ VIGILANT : ne pas utiliser cet outil lorsque vous
êtes fatigué, malade ou sous l’influence de l’alcool, de
drogues ou de médicaments.
• ENTRETENEZ VOS OUTILS AVEC SOINS : suivez les
instructions dans la section Entretien. Garder vos mains
sèches, propres et exemptes de graisse et de poussière.
• La protection du DISJONCTEUR DIFFÉRENTIEL DE FUITE
À LA TERRE DDFT doit être fournie sur le(s) circuit(s)
ou les prise(s) pour être utilisée avec le taille-bordure. Les
connecteurs femelles sont disponibles avec une protection
DDFT intégrée et peuvent être utilisés pour cette mesure
de sécurité.
• VÉRIFIEZ LES PIÈCES ENDOMMAGÉES : avant toute
utilisation ultérieure de l’outil, un protecteur ou une autre
pièce qui est endommagé doit être soigneusement vérifié
afin de déterminer s’il fonctionnera correctement et s’il
effectuera la fonction prévue. Vérifiez l’alignement des
pièces qui se déplacent, les fixations des pièces qui se
déplacent, le bris des pièces, le montage et tout autre état
qui peut affecter son utilisation. Un protecteur ou une
autre pièce qui est endommagé doit être convenablement
réparé ou remplacé par un centre de services autorisé sauf
indication contraire dans ce manuel.

FRANÇAIS
13
• NE PAS immerger l’outil dans l’eau ou l’asperger avec un
tuyau. NE PAS laisser pénétrer tout liquide à l’intérieur.
• NE PAS entreposer l’outil sur ou près de fertilisants ou de
produits chimiques.
• NE PAS nettoyer avec une laveuse à pression.
• Maintenez les protecteurs en place en bon état de
fonctionnement.
• Gardez vos mains et vos pieds à distance de la zone de
coupe.
• GARDEZ LES ENFANTS, LES PASSANTS ET LES ANIMAUX
LOIN de la zone de travail à un minimum de 30 pieds (10
mètres) lorsque vous démarrez ou utilisez l’outil.
• INSPECTEZ LA ZONE avant d’utiliser l’outil. Retirez tous des
débris et les objets durs comme des roches, du verre, les fils,
etc. qui peuvent ricocher, être projetés ou d’une façon ou
d’une autre causer une blessure ou des dommages durant
l’utilisation.
• Ne pas laisser l’outil lorsqu’il est branché. Débranchez-le de
la prise lorsqu’il n’est pas utilisé et avant l’entretien.
• NE PAS utiliser avec un cordon ou une fiche endommagés.
Si l’outil ne fonctionne pas comme il le devrait, a été
échappé, endommagé, laissé à l’extérieur ou échappé
dans l’eau, retournez-le dans un centre de services.
• NE PAS tirer ou transporter par le cordon, utiliser le cordon
comme une poignée, ou enrouler le cordon autour de
bords ou coins coupants. Gardez le cordon hors de portée
de surfaces chaudes.
• NE PAS débrancher en tirant sur le cordon. Pour
débrancher, saisir la fiche, et non le cordon.
• Ne pas manipuler la fiche ou l’outil avec les mains
mouillées.
• Éteignez toutes les commandes avant de débrancher.
• Cet outil est muni d’une isolation double. Utilisez
seulement des pièces de remplacement identiques.
Consultez les instructions pour l’entretien des outils à
isolation double.
• Pour réduire le risque de choc électrique, utilisez seulement
une rallonge conçue pour un usage extérieur, comme la
SJW ou SJTW.
• Assurez-vous que la rallonge est en bon état et de la bonne
taille pour votre outil. Le calibre minimum du tableau
des cordons amovibles affiche la bonne taille à utiliser
selon longueur de cordon et l’intensité nominale de la
plaque signalétique. En cas de doute, utilisez le calibre
le plus lourd suivant. Plus le numéro de calibre est bas,
plus le cordon est lourd. Une rallonge de taille inférieure
entraînera une chute de tension de secteur ce qui causera
une perte de puissance et une surchauffe.
• Entretenez l’outil avec soins : inspectez régulièrement les
rallonges et remplacez-les si elles sont endommagées.
• Afin de réduire le risque de débranchement du cordon de
l’outil de la rallonge durant le fonctionnement :
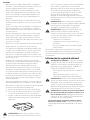
a ) Faites un nœud comme illustré dans la figure B; OU
b ) Utilisez une des sangles de fixation du connecteur
femelle de la fiche ou les connecteurs décrit dans ce
manuel; OU
c ) Branchez bien la rallonge avec la fiche de l’outil
comme illustré ou décrit dans le mode d'emploi.
AVERTISSEMENT: Afin de réduire le risque de
blessure corporelle due à un mauvais branchement
électrique entre la fiche de l’outil et la rallonge, fixez
entièrement et fermement la fiche de l’outil à la
rallonge. Vérifiez régulièrement le branchement durant
l’utilisation afin de vous assurer qu’il entièrement fixé.
Ne pas utiliser une rallonge qui est mal branchée. Un
mauvais branchement peut entraîner une surchauffe,
un incendie et augmente le risque de brûlure.
AVERTISSEMENT: Si la gâchette ne met pas l’outil en
marche ou si ne l’éteint pas, ne pas se servir de l’outil.
Tout outil qui ne peut être contrôlé avec la gâchette est
dangereux et doit être réparé.
AVERTISSEMENT: Certaines poussières créées par ce
produit contiennent des produits chimiques reconnus
dans l’État de la Californie pour causer le cancer, des
anomalies congénitales ou autres effets nuisibles sur
la reproduction. Certains exemples de ces produits
chimiques sont:
• des composants de fertilisants;
• des composants d’insecticides, d’herbicides et de
pesticides;
• de l’arsenic et du chrome provenant du bois de
construction traité chimiquement.
Pour réduire votre exposition à ces produits chimiques, porter
un équipement de sécurité approuvé, comme un masque
antipoussière spécialement conçu pour filtrer les particules
microscopiques.
Renseignements de sécurité
supplémentaires
AVERTISSEMENT: TOUJOURS porter des lunettes
de sécurité. Les lunettes de tous les jours NE SONT PAS
des lunettes de sécurité. De plus, utilisez un masque
facial ou antipoussière si l’opération de coupe est
poussiéreuse. PORTEZ TOUJOURS UN ÉQUIPEMENT DE
SÉCURITÉ CERTIFIÉ:
• Protection des yeuxANSI Z87.1 (CAN/CSA Z94.3),
• protection auditive ANSI S12.6 (S3.19),
• protection respiratoire NIOSH/OSHA/MSHA.
AVERTISSEMENT: L’utilisation de cet outil peut
générer et/ou disperser de la poussière qui peut causer
des lésions respiratoires graves et permanentes ou
d’autres blessures. Utilisez toujours une protection
respiratoire approuvée par NIOSH/OSHA appropriée
pour l’exposition à la poussière. Dirigez les particules
loin du visage et du corps.
AVERTISSEMENT: Portez toujours une protection
auditive personnelle appropriée conforme à

FRANÇAIS
14
ANSI S12.6 (S3.19) durant l’utilisation. Dans
certaines conditions et selon la durée d’utilisation,
le bruit provenant de ce produit peut contribuer à la
perte de l’audition.
• Les évents couvrent souvent des pièces qui se
déplacent et doivent être évités. Des vêtements
amples, les bijoux ou les cheveux longs peuvent se coincer
dans des pièces qui déplacent.
Règles de sécurité et instructions :
Rallonges
AVERTISSEMENT: Afin de réduire le risque de choc
électrique, utilisez seulement avec une rallonge conçue
pour l’utilisation à l’extérieur, comme une rallonge de
type SW-A, SOW-A, STW-A, STOW-A, SJW-A, SJOW-A,
SJTW-A ou SJTOW-A.
• Assurez-vous que votre rallonge est en bon état.
Lorsque vous utilisez une rallonge, assurez-vous
d’utiliser suffisamment lourd pour faire circuler le
courant qui sera acheminé au produit. Un cordon de
taille inférieure entraînera une chute de tension de
secteur ce qui causera une perte de puissance et une
surchauffe. Le tableau affiche la bonne taille à utiliser
selon longueur de cordon et l’intensité nominale de la
plaque signalétique. En cas de doute, utilisez le calibre
le plus lourd suivant. Plus le numéro de calibre est
bas, plus le cordon est lourd. Si la rallonge doit être
utilisée à l’extérieur, le cordon doit être approprié pour
le travail extérieur. Les lettres «WA» sur la gaine du
cordon indiquent que le cordon est approprié pour une
utilisation extérieure.
• Pour la sécurité de l’utilisateur, utiliser une rallonge
de calibre adéquat (AWG, American Wire Gauge
[calibrage américain normalisé des fils électriques]).
Plus le calibre est petit, et plus sa capacité est grande. Un
calibre16, par exemple, a une capacité supérieure à un
calibre18. L’usage d’une rallonge de calibre insuffisant
causera une chute de tension qui entraînera perte de
puissance et surchauffe. Si plus d’une rallonge est utilisée
pour obtenir une certaine longueur, s’assurer que chaque
rallonge présente au moins le calibre de fil minimum. Le
tableau ci-dessous illustre les calibres à utiliser selon la
longueur de rallonge et l’intensité nominale indiquée sur
la plaque signalétique. En cas de doute, utiliser le calibre
suivant. Plus le calibre est petit, plus la rallonge peut
supporter decourant.
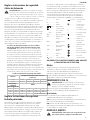
Calibre minimum pour les cordons d'alimentation
Volts
Longueur totale du cordon
d'alimentation en mètre (pieds)
120 V 7,6 ( 25 ) 15,2 ( 50 )
30,5
( 100 )
45,7
( 150 )
240 V 15,2 ( 50 )
30,5
( 100 )
61,0
( 200 )
91,4
( 300 )
Ampères
AWG
Plus que Pas plus
que
0 6 18 16 16 14
6 10 18 16 14 12
10 12 16 16 14 12
12 16 14 12 Non recommandé
Règles de sécurité et instructions :
Fiche polarisée
Pour réduire le risque de choc électrique, votre équipement
est muni d’une fiche polarisée (une lame est plus large
que l’autre). Cet équipement doit être utilisé avec un
fil électrique polarisé à 2 lames ou une rallonge de fil
électrique à 3 lames. Les branchements polarisés s’inséreront
ensemble d’une seule façon. Assurez-vous que l’extrémité
du connecteur femelle de la rallonge a des largeurs de
fentes pour lames petite et grande. Si la fiche ne s’insère pas
entièrement dans la rallonge, inversez-là. Si elle ne s’insère
toujours pas, procurez-vous une rallonge appropriée. Si la
rallonge ne s’insère pas entièrement dans la prise, contactez
un électricien qualifié pour installer une prise appropriée. Ne
jamais modifier la fiche de l’outil ou la rallonge.
L’étiquette apposée sur votre outil peut inclure les symboles
suivants. Les symboles et leur définition sont indiqués ci-après:
V ......................... volts
Hz ....................... hertz
min ..................... minutes
or DC ...... courant continu
...................... fabrication classe I
(mis à la terre)
…/min .............. par minute
BPM .................... battements par
minute
IPM ..................... impacts par minute
RPM .................... revolutions per
minute
sfpm ................... pieds linéaires par
minute (plpm)
SPM (FPM) ......... fréquence par
minute
A ......................... ampères
W ........................ watts
or AC ........... courant alternatif
or AC/DC .... courant alternatif
ou continu
...................... fabrication classe II
(double isolation)
n
o
....................... vitesse à vide
n ......................... vitesse nominale
...................... borne de terre
...................... symbole
d’avertissement
..................... radiation visible
..................... protection
respiratoire
.....................protection oculaire
.....................protection auditive
..................... lire toute la
documentation
CONSERVER CES CONSIGNES POUR
UTILISATION ULTÉRIEURE
Moteur
S’assurer que le bloc d’alimentation est compatible avec
l’inscription de la plaque signalétique.Une diminution
de tension de plus de 10 % provoquera une perte de
puissance et une surchauffe. Les outils BLACK+DECKER
sont testés en usine; si cet outil ne fonctionne pas, vérifier
l’alimentationélectrique.
DESCRIPTION (FIG. A)
AVERTISSEMENT: ne jamais modifier l’outil
électrique ni aucun de ses composants, car il y a
risques de dommages corporels oumatériels.
Reportez-vous en figureA au début de ce manuel pour
obtenir la liste complète descomposants.

FRANÇAIS
15
Usage Prévu
Cet outil est conçu pour des applications de coupes
domestiques à l’extérieur.
NE PAS les utiliser en milieu ambiant humide ou en
présence de liquides ou de gazinflammables.
NE PAS le laisser à la portée des enfants. Une supervision
est nécessaire auprès de tout utilisateur nonexpérimenté.
ASSEMBLAGE ET AJUSTEMENTS
AVERTISSEMENT: pour réduire le risque de
blessures graves, éteindre l’outil et retirer le
débrancher avant d’effectuer tout réglage
et d’enlever ou d’installer tout accessoire. Un
démarrage accidentel peut provoquer desblessures.
AVERTISSEMENT: débranchez le taille-bordure
avant de tenter de fixer le protecteur, LE GUIDE DE
BORDURE OU LA POIGNÉE. NE JAMAIS UTILISER
L’OUTIL SANS AVOIR FIXÉ LE PROTECTEUR FERMEMENT
EN PLACE. LE PROTECTEUR DOIT TOUJOURS ÊTRE SUR
L’OUTIL POUR PROTÉGER L’UTILISATEUR.
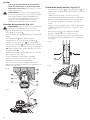
Fixer le protecteur (Fig. B, C)
AVERTISSEMENT: NE JAMAIS UTILISER le
taille-bordure SANS AVOIR FIXÉ LE PROTECTEUR
FERMEMENT EN PLACE.
• Retournez le taille-bordure pour que vous puissiez voir
le bas de la bobine
9
.
• Retirez la vis du protecteur avec un tournevis Phillips.
• Retournez le protecteur
8
et glissez-le entièrement
dans le boîtier du moteur
6
. Assurez-vous que les
languettes
10
sur le protecteur s’enclenchent dans les
nervures
11
sur le boîtier du moteur comme illustré
dans la Fig. B. La languette d’accrochage
25
doit
s’insérer dans la fente du boîtier
26
.
• Continuez à glissez le protecteur jusqu’à ce que vous
l’entendiez «cliquer» en place.
• Insérez la vis du protecteur et serrez-la de façon
sécuritaire comme illustré dans la Fig. C pour terminer
l’assemblage du protecteur.
• Une fois que le protecteur est installé, retirez le
revêtement de la lame à tronçonner du fil, situé à
l’extrémité du protecteur.
Fig. B
8
9
25
26
6
10
11
Fig. C
Fixer la poignée auxiliaire (Fig. D, E, F)
• Pour fixer la poignée
4
, appuyez sur les boutons
12
des deux côtés du boîtier supérieur comme illustré dans
la Fig. D.
• Placez la poignée comme illustré dans la Fig. E de façon
à faire correspondre le côté ayant des rainures avec
le bouton ayant des rainures. Poussez partiellement
la poignée dessus pour qu’elles tiennent les boutons
lorsque vous les relâcherez avec votre main.
• Poussez la poignée complètement dans le boîtier et
placez-là légèrement jusqu’à ce qu’elle «clique» en
place (Fig. F).
• Pour ajuster la poignée vers le haut ou vers le bas,
appuyez sur le bouton
13
et montez ou baissez la
poignée.
• La poignée doit être ajustée pour que votre bras avant
soit droit lorsque le taille-bordure est en position de
travail.
Fig. D
12
Fig. E
4

FRANÇAIS
16
Fig. F
13
Ajustement de la hauteur (Fig. G)
ATTENTION: ajustez la longueur du taille-bordure
afin d’obtenir des positions de travail appropriées
comme illustré dans la Fig.I.
• La hauteur générale du taille-bordure peut être ajustée
en desserrant le collier
5
et en le tournant dans le sens
de la flèche comme illustré dans la Fig. G.
Déplacez le boîtier supérieur vers le haut ou vers le bas.
Lorsque la hauteur désirée est atteinte, serrez le collier en le
tournant dans le sens opposé comme illustré dans la Fig.G.
Fig. G
5
Fixer la rallonge (Fig. H)
Un enrouleur de rallonge
2
est intégré à la poignée de la
gâchette qui empêche le cordon de se débrancher.
• Pour utiliser cette fonction, doublez simplement la
rallonge d’environ 8 pouces (203mm) à partir de
l’extrémité et insérez-la dans la fente
14
à l’extrémité de
la poignée comme illustré dans la Fig.H.
• Accrochez la boucle formée par le doublement de la
rallonge sur la languette
2
. Tirez doucement sur la
rallonge afin d’assurer qu’elle fermement retenue dans la
poignée du taille-bordure.
Placez l’extrémité du connecteur femelle de la rallonge dans
la fiche du cordon d’alimentation (3) dans le taille-bordure.
Fig. H
2
14
3
Relâcher le fil de coupe
Pour des fins d’expédition, le fil de coupe est collé au boîtier
de la bobine.
• Retirez le ruban maintenant le fil de coupe au boîtier de
la bobine.
• Consultez «Remplacer la bobine» pour des instructions
pour retirer la bobine
FONCTIONNEMENT
AVERTISSEMENT: afin de réduire le risque
de blessure corporelle, éteignez l’outil et
débranchez-le de la source d’alimentation avant
d’effectuer tout ajustement ou de retirer/installer
des pièces ou des accessoires. Un démarrage
accidentel peut causer des blessures.
AVERTISSEMENT: utilisez toujours une protection
des yeux appropriée conforme à la norme ANSI Z87.1
(CAN/CSA Z94.3) lorsque vous utilisez cet outil.
ATTENTION: avant de commencer la coupe, utilisez
seulement le type de fil de coupe approprié.
ATTENTION: inspectez la zone à être coupée et retirez
tout câble, corde ou objet ressemblant à une corde qui
pourrait s’emmêler dans le fil de rotation ou la bobine.
Soyez particulièrement prudent afin d’éviter tout câble
qui pourrait être plié vers l’extérieur dans la trajectoire
du taille-bordure, comme les piques à la base d’une
clôture à mailles losangées.
Position appropriée des mains (Fig. I)
AVERTISSEMENT: afin de réduire le risque de
blessure corporelle grave, utilisez TOUJOURS la
position des mains appropriée comme illustrée.
AVERTISSEMENT: afin de réduire le risque de
blessure grave, TOUJOURS maintenir solidement en
prévision d’une réaction soudaine.
Une position des mains adéquate nécessite une main sur la
poignée principale
3
et une main sur la poignée auxiliaire
(5 .
Mettre en marche et éteindre
• Pour mettre le taille-bordure en marche, appuyez sur la
gâchette
1
.
• Pour éteindre le taille-bordure, relâchez la gâchette.

FRANÇAIS
17
Utiliser le taille-bordure
• Prenez l’outil, placez-le en angle et balancez lentement
le taille-bordure d’un côté à l’autre comme illustré dans
la Fig. I.
• Maintez un angle de coupe de 5° à 10° comme illustré
dans la Fig. I1. Ne pas excéder 10° (Fig. I2). Coupez avec
le bout du fil. Pour garder une certaine distance avec les
surfaces dures, utilisez laroue de bordure
7
.
• Maintenez une distance minimale de 24 pouces (609,6
mm) entre le protecteur et vos pieds comme illustré
dans la Fig. I. Pour atteindre cette distance, ajustez la
hauteur générale du taille-bordure comme illustré dans
la Fig.G.
Fig. I Fig. I1
Fig. I2 Fig. I3
Passez en mode Bordure (Fig. K)
Le taille-bordure peut être utilisé en mode coupe ou en
mode bordure pour couper l’herbe surplombant le long des
bords de pelouse et des plates-bandes.
AVERTISSEMENT: débranchez la fiche de la source
d’alimentation avant d’effectuer tout ajustement.
AVERTISSEMENT: lorsqu’il est utilisé pour tailler les
bordures, les pierres, les pièces de métal et d’autres
objets peuvent être projetés à une vitesse élevée par le
fil. Le taille-bordure et le protecteur sont conçus pour
réduire les risques. Cependant, ASSUREZ-VOUS que les
autres personnes et les animaux sont à une distance
d’au moins 100 pieds (30m).
• Afin de l’utiliser pour entretenir les bordures, tournez le
collier
5
comme illustré dans la Fig. K.
• Tenez la tige de métal et tournez le boîtier le plus bas à
180° comme illustré dans la Fig. K.
• Retournez le collier jusqu’à ce qu’il soit serré.
REMARQUE: la tige de métal et le boîtier tourneront
seulement dans un sens.
• Pour retourner en position de coupe, desserrez le
collier verrouillé, tournez le boîtier le plus bas à 180° et
resserrez le collier.
Fig. K
5
Faire des bordures (Fig. L)
Les résultats de coupe optimale sont obtenus sur les
bordures plus profondes que 2 pouces (50 mm). Ne pas
utiliser ce taille-bordure pour créer des tranchées.
• À l’aide de la roue de bordure
7
, orientez le taille-
bordure comme illustré dans la Fig.L.
• Placez la roue de bordure sur le bord du trottoir ou
d’une surface abrasive afin que le fil de coupe soit
au-dessus de la pelouse ou de la terre à être coupée.
REMARQUE: le système d’alimentation automatique peut
ne pas fonctionner correctement si la roue du guide de
bordure n’est pas utilisée.
REMARQUE: vous remarquerez une usure du fil de coupe
plus rapide que la normale si la roue de bordure est placée
trop loin de la bordure avec le fil de coupe placé sur le
trottoir ou la surface abrasive.
• Pour couper de plus près, inclinez légèrement le taille-
bordure.
• Retournez à la position de coupe en desserrant le collier
verrouillé et en tournant le boîtier le plus bas à 180°.
L’outil se verrouillera en position de coupe.
Fig. L
File de coupe / Alimentation du fil
Votre taille-bordure utilise un fil d’un diamètre de 0,065
pouce (1,65 mm), ROND, en nylon. Durant l’utilisation,
les extrémités de fils en nylon deviendront effilochées et
usées et une bobine à alimentation automatique spéciale

FRANÇAIS
18
s’alimentera automatiquement et coupera une nouvelle
longueur de fil. Le fil de coupe s’use rapidement et nécessite
plus d’alimentation si la coupe ou la bordure est faite le
long des trottoirs ou d’autres surfaces abrasives ou si de
mauvaises herbes plus lourdes sont coupées. Le mécanisme
d’alimentation du fil automatique avancé détecte si plus de
fil de coupe est nécessaire et alimente et coupe la bonne
longueur du fil lorsque c’est requis. Ne pas cogner le taille-
bordure sur le sol afin d’alimenter le fil ou pour toute autre
raison.
Conseils pratiques pour la coupe
• Utilisez l’extrémité du fil pour effectuer la coupe; ne pas
forcer la tête du fil dans l’herbe non coupée.
• Les fils de fer et les clôtures entraînent l’usure
supplémentaire du fil, même un bris. Les murs de pierres
et de briques, les bordures de trottoirs et le bois peuvent
user rapidement le fil.
• Ne pas laisser le capuchon de la bobine traîner sur le sol
ou d’autres surfaces.
• En longue croissance, coupez de bas en haut et
n’excédez pas 12 pouces (304,8 mm) de hauteur.
• Gardez le taille-bordure incliné vers la zone étant
coupée; cela la meilleure zone de coupe.
• Le taille-bordure coupe lorsqu’il passe de gauche à
droite. Cela évite de projeter des débris vers l’utilisateur.
• Évitez les arbres et les arbustes. L’écorce des arbres,
les moulures de bois, le revêtement et les poteaux de
clôture peuvent facilement être endommagés par le fil.
ENTRETIEN
AVERTISSEMENT: afin de réduire le risque
de blessure corporelle, éteignez l’outil et
débranchez-le de la source d’alimentation avant
d’effectuer tout ajustement ou de retirer/installer
des pièces ou des accessoires. Un démarrage
accidentel peut causer des blessures.
1. Gardez les orifices d’aération propres afin d’éviter la
surchauffe.
2. Le fil de votre taille-bordure peut s’assécher avec le
temps. Pour garder en excellent état, entreposez les
bobines de rechange déjà enroulées ou le fil en vrac
dans un sac de plastique hermétique avec une cuillerée
à table d’eau.
3. Les pièces en plastique peuvent être nettoyées en
utilisant un savon doux et un chiffon humide.
4. Le coupeur de fil sur le bord du protecteur peut
s’émousser avec le temps. Il est recommandé que vous
vérifiiez régulièrement le tranchant de la lame avec le fil.
MAINTENANCE
AVERTISSEMENT: pour réduire le risque de
blessures graves, éteindre l’outil et retirer le
débrancher avant d’effectuer tout réglage
et d’enlever ou d’installer tout accessoire. Un
démarrage accidentel peut provoquer desblessures.
Nettoyage
AVERTISSEMENT : enlever les saletés et la poussière
hors des évents au moyen d’air comprimé propre et
sec, au moins une fois par semaine. Pour minimiser
le risque de blessure aux yeux, toujours porter une
protection oculaire conforme à la norme ANSI Z87.1
lors dunettoyage.
AVERTISSEMENT : ne jamais utiliser de solvants ni
d’autres produits chimiques puissants pour nettoyer
les pièces non métalliques de l’outil. Ces produits
chimiques peuvent affaiblir les matériaux de plastique
utilisés dans ces pièces. Utiliser un chiffon humecté
uniquement d’eau et de savon doux. Ne jamais laisser
de liquide pénétrer dans l’outil et n’immerger aucune
partie de l’outil dans unliquide.
Accessoires
AVERTISSEMENT : puisque les accessoires autres
que ceux offerts par BLACK+DECKER n’ont pas été
testés avec ce produit, leur utilisation pourrait s’avérer
dangereuse. Pour réduire le risque de blessures,
utiliser exclusivement les accessoires BLACK+DECKER
recommandés avec le présentproduit.
AVERTISSEMENT:lL’utilisation de tout accessoire
non recommandé par BLACK+DECKER pour ce taille-
bordure pourrait être dangereuse.
ATTENTION: avant de commencer la coupe, utilisez
seulement le type de fil de coupe approprié.
Utilisez une bobine de remplacement BLACK+DECKER
ayant le numéro de modèle AF-100 et le capuchon de
remplacement RC-100.
Rechargez le fil en nylon (soit une bobine de remplacement
déjà enroulé ou en vrac) comme illustré dans ce manuel.
• UTILISEZ SEULEMENT UN FIL D’UN DIAMÈTRE DE 0,065
POUCE (1,65 MM) ROND EN NYLON. Ne pas utiliser un fil
de calibre plus lourd ou dentelé puisqu’il surchargera le
moteur et entraînera une surchauffe. Ce fil est disponible
chez votre détaillant local ou un centre de services
autorisé.
• D’autres pièces de remplacement (protecteurs,
capuchons de bobines, etc.) sont disponibles dans les
centres de services BLACK+DECKER. Pour localiser votre
service local, composez: 1-800-544-6986 ou visitez
www.blackanddecker.com.
Remplacer la bobine (Fig. M, N, O, P)
Avertissement: afin de réduire le risque
de blessure corporelle, éteignez l’outil et
débranchez-le de la source d’alimentation avant
d’effectuer tout ajustement ou de retirer/installer
des pièces ou des accessoires. Un démarrage
accidentel peut causer des blessures.
La page est en cours de chargement...
La page est en cours de chargement...
La page est en cours de chargement...
La page est en cours de chargement...
La page est en cours de chargement...
La page est en cours de chargement...
La page est en cours de chargement...
La page est en cours de chargement...
La page est en cours de chargement...
La page est en cours de chargement...
La page est en cours de chargement...
La page est en cours de chargement...
La page est en cours de chargement...
La page est en cours de chargement...
La page est en cours de chargement...
La page est en cours de chargement...
-
 1
1
-
 2
2
-
 3
3
-
 4
4
-
 5
5
-
 6
6
-
 7
7
-
 8
8
-
 9
9
-
 10
10
-
 11
11
-
 12
12
-
 13
13
-
 14
14
-
 15
15
-
 16
16
-
 17
17
-
 18
18
-
 19
19
-
 20
20
-
 21
21
-
 22
22
-
 23
23
-
 24
24
-
 25
25
-
 26
26
-
 27
27
-
 28
28
-
 29
29
-
 30
30
-
 31
31
-
 32
32
-
 33
33
-
 34
34
-
 35
35
-
 36
36


Black & Decker BESTA510 Manuel utilisateur
- Catégorie
- Coupe-herbe
- Taper
- Manuel utilisateur
dans d''autres langues
- English: Black & Decker BESTA510 User manual
- español: Black & Decker BESTA510 Manual de usuario
Documents connexes
-
Black & Decker ST8600 Manuel utilisateur
-
-
-
-
-
-
-
-
-


