OXO 8-Cup Coffee Maker Manuel utilisateur
- Catégorie
- Accessoires de préparation de café
- Taper
- Manuel utilisateur
Ce manuel convient également à

2
8-Cup Coffee Maker
INSTRUCTION MANUAL

3
• Read all instructions. Use this product only as
described in this manual.
• Keep the packaging material (cardboard, plastic,
etc.) out of the reach of children (danger of
asphyxiation or injury).
• Do not touch hot surfaces. Use handles or knobs.
Care must be taken, as burns can occur from
touching hot parts or from spilled hot liquid.
• To protect against fire, electric shock, and injury
to persons, do not immerse cord, plugs, or
Coffee Maker in water or other liquid.
• Children should be supervised to ensure that they
do not play with the appliance.
• Unplug Coffee Maker from outlet when
not in use and before cleaning. Allow to cool
before putting on or taking off parts and
before cleaning the appliance.
• To prevent scalding, do not open brew basket lid,
attempt to dislodge a potential clog, or otherwise
touch the brew basket area until Coffee Maker has
sufficiently cooled. Scalding may occur if the lid is
removed during brewing cycles.
• Coffee Maker must be operated on a flat surface
away from the edge of counter to prevent
accidental tipping.
• Do not operate any appliance with a damaged cord
or plug, or after the appliance malfunctions or is
dropped or damaged in any manner. Contact OXO
Customer Service at (800) 545-4411. Do not
return to store.
• The use of accessory attachments not recommended
by OXO may result in fire, electric shock, or injury
to persons.
• Use only the carafe provided with the Coffee Maker
to capture brewed coffee when in Carafe mode.
IMPORTANT SAFEGUARDS
Read all instructions.
When using electrical appliances, basic safety precautions should always be followed to
reduce the risk of fire, electric shock, and/or injury to persons, including the following:
A Note About Safety

4
• Do not let cord hang over edge of table or counter
or touch hot surfaces.
• Do not place on or near a hot gas or electric
burner, or in a heated oven.
• Always attach plug to appliance first, then plug
cord into the wall outlet. To disconnect, turn any
control to the off position, then remove plug from
wall outlet.
• The coffee carafe is designed for use with this
appliance. It must never be used on a range top
or in a microwave oven.
• Do not put any substances other than water,
descaling products, or coffee grounds into the
Coffee Maker. Do not use Coffee Maker to
cook or prepare other liquids or foods.
• Do not use appliance without lid properly placed
on carafe.
• Do not touch internal parts while Coffee Maker
is brewing.
• Do not rotate or remove carafe or brew basket
while brewing coffee.
• This appliance is intended for household
use only.
Do not use appliance for other than intended use.
Do not use outdoors.
To reduce the risk of fire or electric shock, do
not remove the bottom cover. Doing so will void
the warranty. No user-serviceable parts are inside.
Repair should be done by authorized service
personnel only.
Shock Hazard:
This appliance has a polarized plug (one wide blade)
that reduces the risk of electric shock. The plug fits
only one way into a polarized outlet. Do not defeat
the safety purpose of the plug by modifying the plug
in any way or using an adapter. If the plug does
not fit, reverse the plug. If it still does not fit, have
an electrician replace the outlet. Do not plug this
appliance into an outlet with a voltage other than
specified on the bottom of this appliance.
• If the supply cord is damaged, it must be
replaced by the manufacturer, its service agent,
or similarly qualified persons in order to avoid
a hazard.
• To avoid an electrical circuit overload,
do not use any high wattage appliance on the
same circuit as this appliance. This Coffee Maker
is not intended for use by children, persons with
reduced physical, sensory, or mental capabilities,
or lack of experience and knowledge, unless
they have received supervision or instruction
concerning use of the appliance by a person
responsible for their safety.

5
SAVE THESE INSTRUCTIONS
This symbol alerts you to important operating and service instructions.
This symbol alerts you to the risk of fire or electric shock in the
accompanying message.

6
A Note About Safety ............................ 2
Registration Info ................................... 5
Meet Your Coffee Maker ...................... 6
Before You Begin .................................. 7
Brewing Into Carafe ............................. 8
Brewing Into Mug ................................. 9
Cleaning And Care ............................. 10
Descaling ............................................11
Troubleshooting ...................................12
Our Guarantee ................................... 13
This machine
was tested to
guarantee quality.
As a result, a small amount
of filtered water may
remain inside.
Congratulations on your new
OXO Brew appliance!
Register your product at oxo.com/productregistration
for updates and other relevant information.
Although we appreciate registration, it is not required. As part of our privacy policy,
we never sell or give away your information.
If you have any trouble with the product during the warranty period, do not attempt to return
it to a retail store. Instead, please email info@oxo.com or call (800) 545-4411.

7
2-4 CUPS 5-8 CUPS
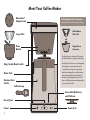
Rainmaker
TM
Showerhead
Large Filter
Brew Cycles
Power
Brew
Basket
Stainless Steel
Carafe
Water Tank
Optional Single-Serve Accessory:
optimizes flavor when brewing 2-4 cups
Kalita Wave
Filter 185
Single-Serve
Accessory
Use the Accessory and wave filter inside
the Brew Basket for single-serve brewing.
The Single Serve Accessory was designed
for brewing 2–4 cups into the carafe
or directly into a mug. Its compact size
and shape changes the way the brewing
water and grounds interact during the
extraction, meaning the Accessory will
draw out different nuanced characteristics
of your favorite coffee.
Reversible Well Cover
and Platform
Mug/Carafe Mode Switch
Coffee Scoop
Clean Cycle
Meet Your Coffee Maker

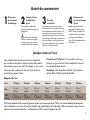
8
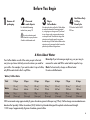
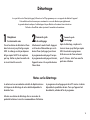
1
Remove all
packaging 2
Clean and
wash all parts 3
Plug in
Coffee Maker 4
Run Water-Only
5-8 Cup
Brew Cycle
For detailed cleaning
instructions, see p.10
Do not use abrasive pads,
harsh chemicals or spray cleaners.
Carafe is not dishwasher safe.
We selected a short cord for this Coffee Maker
to reduce the hazards of becoming tangled
in, or tripping over a longer cord. If you need
to use a longer cord, an approved extension
cord may be used. The electrical rating of the
extension cord must be equal to or greater
than the rating of Coffee Maker. Make sure the
extension cord is arranged so that it cannot be
pulled on by children or tripped over.
Fill water tank to MAX
fill line.
A Note About Water
Your Coffee Maker uses all of the water you put in the tank
every time you brew. Add only as much water as you need for
your coffee. For example, if you want to make 3 cups of coffee,
only fill the water tank to the 3 cup fill line.
Brew tip: If you’re brewing a single mug, use your mug to
measure the water and fill the water tank for a perfect cup.
Note: For best results, always use filtered water.
Do not use distilled water.
Water/Coffee Ratio
Yield 2 Cups 3 Cups 4 Cups 5 Cups 6 Cups 7 Cups 8 Cups
Water
10 oz /
296 mL
15 oz /
444 mL
20 oz /
591 mL
25 oz /
739 mL
30 oz /
887 mL
35 oz /
1035 mL
40 oz /
1183 mL
Coffee
(Ground)
16 g
(2 scoops)
24 g
(3 scoops)
32 g
(4 scoops)
40 g
(5 scoops)
48 g
(6 scoops)
56 g
(7 scoops)
64 g
(8 scoops)
OXO recommends using approximately 8 grams of medium-ground coffee per cup (5 fl oz). Coffee dosage recommendations are
based on the Specialty Coffee Association (SCA) Golden Cup Standard designed for optimal extraction and strength.
1 OXO scoop = approximately 8 grams of medium-ground coffee.
Before You Begin

9
2-4 CUPS 5-8 CUPS
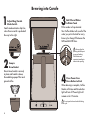
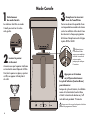
Brewing into Carafe
1
Adjust Mug/Carafe
Mode Switch
Carafe mode activates drip-free
valve. Ensure switch is pushed all
the way to the right.
2
Snap in
Brew Basket
Ensure brew basket is securely
in place and handle is down,
then add large paper filter and
ground coffee.
3
Add Filtered Water
to Water Tank
Fill to number of cups desired.
Your Coffee Maker will use all of the
water you put in the tank for every
brew cycle. Always fill between the
MIN and MAX fill lines.
4
Press Power then
Brew Button to Start
When brewing is complete, Coffee
Maker will chime and Brew button
light will turn off. Power light will
remain on for 15 minutes.
Do not open the brew basket lid during
brew cycle
2-4 CUPS 5-8 CUPS
Always align the
opening and the spout
to prevent leaking.
The lid features a
convenient marking to
indicate the opening.

10
2-4 CUPS 5-8 CUPS
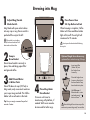
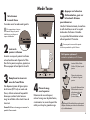
Brewing into Mug
1
Adjust Mug/Carafe
Mode Switch
Mug Mode will open valve to brew
into any cup or mug. Ensure switch is
pushed all the way to the left.
If the switch is not on Mug
mode, the brew basket will not
drain and could overflow.
2
Snap in
Brew Basket
Ensure brew basket is securely in
place, then add large paper filter
and ground coffee.
3
Add Filtered Water
to Water Tank
Never fill above 4 cups (20 fl oz) in
Mug mode; only use as much water as
your cup or mug can hold. The Coffee
Maker will use all water in the tank.
Tip: Use your mug to measure the perfect
amount of water.
4
Place Mug Under
Brew Basket
Turn over well cover to
elevate mug with platform, if
needed. Well cover can also
be removed for taller mugs.
5
Press Power then
2-4 Cup Button to Start
When brewing is complete, Coffee
Maker will chime and Brew button
light will turn off. Power light will
remain on for 15 minutes.
Do not open the brew basket lid during
brew cycle
2-4 CUPS 5-8 CUPS
Optional Single-Serve Accessory:
optimizes flavor when brewing 2-4 cups
Insert wave filter
(Kalita 185) into
the Single-Serve
Accessory.
Place the Single-Serve
Accessory directly into
the brew basket. Snap
brew basket into place.
Add 2-4 cups of
filtered water to water
tank and press
2-4 CUPS
button to brew.
Rinse the Single-Serve Accessory after
each use to prevent clogs and / or overflow.

11
Always unplug your Coffee Maker before cleaning it. Any service or
maintenance other than cleaning or descaling should be performed by an
authorized service representative. For more information,
call OXO Customer Service at (800) 545-4411.
Cleaning & Care
Never immerse the Coffee Maker power cord or plug in water.
Do not allow liquid to come in contact with power cord or plug.
Doing so can result in electrical shock or death.
To prevent damage to the appliance when cleaning, do not use
alkaline cleaning agents, abrasive pads, harsh chemicals, or spray
cleaner chemicals when cleaning.
Regular Cleaning
Clean exterior regularly with a damp cloth and wipe dry.
Descale your Coffee Maker regularly.
See pg. 11 for descaling instructions.
Stain Removal
Remove coffee oil stains in the carafe by soaking overnight
with a small amount of dishwasher detergent and water.
Filters
To replace filters for Single Serve Accessories,
look for Kalita Wave Filter 185.
To replace large filters, look for basket filters
labeled as 8-12 cup filters.
Hand Wash Removable Parts
carafe and lid with mild detergent after use. Rinse
thoroughly. Carafe and lid are not dishwasher safe.
Placing carafe in dishwasher will compromise the
vacuum insulation.
are all top-rack
dishwasher safe.

12
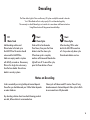
Descaling
The Clean button light will turn on after every 90 cycles as a helpful reminder to descale.
Your Coffee Maker will not work properly if it is not descaled regularly.
The warranty is voided if descaling is not carried out in accordance with these instructions.
Using filtered water will help prevent mineral buildup.
1
Fill
Water Tank
Add descaling solution and
filtered water to the tank up to
the MAX fill line.The mixture should
not exceed the MAX fill line.
Make sure empty carafe is in place
with lid fully screwed on. Remove any
filters or the Single Serve Accessory
from the brew basket. Ensure brew
basket is securely in place.
2
Start
Clean Cycle
Slide switch to Carafe mode.
Press Power, then press the Clean
button to start the clean cycle.
When clean cycle is complete,
machine will chime and Clean button
light will turn off.
To cancel the cycle,
press the Clean button or Power.
3
Start
Rinse Cycle
After descaling, fill the water
tank to the MAX fill line and run
a 5-8 cup water-only brew cycle.
Discard water before next use.
Notes on Descaling
Scale is a naturally occurring buildup of mineral deposits.
How often you should descale your Coffee Maker depends
on water hardness.
Buy descaling solution where household cleaning products
are sold; follow solution’s recommended use.
Clean cycle will take around 25 minutes. Time will vary
based on amount of mineral deposit. Allow cycle to finish
to ensure machine is fully descaled.

13
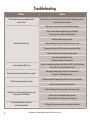
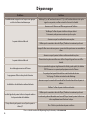
Troubleshooting
Problem Solution
Coffee Maker beeps when pressing Brew button
and won’t start
Make sure there is water in the tank. If water is in the tank and beeping continues,
please contact Customer Service.
Brew basket is overflowing
Make sure you are using only one paper filter before brewing.
Check to ensure the brew basket drain hole is not blocked.
If necessary, clean out with a soft-bristled brush.
Make sure carafe is properly in place.
Check that the Mug/Carafe mode switch is positioned correctly.
Try using a medium grind; too fine a grind may cause water build-up.
Make sure the brew basket is snapped securely in place.
Rinse all removable parts with water.
Wipe down machine with a damp cloth.
I want to brew fewer than 2 cups
In order to consistently make high-quality coffee, the OXO 8-Cup Coffee Maker
does not allow you to brew fewer than 2 cups.
Brew cycle is taking more than 8 minutes to complete
There might be mineral deposit obstruction in the water tubes.
See page 11 for descaling instructions.
Coffee is brewing into carafe very slowly
Make sure carafe lid is engaged with valve at the bottom of brew basket.
Check for obstruction in brew basket drain hole.
Coffee drips out of brew basket when carafe or mug
is removed from Coffee Maker
Check that the Mug/Carafe mode switch is positioned correctly.
Drip-free valve is deactivated when in mug mode.
Allow brew basket to drain fully before removing mug.
Can I use the Single-Serve Accessory
without the brew basket?
The Single-Serve Accessory must be used inside the brew basket.
For the most up-to-date troubleshooting information, visit oxo.com

14
Our Guarantee
Two-Year Warranty:
Your OXO Brew appliance is guaranteed by OXO for two years
from the date of purchase in the case of any manufacturing defects in
materials or workmanship. This OXO warranty is only offered on OXO
Brew appliances sold new and utilized in the US and Canada.
The OXO warranty covers all costs related to restoring the proven
defective product through the repair or replacement of any
defective part and necessary labor so that it conforms to its original
specifications. A replacement product may be provided instead of
repairing a defective product. OXO’s exclusive obligation under this
warranty is limited to such repair or replacement.
A receipt indicating the purchase date is required for any
claims, so please keep it in a safe place. We recommend
that you register your product on our website, www.oxo.com/
productregistration. Although greatly appreciated, the product
registration is not required to activate any warranty and product
registration does not eliminate the need for the original proof of
purchase.
The warranty does not cover damages resulting from misuse or abuse
of the product and/or uses inconsistent with this Instruction Manual,
attempts at repair, theft, use with unauthorized attachments or failure
to follow the instructions provided with the product.
The warranty becomes void if attempts at repair are made by non-
authorized third parties and/or if spare parts, other than those
provided by OXO, are used. You may also arrange for service after
the warranty expires at an added cost.
For questions, returns, repairs or warranty claims within the U.S.,
please visit www.oxo.com or contact OXO Customer Service at
(800) 545-4411. We will be glad to assist you.
For customer service, claims, or questions on sales in Canada, OXO
Customer Service will gladly put you in touch with the appropriate
individuals.
This warranty gives you specific legal rights, and you may have other
legal rights which vary from state to state, country to country, or
province to province. The customer may assert any such rights at their
sole discretion.
CONTACT INFO:
If you have any trouble with the product during the warranty period, do not attempt to return it to a retail store.
Instead, please visit us online at www.oxo.com or contact us here:
OXO U.S. Customer Service
Hours: Monday–Friday, 8:00am – 5:00pm (ET)
Phone: (800) 545-4411
Mail: OXO International, Inc.
1331 S Seventh St., Building 1,
Chambersburg, PA 17201-9912
Outside the U.S.
Please contact your local distributor or email info@oxo.com

Better brewing.
Better coffee. Better day.

29
Cafetière 8 tasses
MODE D’EMPLOI

2
• Lire toutes les instructions. Utiliser ce produit
uniquement tel que décrit dans ce document.
• Conserver tous les matériaux d’emballage
(carton, plastique, etc.) hors de portée des enfants
(risque d'asphyxie ou de blessure).
• Ne pas toucher de surfaces chaudes. Utiliser les
poignées ou les boutons. Attention. Tout contact avec
les pièces chaudes ou du liquide chaud renversé peut
provoquer des brûlures.
• Pour éviter tout choc électrique, incendie ou blessure
corporelle, ne pas immerger le cordon, les
prises ou la cafetière dans de l’eau ou tout
autre liquide.
• Une surveillance attentive s’impose lorsqu’un appareil
ménager est utilisé par ou à proximité d’enfants.
• Débrancher la cafetière lorsqu’elle n’est pas
utilisée et avant le nettoyage. Attendre que
l’appareil ait refroidi avant d’installer ou de
retirer des pièces, et avant de nettoyer l’appareil.
• Pour éviter les brûlures, ne pas ouvrir le couvercle du
panier à infusion, tenter de déboucher ou sinon de
toucher le panier à infusion avant que la cafetière ait
complètement refroidi. Retirer le couvercle pendant
un programme d’infusion peut provoquer un risque
d'ébouillantage.
• La cafetière doit être utilisée sur une surface plane loin
du bord de la table ou du plan de travail pour éviter
tout risque de basculement.
• Ne pas utiliser l’appareil si son cordon ou sa fiche
est endommagé(e), s’il a présenté un défaut de
fonctionnement, s’il est tombé ou a été endommagé
d’une quelconque façon. Contacter le service à la
clientèle OXO au (800) 545- 4411. Ne pas le r
envoyer au magasin.
• L’utilisation d’accessoires non recommandés par OXO
peut causer un incendie, un choc électrique ou des
blessures corporelles.
•N’utiliser que la carafe fournie avec l’appareil pour
préparer le café lorsque la cafetière est en mode Carafe.
CONSIGNES DE SÉCURITÉ IMPORTANTES
Lire toutes les instructions.
Afin de réduire le risque d’incendie, de choc électrique et/ou de blessures corporelles lors de l’utilisation d’appareils
électriques, certaines précautions élémentaires de sécurité doivent être systématiquement respectées – notamment :
La sécurité avant tout

3
• Ne pas laisser le cordon pendre du bord d’une table ou
d’un plan de travail, ou toucher une surface chaude.
• Ne pas placer sur ou près d’un brûleur électrique ou
à gaz chaud, ou dans un four chaud.
• Toujours brancher la fiche sur l’appareil avant de
brancher le cordon sur la prise murale. Pour la mise
hors tension, tourner et placer la commande en
position « off » (arrêt), puis débrancher la fiche de
la prise murale.
• La carafe à café est conçue pour être utilisée avec
cet appareil. Elle ne doit jamais être utilisée sur une
cuisinière ou dans un four à micro-ondes.
• Ne pas mettre d’autres substances que de l’eau, un
produit de détartrage ou du café dans la cafetière.
Ne pas utiliser la cafetière pour cuisiner ou préparer
d’autres liquides ou aliments.
• Ne pas utiliser l’appareil si le couvercle n’est pas
correctement fixé sur la carafe.
• Ne pas toucher les composants internes pendant que
le café est en cours d’infusion.
• Ne pas faire tourner ou retirer la carafe, ou le panier
à infusion, pendant l’infusion du café.
• Cet appareil est exclusivement destiné à un
usage domestique. Ne pas utiliser l’appareil pour
un autre usage que celui pour lequel il est conçu.
Ne pas utiliser à l’extérieur.
Pour réduire le risque d’incendie ou de choc
électrique, ne pas retirer la protection de la base. Le
non-respect de cette consigne entraîne l’annulation de la
garantie. Aucune pièce n’est réparable par l'utilisateur
à l'intérieur. Toute réparation doit uniquement être
effectuée par un personnel d’entretien autorisé.
Risque de choc électrique:
Cet appareil est muni d'une fiche polarisée (une lame
large) qui réduit le risque de choc électrique. La fiche
s’insère dans la prise polarisée dans un seul sens. Ne
surtout pas supprimer ce dispositif de sécurité en modifiant
la fiche ou en utilisant un adaptateur. Si la fiche n’entre
pas, inverser la fiche. Si elle ne s’imbrique toujours pas,
demander à un électricien de remplacer la prise. Ne
pas brancher cet appareil si la tension du domicile ne
correspond pas à celle qui figure sur l’appareil.
• Pour éviter une surcharge électrique, ne pas
utiliser un appareil à forte puissance sur le même circuit
que cet appareil. Cette cafetière n’est pas prévue
pour être utilisée par des enfants ou des personnes
présentant des capacités physiques, sensorielles ou
mentales réduites ou manquant d’expérience ou de
connaissances, à moins d’être supervisés ou de recevoir
des instructions sur l’utilisation de l’appareil de la part
d’une personne responsable de leur sécurité.
• Si le cordon d’alimentation est endommagé,
il doit être remplacé par le fabricant, son représentant
ou toute autre personne ainsi qualifiée afin d’éviter
tout danger.

4
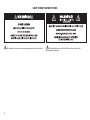
MISE EN GARDE, POUR RÉDUIRE LE RISQUE DE CHOC ÉLECTRIQUE,
NE PAS ENLEVER LE COUVERCLE (OU LE PANNEAU ARRIÈRE)
AUCUNE PIÈCE RÉPARABLE PAR L'UTILISATEUR À L'INTÉRIEUR
LA RÉPARATION DOIT UNIQUEMENT ÊTRE EFFECTUÉE PAR UN PERSON
NEL D'ENTRETIEN AUTORISÉ
RISQUE DE CHOC ÉLECTRIQUE
UTILISER AVEC UNE PRISE 110V CA UNIQUEMENT.
NE PAS UTILISER D’ADAPTATEUR.
LE NONRESPECT DE CES INSTRUCTIONS PEUT CAUSER UN DÉCÈS,
UN INCENDIE OU UN CHOC ÉLECTRIQUE.
CONSERVER CES INSTRUCTIONS
Ce symbole vous signale d’importantes instructions d’utilisation et
d’entretien.
Ce symbole vous signale le risque d’incendie ou de choc électrique
dans le message d’accompagnement.

25
La sécurité avant tout ............................ 2
Info d’ enregistrement ........................... 5
Présentation de votre nouvelle cafetière 6
Avant de commencer ............................ 7
Mode carafe ........................................ 8
Mode Tasse .......................................... 9
Nettoyage .......................................... 10
Détartrage ...........................................11
Résolution de problèmes ......................12
Notre garantie .................................... 13
Cette machine a
été testée pour en
garantir la qualité
Résultat, il est possible
qu’il reste une petite
quantité d’eau filtrée
à l’intérieur.
Félicitations pour votre nouvel
appareil OXO Brew!
Enregistrez votre produit sur oxo.com/inscription.aspx pour recevoir
les mises à jour et autres informations importantes.
Bien qu’apprécié, l’enregistrement du produit n’est pas obligatoire. Dans le cadre de notre politique de
confidentialité, nous ne vendons ni ne donnons jamais d’informations sur vous.
Si vous avez le moindre problème avec le produit pendant la période de garantie, n’essayez pas de le
renvoyer à un magasin de détail. Envoyez plutôt un e-mail à info@oxo.com ou appelez le (800) 545-4411.

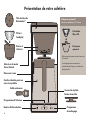
6
2-4 CUPS 5-8 CUPS
Tête de douche
Rainmaker
TM
Filtre à
fond plat
Programmes d’infusion
Bouton d’alimentation
Panier à
infusion
Carafe à double paroi en
acier inoxydable
Réservoir à eau
Petit panier optionnel:
extraction optimale pour 2-4 tasses
Filtre Kalita
Wave 185
Petit panier
optionnel
Utilisez le petite panier optionnel en mode
“A la tasse”.
Son design permet una extraction
optimale du café lorsque vous faites une
petite quantité.
Couvercle et plate-
forme réversible
Sélecteur de mode
Tasse/Carafe
Cuillère doseuse
Programme
de nettoyage
Présentation de votre cafetière
La page est en cours de chargement...
La page est en cours de chargement...
La page est en cours de chargement...
La page est en cours de chargement...
La page est en cours de chargement...
La page est en cours de chargement...
La page est en cours de chargement...
La page est en cours de chargement...
-
 1
1
-
 2
2
-
 3
3
-
 4
4
-
 5
5
-
 6
6
-
 7
7
-
 8
8
-
 9
9
-
 10
10
-
 11
11
-
 12
12
-
 13
13
-
 14
14
-
 15
15
-
 16
16
-
 17
17
-
 18
18
-
 19
19
-
 20
20
-
 21
21
-
 22
22
-
 23
23
-
 24
24
-
 25
25
-
 26
26
-
 27
27
-
 28
28


OXO 8-Cup Coffee Maker Manuel utilisateur
- Catégorie
- Accessoires de préparation de café
- Taper
- Manuel utilisateur
- Ce manuel convient également à
dans d''autres langues
- English: OXO 8-Cup Coffee Maker User manual
