QLIMA DFA2330 Manuel utilisateur
- Catégorie
- Chauffe-eau
- Taper
- Manuel utilisateur

DFA 2320
DFA 2330
DFA 2350
3
4
1
MANUEL D’UTILISATION
OPERATING MANUAL
GEBRUIKSAANWIJZING
2
16
30

32
1 LISEZ PRÉALABLEMENT LE MANUEL D’UTILISATION.
2 EN CAS DE DOUTE, CONTACTEZ VOTRE REVENDEUR.
3
2
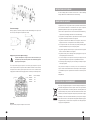
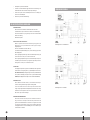
PRINCIPAUX
COMPOSANTS
Sortie de l’air chaud
Coque inférieure
Réservoir de
combustible
Affichage de la
température
Bouton de réglage
de la température
Affichage de la
température
Interrupteur
d’alimentation/
réinitialisation à LED
Poignée
Coque supérieure
Grille de protection
du ventilateur
Compresseur d’air
Bouchon du
réservoir de
combustible
Cordon
d’alimentation
Jauge de niveau
d’huile
Roue
Tube supérieur
Tube inférieur”
q
w
e
r
t
y
u
i
o
a
s
d
f
g
h
j
k
3
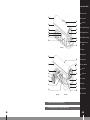
3
DFA 2320
DFA 2330 DFA 2350
q
q
w
g
d
r
h
t
y
i
o
a
s
d
f
g
o
j
a
s
f
e
k
u
w
e
r
t
y
u
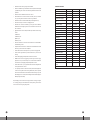
SPECIFICATIONS DUAL FUEL FORCED AIR HEATER
Model DFA 2320
Pin 220-240V / 50hz / 1Ph
Oil consumption 1.65kg/h
Normal operation 230 W
Fuel Diesel/Kerosene
QN 20,000 W
IP class IPX4
PVG Holding BV, Kanaalstraat 12 C, 5347 KM Oss, the Netherlands
P.O. Box 96, 5340 AB Oss, the Netherlands | Qlima.com
Made in PRC
SPECIFICATIONS DUAL FUEL FORCED AIR HEATER
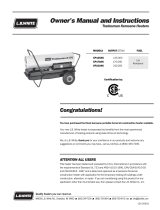
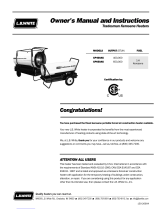
Model DFA 2330
Pin 220-240V / 50hz / 1Ph
Oil consumption 2.5kg/h
Normal operation 230 W
Fuel Diesel/Kerosene
QN 30,000 W
IP class IPX4
PVG Holding BV, Kanaalstraat 12 C, 5347 KM Oss, the Netherlands
P.O. Box 96, 5340 AB Oss, the Netherlands | Qlima.com
Made in PRC
SPECIFICATIONS DUAL FUEL FORCED AIR HEATER
Model DFA 2350
Pin 220-240V / 50hz / 1Ph
Oil consumption 4kg/h
Normal operation 340 W
Fuel Diesel/Kerosene
QN 50,000 W
IP class IPX4
PVG Holding BV, Kanaalstraat 12 C, 5347 KM Oss, the Netherlands
P.O. Box 96, 5340 AB Oss, the Netherlands | Qlima.com
Made in PRC
Model DFA 1650 Premium
Pin 220-230V / 50hz / 1Ph
Ignition 145 W
Normal operation 125 W
Fuel Combustible liquide conforme aux arrêtes
du 25/06/2010 et 18/07/2002 or Class C1 paraffin
(BS2869 part2) or 1-K kerosene or No.1. fuel oil
Pout 16.500 W
IP class IPX4
Serial number
SPECIFICATIONS DUAL FUEL FORCED AIR HEATER
PVG Holding BV, Kanaalstraat 12 C, 5347 KM Oss, the Netherlands | P.O.
Box 96, 5340 AB Oss, the Netherlands | Qlima.com
Made in Korea
More
Info:
3 TABLE DES MATIÈRES
Conseils d’utilisation (fr)
Montage du chauffage
Installation
Remplissage du reservoir
Allumer et faire fonctionner
de l’appareil
Schéma de câblage
Dépannage
Maintenance
Instructions de stockage
Conditions de garantie
Protection de l’environnement
4 TABLE OF CONTENTS
Directions for use (gb)
Assembling the heater
Installation instructions
Filling fuel
Igniting and operating the heater
Wiring diagram
Trouble shooting
Maintenance
Storage instructions
Guarantee conditions
Environmental protection
1 INHOUDSOPGAVE
Gebruiksaanwijzingen
De kachel monteren
Installatie
Vullen met brandstof
De heater starten en gebruiken
Bedradingsschema
Problemen oplossen
Onderhoud
Aanwijzingen voor bewaring
Garantievoorwaarden
Milieubescherming

54
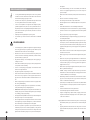
CONSEILS D’UTILISATION (FR)
G
• Lisez attentivement ce manuel d’utilisation avant d’utiliser l’appareil et conser-
vez-le pour toute référence ultérieure. Installez cet appareil uniquement s’il est
conforme à la législation, aux ordonnances et aux normes locales et nationales.
• Le chauffage est conçu pour un usage externe uniquement. Ce produit est desti-
né à être utilisé comme chauffage dans des conditions non résidentielles unique-
ment.
• Une fois retiré de son emballage, vérifiez si l’appareil n’est pas endommagé. En
cas de doute, n’utilisez pas l’appareil. Mais contactez le service clients de votre
fournisseur local. Pour éviter tout danger, gardez le matériel d’emballage (sacs
en plastique, etc.) hors de portée des enfants.
• Toute modification du système de sécurité est interdite.
• Ce radiateur est fabriquè en conformitè aux textes pertinents de la norme LVD/
EMC.
AVERTISSEMENTS
• Lisez le mode d’emploi avant d’utiliser le chauffage. La sécurité de ce chauffage
est garantie seulement par son utilisation correcte selon ces instructions, par
conséquent il est recommandé de les conserver pour consultation ultérieure.
• Utilisez ce dispositif uniquement dans son but prévu. Tout autre utilisation peut
entraîner des courts-circuits, brûlures, électrocutions, explosions de lampes, colli-
sions, etc.
• Installez l’appareil uniquement s’il est en conformité avec les réglementations,
lois et normes locales.
• Assurez-vous que la tension disponible ne dépasse pas la tension mentionnée
dans les spécifications de ce manuel.
• Avant de brancher l’appareil, vérifiez que la tension du réseau électrique corres-
pond bien aux informations mentionnées sur la plaque de type de l’appareil.
• L’appareil peut fonctionner sur des réseaux électriques de ~230 V.
• Assurez-vous toujours que vous voyez réellement l’appareil quand vous voulez le
mettre en marche. N’utilisez jamais de minuterie, programmateur ou tout autre
dispositif (y compris appli Internet) qui mettent en marche l’appareil automati-
quement car cela peut provoquer un incendie !
• Installez le chauffage selon les instructions dècrites dans la section installation du
mode d’emploi.
• Ce chauffage est fabriqué selon les normes CE de sécurité. Nèanmoins, il faut
prendre des prècautions comme avec tout autre dispositif de chauffage.
• RISQUE D’INCENDIE : N’utilisez jamais le chauffage dans des endroits où l’on peut
trouver des gaz inflammables et/ou toxiques, des produits ou des émanations
(par exemple, des gaz d’échappement, des vapeurs de peinture, des rideaux, du
papier, des vêtements).
• Si le chauffage est placé trop près de matières inflammables il y a un risque d’in-
cendie.
• N’utilisez pas de rallonge électrique ni de multiprise.
• Pour des raisons de sécurité, soyez attentifs lorsque des enfants ou des animaux
sont à proximité du chauffage, comme avec tout autre dispositif de chauffage et
assurez-vous que les enfants soient toujours conscients de la présence d’un chauf-
fage chaud. 33
• Cet appareil n’est pas prévu pour une utilisation par des personnes (y compris
des enfants) dont les capacités physiques, sensorielles ou mentales sont réduites,
ou qui manquent d’expérience et de connaissances, à moins qu’elles n’aient été
supervisées ou instruites sur l’utilisation de l’appareil par une personne respon-
sable de leur sécurité.
• Si le cordon fourni est endommagé, il doit être remplacé par le fabricant, son
agent de service ou toute personne également qualifiée pour éviter un risque.
• Ne pas laisser les enfants en bas âge jouer avec l’appareil.
• Pour éviter la surchauffe ne couvrez pas l’appareil.
• L’appareil ne doit pas être situé directement sous une prise.
• N’utilisez pas ce chauffage dans les environs immédiats d’un bain, douche ou
d’une piscine.
• Assurez-vous que le câble d’alimentation ne touche jamais le chauffage.
• Le pare-feu de ce chauffage est destiné à empêcher un accès direct aux éléments
chauds et doit être en place lorsque le chauffage est en cours d’utilisation.
• N’enfilez aucun objet dans les ouvertures de l’appareil.
• Le pare-feu ne donne pas de protection complète pour les jeunes enfants et les
personnes infirmes.
• Cet appareil peut être utilisé par des enfants à partir de 8 ans et des personnes
atteintes de déficiences physiques, sensorielles ou mentales, ayant une expérience
et des connaissances insuffisantes, uniquement si ces enfants et personnes sont
placés sous la surveillance d’une personne responsable ou ont reçu des instruc-
tions sur l’utilisation en toute sécurité de l’appareil.
• Les opérations d’utilisation et de nettoyage quotidien ne doivent pas être réali-
sées par des enfants sans surveillance.
• Les enfants de moins de 3 ans doivent être tenus à l’écart du chauffage.
• Les enfants âgés de 3 à 8 ans ne peuvent allumer ou éteindre l’appareil qu’à
condition qu’il ait été placé ou installé dans sa position normale de fonctionne-
ment et qu’ils aient reçu l’autorisation ainsi que toutes les instructions concernant
l’utilisation de l’appareil d’une manière sûre et les risques encourus.
• Les enfants âgés de 3 à 8 ans ne peuvent pas brancher, régler, nettoyer l’appareil
ni effectuer la maintenance utilisateur
• ATTENTION - Certaines parties de ce produit peut devenir très chaudes et provo-
quer des brûlures. Il faut prêter attention plus particulièrement aux enfants et
aux personnes vulnérables présentes dans la pièce.
• Avertissement - N’utilisez pas ce chauffage dans de petites pièces lorsqu’elles sont
occupées par des personnes dans l’incapacité de quitter seules la pièces, à moins
d’une surveillance permanente.
• Pendant le fonctionnement et juste après, l’appareil est extrêmement chaud.
Ne le touchez JAMAIS pendant son fonctionnement ou juste après. Ne déplacez
JAMAIS l’appareil pendant cette période.
• Éteindre l’appareil lorsqu’il est sans surveillance.
• Ne couvrez pas ou n’obstruez pas l’appareil pendant qu’il est utilisé.
• Débranchez le secteur pendant l’installation, le nettoyage, l’entretien et/ou le
transport. Assurez-vous qu’il est complètement refroidi avant de le déplacer, net-
toyer ou d’exécuter l’entretien.
Une mauvaise utilisation de l’appareil de chauffage peut provoquer des blessures
graves ou entraîner la mort suite à des risques de brûlure, feu, explosion, choc
électrique et/ou intoxication au monoxyde de carbone.
• Une mauvaise utilisation de l’appareil de chauffage peut provoquer des blessures
graves ou entraîner la mort suite à des risques de brûlure, feu, explosion, choc

76
électrique et/ou intoxication au monoxyde de carbone.
• Utilisez l’appareil de chauffage uniquement dans des zones bien aérées.
• Utilisez un carburant de qualité supérieure, type Qlima Premium Quality ou équi-
valent, afin de veiller au bon état de fonctionnement de l’appareil.
• Ne jamais utiliser un carburant autre que le kérosène ou le diesel.
• Ne jamais utiliser votre appareil de chauffage avec des liquides à base d’essence,
benzène, diluants pour peinture, alcool ou tout autre composé à base d’huile.
• Ne jamais utiliser l’appareil de chauffage en présence de vapeurs ou gaz inflam-
mables.
• Ne jamais ajouter de carburant à l’appareil de chauffage, à moins qu’il ne soit à
froid.
• Utilisez uniquement du kérosène OU du diesel comme carburant, ne les mélangez
pas. Pour passer du kérosène au diesel, veillez à vider entièrement le reservoir à
carburant.
• Toujours respecter les distances de dégagement minimales lors de l’utilisation du
radiateur
Arrivée d’air: 1,00m
Sortie d’air: 3,00m.
Côtés 0,6m
Dessus 1,50m.
• Ne jamais utiliser de conduits ou tout autre objet pour acheminer le flux d’air vers
les prises d’entrée ou sortie d’air.
• Ne jamais transporter l’appareil de chauffage avec du carburant déjà présent dans
le réservoir. Assuez-vous que le réservoir soit vide.
• Assurez-vous que l’appareil de chauffage soit placé sur une surface plane et ferme.
• Assurez-vous que l’appareil de chauffage soit placé sur une surface sécurisée, iso-
lée de toutes vibrations et stable.
• Evitez les situations à risque et (potentiellement) dangereuses.
• Tout objet inflammable doit être conservé dans un lieu sûr, conformément aux
régulations en vigueur, afin d’éviter que l’appareil puisse émettre des vapeurs
potentiellement dangereuses.
• Vérifiez que l’appareil de chauffage soit positionné sur une surface plane, non
endommagée.
• Pour un fonctionnement optimal de l’appareil, il est recommandé d’utiliser
un combustible Qlima Premium Qualité ou un autre combustible liquide pour
appareil mobile de chauffage. Le diesel peut également être utilisé mais avec
de moindres performances. Les émissions pourraient être plus importantes et la
combustion moins complète (possibilité d’apparition de petites flammes visibles à
l’échappement).
Si vous ne parvenez pas à consulter ou à suivre les règles, instructions et explicati
ons, la garantie sera annulée et le fabricant ne prendra plus en charge aucun dom
mage de l’appareil et/ou de votre environnement sous garantie.
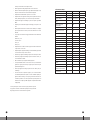
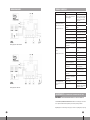
SPÉCIFICATIONS TECHNIQUES
Modèle DFA 2320 DFA 2330 DFA 2350
Apport thermique [kW] * 20 30 50
Estimation du flux d’air [m³/h] 550 750 1100
Type de carburant Diesel - Kérosène Diesel - Kérosène Diesel - Kérosène
Consommation de carburant
[kg/h]
1.65 2.4 4
Taille de l’injecteur de
carburant (mm)
0.54 0.88 1.24
Tension [V/Hz] AC220-240/50 AC220-240/50 AC220-240/50
Réglage de pression d’air
[bar]
0.32 0.31 0.45
Courant nominal [A] 1.1 1.1 1.5
Puissance électrique [W] 230 230 340
Calibre de fusible T10A T10A T10A
Température ambiante -20-40 ºC -20-40 ºC -20-40 ºC
Dimensions
Poids net (kg) 13.4 19.2 23.2
Longueur (mm) 752 855 1076
Largeur (mm) 305 470 515
Hauteur (mm) 416 588 585
Capacité du réservoir (l) 22 38 50
Plage de fonctionnement (h) ~11 ~14 ~11
Accessoires standard
Jauge de carburant oui oui oui
Poignée 1 1 1
Thermostat d’ambiance Intégré Intégré Intégré
Voyant de détection des
défauts de fonctionnement
Intégré Intégré Intégré
Température ambiante de
fonctionnement
-20~40 ºC -20~40 ºC -20~40 ºC
* Basé sur le pouvoir calorifique supérieur [h]”
33

98
INSTALLATION
Assurez-vous de monter l’appareil uniquement sur un terrain stable et solide. En
cas de doute, faîtes vérifier le terrain par un expert.
ATTENTION - cet appareil doit être raccordé à une prise à la terre.
Placer le radiateur sur une surface plane, horizontale, non inflammable et solide.
Les radiateurs à alimentation directe sont destinés à une utilisation dans des
zones extérieures ouvertes ou dans des zones intérieures bien ventilées. Pour une
utilisation en intérieur, des orifices de ventilation permanents d’au moins 25cm²/
kW sont nécessaires. Ils doivent être répartis de façon homogène entre le sol et le
niveau supérieur et présenter une surface minimale de 250cm².
DFA 2320 DFA 2330 DFA 2350
Taille minimale des orifices 600 cm² 800 cm² 1250 cm²
• Tenir le radiateur éloigné des matériaux inflammables, combustibles, explo-
sifs ou corrosifs.
• Ne jamais, sous aucun motif, bloquer ou limiter l’arrivée et la sortie d’air.
• Ne pas exposer directement à l’atmosphère extérieure ou à une humidité
excessive.
• Suivre les réglementations générales et spécifiques en matière de sécurité
incendie en vigueur dans tous les cas d’utilisation. En toute circonstance, veil-
ler à respecter les distances de sécurité minimum suivantes par rapport aux
matériaux ou objets situés à proximité du radiateur:
• Côté: 0,6m
• Côté de l’arrivée d’air: 1m
• Dessus: 1,5m
• Côté de la sortie d’air chaud: 3m
Sol: 0m
• Les planchers et les plafonds des zones dans lesquelles le radiateur est utilisé
doivent être constitués de matériaux ignifuges.”
L’utilisation d’un carburant approprié est essentiel pour garantir la sécurité, la
fiabilité et le confort d’utilisation de votre appareil.
Les dommages et/ou dysfonctionnements résultants d’une mauvaise utilisation
de l’appareil de chauffage dues à l’emploi de produits autres que les huiles de
paraffine, dénuées d’eau ou huiles diesel de haute qualité, dénuées d’eau
(contrairement aux huiles domestique) ne sont pas couvertes par la présente
garantie.
Contactez votre revendeur le plus proche pour déterminer l’huile la plus
appropriée à votre appareil de chauffage.
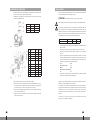
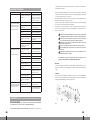
MONTAGE DU CHAUFFAGE
Le fabricant décline toute responsabilité pour tout préjudice ou dommage si l’at-
tention n’a pas été portée aux points décrits ci-dessus.
L’utilisation de ce produit et des éléments nécessaires à cet effet est entièrement
aux risques de l’utilisateur final.
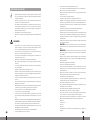
Pos Description Qty DFA 2320
AVis 2
BRondelle plate 2
CPoignée 1
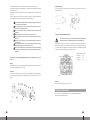
Fig. 1
Pos.Description Qty
DFA 2330
Qty
DFA 2350
APoignée 1 1
BVis 8 6
CRondelle à ressort 8 6
DRondelle plate 8 6
EEnsemble tuyau-
pieds 1 1
FÉcrou M5 8 6
GÉcrou M12 2 2
HRondelle plate ø12 2 2
IRoue 2 2
JEssieu 1 1
KGoupille 2 2
Fig. 2
Pour assembler le radiateur, procéder comme suit (voir Fig.2):
1. Insérer J dans le trou correspondant de E, insérer la goupille K dans le trou cor-
respondant; placer les rondelles H sur les deux côtés de l’essieu J, faire glisser la
roue I sur l’essieu J, serrer l’écrou G pour fixer la roue sur l’essieu.
2. Placer le corps du radiateur sur E, vérifier que les trous de la poignée A font face
aux trous correspondants sur E.
3. Utiliser les vis, écrous et rondelles B, C, D et F pour fixer l’ensemble tuyau-pieds
et la poignée au réservoir.
33

1110
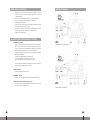
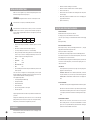
SCHÉMA DE CÂBLAGE
Schéma de câblage pour DFA 2320/2330
Schéma de câblage pour DFA 2350
REMPLISSAGE DU RESERVOIR
• Remplissez le réservoir de carburant dans une zone adaptée et convena-
blement aérée. Evitez tout risque de fuite de carburant et respectez les
consignes de sécurité :
• Assurez-vous que l’appareil de chauffage repose sur une surface plane.
• Assurez-vous que l’appareil de chauffage est à l’arrêt et à froid.
• Retirez le bouchon du réservoir.
• Assurez-vous que le carburant rajouté est identique à celui déjà présent dans
le réservoir, à moins que celui-ci ne soit vide.
• Remplissez le réservoir sans dépasser le niveau maximum autorisé et évitez
tout débordement; la jauge de carburant vous indique le niveau.
• Fermez le bouchon du réservoir
ALLUMER ET FAIRE FONCTIONNER DE L’APPAREIL
DEMARRAGE DE L’APPAREIL
Après avoir rempli votre appareil de carburant, branchez le cordon d’alimen-
tation à la prise secteur (prise terre). Ajustez le thermostat selon vos préfé-
rences (5 - 45°C.) et placez l’interrupteur sur la position‘ON’. Le voyant d’ali-
mentation du panneau s’allume et met en marche votre appareil.
La température affichée (uniquement pour les modèles DFA 2900 Premium &
DFA 4100 Premium) indique:
• ‘L’ lorsque la température détectée est inférieur à 5°C
• Lorsque la température réelle est comprise entre 5 et 45°C
• ‘Hi’ lorsque la température détectée est supérieure à 45°C
Lorsque l’appareil de chauffage ne démarre pas, il se peut que la tempéra-
ture programmée soit inférieure à celle détectée.
ARRET DE L’APPAREIL
Placez l’interrupteur sur la position‘OFF’.
REDEMARRER L’APPAREIL
Patientez 20 secondes après l’arrêt pour éviter tout risque de dommage.
REGLER LA DIRECTION DU FLUX D’AIR AVEC LES VOLETS
Pour régler la direction du flux d’air, utilisez les volets (fig.10). Soit environ 28
degrés vers le haut et 20 degrés vers le bas.
33

1312
MAINTENANCE (À EXÉCUTER PAR DES PERSONNES AUTORISÉES UNIQUEMENT)
AVERTISSEMENT! : NE JAMAIS FAIRE L’ENTRETIEN DU CHAUFFAGE TANT QU’IL
EST BRANCHÉ OU CHAUD!
UTILISER DES PIÈCES DE RECHANGE D’ORIGINE UNIQUEMENT. L’usage de
pièces tierces ou d’autres composants alternatifs entraînera l’annulation de
la garantie et pourra entraîner des conditions de fonctionnement dange-
reuses.
Essuyer régulièrement le boîtier du radiateur à l’aide d’une éponge douce ou d’un chiffon.
Pour les pièces très sales, utiliser une éponge humidifiée avec de l’eau tiède et un détergent
doux, puis sécher à l’aide d’un chiffon propre.
Protéger l’arrivée d’air et le ventilateur de la poussière et de la saleté. Pour nettoyer les
pièces internes, souffler doucement de l’air comprimé par l’orifice d’entrée d’air.
Inspecter régulièrement le câble d’alimentation: s’il est usé, fissuré ou endommagé, le faire
remplacer par le service technique.
Avant de ranger le radiateur, vérifier qu’il est sec et qu’il a complètement refroidi. Couvrir
l’appareil d’un sac en plastique, le replacer dans sa boîte d’emballage et le ranger dans un
endroit sec et aéré.
Avant de procéder à toute tâche d’entretien, mettre hors tension et débran-
cher le radiateur, puis le laisser refroidir pendant au moins 15minutes
Ne pas essayer d’effectuer des réparations électriques soi-même. Si le radia-
teur a besoin d’un entretien ou d’une réparation, contacter un technicien
qualifié.
Ne pas utiliser un appareil défectueux avant qu’un technicien qualifié ne l’ait
inspecté et réparé.
Lors du nettoyage, s’assurer qu’aucune eau ne pénètre dans l’appareil.
Ne pas ouvrir l’appareil pour nettoyer les pièces internes. Ne pas pulvériser
d’eau dans le radiateur.
Ne jamais utiliser de solvants, d’essence, de toluène ou de produits chimiques
agressifs similaires pour nettoyer le radiateur
Avant chaque utilisation saisonnière, il est recommandé de procéder aux vérifications sui-
vantes UNIQUEMENT EN FAISANT APPEL À DU PERSONNEL QUALIFIÉ:
Buse
Dévisser avec précaution la buse de son raccord. Souffler de l’air comprimé dans l’orifice de
la buse pour éliminer les saletés. Remplacer la buse si nécessaire.
Filtres à air
Nettoyer les filtres à air. Ôter le couvercle du filtre à air (11), nettoyer le filtre d’admission
d’air (10) à l’aide d’un détergent léger et le sécher soigneusement avant de le remettre en
place. Remplacer le filtre de sortie d’air (9) une fois par an (Fig.3)
DÉPANNAGE
PROBLÈME CAUSE SOLUTION
L’écran affiche E0 1. L’interrupteur «|ON/O (OFF)»
est allumé sur «| (ON)» lorsque le
générateur est branché.
1. Une fois le générateur
débranché, assurez-vous que
l’interrupteur est en position
«O(OFF)», puis branchez le
générateur et positionnez l’inter-
rupteur sur «(|) ON».
Le radiateur s’allume mais
la carte de circuit im-
primé principale arrête le
radiateur après une courte
période.
L’écran affiche E1
1. Mauvaise pression de la
pompe.
1. Voir la section sur le réglage de
la pression de la pompe.
2. Sortie d’air, entrée d’air ou
filtre à peluches sale.
2. Voir la section sur la sortie
d’air, l’entrée d’air et le filtre à
peluches.
3. Filtre à carburant sale. 3. Voir la section sur le filtre à
carburant.
4. Buse du brûleur bouchée. 4. Nettoyer la buse à l’air com-
primé, la remplacer si nécessaire
5. Cellule photoélectrique sale. 5. Nettoyer la cellule photoélec-
trique.
6. Assemblage de cellules
photoélectriques mal installé.
(Absence de flamme)
6. S’assurer que le raccord de la
cellule photoélectrique est bien
installé dans le support.
7. Cellule photoélectrique dé-
fectueuse.
7. Remplacer la cellule photoélec-
trique.
8. Mauvais branchement entre la
cellule photoélectrique et la carte
de circuit imprimé principale.
8. Vérifier les composants élec-
triques.
Le radiateur ne s’allume
pas mais le moteur tourne
pendant un court instant
L’écran affiche E1
1. Réservoir de combustible vide,
sale ou ne contenant pas le bon
combustible.
1. Retirez le mauvais carburant ou
le carburant sale
Remplir le réservoir avec du diesel
ou du kérosène propre.
2. Mauvaise pression de la
pompe.
2. Voir la section sur le réglage de
la pression de la pompe.
3. Filtre à carburant sale. 3. Voir la section sur le filtre à
carburant.
4. La buse du brûleur est
bouchée.
4. Nettoyer la buse à l’air com-
primé, la remplacer si nécessaire
5. Dépôts de carbone sur la
bougie d’allumage et/ou écart
inapproprié.
5. Voir la section sur la bougie
d’allumage.
6. Le câble d’allumage n’est pas
branché sur la bougie d’allumage.
6. Brancher le câble d’allumage
sur la bougie d’allumage. Voir la
section sur la bougie d’allumage.
7. L’air fuit dans la conduite
d’huile.
7. Vérifier les tuyaux, resserrer les
raccords, procéder aux remplace-
ments nécessaires.
8. La viscosité du combustible a
augmenté à basse température.
8. Ajouter 10 à 20% de kérosène
au diesel.
9. Mauvais branchement entre la
cellule photoélectrique et la carte
de circuit imprimé principale.
9. Vérifier les composants élec-
triques.
Le ventilateur ne s’allume
pas lorsque le radiateur est
branché et que l’interrup-
teur d’alimentation est en
position «ON»
1.Le thermostat est réglé à une
température inférieure à celle de
la pièce.
1. Tourner le bouton de réglage
du thermostat jusqu’à un réglage
plus élevé.
2. Absence d’alimentation élec-
trique.
2. Vérifier que le câble du radia-
teur et la rallonge sont branchés.
Vérifier l’alimentation élec-
trique.»
33

1514
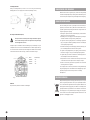
Fig.3
Électrodes d’allumage
Nettoyer, ajuster et, si nécessaire, remplacer les électrodes d’allumage. Pour l’espace entre
les électrodes, voir les figures4 et 5 (dimensions en mm).
Fig.4 Fig.5
Réglage de la pression du compresseur (Fig.6)
La pression du compresseur est réglée en usine et doit être contrôlée et ajus-
tée uniquement par des techniciens qualifiés. Toute modification apportée à
l’appareil peut être dangereuse.
Ôter le capuchon de la jauge de pression. Connecter une jauge de pression au port de
mesure de pression situé sur la protection arrière. Allumer le radiateur et relever la valeur
de la pression d’air. Si besoin, ajuster la pression à la valeur correcte en tournant la vis de
réglage (l’évent au milieu de la vis de réglage) dans le sens horaire pour réduire la pression:
Modèle Pression d’air (bar)
DFA 2320 0.32
DFA 2330 0.31
DFA 2350 0.45
FILT RE DE SORTIE - RET IRER
LE COUV ERCLE ET RE MPLA CER
LE FILTRE UNE FO IS PAR AN
FILTRE D’ADMISSION
LAV ER ET SÉCHER T OUTES LES
500 HEURES OU SI NÉC ESSAIRE
Fig.6
Électricité
Inspecter les câbles, les pièces électriques et les connexions.
INSTRUCTIONS DE STOCKAGE
Stocker le chauffage dans un endroit sec au-dessus de 10 °C dans l’embal lage
d’origine. Enlever tout le carburant dur réservoir avant stockage.
CONDITIONS DE GARANTIE
L’appareil est livré avec une garantie de 24 mois qui démarre à la date d’achat.
Tous les défauts de fabrication ou de matériaux seront réparés ou remplacés
gratuitement pendant cette période. Les règles suivantes s’appliquent:
1. Nous refusons expressément toutes les autres demandes d’indemnisation, y
compris celles pour dommages collatéraux et/ou consécutifs damage.
2. Les réparations ou remplacements de composants dans le cadre de la période
de garantie n’entraînent pas d’extension de la garantie.
3. La garantie est annulée si des modifications ont été apportées, des pièces non
d’origine sont montées ou si les réparations ont été réalisées par des tiers.
4. Les composants soumis à une usure normale, tels que filtres, batteries, lampes
et éléments chauffants ne sont pas couverts par la garantie.
5. La garantie s’applique seulement lorsque vous présentez la facture originale
datée et si aucune modification n’a été apportée.
6. La garantie s‘annule pour des dommages causés par négligence et/ou par des
actions qui divergent de celles du manuel.
7. Les coûts de transport et les risques liés au transport de l’appareil ou des
composants de l’appareil sont toujours de la responsabilité de l’acheteur.
8. Les dommages causés par l’usage de pièces de rechange non adaptées n’est pas
couvert par la garantie.
Pour prévenir toute dépense non nécessaire, nous vous recommandons de
toujours consulter d’abord attentivement le mode d’emploi. Amenez l’appareil
à votre distributeur pour les réparations si les instructions ne fournissent pas de
solution.
www.qlima.com
PROTECTION DE L’ENVIRONNEMENT
Ne pas jeter des appareils électriques avec les déchets managers municipaux non
triés. Utiliser des équipements de collecte séparés. Contacter votre gouvernement
local pour toute information concernant les systèmes de collecte disponibles. Si les
appareils électriques sont jetés sur des sites d’enfouissement des déchets ou dans
déchetteries, des substances dangereuses risquent de pénétrer dans les nappes
phréatiques et entrer dans la chaîne alimentaire et peuvent poser des risques à
votre santé et bien-être. Lors du remplacement d’appareils électriques usagés par
des appareils neufs, le revendeur est tenu de reprendre votre vieil appareil pour
recyclage au moins gratuitement.
33
CAPUCHON DU MANOMÈTRE ORIFICE D’AÉRATION

1716
1 PLEASE READ THE USER’S MANUAL FIRST.
2 IF YOU HAVE ANY DOUBTS, CONSULT YOUR DEALER.
4
16
MAIN COMPONENTS
Hot air outlet
Lower shell
Fuel tank
Temperature Display
Temperature knob
Temperature Display
LED power / reset
switch
Handle
Upper shell
Fan guard
Air compressor
Fuel cap
Power cord
Oil gauge
Wheel
Upper tube
Lower Tube
q
w
e
r
t
y
u
i
o
a
s
d
f
g
h
j
k
4
17
DFA 2320
DFA 2330 DFA 2350
q
q
w
g
d
r
h
t
y
i
o
a
s
d
f
g
o
j
a
s
f
e
k
u
w
e
r
t
y
u

1918
DIRECTIONS FOR USE (GB)
G
• Read this user manual carefully before using the appliance and keep it for future
reference. Install this device only when it complies with local/national legislation,
ordinances and standards.
• The heater is designed for outdoor use only. This product is intended to be used
as a heater in non-residential conditions only
• After unpacking, check the appliance for any damages. When in doubt, do not
use the appliance, but contact customer service at your local dealer. Keep the
packaging mate- rials (plastic bags, etc.) away from children, as they may cause
hazardous situations to children.
• No modifications to the safety system are allowed.
• This heater is constructed in conformity with relevant texts in the LVD/EMC stand-
ard.
WARNINGS
• Read the Directions for Use before using the Heater. The safety of this heater is
guaranteed only by its correct usage in accordance with these instructions, there-
fore it is recommended that they are retained for future reference.
• Only use the device for its intended purpose. Other usage may lead to short cir-
cuits, burns, electroshocks, lamp explosion, crash, etc.
• Only use the device for its intended purpose. Other usage may lead to short circuits, burns, elec-
troshocks, lamp explosion, crash, etc.
• Install the heater only if it complies with local regulations, laws and standards;
• Make sure that the available voltage does not exceed the voltage stated in the specifications of
this manual.
• Check if the voltage indicated on the type plate corresponds to the local mains voltage before
you connect the appliance.
• The appliance is suitable for mains voltages ranging from ~230 V.
• Always make sure that you actually see the appliance when you want to switch it on. Never use
things like a timer, programmer or any other device (including Internet apps) that switches on
the appliance automatically as this may cause fire!
• Use the heater according to the instructions as described in the installation section of the direc-
tions for use;
• This heater is manufactured according to CE safety standards. Nevertheless, as with any other
heating device, care must be taken;
• RISK OF FIRE Never use the heater in places where inflammable and/or harmful Gases, products
or fumes may be present (e.g. exhaust Gases, paint fumes, curtains, paper, clothes);
• If the heater is positioned too close to inflammable materials you may risk fire;
• Do not use any extension cords or multi-socket adapters.
• For safety reasons take care when children or animals are in the proximity of the heater, as with
any other heating device, and make sure that children are always aware of the presence of a hot
heater;
• This appliance is not intended for use by persons (including children) with reduced physical, senso-
ry or mental capabilities, or lack of experience and knowledge, unless they have been given super-
vision or instruction concerning use of the appliance by a person responsible for their safety.
• If the supply cord is damaged, it shall be replaced by the manufacturer, its service agent or simi-
larly qualified persons in order to avoid a hazard.
• Children should be supervised to ensure that they do not play with the appliance.
• In order to avoid overheating, do not cover the device.
44
• The device must not be located immediately below a socket outlet.
• Do not use this heater in the immediate surroundings of a bath, a shower or a swimming pool.
• Make sure that the power cable can never touch the heater.
• The guard of this heater is intended to prevent direct access to warm parts and must be in place
when the heater is in use..
• Do not insert objects into the openings of the device.
• The guard does not give full protection for young children and infirm persons.
• This appliance can be used by children aged from 8 years and above and persons with reduced
physical, sensory or mental capabilities or lack of experience and knowledge if they have been
given supervision or instruction concerning use of the appliance in a safe way and understand
the hazards involved.
• Cleaning and user maintenance shall not be made by children without supervision.
• Children of less than 3 years should be kept away from the heater.
• Children aged from 3 years and less than 8 years shall only switch on/off the appliance provided
that it has been placed or installed in its intended normal operating position and they have been
given supervision or instruction concerning use of the appliance in a safe way and understand
the hazards involved.
• Children aged from 3 years and less than 8 years shall not plug in, regulate and clean the appli-
ance or perform user maintenance.
• CAUTION - some parts of this product can become very hot and cause burns.
Particular attention has to be given where children and vulnerable people are
present.
• WARNING - Do not use this heater in small rooms when they are occupied
by persons not capable of leaving the room on their own, unless constant supervi-
sion is provided.
• During operation and just after operation the appliance will be extremely hot.
NEVER touch it during operation or just after operation. NEVER move the appli-
ance during this time.
• Switch off the appliance when it is unattended.
• Do not cover or obstruct the heater when in use.
• Disconnect the mains during installation, cleaning , maintenance and / or trans-
portation. Ensure it is cooled down completely before moving, cleaning or per-
forming maintenance.
• Improper use of this heater can result in serious injury or death from burns, fire,
explosion, electrical shock and/or carbon monoxide poisoning.
• Use this heater only in well ventilated areas.
• Use good quality fuel like Qlima Premium Quality fuels or similar in order to
ensure that your heater can be used without problems.
• Never use other fuels than kerosene or diesel.
• Never use this heater with liquids like gasoline, benzene, paint thinners, alcohol
based liquids or other oil compounds.
• Never use this heater where flammable vapours may be present.
• Never refill the heater, unless it has cooled down completely.
• Use kerosene OR diesel as a fuel only, not mixed. When you want to switch from
kerosene to diesel or vice versa, first empty the fuel tank completely.
• Never use ducts or other objects to guide the air flow on air inlet or air outlet side.
• Always respect the minimum clearance distances when using the heater
Air inlet: 1 m
air outlet: 3,00 m.
Sides 0.6 m
top 1,50 m.
• Never transport the heater with fuel in the tank. Make sure it is empty before
moving it.

2120
44
• Always ensure that the heater is standing and keeps standing on a level and firm
surface.
• Make sure the surface on which the heater is standing is stable, without vibrations
and not moving.
• Make sure that (potentially) dangerous situations cannot occur.
• Combustible objects should be stored safely according to local regulations, but
never in such a way that the heater can heat or ignite them or (potentially) dan-
gerous vapours can be generated.
• Make sure the heater is standing on a surface which cannot be harmed by using
the unit.
• For optimal performance of this heater, please use Qlima Quality Fuels or other
kerosene. Diesel may be used, but the performance of the heater will be influ-
enced. Emissions might be higher and burning process will be a little more volatile
(small flame tips might be visible at the exhaust of the heater.
If you fail to consult and/or follow up the rules, instructions and explanation, the warranty will
no longer be valid, and the manufacturer will no longer deal with any damage to the appliance
and/or your environment under the warranty.
TECHNICAL SPECIFICATIONS
Model DFA 2320 DFA 2330 DFA 2350
Heat Input [kW] * 20 30 50
Air Flow Rating [m³/h] 550 750 1100
Fuel Type Diesel - Kerosene Diesel - Kerosene Diesel - Kerosene
Fuel consumption [kg/h] 1.65 2.4 4
Fuel Nozzle size mm 0.54 0.88 1.24
Voltage [V/Hz] AC220-240/50 AC220-240/50 AC220-240/50
Air Pressure Setting [bar] 0.32 0.31 0.45
Current Rating [A] 1.1 1.1 1.5
Electrical Power [W] 230 230 340
Fuse Rating T10A T10A T10A
Ambient temperature -20-40 ºC -20-40 ºC -20-40 ºC
Dimensions
Net Weight (kg) 13.4 19.2 23.2
Length (mm) 752 855 1076
Width (mm) 305 470 515
Height (mm) 416 588 585
Tank Capacity (l) 22 38 50
Operating range (h) ~11 ~14 ~11
Standard Accessories
Fuel gauge yes yes yes
Handle 1 1 1
Ambient thermostat built-in built-in built-in
Malfunction detection light built-in built-in built-in
Operating ambient
temperature
-20~40 ºC -20~40 ºC -20~40 ºC
* Based on Gross Calorific Value [Hrs]
ASSEMBLING THE HEATER
The manufacturer is not responsible for any harm or damage if attention is
not paid to the points described above.
The use of this product and the elements required for that purpose is entirely
at the end user’s own risk.
Pos Description Qty DFA 2320
AScrew 2
BPlain
washer 2
CHandle 1
Pos.Description Qty
DFA 2330
Qty
DFA 2350
AHandle 1 1
BScrew 8 6
CSpring washer 8 6
DPlain washer 8 6
EFeet pipe 1 1
FNut M5 8 6
GNut M12 2 2
HPlain washer
ø12 2 2
IWheel 2 2
JWheel shaft 1 1
KCotter 2 2
To assemble the heater, proceed as follows (see Fig. 2):
1 Insert J to corresponding hole of E insert the K to the corresponding holes;
put H to the two sides of J, slide the wheel I over the wheel shaft J screw G to
fix the wheel on the shaft.
2 Put the heater body on E, make sure the holes of A point towards the corre-
sponding holes on E respectively.
3 Using B, C, D & F to fix the feet pipe assembly and handle to the tank.
Fig. 2
Fig. 1

2322
• Make sure the heater is standing on a level surface
• Make sure the heater is switched off and cooled down completely
• Remove the fuel tank cap
• Ensure that the same fuel is added to the remaining fuel in the tank, unless
the tank is empty.
• Fill the tank just below the maximum level in order to avoid spillage; the
gauge indicates the fuel level
• Replace the fuel tank cap
IGNITING AND OPERATING THE HEATER
STARTING THE HEATER
Fill tank with clean fuel. Only use Diesel or Kerosene.
The fuel gauge on top of the tank allows to check fuel level
Connect the power cord plug to a AC220-240V 50 Hz earthed electrical supply
system.
Earthing is mandatory.
Models DFA 2320/DFA 2330/DFA 2350:
When complete “start-up” above, the left display window shows “--”, the right
display window shows ambient temperature value.
Push the power switch to “ON”(1) position.
The default temperature setting is 20℃, be showed on the left display window.
If the ambient temperature is lower than default temperature, the electrodes
start sparking, after 7 seconds, the heater starts.
If the ambient temperature is higher than default temperature, turn thermostat
control knob to desired temperature, the electrodes start sparking, after 7 sec-
onds, the heater starts.
COLD START-UP
at low temperature keep the air vent hole (see Fig. 6) closed by a finger dur-
ing ignition to make start-up easier.
ABNORMAL OPERATION: in case of malfunction (flame failure, reduced air
flow, bad combustion, etc.) the heater stops and the indicator light starts
FLASHING (THE LOCK-OUT MODE code will be showed on the display win-
dow).
STOPPING THE HEATER
Move switch to “OFF” (O) position. Unplug the unit when not used for a long time.
Never disconnect the heater from mains to stop it while in operation. Always
wait 5 minutes after switching off the heater to allow the cooling sequence
to be completed, otherwise the residual heat could damage internal compo-
nents.
RE-SET/ RESTART THE HEATER
When heater in lock-out mode, check and remove the cause of lock-out
before restarting the heater. To reset, turn the ON/OFF switch to 0 and then
again to I. In case of repeated malfunction, call technical service. Turning the
thermostat control knob will NOT reset the heater.
44
INSTALLATION INSTRUCTIONS
Make sure to use the appliance only on a firm and sturdy underground. In case of
doubt have underground checked by an expert.
WARNING - this appliance must be connected to an earthed power socket.
Position the heater on a flat, level, non-flammable, solid surface.
Direct-fired heaters are intended for use in outdoor open areas or in indoor well
ventilated areas. For indoor use, provide permanent ventilation openings of at
least 25 cm²/kW, equally distributed between floor and high level, with a mini-
mum of 250 cm².
DFA 2320 DFA 2330 DFA 2350
Minimum Opening Size 600 cm² 800 cm² 1250 cm²
• Keep the heater away from flammable, combustible, explosive or corrosive
materials.
• Never block or restrict the air inlet and outlet for any reason.
• Do not expose directly to the weather or to excessive humidity.
• Follow general and special fire safety regulations in force in all fields of appli-
cations. In any case ensure the following minimum safety clearances from
materials or objects in the surroundings of the heater:
• Side: 0.6 m
• Air inlet side: 1 m
• Top: 1.5 m
• Hot air outlet side: 3 m
• Floor: 0 m
• Floors and ceilings must be made of fireproof materials in the place where the
heater is operated.
Your heater has been designed for use with high-quality oil such as Qlima
Premium Quality Fuels or high quality, water-free pure diesel oil (not home-oil).
Only fuels of this kind will ensure clean and proper burning.
Lower quality fuel may result in:
• Increased possibility of malfunctioning
• Incomplete combustion
• Reduced heater lifetime
• Smoke and/or fumes
• Deposits on the grid, mantle or other objects
• Increased repair costs
Using the right fuel is therefore essential for safe, efficient and comfortable use of
your heater.
Damage and/or malfunctioning of the heater due to the use of other than high
quality, water-free pure die- sel oil (not home-oil) is not covered by the warranty.
Always refer to your local dealer for the right fuel for your heater.
FILLING FUEL
Fill the fuel tank in a suitable, well ventilated area. Please avoid spillage of fuel
and respect following precautions:

2524
TROUBLE SHOOTING
TROUBLE CAUSE REMEDY
E0 displayed on the screen 1.The “|ON/O (OFF)” switch is
turned “| (ON)” when the gen-
erator is plugged.
1.After disconnecting the
generator, see that the switch is
in the “O(OFF)” position, plug
the generator in and turn the
switch “(|) ON”.
Heater ignites but MAIN PCB
assembly shuts heater off
after a short period of time
E1 displayed on the screen
1.Wrong pump pressure. 1.See pump pressure adjust-
ment.
2.Dirty air output, air Intake or
lint Filter.
2.See air output, air intake and
lint filter.
3.Dirty fuel filter. 3.See Fuel filter.
4.Burner nozzle clogged. 4.Clean nozzle blowing com-
pressed air, replace if necessary.
5.Dirty photocell lens. 4.Clean photocell lens.
6.Photocell assembly not prop-
erly installed.(Not seeing flame)
6.Make sure photocell boot is
properly seated in bracket.
7.Defective photocell. 7.Replace photocell.
8.Bad electrical connection
between photocell and MIAN
PCB assembly.
8.Check electrical components.
Heater will not ignite but
motor runs for a short period
of time
E1 displayed on the screen
1.Empty fuel tank, dirty or
wrong fuel.
1.Remove wrong or dirty fuel
Fill the tank with clean Diesel or
kerosene.
2.Wrong pump pressure. 2.See pump pressure adjust-
ment.
3.Dirty fuel filter. 3.See Fuel filter.
4. Burner nozzle clogged . 4.Clean nozzle blowing com-
pressed air, replace if necessary.
5.Carbon deposits on spark
plug and/or improper gap.
5.See spark plug.
6.Ignition wire is not attached
to spark plug.
6.Attach ignition wire to spark
plug. See spark plug.
7.Air leaks in oil line . 7.Check hoses, tighten connec-
tions, if necessary replace.
8.Fuel viscosity increased at low
temperature.
8.Mix Diesel with 10-20% ker-
osene.
9.Bad electrical connection
between photocell and MIAN
PCB assembly.
9.Check electrical components.
Fan does not turn when
heater is plugged in and
power switch was in the”ON”
position
1.Thermostat setting is lower
than room temp.
1.Turn thermostat control knob
to a higher setting.
2.No electrical power. 2. Check to insure heater cord
and extension cord are plugged
in. Check power supply.
MAINTENANCE (TO BE EXECUTED BY AUTHORIZED PERSONS ONLY)
WARNING!! : NEVER SERVICE HEATER WHILE IT IS PLUGGED IN OR WHILE HOT!
USE ORIGINAL EQUIPMENT REPLACEMENT PARTS ONLY. Use of third party or other alter-
nate components will void warranty and may cause unsafe operating conditions.
Regularly wipe the enclosure using a soft sponge or cloth. For very dirty parts, use a sponge
WIRING DIAGRAM
Wiring diagram for DFA 2320/2330
Wiring diagram for DFA 2350
44

2726
Ignition Electrodes
Clean, adjust and if necessary replace ignition electrode. For electrode gaps see Fig. 4-5
(dimensions in mm).
Fig.4 Fig.5
Compressor Pressure Adjustment (Fig. 6)
The compressor pressure is factory set and must be checked and adjusted by
qualified technicians only. Tampering with the unit may be dangerous.
Remove pressure gauge cap. Connect a pressure gauge on the pressure measuring port on
the rear guard. Start heater and read air pressure value. If necessary adjust pressure to the
correct value turning the adjusting screw (the air vent hole in the adjusting screw middle)
clockwise to increase, anticlockwise to decrease the pressure:
Model Air Pressure (bar)
DFA 2320 0.32
DFA 2330 0.31
DFA 2350 0.45
OUT PUT FILT ER
REM OVE COV ER AND REPL ACE
FILT ER ONCE A YEAR
INTA KE FILTER
WASH AND DR Y EVER Y 500
HOURS OR AS NEC ESSARY
Fig.6
Electrical
Inspect cables, electrical parts and connections.
STORAGE INSTRUCTIONS
Store the heater in a dry place above 10ºC in the original packaging. Remove
all fuel from the tank before storing.
wetted with lukewarm water and a mild detergent, then dry using a clean cloth.
Keep air inlet and fan free from dust and dirt. To clean inner parts, gently blow compressed
air through air inlet.
Regularly inspect the power cable: if worn, cracked or damaged have it replaced by techni-
cal service.
Before storing the heater, make sure it is perfectly cool and dry. Cover the unit with a plas-
tic bag, put it in its packing box and store it in a dry, ventilated place.
Before starting any maintenance task, shut down, unplug and let the heater
cool down for at least 15 minutes.
Do not attempt any electrical repair yourself. If the heater needs service or
repair, contact a qualified technician.
Do not use a faulty unit unless a qualified technician has inspected and
repaired it.
When cleaning, make sure that water does not enter the unit.
Do not open the enclosure to clean the inner parts. Do not spray water into
the heater.
Never use solvents, gasoline, toluene and similar aggressive chemicals to
clean the heater.
After product maintenance, it is necessary for qualified technician to inspect
and debug the product to its normal state before use
Do not carry out emergency servicing under wet conditions, If unavoidable,
please provision of weatherproof covers for appliances designed for outdoor
installation
The following checks BY QUALIFIED PERSONNEL ONLY are recommended before every sea-
sonal use:
Nozzle
Carefully unscrew nozzle from nozzle fitting. Blow compressed air through nozzle orifice to
free it from dirt. Replace nozzle if necessary.
Air Filters
Clean air filters. Remove filter end cover (11), wash air intake filter (10) using a light deter-
gent and dry it thoroughly before re-installing. Replace air delivery filter (9) once a year
(Fig.3)
Fig.3
44

2928
GUARANTEE CONDITIONS
The appliance is supplied with a 24-month guarantee, commencing on the date of
purchase. All material and manufacturing defects will be repaired or replaced free of
charge within this period. The following rules apply:
1. We expressly refuse all further damage claims, including claims for collateral and/or
consequential damage.
2. Repairs to or replacement of components within the guarantee period will not result
in an extension of the guarantee.
3. The guarantee is invalidated if any modifications have been made, non-genuine
parts are fitted or repairs are carried out by third parties.
4. Components subject to normal wear, such as filters, batteries, lamps and heating ele-
ments are not covered by the guarantee.
5. The guarantee is valid only when you present the original, dated purchase invoice
and if no modifications have been made to it.
6. The guarantee is invalid for damage caused by neglect and/or by actions that deviate
from those in this instruction booklet.
7. Transportation costs and the risks involved during the transportation of the appli-
ance or components of the appliance shall always be for the account of the purchas-
er
8. Damage caused by not using suitable spare parts is not covered by the guarantee.
To prevent unnecessary expense, we recommend that you always first carefully consult
the instructions for use. Take the appliance to your dealer for repairs if these instruc-
tions do not provide a solution.
www.qlima.com
ENVIRONMENTAL PROTECTION
Do not dispose of electrical appliances as unsorted municipal waste, use separate col-
lection facilities.
Contact your local government for information regarding the collection systems availa-
ble.
If electrical appliances are disposed of in landfills or dumps, hazardous substances
can leak into the groundwater and get into the food chain, damaging your health and
well-being. When replacing old appliances with new ones, the retailer is legally obligat-
ed to take back your old appliance for disposal at least for free of charge.
4 4

3130
1 LEES EERST DE GEBRUIKSAANWIJZING.
2 RAADPLEEG BIJ TWIJFEL UW DEALER.
1
30
BELANGRIJKSTE
ONDERDELEN
Hete luchtuitlaat
Onderste huls
Brandstoftank
Temperatuurdisplay
Temperatuurknop
Temperatuurdisplay
Aan-uit/
resetschakelaar met
ledlampje
Handgreep
Bovenste huls
Ventilator
Luchtcompressor
Brandstofdop
Stroomkabel
Oliepeil
Wiel
Bovenste slang
Onderste slang
q
w
e
r
t
y
u
i
o
a
s
d
f
g
h
j
k
1
31
DFA 2320
DFA 2330 DFA 2350
q
q
w
g
d
r
h
t
y
i
o
a
s
d
f
g
o
j
a
s
f
e
k
u
w
e
r
t
y
u

3332
GEBRUIKSAANWIJZINGEN (NL)
G
• Lees deze gebruikershandleiding aandachtig alvorens het toestel te gebruiken
en bewaar het voor later. Installeer dit toestel enkel wanneer het voldoet aan de
lokale/nationale wetgeving, regelgeving en normen.
• De kachel is enkel ontworpen voor gebruik buitenshuis. Dit product is bedoeld
om enkel te gebruiken als kachel in niet-residentiële omgevingen
• Controleer na het uitpakken of het apparaat niet beschadigd is. Twijfelt u,
gebruik het apparaat dan niet, maar neem contact op met de klantenservice of
uw plaatselijke leverancier. Het verpakkingsmateriaal (plastic zakken enz.) moet
buiten het bereik van kinderen gehouden worden, want het zou een bron van
gevaren kunnen vormen.
• Aanpassingen aan het veiligheidssysteem zijn niet toegestaan.
• Deze verwarmer is geconstrueerd conform de relevante teksten in de LVD/EMC
norm.
WAARSCHUWINGEN
• Lees de Aanwijzingen voor gebruik van het apparaat. De veiligheid van het appa-
raat is enkel gegarandeerd bij correct gebruik volgens deze instructies, daarom
wordt aanbevolen deze te bewaren voor latere raadpleging.
• Gebruik het toestel enkel voor de bestemde doeleinden. Het gebruik op ande-
re manieren kan leiden tot kortsluitingen, brandwonden, elektrische schokken,
exploderen van lampen, ongevallen, enz.
• Het gebruik moet volledig in overeenstemming zijn met lokale regelgeving, ver-
ordeningen en normen.
• Verzeker dat de beschikbare spanning niet hoger is dan de spanning beschreven
in de specificaties van deze handleiding.
• Controleer of de netspanning op het typeplaatje overeenkomt met het lokale
lichtnet voor u het apparaat aansluit.
• Het apparaat is geschikt voor netspanningen van ~230 V.
• Verzeker steeds dat u het toestel kan zien tijdens het aanschakelen. Gebruik nooit
zaken zoals een timer, programmeer- of andere apparaten (inclusief Internet
apps) die het toestel automatisch aanschakelen omdat dit brand kan veroorza-
ken!
• Installeer het apparaat volgens de instructies beschreven in de paragraaf “instal-
latie” van de gebruiksaanwijzing.
• Het apparaat is vervaardigd volgens de CE veiligheidsnormen. Desondanks is,
zoals bij elk verwarmingstoestel, voorzichtigheid geboden.
• BRANDGEVAAR! Gebruik het apparaat nooit op plaatsen waar ontvlambare en/of
schadelijke gassen, producten of dampen aanwezig kunnen zijn (zoals uitlaatgas-
sen, verfdampen, gordijnen, papier, kleding).
• Als het apparaat te dicht bij brandbare materialen staat, ontstaat er brandgevaar.
• Gebruik geen verlengsnoeren of meervoudige adapters.
• Wees om veiligheidsredenen voorzichtig wanneer kinderen of dieren in de buurt
van het apparaat zijn, zoals bij elk verwarmingstoestel, en verzeker dat kinderen
zich steeds bewust zijn van de aanwezigheid van een het apparaat.
• Dit toestel is niet geschikt voor gebruik door personen (inclusief kinderen) met
verminderde fysische, motorische of mentale mogelijkheden, of het gebrek aan
ervaring en kennis, behalve onder toezicht of wanneer ze uitleg betreffende het
gebruik van het toestel hebben gekregen van een persoon verantwoordelijk voor 11
hun veiligheid.
• Als de netkabel beschadigd is, moet deze door de fabrikant, diens onderhouds-
monteur of een vergelijkbaar gekwalificeerde persoon worden vervangen om
gevaren te vermijden.
• Kinderen moeten onder toezicht staan, zodat zij niet met de machine kunnen spe-
len.
• Dek het toestel niet af om oververhitting te voorkomen.
• Het toestel mag zich niet vlak onder een stopcontact bevinden.
• Gebruik het apparaat niet in de onmiddellijke nabijheid van een bad, douche of
zwembad.
• Verzeker dat het aansluitsnoer nooit het verwarmingselement kan raken.
• De afscherming van deze kachel is bedoeld om directe toegang tot verwarmings-
elementen te voorkomen en moet op zijn plaats zijn wanneer de kachel in gebruik
is.
• Steek geen objecten in de openingen van het apparaat.
• Het haardscherm biedt geen volledige bescherming tegen jonge kinderen en per-
sonen met beperkte mobiliteit.
• Dit apparaat kan worden gebruikt door kinderen ouder dan 8 jaar en door perso-
nen met fysieke, sensorische of verstandelijke beperkingen of gebrek aan ervaring
of kennis als zij onder toezicht staan of instructies hebben gekregen over het vei-
lig gebruik van het apparaat en de gevaren begrijpen die met het gebruik ervan
samenhangen.
• Het schoonmaken en uitvoeren van ander onderhoud mag niet worden gedaan
door kinderen zonder toezicht.
• Kinderen jonger dan 3 jaar moeten uit de buurt van het apparaat worden gehou-
den.
• Kinderen van 3 tot 8 jaar mogen het apparaat uitsluitend in- of uitschakelen als
dit op de bedoelde wijze geplaatst of geïnstalleerd is en zij onder toezicht staan
of instructies hebben gekregen over het veilige gebruik van het apparaat en
begrijpen welke risico’s er zijn.
• Kinderen van 3 tot 8 jaar mogen het apparaat niet aansluiten, instellen en schoon-
maken of gebruikersonderhoud plegen.
• ATTENTIE - Sommige onderdelen van dit product kunnen erg heet worden en
brandwonden veroorzaken. Er dient bijzonder voorzichtig gedaan te worden als
er kinderen en kwetsbare personen aanwezig zijn.
• Waarschuwing - Gebruik deze verwarmer niet in kleine kamers waar de aanwe-
zige personen niet in staat zijn de kamer op eigen kracht te verlaten, behalve
wanneer er voortdurend toezicht aanwezig is.
• Tijdens bedrijf en net na bedrijf zal het toestel extreem heet zijn. Raak het NOOIT
aan tijdens bedrijf of net na bedrijf. Verplaats het toestel NOOIT tijdens deze
momenten.
• Schakel het toestel uit wanneer het alleen gelaten wordt.
• De verwarmer tijdens gebruik nooit bedekken of hinderen.
• Koppel de voedingsspanning los tijdens installatie, reiniging, onderhoud en/of
verplaatsen. Verzeker dat het volledig afgekoeld is voor het verplaatsen, reinigen
of uitvoeren van onderhoud.
Ongepast gebruik van deze kachel kan leiden tot ernstige letsels of de dood als gevolg
van brandwonden, brand, explosie, elektrische schok en/of koolmonoxidevergifti-
ging.
• Ongepast gebruik van deze kachel kan leiden tot ernstige letsels of de dood als
gevolg van brandwonden, brand, explosie, elektrische schok en/of koolmonoxide-
vergiftiging.

3534
• Gebruik deze kachel enkel in goed geventileerde ruimtes.
• Gebruik een brandstof van goede kwaliteit zoals deze van Qlima Premium Quality
of gelijkwaardig om te verzekeren dat uw kachel gebruikt kan worden zonder
problemen.
• Gebruik nooit andere brandstoffen dan kerosine of diesel.
• Gebruik deze kachel nooit met vloeistoffen zoals benzine, benzeen, verfverdun-
ners, op alcohol gebaseerde vloeistoffen of andere olie-grondstoffen.
• Gebruik deze kachel nooit waar brandbare dampen aanwezig kunnen zijn.
• Vul de kachel nooit bij vooraleer deze volledig afgekoeld is.
• Gebruik kerosine OF diesel als brandstof, geen mengsel van beide. Maak de
brandstoftank eerst volledig leeg wanneer u wil overschakelen van kerosine naar
diesel of andersom.
• Bij gebruik van de heater moet altijd de minimale vrije afstanden worden aange-
houden
Luchtinlaat: 1 m
Luchtuitlaat: 3,00 m
Zijkanten 0,6 m
Bovenkant 1,50 m.»
• Gebruik nooit kanalen of andere zaken om de luchtstroom van de luchtinlaat of
de luchtuitlaat te geleiden.
• Verplaats de kachel nooit wanneer er brandstof in de brandstoftank zit. Verzeker
dat deze leeg is alvorens de kachel te verplaatsen.
• Verzeker dat de kachel steeds rechtop staat en op een vlak en stevig oppervlak.
• Verzeker dat het oppervlak waarop de kachel staat stabiel is, niet trilt en niet
beweegt.
• Verzeker dat (mogelijk) gevaarlijke situaties niet kunnen voorkomen.
• Brandbare stoffen moeten veilig opgeslagen worden volgens de lokale regelge-
vingen maar nooit op een manier waarop ze door de kachel kunnen verwarmd of
ontstoken worden of (mogelijk) gevaarlijke dampen kunnen vormen.
• Verzeker dat de kachel op een oppervlak staat dat niet kan beschadigd worden
door het gebruiken van de eenheid.
• Voor optimale prestaties van deze kachel worden Qlima Premium Quality Fuels
of andere kerosine geadviseerd. Diesel kan gebruikt worden, maar de prestaties
van de kachels worden hierdoor beïnvloed. Emissies kunnen dan hoger zijn en het
verbrandingsproces iets volatieler (kleine vlamtoppen kunnen zichtbaar zijn bij de
uitblaasopening van de kachel).
Bij niet raadplegen en/of niet naleven van de regels, instructies en uitleg, zal de garan-
tie niet langer geldig zijn en zal de fabrikant niet meer bijstaan in geval van schade
aan het toestel en/of de omgeving onder garantie.
TECHNISCHE SPECIFICATIES
Model DFA 2320 DFA 2330 DFA 2350
Warmtetoevoer [kW] * 20 30 50
Blaasvermogen [m³/u] 550 750 1100
Brandstoftype Diesel - kerosine Diesel - kerosine Diesel - kerosine
Brandstofverbruik [kg/u] 1.65 2.4 4
Afmeting brandstofmondstuk
mm
0.54 0.88 1.24
Netspanning [V/Hz] AC220-240/50 AC220-240/50 AC220-240/50
Luchtdrukinstelling (bar) 0.32 0.31 0.45
Stroomsterkte [A] 1.1 1.1 1.5
Elektrisch vermogen [W] 230 230 340
Zekering T10A T10A T10A
Omgevingstemperatuur -20-40 ºC -20-40 ºC -20-40 ºC
Afmetingen
Netto gewicht (kg) 13.4 19.2 23.2
Lengte (mm) 752 855 1076
Breedte (mm) 305 470 515
Hoogte (mm) 416 588 585
Tankcapaciteit (l) 22 38 50
Bedrijfsbereik (u) ~11 ~14 ~11
Standaard accessoires
Brandstofmeter ja ja ja
Handvat 1 1 1
Omgevingsthermostaat Ingebouwd Ingebouwd Ingebouwd
Lampje voor storingsdetectie Ingebouwd Ingebouwd Ingebouwd
Omgevingstemperatuur in
bedrijf
-20~40 ºC -20~40 ºC -20~40 ºC
Op basis van calorische bovenwaarde [uur]"
11

3736
INSTALLATIE
Verzeker dat het toestel enkel op een stevige en stabiele ondergrond gebruikt
wordt. Laat bij twijfel de ondergrond controleren door een deskundige.
WAARSCHUWING - dit toestel moet aangesloten worden op een
geaard stopcontact.
Plaats de heater op een vlak, recht, onbrandbaar en massief oppervlak.
Heaters met rechtstreekse verbranding zijn bedoeld voor gebruik in de buiten-
lucht of in goed geventileerde binnenruimten. Voor gebruik binnenshuis
moeten permanente ventilatieopeningen van ten minste 25 cm²/kW worden
aangebracht, gelijkmatig verdeeld tussen het vloer- en bovenste niveau, met
een minimum van 250 cm².
DFA 2320 DFA 2330 DFA 2350
Minimumgrootte van de opening 600 cm² 800 cm² 1250 cm²
• Houd de heater uit de buurt van ontvlambare, brandbare, explosieve of
corrosieve materialen.
• De luchtinlaat en -uitlaat mogen nooit worden geblokkeerd of beperkt.
• Stel het apparaat niet bloot aan rechtstreekse weersinvloeden of uitzon-
derlijke vochtigheid.
• Volg algehele en speciale richtlijnen voor de brandveiligheid op die gel-
den voor alle toepassingsgebieden. Zorg in ieder geval voor de volgende
minimale veiligheidsafstanden van materialen of objecten in de omge-
ving van de heater:
• Zijkant: 0,6 m
• Zijde luchtinlaat: 1 m
• Bovenkant: 1,5 m
• Zijde hete luchtuitlaat: 3 m
• Vloer: 0 m
• In de ruimte waarin de heater wordt gebruikt moeten de vloeren en pla-
fonds gemaakt zijn van onbrandbaar materiaal.”
Het gebruiken van de juiste brandstof is daarom essentieel voor het veilig, effici-
ent en comfortabel gebruik van uw kachel.
Beschadiging en/of slechte werking van de kachel vanwege het gebruik van andere
brandstoffen dan watervrije paraffineolie van hoge kwaliteit of watervrije zuivere
dieselolie (geen olie voor huiselijk gebruik) wordt niet gedekt door de garantie.
Raadpleeg steeds uw lokale verdeler voor informatie over de juiste brandstof
voor uw kachel.
VULLEN MET BRANDSTOF
Vul de brandstoftank in een geschikte, goed geventileerde ruimte. Gelieve het
morsen van brandstof te vermijden en de volgende voorzorgsmaatregelen te res-
pecteren:
• Verzeker dat de kachel op een vlak oppervlak staat.
• Verzeker dat de kachel uitgeschakeld is en volledig afgekoeld is.
DE KACHEL MONTEREN
De fabrikant is niet verantwoordelijk voor schade of letsel wanneer er geen reke-
ning wordt gehouden met de hierboven beschreven zaken.
Het gebruik van dit product en de daarvoor benodigde elementen is volledig op
eigen risico van de eindgebruiker.
Pos Omschrijving Qty DFA 2320
ASchroef 2
BPlatte ring 2
CHandvat 1
Pos.Omschrijving Qty
DFA 2330
Qty
DFA 2350
AHandvat 1 1
BSchroef 8 6
CVeerring 8 6
DPlatte ring 8 6
EVoetpijp 1 1
FMoer M5 8 6
GMoer M12 2 2
HPlatte ringø12 2 2
IWiel 2 2
JWielas 1 1
KSpie 2 2
Ga als volgt te werk om de heater te monteren (zie afb. 2):
1 Steek J in het bijbehorende gat E en steek K in de bijbehorende gaten; plaats
H aan beide kanten van J, schuif het wiel I over de wielas J; schroef G vast om
het wiel op de as te bevestigen.
2 Plaats de romp van de heater op E, zorg ervoor dat de gaten van A in de rich-
ting van de bijbehorende gaten op E wijzen.
3 Gebruik B, C, D en F om de gemonteerde pijpvoeten en het handvat op de
tank te bevestigen.»
Fig. 2
Fig. 1
11

3938
BEDRADINGSSCHEMA
Bedradingsschema voor DFA 2320/2330
Bedradingsschema voor DFA 2350
• Verwijder de dop van de brandstoftank.
• Verzeker dat de brandstoftank bijgevuld wordt met hetzelfde type van
brandstof dat zich reeds in de tank bevindt, tenzij de tank leeg is.
• Vul de tank tot juist onder het maximumpeil om morsen te vermijden; de
meter toont het brandstofpeil.
• Plaats de dop van de brandstoftank terug.
DE HEATER STARTEN EN GEBRUIKEN
DE HEATER STARTEN
Vul de tank met schone brandstof. Gebruik alleen diesel of kerosine.
De brandstofmeter op de bovenkant van de tank toont het brandstofpeil.
Sluit de stroomkabel aan op een geaard stopcontact van een AC220-240V 50
Hz stroomvoorziening.
Randaarde is verplicht.
Modellen DFA 2320/DFA 2330/DFA 2350:
Wanneer ‘opstarten’ zoals hierboven vermeld is afgerond, geeft het dis-
playvenster «»--»» weer; het rechtervenster toont de hoogte van de omge-
vingstemperatuur..
Zet de stroomschakelaar in de stand «»ON»» (1).
De standaard temperatuurinstelling is 20°C; deze wordt weergegeven in het
linker displayvenster.
Als de omgevingstemperatuur lager is dan de standaard temperatuur, begin-
nen de elektroden te vonken; na 7 seconden start de heater.
Als de omgevingstemperatuur lager is dan de standaard temperatuur, zet u
de instelknop van de thermostaat op de gewenste temperatuur; de elektro-
den beginnen te vonken; na 7 seconden start de heater.
KOUDE START
houd bij lage temperaturen het gat van de luchtuitlaat (zie afb. 6) tijdens het
ontbranden met een vinger afgesloten, om gemakkelijker te kunnen starten.
ABNORMALE BEDIENING: bij storingen (storingen van de vlam, verminderde lucht-
stroom, slechte verbranding, enz.) stopt de heater en gaat het indicatorlampje
KNIPPEREN (in het displayvenster verschijnt de code van DE LOCKOUT-MODUS).
DE HEATER STOPPEN
Zet de schakelaar in de stand «»OFF»» (O). Trek de stekker uit het stopcon-
tact als de eenheid gedurende langere tijd niet wordt gebruikt.
Trek nooit de stekker van de heater uit het stopcontact om deze te laten
stoppen als hij in gebruik is. Wacht altijd 5 minuten nadat de heater is uitge-
schakeld om de koelsequentie te laten voltooien; anders kan de resterende
hitte interne componenten beschadigen.
DE HEATER RESETTEN/HERSTARTEN
Als de heater in lockout-modus staat, moet de oorzaak van de lockout wor-
den gecontroleerd en verholpen voordat de heater opnieuw kan worden
gestart. Zet de ON/OFF-schakelaar in de stand 0 en vervolgens weer in stand
I om de heater te resetten. Neem contact op met de technische dienst als de
storing blijft bestaan. De heater wordt NIET gereset door de instelknop van
de thermostaat te verdraaien.
11
La page est en cours de chargement...
La page est en cours de chargement...
La page est en cours de chargement...
-
 1
1
-
 2
2
-
 3
3
-
 4
4
-
 5
5
-
 6
6
-
 7
7
-
 8
8
-
 9
9
-
 10
10
-
 11
11
-
 12
12
-
 13
13
-
 14
14
-
 15
15
-
 16
16
-
 17
17
-
 18
18
-
 19
19
-
 20
20
-
 21
21
-
 22
22
-
 23
23


QLIMA DFA2330 Manuel utilisateur
- Catégorie
- Chauffe-eau
- Taper
- Manuel utilisateur
dans d''autres langues
- English: QLIMA DFA2330 User manual
- Nederlands: QLIMA DFA2330 Handleiding
Documents connexes
Autres documents
-
Eurom 307030 Manuel utilisateur
-
Dura Heat DuraHeat DFA-170C Manuel utilisateur
-
 Dyna-Glo Delux KFA400DGD Manuel utilisateur
-
Dyna-Glo Delux KFA650DGD Mode d'emploi
-
 Dyna-Glo Delux KFA650DGD Guide d'installation
-
-
 L.B. White CP170AK Owner's Manual And Instructions
-
 L.B. White CP400AK Owner's Manual And Instructions


