DeLonghi EC9155M Mode d'emploi
- Catégorie
- Cafetières
- Taper
- Mode d'emploi

QUICK START
GUIDE
EC9155M

3356-EC9155M
2
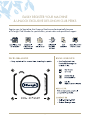
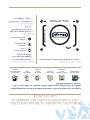
EASILY REGISTER YOUR MACHINE
& UNLOCK EXCLUSIVE DE’LONGHI CLUB PERKS
Register your La Specialista Arte Espresso Machine and automatically become
a De’Longhi Club Member for special offers, private sales and specialized support.

EC9155M
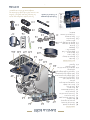
IN THE BOX
3
Get Started &
Owner’s Instructions
Booklets
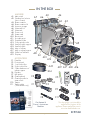
ACCESSORIES
C1. Portafilter
C2. Dosing funnel
C3. 1-cup coffee filter
C4. 2-cups coffee filter
C5. “Water hardness test“
indicator paper
C6. Descaler
C7. Milk pitcher
C8. Cleaning brush
C9. Cleaning needle for
steam nozzle
C10. Tamper
C11. Tamping Mat
(*some models only)
MACHINE
A1. Main switch
A2. Grinding level selector
(fine to coarse)
A3. Beans container
A4. Beans container lid
A5. Accessory storage
A6. Water tank lid
A7. Water tank
A8. Power cord
A9. Steam wand
A10. Brewing unit
A11. Hot water spout
A12. Portafilter holder
A13. Coffee grinder outlet
A14. Small cup grille support
A15. Small cup grille
A16. Mug or cup tray
A17. Mug or cup tray support
A18. Water level indicator
A19. Drip tray
This short guide is not intended to
explain all the functions of the
appliance. Please read all the owner’s
instruction booklet before use.
Détartrant pour machinesà café
Détartrant pour machinesà café
Détartrant pour machinesà café
Détartrant pour machinesà café
Détartrant pour machinesà café
C1 C3
C2
Détartrant pour machinesà café
C4
Détartrant pour machinesà café
Détartrant pour machines à café
Détartrant pour machinesà café
C5
C6 C7
C8
C9
C10
C 11
A15
Détartrant pour machinesà café
A14
A2
A3
A1
A8
A11
A4
A6A7
A10 A9
A5
A12
A13
A19 A17 A18 A16

4
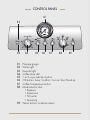
CONTROL PANEL
B1. Pressure gauge
B2. Water light
B3. Descale light
B4. Coffee dose dial
B5. 1 or 2-cups selection button
B6. OK button: brew /confirm / turn on from Stand-by
B7. Coffee Temperature button
B8. Mode selector dial:
• Espresso
• Americano
• Hot water
• Descaling
B9. Steam button: to deliver steam
B3 B4 B5 B6 B7 B8 B9
B2
B1

EC9155M
MAX
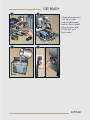
5
GET READY
Clean all accessories
with warm water
and mild detergent
and dry them, install
all accessories and
fill the tank with
fresh water.
1 2
34

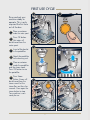
FIRST USE CYCLE
6
1
5
34
Rinse and get your
machine ready to
operate. This is only
required the first time
out of the box.
2
6
Press OK button.
Hot water will
be delivered from the
water spout.
Place a container
under the water spout.
1
2
Insert a filter basket
in the portafilter.
3
Attach the portafilter
to the brewing unit.
4
Place a container
under the portafilter
and the steam wand.
Press OK button to rise
the portafilter.
5
Press Steam
Button. Steam will
be delivered from the
steam wand. Let the
steam flow out for a few
seconds. Press again the
steam button to stop.
Your machine is now
ready for use.
6

EC9155M
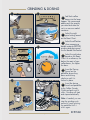
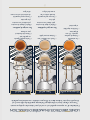
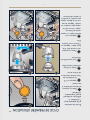
GRINDING & DOSING
7
Add fresh coffee
beans into the bean
hopper. We recommend
adding only the quantity
you need and store the
rest in a vacuum sealed
container.
1
Select the right
grind setting, based
on the Roast Chart.
2
Select the x2 button
when preparing a
double espresso BEFORE
grinding and dosing and
use the double filter basket.
3
Select the right dose
based on the Roast
Chart. As a reference, the
darker the roast of your
coffee beans, the higher
the dose.
4
Insert the Dosing
Funnel on the
portafilter by pushing
down and turning
clockwise until it is
locked in place.
5
Insert the dosing
funnel and portafilter
to the Coffee Grinder
Outlet and push until it
clicks. Grinding will start
and stop automatically.
Note: if needed, you can
stop the grinding cycle
earlier by simply pushing
the portafilter until it
clicks again.
6
1 2
34
6
5

8
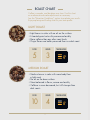
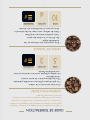
ROAST CHART
LIGHT ROAST
• Light brown in color with no oil on the surface
• A toasted grain taste with pronounced acidity
• More caffeine than any other roast levels
• Origin flavors are better preserved than in a dark roast
MEDIUM ROAST
• Medium brown in color with more body than
a light roast
• No oil on the bean surface
• More balanced in flavor, aroma and acidity
• Caffeine is more decreased, but still stronger than
dark roasts
Coffee is complex and develops over time. Use this chart
as a reference and make adjustments as necessary.
See the “Extraction Guidelines” section to evaluate your results.
Enjoy exploring and finding what fits your taste profile.
DOSE
5
TEMPERATURE
5
DOSE
10
TEMPERATURE
4
GRIND
3
GRIND
4

EC9155M
9
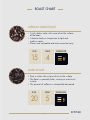
ROAST CHART
MEDIUM DARK ROAST
• A rich, darker color with some oil on the surface
of the bean
• A heavier body in comparison to light and
medium roasts
• Flavors are noticeable and taste somewhat spicy
DARK ROAST
• Dark in color with a sheen of oil on the surface
• The flavor is generally bitter, smokey or even burnt
in taste
• The amount of caffeine is substantially decreased
DOSE
15
TEMPERATURE
3
DOSE
20
TEMPERATURE
2
GRIND
4
GRIND
5

Tap
Tap
10
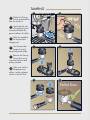
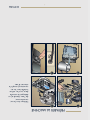
TAMPING
1 2
34
6
5
Perfect Dose
Detach the Dosing
Funnel and portafilter
from the machine.
1
Gently tap the side
of the dosing funnel
to evenly distribute the
ground coffee in the filter.
2
Place the portafilter
on the provided
tamping mat.
3
Use the provided
tamper to evenly
tamp the ground coffee.
4
Remove the Dosing
Funnel by turning
it counterclockwise and
pulling upwards.
5
Make sure that the
tamped ground
coffee is at the indicator
marker inside the filter.
6

EC9155M
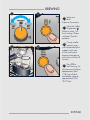
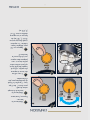
BREWING
1 2
Select the Coffee
Temperature
Button to select 1 of
the 3 settings. Please
see Roast Chart for
guidance.
If using smaller
espresso cups,
use the provided grille
support, which can
fit two small cups if
brewing two espresso
at the time with the x2
function.
3
Select your
drink:
Espresso, Americano.
1
2
3
11
4
Press OK to
start Brewing. Sin-
gle espresso will deliver
approximately 35ml
(1.18 fl oz) of drink,
and double espresso
approximately 70ml
(2.37 fl oz).
4

12
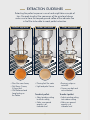
Extracting the perfect espresso is an art and might take a couple of
tries. Be ready to adjust the coarseness of the grind and always
make sure to have the tamped ground coffee at the indicator line
in the filter to be able to reach perfect extraction.
• Flow like warm honey
• Nut-Brown Crema,
3-4mm thick
• Well-Balanced and
Long Lasting on
the Palate.
•Flowing fast like water
• Light and pale Crema
To make it perfect:
• Adjust grinding setting
to a finer setting
• Make sure ground
quantity is at
indicator level
• flowing in drips or
not at all
• Crema very dark and
not uniformed
To make it perfect:
• Adjust grinding setting
to a coarser setting
• Make sure ground
quantity is at
indicator level
EXTRACTION GUIDELINES
Perfect espresso Under extracted Over extracted
11

EC9155M
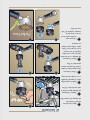
FROTHING
2
34
56
Fill the milk jug
with fresh cold
milk or preferred
milk-alternative.
1
Turn steam wand
on to purge
condensation before
use. Point steam wand
away from you during
this process.
2
To froth, place
nozzle on the
surface of milk and air
will catch by the mixing
of milk and steam.
3
Keep the steam
nozzle just on the
surface, careful not to
make big bubbles by
not letting too much
air in.
4
Insert the steam
nozzle just under
the milk to create
rotation (or vortex).
Once the milk jug is too
hot to touch, turn off.
5
Clean the steam
wand with a damp
cloth immediately
after use.
6
13
COW
MILK
ALMOND
MILK
OAT
MILK
SOY
MILK
1

14
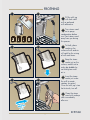
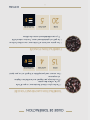
CLEANING & MAINTENANCE
1 2
34
5
Empty drip-tray
daily or when full.
1
Clean filter baskets
after each use.
2
For any stubborn
milk residue on
the steam wand, use
DeLonghi Eco Multiclean
Solution, available on
delonghi.com.
3
Setting the water
hardness will
increase (harder water)
or decrease (softer
water) the frequency
of the need to descale
the machine. Use the
provided indicator
paper test (C5) and
refer to the User Manual
for detailed instructions.
5
Keeping your
machine clean will
improve the quality
of the drink and
the longevity of the
machine.
Promptly descale
the machine when
the Descaling light turns
Follow the detailed
instruction on the User
Manual.
4

14
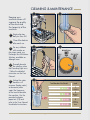
NETTOYAGE ET ENTRETIEN
1 2
34
5
Vider le plateau
d’égouttement à tous
les jours ou quand il est
plein.
1
Nettoyer les filtres
après chaque
utilisation.
2
Pour enlever les
résidus de lait
tenaces sur la tige
de vapeur, utiliser le
nettoyant Eco Multiclean
de De’Longhi, en vente
à delonghi.com.
3
Régler la dureté
de l’eau, augmentera
(eau plus dure)
ou diminuera (eau plus
doux) la fréquence
de détartrage. Utili-
sez la bandelette de
« TOTAL HARDNESS
TEST (C5) et
reportez-vous au mode
d’emploi pour des ins-
tructions détaillées.
5
Garder la machine
propre améliorera la
qualité des boissons
et la durée de vie
de la machine.
Détartrer la ma
chine dès que le
voyant s’allume (orange).
Suivre les instructions
détaillées dans le guide
d’utilisation.
4

EC9155M
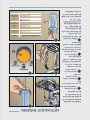
FAIRE LA MOUSSE DE LAIT
2
34
56
Remplir le pot à
lait de lait frais
et froid ou de votre bois-
son végétale préférée.
1
Tourner le bouton
vapeur pour purger la
condensation
avant l’uti-
lisation. Diriger la tige de
vapeur loin de soi pendant
ce processus.
2
Pour faire mousser
le lait, placer le
bec sur la surface du
lait et l’air sera aspiré
par le mélange du lait
et de la vapeur.
3
Garder le bec
vapeur à la sur-
face et éviter de créer
des grandes bulles en
ne laissant pas trop
d’air entrer.
4
Insérer le bec
vapeur légèrement
dans le lait pour créer
un tourbillon. Lorsque
le pot à lait est trop
chaud au toucher,
éteindre la vapeur.
5
Nettoyer la tige
de vapeur avec
un chiffon humide
immédiatement après
l’utilisation.
6
13
COW
MILK
ALMOND
MILK
OAT
MILK
SOY
MILK
1

12
L’extraction d’un espresso parfait est un art et peut nécessiter quelques essais.
S’assurer d’avoir tassé uniformément la bonne quantité de café moulu et
être prêt à ajuster la dose dans le filtre pour obtenir une extraction parfaite.
LIGNES DIRECTRICES EN MATIÈRE D’EXTRACTION
Un espresso parfait Sous-extrait Sur-extrait
11
• Sur-extraction
• Créma de couleur
noisette, 3-4 mm
d’épaisseur
• Goût bien équilibré
et persistant
• Coule vite comme l’eau
• Créma mince et pâle
Pour corriger le problème :
• Régler le degré de mouture
pour obtenir une mouture
plus fine
• S’assurer que la quantité
de café moulu est au
niveau de la ligne
• Coule goutte à goutte
ou pas du tout
• Créma très foncée et
pas uniforme
Pour corriger le problème :
• Régler le degré de mouture
pour obtenir une mouture
plus grossière
• S’assurer que la quantité
de café moulu est au niveau
de la ligne

EC9155M
L’INFUSION
1 2
Sélectionner la
touche de la tempé-
rature du café
pour choisir 1 des 3 op-
tions. Consulter le Guide
de torréfaction pour plus
d’information.
Si vous utilisez
des tasses à expresso
plus petites, utilisez le
support de grille fourni,
qui peut contenir deux
petites tasses si vous
préparez deux expres-
sos à la fois avec la
fonction x2.
3
Sélectionner la
boisson :
Espresso, Americano.
1
2
3
11
4
Appuyez sur OK
pour démarrer la per-
colation. Un espresso
simple fournira environ
35 ml (1,18 fl oz) de
boisson et un espresso
double environ 70 ml
(2,37 fl oz).
4

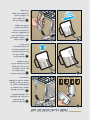
Tap
Tap
10
LE TASSAGE
1 2
34
6
5
Perfect Dose
Après la mouture,
extraire l’entonnoir
de dosage et le porte-filtre
1
Tapoter l’entonnoir
de dosage pour niveler le
café moulu dans le filtre
2
Mettre le porte-filtre
dans le logement prédéfi-
ni sur le tapis de tassage
3
Utiliser le tasseur
fourni pour tasser le café
moulu de manière homo-
gène dans le filtre.
4
Retirer l’entonnoir
de dosage en le tournant
dans le sens inverse des
aiguilles d’une montre
et en le tirant vers l’haut,
donc vérifier que la dose
est correcte
5
S’assurer que
le café moulu tassé
est au niveau de la
marque indiquée à l’inté-
rieur du filtre.
6

EC9155M
9
GUIDE DE TORRÉFACTION
DOSE
15
TEMPÉRATURE
3
DOSE
20
TEMPÉRATURE
2
MOUTURE
4
MOUTURE
5
TORRÉFACTION MOYENNE FONCÉE
• Couleur plus riche et foncée avec un peu d’huile
sur la surface des grains
• Plus de corps par rapport aux torréfactions légères
et moyennes
• Les saveurs sont perceptibles et le goût est un peu épicé
TORRÉFACTION FONCÉE
• Les grains sont noirs et lustrés avec une surface huileuse
• Le goût est généralement amer, fumé ou même brûlé
Il y a considérablement moins de caféine
La page charge ...
La page charge ...
La page charge ...
La page charge ...
La page charge ...
La page charge ...
La page charge ...
La page charge ...
-
 1
1
-
 2
2
-
 3
3
-
 4
4
-
 5
5
-
 6
6
-
 7
7
-
 8
8
-
 9
9
-
 10
10
-
 11
11
-
 12
12
-
 13
13
-
 14
14
-
 15
15
-
 16
16
-
 17
17
-
 18
18
-
 19
19
-
 20
20
-
 21
21
-
 22
22
-
 23
23
-
 24
24
-
 25
25
-
 26
26
-
 27
27
-
 28
28


DeLonghi EC9155M Mode d'emploi
- Catégorie
- Cafetières
- Taper
- Mode d'emploi
dans d''autres langues
- English: DeLonghi EC9155M User guide
Autres documents
-
DE LONGHI EC935X Manuel utilisateur
-
Breville Barista Express Semi-Automatic Le manuel du propriétaire
-
-
Breville TOUCH Impress Espresso Manuel utilisateur
-
-
KitchenAid 4KPES100ER1 Manuel utilisateur
-
-
-
Breville BES870 Manuel utilisateur
-