Pleasant Hearth OFG112SE Manuel utilisateur
- Taper
- Manuel utilisateur

1
30-10-093 Rev. 08/11/16
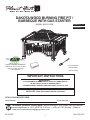
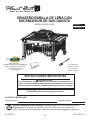
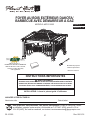
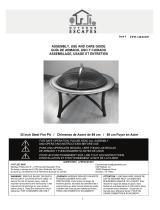
DAKOTA WOOD BURNING FIRE PIT /
BARBEQUE WITH GAS STARTER
MODEL #OFG112SE
Propane cylinders
sold separately.
Serial Number
Purchase Date
ATTACH YOUR RECEIPT HERE
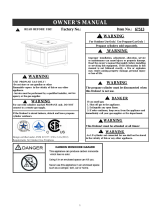
INSTALLER: Leave this manual with the consumer.
WARNING!
IF THE INFORMATION IN THIS MANUAL IS NOT FOLLOWED EXACTLY,
AN ELECTRICAL SHOCK OR FIRE MAY RESULT
CAUSING PROPERTY DAMAGE, PERSONAL INJURY OR LOSS OF LIFE.
IMPORTANT INSTRUCTIONS
C US
™
Questions, problems, missing parts? Before returning to your retailer, call our customer
service department at 1-877-447-4768, 8:30 a.m. – 4:30 p.m. CST, Monday – Friday, or
email us at [email protected]
PROJECT NUMBER 0418GM016S
ANS Z21.89-2013 • CSA 1.18-2013,
Outdoor Cooking Specialty
Gas Appliances
Patent Pending
Français p. 37
Español p. 19

2
TABLE OF CONTENTS
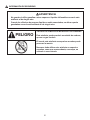
WARNING: For outdoor use only. Do not use in a building,
garage or any other enclosed area.
WARNING:
THIS INSTRUCTION MANUAL CONTAINS IMPORTANT
INFORMATION NECESSARY FOR THE PROPER ASSEMBLY AND SAFE
USE OF THE APPLIANCE. READ AND FOLLOW ALL WARNINGS AND
INSTRUCTIONS BEFORE ASSEMBLING AND USING THE APPLIANCE.
FOLLOW ALL WARNINGS AND INSTRUCTIONS WHEN USING THE
APPLIANCE. KEEP THIS MANUAL FOR FUTURE REFERENCE.
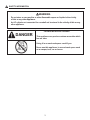
DANGER
• NEVER OPERATE THIS APPLIANCE UNATTENDED.
• NEVER OPERATE THIS APPLIANCE WITHIN 10FT (3.05M) OF ANY
STRUCTURE, COMBUSTIBLE MATERIAL OR OTHER GAS CYLINDER.
• NEVER OPERATE THIS APPLIANCE WITHIN 25 FT (7.5 M) OF ANY
FLAMMABLE LIQUID.
• IF A FIRE SHOULD OCCUR, KEEP AWAY FROM THE APPLIANCE AND
IMMEDIATELY CALL YOUR FIRE DEPARTMENT. DO NOT ATTEMPT TO
EXTINGUISH AN OIL OR A GREASE FIRE WITH WATER.
FAILURE TO FOLLOW THESE INSTRUCTIONS COULD RESULT IN FIRE,
EXPLOSION OR BURN HAZARD, WHICH COULD CAUSE PROPERTY
DAMAGE, PERSONAL INJURY OR DEATH.
Safety Information................................................................................................................ 3
Package Contents................................................................................................................ 6
Preparation .......................................................................................................................... 7
Assembly Instructions .......................................................................................................... 8
Operating Instructions ..........................................................................................................11
Care and Maintenance .........................................................................................................16
Troubleshooting.. ..................................................................................................................17
Warranty................................................................................................................................17
Replacement Parts List ........................................................................................................18
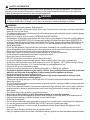
DANGER
IF YOU SMELL GAS:
1. SHUT OFF GAS TO THE APPLIANCE.
2. EXTINGUISH ANY OPEN FLAME.
3. IF ODOR CONTINUES, KEEP AWAY FROM THE APPLIANCE AND
IMMEDIATELY CALL YOUR GAS SUPPLIER OR YOUR FIRE
DEPARTMENT.
FAILURE TO FOLLOW THESE INSTRUCTIONS COULD RESULT IN FIRE
OR EXPLOSION WHICH COULD CAUSE PROPERTY DAMAGE,
PERSONAL INJURY OR DEATH.

3
DANGER
CARBON MONOXIDE HAZARD
This appliance can produce carbon monoxide which
has no odor.
Using it in an enclosed space can kill you.
Never use this appliance in an enclosed space such
as a camper, tent, car or house.
WARNING
Do not store or use gasoline or other ammable vapors or liquids in the vicinity
of this or any other appliance.
An LP cylinder not connected for use shall not be stored in the vicinity of this or any
other appliance.
SAFETY INFORMATION

4
SAFETY INFORMATION
Read and follow all warnings and instructions before assembling and using the appliance. The instruction
manual contains important information necessary for the proper assembly and safe use of the appliance.
Follow all warnings and instructions when using the appliance.
DANGER
• Failure to follow the dangers, warnings and cautions contained in this owner’s manual may result
inseriousbodilyinjuryordeath,orinareoranexplosioncausingdamagetoproperty.
WARNING
• Maximuminletgassupplypressure:Bottlepressure.
• Warning:Neverplaceacoverontherepitwheninuse.Ensuretherepitandmeshcoverhavecooledbefore
placingacoverovertherepit.
• This appliance shall be used only outdoors in a well-ventilated space and shall not be used in a building, garage
or any other enclosed area.
• Never burn in vehicles, tents or indoors. CARBON MONOXIDE HAZARD
• The installation of this product must conform with local codes or, in the absence of local codes, with the National
FuelGasCode,ANSIA223.1/NFPA54,StorageandHandlingofliqueedPetroleumGases,ANSI/NFPA58;
orNaturalGasandPropaneInstallationCode,CSAB149.1;PropaneStorageandHandling,CSAB149.2;orthe
standardforRecreationalVehicles,ANSIA119.2/NFPA1192;andRecreationalVehicleCode,CSAZ240RV
Series, as applicable.
• Donotusethisapplianceifanyparthasbeenunderwater.Immediatelycallaqualiedservicetechnicianto
inspect the appliance and to replace any part of the control system and any gas control that has been under water.
• Alwaysensurethatthemeshcoverissecuredovertherebowlwhileinuse.
• Do not store a spare LP cylinder under or near the appliance or any other heat sources.
• Do not operate the propane appliance if there is a gas leak present.
• Neveruseaametocheckforgasleaks.
• DONOTusegasolineorkerosenetostartthereinyourrepit.
•
Donotusethisapplianceunderextendedawnings.Failuretocomplycouldresultinareorpersonalinjury.
• Donotmovetherepitwheninuse.Allowtherepittocoolto115degreesF(45°C)beforemovingorstoring.
• Placetherepitnocloserthan10ft/3metersfromwallsorcombustiblesduringuse.
• Only place unit on non-combustible surfaces.
• Donotputanyotherappliancecoveroranythingammableon,orbeneaththeappliance.
•
The propane appliance should never be used by children. Young children should be carefully supervised
when they are in the area of the appliance. Keep pets away from the appliance at all times.
• Use heat resistant gloves when handling hot tools.
• Children and adults should be alerted to the hazards of high surface temperatures and keep a safe
distance to avoid burning or clothing ignition.
• Ifamegoesoutduringgasignition,turnthegasvalveoff.Followtheinstructionsandwaitveminutesbefore
attempting to relight.
•
The use of alcohol, prescription or non-prescription drugs may impair the consumer’s ability to properly assemble
orsafelyoperatetherepit.
• Do NOT burn charcoal briquettes, lump charcoal, manufactured logs, driftwood, trash, leaves, paper, cardboard,
plywood, painted or stained or pressure treated wood. Avoid using softwoods such as pine or cedar that can
throw sparks.
• Thisoutdoorrepitisforusewithdry,seasonedhardwood.
• Never hang or place clothing or other ammable materials on or near the appliance.
• Neverleanovertheoperatingapplianceorplacehandsorngersontheupperportionoftheoperationalunit.
• Keep ventilation openings in cylinder enclosure free and clear of debris.
• Do not alter the appliance.
•
The conversion or attempted use of natural gas in a propane unit or propane gas in a natural gas unit is dangerous.
• For use with cylinders marked PROPANE only. DO NOT connect to a remote gas supply.
• Donotusethisapplianceonvehicles,boats,orrecreationalvehicles.Alwaysoperatetheapplianceonat,
level surface.
• Keep any electrical supply cord away from any heated surfaces.
•
Keepyourappliancefreeandclearfromcombustiblematerials,gasolineandotherammablevaporsandliquids.

5
DANGER
WARNING
• FLAMMABLE GAS UNDER PRESSURE
• LEAKING LP GAS MAY CAUSE A FIRE OR EXPLOSION IF IGNITED CAUSING SERIOUS BODILY INJURY
OR DEATH
• CONTACT LP GAS SUPPLIER FOR REPAIRS, OR DISPOSAL OF THIS CYLINDER OR UNUSED LP GAS
SAFETY INFORMATION
• Whentherepitisinuse,thepokerbracketonthemeshcovercanreachextremetemperaturethatcan
cause serious injury to an unprotected hand. Use a poker when handling.
• Visually inspect burner for obstructions. Keep tank enclosure free and clear from debris.
• Do not use this appliance unless all parts are in place.
• If any guard or other protective device has been removed for servicing, the protective device must
be replaced prior to operating this appliance. Installation and repair should be done by a qualied
service person. The appliance should be inspected before use and at least annually by a qualied
service person. More frequent cleaning may be required as necessary. It is imperative that control
compartment, burners and circulating air passageways of the appliance be kept clean.
• This appliance is designed only to be used with a 1 lb/ 16.4 oz disposable propane gas cylinder equipped
with a CGA #600 connection. Cylinder must be marked “propane”. The propane cylinder must be
constructedandmarkedinaccordancewiththespecicationsforGascylindersoftheU.S.Department
ofTransportation(DOT)ortheNationalStandardsofCanada,CAN/CSA-B339,Cylinders,Spheresand
TubesforTransportationofDangerousGoods;andCommission,asapplicable.
• Cylinders must be stored outdoors in a well-ventilated area out of the reach of children.
• Disconnect the cylinder when the appliance is not being used.
• This appliance is not designed for commercial use.
• Disconnected cylinders must have valve caps tightly installed and must not be stored in a building or any
other enclosed area.
• Donotattempttorelldisposablecylinders.
• Do not store a spare LP gas cylinder under or near this appliance.
• Do not use appliance on combustible table tops.
• DoNOTusethisoutdoorrepitunderanyoverheadornearanyunprotectedcombustibleconstructions.
Avoid using near or under overhanging trees and shrubs.
• Alwaysusethisoutdoorrepitonahard,level,non-combustiblesurfacesuchaconcrete,rockorstone.
An asphalt or blacktop surface may not be acceptable for this purpose. Do NOT use on wooden decks.
FOR PROPANE GAS UNITS
• The gas pressure regulator provided with the propane appliance must be used.
•Areplacementpressureregulatormustbespeciedbytheappliancemanufacturer.
•Donotattempttodisconnectthegascylinderoranygasttingwhileyourapplianceisinoperation.
• A dented or rusty propane cylinder may be hazardous and should be checked by your gas
supplier prior to use.
• Do not use a propane cylinder with a damaged valve and any other worn out parts.
• Transit and store the empty gas cylinders carefully and properly.
• For Outdoor Use Only. If Stored Indoors, Detach and Leave Cylinder Outdoors
• If you see, smell or hear the hiss of escaping gas from the propane cylinder:
1. Disconnect propane gas cylinder
2. Do not attempt to correct the problem yourself.
3.Gettoyourgassupplierand/ortheredepartmentforhelp.
CALIFORNIA PROPOSITION 65
Fuelsusedingasoroilredappliancesandtheproductsofcombustionofsuchfuelscontainchemicals,
including Benzene, known to the State of California to cause cancer, birth defects or other reproductive harm.
This product contains chemicals, including lead and lead compounds, known to the State of California to
cause cancer, birth defects or other reproductive harm.
Fuels used in wood and charcoal burning appliances and the products of combustion of such fuels, contain
chemicals known to cause cancer, birth defects or other reproductive harm. Wash hands after handling.

6
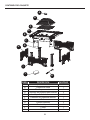
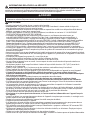
PACKAGE CONTENTS
PART DESCRIPTION QUANTITY
A Poker Bracket 1
B Mesh Cover 1
C Cooking Grid 1
D Cooking Grid Supports 2
E Table Top 1
F HeatShieldExtender 1
G Legs 4
H Side Panels 3
I Door Panel 1
J Storage Cover 1
K Poker 1
A
B
C
D
E
F
G
H
I
J
K

7
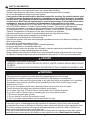
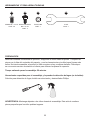
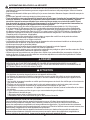
HARDWARE USED
AA
M6X10mm BOLT
QTY: 28
M6X10mm
STEPPED BOLT
QTY: 4
BB
M6 NUT
QTY: 1
CC
WRENCH
QTY: 1
DD
Before beginning assembly of product, make sure all parts are present. Compare parts with
package contents list and hardware contents above. If any part is missing or damaged, do not
attempt to assemble the product. Contact our customer service for replacement parts.
Estimated assembly time: 20 minutes
Tools Required for Assembly and Leak Testing (not included):
Leak detection solution, spray bottle, and Phillips screwdriver.
PREPARATION
WARNING: Keep children away during assembly. This item contains small parts which can be
swallowed by children.

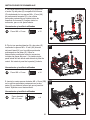
8
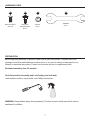
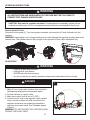
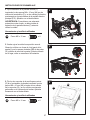
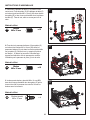
1. Turn over the table top (E) and lay it at on
oor. Attach the legs (G) to the table top (E) by
inserting three M6x10mm bolts (AA) through each
leg (G) and into the pre-installed nuts on the
underside of the table top (E). Secure all
hardware, but do not tighten at this time.
Hardware Used
BB
M6x10mm
Stepped Bolt
x 4
2
H
AA
G
3
G
BB
ASSEMBLY INSTRUCTIONS
Hardware Used
Hardware Used
AA M6x10mm Bolt x 12
AA M6x10mm Bolt x 12
1
G
AA
E
2. Attach the three side panels (H) to the legs
(G) by inserting M6x10mm bolts (AA) through the
side panel (H) and into the pre-installed nuts on
the legs (G). Tighten all hardware, including parts
from step 1, with screwdriver. Do not install any
side panel to the side with control panel. Do not
install the door panel (I) at this time.
3. Insert four M6 x 10mm stepped bolts (BB)
through the pre-installed nuts on the two legs (G)
that are on the same side as the control panel.
Tighten with screwdriver.

9
ASSEMBLY INSTRUCTIONS
Hardware Used
Hardware Used
AA
M6x10mm Bolt
x 2
6
D
AA
5
I
AA M6x10mm Bolt x 2
F
AA
4
E13
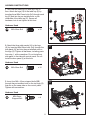
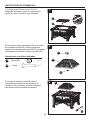
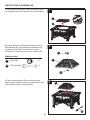
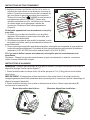
4. Attach Heat Shield Extender (F) by inserting
two M6 x 10mm bolts (AA) through the holes on
the Heat Shield Extender (F) and into the
pre-installed nuts on the back of the Main Heat
Shield (E13). Tighten with a screwdriver.
WARNING: The Heat Shield Extender (F) must
be installed before use to provide proper heat
protection.
5. Turn the unit back to its normal standing
position. Align the L shaped holes on the Door
Panel (I) with the stepped bolts (BB) on the
legs (G) and slide the Door Panel (I) into place
as illustrated.
6. Attach the 2 Cooking Grid Supports (D) to
the rebowl by inserting 2 M6x10mm Bolts (AA)
through the holes in the Cooking Grid Supports
(D) and into the pre-installed nuts in the Firebowl.
Tighten securely with a screwdriver.

10
ASSEMBLY INSTRUCTIONS
8
B
A
CC
9
B
K
Hardware Used
CC M6 Nut x 1
DD Wrench x 1
7
C
D
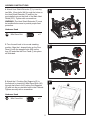
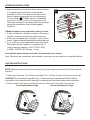
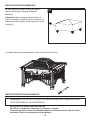
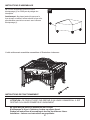
7. Place Cooking Grid (C) into re bowl and onto
Cooking Grid Supports (D) as illustrated.
8. Insert poker bracket (A) into the hole in mesh
cover (B). Secure the poker bracket (A) by using
M6 nut (CC) underneath the mesh cover (B).
Tighten with wrench (DD).
9. Place mesh cover (B) over Fire Bowl as
illustrated. Keep poker (K) near re pit for use
as needed.

11
10
J
ASSEMBLY INSTRUCTIONS
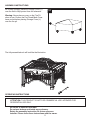
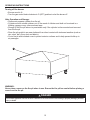
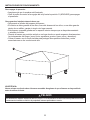
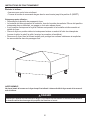
The fully assembled unit will look like the illustration.
10. During storage, place the Storage Cover (J)
over the unit to help protect from the elements.
Warning: Never place a cover on the Fire Pit
when in use. Ensure the Fire Pit and Mesh Cover
have cooled before placing Storage Cover (J)
over the re pit.
ATTENTION: THIS PRODUCT IS NOT FOR COMMERCIAL USE. INTENDED FOR
RESIDENTIAL USE ONLY.
Do not sit or stand on this table.
Do not use indoors and inside any enclosure.
Retain the assembly instruction for future reference.
Installer: Please leave these instructions with the owner.
OPERATING INSTRUCTIONS

12
OPERATING INSTRUCTIONS
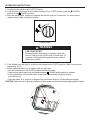
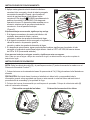
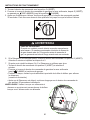
LEAK CHECK
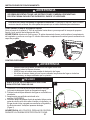
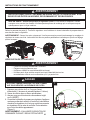
1.Make2-3ozofleakchecksolution(onepartliquid
dishwashingdetergentandthreepartswater)
2. Put leak solution in a spray bottle.
3.MakesurecontrolknobissettoO(OFF).
4. Connect the LP tank to the regulator. Apply several
drops of solution where the tank connects to the
regulator and where corrugated pipe attaches to
regulator and control valve. See if bubbles appear.
(Figure1)
WARNING: DO NOT ROTATE THE CONTROL KNOB
DURING THE LEAK CHECK.
1
WARNING
ALL INSTRUCTIONS AND SAFEGUARDS ON THIS PAGE MUST BE FOLLOWED TO
PREVENT FIRE, DAMAGE AND/OR INJURY.
CAUTION: Only use the regulator provided. If a replacement is necessary, please call our
customerservicecenter.Donotusereplacementpartsthatarenotintendedforthisrepit.
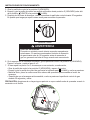
How to install LP tank:
Removethedoorpanel(I).TurntheregulatoroutwardsandscrewtheLPtankclockwiseintothe
regulator.
WARNING:Handtightenonly.Usingexcessiveforcecoulddamagetheregulatorcouplingandcould
cause a leak. The cylinder must be fully upright for the cylinder to have vapor withdrawal only.
• Perform all leak tests outdoors.
• Extinguishallopenames.
• NEVER leak test when smoking.
• Donotusetherepituntilallconnectionshavebeenleaktestedanddonotleak.
WARNING
NEVER USE A LIGHTER/FLAME TO CHECK FOR GAS LEAKS.
DANGER

13
OPERATING INSTRUCTIONS
LIGHTING INSTRUCTIONS
2
Incorrect placement of logs:Correct placement of logs:
NOTE: Removemeshcover(B)andcookinggrid(C)whenlightingwoodwiththeFireshotIgnition
System™.
1.Placelogsinrebowl.Donotburnmorethan7lbs/3.18kgsofwoodorrelogsintherepit.
CAUTION: Do not attempt to operate until you have read and understand all General Safety
information in this manual and all assembly is complete and leak checks have been performed.
2.Positionlogssothattheydonotblocktheburner.Placemeshcover(B)overrebowl.
5. Apply several drops of solution where valve connects
to corrugated pipe and where corrugated pipe
connects to burner. Push and turn the gas control
knob to release propane gas into the connections.
Turn the knob to
(FLAME)andthenimmediately
turnknobtoO(OFF).Onlydothisoperationonce.
The burner may light for a moment while the gas passes
through the connections. See if bubbles appear.
(Figure2)
If Bubbles appear at any connection, there is a leak.
1. If leak is at cylinder / regulator connector: Disconnect
cylinder, reconnect and perform another leak test.
2. If leak is at corrugated pipe / Regulator / control valve /
burner: Tighten connection and perform another leak test.
3. If you continue to see bubbles after several attempts,
that means that the regulator, corrugated pipe, or
control valve are defective. Call 1-877-447-4768,
8:30AM - 4:30PM CST, Monday - Friday.
If no bubbles appear at any connection, the connections are secure.
Note: Whenever gas connections are loosened or removed, you must perform a complete leak test.

14
OPPERATING INSTRUCTIONS
3.TurnthecontrolknobtotheO(OFF)Position.
4.PushandturngascontrolknobcounterclockwisefromO(OFF)positionpastthe
(IGNITE)
position to the
(FLAME)position.
5. After the starter lights, continue to depress the control knob for 30 seconds. You may need to
repeat several times to ignite the burner.
6.IftheStarterdoesnotstaylit,turnthecontrolknobtotheO(OFF)position.Wait5minutesand
repeat step 4 to 5.
7. If after repeating steps 3 to 6, Starter does not light, then
•TurnthecontrolknobtotheO(OFF)positionandwait5minutes.
• Push and turn gas control knob counterclockwise to
(FLAME)andcontinuetodepress.
• In the meantime put the match holder close to the burner head to light the starter.
(seeillustration).
• After the starter is lit, continue to depress the gas control knob for 30 seconds and release.
CAUTION: Take care not to allow any clothing or hair to drape over the burner when lighting with the match.
WARNING
FOR YOUR SAFETY
Be careful when attempting to manually ignite this
repit.Holdinginthecontrolknobformorethan10
seconds before igniting the gas will cause a ball of
ameuponignition.
Control Knob

15
OPERATING INSTRUCTIONS
Turning off the burner:
• Ensure wood is lit.
•TurnthegascontrolknobclockwisetoO(OFF)positiontoshuttheburneroff.
After Operation and Storage:
•Disconnectpropanecylinderfromrepit.
• Cylinder must be stored outdoors out of the reach of children and shall not be stored in a
building, garage or any other enclosed area.
•Storageofthisrepitindoorsispermissibleonlyifthecylinderisdisconnectedandremoved
fromtherepit.
•Storerepituprightinanareashelteredfromdirectcontactwithinclementweather(suchas
rain,sleet,hail,snow,dustanddebris).
•Coverrepitwithincludedcovertoprotectexteriorsurfacesandtohelppreventbuild-upin
air passages.
WARNING:
Never place a cover on the re pit when in use. Ensure the re pit has cooled before placing a
cover over the re pit.
J
DANGER
Donotstoreapplianceuntilcooltotouch.Failuretodosocouldresultinreresultinginpropertydamage,personal
injury, or death.

16
OPERATING INSTRUCTIONS
OPERATION WITH THE COOKING GRID
1.Thecookinggridshouldonlybeutilizedwhentherepitisbeingusedforcooking.
2.ThegascontrolknobmustbeintheO(OFF)positionwhenutilizingthecookinggrid.
3.Whencookingwithoilorgrease,haveaBCorABCreextinguisherreadilyavailable.
4.Intheeventofanoilorgreasere,donotattempttoextinguishwithwater.Immediatelycallthe
redepartment.AtypeBCorABCreextinguishermay,insomecircumstancescontainthere.
5. In the event of rain, snow, hail, sleet or other forms of precipitation while cooking with oil or grease,
turnofftherepitburnerandgassupply.Donotattempttomovetherepit.
6. When cooking, the appliance must be on a level, stable, noncombustible surface in an area clear
ofcombustiblematerial.Anasphaltsurface(blacktop)maynotbeacceptableforthispurpose.
7.Donotleavetherepitunattended.Keepchildrenandpetsawayfromtherepitatalltimes.
8.Thisrepitwillbehotduringandafteruse.Useinsulatedovenmittsorglovesforprotectionfrom
hot surfaces or splatter from cooking liquids.
CARE AND MAINTENANCE
Toenjoyyearsofoutstandingperformancefromyourrepit,makesureyouperformthefollowing
maintenance activities on a regular basis:
Keepexteriorsurfacesclean.
1.Usewarmsoapywaterforcleaning.Neveruseammableorcorrosivecleaningagents.
2.Whilecleaningyourrepit,besuretokeeptheareaaroundtheburnerdryatalltimes.Donot
submerge the control valve assembly. If the gas control is submerged in water, do NOT use it.
It must be replaced.
a. Keep the appliance area clear and free from combustible materials, gasoline and other
ammablevaporsandliquids.
b.Donotobstructtheowofcombustionandventilationair.
c. Keeptheventilationopening(s)ofthecylinderenclosurefreeandclearfromdebris.
3. Airowmustbeunobstructed.Keepstarter’scontrol,burner,andcirculatingairpassagewaysclean.
Signs of possible blockage include:
•Gasodorwithextremeyellowtippingofame.
•Starter’sameisexcessivelyuneven.
• Starter makes popping noises.
•Spidersandinsectsorashescannestinburnerororice.Thisdangerousconditioncan
damage starter and render it unsafe for use. Clean the burner area by removing any
debris. Compressed air may help clear away smaller particles.
•Carbondepositsmaycreaterehazard.Cleantheburnerboxwithwarmsoapywaterifany
carbon deposits develop.
CAUTION:Onlyaqualiedservicepersonshouldrepairgaspassagesandassociatedcomponents.
Alwaysallowrepittocoolbeforeattemptingservice.
DANGER
Never Operate This Appliance Unattended. Failure to follow this danger statement could result in
re,explosionorburnhazardthatcouldcausepropertydamage,personalinjuryordeath.DONOT
ATTEMPT TO EXTINGUISH AN OIL OR GREASE FIRE WITH WATER.

17
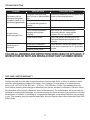
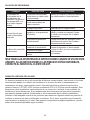
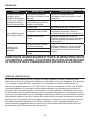
TROUBLESHOOTING
Problem DESCRIPTION Corrective Action
The burner will not
light using the igniter
procedure(weakorno
sparkbeinggenerated)
The igniter electrode may
have a loose or disconnected
wire.
Check the connection and reconnect any
loose or disconnected wires.
The igniter electrode may
be covered with grease or
residue.
Clean the igniter electrode.
Nogasowor
obstructedgasow
Empty tank Replace with new tank.
Poor connection between
regulator and cylinder
coupling.
Turnrepitoff.Disconnectand
reconnect cylinder. Hand tighten
cylinder. Do not over tighten.
Burner inlet blocked Clean the burner as described in the
Care and Maintenance section in the
manual.
Starterameis
abnormal
Noise upon combustion
Clean burner if there’s ash inside. Clean
oricewithcompressedairifitisblocked
by ash.
Flame is erratic
Extremeyellowame
ONE YEAR LIMITED WARRANTY
If within one year from the date of original purchase, this item fails due to a defect in material or work-
manship, we will replace or repair at our option, free of charge. To order parts or to obtain warranty
service, call 1-877-447-4768, 8:30 a.m. – 4:30 p.m., CST, Monday – Friday. This warranty does not
cover defects resulting from improper or abnormal use, misuse, accident, or alteration. Failure to follow
all instructions in the owner’s manual will also void this warranty. The manufacturer will not be liable for
incidental or consequential damages, or common erosion of outdoor products. Some states do not allow
theexclusionorlimitationofincidentalorconsequentialdamages,sotheabovelimitationmaynotapply
toyou.Thiswarrantygivesyouspeciclegalrights,andyoumayalsohaveotherrightswhichvaryfrom
state to state.
FOLLOW ALL WARNINGS AND INSTRUCTIONS WHEN USING THE APPLIANCE. IF
INSTRUCTIONS OR PARTS ARE MISSING CONTACT GHP CUSTOMER SERVICE.

18
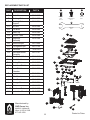
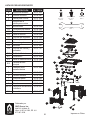
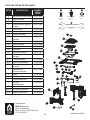
REPLACEMENT PARTS LIST
Printed in China
Manufactured by
GHP Group, Inc.
6440 W. Howard St.
Niles, IL 60714-3302
877-447-4768
PART DESCRIPTION PART #
A Poker Bracket 40-07-453
B Mesh Cover 30-06-387
C Cooking Grid 30-01-093
D Cooking Grid
Support
30-01-094
E1 Air Vent 30-06-386
E2 Fire Bowl 30-06-380
E3 Table Top 30-06-385
E4 Control Panel 30-06-389
E5 Regulator
Assembly
30-06-388
E6 Thermocouple 30-01-099
E7 Corrugated Pipe 30-01-100
E8 Electrode 30-01-091
E9 Valve and Burner
Assembly
30-01-101
E10 Gas Control Knob 30-01-042
E11 Match Holder 30-01-040
E12 Rating Plate 30-06-390
E13 Main Heat Shield 30-06-381
F Heat Shield
Extender
30-01-088
G Legs 30-06-384
H Side Panels 30-06-383
I Door Panel 30-06-382
J Storage Cover 30-06-391
K Poker 40-04-409
AA-DD Hardware Pack 30-09-507
N/A Instruction Manual 30-10-093
WRENCH
QTY: 1
DD
AA
M6X10mm
BOLT
QTY: 28
M6X10mm
STEPPED BOLT
QTY: 4
BB
M6 NUT
QTY: 1
CC
A
B
C
D
E1
E2
E3
E5
E6
E7
E8
E9
E10
E11
E12
E13
E4
F
G
H
I
J
K

19
BRASERO/PARILLA DE LEÑA CON
ENCENDEDOR DE GAS DAKOTA
MODELO #OFG112SE
C US
™
NÚMERO DE PROYECTO 0418GM016S
ANS Z21.89-2013 • CSA 1.18-2013,
Outdoor Cooking Specialty
Gas Appliances
Français p. 37
English p. 1
Los cilindros de
propano se venden
por separado.
Patente en trámite
Número de serie
Fecha de compra
ADJUNTE SU RECIBO AQUÍ
INSTALADOR: déjele este manual al consumidor.
¡ADVERTENCIA!
SI LA INFORMACIÓN DE ESTE MANUAL NO SE RESPETA CON EXACTITUD, SE
PODRÍA OCASIONAR UNA DESCARGA ELÉCTRICA O UN INCENDIO, LO QUE PODRÍA
PROVOCAR DAÑOS MATERIALES Y LESIONES PERSONALES, INCLUSO LA MUERTE.
INSTRUCCIONES IMPORTANTES
¿Dudas, problemas, piezas faltantes? Antes de volver a la tienda, llame a nuestro
Departamento de Atención al Cliente al 1-877-447-4768, de lunes a viernes de
8:30a16:30(horacentralestándar),oescribaa[email protected]
30-10-093 Rev. 08/11/16

20
CONTENIDO
ADVERTENCIA:
ESTE MANUAL DE INSTRUCCIONES CONTIENE
INFORMACIÓN IMPORTANTE Y NECESARIA PARA ENSAMBLAR COR
-
RECTAMENTE EL ARTEFACTO Y UTILIZARLO DE MANERA SEGURA. LEA
Y RESPETE TODAS LAS ADVERTENCIAS E INSTRUCCIONES ANTES DE
ENSAMBLAR Y UTILIZAR EL ARTEFACTO. RESPETE TODAS LAS ADVER
-
TENCIAS E INSTRUCCIONES AL UTILIZAR EL ARTEFACTO. CONSERVE
ESTE MANUAL PARA CONSULTARLO CUANDO SEA NECESARIO.
PELIGRO
• NUNCA DEJE ESTE ARTEFACTO DESATENDIDO CUANDO ESTÉ
ENCENDIDO.
• NUNCA HAGA FUNCIONAR ESTE ARTEFACTO A UNA DISTANCIA DE
10 PIES (3,05 M) O MENOS RESPECTO DE UNA ESTRUCTURA, UN
MATERIAL COMBUSTIBLE U OTRO CILINDRO DE GAS.
• NUNCA HAGA FUNCIONAR ESTE ARTEFACTO A UNA DISTANCIA DE
25 PIES (7,5 M) O MENOS RESPECTO DE UN LÍQUIDO INFLAMABLE.
• SI SE PRODUCE UN INCENDIO, ALÉJESE DEL ARTEFACTO Y LLAME
INMEDIATAMENTE AL CUERPO DE BOMBEROS. NO USE AGUA
PARA EXTINGUIR UN INCENDIO PROVOCADO POR ACEITE O GRASA.
SI NO SIGUIERA ESTAS INSTRUCCIONES, PODRÍA PRODUCIRSE UN
INCENDIO O UNA EXPLOSIÓN, O QUEMARSE EL ARTEFACTO, LO QUE
A SU VEZ PODRÍA PROVOCAR DAÑOS MATERIALES Y LESIONES
PERSONALES, INCLUSO LA MUERTE.
PELIGRO
SI PERCIBE OLOR A GAS:
1. CIERRE LA CONEXIÓN DE GAS QUE VA AL ARTEFACTO.
2. APAGUE TODA LLAMA ABIERTA.
3. SI EL OLOR PERSISTE, ALÉJESE DEL ARTEFACTO Y LLAME
INMEDIATAMENTE A SU PROVEEDOR DE GAS O AL CUERPO
DE BOMBEROS.
SI NO SIGUIERA ESTAS INSTRUCCIONES, PODRÍA PRODUCIRSE UN
INCENDIO O UNA EXPLOSIÓN CAPAZ DE PROVOCAR DAÑOS
MATERIALES Y LESIONES PERSONALES, INCLUSO LA MUERTE.
ADVERTENCIA: utilizar exclusivamente al aire libre. No se debe
usar dentro de un edicio, garaje ni ningún otro lugar cerrado.
Información de seguridad .................................................................................................... 21
Contenido del paquete ........................................................................................................ 24
Preparación ........................................................................................................................ 25
Instrucciones de ensamblaje .............................................................................................. 26
Instrucciones de funcionamiento ........................................................................................ 29
Cuidado y mantenimiento ................................................................................................... 34
Solución de problemas ....................................................................................................... 35
Garantía .............................................................................................................................. 35
Lista de piezas de repuesto ................................................................................................ 36
La page est en cours de chargement...
La page est en cours de chargement...
La page est en cours de chargement...
La page est en cours de chargement...
La page est en cours de chargement...
La page est en cours de chargement...
La page est en cours de chargement...
La page est en cours de chargement...
La page est en cours de chargement...
La page est en cours de chargement...
La page est en cours de chargement...
La page est en cours de chargement...
La page est en cours de chargement...
La page est en cours de chargement...
La page est en cours de chargement...
La page est en cours de chargement...
La page est en cours de chargement...
La page est en cours de chargement...
La page est en cours de chargement...
La page est en cours de chargement...
La page est en cours de chargement...
La page est en cours de chargement...
La page est en cours de chargement...
La page est en cours de chargement...
La page est en cours de chargement...
La page est en cours de chargement...
La page est en cours de chargement...
La page est en cours de chargement...
La page est en cours de chargement...
La page est en cours de chargement...
La page est en cours de chargement...
La page est en cours de chargement...
La page est en cours de chargement...
La page est en cours de chargement...
-
 1
1
-
 2
2
-
 3
3
-
 4
4
-
 5
5
-
 6
6
-
 7
7
-
 8
8
-
 9
9
-
 10
10
-
 11
11
-
 12
12
-
 13
13
-
 14
14
-
 15
15
-
 16
16
-
 17
17
-
 18
18
-
 19
19
-
 20
20
-
 21
21
-
 22
22
-
 23
23
-
 24
24
-
 25
25
-
 26
26
-
 27
27
-
 28
28
-
 29
29
-
 30
30
-
 31
31
-
 32
32
-
 33
33
-
 34
34
-
 35
35
-
 36
36
-
 37
37
-
 38
38
-
 39
39
-
 40
40
-
 41
41
-
 42
42
-
 43
43
-
 44
44
-
 45
45
-
 46
46
-
 47
47
-
 48
48
-
 49
49
-
 50
50
-
 51
51
-
 52
52
-
 53
53
-
 54
54


Pleasant Hearth OFG112SE Manuel utilisateur
- Taper
- Manuel utilisateur
dans d''autres langues
Documents connexes
-
Pleasant Hearth OFW827T Manuel utilisateur
-
-
-
-
-
-
-
-
-
Autres documents
-
 Red Mountain Valley 8922643 Le manuel du propriétaire
-
Bond BH5002-1 Le manuel du propriétaire
-
 BOND MANUFACTURING 67513 Mode d'emploi
-
Real Flame 940-GRY Manuel utilisateur
-
-
OVE Decors 15PFP-SOLA40-CHD Mode d'emploi
-
-
Endless Summer WAD1010SP Le manuel du propriétaire
-
Dancook 9000 Le manuel du propriétaire
-
 Outdoor Escapes FPW-OE21039 Manuel utilisateur


