La page est en cours de chargement...

1
Serial Number
Purchase Date
ATTACH YOUR RECEIPT HERE
Questions, problems, missing parts? Before returning to your retailer, call our customer
service department at 1-877-447-4768, 8:30 a.m. – 4:30 p.m. CST, Monday – Friday, or
e-mail us at [email protected]
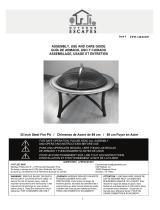
Stratford Fire House
MODEL #OFW577HC / OFW577H-1
Français p. 19
Español p. 10
30-10-113
Rev. 01/24/18

2
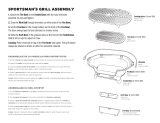
PACKAGE CONTENTS FOR OFW577HC / OFW577H-1
PART DESCRIPTION QTY
I
Left Door
1
J
Right Door
1
L
Right Front Support
1
M
Bottom Base
1
N
Ash Catcher
1
O
Legs
4
P
Poker
1
PART DESCRIPTION QTY
A
Chimney
1
B
Top Cover
1
C
Back Support
2
D
Back Mesh Panel
1
E
Side Mesh Panel
2
F
**Cooking Grid
1
G
Left Front Support
1
H
Wood Grate
1
**NOTE: Cooking grid part (F) ONLY applies to model # OFW577HC.
C
M
O
N
J
A
A
E
F
B
D
I
H
G
L
P

3
HARDWARE LIST
Bolt
M6x12mm
Qty. 40
Wrench
Qty. 1
Nut
M6
Qty. 24
Locknut
M5
Qty. 4
Bolt
M5x45mm
Qty. 4
AA
BB CC DD EE
Please read and understand this entire manual before attempting to assemble, operate or install
the product. If you have any questions regarding the product, please call customer service at
1-877-447-4768, 8:30 a.m. – 4:30 p.m. CST, Monday – Friday.
WARNINGS:
• DO NOT allow children or pets near the re pit without supervision.
• DO NOT touch surface of re pit while in use.
• FOR OUTDOOR USE ONLY! Burning wood and charcoal indoors can kill you. It gives off
carbon monoxide, which has no odor.
• NEVER burn in vehicles, tents, garages, other enclosed areas or indoors. CARBON
MONOXIDE HAZARD.
• NEVER LEAVE FIRE UNATTENDED!
• NEVER place a storage cover on re pit when in use. Ensure the re pit has cooled before
placing a storage cover over the re pit.
• DO NOT use under overhead cables or power lines.
CAUTIONS:
• Adequate re extinguishing material should be readily available.
• Burn only seasoned hard wood or re logs in the re pit.
• DO NOT attempt to move the re pit while it is hot or in use.
• DO NOT use gasoline or kerosene to start the re in your re pit.
• DO NOT use this outdoor re pit under any overhead or near any unprotected combustible
constructions. Avoid using near or under overhanging trees and shrubs. DO NOT use this unit
on long or dry grass and/or leaves.
• Always use this outdoor re pit on a hard, level, non-combustible surface such as concrete,
rock or stone. An asphalt or blacktop surface may not be acceptable for this purpose. DO NOT
use on wooden decks.
• Place the re pit no closer than 10 feet / 3.05 meters from walls or combustibles during use.
• Poker handle may become hot during and after use.
• Use heat-resistant gloves to handle hot tools.
• Always ensure that the doors are securely closed while in use.
• DO NOT use bare hands to open latch or open the doors while in use.
• ALWAYS use heat resistant gloves when handling the doors or the latch.
CALIFORNIA PROPOSITION 65 WARNING: Fuels used in wood or charcoal burning appliances,
and the products of combustion of such fuels, can expose you to chemicals including carbon black,
which is known to the state of California to cause cancer, and carbon monoxide, which is known to
the state of California to cause birth defects or other reproductive harm.
This product can expose you to chemicals including nickel, which is known to the State of California
to cause cancer.
For more information go to: www.P65Warnings.ca.gov
SAFETY INFORMATION

4
PREPARATION
ASSEMBLY INSTRUCTIONS
1. Attach the legs (O) to the bottom base (M)
using eight M6x12mm bolts (AA) and eight M6
nuts (BB). Tighten with a screwdriver and the
wrench (EE).
Before beginning assembly of product, make sure all parts are present. Compare parts with
package contents list and hardware contents above. If any part is missing or damaged, do
not attempt to assemble the product. Contact customer service for replacement parts.
Estimated Assembly Time: 30 minutes
Tools Required for Assembly: Phillips Screwdriver (Not Included). Wrench (included).
EE
1
Hardware Used
AA
M6x12mm Bolt
M6 Nut
x 8
x 8
BB
M
O
Wrench
EE
Phillips Screwdriver
(not included)

5
ASSEMBLY INSTRUCTIONS
2. Attach the back supports (C), left front support
(G), and the right front support (L) to the
bottom base (M) using eight M6x12mm bolts
(AA). Do not tighten completely at this time.
3. Attach the back mesh panel (D) to the back
supports (C) using four M6x12mm bolts (AA)
and four M6 nuts (BB). Do not tighten at this
time.
2
3
4. Attach the two side mesh panels (E) to the
supports (G and L) using eight M6x12mm
bolts (AA) and eight M6 nuts (BB). Do not
tighten at this time.
4
AA
AA
AA
M6x12mm Bolt
M6x12mm Bolt
M6x12mm Bolt
M6 Nut
M6 Nut
x 4
x 8
x 8
x 4
x 8
Hardware Used
Hardware Used
Hardware Used
C
C
C
C
D
E
L
M
L
BB
BB
G
G

6
7
ASSEMBLY INSTRUCTIONS
5. Attach the left door (I) to the left front support
(G) and the right door (J) to the right front
support (L) using four M5x45mm bolts (CC)
and four M5 Locknuts (DD). Tighten with a
screwdriver and the wrench (EE).
L
J
5
6. Attach the chimney (A) to the top cover (B)
using four M6x12mm bolts (AA) and four
M6 nuts (BB). Use a phillips screwdriver
and the wrench (EE) to tighten.
6
H
F
B
C
LG
7. Insert the wood grate (H) into the bottom
base. If you have model # OFW577HC, insert
the cooking grid (F) into the brackets of the
four posts. For all units, attach the top cover
(B) to the back supports (C), left front support
(G), and right front support (L) using eight
M6x12mm bolts (AA). Make sure the parts
t together and use a phillips screwdriver to
tighten all parts at this time. Adjustments can
be made before tightening.
Hardware Used
CC
M5x45mm Bolt
M5 Locknut
x 4
x 4
Hardware Used
Hardware Used
IG
AA
AA
M6x12mm Bolt
M6x12mm Bolt
M6 Nut
x 4
x 8
x 4
BB
DD
Wrench
Wrench
EE
EE
Phillips Screwdriver
(not included)
Phillips Screwdriver
(not included)
Phillips Screwdriver
(not included)
A
B

7
ASSEMBLY INSTRUCTIONS
8
M
N
8. Slide the ash catcher (N) in place under the
bottom base (M) as shown in gure 8.
9
9. Your re house is now ready for use. Put the
poker (P) beside the re house. Keep nearby
for use anytime.
P

8
CARE AND MAINTENANCE
• To extend the life of your re pit, clean it after each use and use a storage cover to protect the unit
from the elements.
• Use a soft cloth to wipe re pit and poker.
• Do not attempt to clean while hot.
• Store in a cool, clean, dry place.
GHP Group, Inc.
6440 W. Howard St.
Niles, IL 60714-3302
877-447-4768
ONE YEAR LIMITED WARRANTY
If within one year from the date of original purchase, this item fails due to a defect in material or
workmanship, we will replace or repair at our option, free of charge. To order parts or to obtain
warranty service, call 1-877-447-4768, 8:30AM – 4:30PM, CST, Monday – Friday. This warranty
does not cover defects resulting from improper or abnormal use, misuse, accident, or alteration.
Failure to follow all instructions in the owner’s manual will also void this warranty. The manufacturer
will not be liable for incidental or consequential damages, or common erosion of outdoor products.
Some states do not allow the exclusion or limitation of incidental or consequential damages, so the
above limitation may not apply to you. This warranty gives you specic legal rights, and you may also
have other rights which vary from state to state.

9
REPLACEMENT PARTS LIST
For replacement parts, call our customer service department at 1-877-447-4768, 8:30 a.m. – 4:30 p.m.,
CST, Monday – Friday.
Printed in China
PART DESCRIPTION PART #
A
Chimney
30-06-492
B
Top Cover
30-06-493
C
Back Support
30-06-494
D
Back Mesh Panel
30-06-495
E
Side Mesh Panel
30-06-496
F
**Cooking Grid
30-06-497
G
Left Front Support
30-06-498
H
Wood Grate
30-06-499
I
Left Door
30-06-500
J
Right Door
30-06-501
K
Door Catch Handle
30-06-502
L
Right Front Support
30-06-503
M
Bottom Base
30-06-504
N
Ash Catcher
30-06-505
O
Leg
30-06-506
P
Poker
30-01-145
Q
M6x12mm Bolt
30-09-133
N/A
Instruction Manual
30-10-113
HWP
Hardware Pack
30-09-523
** NOTE: Cooking grid part ONLY applies to model # OFW577HC
AA
AA
AA
BB
CC
DD
EE
C
M
O
N
K
J
A
A
E
F
B
D
I
H
G
L
P
Q

10
Número de serie
Fecha de compra
ADJUNTE AQUÍ SU RECIBO
¿Preguntas, problemas, piezas faltantes? Antes de hacer una devolución a la tienda, llame
a nuestro Departamento de Atención al Cliente al 1-877-447-4768, de lunes a viernes de
8:30 a. m. a 4:30 p. m. hora central estándar, o escriba a [email protected].
Brasero estilo caseta Stratford
MODELO N.° OFW577HC / OFW577H-1
Français p. 19
English p. 1
30-10-113
Rev. 01/24/18

11
CONTENIDO DEL EMBALAJE DE OFW577HC / OFW577H-1
PIEZA DESCRIPCIÓN CANT.
I Puerta izquierda 1
J Puerta derecha 1
L Soporte delantero derecho 1
M Base inferior 1
N Colector de cenizas 1
O
Patas
4
P Atizador 1
PIEZA DESCRIPCIÓN CANT.
A Chimenea 1
B Cubierta superior 1
C Soporte posterior 2
D Panel de malla posterior 1
E Panel de malla lateral 2
F ** Parrilla de cocción 1
G Soporte delantero izquierdo 1
H Rejilla para madera 1
** NOTA: La pieza parrilla de cocción (F) SOLO corresponde al modelo n.° OFW577HC.
C
M
O
N
J
A
A
E
F
B
D
I
H
G
L
P

12
LISTA DE HERRAMIENTAS Y TORNILLERÍA
Lea el manual entero atentamente antes de intentar ensamblar, poner en funcionamiento o instalar
el producto. Si tiene preguntas relacionadas con el producto, llame al Departamento de Atención al
Cliente al 1-877-447-4768, de lunes a viernes de 8:30 a. m. a 4:30 p. m. (hora central estándar).
ADVERTENCIAS:
• NO deje que los niños o las mascotas se acerquen al brasero sin supervisión.
• NO toque la supercie del brasero durante su uso.
• PARA UTILIZAR SOLO AL AIRE LIBRE. Quemar madera y carbón en un espacio cerrado
puede provocar la muerte. Produce monóxido de carbono, que es un gas inodoro.
• NUNCA encienda esta unidad en vehículos, carpas, garajes ni lugares cerrados. PELIGRO
DE EMISIÓN DE MONÓXIDO DE CARBONO.
• ¡NUNCA DEJE EL FUEGO DESATENDIDO!
• NUNCA coloque una funda sobre el brasero encendido. Asegúrese de que el brasero se haya
enfriado antes de colocar la funda.
• NO utilice el brasero debajo de líneas de energía o cables aéreos.
PRECAUCIONES:
• Debe tener a mano materiales adecuados para extinguir incendios.
• Queme en el brasero solo madera dura estacionada o leña.
• NO intente mover el brasero cuando esté caliente o en uso.
• NO utilice gasolina ni kerosene para encender el fuego en el brasero.
• NO utilice este brasero de exterior debajo de techos ni cerca de estructuras combustibles que
no tengan protección. No lo use cerca o debajo de árboles o arbustos con ramas colgantes.
NO use la unidad en lugares donde haya hojas o césped alto que estén secos.
• Siempre utilice este brasero de exterior sobre una supercie dura, nivelada y no combustible,
como cemento, roca o piedra. Algunas supercies asfaltadas o pavimentadas no son
aceptables para este n. NO utilice el brasero sobre pisos de madera.
• Mantenga el brasero encendido a una distancia mínima de 10 pies (3,05 metros) respecto de
las paredes o elementos combustibles.
• El mango del atizador puede calentarse durante y después del uso.
• Utilice guantes termorresistentes para manipular herramientas calientes.
• Siempre asegúrese de que las puertas estén bien cerradas mientras la unidad está en uso.
• NO abra el cerrojo con las manos desprotegidas ni abra las puertas mientras estén en uso.
• SIEMPRE use guantes resistentes al calor cuando manipule las puertas o el cerrojo.
ADVERTENCIA SOBRE LA PROPOSICIÓN 65 DE CALIFORNIA: Los combustibles utilizados
en electrodomésticos que queman madera o carbón, así como los productos de la combustión de
tales combustibles, pueden exponerlo a sustancias químicas como el negro de carbón, que según
el estado de California, puede provocar cáncer, y el monóxido de carbono, que según el estado de
California, puede provocar anomalías congénitas u otros daños reproductivos.
Este producto puede exponerlo a sustancias químicas como el níquel que, según el estado de
california, puede provocar cáncer.
Para más información, visite www.P65Warnings.ca.gov
INFORMACIÓN DE SEGURIDAD
Perno
M6 × 12 mm
Cant. 40
Llave inglesa
Cant. 1
Tuerca
M6
Cant. 24
Tuerca de
bloqueo M5
Cant. 4
Perno
M5 × 45 mm
Cant. 4
AA
BB CC DD EE

13
PREPARACIÓN
INSTRUCCIONES DE ENSAMBLAJE
1. Fije las patas (O) a la base inferior (M)
usando ocho pernos M6 × 12 mm (AA) y ocho
tuercas M6 (BB). Ajuste con el destornillador
y la llave inglesa (EE).
Antes de comenzar el ensamblaje de este producto, asegúrese de que estén todas las piezas.
Compare las piezas con la lista de contenido del embalaje y el contenido de tornillería y
herramientas de arriba. Si falta alguna pieza o está dañada, no intente ensamblar el producto.
Comuníquese con el servicio de atención al cliente para solicitar piezas de repuesto.
Tiempo estimado de ensamblaje: 30 minutos
Herramientas requeridas para el ensamblaje: Destornillador Phillips (no incluido). Llave
inglesa (incluida).
EE
1
Herramientas y tornillería utilizadas
AA
Perno M6 × 12 mm
Tuerca M6
× 8
× 8
BB
M
O
Llave inglesa
EE
Destornillador Phillips
(no incluido)

14
INSTRUCCIONES DE ENSAMBLAJE
2. Fije el soporte posterior (C), el soporte
delantero izquierdo (G) y el soporte delantero
derecho (L) a la base inferior (M) usando
ocho pernos M6 × 12 mm (AA). No apriete
completamente todavía.
3. Fije el panel de malla posterior (D) a
los soportes posteriores (C) usando
cuatro pernos M6 ×12 mm (AA) y cuatro
tuercas M6 (BB). No los ajuste todavía.
4. Fije los dos paneles de malla laterales (E)
a los soportes (G y L) usando ocho pernos
M6 ×12 mm (AA) y ocho tuercas M6 (BB).
No los ajuste todavía.
AA
AA
AA
Perno M6 × 12 mm
Perno M6 × 12 mm
Perno M6 × 12 mm
Tuerca M6
Tuerca M6
× 4
× 8
× 8
× 4
× 8
Herramientas y tornillería utilizadas
Herramientas y tornillería utilizadas
Herramientas y tornillería utilizadas
BB
BB
2
3
4
C
C
C
C
D
E
L
M
L
G
G

15
INSTRUCCIONES DE ENSAMBLAJE
5. Fije la puerta izquierda (I) al soporte delantero
izquierdo (G) y la puerta derecha (J) al soporte
delantero derecho (L) usando cuatro pernos
M5 × 45 mm (CC) y cuatro M5 tuerca de
bloqueo (DD). Ajuste con el destornillador y la
llave inglesa (EE).
6. Fije la chimenea (A) a la cubierta superior (B)
usando cuatro pernos M6 × 12 mm (AA) y
cuatro tuercas M6 (BB). Para ajustar, use un
destornillador Phillips y una llave inglesa (EE).
6
A
B
Herramientas y tornillería utilizadas
CC
Perno M5 × 45 mm
M5 tuerca de bloqueo
× 4
× 4
Herramientas y tornillería utilizadas
AA
Perno M6 × 12 mm
Tuerca M6
× 4
× 4
BB
DD
Llave inglesa
Llave inglesa
EE
EE
Destornillador Phillips
(no incluido)
Destornillador Phillips
(no incluido)
L
J
5
IG
7. Inserte la rejilla para madera (H) en la base
inferior. Si tiene el modelo n.
O
OFW577HC, inserte
la parrilla de cocción (F) en los soportes de los
cuatro postes. Para todas las unidades, je la
cubierta superior (B) a los soportes posteriores
(C), al soporte delantero izquierdo (G) y al soporte
delantero derecho (L) usando ocho pernos
M6 × 12 mm (AA). Asegúrese de que las piezas
encajen y use un destornillador Phillips para ahora
sí ajustar todas las piezas. Antes de esta acción,
realice los ajustes necesarios.
Herramientas y tornillería utilizadas
AA
Perno M6 × 12 mm
× 8
Destornillador Phillips
(no incluido)
7
H
F
B
C
LG

16
INSTRUCCIONES DE ENSAMBLAJE
8. Deslice el colector de cenizas (N) hasta
ubicarlo en su lugar debajo de la base inferior
(M), como se muestra en la gura 8.
9. El brasero está listo para ser utilizado.
Coloque el atizador (P) junto al brasero.
Manténgalo cerca para usarlo en cualquier
momento.
8
M
N
9
P

17
CUIDADO Y MANTENIMIENTO
• Para prolongar la vida útil del brasero, límpielo después de cada uso y emplee una funda para
proteger la unidad de los factores externos.
• Utilice un paño suave para limpiar el brasero y el atizador.
• No intente limpiarlo cuando esté caliente.
• Guarde la unidad en un lugar fresco, limpio y seco.
GHP Group, Inc.
6440 W. Howard St.
Niles, IL 60714-3302, EE. UU.
877-447-4768
UN AÑO DE GARANTÍA LIMITADA
Si durante el transcurso de un año a partir de la fecha de compra original, este artículo no funciona
correctamente debido a un defecto en el material o en la mano de obra, lo reemplazaremos o
repararemos sin cargo, según nuestro criterio. Para solicitar piezas u obtener el servicio de la
garantía, llame al 1-877-447-4768, de lunes a viernes de 8:30 a. m. a 4:30 p. m. (hora central
estándar). Esta garantía no cubre defectos ocasionados por uso inapropiado o anormal, uso
indebido, accidentes o alteraciones. Si no se respetan todas las instrucciones del manual del
propietario, esta garantía quedará anulada. El fabricante no será responsable de daños incidentales
o indirectos, ni del deterioro normal de los productos para exteriores. Algunos estados no permiten
la exclusión o limitación de daños incidentales o indirectos. Por lo tanto, es posible que la limitación
mencionada no se aplique en su caso. Esta garantía otorga derechos legales especícos, y podría
haber otros derechos aplicables según el estado.

18
LISTA DE PIEZAS DE REPUESTO
Para obtener las piezas de repuesto, llame a nuestro Departamento de Atención al Cliente al
1-877-447-4768, de lunes a viernes de 8:30 a. m. 4:30 p. m. (hora central estándar).
Impreso en China
PIEZA DESCRIPCIÓN N.º DE PIEZA
A
Chimenea
30-06-492
B
Cubierta superior
30-06-493
C
Soporte posterior
30-06-494
D
Panel de malla posterior
30-06-495
E
Panel de malla lateral
30-06-496
F
** Parrilla de cocción
30-06-497
G
Soporte delantero izquierdo
30-06-498
H
Rejilla para madera
30-06-499
I
Puerta izquierda
30-06-500
J
Puerta derecha
30-06-501
K
Manija del cerrojo de la puerta
30-06-502
L
Soporte delantero derecho
30-06-503
M
Base inferior
30-06-504
N
Colector de cenizas
30-06-505
O
Pata
30-06-506
P
Atizador
30-01-145
Q
Perno M6x12mm
30-09-133
N/A
Manual de instrucciones
30-10-113
HWP
Paquete de tornillería
y herramientas
30-09-523
** NOTA: La parrilla de cocción SOLO corresponde al
modelo n.° OFW577HC.
AA
AA
AA
BB
CC
DD
EE
C
M
O
N
K
J
A
A
E
F
B
D
I
H
G
L
P
Q

19
Numéro de série
Date d’achat
AGRAFEZ VOTRE FACTURE ICI
Questions, problèmes, pièces manquantes? Avant de retourner l’article au détaillant,
appelez notre service à la clientèle au 1 877 447-4768, entre 8 h 30 et 16 h 30 (HNC),
du lundi au vendredi, ou envoyez un courriel à [email protected]
Foyer extérieur Stratford
MODÈLES n
o
OFW577HC / OFW577H-1
Español p. 10
English p. 1
30-10-113
Rev. 01/24/18

20
CONTENU DE L’EMBALLAGE POUR OFW577HC/OFW577H-1
PIÈCE DESCRIPTION QTÉ
I Porte gauche 1
J Porte droite 1
L Support avant droit 1
M Base 1
N Cendrier 1
O Pieds 4
P Tisonnier 1
PIÈCE DESCRIPTION QTÉ
A Cheminée 1
B Couvercle supérieur 1
C Support arrière 2
D Panneau grillagé arrière 1
E Panneau grillagé latéral 2
F Grille de cuisson** 1
G Support avant gauche 1
H Grille pour le bois 1
** REMARQUE : la grille de cuisson (F) est offerte SEULEMENT avec le modèle n
o
OFW577HC.
C
M
O
N
J
A
A
E
F
B
D
I
H
G
L
P
/