INDOOR COOKING
Drop-in Gas Cooktop
KGC
Use & Care Manual

SAFETY DEFINITIONS
READ THESE INSTRUCTIONS CAREFULLY AND COMPLETELY BEFORE INSTALLING
OR USING YOUR APPLIANCE TO REDUCE THE RISK OF FIRE, BURN HAZARD, OR
OTHER INJURY. KEEP THIS MANUAL FOR FUTURE REFERENCE.
CAUTION
NOTICE
Do not store or use gasoline or other flammable vapors and liquids in the vicinity
of this or any other appliance.
WHAT TO DO IF YOU SMELL GAS:
1) Do not try and light any appliance.
2) Do not touch any electrical switch.
3) Do not use any phone in your building.
4) Immediately call your gas supplier from a neighbor’s phone. Follow the gas
supplier’s instructions.
5) If you cannot reach your gas supplier, call the fire department.
Installation and service must be performed by a qualified installer, service agency,
or the gas supplier.
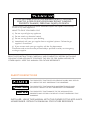
IF THE INFORMATION IN THIS MANUAL IS NOT FOLLOWED
EXACTLY, A FIRE OR EXPLOSION MAY RESULT CAUSING
PROPERTY DAMAGE, PERSONAL INJURY, OR DEATH.
INSTALLER: LEAVE THIS MANUAL WITH THE OWNER OF THE APPLIANCE.
HOMEOWNER: RETAIN THIS MANUAL FOR FUTURE REFERENCE.
THIS INDICATES THAT DEATH OR SERIOUS INJURY MAY OCCUR
AS A RESULT OF NOT OBSERVING THIS WARNING.
THIS INDICATES THAT MINOR OR MODERATE INJURY MAY
OCCUR AS A RESULT OF NOT OBSERVING THIS WARNING.
THIS INDICATES THAT DAMAGE TO THE APPLIANCE OR
PROPERTY MAY OCCUR AS A RESULT OF NOT OBSERVING THIS
WARNING.

©2020 Hestan Commercial Corporation
1
EN
Message from Hestan:Message from Hestan:
Hestan’s award-winning culinary innovations and purpose-built features
reinvented the restaurant kitchen and redefined culinary experience in some
of America’s most acclaimed restaurants. Hestan now takes this performance
from the back of the house and puts it front and center in yours. Thoughtfully
designed and meticulously built, Hestan will serve you beautifully for years to
come.
Hestan is the only residential brand born from the dreams and demands of
professional chefs. From ranges to refrigeration, every detail is designed to
deliver the performance and reliability expected in a restaurant – now available
for you.
We appreciate you choosing Hestan, and we promise to deliver the very best to
you.
Welcome to HestanWelcome to Hestan


©2020 Hestan Commercial Corporation
3
EN
When properly cared for, your Hestan appliance will provide safe, reliable service for many years.
When using this appliance, basic safety practices must be followed as outlined below.
INSTALLER: Please leave these Installation Instructions with the owner.
OWNER: Please retain these Installation Instructions for future reference.
This cooktop is designed for residential use only Do NOT install this cooktop outdoors.
SAFETY PRECAUTIONS - BEFORE YOU BEGIN
ELECTRICAL SHOCK HAZARDELECTRICAL SHOCK HAZARD
Disconnect power before installing or servicing appliance. Before turning
power ON, be sure all controls are in the OFF position. Failure to do so can
result in death or electrical shock.
ELECTRICAL GROUNDINGELECTRICAL GROUNDING
This appliance must be grounded. Grounding reduces the risk of electric shock in the event of
a short circuit. Read the ELECTRICAL CONNECTIONS section of the Installation Manual for
complete instructions.
This appliance is equipped with a 3-prong grounding plug for your protection against shock hazard
and should be directly plugged into a properly grounded receptacle. Do not cut or remove the
grounding prong from this plug.
TABLE OF CONTENTS
3 SAFETY PRECAUTIONS - BEFORE YOU BEGIN
8 MODEL NUMBERS
9 RATING LABEL
9 REGULATORY / CODE REQUIREMENTS
10 GAS COOKTOP OPERATION
12 COOKWARE
13 CARE & MAINTENANCE
17 PARTS LIST
17 SERVICE
17 LIMITED WARRANTY

©2020 Hestan Commercial Corporation
4
EN
SAFETY PRECAUTIONS - BEFORE YOU BEGIN
(CONTINUED)
GAS
SUPPLY
TO
APPLIANCE
SHUTOFF VALVE
IN OPEN POSITION
ELECTRICAL SUPPLYELECTRICAL SUPPLY
This appliance must be connected to a dedicated circuit, 120 VAC, Single Phase, 60 Hz, with
a current rating as shown in ”MODEL NUMBERS” on page 8 Have the installer show you
where the electric circuit breaker is located so you know how to shut off the power to this
appliance. It is the responsibility of the user to have the appliance connected by a licensed
electrician in accordance with all local codes, or in the absence of local codes, in accordance
with the National Electrical Code. Read the ELECTRICAL CONNECTIONS section of the
Installation Manual for complete details.
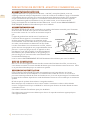
GAS SUPPLYGAS SUPPLY
A gas shut-off valve must be located in an easily
accessible location for servicing of the cooktop. Make
sure all users of the cooktop know where this shut-off is
located, and how to shut off the gas.
The type of gas should be verified prior to installation
and operation of this appliance. It is the responsibility of
the user to have the appliance connected by a licensed
plumber in accordance with all local codes, or in the
absence of local codes, in accordance with the National
Fuel Gas Code.
When connecting to LP gas, verify the tank is equipped
with its own high pressure regulator. The pressure of the
gas supplied to the appliance must not exceed 11.0” WC
[2.74 kPa]. Consult the Installation Manual for details
on gas type, gas pressure, connection and leak testing
instructions, etc.
Read the GAS CONNECTIONS section of the Installation Manual for complete details.
CONVERSION KITSCONVERSION KITS
In the event your Hestan appliance needs to be converted from NG to LP, or vice-versa, you
will need to contact Hestan Customer Service to arrange a service call. This conversion can
only be performed by a qualified technician.
VENTILATION REQUIREMENTSVENTILATION REQUIREMENTS
It is strongly recommended that this appliance be installed with a Hestan vent hood. Hestan
vent hoods have been matched up to the BTU output of the cooktop. Due to the high heat
output of this cooktop, it is very important that the hood and ductwork installation meets
local building codes and is installed by a qualified technician.
Do not use a down-draft style ventilation system.
Do not mount a microwave oven/ventilator combination above the cooktop. This type of unit
does not have sufficient airflow to remove the high heat output of this cooktop.
Consult the Installation Manual for further details.
Consult with your Hestan dealer on selecting the appropriate vent hood for your
Hestan appliance.

©2020 Hestan Commercial Corporation
5
EN
SAFETY PRECAUTIONS - BEFORE YOU BEGIN
(CONTINUED)
IN CASE OF POWER OUTAGEIN CASE OF POWER OUTAGE
All the control knobs must be in the OFF position to prevent unintended operation at power
up.
DO NOT ATTEMPT TO USE THE COOKTOP DURING A PROLONGED POWER FAILURE.
Although the burners can be manually lit, they should be used ONLY WHILE BEING
ATTENDED BY THE USER. On low burner settings, if the flame were to go out, a dangerous
accumulation of gas could result in an explosion.
CAUTION
Lighting gas burners with a match is dangerous.
You should match light the cooktop burners only in an emergency.
Light a match and hold the flame near the burner you want to light. Wooden matches work
best.
Push in and turn the control knob slowly.
Be sure you are turning the correct knob for the burner you are lighting.
CAUTION
CHILD SAFETYCHILD SAFETY
IT IS THE RESPONSIBILITY OF THE PARENTS OR GUARDIANS TO ENSURE CHILDREN
ARE INSTRUCTED IN THE SAFE USE OF THIS APPLIANCE. Do not allow children to use
this appliance without adult supervision. Do not allow children to play in or around the
appliance, even when not in use. Items of interest to children should not be stored in or on the
appliance or in cabinets above. Children climbing on the appliance could be seriously injured.
BURN HAZARD - All parts of the cooktop can get very hot during operation. Do not let
children touch the appliance while in operation. Failure to observe these instructions may
result in severe burns or injury.
TECHNICAL SAFETYTECHNICAL SAFETY
Installation and service on this appliance must be performed by a qualified appliance installer,
or a Hestan service technician. Do not repair or replace any part of the appliance unless
specifically instructed to do so. Defective parts must only be replaced with genuine Hestan
parts. Contact Hestan Customer Service for inquiries or to arrange a service call.
The appliance must be disconnected from the power and gas supply during any service or
maintenance work.

©2020 Hestan Commercial Corporation
6
EN
SAFETY PRECAUTIONS - BEFORE YOU BEGIN
(CONTINUED)
USER SAFETYUSER SAFETY
Use only dry or heat-resistant pot holders / gloves. Using moist or damp potholders can result
in steam burns. Do not substitute dish towels or similar items for potholders. These items
could come in contact with hot surfaces and ignite.
Avoid wearing loose-fitting garments or long sleeves while cooking. They could ignite. For
personal safety, wear proper apparel while using the appliance. Some synthetic fabrics are
highly flammable and should not be worn while cooking.
For safety considerations, NEVER use this appliance as a space heater to heat or warm the
room. Doing so may result in carbon monoxide poisoning.
Do not use aluminum foil to line the surface burners. Doing so may result in a risk of electric
shock, or fire.
Do not allow anyone to climb, stand, step on, lean against, or sit on any part of the appliance.
This may result in damage to the appliance, or personal injury.
FIRE SAFETYFIRE SAFETY
To reduce the risk of a grease fire, do not leave burners unattended at high settings. Boil-overs
could smother the flames and igniter, which would allow unburned gas to escape into the room.
Always turn on the ventilation hood when cooking. Clean vent hood grease filters frequently -
grease should not be allowed to accumulate on the fan or filters.
Use the appropriate pan size for the burner being used. For safety considerations, adjust the
flame size so they do not travel up the sides of the pan.
Keep the appliance area clear and free from combustible materials, gasoline, and other
flammable vapors and liquids. NEVER store flammable liquids and materials above or on the
cooktop, or near cooking surfaces. Do not obstruct the flow of combustion and ventilation air
of the appliance.
ALWAYS have a working smoke detector near the kitchen.
ALWAYS have an appropriate fire extinguisher (Type ABC or type K) nearby.
In case of fire:
Smother fire or flames using the lid of the utensil (pot or pan), a cookie sheet or metal
tray. Then shut off the burner. Use an extinguisher, or baking soda if the fire is small
and relatively contained.
DO NOT USE WATER ON A GREASE FIRE. Doing so may result in spreading the fire
elsewhere.
NEVER pick up a flaming pan. You may spill the grease on yourself and be severely
burned.
If accessible, turn off the ventilation hood during a fire, but do not reach through the
flames to do this.
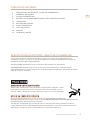
In the event of personal clothing or hair catching fire, drop and roll immediately to smother the
flames. Seek medical attention if necessary.

©2020 Hestan Commercial Corporation
7
EN
IF THE FLAMES DO NOT GO OUT - EVACUATE AND CALL THE FIRE
DEPARTMENT.
SAFETY DURING CLEANINGSAFETY DURING CLEANING
Only clean the appliance as directed in the CLEANING & MAINTENANCE section of this
manual.
Do not use a steam cleaner to clean any part of the cooktop. Steam could penetrate into
electrical components and cause a short circuit and/or shock hazard.
Use only a small toothbrush to clean the burner ports and igniter of the burners. Do not insert
sharp objects or scratch the burner ports.
Wait until the appliance is completely cool before using any aerosol-type cleaners. Many of
these cleaners use flammable propellants which could ignite in the presence of heat.
PROPER USAGEPROPER USAGE
Only certain types of glass, heatproof glass-ceramic, earthenware, or other glazed utensils are
suitable for use on the burners. However, these types of materials may break with sudden
temperature changes. Use only on low or medium heat settings, and according to their
manufacturers’ directions.
Bakeware, such as large casserole pans, cookie sheets, etc. should not be used on the burners.
Large griddle plates that span across 2 burners should be used with care and on medium to low
flame settings to avoid a build-up of heat which could distort the grates or the burner bowl.
Always position the handles of pot and pans so they do not extend over adjacent work areas
or over the edge of the counter. This is to avoid knocking over hot contents which could burn
you, or result in a fire.
SAFETY PRECAUTIONS - BEFORE YOU BEGIN
(CONTINUED)

©2020 Hestan Commercial Corporation
8
EN
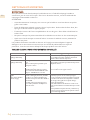
MODEL NUMBERS
COOKTOP MODELSCOOKTOP MODELS
MODEL NO. DESCRIPTION
CIRCUIT BREAKER
REQ’D
KGC30-NG / -LP 30” DROP-IN GAS COOKTOP 15 Amp
KGC36-NG / -LP 36” DROP-IN GAS COOKTOP 15 Amp
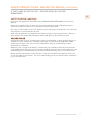
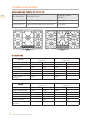
RATINGSRATINGS
KGC 30KGC 30
POWER Btu/h with NG
at 5inch W.C.
POWER Btu/h with LP
at 10inch W.C.
Zones max flow rate min flow rate max flow rate min flow rate
Front right 8000 1300 6000 1300
Front left 8000 1300 6000 1300
Rear left 10500 2200 10500 2200
Rear right 10500 2200 10500 2200
Center – simmer 850 850
Center – main flame 20000 20000
KGC36KGC36
POWER Btu/h with NG
at 5inch W.C.
POWER Btu/h with LP
at 10inch W.C.
Zones max flow rate min flow rate max flow rate min flow rate
Front right (Stacked B) 15000 1300 15000 1300
Front left (Stacked B) 15000 1300 15000 1300
Rear left (Stacked B) 15000 1300 15000 1300
Rear right (Stacked B) 15000 1300 15000 1300
Center – simmer 850 850
Center – main flame 20000 20000
KGC 30 KGC 36

©2020 Hestan Commercial Corporation
9
EN
REGULATORY / CODE REQUIREMENTS
Installation of this cooking appliance must be made in accordance with local codes. In the
absence of local codes, this unit should be installed in accordance with the National Fuel
Gas Code
ANSI Z223.1/NFPA 54
, Natural Gas and Propane Installation code
CSA B149.1
, or
Propane Storage and Handling Code
B149.2
.
All Electrical Components must be electrically grounded in accordance with local codes or
in the absence of local codes with the National Electrical Code
ANSI/NFPA 70
, or Canadian
Electrical code
CSA C22.1
.
STATE OF MASSACHUSETTSSTATE OF MASSACHUSETTS
Massachusetts requires all gas be installed using a plumber or gas fitter carrying the appropriate
Massachusetts license. All permanently installed natural gas or propane installations require a
T-handle type manual gas valve be installed in the gas supply line to this appliance. Flexible gas
connector must not be longer than 36” [91.4 cm].
CALIFORNIA PROPOSITION 65 - WARNING CALIFORNIA PROPOSITION 65 - WARNING
WARNINGWARNING This product can expose you to chemicals including carbon monoxide,
which is known to the State of California to cause birth defects or other reproductive
harm. For more information, go to www.P65Warnings.ca.gov.
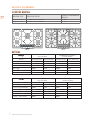
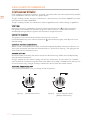
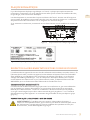
RATING LABEL
There are two rating labels on the unit. The main label contains important information about your
Hestan appliance such as the model and serial number, gas type and electrical rating.
Both rating labels are located in the bottom of the cooktop unit. Make sure you record your
model number and serial number for future use. The second rating label contains information
about the gas requirements and usage.
If service is necessary, contact Hestan Customer Care with the model and serial number.
Figure 1.
Typical rating label
KGCXX
HESTAN COMMERCIAL CORP.
ANAHEIM, CA - USA
XXX XXXXXX
xxxxxxxxx
xxxxxxxxx
xxxxxxxxx
Figure 2.
Rating label location

©2020 Hestan Commercial Corporation
10
EN
GAS COOKTOP OPERATION
CONTROLS AND BURNERSCONTROLS AND BURNERS
Each cooktop has two kinds of burners, all sealed. On both models, the center power burner provides
up to 20,000 BTUs and turns down to a gentle simmer.
The 30” cooktop provides two pairs of side burners - the rear burners are rated at 10500 BTU, and the
front burners are rated at 8000 BTU.
The 36” cooktop provides four side burners rated at 15000 BTU, with simmer settings of 1300 BTU.
IGNITIONIGNITION
Electronic ignition is provided on all burners. Each control knob has a position to activate
the igniters. The cooktop has automatic re-ignition: when a burner is in use and the flame is
accidentally extinguished, the igniters will activate to re-light the burner.
USING THE BURNERSUSING THE BURNERS
The graphic in front of each knob indicates which burner it controls.
For the desired burner, press and turn the knob to
until the burner lights, then adjust it to the
desired setting.
CONTROL KNOB ILLUMINATIONCONTROL KNOB ILLUMINATION
When a knob is turned away from OFF, it will illuminate (white). When a burner has been in use
and is then turned off, the knob will illuminate red as a “burner hot” warning. The light goes out
after the burner has had time to cool.
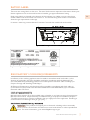
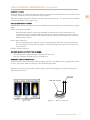
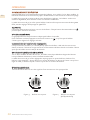
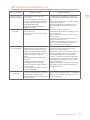
SIMMER SETTINGSIMMER SETTING
On both models of cooktop, the center burner has dual flame rings. When set to SIM (simmer),
only the center flame burns.
The 36” cooktop also has simmer settings for the four side burners. Those burners are “stacked” -
each of them has one burner ring above the other. When set to SIM, a stacked burner will only use
one of its burner rings. The 30” cooktop’s side burners do not have the simmer feature.
TURNING THE BURNER OFFTURNING THE BURNER OFF
Turn the knob clockwise as far as it will go to the off position.
.
Figure 3.
Burner with simmer
Figure 4.
Burner without simmer
(KGC30 side burners)

©2020 Hestan Commercial Corporation
11
EN
GAS COOKTOP OPERATION
(CONTINUED)
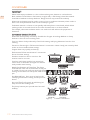
BURNER FLAMESBURNER FLAMES
Turn each burner on. For Natural Gas installations, the flames should be blue in color with no trace
of yellow. With LP, the tips of the flame may be yellow.
The burner flames should not flutter or lift off from the burner ports. The inner cone of the flame
should be between 1/2” and 3/4” long.
SEALED SURFACE BURNERS SEALED SURFACE BURNERS
IMPORTANT: Do not obstruct the flow of combustion and ventilation air around the burner grate
edges.
Burner cap and gas spreader
Always keep the burner cap and gas spreader in place when using a surface burner. A
clean burner cap and spreader will help prevent poor ignition and uneven flames. Always
clean the part after a spillover and routinely remove and clean according to the “Care and
Maintenance” section.
Burner base and orifice
Gas must flow freely through the orifice to light properly. Keep this area free of soil and
do not allow spills, food, cleaning agents or any other material to enter the orifice or the
area around it.
Protect it during cleaning.
BE SURE WHEN LIGHTING THE BURNER:BE SURE WHEN LIGHTING THE BURNER:
• Gas spreader pin is properly aligned with burner base slot.
• Cap pin is properly aligned with gas spreader slot.
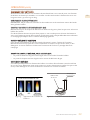
BURNERS AND BURNER PORTSBURNERS AND BURNER PORTS
Check burner flames occasionally. Observe figure 5 below - with Natural Gas, a good flame is blue
in color, not yellow. With LP, the tips of the flame may be yellow.
Keep this area free of soil and do not allow spills, food, cleaning agents or any other material to
enter the burner ports.
Figure 5.
Burner flame
appearance
1/2” to 3/4”
COOKTOP BURNER
Figure 6.
Burner flame size

©2020 Hestan Commercial Corporation
12
EN
COOKWARE
IMPORTANT: IMPORTANT:
Never leave empty cookware on a hot surface cooking area, element or surface burner.
Ideal cookware should have a flat bottom, straight sides, a well fitting lid and the material
should be of medium-to-heavy thickness. Rough finishes may scratch the cooktop.
Aluminium and copper may be used as a core or base in cookware. However, when used as a
base it can leave permanent marks on the cooktop or grates.
Cookware material is a factor in how quickly and evenly heat is transferred, which affects
cooking results. A nonstick finish has the same characteristics as its base material.
For example, aluminum cookware with a non-stick finish will take on the properties of
aluminum.
COOKWARE CHARACTERISTICS COOKWARE CHARACTERISTICS
Aluminum: Heats quickly and evenly. Suitable for all types of cooking. Medium or heavy
thickness is best for most cooking tasks.
Cast Iron: Heats slowly and evenly. Good for browning and frying. Maintains heat for slow
cooking.
Ceramic or Ceramic glass: Follow manufacturer’s instructions. Heats slowly, but unevenly. Ideal
results on low to medium heat settings.
Copper: Heats very quickly and evenly.
Earthenware: Follow manufacturer’s instructions.
Use on low heat settings.
Porcelain enamel on steel or cast Iron: See
stainless steel or cast iron.
Stainless steel: Heats quickly, but unevenly. A
core or base of aluminum or copper on stainless
steel provides even heating.
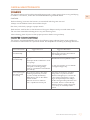
Match Pan Diameter to Flame Size. The flame
should be the same size as the bottom of the pan
or smaller. Do not use small pans with high flame
settings as the flames can lick up the sides of the
pan.
Use Balanced Pans. Pans must sit level on the
cooktop grate without rocking. Center pan over
burner.
Use a Lid That Fits Properly. A well-fitting lid
helps shorten the cooking time.
Flat, heavy bottom pans provide even heat and
stability.
BALANCED PAN
UNBALANCED PAN
CONVEX
(ROUNDED)
CONCAVE
(HOLLOW)
FLAME TOO LARGE
FOR PAN SIZE
USE LIDS THAT
FIT PROPERLY
Figure 7.
Cookware Guidelines

©2020 Hestan Commercial Corporation
13
EN
CLEANINGCLEANING
The entire Cooktop can be safely cleaned by wiping with a soapy sponge, then rinsing and drying.
If stubborn soil remains, follow the recommended cleaning methods below.
CAUTION:
Before cleaning, be certain the burners are turned off and the grates are cool.
Always use the mildest cleaner that will do the job.
Use clean, soft cloths, sponges or paper towels.
Rub stainless steel finishes in the direction of the grain. Wipe area dry to avoid water marks.
Do not clean removable cooktop parts in any self-cleaning oven.
After cleaning, place all parts in their proper positions before using cooktop.
SUGGESTED CLEANING MATERIALSSUGGESTED CLEANING MATERIALS
The cleaners recommended below and on the following page indicate cleaner types and do not
constitute an endorsement of a particular brand. Use all products according to package directions.
Parts and materials Suggested cleaners Suggestions/Reminders
Burner base
(Cast aluminum)
Damp cloth. Keep the gas orifice area free of
cleaning agents and any other material
from entering the orifice.
• Detergent and hot water; rinse and
dry.
• Stiff nylon-bristle toothbrush to clean
port openings.
Rub lightly, in a circular motion.
Aluminum cleaners may dull the surface.
Gas spreader
(Cast aluminum)
Abrasive cleansers: Revere ware®
metal polish. Following package
directions. Use Brillo® or S.O.S.® pads.
Rinse and dry.
To clean port opening, use a toothbrush
or straightened paper clip.
Burner cap and grate
(Porcelain enamel
on cast iron)
• Non-abrasive cleaners: Hot water
and detergent, Fantastic, Formula
409. Rinse and dry immediately.
• Mild abrasive cleaners: Bon Ami®
and Soft Scrub®.
• Abrasive cleaners for stubborn
stains: soap-filled steel wool pad.
• The grates are heavy; use care when
lifting. Place on a protected surface.
• Blisters/crazing/chips are common due
to the extreme temperatures on grate
fingers and rapid temperature changes.
• Acidic and sugar-laden spills deteriorate
the enamel. Remove soil immediately.
• Abrasive cleaners, used too vigorously
or too often, can eventually mar the
enamel.
CARE & MAINTENANCE

©2020 Hestan Commercial Corporation
14
EN
CARE & MAINTENANCE
(CONTINUED)
Parts and materials Suggested cleaners Suggestions/Reminders
Exterior finish
(Porcelain enamel)
• Hot sudsy water: rinse and dry
thoroughly.
• Non-abrasive cleansers: Ammonia,
Fantastic®, Formula 409®.
• Mild abrasive cleansers: Bon Ami®,
Ajax®, Comet®.
• Liquid cleaners: Kleen King®, Soft
Scrub®.
• Acidic and sugar-laden spills deteriorate
the porcelain enamel. Remove soil
immediately.
• Do not use wet sponge or towel on hot
porcelain.
• Always apply minimal pressure with
abrasive cleaners.
Control knobs
• Hot sudsy water: rinse and dry
immediately.
• If necessary, remove knobs (lift
straight up).
• Do not soak knobs.
• Do not use abrasive scrubbers or
cleansers.
• Do not force knobs onto valve shaft.
• Pull knobs straight away from control
panel to remove.
• When replacing knobs, make sure
knobs are in the OFF position.
• Do not remove seats under knobs.
Exterior finish
(Stainless Steel)
• Non-abrasive cleaners: Hot water
and detergent. Fantastic®, Formula
409®. Rinse and dry immediately.
• Cleaner polish: Stainless Steel
Magic® to protect the finish from
staining and pitting; enhances
appearance.
• Hard water spots: Household white
vinegar.
• Mild Abrasive Cleaners: Kleen
King® stainless steel liquid cleaner,
Cameo® aluminum & stainless steel
cleaner, Bon Ami®.
• Heat discoloration: Bar Keepers
Friend®.
• Stainless steel resists most food stains
and pit marks provided the surface is
kept clean and protected.
• Never allow food stains or salt to remain
on stainless steel for any length of time.
• Rub lightly in the direction of polish
lines.
• Chlorine or chlorine compounds in some
cleaners are corrosive to stainless steel.
Check ingredients on label before using.
• Always apply minimal pressure with
abrasive cleaners especially on graphics.
Igniters
(Ceramic)
• Carefully wipe with a cotton swab
dampened with water, ammonia or
Formula 409®.
• Gently scrape soil off with a
toothpick.
• Avoid excess water on the igniter.
A damp igniter will prevent burner from
lighting.
• Remove any lint that may remain after
cleaning.

©2020 Hestan Commercial Corporation
15
EN
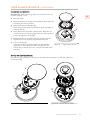
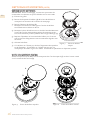
CLEANING GAS BURNER: CLEANING GAS BURNER:
IMPORTANT: Before cleaning, make sure all controls are off
and the cooktop is cool.
1) Remove grates.
2) Remove the burner cap (A) from the burner base and clean
according to cleaning section.
3) Remove the burner spreader (B).
Clean the gas tube opening and burner port according to
cleaning section
4) Clean the burner base with a damp cloth. Keep the gas
orifice area free of cleaning agents and any other material
from entering the orifice(s) (C).
5) Replace the burner spreader and cap, making sure the
alignment pins are properly aligned with the slots.
6) Turn on the burner.
If the burner does not light, check cap and spreader
alignment. If the burner still does not light, do not
service the gas burner yourself. Contact a trained repair
specialist.
NOTES ON CENTER BURNERNOTES ON CENTER BURNER
Be careful not to get debris or cleaners in the exposed orifice (C) or in the area under the
orifice cover (D).
A
B
C
Figure 8.
Single burner pieces
A
B
C
A
B
D
C
CARE & MAINTENANCE
(CONTINUED)
Figure 9.
Stacked burner pieces
Figure 10.
Center burner pieces

©2020 Hestan Commercial Corporation
16
EN
TROUBLESHOOTINGTROUBLESHOOTING
Try the solutions suggested here first in order to avoid the cost of an unnecessary service call.
Ignition will not operate
• Is the power supply cord unplugged?
Plug into a grounded 3 prong outlet.
• Has a household fuse been blown or has the circuit breaker been tripped?
Replace the fuse or reset the circuit breaker.
Surface burners will not operate
• Is this the first time the surface burners have been used?
Turn on any one of the surface burner knobs to release air from the gas lines.
• Is the control knob set correctly?
Push in knob before turning to a setting.
• Are the burner ports clogged?
See “Sealed Surface Burners” section.
Surface burner flames are uneven yellow and/or noisy
• Are the burner ports clogged?
See “Sealed Surface Burners” section.
• Are the burner caps positioned properly?
See “Sealed Surface Burners” section.
• Is propane gas being used?
The appliance may have been converted improperly. Contact a service technician.
Surface burner makes popping noises
• Is the burner wet?
Let it dry.
• Is the cap and gas spreader positioned correctly?
Make sure the alignment pins are properly aligned
See “Sealed Surface Burners” section.
Excessive heat around cookware on cooktop
• Is the cookware the proper size?
Use cookware about the same size as the surface cooking area, element or surface burner.
Cookware should not extend more than 1 in (2.5 cm) outside the cooking area.
Cooktop cooking results not what expected
• Is the proper cookware being used?
See “Cookware” section.
• Is the control knob set to the proper heat level?
See “Controls and Burners” section.
CARE & MAINTENANCE
(CONTINUED)

©2020 Hestan Commercial Corporation
17
EN
SERVICE
All warranty and non-warranty repairs should be performed by qualified service personnel.
To locate an authorized service agent in your area, contact your Hestan dealer, local
representative, or the manufacturer. Before you call, please have the model number and serial
number information ready.
Hestan Commercial Corporation
3375 E. La Palma Avenue
Anaheim, CA 92806
(888) 905-7463
PARTS LIST
Please visit the Hestan website to access the parts list for your Hestan Indoor product:
www.hestanhome.com.www.hestanhome.com.
LIMITED WARRANTY
WHAT THIS LIMITED WARRANTY COVERSWHAT THIS LIMITED WARRANTY COVERS
Hestan Commercial Corporation (“HCC”) warrants to the original consumer purchaser of
a Hestan Indoor Cooking product (the “Product”) from an HCC authorized dealer that the
Product is free from defective materials or workmanship for a period of three (3) years from
the date of original retail purchase or closing date for new construction, whichever period is
longer (“Limited Warranty Period”). HCC agrees to repair or replace, at HCC’s sole option,
any part or component of the Product that fails due to defective materials or workmanship
during the Limited Warranty Period. This Limited Warranty is not transferable and does
not extend to anyone beyond the original consumer purchaser (“Purchaser”). This Limited
Warranty is valid only on Products purchased and received from an HCC authorized dealer in
the fifty United States, the District of Columbia and Canada. This Limited Warranty applies
only to Products in non-commercial use and does not extend to Products used in commercial
applications.
HOW TO OBTAIN WARRANTY SERVICEHOW TO OBTAIN WARRANTY SERVICE
If the Product fails during the Limited Warranty Period for reasons covered by this Limited
Warranty, the Purchaser must immediately contact the dealer from whom the Product was
purchased or HCC at 888.905.7463.
Purchaser is responsible for making the Product reasonably accessible for service or for paying
the cost to make the Product reasonably accessible for service. Service is to be provided during
normal business hours of the authorized Hestan Commercial Service Provider. To the extent
Purchaser requests service outside of the normal business hours of the authorized Hestan
Commercial Service Provider, Purchaser will pay the difference between regular rates and
overtime or premium rates. Purchaser is required to pay all travel costs for travel beyond 50
miles (one way) from the nearest authorized Hestan Commercial Service Provider.

©2020 Hestan Commercial Corporation
18
EN
EXTENSIONS TO THREE YEAR LIMITED WARRANTY PERIOD:EXTENSIONS TO THREE YEAR LIMITED WARRANTY PERIOD:
In addition to the Three-Year Limited Warranty, the following components have extended
warranty coverage as specifically set forth below:
1) The Product’s gas burners (excludes appearance), electric heating elements, blower
motors (ventilation hoods), electronic control boards, magnetron tubes and induction
generators (where applicable) are warranted to be free from defects in material and
workmanship under normal non-commercial use and service for a period of five (5) years
of the original Purchaser. This excludes surface corrosion, scratches, and discoloration
which may occur during normal use and is limited to replacement of the defective part(s),
with the Purchaser paying all other costs, including labor, shipping and handling, as
applicable.
WHAT THIS LIMITED WARRANTY DOES NOT COVER:WHAT THIS LIMITED WARRANTY DOES NOT COVER:
This Limited Warranty does not cover and HCC will not be responsible for and will not pay
for: damage to or defects in any Product not purchased from an HCC authorized dealer; color
variations in color finishes or other cosmetic damage; failure or damage from abuse, misuse,
accident, fire, natural disaster, commercial use of the Product, or loss of electrical power or gas
supply to the Product; damage from alteration, improper installation, or improper operation
of the Product; damage from improper or unauthorized repair or replacement of any part or
component of the Product; damage from service by someone other than an authorized agent or
representative of the Hestan Commercial Service Network; normal wear and tear; damage from
exposure of the Product to a corrosive atmosphere containing chlorine, fluorine, or any other
damaging chemicals; damage resulting from the failure to provide normal care and maintenance
to the Product; damage HCC was not notified of within the Limited Warranty Period; and
incidental and consequential damages caused by any defective material or workmanship.
ARBITRATION:ARBITRATION:
This Limited Warranty is governed by the Federal Arbitration Act. Any dispute between
Purchaser and HCC regarding or related to the Product or to this Limited Warranty shall be
resolved by binding arbitration only on an individual basis with Purchaser. Arbitration will be
conducted by the American Arbitration Association (“AAA”) in accordance with its Consumer
Arbitration Rules or by JAMS. The arbitration hearing shall be before one arbitrator appointed
by the AAA or JAMS. The arbitrator shall not conduct class arbitration and Purchaser shall not
bring any claims against HCC in a representative capacity on behalf of others.
LIMITATION OF LIABILITY:LIMITATION OF LIABILITY:
This Limited Warranty is the final, complete and exclusive agreement between HCC and
Purchaser regarding the Product.
THERE ARE NO EXPRESS WARRANTIES OTHER THAN THOSE LISTED AND DESCRIBED
ABOVE. NO WARRANTIES WHETHER EXPRESS OR IMPLIED, INCLUDING, BUT NOT
LIMITED TO, ANY IMPLIED WARRANTIES OF MERCHANTABILITY OR FITNESS FOR A
PARTICULAR PURPOSE SHALL APPLY AFTER THE LIMITED WARRANTY PERIOD STATED
ABOVE. NO OTHER EXPRESS WARRANTY OR GUARANTY GIVEN BY ANY PERSON,
FIRM OR CORPORATION WITH RESPECT TO THIS PRODUCT SHALL BE BINDING ON
HCC. HCC ASSUMES NO RESPONSIBILITY THAT THE PRODUCT WILL BE FIT FOR ANY
PARTICULAR PURPOSE, EXCEPT AS OTHERWISE PROVIDED BY APPLICABLE LAW.
HCC SHALL NOT BE LIABLE FOR LOSS OF REVENUE OR PROFITS, FAILURE TO
REALIZE SAVINGS OR OTHER BENEFITS, OR ANY OTHER SPECIAL, INCIDENTAL OR
CONSEQUENTIAL DAMAGES CAUSED BY THE USE, MISUSE OR INABILITY TO USE THE
PRODUCT, REGARDLESS OF THE LEGAL THEORY ON WHICH THE CLAIM IS BASED,
AND EVEN IF HCC HAS BEEN ADVISED OF THE POSSIBILITY OF SUCH DAMAGES. NO
RECOVERY OF ANY KIND AGAINST HCC SHALL BE GREATER IN AMOUNT THAN THE
PURCHASE PRICE OF THE PRODUCT.
LIMITED WARRANTY
(CONTINUED)
La page est en cours de chargement...
La page est en cours de chargement...
La page est en cours de chargement...
La page est en cours de chargement...
La page est en cours de chargement...
La page est en cours de chargement...
La page est en cours de chargement...
La page est en cours de chargement...
La page est en cours de chargement...
La page est en cours de chargement...
La page est en cours de chargement...
La page est en cours de chargement...
La page est en cours de chargement...
La page est en cours de chargement...
La page est en cours de chargement...
La page est en cours de chargement...
La page est en cours de chargement...
La page est en cours de chargement...
La page est en cours de chargement...
La page est en cours de chargement...
La page est en cours de chargement...
La page est en cours de chargement...
La page est en cours de chargement...
La page est en cours de chargement...
-
 1
1
-
 2
2
-
 3
3
-
 4
4
-
 5
5
-
 6
6
-
 7
7
-
 8
8
-
 9
9
-
 10
10
-
 11
11
-
 12
12
-
 13
13
-
 14
14
-
 15
15
-
 16
16
-
 17
17
-
 18
18
-
 19
19
-
 20
20
-
 21
21
-
 22
22
-
 23
23
-
 24
24
-
 25
25
-
 26
26
-
 27
27
-
 28
28
-
 29
29
-
 30
30
-
 31
31
-
 32
32
-
 33
33
-
 34
34
-
 35
35
-
 36
36
-
 37
37
-
 38
38
-
 39
39
-
 40
40
-
 41
41
-
 42
42
-
 43
43
-
 44
44


Hestan Gas cooktop Le manuel du propriétaire
- Taper
- Le manuel du propriétaire
- Ce manuel convient également à
dans d''autres langues
- English: Hestan Gas cooktop Owner's manual
Documents connexes
-
Hestan Gas cooktop Guide d'installation
-
Hestan KRD364GD-NG Mode d'emploi
-
-
-
-
-
Bosch HCP50652UC Le manuel du propriétaire
-
-