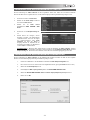
Numark OMNI CONTROL Guide de démarrage rapide
- Taper
- Guide de démarrage rapide

QUICKSTART MANUAL
ENGLISH ( 3 – 10 )
MANUALE DE INICIO RÁPIDO
ESPAÑOL ( 11 – 18 )
GUIDE D'UTILISATION SIMPLIFIÉ
FRANÇAIS ( 19 – 26 )
GUIDA RAPIDA
ITALIANO ( 27 – 34 )
KURZANLEITUNG
DEUTSCH ( 35 – 42 )


3
This Quickstart Guide explains how to quickly setup and begin using the Numark OMNI
CONTROL DJ system. Please take a few minutes to go through this Quickstart and get familiar
with the setup procedure and basic controls.
We have designed OMNI CONTROL as a complete system for software-based DJs. OMNI
CONTROL is a MIDI-compliant device and can be used with any software which supports the
MIDI protocol. We have included two software packages – Native Instruments’ Traktor LE and
MixMeister Fusion Live – enabling you to DJ right out of the box. Plus, you can play your mixes
through this software or from OMNI CONTROL itself. Two sets of RCA connections on the rear
panel allow you to send your master and cue mixes to remote speaker or amp systems.
We also highly recommend reading the software reference manuals, included on the installation
disc, in order to take full advantage of OMNI CONTROL. Happy DJing!
Please Note: If you are using Omni Control with a USB hub, we recommend that you either use a
powered hub, or the optional 6V 1A power adapter. This will ensure proper operation.
BOX CONTENTS
OMNI CONTROL
QUICKSTART MANUAL
SAFETY & WARRANTY INFORMATION
USB CABLE
MIXMEISTER FUSION LIVE COUPON
SOFTWARE/DRIVER CD
:: Omni Control Quickstart Guide ::
A NOTE ABOUT MIDI CONTROL :::::
Omni Control was designed as a MIDI-compliant device, allowing you to control any
computer application which supports the MIDI protocol. This means that you can not
only use Omni Control with the included software, but can also use the controller with
a variety of other music and video applications as well. In order to use Omni Control
with your favorite software, you will have to enable Omni Control as a MIDI input
device in your software’s preferences. Please note that depending on your software,
the Omni Control may not necessarily show up as “Omni Control” in the MIDI
preferences.

4
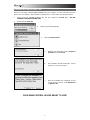
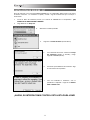
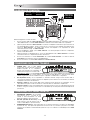
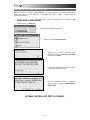
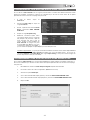
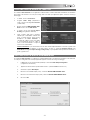
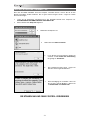
DRIVER INSTALLATION – PC
Before you can begin using the OMNI CONTROL with your computer, you must install the necessary
drivers onto your computer. The installation is quick and easy – please follow the instructions below:
1. Please insert the included installation disc into your computer’s CD-ROM drive. DO NOT
CONNECT THE OMNI CONTROL YET!
2. Double-click on Setup.exe.
3. Select your preferred language.
4. Click on Install the driver.
5. Read the User Agreement, select I accept the
agreement, then click Install.
6. The installation procedure will begin. Please
follow the on-screen instructions.
7. Once the installation has completed, you will
see the screen on the left. Click Reboot Now
or Reboot Later.
YOUR OMNI CONTROL IS NOW READY TO USE!

5
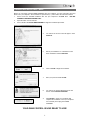
DRIVER INSTALLATION – MAC
Before you can begin using the OMNI CONTROL with your computer, you must install the necessary
drivers onto your computer. The installation is quick and easy – please follow the instructions below:
1. Please insert the included installation disc into your computer’s CD-ROM drive. DO NOT
CONNECT THE OMNI CONTROL YET!
2. Open the CD to view its contents.
3. Please double-click Install OMNI CONTROL to begin the installation procedure.
4. You will see the screen on the left appear. Click
Continue.
5. Select your hard-drive as a destination for the
driver installation and click Continue.
6. Click on Install to begin the installation.
7. Enter your password and click OK.
8. You will see the warning displayed on the left.
Please select Continue Installation.
9. Click Restart to restart your computer and
complete the installation. Once your computer
has restarted, please plug in the OMNI
CONTROL.
YOUR OMNI CONTROL IS NOW READY TO USE!

6
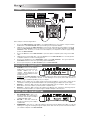
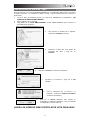
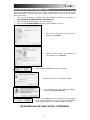
CONNECTION DIAGRAM
Please study the connection diagram above.
1. Connect the OMNI CONTROL’s USB PORT to an available USB2.0 port on your computer, using the included
USB2.0 cable. The OMNI CONTROL will be powered through your computer’s USB bus.
2. (Optional) You can power the OMNI CONTROL by connecting an optional 6V 1A power adapter to the DC IN
input on the OMNI CONTROL. Please note that it is not necessary to have the adapter plugged in for the OMNI
CONTROL to work. However, you should connect this adapter if your computer is not able to supply enough
power to the OMNI CONTROL.
3. Connect the OUTPUT 1 on the OMNI CONTROL to your main speaker or amplifier system, using a stereo RCA
cable.
4. (Optional) Using a stereo RCA cable, connect the OUTPUT 2 on the OMNI CONTROL to a secondary speaker
or amplifier system to be used for monitoring purposes.
5. Connect your headphones to the HEADPHONES output on the OMNI CONTROL. The signal output from
HEAPHONES will be the same as the signal being output from OUTPUT 2.
6. Connect your microphone to the MIC THROUGH input on the OMNI CONTROL.
REAR PANEL CONNECTIONS
1. USB PORT – Please use the supplied
USB2.0 cable to connect this port to an
available USB2.0 port on your
computer. When plugged into your
computer, the unit will draw power from
the USB connection.
Please note: The OMNI CONTROL requires a USB2.0 connection in order to function fully and properly. If using
a USB1.1 connection, only OUTPUT 1 will work. To take advantage of both outputs, please make sure that you
are connecting to a USB2.0 compatible port on your computer.
2. DC IN – If your computer does not supply enough power through the USB bus, you may wish to power the unit
externally by connecting an optional 6V/1A adapter to this input and plugging the adapter into a power supply.
3. OUTPUT 1 – This stereo RCA connection will output the Master Mix from your computer. Please use a stereo
RCA cable to connect this output to a powered speaker or amplifier system.
4. OUTPUT 2 – This stereo RCA connection will output the Cue Mix from your computer for monitoring purposes.
Please note that the Cue Mix is also output through the Headphone Output on the front panel.
FRONT PANEL CONNECTIONS
1. MIC THROUGH INPUT – This is a ¼”
microphone input. The signal from this
input will be sent directly to the Output
1 (Master Mix) RCA output.
2. MIC VOL – This knob controls the
microphone level being sent to Output
1 (Master Mix).
3. HEADPHONES – This stereo ¼” output will output the signal being routed to Output 2 (Cue Mix). To take full
advantage of cueing and monitoring through this output, please make sure that you have routed the Cue Mix in
your software to Output 2 of the OMNI CONTROL.
COMPUTER
POWER
SUPPLY
(OPTIONAL)
MICROPHONE
HEADPHONES
SPEAKER OR
AMP SYSTEM
(MASTER)
SPEAKER OR
AMP SYSTEM
(MONITOR)
34
12
3
12

7
ROUTING AUDIO OUTPUTS IN TRAKTOR
If you are using the OMNI CONTROL with Native Instruments’ Traktor or Traktor LE software applications, please see the
example and instructions below for information on routing your audio outputs to take full advantage of cueing and
monitoring.
1. In Traktor, click on Preferences.
2. Choose Audio Setup and click on the
Soundcard tab.
3. Next, under the Audio Device pull-down
menu, select OMNI CONTROL ASIO
Driver.
4. Then click on the Output Routing tab.
5. Lastly, you can choose which outputs you
would like to use for your Master and
Monitor channels from the pull-down menu
on the bottom. Since the Headphone
output on the OMNI CONTROL is tied to
the Output 2 stereo RCA pair, we
recommend using the Output 1 pair as your
Master channel and the Output 2 pair as
your Monitor channel.
Additional Information: You may also wish to send each virtual “deck” independently to each output pair on the
OMNI CONTROL for use with an external mixer. To do so, please select External as the Mixer Mode in the
Output Routing tab. You will then be able to decide which deck is being sent to which output pair.
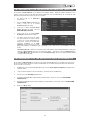
ROUTING AUDIO OUTPUTS IN MIXMEISTER
If you are using the OMNI CONTROL with the Mixmeister DJ software application, please see the example and
instructions below for information on routing your audio outputs to take full advantage of cueing and monitoring.
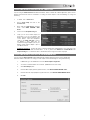
1. In Mixmeister, go to the Tools menu and select Audio Output Configuration.
2. You will see a window similar to the one below. (MixMeister Fusion Live shown)
3. Select Dual Output option.
4. Under the Main output (speakers) pull-down menu, select Numark OMNI CONTROL Audio.
5. Under the Preview output (headphones) pull-down menu, select Numark OMNI CONTROL Audio.
6. Click OK.

8
CHANGING LATENCY
Audio Latency describes the time that it takes
for your soundcard to respond to a command.
In other words, this is the time that it takes for
your computer to process data and output
sound. The lower your latency is, the faster
your computer will respond to commands and
output sound.
For example, with high latency settings you may
start to notice a significant lag when you change
EQ, level and effect settings. In this case, you
will want to decrease your soundcard’s latency
in order to achieve a quicker response.
To change latency settings for the OMNI
CONTROL, please open the Numark USB
Control Panel by clicking on Start | All
Programs | NUMARK | Numark USB Control
Panel.
You will see a drop-down menu on the lower
portion of the Numark USB Control Panel.
Click on the drop-down arrow to view the
available latency settings and select the desired
setting. Selecting ‘1024’ samples will result in a high audio latency and more lag, while selecting ’49’
samples will give you the lowest audio latency and quickest response.
Please note:
Depending on your computer, some latency settings may not work correctly. If you are
running on a slower machine and try to use low audio latency settings (‘49’, ‘64’, ‘128’ samples), you
may experience audio drop-outs and glitches. If you experience drop-outs or glitches, you will need to
increase the audio latency in the Numark USB Control Panel by choosing one of the higher settings,
such as ‘512’ or ‘1024’ samples.

9
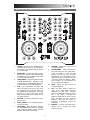
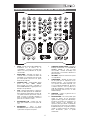
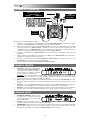
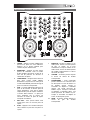
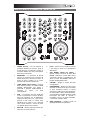
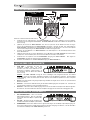
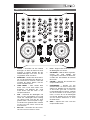
TRAKTOR LE CONTROLLER MAPPING
1
2
9
3
10
11
11
11
11
10
12
13
14
15
19
20
15
19
20
16 1621
24
25
26
27
28
29
17
18
24
25
26
27
28
29
17
18
21
2322
21 21
2322
11
11
3
8
8
45
77
6456
1. TRACK – You can use the TRACK knob to
scroll through the music on your computer.
Press down on the TRACK knob to preview
the selected track.
2. DIRECTORY – Pressing this button toggles
between the Browser Tree Window and
List Window so you can browse and select
your tracks within the folders.
3. LOAD TRACK – Each virtual deck features
a LOAD TRACK button. Selecting a track
and pressing the LOAD TRACK button will
load the track to the corresponding deck.
4. CUE – The CUE button will return and
pause the track at the last set cue point.
For temporary play of the cue point, you
can hold down the CUE button. The track
will play for as long as the button is held
down and will return to the cue point once it
has been released.
5. SET CUE - You can use this button to set a
new cue point.
6. PLAY / PAUSE – Press to begin playing or
to pause the track.
7. JOG WHEEL – When the deck is stopped,
the JOG WHEEL will scratch the selected
track. When the deck is playing, the JOG
WHEEL will bend the track's pitch.
8. VOLUME – Adjusts the volume of the
corresponding deck.
9. CROSSFADER – Fades between the
two tracks playing on the virtual decks.
If the crossfader is in the left-most
position, you will only hear the audio
from Deck A. If the crossfader is in the
right-most position, you will only be able
to hear the audio from Deck B. When
the crossfader is in a point between the
two, you will hear both Decks.
10. GAIN – Adjusts the gain level of the
corresponding deck.
11. EQ – Use these knobs to adjust the
levels of the Treble, Mid, and Bass
frequencies on each deck. Pressing
down on an EQ knob makes it function
like a "kill switch," removing that
frequency band from the music on that
deck. The LED next to the knob will
illuminate when the Kill feature is
engaged. To disengage it press the
knob again.
12. MASTER – Controls the Master level,
allowing you to change the overall
volume of the mix.

10
13. PH MIX – Adjusts the balance between the
Monitor and Master channels in the
headphones. Please note that, unless you
are using a multiple output audio interface,
the Monitor and Master Mix channels will
be the same.
14. PH VOL – This knob adjusts the
headphone mix level. Please note that,
unless you are using a multiple-output
audio interface, the Monitor and Master Mix
channels will be the same.
15. PFL – Press the PFL button to send the
music playing on the deck to the Monitor
channel. Please note that if you are not
using a multiple-output audio interface, the
Monitor and Master Mix channels will be
the same.
16. PITCH – Changes the pitch or tempo of the
music playing on that deck.
17. FINE PITCH – Makes fine pitch
adjustments to the music on the deck.
18. TAP – Tap this button in time with the
beats of the music on that deck. This will
enter a new BPM ("beats per minute")
reading for that track.
19. KEY – Engages the Master Tempo feature,
which locks the musical key of the track to
the original key (as if it were playing with
0% pitch adjustment). You can then adjust
the tempo of the track without affecting its
key or pitch.
20. SYNC – Synchronizes the music playing on
that deck to the music playing on the other
deck.
21. PITCH BEND -/+ – You can use these two
pitch bend buttons to temporarily adjust the
pitch and tempo of the music playing on
the corresponding deck. Pitch bend is
typically used to make small adjustments
when mixing two tracks so their beats
occur synchronously.
22. LOOP IN – Press this button to set the
starting point of a loop.
23. LOOP OUT – Press this button (after
pressing LOOP IN) to set the ending point
of a loop. Once you press it, you will jump
back to the Loop In point and the loop will
be active. To turn a loop off, simply press
LOOP OUT again.
24. FX AMT – Adjusts how much of the
selected effect will be heard in the Master
Mix. If the knob is all the way down, you
will hear only the original ("dry") sound. If
the knob is all the way up, you will hear the
maximum amount of effected ("wet")
sound.
25. SELECT – Selects an effect to be applied
to the Master Mix.
26. PAR – Adjusts the amount of the
designated Effect Parameter. Please
note that this parameter will vary
depending on the selected effect.
27. ON / OFF – Press this button to turn the
master effect on and off.
28. FILTER AMT – Adjusts the amount of
filter applied to the music on that deck.
The center position is zero. Turning the
knob clockwise will increase the amount
of high-pass filter. Turning the knob
counter-clockwise will increase the
amount of low-pass filter.
29. FILTER ON / OFF – Activates or
deactivates the filter on that deck
.

11
Esta Guía de inicio rápido explica cómo instalar y comenzar a usar rápidamente el sistema para
DJ OMNI CONTROL de Numark. Tómese unos minutos para leer la guía y familiarizarse con el
procedimiento de instalación y los controles básicos.
Hemos diseñado al OMNI CONTROL como sistema completo para los DJ basados en software.
OMNI CONTROL es un dispositivo compatible con MIDI que se puede usar con cualquier
software que soporte el protocolo MIDI. Hemos incluido dos paquetes de software Traktor LE
de Native Instruments y Fusion Live de MixMeister —que le permiten actuar como DJ en cuanto
saque el sistema de la caja. Además, puede reproducir sus mezclas mediante este software o
desde el OMNI CONTROL propiamente dicho. Dos conjuntos de conexiones RCA del panel
trasero le permiten enviar sus mezclas maestras y de cue a sistemas de altavoces o
amplificadores remotos.
Asimismo, recomendamos especialmente leer los manuales de referencia de software incluidos
en el disco de instalación, a fin de aprovechar al máximo el OMNI CONTROL. ¡Éxito como DJ
!
Para tener en cuenta
: Si va a operar el Omni Control con un hub USB, recomendamos que use ya sea
un hub alimentado o el adaptador de alimentación de 6 V, 1 A opcional. De esta forma se asegurará el
funcionamiento correcto.
CONTENIDO DE LA CAJA
OMNI CONTROL
MANUAL DE INICIO RÁPIDO DEL USUARIO
INSTRUCCIONES DE SEGURIDAD E INFORMACIÓN DE LA GARANTÍA
CABLE USB
CUPÓN DE MIXMEISTER FUSION LIVE
CD DE SOFTWARE/DRIVERS
::: Inicio rápido de Omni Control :::
NOTA ACERCA DEL CONTROL MIDI :::::
Omni Control está diseñado como dispositivo compatible con MIDI, lo que le permite
controlar cualquier aplicación de computadora que soporte el protocolo MIDI. Esto
significa que no sólo puede usar Omni Control con el software incluido, sino que
también puede usar el controlador con una variedad de aplicaciones de música y
video adicionales. A fin de usar Omni Control con su software favorito, debe habilitar
Omni Control como dispositivo de entrada MIDI en las preferencias de su software.
Tenga en cuenta que dependiendo de su software, Omni Control puede no aparecer
necesariamente como “Omni Control” en las
p
referencias MIDI.

12
INSTALACIÓN DE DRIVERS - PC
Antes de comenzar a usar la interfaz OMNI CONTROL con su computadora, debe instalar en la misma
los drivers necesarios. La instalación es rápida y sencilla —siga las instrucciones que se incluyen a
continuación:
1. Inserte el disco de instalación provisto en la lectora de CD-ROM de su computadora. ¡NO
CONECTE LA OMNI CONTROL TODAVÍA!
2. Haga doble clic en Setup.exe.
3. Seleccione su idioma preferido.
4. Haga clic en Install the driver (Instalar driver).
5. Lea el Acuerdo de Usuario, seleccione I accept
the agreement (Acepto el acuerdo) y luego
haga clic en Install (Instalar).
6. Comienza el procedimiento de instalación. Siga
las instrucciones de la pantalla.
7. Una vez terminada la instalación, verá la
pantalla de la izquierda. Haga clic en Reboot
Now o Reboot Later.
¡AHORA, SU INTERFAZ OMNI CONTROL ESTÁ LISTA PARA USAR!

13
INSTALACIÓN DE DRIVERS - MAC
Antes de comenzar a usar la interfaz OMNI CONTROL con su computadora, debe instalar en la misma
los drivers necesarios. La instalación es rápida y sencilla —siga las instrucciones que se incluyen a
continuación:
1. Inserte el disco de instalación provisto en la lectora de CD-ROM de su computadora. ¡NO
CONECTE LA OMNI CONTROL TODAVÍA!
2. Abra el CD para ver su contenido.
3. Haga doble clic en Install OMNI CONTROL (Instalar OMNI CONTROL) para comenzar el
procedimiento de instalación.
4. Verá aparecer la pantalla de la izquierda.
Haga clic en Continue (Continuar).
5. Seleccione su disco duro como destino de
instalación del driver y haga clic en
Continue.
6. Haga clic en Install para comenzar la instalación.
7. Introduzca su contraseña y haga clic en OK
(Aceptar).
8. Verá la advertencia que se muestra a la
izquierda. Seleccione Continue Installation
(Continuar la instalación).
9. Haga clic en Restart (Reiniciar) para reiniciar su
computadora y completar la instalación. Una vez reiniciada
su computadora, enchufe la DFJ IO.
¡AHORA, SU INTERFAZ OMNI CONTROL ESTÁ LISTA PARA USAR!

14
DIAGRAMA DE CONEXIÓN
Estudie el diagrama de conexión de arriba.
1. Conecte el puerto USB de la OMNI CONTROL a un puerto USB2.0 disponible de su computadora, usando el
cable USB2.0 incluido. La interfaz OMNI CONTROL se alimenta a través del bus USB de su computadora
2. (Opcional) Puede alimentar la OMNI CONTROL conectando un adaptador de alimentación opcional de 6 V 1 A
a la entrada DC IN de la interfaz. Tenga en cuenta que no es necesario tener el adaptador enchufado para que
funcione la OMNI CONTROL. En cambio, debe conectar este adaptador si su computadora no puede
suministrar suficiente energía a la OMNI CONTROL.
3. Conecte la OUTPUT 1 (Salida 1) de la OMNI CONTROL a su sistema principal de altavoces o amplificador,
usando un cable RCA estéreo.
4. (Opcional) Usando un cable RCA estéreo, conecte la salida OUTPUT 2 de la OMNI CONTROL a un sistema
secundario de altavoces o amplificador para fines de monitoreo.
5. Conecte sus auriculares a la salida HEADPHONES de la interfaz OMNI CONTROL. La señal de salida de
HEAPHONES es la misma que sale por la salida OUTPUT 2.
6. Conecte su micrófono a la entrada MIC THROUGH de la OMNI CONTROL.
CONEXIONES DEL PANEL TRASERO
1. PUERTO USB – Use el cable USB2.0
provisto para conectar este puerto a un puerto
USB2.0 disponible de su computadora.
Cuando esté enchufada a su computadora, la
unidad extrae energía por la conexión USB.
Para tener en cuenta: La interfaz OMNI CONTROL requiere una conexión USB2.0 para funcionar plena y
correctamente. Si usa una conexión USB1.1, sólo funcionará la salida OUTPUT 1. Para aprovechar ambas
salidas, asegúrese de conectar la unidad a un puerto compatible con USB2.0 de su computadora.
2. DC IN (Entrada de CC) – Si su computadora no suministra suficiente energía a través del bus USB, es
conveniente que alimente la unidad conectando un adaptador opcional de 6 V/1 A a esta entrada y enchufando
el adaptador a una fuente de alimentación.
3. OUTPUT 1 (Salida 1) – Esta conexión RCA estéreo entrega la mezcla maestra de su computadora. Use un
cable RCA estéreo para conectar esta salida a un sistema de altavoces alimentados o amplificador.
4. OUTPUT 2 (Salida 1) – Esta conexión RCA estéreo entrega la mezcla de cue de su computadora para fines de
monitoreo. Tenga en cuenta que la mezcla de cue sale también por la salida para auriculares Headphone del
panel frontal.
CONEXIONES DEL PANEL FRONTAL
1. ENTRADA MIC THROUGH – Es una entrada
para micrófono de ¼”. La señal de esta
entrada se envía directamente a la salida
RCA estéreo Output 1 (mezcla maestra).
2. MIC VOL (Volumen de micrófono) – Esta
perilla controla el nivel de micrófono que se
envía a la salida Output 1 (mezcla maestra).
3. HEADPHONES (Auriculares) – Esta salida estéreo de ¼” entrega la señal que se encamina a la salida Output
2 (mezcla de cue). Para aprovechar plenamente las funciones de cue y monitoreo que produce esta salida,
asegúrese de encaminar la entrada Cue Mix (mezcla de cue) en su software a la salida Output 2 de la OMNI
CONTROL.
COMPUTADORA
ADAPTOR DE
ALIMENTACIÓN
(OPCIONAL)
MICROFONO
AURICULARES
AL ALTAVOZ o SIST. AMPLIFICADOR
(MONITOR) (MAESTRO)
34
12
3
12

15
ENCAMINAMIENTO DE LAS SALIDAS DE AUDIO EN TRAKTOR
Si está usando la OMNI CONTROL con las aplicaciones de software Traktor o Traktor LE de Native Instruments, vea el
ejemplo y las instrucciones de más abajo para obtener información sobre el encaminamiento de sus salidas de audio
para aprovechar plenamente las funciones de cue y monitoreo.
1. En Traktor, haga clic en Preferences
(Preferencias).
2. Seleccione Audio Setup (Configuración de
audio) y haga clic en la pestaña
Soundcard (Tarjeta de sonido).
3. Luego, bajo el menú desplegable Audio
Device (Dispositivo de audio), seleccione
OMNI CONTROL ASIO Driver.
4. Luego, haga clic en la pestaña Output
Routing (Encaminamiento de salidas).
5. Por último, puede seleccionar las salidas
que desea usar para sus canales maestro
y monitor en el menú desplegable de la
parte inferior. Puesto que la salida para
auriculares Headphone de la OMNI
CONTROL está vinculada al par de salida
RCA estéreo Output 2, recomendamos usar el par Output 1 como canal maestro y el par Output 2 como canal
monitor.
Información adicional: También es conveniente enviar cada “bandeja” virtual independientemente a cada par de
salida de la OMNI CONTROL para usar con un mezclador externo. Para hacerlo, seleccione External (Externo)
como Mixer Mode (Modo del mezclador) en la pestaña Output Routing. Esta forma, podrá decidir qué bandeja
se envía a cada par de salida.
ENCAMINAMIENTO DE LAS SALIDAS DE AUDIO EN MIXMEISTER
Si está usando la OMNI CONTROL con la aplicación de software para DJ Mixmeister, vea el ejemplo y las instrucciones
de más abajo para obtener información sobre el encaminamiento de sus salidas de audio para aprovechar plenamente
las funciones de cue y monitoreo.
1. En Mixmeister, vaya al menú Tools (Herramientas) y seleccione Audio Output Configuration (Configuración de
salidas de audio).
2. Verá una ventana similar a la que se ilustra abajo. (Se muestra Fusion de Mixmeister)
3. Seleccione la opción Dual Output (Salida dual).
4. En el menú desplegable Main output (speakers) (Salida principal – altavoces), seleccione Numark OMNI
CONTROL Audio.
5. En el menú desplegable Preview output (headphones) (Vista preliminar - auriculares), seleccione Numark OMNI
CONTROL Audio.
6. Haga clic en OK (Aceptar).

16
CÓMO CAMBIAR LA LATENCIA
La latencia de audio describe el tiempo que su
tarjeta de sonido demora en responder a un
comando. En otras palabras, es el tiempo que su
computadora demora en procesar los datos y
producir el sonido en la salida. Cuando más baja
es la latencia, más rápido responde su
computadora a los comandos para producir
sonido.
Por ejemplo, con parámetros de alta latencia,
puede comenzar a notar un retardo significativo
cuando cambie los parámetros de ecualización,
nivel y efectos. En este caso, es conveniente que
disminuya la latencia de su tarjeta de sonido a fin
de lograr una respuesta más rápida.
Para cambiar los parámetros de la OMNI
CONTROL, abra el panel de control de USB
Numark haciendo clic en Start | All Programs |
NUMARK | Numark USB Control Panel (Inicio –
Todos los programas – NUMARK – Panel de
control de USB Numark).
Verá un menú desplegable en la parte inferior del panel de control de USB Numark. Haga clic en la
flecha desplegable para ver los parámetros de latencia disponibles y seleccionar el que desea. El
parámetro ‘1024 samples’ producirá una latencia de audio mayor y más retardo, mientras que el ’49
samples’ le dará la latencia más baja y la respuesta más rápida.
Para tener en cuenta
: Dependiendo de su computadora, algunos parámetros de latencia pueden no
funcionar correctamente. Si está trabajando en una máquina lenta y prueba usar los parámetros ’49
samples’ o ’64 samples’, puede experimentar interrupciones y discontinuidades del audio. SI
experimenta tales defectos, es necesario que aumente la latencia de audio en el panel de control de
USB Numark eligiendo uno de los parámetros más lentos, tales como ‘512 samples’ o ‘1024
samples’.

17
ASIGNACIÓN DEL CONTROLADOR PARA TRAKTOR LE
1
2
9
3
10
11
11
11
11
10
12
13
14
15
19
20
15
19
20
16 1621
24
25
26
27
28
29
17
18
24
25
26
27
28
29
17
18
21
2322
21 21
2322
11
11
3
8
8
45
77
6456
1. PISTA – Puede usar la perilla TRACK para
desplazarse por la música en su
computadora. Presione la perilla para
obtener una vista preliminar de la pista
seleccionada.
2. DIRECTORIO – Pulsando este botón se
conmuta entre la ventana del árbol del
navegador y la ventana de lista, de modo
que usted puede seleccionar sus pistas
dentro de las carpetas.
3. CARGAR PISTA – Cada bandeja virtual
posee un botón LOAD TRACK.
Seleccionando una pista y pulsando el
botón LOAD TRACK se carga la pista en la
bandeja correspondiente.
4. CUE – El botón CUE regresa y detiene la
pista en el último punto de cue establecido.
Para reproducir temporalmente el punto de
cue, puede mantener presionado el botón
CUE. La pista se reproduce mientras el
botón se mantiene presionado y retorna al
punto de cue cuando se suelta.
5. ESTABLECER CUE – Puede usar este
botón para establecer un nuevo punto de
cue.
6. REPRODUCIR – Pulse el botón
REPRODUCIR para comenzar a reproducir
o para hacer una pausa en la pista.
7. RUEDA DE AVANCE LENTO – Cuando la
bandeja está detenido, con la RUEDA DE
AVANCE LENTO se raya la pista
seleccionada. Cuando la bandeja está
reproduciendo, con la rueda se inflexiona el
pitch de la pista.
8. VOLUMEN – Ajusta el volumen de la pista
correspondiente.
9. CROSSFADER – Realiza la fusión entre
las dos pistas que se reproducen en las
bandejas virtuales. Si el crossfader está
en la posición del extremo izquierdo, sólo
se oye el audio de la bandeja A. Si está en
el extremo derecho, sólo se podrá oír el
audio de la bandeja B. Cuando está en un
punto intermedio entre los dos, se oirán
ambas bandejas.
10. GANANCIA – Ajusta la ganancia de la
pista correspondiente.
11. ECUALIZACIÓN – Use estas perillas para
ajustar los niveles de las frecuencias
agudas, medias y graves de cada bandeja.
Al pulsar una perilla de ecualización, la
misma funciona como interruptor de
supresión (“kill”) que elimina esa banda de
frecuencias de la música de esa pantalla.
El LED ubicado junto a la perilla se ilumina
cuando se activa la función de supresión.
Para desactivarla, pulse la perilla
nuevamente.

18
12. NIVEL MAESTRO – Controla el nivel
maestro, lo que le permite cambiar el
volumen general de la mezcla.
13. MEZCLA PARA AURICULARES – Esta
perilla ajusta el balance entre los canales
de monitor y maestro en los auriculares.
Tenga en cuenta que, a menos que esté
usando una interfaz de audio con varias
salidas, el canal monitor y maestro es el
mismo.
14. VOLUMEN DE AURICULARES – Esta
perilla ajusta el nivel de la mezcla para
auriculares. Tenga en cuenta que, a
menos que esté usando una interfaz de
audio con varias salidas, el canal monitor y
de mezcla maestra es el mismo.
15. PFL – Pulse el botón PFL para enviar la
música que se reproduce en la bandeja al
canal monitor. Tenga en cuenta que, a
menos que esté usando una interfaz de
audio con varias salidas, el canal monitor y
de mezcla maestra es el mismo.
16. PITCH – Cambia el pitch o el tempo de la
música que se reproduce en esa bandeja.
17. PITCH FINO – Hace los ajustes finos del
pitch en la música de la bandeja.
18. TAP – Golpee este botón en forma
sincronizada con los beats de la música de
esa bandeja. De esta forma se introduce
una nueva lectura de BPM ("beats por
minuto") para esa pista.
19. TONALIDAD – Activa la característica
Master Tempo, que engancha la tonalidad
musical de la pista a la tonalidad original
(como si estuviera tocando con 0% de
ajuste de pitch). Es posible ajustar
entonces el tempo de la pista sin afectar a
su tonalidad o pitch.
20. SINCRONISMO – Sincroniza la música
que se toca en esa bandeja con la que se
toca en la otra.
21. INFLEXIÓN DE PITCH -/+ - Puede usar
estos dos botones de inflexión de pitch
para ajustar temporalmente el pitch y el
tempo de la música que se reproduce en la
bandeja correspondiente. La inflexión de
pitch se usa típicamente para hacer ajustes
pequeños cuando se mezclan dos pistas,
de modo que sus beats se produzcan
sincronizadamente.
22. PUNTO INICIAL DEL LOOP - Pulse este
botón para establecer el punto inicial del
loop.
23. PUNTO FINAL DEL LOOP – Pulse este
botón (después de pulsar el de inicio del
loop) para establecer el punto final del
loop. Una vez que lo pulse, debe saltar de
regreso al punto inicial del loop y éste se
activará. Para desactivar un loop,
simplemente pulse otra vez el botón de
punto final del loop.
24. CANTIDAD DEL EFECTO – Ajusta cuánto
del efecto seleccionado se escuchará en la
mezcla maestra. Si la perilla está
totalmente hacia abajo, oirá sólo el sonido
original (“dry”). Si está totalmente hacia
arriba, escuchará la cantidad máxima del
sonido con efecto (“wet”).
25. SELECCIÓN – Selecciona el efecto a
aplicar a la mezcla maestra.
26. PARÁMETRO – Ajusta la cantidad del
parámetro de efecto designado. Tenga en
cuenta que este parámetro varía en función
del efecto seleccionado.
27. SÍ / NO – Pulse este botón para activar y
desactivar el efecto maestro.
28. CANTIDAD DE FILTRO – Ajusta la
cantidad de filtro aplicado a la música de
esta bandeja. La posición central es cero.
Al girar la perilla en sentido horario
aumenta la cantidad del filtro pasaaltos. Al
girarla en sentido antihorario aumenta la
cantidad del filtro pasabajos.
29. FILTRO SÍ / NO – Activa o desactiva el
filtro de esa bandeja.

19
Ce guide d’utilisation simplifié vous explique comment installer et utiliser rapidement le système
OMNI CONTROL DJ de Numark. Veuillez prendre quelques minutes pour lire ce guide
d'utilisation simplifié afin de vous familiariser avec la procédure d’installation et les commandes
de base.
Nous avons conçu l’OMNI CONTROL de manière qu’il soit un système des plus complet pour les
DJ qui se servent d’applications logicielles dans leurs prestations. L’OMNI CONTROL est un
appareil MIDI et peut être utilisé avec tout logiciel qui prend en charge le protocole MIDI. Nous
avons inclus les logiciels Traktor LE de Native Instruments et MixMeister Fusion Live qui vous
permettront de commencer immédiatement. De plus, vous pouvez faire jouer vos mixes par le
biais des logiciels ou par le biais du OMNI CONTROL. Deux paires de connexions RCA situées
sur le panneau arrière vous permettent d’acheminer les mixes master et cue à un haut-parleur
distant ou à un système de sonorisation.
Nous vous recommandons également de lire les guides de référence des logiciels inclus sur le
disque d'installation afin de profiter pleinement de toutes les fonctions du OMNI CONTROL.
Bon DJing!
Remarque :
Si vous branchez l’Omni Control à un répéteur USB, nous vous recommandons d’en
utiliser un qui possède une alimentation externe ou d'utiliser un câble d'alimentation 6 V 1 A vendu
séparément. Ceci assurera le bon fonctionnement de l’appareil.
CONTENU DE LA BOÎTE
OMNI CONTROL
GUIDE D’UTILISATION SIMPLIFIÉ
INSTRUCTIONS DE SECURITE ET INFORMATIONS DE GARANTIE
CÂBLE USB
COUPON DE MIXMEISTER FUSION LIVE
CD D’INSTALLATION DU LOGICIEL/DU PILOTE
::: Guide d’utilisation simplifié pour Omni Control :::
REMARQUE A PROPOS DU CONTROLE MIDI :::::
Omni Control est compatible avec le protocole MIDI, ainsi, vous permettant de
commander tout logiciel que supporte le protocole MIDI. Non seulement pouvez-
vous utiliser le Omni Control avec les logiciels fournis, mais vous pouvez utiliser le
contrôleur avec une multitude d’autres applications audio et vidéo. Afin d’utiliser le
Omni Control avec vos applications préférées, vous devrez l’ajouter en tant
qu’appareil d’entrée MIDI dans les préférences de vos applications. Veuillez noter
que selon vos applications, le Omni Control peut ne pas apparaître comme « Omni
Control » dans les préférences MIDI.

20
INSTALLATION DES PILOTES – PC
Avant de commencer à utiliser le OMNI CONTROL avec votre ordinateur, vous devez installer tous les
pilotes nécessaires sur votre ordinateur. L’installation est simple et rapide – veuillez suivre les
instructions ci-dessous :
1. Veuillez insérer le disque d’installation dans le lecteur CD-ROM de votre ordinateur. NE
BRANCHEZ PAS LE OMNI CONTROL!
2. Double-cliquez sur Setup.exe.
3. Sélectionnez la langue de votre choix.
4. Cliquez sur l’option Install the driver.
5. Veuillez lire le contrat d’utilisation, puis
sélectionnez l’option I accept the agreement,
puis cliquez sur Install.
6. La procédure d’installation est lancée. Veuillez
suivre les instructions à l'écran.
7. Une fois l’installation terminée, la fenêtre de
gauche s’affiche. Cliquez sur Reboot Now ou
Reboot Later.
LE OMNI CONTROL EST PRÊT À UTILISER.
La page est en cours de chargement...
La page est en cours de chargement...
La page est en cours de chargement...
La page est en cours de chargement...
La page est en cours de chargement...
La page est en cours de chargement...
La page est en cours de chargement...
La page est en cours de chargement...
La page est en cours de chargement...
La page est en cours de chargement...
La page est en cours de chargement...
La page est en cours de chargement...
La page est en cours de chargement...
La page est en cours de chargement...
La page est en cours de chargement...
La page est en cours de chargement...
La page est en cours de chargement...
La page est en cours de chargement...
La page est en cours de chargement...
La page est en cours de chargement...
La page est en cours de chargement...
La page est en cours de chargement...
La page est en cours de chargement...
La page est en cours de chargement...
-
 1
1
-
 2
2
-
 3
3
-
 4
4
-
 5
5
-
 6
6
-
 7
7
-
 8
8
-
 9
9
-
 10
10
-
 11
11
-
 12
12
-
 13
13
-
 14
14
-
 15
15
-
 16
16
-
 17
17
-
 18
18
-
 19
19
-
 20
20
-
 21
21
-
 22
22
-
 23
23
-
 24
24
-
 25
25
-
 26
26
-
 27
27
-
 28
28
-
 29
29
-
 30
30
-
 31
31
-
 32
32
-
 33
33
-
 34
34
-
 35
35
-
 36
36
-
 37
37
-
 38
38
-
 39
39
-
 40
40
-
 41
41
-
 42
42
-
 43
43
-
 44
44


Numark OMNI CONTROL Guide de démarrage rapide
- Taper
- Guide de démarrage rapide
dans d''autres langues
- italiano: Numark OMNI CONTROL Guida Rapida
- English: Numark OMNI CONTROL Quick start guide
- español: Numark OMNI CONTROL Guía de inicio rápido
- Deutsch: Numark OMNI CONTROL Schnellstartanleitung
Documents connexes
Autres documents
-
Pioneer DJ Equipment DDJ-ERGO-K Manuel utilisateur
-
Vista Traktor Kontrol S4 Manuel utilisateur
-
Pioneer DDJ-T1 Manuel utilisateur
-
iON iCUE Manuel utilisateur
-
Yamaha CL5/CL3/CL1 V1.5 Manuel utilisateur
-
Yamaha V5 Manuel utilisateur
-
Yamaha V3 Manuel utilisateur
-
-
Yamaha v4 Manuel utilisateur
-
ALPOWL B11S4gkFLJL Manuel utilisateur