
Britax Child Safety, Inc., 4140 Pleasant Road, Fort Mill, SC 29708, U.S.A
Consumer Services: 888.427.4829 or 704.409.1699
www.Britax.com
© 2015 Britax Child Safety, Inc. All rights reserved.
A:03.15
P03758500
Page 1 of 2
CLICKTIGHT
™
Convertibles
Instructions / Instructions / Instrucciones
Anti-Rebound Bar Kit:
• Anti-Rebound Bar
• No Tools Required
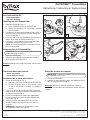
Installing the Anti-Rebound Bar
1. Open the CLICKTIGHT (Fig. 1).
a. Press the dimple on the CLICKTIGHT dial.
b. Rotate dial clockwise until CLICKTIGHT releases
and lift to open.
2. Pull back on the shell cover behind the red marker at
the front of the seat and locate the open end of the
structure tube (Fig. 2).
3. Insert one end of the anti-rebound bar into the tube as
shown, then repeat for the other side (Fig. 3).
4. Lift up on the anti-rebound bar to ensure both ends
are properly set inside the structure tubes.
NOTE: Close the CLICKTIGHT to completely secure
the anti-rebound bar.
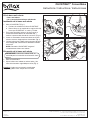
Removing the Anti-Rebound Bar
IMPORTANT: The anti-rebound bar MUST be removed
for forward-facing installation.
1. Open the CLICKTIGHT.
2. Grasp the anti-rebound bar at both sides and pull
away from the child seat (Fig. 4).
Cleaning: Sponge clean using warm water and mild soap.
Towel dry.
2
4
1
1b
1a
Red / Rouge
3
Trousse de barre anti-rebond :
• Barre anti-rebond
• Aucun outils nécessaire
Installation de la barre anti-rebond
1. Ouvrez le CLICKTIGHT (Fig. 1).
a. Appuyez sur le cran d’arrêt du témoin CLICKTIGHT.
b. Tournez le témoin dans le sens horaire jusqu’à
ce que le CLICKTIGHT se libère, se soulève et
s’ouvre.
2. Tirez sur la housse de la coque derrière le marqueur
rouge à l’avant du siège et repérez l’extrémité ouverte
du tube de structure (Fig. 2).
3. Insérez une extrémité de la barre anti-rebond dans
le tube comme illustré, puis répétez l’opération de
l’autre côté (Fig. 3).
4. Soulevez la barre anti-rebond pour vous assurer
qu’elle est régler correctement dans les tubes de
structure.
REMARQUE : Fermeture du CLICKTIGHT va fixer
complètement la barre anti-rebond.
Retrait de la barre anti-rebond
IMPORTANT : La barre anti-rebond DOIT être retirée dans
les installations vers l’avant.
1. Ouvrez le CLICKTIGHT.
2. Attrapez les deux côtés de la barre anti-rebond et tirez-la
hors du siège pour enfant (Fig. 4).
Nettoyage: Nettoyez à l’éponge la barre anti-rebond en
utilisant de l’eau chaude et du savon doux. Séchez avec une
serviette.
La page charge ...
-
 1
1
-
 2
2


Britax Anti-Rebound Bar ClickTight Convertibles Manuel utilisateur
- Taper
- Manuel utilisateur
- Ce manuel convient également à
dans d''autres langues
Documents connexes
Autres documents
-
 TREK BIKES ROCKSHOX BOXXER Le manuel du propriétaire
-
GAS GAS MC 2008 Manuel utilisateur
-
DAHON REVELATION Manuel utilisateur
-
Specialized S-Works Stumpjumper 29 Mode d'emploi
-
Joie i-Venture Group 0+/1 Car Seat Manuel utilisateur
-
 Vertigo Motors COMBAT TITANIUM R 2019 Le manuel du propriétaire
-
CYBEX Sirona Manuel utilisateur
-

