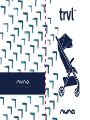
Nuna NST15705 Manuel utilisateur
- Catégorie
- Poussettes
- Taper
- Manuel utilisateur

IM-000710B

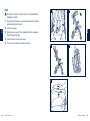
Designed
around your life

3
TRVL instructions
EN
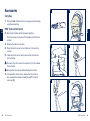
Contents
Product Information 4
Warranty
Contact
Child Usage Requirements 5
Warnings 6
Parts List 10
Product Setup 12
Product Use 18
Accessories 28
Cleaning and Maintenance 30
Français (CA) 32
IMPORTANT!
KEEP THESE
INSTRUCTIONS FOR
FUTURE REFERENCE:
READ CAREFULLY

Child Usage Requirements
This stroller is suitable for use with children who meet the
following requirements:
Weight: up to 50 lb (22.7 kg) maximum
Height: up to 45 in. (114.3 cm)
When using the stroller frame with the a NUNA infant carrier,
refer to the child usage requirements listed in its instruction
manual.
4TRVL instructions 5
TRVL instructions
EN
EN
Product Information
Model Number: ___________________________________________________________________________________________________________________________________
Manufactured date: _______________________________________________________________________________________________________________________
The model number and the manufactured in date are located
on a label on the bottom of the stroller frame.
Warranty
We have purposely designed our high-quality products so
that they can grow with both your child and your family.
Because we stand by our product, our gear is covered by
a custom warranty per product, starting from the day it
was purchased. Please have the proof of purchase, model
number and manufactured in date available when you
contact us.
For warranty information please visit:
www.nunababy.ca
Contact
For replacement parts, service, or additional warranty
questions, please contact our customer service department.
In Canada:
info@nunababy.ca
1.800.667.4111

6TRVL instructions 7
TRVL instructions
EN
EN
WARNIN G
Failure to follow these warnings and instructions
could result in serious injury or death.
A child’s safety is your responsibility. NEVER leave
your child unattended.
To avoid any danger of suffocation, remove all
plastic covers before using the stroller and destroy
or keep away from babies and children!
Keep small parts away from children as they pose
a choking hazard.
Discontinue using this stroller if it becomes
damaged or broken.
Use original Nuna parts and accessories only.
Use of this stroller with a child weighing more than
50 lb (22.7 kg) or taller than 45 in. (114.3 cm) in
height will cause excessive wear, and stress on the
stroller, and could create an unstable condition.
Use the stroller with only one child at a time.
To prevent a hazardous, unstable condition, do
not place more than 10 lb (4.5 kg) in the storage
basket before use.
Negotiate curbs and rough ground carefully.
Repeated impact could cause damage to this
stroller.This stroller is to be used only at walking
speed and is not intended for use while jogging,
skating, etc.
The parking brake MUST be engaged when the
stroller is stopped and when placing and removing
child.
Overloading, incorrect folding, and using
accessories other than those approved by Nuna,
e.g. child seats, bag hooks, rain covers, buggy
boards, etc., may damage or make this stroller
unsafe.
Adding accessories such as purses, shopping
bags, or parcels to the handle or canopy can cause
the stroller to be unstable.
This stroller does not replace a crib or a bed.
Should your child need to sleep, they should be
placed in a crib or approved sleeping area based
on your child’s requirements.
Avoid serious injury from falling or sliding out.
Always use seat belt. After fastening buckles,
adjust belts to get a snug fit around your child.
This stroller has been designed to use from birth.
We recommend using lowest reclined position for
newborn babies.
Child may slip into leg openings and strangle.
Avoid finger entrapment Use care when folding
and unfolding the stroller. Be certain the stroller
is fully erected and latched before allowing your
child near the stroller
Strangulation Hazard Do not place items with a
string around your child’s neck, suspend strings
from the stroller, or attach strings to toys.
ALWAYS keep your child in view while in this
stroller.
ALWAYS allow the fabric to dry naturally away
from direct heat.

8TRVL instructions 9
TRVL instructions
EN
EN
ALWAYS check that the attachments are correctly
engaged.
DO NOT let your child play with this stroller.
DO NOT place any item on the canopy of this
stroller.
DO NOT leave this stroller exposed in the vicinity
of a strong source of heat i.e. a radiator or open
fire or store this stroller in a damp place.
DO NOT make any changes or modifications to
this stroller that are not specified in this manual.
DO NOT use storage basket as a child carrier.
NEVER use the stroller on stairs or escalators. You
may suddenly lose control of the stroller or your
child may fall out.
NEVER allow your child to stand on the footrest.

10 TRVL instructions 11
TRVL instructions
EN
EN
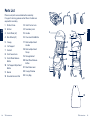
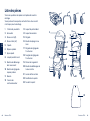
Parts List
Make sure all parts are available before assembly.
If any part is missing, please contact Nuna. No tools are
required for assembly.
13 4
2
6
7
8
11
10
9
12
13
5
15
16
20
17
19
22
14
21
1 Stroller Frame
2 Armbar
3 Front Wheel (x2)
4 Rear Wheel (x2)
5 Canopy
6 Calf Support
7 Footrest
8 Front Swivel Lock
9 Front Wheel Release
Button
10 Calf Support Adjustment
Button
11 Buckle
12 Shoulder Harness Pad
13 Infant Carrier Lock
14 Secondary Lock
15 Handle
16 One-Hand-Fold Button
17 Recline Adjustment
Handle
18 Recline Adjustment
Straps
19 Storage Basket
20 Rear Wheel Release
Button
21 Rear Brake Lever
22 Canopy Window
23 Carry Bag
23
18

12 TRVL instructions 13
TRVL instructions
EN
EN
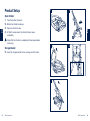
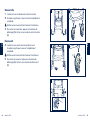
Product Setup
Open Stroller
1 - Take the stroller frame out.
2 - Rotate the stroller handle up.
3 - Open the stroller fra me.
4 - A “click” sound means the stroller frame is open
completely.
Check that the stroller is completely latched open before
continuing.
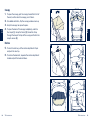
Storage Basket
5 - Hook the storage basket on the rear legs on both sides.
click
1 4
2
3
5

14 TRVL instructions 15
TRVL instructions
EN
EN
click
2
4
5
1
2
3
2 2
1
1
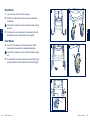
Rear Wheels
1 - Insert the rear wheels into the rear legs.
2 - A “click” sound means the rear wheel is assembled
completely.
Check that the wheels are securely attached by pulling
on them.
3 - To remove the rear wheel, press the release button (1)
and detach the rear wheel from the rear leg (2).
Front Wheels
4 - Insert the front wheels into the front legs. A “click”
sound means the wheel is assembled completely.
Check that the wheels are securely attached by pulling
out.
5 - To remove the front wheel, press the release button (1)
and then detach the front wheel from the front leg (2).
1

16 TRVL instructions 17
TRVL instructions
EN
EN
1
2
3
4
click
5
6
1
1
2
2
1
click
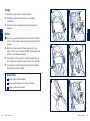
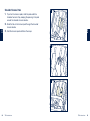
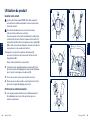
Canopy
1 - Slide the canopy mounts onto the stroller.
2 - A “click” sound means the canopy is assembled
completely.
3 - Snap the buttons on the back panel of canopy to the
backrest.
Armbar
It is always recommended that the armbar be used, but it
is not a restraint device. Always secure the child with the
harness.
4 - Align the armbar ends with the armbar mounts, and
insert until it clicks into place. A “click” sound means the
armbar is assembled completely.
5 - To rotate the armbar, press the armbar release button on
one side (1) and rotate the armbar from the other side (2).
6 - To remove the armbar, press the armbar release buttons
(1) and pull the armbar out (2).
Check Setup
Stroller frame is latched open
Rear and front wheels are securely attached
Armbar is securely attached

18 TRVL instructions 19
TRVL instructions
EN
EN
2 5
1
2 2
1
3
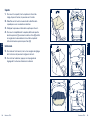
Product Use
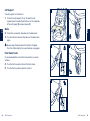
Securing Your Child
The parking brake MUST be engaged when the stroller is
stopped and when placing and removing child.
To avoid serious injury from falling or sliding out, always
secure your child with the harness.
Make sure the harness is adjusted properly and your
child is snugly secured. The space between the child and
the shoulder harness should be about the thickness of
one finger. DO NOT cross the shoulder belts. This will
cause pressure on your child’s neck.
1 - Push the top button on the buckle (1) to release the
buckle latch and remove the magnetic clips (2).
Place your child in the stroller.
2 - Insert the waist clips into the center buckle (1). Slide the
crotch belt adjustment buckle to adjust as needed (2).
3 - Open the harness covers to adjust the harness.
4 - Fit the harness snugly to your child by sliding the
adjustment straps to tighten.
Shoulder Harness Position
5 - The upper shoulder harness buckles can be moved up
and down for added adjustment.
1
2
4

20 TRVL instructions 21
TRVL instructions
EN
EN
25
6
1
2
1
Canopy
1 - To open the canopy, pull the canopy toward the front of
the seat, and to close the canopy, push it back.
2 - For added ventilation, flip the canopy window cover up.
3 - Unzip the canopy rear panel to open.
4 - To open the back of the canopy completely, undo the
four snaps (1), roll up the fabric (2), thread the strap
through the loop at the top of the canopy and fasten the
snap to secure (3).
Recline
5 - To raise the recline, pull the recline adjustment straps
and push the seat up.
6 - To recline the backrest, squeeze the recline adjustment
handle and pull the backrest down.
4
3
1 1
23

22 TRVL instructions 23
TRVL instructions
EN
EN
2
1
Shoulder Harness Pads
1 - To put on the harness pads, slide the pad under the
shoulder harness strap, keeping the opening in the pad
around the shoulder harness buckle.
2 - Slide the tab on the harness pad through the shoulder
harness buckle.
3 - Fold the harness pad and fasten the snaps.
3

24 TRVL instructions 25
TRVL instructions
EN
EN
4
5
2
3
Calf Support
The calf support has 2 positions.
1 - To raise the calf support, lift up. To lower the calf
support, press the adjustment buttons on the underside
of the calf support (1) and push down (2).
Brake
2 - To lock the rear wheels, step down on the brake lever.
3 - To unlock the rear wheels, step down on the brake lever
again.
Always apply the brake when the stroller is stopped.
Push the stroller slightly to ensure the brake is engaged.
Front Swivel Locks
It is recommended to use the front swivel locks on uneven
surfaces.
4 - Turn the front swivel lock to lock the front wheel.
5 - Turn the front swivel lock back to unlock it.
1
2
1
1

26 TRVL instructions 27
TRVL instructions
EN
EN
5
4
3
1
2
2
1
Fold
Ensure that the front swivel locks are unlocked before
folding the stroller.
1 - Ensure that the snap on each side is fastened correctly
before folding the stroller.
2 - Fold the canopy.
3 - Slide the lock against the handle (1) and then squeeze
the folding button (2).
4 - Fold the top of the stroller down.
5 - The frame can fold and stand on its own.

28 TRVL instructions 29
TRVL instructions
EN
EN
1
Accessories
Carry Bag
1 - Put the folded stroller into the carry bag and close the bag
using the drawstring.
PIPA™ Series Infant Carrier
2 - Recline the stroller seat to the lowest position.
Push the canopy to the rear of the stroller and attach the
arm bar.
3 - Release the infant carrier lock.
4 - Place the infant carrier on the stroller so it sits over the
arm bar.
5 - Close the infant carrier lock to secure the infant carrier
on the stroller.
Pull up on the infant carrier to check that it is fully locked
to the stroller.
Remove the infant carrier before folding the stroller.
6 - To remove the infant carrier, release the infant carrier
lock, squeeze the release handle (1), and lift the infant
carrier up (2).
5
6
1
2
3
2
1
2
4

30 TRVL instructions 31
TRVL instructions
EN
EN
Cleaning and Maintenance
Clean the frame, plastic parts, and fabric with a damp
cloth, but do not use abrasives or bleach. Do not use silicon
lubricants as they will attract dirt and grime. Do not store
your stroller in a damp place.
Clean the stroller wheels regularly with water and remove
any dirt.
To ensure long-lasting use, wipe off this product with a soft,
absorbent cloth after using it in rainy weather.
Refer to the care label attached to the fabric for washing and
drying instructions.
It is normal for fabric to color from sunlight and to show wear
and tear after a long period of use, even when used normally.
For reasons of safety, only use original Nuna parts.
Check regularly if everything functions properly. If any parts
are torn, broken, or missing, stop using this product.
Nuna International B.V. Nuna and all associated logos are trademarks.

32 Directives TRVL 33Directives TRVL
FR
FR
Contenu
Informations sur le produit 34
Garantie
Contact
Conditions d’utilisation de la poussette 35
Mises en garde 36
Liste des pièces 40
Installation du produit 42
Utilisation du produit 48
Accessoires 58
Nettoyage et entretien 60
IMPORTANT !
CONSERVEZ CES
INSTRUCTIONS POUR
UNE UTILISATION
FUTURE !
LIRE ATTENTIVEMENT

Exigences d’utilisation par les
enfants
Ce siège de poussette est adapté aux enfants répondant aux
exigences suivantes:
Poids: jusqu’à 50 lb (22,7 kg) maximum
Taille: 114,3 cm (45 po.)
En cas d’utilisation du cadre de la poussette avec la nacelle
MIXX ou un porte-bébé Nuna, consultez les exigences
d’utilisation par les enfants apparaissant dans les manuels
d’utilisation.
34 Directives TRVL 35Directives TRVL
FR
FR
Informations sur le produit
Numéro de modèle: ____________________________________________________________
Date de fabrication: ____________________________________________________________
Le numéro de modèle et la date de fabrication se situent
sur une étiquette sur la partie inférieure du cadre de la
poussette.
Garantie
Nous avons conçu spécialement nos produits de haute
qualité afin qu’ils puissent accompagner le développement
de votre enfant et de votre famille. Nous soutenons
notre produit en couvrant notre matériel par une garantie
personnalisée, commençant le jour de son achat.
Ayez la preuve d’achat, le numéro de modèle et la date de
fabrication à votre disposition lorsque vous nous contactez.
Pour des informations sur la garantie, veuillez vous rendre
sur le site suivant :
www.nunababy.ca
Contact
Pour des informations sur les pièces de rechange, le service
ou des questions supplémentaires sur la garantie, veuillez
contacter notre service client.
Au Canada:
info@nunababy.ca
1.800.667.4111

36 Directives TRVL 37Directives TRVL
FR
FR
Négocier soigneusement les bordures et les
terrains accidentés. Des chocs répétés pourraient
endommager cette poussette.
Cette poussette doit être utilisée uniquement à
la vitesse de marche et n’est pas destinée à être
utilisée pendant le jogging, le patinage à roulettes,
etc.
Le frein de stationnement DOIT être serré lorsque
la poussette est arrêtée et lors de la mise en
place et du retrait de l’enfant.
La surcharge, le pliage incorrect et l’utilisation
d’accessoires autres que ceux approuvés par
Nuna, comme les sièges d’enfant, les crochets
de sac, les habillages de pluie, les planches
de poussette, etc. peuvent endommager cette
poussette ou la rendre dangereuse.
L’ajout d’accessoires tels que sacs à main, sacs
à provisions ou colis à la poignée ou à la capote
peut rendre la poussette instable.
Cette poussette ne remplace pas un berceau ou
un lit. Si votre enfant a besoin de dormir, il devrait
être placé dans un berceau ou dans une aire de
sommeil approuvée selon les besoins de votre
enfant.
La sécurité d’un enfant est votre responsabilité.
Ne JAMAIS laisser votre enfant sans surveillance.
Pour éviter tout risque de suffocation, retirer
toutes les protections en plastique avant d’utiliser
la poussette et les détruire ou les garder hors de
portée des bébés et des enfants!
Conserver les petites pièces à l’écart des enfants,
car elles présentent un risque d’étouffement.
Cesser d’utiliser cette poussette si celle-ci est
endommagée ou brisée.
Utiliser uniquement des pièces et accessoires
d’origine Nuna.
L’utilisation de cette poussette avec un enfant
pesant plus de 22,7 kg (50 lb) ou dont la taille
est supérieure à 114,3 cm (45 po.) entraînera une
usure excessive de la poussette et la surcharge
et pourrait créer une condition instable. Utiliser la
poussette avec un seul enfant à la fois.
Pour éviter une condition dangereuse et instable,
ne pas placer plus de 4,5 kg (10 lb) dans le panier
de rangement avant l’utilisation.
AVERTISSEMENT
Ne pas suivre ces avertissements et instructions
peut conduire à de sérieuses blessures ou la
mort.
La page est en cours de chargement...
La page est en cours de chargement...
La page est en cours de chargement...
La page est en cours de chargement...
La page est en cours de chargement...
La page est en cours de chargement...
La page est en cours de chargement...
La page est en cours de chargement...
La page est en cours de chargement...
La page est en cours de chargement...
La page est en cours de chargement...
La page est en cours de chargement...
-
 1
1
-
 2
2
-
 3
3
-
 4
4
-
 5
5
-
 6
6
-
 7
7
-
 8
8
-
 9
9
-
 10
10
-
 11
11
-
 12
12
-
 13
13
-
 14
14
-
 15
15
-
 16
16
-
 17
17
-
 18
18
-
 19
19
-
 20
20
-
 21
21
-
 22
22
-
 23
23
-
 24
24
-
 25
25
-
 26
26
-
 27
27
-
 28
28
-
 29
29
-
 30
30
-
 31
31
-
 32
32


Nuna NST15705 Manuel utilisateur
- Catégorie
- Poussettes
- Taper
- Manuel utilisateur
dans d''autres langues
- English: Nuna NST15705 User manual
Documents connexes
Autres documents
-
Joie Litetrax Manuel utilisateur
-
Joie Litetrax 4 Wheeler Pushchair Le manuel du propriétaire
-
mothercare Joie Chrome GL Stroller Le manuel du propriétaire
-
Chicco Cortina® Together Stroller Le manuel du propriétaire
-
Evenflo Pivot Manuel utilisateur
-
Graco Relay Click Connect Le manuel du propriétaire
-
-
 Jole litetrax™ 4 Manuel utilisateur
-
