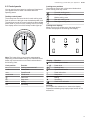
Bosch HIS8655U Manuel utilisateur
- Catégorie
- Micro-ondes
- Taper
- Manuel utilisateur


en-us
2
Table of contents
1 IMPORTANT SAFETY INSTRUCTIONS.................... 3
1.1 Safety definitions....................................................... 3
1.2 General information................................................... 3
1.3 Intended use ............................................................. 3
1.4 Restriction on user group .......................................... 3
1.5 Proper installation and maintenance ......................... 3
1.6 Safe use.................................................................... 4
1.7 Child safety ............................................................... 8
1.8 Electromagnetic interference..................................... 8
1.9 State of California Proposition 65 Warnings .............. 8
2 Preventing material damage .................................... 9
2.1 Preventing oven cavity damage ................................ 9
2.2 Preventing cooktop damage...................................... 9
3 Environmental protection and energy-saving ...... 10
3.1 Disposal of packaging............................................. 10
3.2 Saving energy when using the oven........................ 10
3.3 Saving energy when using the cooktop................... 10
4 Familiarizing yourself with your appliance ........... 11
4.1 Appliance................................................................ 11
4.2 Control panels......................................................... 13
5 Accessories............................................................. 15
5.1 Other accessories................................................... 15
5.2 Fitting the telescopic rail set .................................... 15
5.3 Inserting racks......................................................... 15
6 Before using for the first time ................................ 17
6.1 Setting the time....................................................... 17
6.2 Cleaning the appliance before using it for the first
time......................................................................... 17
6.3 Cleaning the accessories........................................ 17
7 Cooktop operation .................................................. 18
7.1 Setting the power level............................................ 18
7.2 Turning the cooking zone off ................................... 18
7.3 Residual heat indicator............................................ 18
7.4 CombiZone ............................................................. 18
7.5 Warming zone......................................................... 19
7.6 SpeedBoost® ......................................................... 19
7.7 Panel lock ............................................................... 19
7.8 Automatic time limitation ......................................... 20
7.9 Power management................................................ 20
7.10 Induction cooking.................................................. 20
8 Oven operation........................................................ 21
8.1 Switching on the oven............................................. 21
8.2 Time-setting options................................................ 21
8.3 Core temperature meat probe ................................. 22
8.4 Sabbath mode......................................................... 23
8.5 Panel lock ............................................................... 23
8.6 Getting the most out of your oven ........................... 23
8.7 Basic Settings - Oven.............................................. 25
9 Cleaning and maintenance...................................... 27
9.1 Cleaning and maintenance - cooktop ....................... 27
9.2 Cleaning and maintenance - oven ............................ 28
10 Cooking charts ....................................................... 33
10.1 Baked goods/entrees ............................................. 33
10.2 Meats ..................................................................... 35
11 Troubleshooting..................................................... 39
12 Disposal .................................................................. 40
12.1 Disposal of your old appliance................................ 40
13 Customer Service................................................... 40
13.1 Model number (E-Nr.) and production number
(FD)........................................................................ 40
13.2 Rating plate location............................................... 40
14 STATEMENT OF LIMITED PRODUCT
WARRANTY ............................................................ 41
14.1 What this warranty covers & Who it applies to........ 41
14.2 How long the warranty lasts ................................... 41
14.3 Repair/replace as your exclusive remedy ............... 41
14.4 Out of warranty product.......................................... 42
14.5 Warranty exclusions............................................... 42
14.6 Obtaining warranty service ..................................... 42
14.7 Product information ................................................ 42

en-us
3
Read all instructions carefully before use. These
precautions will reduce the risk of electrical shock, fire and
injury to persons. When using kitchen appliances, basic
safety precautions must be followed including those in the
following pages.
1.1 Safety definitions
Here you can find explanations of the safety signal words
used in this manual.
WARNING
This indicates that death or serious injuries may occur as
a result of non-observance of this warning.
CAUTION
This indicates that minor or moderate injuries may occur
as a result of non-observance of this warning.
NOTICE:
This indicates that damage to the appliance or property
may occur as a result of non-compliance with this
advisory.
Note:This alerts you to important information and/or tips.
1.2 General information
Here you can find general information about this manual.
¡Please read this manual carefully.
¡Observe the safety instructions and warnings.
¡Keep the manual and the product information in a safe
place for future reference or for the next owner.
¡Check the appliance for damage after unpacking it. Do
not connect the appliance if it has been damaged in
transit.
1.3 Intended use
Only a qualified electrician may connect appliances
without plugs. The manufacturer is not responsible for
damage caused by incorrect connections. Please see the
Statement of Limited Product Warranty →
Page41
.
Only use this appliance:
¡To prepare meals and drinks.
¡Under supervision. Never leave the appliance
unattended when cooking for short periods.
¡In private households and in enclosed spaces in a
residential environment.
Do not use the appliance:
¡On boats or in vehicles.
¡as a room heater.
¡This appliance is not intended for operation with an
external time switch or external remote control.
1.4 Restriction on user group
This appliance is not intended for use by persons
(including children) with reduced physical, sensory or
mental capabilities, or lack of experience and knowledge,
unless they have been given supervision or instruction
concerning use of the appliance by a person responsible
for their safety.
When children become old enough to use the appliance, it
is the responsibility of the parents or legal guardians to
ensure that they are instructed in safe practices by
qualified persons.
Children should be supervised to ensure that they do not
play with the appliance.
Do not let children play with the appliance.
1.5 Proper installation and maintenance
WARNING
TIP OVER HAZARD! A child or adult can tip the range
over and be killed.
▶Install the anti-tip device to the structure and/or the
range.
▶Verify the anti-tip device has been properly installed
and engaged.
▶Engage the range to the anti-tip device. Ensure the
anti-tip device is re-engaged when the range is moved.
▶Re-engage the anti-tip device if the range is moved. Do
not operate the range without the anti-tip device in
place and engaged.
▶See installation instructions for details.
▶Failure to follow the instructions in this manual can
result in death or serious burns to children and adults.
▶Check for proper installation and use of the anti-tip
bracket. Carefully tip the range forward pulling from the
back to ensure that the anti-tip bracket engages the
range leg and prevents tip-over. The range should not
move more than 1" (2.5cm).
IMPORTANT SAFETY INSTRUCTIONS
READ AND SAVE THESE INSTRUCTIONS

en-us
4
WARNING
In the event of a malfunction, it might become necessary
to turn off the power supply.
▶Have the installer show you the circuit breaker or fuse.
Mark it for easy reference.
To avoid electrical shock hazard, before servicing the
appliance, turn power off at the service panel and lock the
panel to prevent the power from being switched on
accidentally.
Proper Installation - Improper installation or grounding can
cause electric shock.
▶This appliance must be properly installed and grounded
by a qualified technician.
▶Connect only to properly grounded outlet.
▶Refer to installation instructions for details.
User Servicing - Do not repair or replace any part of the
appliance unless specifically recommended in this
manual.
▶All other servicing should be referred to an authorized
service provider.
Light socket is live when door is open if main power
supply is not turned off.
▶Turn off main power supply at the service panel before
changing the light bulbs.
WARNING
Make sure the appliance and lights are cool and power to
the appliance has been turned off before replacing the
light bulb(s). Failure to do so could result in electrical
shock or burns.
▶The lenses must be in place when using the appliance.
▶The lenses serve to protect the light bulb from breaking.
▶The lenses are made of glass. Handle carefully to avoid
breaking. Broken glass can cause an injury.
Failure to follow these instructions when removing the
oven door may lead to personal injury or product damage.
▶Make sure oven is cool and power to the oven has
been turned off before removing the door. Failure to do
so could result in electrical shock or burns.
▶The oven door is heavy and parts of it are fragile. Use
both hands to remove the oven door.
▶The door front is glass. Handle it carefully to avoid
breakage.
▶Grasp only the side of the oven door. Do not grasp the
handle. It may swing in your hand and cause damage
or injury. Failure to grasp the oven door firmly and
properly could result in personal injury or product
damage.
▶To avoid injury from hinge bracket snapping closed, be
sure both levers are securely in place before removing
the door.
▶Do not force the door open or closed. The hinge could
be damaged and cause damage or injury.
▶Do not lay the removed door on sharp or pointed
objects as this could break the glass. Lay it on a flat,
smooth surface, positioned so that the door cannot fall
over.
WARNING
If the supply cord is damaged, it must be replaced by the
manufacturer, its authorized service provider or similar
qualified persons in order to avoid hazard.
WARNING
Grease and fat can ignite when heated.
▶Keep the oven free from grease build up.
CAUTION
In the event of an error the display flashes and beeps
continuously.
▶Disconnect appliance from the power supply and call
an authorized service provider.
WARNING
Malfunctions can cause injuries.
▶Do not operate this appliance if it is not working
properly, or if it has been damaged. Contact an
authorized service provider.
1.6 Safe use
WARNING
When properly cared for, your new appliance has been
designed to be safe and reliable.
▶Read all instructions carefully before use. These
precautions will reduce the risk of burns, electric shock,
fire, and injury to persons.
▶When using kitchen appliances, basic safety
precautions must be followed, including those in the
following pages.
WARNING
Overheated materials can cause fire or burns.
▶Do not allow aluminum foil, plastic, paper or cloth to
come in contact with a hot surface element, heating
element or grate.
▶Do not allow pans to boil dry.
IMPORTANT SAFETY INSTRUCTIONS
READ AND SAVE THESE INSTRUCTIONS

en-us
5
Unattended cooking on a cooktop with fat or oil can be
dangerous and may result in a fire.
▶Do not leave the cooktop unattended when in use.
If materials inside an oven or warming drawer should
ignite, keep door closed.
▶Turn off the appliance and disconnect the circuit at the
circuit breaker box.
A fire could occur during cooking.
▶Always have a working smoke detector near the
kitchen.
▶Have an appropriate fire extinguisher available, nearby,
highly visible and easily accessible near the appliance.
NEVER cover any slots, holes or passages in the oven
bottom or cover an entire rack with materials such as
aluminum foil.
▶Doing so blocks air flow through the oven.
▶Aluminum foil linings may also trap heat, causing a fire
hazard.
If the cooktop is near a window, forced air vent or fan, be
certain that flammable materials such as window
coverings do not blow over or near the burners or heating
elements. They could catch on fire.
Cooking fires can spread if extinguished incorrectly.
▶Never use water on cooking fires.
WARNING - TO REDUCE THE RISK OF A RANGE TOP
GREASE FIRE
▶Never Leave Surface Units Unattended at High
Settings - Boilovers cause smoking and greasy
spillovers that may ignite. Heat oils slowly on low or
medium settings.
▶Always turn hood ON when cooking at high heat or
when flambeing food (i.e. Crepes Suzette, Cherries
Jubilee, Peppercorn Beef Flambe’).
▶Clean ventilating fans frequently. Grease should not be
allowed to accumulate on fan or filter.
▶Use proper pan size. Always use cookware appropriate
for the size of the surface element.
Flames can be drawn into the ventilation system.
▶Whenever possible, do not operate the ventilation
system during a cooktop fire. However, do not reach
through fire to turn it off.
Cookware Handles Should be Turned Inward and Not
Extend Over Adjacent Surface Units.
▶To reduce the risk of burns, ignition of flammable
materials, and spillage due to unintentional contact with
the cookware, the handle of a cookware should be
positioned so that it is turned inward, and does not
extend over adjacent surface units.
Wear Proper Apparel. Loose-fitting or hanging garments,
such as ties, scarves, jewelry, or dangling sleeves, should
never be worn while using the appliance.
▶Tie long hair so that it does not hang loose.
▶Secure all loose garments, etc. before beginning.
Use Proper Pan Size - This appliance is equipped with
one or more surface units of different sizes.
▶Select cookware having flat bottoms large enough to
cover the surface unit cooking zone.
▶The use of undersized cookware will expose a portion
of the cooking zone to direct contact and may result in
ignition of clothing. Proper relationship of cookware to
cooking zone will also improve efficiency.
Boilovers can cause smoke and some foods and oils may
catch fire if left on high temperature settings.
▶When using a timer, always supervise the cooktop.
▶Do not allow anything to boil over or burn.
If the cooktop turns off automatically and can no longer be
operated, it may turn itself on unintentionally at a later
point.
▶Switch off the circuit breaker or fuse in the electrical
panel.
▶Contact Customer Service for support.
CAUTION
The cooking process has to be supervised. A short term
cooking process has to be supervised continuously.
WARNING
If the display does not work when a cooking area is
heating up disconnect the circuit breaker or fuse in the
electrical panel.
▶Contact an authorized service provider.
To avoid risk of fire do not store items on the cooking
surfaces.
In the event that personal clothing or hair catches fire,
drop and roll immediately to extinguish flames.
Do Not Use Water on Grease Fires.
▶Smother fire or flame or use dry chemical or foam-type
extinguisher.
CAUTION
The oven vents are important for air circulation. Covering
the oven vents will cause the oven to overheat. Refer to
the appliance overview for the location of the oven vents.
→
Page11
▶Do not obstruct the front oven vent or rear vent trim.
IMPORTANT SAFETY INSTRUCTIONS
READ AND SAVE THESE INSTRUCTIONS

en-us
6
WARNING
Use Only Dry Potholders - Moist or damp potholders on
hot surfaces may result in burns from steam.
▶Do not let potholders touch hot heating elements.
▶Do not use a towel or other bulky cloth.
Hot oil is capable of causing extreme burns and injury.
▶Use high heat settings on the cooktop only when
necessary.
▶To avoid bubbling and splattering, heat oil slowly on no
more than a low-medium setting.
▶Never move a pan of hot oil, especially a deep fat fryer.
Wait until it is cool.
Spills of hot food may cause burns.
▶Hold the handle of the pan when stirring or turning food.
This helps prevent spills and movement of the pan.
DO NOT TOUCH SURFACE UNITS OR AREAS NEAR
UNITS. Surface units may be hot even though they are
dark in color. Areas near surface units may become hot
enough to cause burns.
▶During and after use, do not touch, or let clothing,
potholders, or other flammable materials contact
surface units or areas near units until they have had
sufficient time to cool. Among these areas are the
cooktop and areas facing the cooktop.
WARNING - Do not place metallic objects such as knives,
forks, spoons, and lids on the cooktop surface since they
can get hot.
DO NOT TOUCH HEATING ELEMENTS OR INTERIOR
SURFACES OF OVEN - Heating elements may be hot
even though they are dark in color. Interior surfaces of an
oven become hot enough to cause burns.
▶During and after use, do not touch, or let clothing,
potholders, or other flammable materials contact
heating elements or interior surfaces of oven until they
have had sufficient time to cool. Other surfaces of the
appliance may become hot enough to cause burns.
Among these surfaces are oven vent openings,
surfaces near these openings and oven doors.
Exercise caution when opening the appliance.
▶Standing to the side, open the door (or drawer) slowly
and slightly to let hot air and/or steam escape.
▶Keep your face clear of the opening and make sure
there are no children or pets near the unit.
▶After the release of hot air and/or steam, proceed with
your cooking.
▶Keep doors shut unless necessary for cooking or
cleaning purposes.
▶Do not leave open doors unattended.
Clean Cooktop With Caution.
▶If a wet sponge or cloth is used to wipe spills on a hot
cooking area, be careful to avoid steam burn.
▶Some cleaners can produce noxious fumes if applied to
a hot surface.
▶Do not clean the appliance while it is still hot.
WARNING - The pan detection shut-off feature may not
turn off the cooking zone due to spilled food or objects
placed on the cooktop.
▶Keep the cooktop clean and do not store objects on the
cooking zones.
CAUTION
Use caution when cooking foods with high alcohol content
(e.g. rum, brandy, bourbon) in the oven. Alcohol
evaporates at high temperatures. There is a risk of
burning as the alcohol vapors may catch fire in the oven.
▶Use only small quantities of alcohol in foods, and open
the oven door carefully.
The oven racks and the oven cavity surfaces become very
hot during cooking.
▶Place oven racks in the desired positions before turning
oven on.
▶Always use oven mitts when the oven is warm.
▶If a rack must be moved while the oven is hot, do not let
oven mitts contact hot heating elements.
▶Use caution when removing oven racks from the lowest
rack position to avoid contact with the hot oven door.
WARNING
Avoid reaching or leaning over the appliance.
▶Be aware that certain clothing and hair sprays may
contain flammable chemicals that could be ignited if
brought in to contact with hot surface units or heating
elements and may cause severe burns.
The oven interior and the meat probe become very hot.
▶Use oven mitts to plug and unplug the meat probe.
WARNING
Storage in or on Appliance - The use of corrosive
chemicals in heating or cleaning will damage the
appliance and could result in injury.
▶Flammable materials, corrosive chemicals, vapors or
non-food products should not be stored or used in an
oven or on or near surface units.
▶The appliance is specifically designed for use when
heating or cooking food.
IMPORTANT SAFETY INSTRUCTIONS
READ AND SAVE THESE INSTRUCTIONS

en-us
7
This appliance is intended for normal family household
use only.
▶It is not approved for outdoor use.
▶See the Statement of Limited Product Warranty. If you
have any questions, contact the manufacturer.
WARNING - Using this appliance other than for its
intended use can cause fire or injury to persons.
▶Use this appliance only for its intended use as
described in this manual.
▶NEVER use your appliances as a space heater for
warming or heating the room. Doing so may result in
overheating the appliance.
▶Never use the appliance for storage.
WARNING - TO REDUCE THE RISK OF INJURY TO
PERSONS IN THE EVENT OF A RANGE TOP GREASE
FIRE, OBSERVE THE FOLLOWING.
▶SMOTHER FLAMES with a close-fitting lid, cookie
sheet, or metal tray, then turn off the burner. BE
CAREFUL TO PREVENT BURNS. If the flames do not
go out immediately, EVACUATE AND CALL THE FIRE
DEPARTMENT.
▶NEVER PICK UP A FLAMING PAN – You may be
burned.
▶DO NOT USE WATER, including wet dishcloths or
towels – a violent steam explosion will result.
▶Use an extinguisher ONLY if:
- You know you have a Class ABC extinguisher, and
you already know how to operate it.
- The fire is small and contained in the area where it
started.
- The fire department is being called.
- You can fight the fire with your back to an exit.
Do not heat or warm unopened food containers. Build-up
of pressure may cause the container to burst and cause
injury.
Liquid between the pot base and the cooktop may build up
steam pressure. This may cause the pot to jump suddenly
causing injury.
▶Always keep the cooktop and bases of pots dry.
When cooking with a double-boiler, the cooktop and
cooking vessel may crack due to overheating.
▶The cooking vessel in the double-boiler must not come
in direct contact with the bottom of the pot filled with
water.
▶Use only heat-resistant cookware.
Failure to operate knobs properly may result in personal
injury and damage to the appliance.
Cooking or roasting bags might explode.
▶Follow the manufacturer’s directions when using
cooking or roasting bags.
CAUTION
To avoid possible injury or damage to the appliance,
ensure oven rack is installed exactly per installation
instructions and not backwards or upside down.
Do not place anything on the oven cavity bottom. Do not
cover it with aluminum foil. A build-up of heat could
damage the appliance or cause injury.
WARNING
Moisture intrusion may cause an electric shock.
▶Do not use any steam cleaners or high-pressure
cleaners to clean the appliance.
If the appliance or the power cord is damaged, this is
dangerous.
▶Never operate a damaged appliance.
▶If the surface is cracked, you must switch off the
appliance in order to prevent a possible electrical
shock. To do this, switch off the appliance via the circuit
breaker in the circuit breaker panel rather than at the
main switch.
▶If the appliance or the power cord is damaged,
immediately switch off the breaker in the circuit breaker
box.
▶Call Customer Service. →
Page40
▶Repairs to the appliance must only be performed by an
autorized service provider.
WARNING - If the surface is cracked, switch off the
appliance to avoid the possibility of electric shock.
Do Not Cook on a Broken Cooktop - If the cooktop should
break, cleaning solutions and spillovers may penetrate the
broken cooktop and create a risk of electric shock.
▶Contact an authorized service provider immediately.
WARNING
Scratched glass in the appliance door may develop into a
crack.
▶Do not use any harsh or abrasive cleaners or sharp
metal scrapers to clean the glass on the oven door, as
they may scratch the surface.
Use of a wrong meat probe can damage the insulation.
Use only the meat probe intended for this appliance.
IMPORTANT SAFETY INSTRUCTIONS
READ AND SAVE THESE INSTRUCTIONS

en-us
8
1.7 Child safety
WARNING
Do not allow children to use this appliance unless closely
supervised by an adult.
▶Children and pets should not be left alone or
unattended in the area where the appliance is in use.
They should never be allowed to play in its vicinity,
whether or not the appliance is in use.
Do not allow anyone to climb, stand, lean, sit, or hang on
any part of an appliance, especially a door, warming
drawer, or storage drawer.
▶This can damage the appliance, and the unit may tip
over, potentially causing severe injury.
Do not let children play with the appliance.
CAUTION
Do not store items of interest to children in cabinets above
a range or on the backguard of a range. Children climbing
on the range to reach items could be seriously injured.
Do Not Leave Children Alone.
▶Children should not be left alone or unattended in the
area where the appliance is in use.
▶They should never be allowed to sit or stand on any
part of the appliance.
▶Always check inside the oven before turning it on.
WARNING
To avoid the risk of suffocation:
▶Do not allow children to play with packaging material.
1.8 Electromagnetic interference
WARNING
This induction cooktop generates and uses ISM frequency
energy that heats cookware by using an electromagnetic
field. It has been tested and complies with Part 18 of the
FCC Rules for ISM equipment. This induction cooktop
meets the FCC requirements to minimize interference with
other devices in residential installation. Induction cooktops
may cause interference with television or radio reception.
If interference occurs, the user should try to correct the
interference by
▶Relocating the receiving antenna of the radio or
television.
▶Increasing the distance between the cooktop and the
receiver.
▶Connecting the receiver into an outlet different than the
cooktop.
▶It is the user's responsibility to correct any interference.
CAUTION
Persons with a pacemaker or similar medical device
should exercise caution when standing near an induction
cooktop while it is in use.
▶Consult your doctor or the manufacturer of the
pacemaker or similar medical device for additional
information about its effects with electromagnetic fields
from an induction cooktop.
1.9 State of California Proposition 65
Warnings
This product may contain a chemical known to the State
of California, which can cause cancer or reproductive
harm. Therefore, the packaging of your product may bear
the following label as required by California:
IMPORTANT SAFETY INSTRUCTIONS
READ AND SAVE THESE INSTRUCTIONS

Preventing material damage en-us
9
Preventing material damage
2 Preventing material damage
Preventing material damage
2.1 Preventing oven cavity damage
NOTICE:
The presence of objects on the oven cavity bottom will
cause heat to build up. The baking and roasting times will
no longer be correct and the enamel will be damaged.
▶Do not cover the oven cavity bottom with any sort of foil
or greaseproof paper.
▶Do not place accessories on the oven cavity bottom.
Do not allow aluminum foil in the oven cavity to come into
contact with the door glass, it could cause permanent
discoloration.
When the oven cavity is hot, any water inside it will create
steam. The change in temperature may cause damage.
▶Never pour water into the oven cavity when it is still hot.
▶Never place cookware containing water on the oven
cavity bottom.
The prolonged presence of moisture in the oven cavity
leads to corrosion.
▶Allow the oven cavity to dry after use.
▶Do not keep moist food in the oven cavity for a long
time with the door closed.
▶Do not store food in the oven cavity.
Leaving the appliance to cool down with the door open will
damage the front of neighboring kitchen units over time.
▶Always allow the oven cavity to cool down with the door
closed after cooking at high temperatures. Only leave
the oven cavity to dry with the door open if a lot of
moisture was produced during operation.
▶Take care not to trap anything in the appliance door.
Fruit juice dripping from the baking tray leaves stains that
cannot be removed.
▶When baking very juicy fruit pies, do not pack too much
on the baking tray.
If the seal is very dirty, the appliance door will not close
properly when the appliance is in operation. This may
damage the front of adjacent kitchen units.
▶Keep the seal clean at all times.
▶Never operate the appliance if the seal is damaged or
missing.
Sitting or placing objects on the appliance door may
damage it.
▶Do not place or hang objects on the appliance door.
▶Do not place cookware or accessories on the appliance
door.
With certain models, accessories may scratch the door
glass when closing the appliance door.
▶Always push accessories fully into the oven cavity.
Carrying the appliance by the door handle could break it.
The door handle cannot support the weight of the
appliance.
▶Do not carry or hold the appliance by the door handle.
2.2 Preventing cooktop damage
NOTICE:
Overheating can damage the cookware.
▶Do not heat empty pots or pans.
Hot cookware can cause the electronics to overheat.
▶Never set down hot pans and pots on the control panel
or the cooktop frame.
When hard or sharp objects fall on the cooktop, they can
cause damage.
▶Do not let hard or pointed objects fall on the cooktop.
Aluminum foil and plastic melt on hot cooking zones.
▶Do not let aluminum foil or plastic come into contact
with hot cooking zones.
▶Do not use cooktop protective film.
Overview of the most common types of damage
Here you can find an overview of the most common types
of damage and suggestions how to avoid them.
Stains
Cause Remedy
Boiled-over food Remove boiled-over food
immediately with a glass scraper.
Unsuitable cleaning
agents
Use cleaning agents that are
suitable for glass ceramic
cooktops.
Scratches
Cause Remedy
Salt, sugar and sand Do not use the cooktop as a work
surface or storage space.
Cookware with rough
bases
Check the cookware.
Discolorations
Cause Remedy
Unsuitable cleaning
agents
Use cleaning agents that are
suitable for glass ceramic
cooktops.
Pot abrasion (e.g.
aluminum)
Lift pots and pans when moving
them.
Blisters
Cause Remedy
Sugar, food with a
high sugar content
Remove boiled-over food
immediately with a glass scraper.

en-us Environmental protection and energy-saving
10
Environmental protection and energy-saving
3 Environmental protection and
energy-saving
Environmental protection and energy-saving
3.1 Disposal of packaging
The packaging materials are environmentally compatible
and can be recycled.
▶Sort the individual components by type and dispose of
them separately.
3.2 Saving energy when using the oven
If you follow these tips, your appliance consumes less
energy.
Only preheat the appliance if the recipe or the
recommended settings tell you to do so.
aNot preheating the appliance can reduce the energy
used.
Use dark-colored, black-coated or enameled baking pans.
aThese types of baking pans absorb the heat particularly
well.
Open the appliance door as little as possible during
operation.
aThis will maintain the temperature in the oven cavity
and eliminate the need for the appliance to reheat.
When baking multiple dishes, do so in succession or in
parallel.
aThe oven cavity is heated after baking the first dish.
This reduces the baking time for the second dish.
If the cooking time is relatively long, you can switch the
appliance off 10minutes before the cooking time ends.
aThere will be enough residual heat to finish cooking the
dish.
Remove any accessories that are not being used from the
oven cavity.
aAccessories that are not being used do not need to be
heated.
Allow frozen food to defrost before cooking.
aThis will save the energy that would otherwise be
required to defrost it.
3.3 Saving energy when using the cooktop
If you follow these tips, your appliance consumes less
energy.
Select a cookware diameter that matches the cooking
zone. Center the cookware on the cooking zone.
Tip:Cookware manufacturers usually state the top
diameter of the cookware. The diameter of the cookware
base is usually smaller.
aThe energy is targeted at the cookware.
If you use cookware that is too small, energy is wasted.
If the cookware is too large, much energy is used to
heat up the cookware.
Close cookware with a fitting lid.
aCooking without a lid consumes more energy.
Only lift the lid when necessary.
aIf you lift the lid, a lot of energy can escape.
Use a glass lid.
aIf you use a glass lid, you can look inside the cookware
without lifting the lid.
Use cookware with a solid flat bottom.
aCurved cookware bases increase energy consumption.
Use a cookware size that matches the amount of food you
want to cook.
aCookware with little content consumes a lot of energy.
Cook with a small amount of water.
aMore water requires more energy to heat it up.
Select a lower power level as soon as possible. Select a
suitable power level to continue cooking.
aFor ongoing cooking a lower power level is sufficient.

Familiarizing yourself with your appliance en-us
11
Familiarizing yourself with your appliance
4 Familiarizing yourself with your appliance
Familiarizing yourself with your appliance
This Use and Care Manual covers several models. Your model may have some but not all of the features listed.
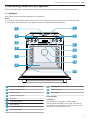
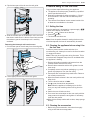
4.1 Appliance
Here you can find an overview of the parts of your appliance.
Notes
¡This Use and Care Manual covers several models. Your model may have some but not all of the features listed.
¡The graphics are representative. Your appliance may have different graphic appearances.
1
6
4
5
22
7
12
8
9
10
11
3
1
Cooking zone displays
2
Cooktop control knobs
3
Front oven vent
4
Socket for meat probe
5
Oven rails
6
Oven cavity bottom
7
Rear vent trim
8
Oven control knob
9
Oven control panel
10
Broil element
11
Convection fan
12
Door hinges
Oven features
Cooling fan
The cooling fan runs during all cooking modes.
The fan can be heard when it is running, and warm air
may be felt as it is released from the rear vent trim. The
fan may also run after the oven is off.

en-us Familiarizing yourself with your appliance
12
Oven vent
Warm air may be released from the rear vent trim before,
during and after cooking. It is normal to see steam
escaping from the rear vent trim, and condensation may
collect in this area. This area may be warm when the oven
is in use.
CAUTION
The oven vents are important for air circulation. Covering
the oven vents will cause the oven to overheat. Refer to
the appliance overview for the location of the oven vents.
→
Page11
▶Do not obstruct the front oven vent or rear vent trim.
Temperature indicator
The temperature indicator bars show the heating-up
phases or residual heat in the oven cavity.
Heating-up
indicator
The heating-up indicator displays the
rising temperature in the oven cavity.
When all bars are filled, the optimal
time for placing the food in the oven
has been reached. In the broiling and
cleaning settings, the bars are all
already filled at the start. The bars are
not filled for the gentle top/bottom
heating type.
Residual heat
indicator
When the appliance is switched off, the
temperature indicator shows the
residual heat in the oven cavity. Once
the temperature has dropped to
approximately 140°F (60°C), the
indicator goes out.
Oven light
Your appliance is equipped with an oven light.
You can turn the oven light on and off by pressing .
Surfaces in the oven cavity
The back wall and side parts in the oven cavity are
selfcleaning. You can tell this from the rough surface.
The oven cavity floor and ceiling are enameled and have
smooth surfaces.
Self-cleaning surfaces
The self-cleaning surfaces are coated with a porous, matte
ceramic layer. This coating absorbs and dispels splashes
from baking and roasting while the appliance is in
operation.
CAUTION
Do not use oven cleaner on the self-cleaning surfaces.
These will damage the surfaces.
▶If oven cleaner does get onto these surfaces, dab it off
immediately using water and a sponge cloth.
▶Do not rub the surface and do not use abrasive cleaning
aids.
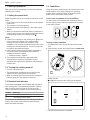
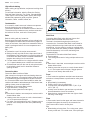
Cooking zones
Here you can find an overview of the cooking zones
available on your cooktop. Place the cookware on the
cooking zone that best matches its size.
Only use cookware that is suitable for induction cooking.
→
"Induction cooking", Page20
12 3
41
1
Ø 7" (18cm)
2
Ø 10 ¼" (26cm)
3
Ø 5 ¾" (14.5cm)
4
Ø 8¼" (21cm)
Symbol Cooking zone Function
Single cooking zone Only one cooking zone size is available.
Combi zone Use with larger size cookware by combining the cooking zones.

Familiarizing yourself with your appliance en-us
13
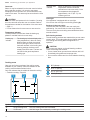
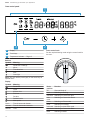
4.2 Control panels
You can use the control panel to configure all functions of
your appliance and to obtain information about the
operating status.
Cooktop control panel
The cooktop has one control knob for each cooking zone.
Push in and turn to the right to set the desired power level.
The markings around the control knobs show the available
power levels. If you turn on any cooking zone, the cooking
zone display at the front of the cooktop surface lights up.
Note:The image of the control knob is representative.
Depending on the available settings, the individual control
knobs may have some but not all functions described in
the following chart.
Knob position Function
0 Cooking zone turned off
1 - 9 Power levels
max SpeedBoost®
combi zone Combi zone
Panel lock
W1 Keep warm
W2 Melting
W3 Simmering
Cooking zone positions
The markings next to each of the control knobs show
which cooking zone they control.
Front left cooking zone
Front right cooking zone
Middle cooking zone
Rear left cooking zone
Rear right cooking zone
Cooking zone displays
When you turn on a cooking zone, the power level or
function is displayed in the cooking zone display.
Display Function
Cooktop on indicator
... Power level
/ Residual heat
SpeedBoost® active
Panel lock active
Keep warm
Melting
Simmering
/ Combi zone activation
NOTICE:
Do not place hot cookware on or close to the display.
Repeated overheating may impair proper function of the
electronics.

en-us Familiarizing yourself with your appliance
14
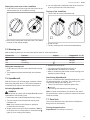
Oven control panel
F F
AM
PM
1
23
1
Display
2
Touch keys
3
Temperature indicator →
Page12
Buttons
Symbol Meaning
Panel lock or settings
Minus
Time functions
Plus
Oven light
Note:You only need to press lightly on the touch keys to
operate them.
Display
Symbol Meaning
Panel lock
Clock
Kitchen timer
End time
Duration
Sabbath mode
Meat probe
h:min Time in hours and minutes
min:sec Time in minutes and seconds
AM/PM Time
Oven control knob
Set the required heating mode using the control knob for
the oven.
Knob
position
Function
off Oven switched off
broil Switching on Broiling
conv broil Switching on Convection Broil
conv
roast
Switching on Convection Roast
pizza Switching on Pizza mode
proof Switching on Proofing
multi rack Switching on Multi Rack mode
conv bake Switching on Convection Bake
bake Switching on Bake

Accessories en-us
15
To operate: Turn to the required heating mode. Turn off
by turning the control knob to off.
Accessories
5 Accessories
Accessories
Only use original accessories. These are designed
especially for your appliance.
The accessories supplied may differ depending on the
appliance model.
Accessories Use
Wire rack Inserting cake pans, baking
dishes, cookware, meat
and frozen meals.
Telescopic rail Pull wire rack out further
without tipping.
Meat probe Determining the degree of
cooking and the
temperature in food items
such as meat and poultry.
5.1 Other accessories
You can purchase other accessories from our Customer
Service, specialist retailers or online.
You will find a comprehensive range of products for your
appliance in our brochures and online:
www.bosch-home.com
Accessories are appliance-specific. When purchasing,
always check for compatibility with your appliance model
number (E-Nr).
You can find out which accessories are available for your
appliance in our online shop or from our Customer
Service.
Telescopic rail
Use
¡Pull wire rack out further without tipping.
¡Order number: 12029918
Side panel extension
Use
¡Side cover for appliances without adjacent kitchen units.
¡Order number: HEZ9YZ04UC
Teppan Yaki
Use
¡Suitable for combi zone
¡Order number: HEZ390512
System pan
Use
¡Frying pan
¡Order number: HEZ390230
Grill pan
Use
¡Suitable for combi zone
¡Order number: HEZ9GR37UC
Toe kick plate
Use
¡Toe kick plate to conceal the appliance feet.
¡Order number: HEZ9TK36UC
Metal range feet
Use
¡Set (4 pcs.) of premium range feet.
¡Order number: HEZ9LLUC
5.2 Fitting the telescopic rail set
Instructions on fitting the telescopic rail set are enclosed
with the set.
5.3 Inserting racks
The wire rack can be inserted into the oven cavity at
5different levels.
CAUTION
The oven racks and the oven cavity surfaces become very
hot during cooking.
▶Place oven racks in the desired positions before turning
oven on.
▶Always use oven mitts when the oven is warm.
▶If a rack must be moved while the oven is hot, do not let
oven mitts contact hot heating elements.
▶Use caution when removing oven racks from the lowest
rack position to avoid contact with the hot oven door.
CAUTION
To avoid possible injury or damage to the appliance,
ensure oven rack is installed exactly per installation
instructions and not backwards or upside down.
Always push racks in fully so that they do not touch the
door panel. Make sure that you always insert the racks
into the oven cavity the right way, and not backwards or
upside down.

en-us Accessories
16
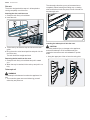
Flat rack
The rack is designed with a stop so it will stop before
coming completely out of the oven.
Inserting the wire rack into oven
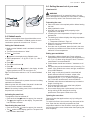
1. Grasp the rack firmly on both sides.
2. Insert the rack.
3. Tilt the rack up to allow the stop to slide onto the rack
guide.
4. Bring the rack to a horizontal position and push it in the
rest of the way.
The rack should be straight and level.
Removing the flat rack from the oven
1. Grasp the rack firmly on both sides and pull it toward
you.
2. When the stop is reached, tilt the rack up and pull it out
fully.
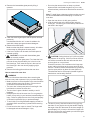
Telescopic rail
WARNING
The telescopic rails become hot when the appliance is in
use.
▶You must take great care to avoid burning yourself
when they are pulled out.
The telescopic rails allow you to pull accessories out
completely. When inserting the baking tray or roasting
shelf, ensure that it locks into place in front of the tab on
the telescopic rails.
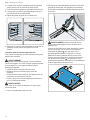
Inserting the telescopic rail into the oven
CAUTION
To avoid possible injury or damage to the appliance,
ensure the telescopic rail is installed exactly per
installation instructions and not backwards or upside
down.
1. Hang the upper part of the rail onto the rack guide.

Before using for the first time en-us
17
2. Clip the lower part of the rail onto the rack guide.
3. Slide the movable part of the telescopic rail in and out a
few times to make sure it is able to move freely and that
the stationary part of the telescopic rail is securely
anchored.
Removing the telescopic rail from the oven
1. Pull the lower part of the rail away from the rack guide.
2. Lift the upper part of the rail off the rack guide.
Before using for the first time
6 Before using for the first time
Before using for the first time
Carry out these steps before using your appliance.
¡The appliance must be properly installed by a qualified
service provider before use.
¡Read and understand all safety precautions →
Page3
and information in the Use and Care Manual prior to
operating.
¡This Use and Care Manual covers several models. Not
all features are available on all models.
6.1 Setting the time
Once the appliance is connected to a power supply, :
flashes on the display. Set the time.
1. Use the and buttons to set the time.
2. Press the button.
aThe time has now been set.
Note:Once the period allowed for setting the time on the
clock has elapsed, the time will automatically be saved.
6.2 Cleaning the appliance before using it for
the first time
In order to prevent excess smoke and odor from
manufacturing oils, heat up the oven for the first time when
it is empty and closed.
Note:There may be a slight odor during first uses. This is
normal and will disappear. Keep the room ventilated while
the appliance is heating.
1. Remove all packing materials and literature from the
cooktop surface and the oven cavity.
2. Remove the accessories and the rack guides from the
oven cavity.
3. Completely remove any leftover packaging, e.g. small
pieces of polystyrene, from the oven cavity.
4. Some parts are covered with a protective film. Remove
this scratch protection film.
5. Wipe the smooth surfaces in the oven cavity with a soft,
damp cloth.
6. Turn the function selector to bake.
7. Use to set the maximum temperature.
Note:When the appliance is heating up for the first
time, you may hear crackling noises coming from the
oven.
8. Switch the oven off after one hour.
9. Once oven has cooled wipe out the oven cavity with hot
soapy water and replace the rack guides. If necessary,
clean the door panels.
10. Wipe off the cooktop surface with a clean, damp sponge
and dry.
6.3 Cleaning the accessories
▶Before using the accessories, clean them thoroughly
using a cloth and warm soapy water.

en-us Cooktop operation
18
Cooktop operation
7 Cooktop operation
Cooktop operation
Here you will find out everything you need to know about
operating your cooktop.
7.1 Setting the power level
Adjust the power level of the cooking zone with the control
knobs.
▶Push and turn the control knob clockwise to the desired
power level.
aThe cooktop on indicator lights up.
aThe selected power level lights up in the cooking zone
display.
aWhen you set down an additional piece of cookware on
another cooking zone, the cookware is detected and the
corresponding cooking zone display shows .
Notes
¡If there is no cookware on the cooking zone, lights up
in the cooking zone display. This means that the
cooking zone tries to detect the cookware. Place
cookware on the cooking zone within 30seconds, or the
cooking zone will switch itself off. Turn the control knob
to 0 and set the power level again.
¡If the indicator lights up while cookware is present on
the cooking zone, check whether the cookware is
suitable for induction cooking.
→
"Induction cooking", Page20
¡The cooktop may temporarily reduce the power
automatically to protect the fragile parts of your
appliance and to prevent the appliance from producing
excess noise.
7.2 Turning the cooking zone off
▶Turn the control knob to 0.
aThe residual heat is displayed on the cooking zone
display until the cooking zone has cooled off.
aWhen all cooking zones are turned off, the cooktop on
indicator goes out. The cooktop is turned off.
7.3 Residual heat indicator
The cooktop is equipped with a residual heat indicator for
each cooking zone. The residual heat indicator lights up
when a cooking zone is turned off. Do not touch the
cooking zone when the residual heat indicator lights up.
Display Meaning
The cooking zone is hot.
The cooking zone is warm.
If you remove the cookware from the cooking zone during
cooking, the residual heat indicator and the selected
power level flash alternately.
7.4 CombiZone
Using this function allows the two left cooking zones to be
linked together into a single cooking zone, providing
greater cooking flexibility. When doing this the same
power level is set for both cooking zones.
Correct use of cookware for the CombiZone
For best results, use cookware that matches the size of
the two cooking zones. Place the cookware in the center
of the cooking zones.
Turning on the CombiZone
1. If a power level is set, turn the two left control knobs
to0.
2. Push and turn the left most control knob to combi zone.
aA beep sounds.
a and blink on the two left cooking zone displays.
aThe CombiZone function is activated.

Cooktop operation en-us
19
Setting the power level on the CombiZone
1. Push and turn the second to the left control knob to the
desired power level for CombiZone cooking.
aBoth cooking zone power levels are linked. Their status
is shown on the cooktop display.
2. You can adjust the CombiZone power level at any time
by turning the second to left control knob.
Turning off the CombiZone
▶Turn the two left control knobs back to 0.
aA beep sounds.
aThe two cooking zones can be used independently.
7.5 Warming zone
With the warming levels you can use preset power levels for various applications.
Power level Function Display Temperature °F (°C)
W1 Keep warm 115 (45)
W2 Melting 160 (70)
W3 Simmering 205 (95)
Setting the warming level
▶Push and turn the control knob to the desired warming
level.
aThe temperature is kept automatically at the desired
level.
7.6 SpeedBoost®
With this function you can heat larger quantities of water
faster than with power level 9. This function temporarily
increases the top output of the selected cooking zone.
Activating SpeedBoost®
WARNING
Oil and fat heat up quickly with the SpeedBoost® function.
Overheated oil and fat may ignite.
▶Never leave the cooktop unattended during cooking.
1. Turn the control knob of the desired cooking zone
clockwise to 9.
Note:If the control knob is already on position 9
continue with the next step.
2. Slightly overturn the control knob clockwise to max up
to the stop. Hold it in this position for 3seconds until
lights up in the cooking zone display.
3. Release the control knob.
aThe control knob automatically returns to 9.
aSpeedBoost® is activated for 10minutes.
aAfter 10minutes a signal sounds and the cooking zone
switches to power level .
Deactivating SpeedBoost®
If you do not deactivate the SpeedBoost® function, it turns
off automatically after 10minutes. The cooking zone
continues operating with power level 9.
▶Turn the control knob to a different power level.
a goes out.
aThe cooking zone switches to power level .
Note:In certain circumstances, this function may switch
off automatically in order to protect the electronic elements
inside the cooktop.
7.7 Panel lock
You can use the panel lock to prevent the cooktop from
being turned on accidentally.
Turning the panel lock on
Requirement:The cooktop is turned off.

en-us Cooktop operation
20
▶Push and turn the two left cooktop control knobs
counter-clockwise to and hold them in this position for
3seconds.
a lights up in the cooking zone display.
aThe cooktop does not respond when any control knob is
operated.
Turning the panel lock off
▶Push and turn the two left cooktop control knobs
counter-clockwise to and hold them in this position for
3seconds.
aThe cooktop control panel is unlocked.
7.8 Automatic time limitation
If a cooking zone is used for a prolonged period of time
without changes in the settings being made, the automatic
time limitation function is triggered.
The cooking zone stops heating. and the residual heat
indicator / flash alternately in the display.
The indicator goes out when the control knob is set to 0.
The cooking zone can now be reset.
When the automatic time limitation is activated depends
on the selected power level (from 1 to 10 hours).
7.9 Power management
The power management function prevents that the total
power of the cooktop is exceeded.
In case the combined selected power levels exceed the
available power, the power level on one of the cooking
zones has to be reduced. The power level of the affected
cooking zone is blinking for 3seconds, before it is reduced
automatically by one step.
¡If the power level is reduced automatically, the power
level displayed on the cooking zone display does not
correspond to the setting on the control knob anymore.
Turn the knob to the power level shown in the cooking
zone display, or to a lower power level.
¡To prevent the automatic power reduction, you can set
a lower power level on one of the cooking zones
manually within 3seconds.
7.10 Induction cooking
Advantages of induction cooking
Induction cooking is fundamentally different from
traditional cooking methods, since the heat builds up
directly in the cookware. This offers numerous
advantages:
¡Saves time when boiling and frying.
¡Saves energy.
¡Easier to care for and clean. Spilled food does not burn
on as quickly.
¡Controlling the heat supply and safety; the cooktop
increases or decreases the heat supply as soon as the
user changes the setting. The induction cooking zone
stops the heat supply when you remove the cookware
from the cooking zone without you having to switch it off
first.
Cookware
Only ferromagnetic cookware is suitable for induction
cooking.
For example:
¡Enameled steel cookware
¡Cast iron cookware
¡Special stainless steel cookware that is suitable for
induction cooking
In order to achieve a good cooking result, ensure that the
ferromagnetic area of the cookware base corresponds to
the size of the cooking zone. If the cookware is not
detected on a cooking zone, place it on a cooking zone
with a smaller diameter.
The base of many items of induction cookware is not fully
ferromagnetic:
If you use large cookware with a smaller ferromagnetic
base, only the area that is ferromagnetic heats up. As a
result, the heat is not distributed evenly. The temperature
of the non ferromagnetic area may therefore be too low for
cooking.
Cookware bases that contain aluminum reduce the
ferromagnetic area. This may reduce the output and the
cookware will not be detected sufficiently or at all, and will
therefore not be heated sufficiently.
Unsuitable cookware
Never use heat diffuser plates or cookware made of the
following:
¡Thin-walled normal steel
¡Glass
¡Clay
La page charge ...
La page charge ...
La page charge ...
La page charge ...
La page charge ...
La page charge ...
La page charge ...
La page charge ...
La page charge ...
La page charge ...
La page charge ...
La page charge ...
La page charge ...
La page charge ...
La page charge ...
La page charge ...
La page charge ...
La page charge ...
La page charge ...
La page charge ...
La page charge ...
La page charge ...
La page charge ...
La page charge ...
La page charge ...
La page charge ...
La page charge ...
La page charge ...
La page charge ...
La page charge ...
La page charge ...
La page charge ...
La page charge ...
La page charge ...
La page charge ...
La page charge ...
La page charge ...
La page charge ...
La page charge ...
La page charge ...
La page charge ...
La page charge ...
La page charge ...
La page charge ...
La page charge ...
La page charge ...
La page charge ...
La page charge ...
La page charge ...
La page charge ...
La page charge ...
La page charge ...
La page charge ...
La page charge ...
La page charge ...
La page charge ...
La page charge ...
La page charge ...
La page charge ...
La page charge ...
La page charge ...
La page charge ...
La page charge ...
La page charge ...
La page charge ...
La page charge ...
La page charge ...
La page charge ...
La page charge ...
La page charge ...
La page charge ...
La page charge ...
-
 1
1
-
 2
2
-
 3
3
-
 4
4
-
 5
5
-
 6
6
-
 7
7
-
 8
8
-
 9
9
-
 10
10
-
 11
11
-
 12
12
-
 13
13
-
 14
14
-
 15
15
-
 16
16
-
 17
17
-
 18
18
-
 19
19
-
 20
20
-
 21
21
-
 22
22
-
 23
23
-
 24
24
-
 25
25
-
 26
26
-
 27
27
-
 28
28
-
 29
29
-
 30
30
-
 31
31
-
 32
32
-
 33
33
-
 34
34
-
 35
35
-
 36
36
-
 37
37
-
 38
38
-
 39
39
-
 40
40
-
 41
41
-
 42
42
-
 43
43
-
 44
44
-
 45
45
-
 46
46
-
 47
47
-
 48
48
-
 49
49
-
 50
50
-
 51
51
-
 52
52
-
 53
53
-
 54
54
-
 55
55
-
 56
56
-
 57
57
-
 58
58
-
 59
59
-
 60
60
-
 61
61
-
 62
62
-
 63
63
-
 64
64
-
 65
65
-
 66
66
-
 67
67
-
 68
68
-
 69
69
-
 70
70
-
 71
71
-
 72
72
-
 73
73
-
 74
74
-
 75
75
-
 76
76
-
 77
77
-
 78
78
-
 79
79
-
 80
80
-
 81
81
-
 82
82
-
 83
83
-
 84
84
-
 85
85
-
 86
86
-
 87
87
-
 88
88
-
 89
89
-
 90
90
-
 91
91
-
 92
92


Bosch HIS8655U Manuel utilisateur
- Catégorie
- Micro-ondes
- Taper
- Manuel utilisateur
dans d''autres langues
- English: Bosch HIS8655U User manual
Documents connexes
Autres documents
-
Samsung NE58H9970WS/AA-00 Le manuel du propriétaire
-
Samsung NE599N1PBSR/AC Le manuel du propriétaire
-
Samsung NE599N1PBSR Manuel utilisateur
-
LG LSE4617ST Le manuel du propriétaire
-
-
LG LSIS3018SS Le manuel du propriétaire
-
LG LSE4616ST Le manuel du propriétaire
-
-