Jenn-Air TC607X4 Le manuel du propriétaire
- Catégorie
- Compacteur de déchets
- Taper
- Le manuel du propriétaire

JENN-AIWCOMPAOTOR/QOMPAOTEUR
Forquestions about features, operation/performance, parts, accessories, or service in the U.S.A.,call:
1-800-JENNAIR (1-800-516-6247) or visit our website at www.jennair.com.
In Canada, call: 1-800-807-6777, or visit our website at www.jennair.ca.
@Iii@ °;_""° =I I=III:,_@I101 @'I @ @lll@sl@l
Au Canada, pour assistance, installation ou service, composez le 1-111-117-6777 ou visitez notre site Web www.jennair.ca.
Table of Contents/Table des matieres ............... 2
JENN-AIR
W10242571 C

TABLE OF CONTENTS
COMPACTOR SAFETY .................................................................. 3
INSTALLATION INSTRUCTIONS .................................................. 4
Unpacking .................................................................................... 4
Location Requirements ................................................................ 4
Electrical Requirements ............................................................... 5
Undercounter Installation............................................................. 5
COMPACTOR USE ......................................................................... 7
How Your Compactor Works....................................................... 7
Loading......................................................................................... 8
Starting Your Compactor ............................................................. 8
Using Compress (Locked)Cycle ................................................. 8
Using the Air Filter ........................................................................ 8
Removing a Filled Bag ................................................................. 8
Installing a New Bag .................................................................... 9
COMPACTOR CARE ...................................................................... 9
Changing the Air Filter .................................................................. 9
Cleaning ........................................................................................ 9
TROUBLESHOOTING .................................................................. 11
ASSISTANCE OR SERVICE ......................................................... 12
In the U.S.A................................................................................ 12
In Canada ................................................................................... 12
Accessories ................................................................................ 12
WAR RANTY .................................................................................. 13
TABLE DES MATIERES
SleCURITle DU COMPACTEUR ................................................... 16
INSTRUCTIONS D'INSTALLATION ............................................. 17
Deballage .................................................................................... 17
Exigences d'emplacement ......................................................... 17
Specifications electriques .......................................................... 18
Installation sous un comptoir .................................................... 18
UTILISATION DU COMPACTEUR ............................................... 20
Fonctionnement du compacteur ................................................ 20
Chargement ................................................................................ 21
Mise en marche du compacteur ................................................ 21
Utiliser le programme de compression (verrouille) .................... 21
Utiliser le filtre & air ..................................................................... 21
Retirer un sac plein ..................................................................... 22
Installation d'un nouveau sac ..................................................... 22
ENTRETIEN DU COMPACTEUR ................................................. 22
Remplacement du filtre & air ...................................................... 22
Nettoyage ................................................................................... 23
DI_PANNAGE ................................................................................. 25
ASSISTANCE OU SERVICE ......................................................... 26
Aux 12tats-Unis............................................................................ 26
Au Canada .................................................................................. 26
Accessoires ................................................................................ 26
GARANTIE ..................................................................................... 27
Keep this book and your sales slip together for future
reference. You must provide proof of purchase or installation
date for in-warranty service.
Write down the following information about your major appliance
to better help you obtain assistance or service if you ever need it.
You will need to know your complete model number and serial
number. You can find this information on the model and serial
number label located on the product.
Dealer name
Address
Phone number
Model number
Serial number
Purchase date
Conservez ce manuel et votre re£u de vente ensemble pour
r_f_rence ult_rieure. Pour le service sous garantie, vous
devez presenter un document prouvant la date d'achat ou
d'installation.
Inscrivez les renseignements suivants au sujet de votre gros
appareil menager pour mieux vous aider a obtenir assistance ou
service en cas de besoin. Vous devrez connaitre le numero de
modele et le numero de serie au complet. Vous trouverez ces
renseignements sur la plaque signaletique situ6e sur le produit.
Nom du marchand
Adresse
Numero de tel6phone
Numero de modele
Numero de serie
Date d'achat
2

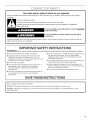
COMPACTOR SAFETY
Your safety and the safety of others are very important.
We have provided many important safety messages in this manual and on your appliance. Always read and obey all safety
messages.
This is the safety alert symbol.
This symbol alerts you to potential hazards that can kill or hurt you and others.
All safety messages will follow the safety alert symbol and either the word "DANGER" or "WARNING."
These words mean:
You can be killed or seriously injured if you don't immediately
follow instructions.
You can be killed or seriously injured if you don't follow
instructions.
All safety messages will tell you what the potential hazard is, tell you how to reduce the chance of injury, and tell you what can
happen if the instructions are not followed.
iMPORTANT SAFETY iNSTRUCTiONS
WARNING: When using an electrical appliance, basic precautions should always be followed, including the following:
m Read all instructions before using the compactor.
m Close supervision is necessary when used by or near
children. Do not allow to be used as a toy, or to run
unattended at any time. Lock Key Switch when not in use
and store key out of reach of children.
m Do not touch moving parts.
m Do not operate with a damaged cord set, plug, motor, or
after damage in any manner. Have the compactor
examined, repaired or adjusted by an authorized
serviceperson.
m Use only for intended use as described in this manual. Do
not use other than manufacturer's recommended
attachments.
m Do not compact toxic or volatile flammable material such as
oily rags and insect sprays. Do not compact lighted
cigarettes, cigars, or other hot or burning items. Do not
overload the compactor.
m Do not take apart the compactor, incorrect reassembly can
cause electric shock when subsequently used.
m Handle a loaded trash bag with care. Sharp objects can
pierce the bag and cause injury. Do not overload trash bag
with heavy material such as glass.
m This compactor is intended for household use only.
SAVE THESE iNSTRUCTiONS
State of California Proposition 65 Warnings:
WARNING: This product contains one or more chemicals known to the State of California to cause cancer.
WARNING: This product contains one or more chemicals known to the State of California to cause birth defects or other
reproductive harm.

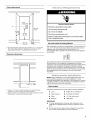
INSTALLATION
Installer: Leave Use and Care Guide with the homeowner.
Homeowner: Keep Use and Care Guide for future reference and
for local electrical inspector's use if required.
Excessive Weight Hazard
Use two or more people to move and install compactor.
Failure to do so can result in back or other injury.
IMPORTANT:
• You may want to wear gloves when moving compactor.
Begin in the room where the compactor will be located.
1. Remove compactor from shipping carton. Follow the
instructions on the shipping carton.
2. Remove all packaging materials such as tape and shipping
pads.
3. Use a mild detergent and warm water to remove waxy
residue caused by shipping material.
4. Dry thoroughly with a soft cloth. For more information, see
"Cleaning."
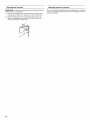
5. Be sure the power cord is attached to the cord clip on the
rear of the compactor.
A. Cord clip
6. Place two of the corner posts from the packaging on the floor
near the compactor.
7. Press the foot pedal to open the compactor drawer and
remove any shipping materials or other items from the
drawer.
NOTE: Do not remove the compactor bag.
8. Grasp the front of the drawer and tilt it backwards slightly
while pulling forward to clear the drawer stops.
9. Grasp sides of drawer and lift drawer out of compactor.
10. Place the drawer on the 2 corner posts.
INSTRU©TIONS
11. Place the other 2 corner posts on the floor to the side of the
compactor.
12. Grasp the sides of the compactor cabinet and put compactor
on its side on top of the corner posts.
13. Remove the shipping base from the bottom of the compactor.
A.Leveling legs B. Shipping base C. Corner posts
14. Tilt compactor to upright position. Leave the drawer out of
the compactor.
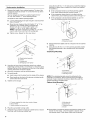
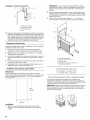
Product dimensions
341/8''
(86.7 cm)
(38.1 cm)
%
\24"
(61 cm)

Cutout dimensions Z£ @s
A
\
3" min.
(7.6 cm)---_
24" min.
(61cm)
18,,iin.
(45.7 cm)
151/4" rain.
(36.7 cm)
A. Grounded electrical outlet must be a minimum of 3" (7.6 cm) away
from surrounding cabinets or nearby walls as shown. It can be
placed either to the left or the right side of the product.
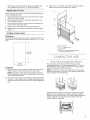
Clearance dimensions
I
B
'1
t
A :-<-_
A. Leave 6" (15.2 cm) of clearance space to the right side of the
compactor in order to remove the compactor bags.
B. Leave 23" (58.4 cm) of clearance in front of the compactor in order
to fully open or remove the compactor drawer.
Electrical Shock Hazard
Plug into a grounded 3 prong outlet.
Do not remove ground prong.
Do not use an adapter.
Do not use an extension cord.
Failure to follow these instructions can result in death,
fire, or electrical shock.
Recommended Grounding Method
This compactor is for use on a single phase, 115-volt, 60 Hz, AC
only, 15- or 20-amp fused and properly grounded circuit and is
equipped with a grounding plug as shown below. It is
recommended that a separate circuit serving only this appliance
be provided.
This compactor must be grounded while in use to reduce the risk
of electric shock. The compactor is equipped with a three-
conductor cord and 3 prong grounding-type plug to fit the proper
grounding-type receptacle. The green (or green and yellow)
conductor in the cord is the grounding wire. Do not connect the
green (or green and yellow) wire to a live terminal. Do not modify
the plug attached to the compactor; use with a grounded
receptacle.
NOTE: Proper installation is your responsibility. Make sure you
have everything necessary for correct installation. It is the
personal responsibility and obligation of the customer to contact
a qualified installer to assure that electrical installation meets all
national and local codes and ordinances.
Tools needed:
Gather the required tools and parts before starting installation.
• Level
• Tape measure
• Pliers
• Scissors
IMPORTANT:
• Phillips No. 2 screwdriver
• Flat-head screwdriver
• 5/le" Box-end wrench
• Utility knife
To avoid damaging floor covering, slide compactor onto
cardboard or hardboard before moving compactor across
floor.
Do not allow the rear frame of the compactor to touch the
floor covering when lifting or moving compactor.

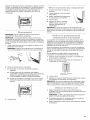
Undercounter Installation
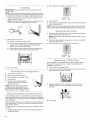
1.
Measure the height of your cabinet opening. The top of the
compactor should be at least 1/8"(3 mm) from the top of the
cabinet opening.
The rear wheels are preset for a cabinet height of 341/8''
(87 cm). See Position "1" in the following picture.
To adjust for other cabinet opening heights:
• Loosen self-tapping screw just enough to clear stud from
hole in Position "1 ."
Move the rear wheel and stud to Position "2" or "3" as
needed for your cabinet opening measurement:
Position "2": 34716"to 341Vie'' (87.5 to 88.1 cm)
Position "3": 3413/16'' to 35" (88.4 to 88.9 cm)
NOTE: To level the compactor in position "3," you may
need to add shims under the front leveling legs.
• Tighten screw. Repeat for other rear wheel.
A ®
D
A. Wheel bracket assembly
B. Cabinet
C. Locating stud
D. Self-tapping screw (pivot)
2. Use pliers to lower front leveling legs away from cabinet.
Adjust legs so there will be a 1/8"(3 mm) to 1/4"(6.4 mm) space
between the top of the compactor and the top of the cabinet
opening. Stand the compactor upright.
3. Move the compactor close to its final location.
4. To install handle:
• Insert screws into the holes from the inside of the drawer.
• Place handle on the front of the drawer and align handle
screw holes with screw ends.
5. Tighten screws snugly.
Using the two #8-18 x 1/2"(13 mm) screws, install the retaining
brackets to cabinet top as needed: the screws are supplied
for postition 2.
• If the compactor frame is to be flush with the cabinet
front, place retaining bracket screws through "1 ."
If the compactor drawer front is to be flush with the
cabinet front, place retaining bracket screws through "3."
If the compactor is to be midway between "1" and "3,"
leave the retaining bracket screws through "2."
A. Countertop
B. Retainingbracket
8. Slowly lift the front slightly and roll compactor into the cabinet
opening.
9. Using the two #8-18 x 1/2"(13 mm) screws (provided), fasten
the retaining brackets to the countertop with the mounting
screws.
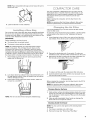
Countertop Mounting
A
B
C
A. Countertop
B. Retaining bracket
C. Mounting screw
NOTE: If the retaining brackets cannot be attached to the
underside of countertop, attach mounting clips (provided) to
brackets. Fasten compactor to kitchen cabinet face with the
screws through the mounting clips.
Cabinet-front Mounting
A. 2 screws inserted into holes from inside of drawer
B. Top of drawer
C. Handle instafled on drawer front
6. Plug into a grounded 3 prong outlet.
7. Determine if you want the compactor cabinet frame or drawer
front flush with the kitchen cabinet face.
D
A. Mounting clip
B. Cabinet face
C. Retaining bracket
D. Screw
10. Grasp sides of compactor drawer and place the wheels of the
drawer into the tracks. Lift at the handle so drawer will go
over drawer stops. Close drawer. Make sure the drawer
6

opens and closes freely. If the toe guard rubs against floor, 3. Attach a 15" x 1/2"quarter-round filler along the top inside
see "Adjusting the Toe Guard" for further instructions, edge of the drawer front using glue or screws.
Adjusting the Toe Guard
If the toe guard rubs the floor covering, the toe guard clearance
may be changed as follows:
1. Mark on each side of the toe guard the amount of toe guard
that rubs the floor covering.
2. Remove the drawer from the compactor. (See Steps 7-9 in
the "Unpacking" section.)
3. Use a ruler and a pencil or chalk to draw a line between the
marks on each side of toe guard.
4. Use scissors or utility knife to cut toe guard along line.
5. Replace drawer. If toe guard still rubs floor covering, repeat
steps 1-4.
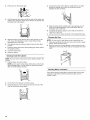
Installing a Custom Panel
Dimensions
Use these dimension drawings to create a custom panel for use
without a trim kit. The panel should be a minimum of 1/2"(1.3 cm)
thick.
29 3/8"Max
(74.6 crn)
A. Custom panel
B. 15"x ½" quarterround
C. Drawer front
D. Four #8 x 1" wood screws placement:
7 holes are available for use
COMPACTOR USE
/
___15" Max ___
(38.1 cm)
/
Installation
1. Align the bottom of the custom panel with the bottom of the
exterior drawer front and rest the panel on the rest tab.
NOTE: The bottom of the custom panel should not extend
below the bottom rest tab which is located at the lower center
of the exterior drawer front.
2.
Secure the custom panel to the exterior drawer front by using
four #8 x 1" wood screws from the inside drawer front at the
locations shown in the picture. There are 7 holes available for
use.
The compacting ram is the part of the compactor which
compresses the trash. The compacting ram stops 7" (178 mm)
from the bottom of the drawer. You will not see compacting of
trash until the drawer is more than 1/2full.
NOTE: You may hear a noise when glass breaks. Strong glass
bottles may not break. The trash in a full compactor bag will be
about 1/4the size of its original bulk.
Load bulky trash, bottles, and cans in the center of the drawer.
Bottles or cans not placed in the center may become caught
between the ram and the drawer. The Drawer Monitor Switch will
sense a "misload" and causes the ram to return to the "up"
position without compacting.

2. SetcompactorCompressCycle switch to ON.
IMPORTANT: Do not push items down into compactor with
hands or feet.
NOTE: You will not see compacting of trash the first few times
you load the compactor. The compactor drawer should be about
1/2full before the compactor can begins compressing the load.
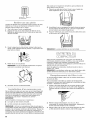
1. Open the drawer. Lift and pull the handle or press the foot
pedal to open the drawer.
NOTE: Pressing the foot pedal opens the container only 3" to
6" (7.6 cm to 15.2 cm), dependent upon the load.
2.
Place trash in compactor.
• Wrap or cover wet or messy trash.
• Do not compact items that may develop offensive odors
such as raw meat, fish, grapefruit rinds, disposable
diapers, or personal hygiene items.
• Load bottles or cans on their sides in the center of the
drawer. Do not load bottles in an upright position.
Compress Air
Cycme Filter
3. Close drawer.
4. Press the foot-actuated START button in with your toe to start
the compacting cycle.
NOTE: During the compacting cycle, the drawer remains locked
until you press the foot-actuated START button to raise the ram.
1. Set the Air Filter switch to ON. The fan creates air movement
in the compactor for odor removal.
NOTE: The Air Filter only works when the Key-Knob is in the
ON position.
2. If you hear noise while the compactor is not in use, it might be
the fan has been left on.
3. Set the Air Filter switch to OFF to turn off the fan.
3. Close the drawer.
1. Open drawer. Load trash.
2. Turn Key-Knob to ON position, i_.
3. Set Compress Cycle switch to OFE
4. Close drawer. \
\
5. Press the foot-actuated START
button in with your toe to start the
compacting cycle.
NOTE: When the compacting cycle is
completed, open the drawer and turn
the Key-Knob to OFR Remove the Key-
Knob and store it out of children's reach.
The Compress (Locked) Cycle extends the use of the bag by
putting constant pressure on the trash to keep it from springing
back. Regular use of acompress cycle can increase bag capacity
up to 25 percent.
During Compress Cycle, the ram will stay in the down position for
extra compacting. The drawer is locked and cannot be opened
when the ram is down.
For best results, use the Compress Cycle for at least 30 minutes
at a time.
1. Lift and pull the handle or press the foot pedal to open the
compactor drawer.
Compress Air
Cycle Filter
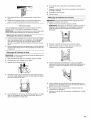
When the trash is compacted to the top of the drawer, remove
the bag. If the bag is too heavy, compact less trash before
emptying it in the future.
1. Pull the drawer completely open.
2. Remove top of bag from bag retainer buttons. Pull up all four
bag cuffs. Close bag with a twist tie.
3. Release drawer side latch. Tilt drawer to the right. This
releases pressure on the bag making it easier to remove
the bag.
4. Lift out bag.
8

NOTE: Fully compacted trash bags can be heavy. Be sure to
handle with care.
I
5. Latch the drawer if it was unlatched.
sSja Hew Bafs
Do not use any kind of bag other than those designed specifically
for use in your compactor. Order replacement compactor bags
through your local dealer or by calling the toll-free number on the
cover or in the "Assistance or Service" section.
IMPORTANT:
Before installing a new bag, be sure:
• The drawer latch is securely locked.
• The drawer is clean and free of debris.
NOTE: An unlatched drawer can cause the drawer monitor
switch to stay open. This will make the ram return and the
compactor will continue to run. Attempt to push the drawer
inwards to stop the compactor. The continuous running of the
compactor can also be attributed to debris in the drawer area. If it
is difficult to open or close the drawer this may be due to either
the drawer latch not being locked or debris in the drawer area.
1. Place folded bag into the drawer. Open bag and pull top
edges over the drawer to
1
[),
2. Lock bag in place by pulling the four prepunched holes over
the bag retainer buttons. Holes will expand over the buttons
without damaging the bag.
3. Press inside of bag against the drawer bottom, sides and
corners for a smooth fit.
NOTE: The ram can and will tear improperly installed bags.
COMPACTOR CARE
Your new compactor is designed to give you many years of
dependable service. However, there are a few things you are
expected to do in order to properly maintain your compactor.
This section will tell you how to clean and care for your
compactor.
Before cleaning the compactor, turn the Key-Knob to the
OFF position.
NOTE: Any services other than those outlined in this section
should be performed by an authorized service technician.
It is recommended that you use the charcoal air filter located
under the filter cover.
To order the correct replacement charcoal filters, call the toll-free
number listed on the cover or in the "Assistance or Service"
section.
1. Insert fingertips in the air filter cover and pull until the side
tabs release. Then, lift the cover to release the bottom tabs.
2. Remove the deodorizer puck, if one exists. To order new
deoderizer pucks, call the toll free number listed on the cover.
3. Remove the air filter by pulling the top edge of the filter. The
filter should pull out easily. Throw away used filter.
4. To replace air filter, push the replacement filter into place.
5. Insert the bottom tabs of the air filter cover and push in until
the side tabs snap into place.
Before cleaning the compactor, turn the Key-Knob to the OFF &
LOCK position and remove it.
NOTE: Any services other than those outlined in this section
should be performed by an authorized service technician.
Cleaning Exterior Surfaces
1.
Wash exterior surfaces (including stainless steel) with a clean
sponge or soft cloth and a mild detergent in warm water. Do
not use abrasive or harsh cleaners. Rinse and dry thoroughly
with a soft cloth.
2. Wipe up spills immediately. Some foods can damage the
finish if left on the compactor surface.
Cleaning Inside the Drawer
NOTE: You may want to wear gloves when cleaning inside
the drawer.
1. Pull drawer completely out until it stops.
2. Remove the bag. See "Removing a Filled Bag."

3. Pressdownonthedrawerlatch.
4=
Hold the drawer latch open and tilt the side of the drawer out
until the lock clears the drawer front. Remove the drawer side
by lifting it out of the drawer
5. Wash the interior of the drawer with a clean sponge or soft
cloth and a mild detergent in warm water. Rinse and dry
thoroughly with a soft cloth.
6. If the drawer side was removed, slide it back into the tilted
position.
7. Press the drawer latch down while pushing the drawer side to
the upright position.
8. Latch the drawer side.
9. Close the drawer.
Cleaning Inside the Cabinet
NOTE: You may want to wear gloves when cleaning inside in the
cabinet.
1=
Pull the drawer out until it stops.
NOTE: Look to see how the drawer rollers move in the tracks
and disengage them. It will be easier to replace the drawer
after you have finished cleaning.
4=
Vacuum the inside of the cabinet. Liquid spills or wet trash
should be cleaned up by hand, or by using a vacuum
designed to pick up liquids.
5=
6=
7.
Wash the inside of the cabinet with a clean sponge or soft
cloth and a mild detergent in warm water. Rinse and dry
thoroughly with a soft cloth.
To replace the drawer, grasp it by the sides and insert the
rollers onto the tracks.
Lift the front of the drawer and push it infully past the stops.
Cleaning the Ram
NOTE: You may want to wear gloves when cleaning the ram.
1. Wipe glass particles off of the ram cover with a cloth or paper
towels. Throw the towel away.
2. Remove foods with a clean sponge or soft cloth and a mild
detergent in warm water. Rinse and dry thoroughly with asoft
cloth.
Cleaning Before a Vacation
If you will be away for more than a couple of days, remove the
compactor bag. Remove the Key-Knob and store it out of
children's reach.
2=
3.
Lift the front of the drawer to clear the stops.
Grasp the drawer on the sides and pull it out the rest of the
way. Set the drawer down gently.
10

TROUBLESHOOTING
Try the solutions suggested here first in order to avoid the cost of an unnecessary service call.
Trash is not compacting
• Is the drawer less than half-full? Drawer must be more than
half full before trash is compacted. The ram stops 7"
(178 mm) from the bottom of the drawer.
Your compactor won't operate
Is the power supply cord unplugged? Plug into a grounded
3 prong outlet.
Has a household fuse blown, or has a circuit breaker
tripped? Replace the fuse or reset the circuit breaker. If the
problem continues, call an electrician.
Is the drawer completely closed? Is the drawer latch
locked? Close the drawer firmly and start the compactor
again. Be sure the latch is locked.
Is the Key-Knob turned to ON? Turn the Key-Knob to ON.
See "Starting Your Compactor."
Did you press the foot-actuated start button? See
"Starting Your Compactor."
The drawer won't open
Is the Compress Cycle engaged? Drawer remains LOCKED
until you reset by engaging the foot-actuated Start button.
Turn the compress Cycle off by pushing the Compress switch
to OFE
Is the drawer latch open? Push on the drawer front in an
attempt to raise the ram. Be sure the latch is locked.
Is the ram all the way up? Drawer will open only when ram is
fully raised. Engage the foot-actuated Start button. See
"Starting your compactor."
There is not enough compaction or force
Do you use the Compress cycle frequently enough?
Compacting works best when the Compress cycle is used.
Keep trash compressed for a minimum of 30 minutes.
Bottles don't break
• Factors that affect bottle breakage: Bottles will not break
every time. The thickness of the bottle's glass and the
content of the trash load below it may keep the bottle from
breaking.
The compactor keeps running
• Is the latch locked? Push on the drawer front to attempt to
engage the drawer monitor switch. Open drawer and be sure
the latch is locked.
Did the foot actuated Start switch not engage? Is the
lever that pushes the Start switch in been bent? Push on
the lever to stop the compactor. If needed, bend the lever
back into position.
Is there debris in the drawer area? This will cause the door
to disengage from the drawer monitor switch causing the
compactor to keep running. This can also prevent the
compactor from starting.
The drawer is hitting the cabinet
• Is there 1/8"(3.2mm) clearance on either side? The cabinet
opening should be 151¼'' (38.7cm) minimum.
• Has the compactor been installed more towards one side
of the cabinet? Center the compactor in the cabinet.
The compactor is moving during operation.
• Are the retaining brackets installed to the cabinet? See
"Countertop Mounting" or "Cabinet-front Mounting".
The drawer is wobbly
• Is the latch locked? An unlatched door will be quite wobbly.
By design, the front door will wobble slightly.
The compactor is noisy
• The noise could be normal operation: The compactor is
driven by a steel chain and steel sprockets.
• Is the fan on? The fan will make a humming noise when on.
Set the Air Filter switch to OFF to turn the fan off.
11

ASSISTANCE
Before calling for assistance or service, please check
"Troubleshooting." It may save you the cost of a service call. If
you still need help, follow the instructions below.
When calling, please know the purchase date and the complete
model and serial number of your appliance. This information will
help us to better respond to your request.
_ _ X4
If the problem is not due to one of the items listed in
the "Troubleshooting" section...
Call the dealer from whom your appliance was purchased, or call
Jenn-Air at 1-800-JENNAIR (1-800-536-6247) to locate an
authorized service company. When calling, please know the
purchase date and the complete model and serial number of your
appliance. Be sure to retain proof of purchase to verify warranty
status.
If the dealer or service company cannot resolve your problem,
write to:
Jenn-Air _Appliances
Customer eXperience Center
553 Benson Road
Benton Harbor, MI 49022-2692
Web address: www.jennair.com
Or call: 1-800-JENNAIR (1-800-536-6247).
U.S. customers using -n-Y for deaf, hearing impaired or speech
impaired, call: 1-800-688-2080 (Monday - Friday, 8:00 a.m. -
8:00 p.m. Eastern Time).
NOTE: When writing or calling about a service problem, please
include the following information:
1. Your name, address and daytime telephone number.
2. Appliance model number and serial number.
3. Name and address of your dealer or servicer.
4. A clear description of the problem you are having.
5. Proof of purchase (sales receipt).
User's guides, service manuals and parts information are
available from Jenn-Air Brand Home Appliances, Customer
eXperience Center.
OR SERVICE
If the problem is not due to one of the items listed in
the "Troubleshooting" section...
Call the dealer from whom your appliance was purchased, or call
Jenn-Air at 1-800-JENNAIR (1-800-536-6247) to locate an
authorized service company. When calling, please know the
purchase date and the complete model and serial number of your
appliance. Be sure to retain proof of purchase to verify warranty
status.
If the dealer or service company cannot resolve your problem,
write to:
Jenn-Air ®Appliances
Customer eXperience Center
200-6750 Century Ave.
Mississauga, ON L5N 3A7
Web address: www.jennair.ca
Or call: 1-800-JENNAIR (1-800-536-6247).
NOTE: When writing or calling about a service problem, please
include the following information:
1. Your name, address and daytime telephone number.
2. Appliance model number and serial number.
3. Name and address of your dealer or servicer.
4. A clear description of the problem you are having.
5. Proof of purchase (sales receipt).
User's guides, service manuals and parts information are
available from Jenn-Air Brand Home Appliances, Customer
eXperience Centre.
To order a color custom panel and handle, contact your local
authorized dealer.
In the U.S.A. visit our webpage www.jennair.com/accessories
or call 1-800-JENNAIR (1-800-536-6247).
In Canada, visit our webpage www.whirlpoolparts.ca
or call: 1-800-807-6777.
Replacement Bags - Call for Part Number.
Charcoal Air Filter - Part Number 4151750
Deoderizer puck - Part Number W10540355
Color Custom Panel and Handle:
Panel Kits:
Part Number W10267290 (White panel)
Part Number W10267300 (Black floating glass panel)
Handles:
Part Number W10540356 (Stainless Steel handle)
Part Number: W10222161 (White handle)
Part Number: W10222162 (Black handle)
12

JENN-AIR®MAJOR APPLIANCE WARRANTY
Applies to products purchased prior to April 1,2015
ONE YEAR LIMITED WARRANTY
For one year from the date of purchase, when this major appliance is installed, operated and maintained according to instructions
attached to or furnished with the product, Jenn-Air brand of Whirlpool Corporation or Whirlpool Canada LP (hereafter "Jenn-Air") will
pay for factory specified replacement parts and repair labor to correct defects in materials or workmanship that existed when this major
appliance was purchased.
YOUR SOLE AND EXCLUSIVE REMEDY UNDER THIS LIMITED WARRANTY SHALL BE PRODUCT REPAIR AS PROVIDED HEREIN.
Service must be provided by a Jenn-Air designated service company. This limited warranty is valid only in the United States or Canada
and applies only when the major appliance is used in the country in which it was purchased. Outside the 50 United States and Canada,
this limited warranty does not apply. This limited warranty is effective from the date of original consumer purchase. Proof of original
purchase date is required to obtain service under this limited warranty.
ITEMS EXCLUDED FROM WARRANTY
This limited warranty does not cover:
1. Service calls to correct the installation of your major appliance, to instruct you on how to use your major appliance, to replace or
repair house fuses, or to correct house wiring or plumbing.
2. Service calls to repair or replace appliance light bulbs, air filters or water filters. Consumable parts are excluded from warranty
coverage.
3. Replacement parts or repair labor if this major appliance is used for other than normal, single-family household use or when it is
used in a manner that is contrary to published user or operator instructions and/or installation instructions.
4. Damage resulting from accident, alteration, misuse, abuse, fire, flood, acts of God, improper installation, installation not in
accordance with electrical or plumbing codes, or use of products including but not limited to consumables or cleaning products not
approved by Jenn-Air.
5. Cosmetic damage, including scratches, dents, chips or other damage to the finish of your major appliance, unless such damage
results from defects in materials or workmanship and is reported to Jenn-Air within 30 days from the date of purchase.
6. Any food loss due to refrigerator or freezer product failures.
7. Costs associated with the removal from your home of your major appliance for repairs. This major appliance is designed to be
repaired in the home and only in-home service is covered by this warranty.
8. Repairs to parts or systems resulting from unauthorized modifications made to the appliance.
9. Expenses for travel and transportation for product service if your major appliance is located in a remote area where service by an
authorized Jenn-Air servicer is not available.
10. The removal and reinstallation of your major appliance if it is installed in an inaccessible location or is not installed in accordance
with published installation instructions.
11. Replacement parts or repair labor for major appliances with original model/serial numbers that have been removed, altered or
cannot be easily determined. This warranty is void if the factory applied serial number has been altered or removed from your major
appliance.
12. Removal or replacement of trim, decorative panels, flooring, cabinetry, islands, countertops, drywall or other built-in fixtures that
interfere with servicing, removal or replacement of the product.
The cost of repair or replacement under these excluded circumstances shall be borne by the customer.
DISCLAIMER OF IMPLIED WARRANTIES
IMPLIED WARRANTIES, INCLUDING ANY IMPLIED WARRANTY OF MERCHANTABILITY OR IMPLIED WARRANTY OF FITNESS FOR
A PARTICULAR PURPOSE, ARE LIMITED TO ONE YEAR OR THE SHORTEST PERIOD ALLOWED BY LAW. Some states and provinces
do not allow limitations on the duration of implied warranties of merchantability or fitness, so this limitation may not apply to you. This
warranty gives you specific legal rights, and you also may have other rights that vary from state to state or province to province.
DISCLAIMER OF REPRESENTATIONS OUTSIDE OF WARRANTY
Jenn-Air makes no representations about the quality, durability, or need for service or repair of this major appliance other than the
representations contained in this warranty. If you want a longer or more comprehensive warranty than the limited warranty that comes
with this major appliance, you should ask Jenn-Air or your retailer about buying an extended warranty.
LIMITATION OF REMEDIES; EXCLUSION OF INCIDENTAL AND CONSEQUENTIAL DAMAGES
YOUR SOLE AND EXCLUSIVE REMEDY UNDER THIS LIMITED WARRANTY SHALL BE PRODUCT REPAIR AS PROVIDED HEREIN.
JENN-AIR SHALL NOT BE LIABLE FOR INCIDENTAL OR CONSEQUENTIAL DAMAGES. Some states and provinces do not allow the
exclusion or limitation of incidental or consequential damages, so these limitations and exclusions may not apply to you. This warranty
gives you specific legal rights, and you also may have other rights that vary from state to state or province to province.
If outside the 50 United States and Canada, contact your authorized Jenn-Air dealer to determine if another warranty applies.
If you need service, first see the "Troubleshooting" section of the Use & Care Guide. After checking "Troubleshooting," you may find
additional help by checking the "Assistance or Service" section or by calling us at 1-800-JENNAIR (1-800-536-6247). 2/13
13

JENN-AIR ®
MAJOR APPLIANCE
LIMITED WARRANTY
Applies to products purchased on or after April 1, 2015
ATTACH YOUR RECEIPT HERE. PROOF OF PURCHASE IS REQUIRED
TO OBTAIN WARRANTY SERVICE.
Please have the following information available when you call the
Customer eXperience Center:
• Name, address and telephone number
• Model number and serial number
• A clear, detailed description of the problem
• Proof of purchase including dealer or retailer name and address
IF YOU NEED SERVICE:
1. Before contacting us to arrange service, please determine whether your product requires repair. Some
questions can be addressed without service. Please take a few minutes to review the Troubleshooting or
Problem Solver section of the Use and Care Guide, scan the QR code on the right to access additional
resources, or visit https://jennair.custhelp.com.
2. All warranty service is provided exclusively by our authorized Jenn-Air Service Providers. In the U.S. and
Canada, direct all requests for warranty service to:
Jenn-Air Customer eXperience Center
1-800-JENNAIR (1-800-536-6247)
If outside the 50 United States or Canada, contact your authorized Jenn-Air dealer to determine whether another warranty applies.
https://jennair.custhelp.com
For two years from the date of purchase, when this
major appliance is installed, operated and maintained
according to instructions attached to or furnished with
the product, Jenn-Air brand of Whirlpool Corporation or
Whirlpool Canada LP (hereafter "Jenn-Air") will pay for
Factory Specified Replacement Parts and repair labor
to correct defects in materials or workmanship that
existed when this major appliance was purchased, or at
its sole discretion replace the product. In the event of
product replacement, your appliance will be warranted
for the remaining term of the original unit's warranty
period.
YOUR SOLE AND EXCLUSIVE REMEDY UNDER THIS
LIMITED WARRANTY SHALL BE PRODUCT REPAIR
AS PROVIDED HEREIN. Service must be provided by a
Jenn-Air designated service company. This limited
warranty is valid only in the United States or Canada
and applies only when the major appliance is used in
the country in which it was purchased. This limited
warranty is effective from the date of original consumer
purchase. Proof of original purchase date is required to
obtain service under this limited warranty.
1. Commercial, non-residential, multiple-family use, or use inconsistent with published
user, operator or installation instructions.
2. In-home instruction on how to use your product.
3. Service to correct improper product maintenance or installation, installation not in
accordance with electrical or plumbing codes or correction of household electrical or
plumbing (i.e. house wiring, fuses or water inlet hoses).
4. Consumable parts (i.e. light bulbs, batteries, air or water filters, preservation
solutions, etc.).
5. Defects or damage caused by the use of non-genuine Jenn-Air parts or accessories.
6. Conversion of products from natural gas or L.P. gas.
7. Damage from accident, misuse, abuse, fire, floods, acts of God or use with products
not approved by Jenn-Air.
8. Repairs to parts or systems to correct product damage or defects caused by
unauthorized service, alteration or modification of the appliance.
9. Cosmetic damage including scratches, dents, chips, and other damage to the
appliance finishes unless such damage results from defects in materials and
workmanship and is reported to Jenn-Air within 30 days.
10. Discoloration, rust or oxidation of surfaces resulting from caustic or corrosive
environments including but not limited to high salt concentrations, high moisture or
humidity or exposure to chemicals.
11. Food or medicine loss due to product failure.
12. Pick-up or delivery. This product is intended for in-home repair.
13. Travel or transportation expenses for service in remote locations where an authorized
Jenn-Air servicer is not available.
14. Removal or reinstallation of inaccessible appliances or built-in fixtures (i.e. trim,
decorative panels, flooring, cabinetry, islands, countertops, drywall, etc.) that
interfere with servicing, removal or replacement of the product.
15. Service or parts for appliances with original model/serial numbers removed, altered
or not easily determined.
The cost of repair or replacement under these excluded circumstances shall be
borne by the customer.
DISCLAIMER OF IMPLIED WARRANTIES
IMPLIED WARRANTIES, INCLUDING ANY IMPLIED WARRANTY OF MERCHANTABILITY OR IMPLIED WARRANTY OF FITNESS FOR A
PARTICULAR PURPOSE, ARE LIMITED TO TWO YEARS OR THE SHORTEST PERIOD ALLOWED BY LAW. Some states and provinces do not
allow limitations on the duration of implied warranties of merchantability or fitness, so this limitation may not apply to you. This warranty gives you
specific legal rights, and you also may have other rights that vary from state to state or province to province.
DISCLAIMER OF REPRESENTATIONS OUTSIDE OF WARRANTY
Jenn-Air makes no representations about the quality, durability, or need for service or repair of this major appliance other than the representations
contained in this warranty. If you want a longer or more comprehensive warranty than the limited warranty that comes with this major appliance, you
should ask Jenn-Air or your retailer about buying an extended warranty.
LIMITATION OF REMEDIES; EXCLUSION OF INCIDENTAL AND CONSEQUENTIAL DAMAGES
YOUR SOLE AND EXCLUSIVE REMEDY UNDER THIS LIMITED WARRANTY SHALL BE PRODUCT REPAIR AS PROVIDED HEREIN. JENN-AIR
SHALL NOT BE LIABLE FOR INCIDENTAL OR CONSEQUENTIAL DAMAGES. Some states and provinces do not allow the exclusion or limitation of
incidental or consequential damages, so these limitations and exclusions may not apply to you. This warranty gives you specific legal rights, and
you also may have other rights that vary from state to state or province to province.
12/14
14

15

SECURITE DU COMPACTEUR
Votre securite et celle des autres est tres importante.
Nous donnons de nombreux messages de s_curit_ importants dans ce manuel et sur votre appareil m_nager. Assurez-vous de
toujours lire tous les messages de s_curit_ et de vous y conformer.
Voici le symbole d'alerte de s_curit_.
Ce symbole d'alerte de s_curit_ vous signale les dangers potentiels de d_cas et de blessures graves a vous
et _td'autres.
Tousles messages de s_curit_ suivront le symbole d'alerte de s_curit_ et le mot "DANGER" ou
"AVERTISSEMENT". Ces mots signifient •
Risque possible de d_cbs ou de blessure grave si vous ne
suivez pas imm_diatement les instructions.
Risque possible de d_cbs ou de blessure grave si vous
ne suivez pas les instructions.
Tous les messages de s_curit_ vous diront quel est le danger potentiel et vous disent comment r_duire le risque de blessure et
ce qui peut se produire en cas de non-respect des instructions.
IMPORTANTES INSTRUCTIONS DE SI CURITi
AVERTiSSEMENT • Lors de I'utilisation d'appareils 61ectrom6nagers, il convient d'observer certaines pr6cautions
616mentaires dont les suivantes :
m Lire toutes les instructions avant d'utiliser le compacteur.
m Une surveillance etroite est necessaire, Iorsque I'appareil
est employe par ou pros d'enfants. Ne pas permettre
d'utiliser I'appareil comme un jouet, ou le faire fonctionner
sans surveillance. Verrouiller I'interrupteur #,cle Iorsque
I'appareil n'est pas utilise et garder la cle hors d'atteinte
des enfants.
m Ne pas toucher les pieces mobiles.
m Ne pas faire fonctionner le compacteur si le cordon
d'alimentation, la fiche de branchement, le moteur sont
endommages ou apres tout dommage quelconque. Faire
examiner, reparer ou ajuster le compacteur par un
technicien autorise.
m Utiliser uniquement pour I'usage auquel il est destine, tel
que decrit dans ce manuel. Ne pas utiliser des accessoires
autres que ceux qui sont recommandes par le fabricant.
m Ne pas utiliser cet appareil pour compacter des produits
toxiques ou fluides inflammables tels que chiffons imbibes
d'huile et vaporisateurs insecticides. Ne pas soumettre au
compacteur les articles comme cigarettes ou cigares
allumes, ou autres objets en combustion ou chauds. Ne pas
surcharger le compacteur.
m Ne pas demonter le compacteur. Un remontage incorrect
peut _tre a I'origine d'un choc electrique, Iors de I'utilisation
subsequente.
m Manipuler avec soin un sac rempli de dechets. Des objets
pointus peuvent percer le sac et causer des blessures. Ne
pas surcharger le sac de dechets avec des materiaux
pesants tels que le verre.
m Ce compacteur est destine a I'usage domestique
uniquement.
CONSERVEZ CES INSTRUCTIONS
Avertissements de la proposition 65 de I'¢:tat de Californie "
AVERTISSEMENT " Ce produit contient au moins un produit chimique connu par I'¢:tat de Californie pour @re a I'origine de
cancers.
AVERTISSEMENT " Ce produit contient au moins un produit chimique connu par I'¢:tat de Californie pour @re a I'origine de
malformations et autres d6ficiences de naissance.
16

INSTRUCTIONS
Installateur • Laissez le Guide d'utilisation et d'entretien au
proprietaire.
Propri_taire : Gardez le Guide d'utilisation et d'entretien pour
reference ulterieure et pour I'usage de I'inspecteur local
d'electricite, au besoin.
D'INSTALLATION
10. Placer le tiroir sur les 2 cornieres de protection.
\
Risque du poids excessif
Utiliser deux ou plus de personnes pour d_placer et
installer le compacteur.
Le non=respect de cette instruction peut causer
une blessure au dos ou d'autre blessure.
IMPORTANT :
• II peut _tre necessaire de porter des gants Iors du
deplacement du compacteur.
1.
2.
Commencer dans la piece oQ le compacteur sera install&
Retirer le compacteur de son emballage de carton.
Enlever tousles materiaux d'emballage et de protection
comme ruban adhesif et cales.
3. Avec une solution d'eau tiede et de produit de nettoyage
menager doux, enlever les residus de cire laisses par les
materiaux de protection.
4. Secher completement avec un chiffon doux. Pour de plus
amples renseignements, voir la section "Nettoyage".
5. Verifier que le cordon d'alimentation electrique est fixe &
I'agrafe & I'arriere du compacteur.
A !
A. Agrafe du cordon d'afimentation
6. Mettre 2 des cornieres de protection de I'emballage sur le sol
pres du compacteur.
7. Ouvrir le tiroir du compacteur et retirer tousles materiaux
d'emballage ou autres articles expedies dans le tiroir.
REMARQUE: Ne pas retirer le sac du compacteur.
8. Saisir la poignee et soulever I'avant du tiroir pour le faire
passer au-dessus des butees.
9. Saisir les c6tes du tiroir et soulever le tiroir pour le retirer du
compacteur.
11. Placer les 2 autres cornieres de protection sur le plancher,
pres du compacteur.
12. Saisir les c6tes de la caisse du compacteur et placer le
compacteur sur le c6te, sur les cornieres de protection.
13. Retirer la base placee au fond du compacteur avant
I'expedition.
A. Pieds de nivellement
B. Base d'exp#dition
C.Cornieres de protection
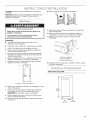
14. Inclinaison vers le compacteur a la position verticale. Laissez
le tiroir du compacteur.
Dimensions du produit
341/8''
(86,7 cm)
(38,1 cm)
'\24"
(61 cm)
17

A
\
3"
(7,6 cm)--_
24" mJn.
(61cm)
18,,iin.
(45,7 cm)
151/4" rain.
(38,7 crn)
341/4" rnin.
(87 cm)
IL
A. La prise #lectrique refine a la terre dolt #tre a une distance
minimum de 3" (7,6 cm) des armoires voisines ou des murs
lat#raux tel qu 'illustr& Elle peut #tre plac_e du cSt# gauche ou du
cSt# droit du produiL
Dimensions de d_gagement
g'
'1
t
-4 '
A :_-_
J
A. Laisser un espace fibre de 6" (15,2 cm) du c6t_ droit du
compacteur pour extraire les sacs du compacteur.
B. Laisser un espace fibre de 23" (58,4 cm) en avant du compacteur
pour ouvrir completement ou retirer le tiroir du compacteur.
Risque de choc _lectrique
Brancher sur une prise a 3 aJv_oles reli_e a la terre.
Ne pas enJever la broche de liaison a la terre.
Ne pas utiliser un adaptateur.
Ne pas utiliser un c_ble de rallonge.
Le non=respect de ces instructions peut causer
un d_c_s, un incendie ou un choc _lectrique.
M_thode recommand_e de mise & la terre
Le compacteur est alimente par un circuit de 115 V CA seulement
monophase, 60 Hz, 15 ou 20 A; le circuit dolt _tre protege par un
fusible et convenablement relie a la terre par I'intermediaire de la
fiche de branchement avec broches de liaison a la terre (voir
I'illustration ci-dessous). IIest preferable que cet appareil soit
alimente par un circuit distinct.
Le compacteur dolt _tre relie & la terre Iorsqu'il est utilise pour
reduire le risque de choc electrique. Le compacteur est equipe
d'un cordon a trois conducteurs et d'une fiche a trois broches de
liaison a laterre, pour convenir & la prise de courant appropriee
reliee a la terre. Le conducteur vert (ou vert et jaune) dans le
cordon est le fil de liaison a la terre. Ne pas connecter le fil vert
(ou vert et jaune) &une borne active. Ne pas modifier la fiche
jointe au compacteur, et utiliser seulement avec une prise reliee
la terre.
REMARQUE : C'est & I'utilisateur qu'incombe la responsabilite
de realiser une installation correcte. S'assurer d'avoir tout le
necessaire pour une installation convenable. C'est au client
qu'incombent la responsabilite et I'obligation personnelle de
contacter un installateur qualifie pour s'assurer que I'installation
electrique repond aux codes et reglements nationaux et Iocaux.
Outillage n_cessaire :
Rassembler les outils et pieces necessaires avant de commencer
I'installation.
• Niveau • Tournevis Phillips no 2
• Ruban & mesurer • Tournevis a lame plate
• Pince • Cle polygonale de s/ld'
• Ciseaux • Couteau utilitaire
IMPORTANT :
• Glisser le compacteur sur le carton ou le panneau de bois dur
avant de deplacer le compacteur sur le plancher, pour
emp_cher d'endommager le rev_tement du plancher.
• Ne pas laisser le chassis arriere du compacteur toucher le
rev_tement du plancher Iors du soulevement ou du
deplacement du compacteur.
18

7=
Installation sous un comptoir
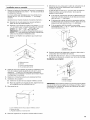
1. Mesurer la hauteur de I'ouverture de I'armoire. Le sommet du
compacteur devrait _tre & au moins 1 ,,(3 mm) du sommet de
I'ouverture de I'armoire.
Les roues arriere sent prer6gl6es pour une armoire d'une
hauteur de 3478," (87 cm). Voir position " 1 " de I'image
suivante.
Ajustement pour d'autres hauteurs d'ouverture d'armoire :
• Desserrer la vis, juste assez pour pouvoir extraire le
piston du trou de positionnement ,, 1 _.
Deplacer la roue arriere et le piston & la position ,,2 _ ou
,, 3 _ au besoin, pour la mesure d'ouverture de I'armoire :
Position _,2 _ : 3413/16"&341_ "(8.57 & 88,1 cm)
Position ,, 3 _ : 3413 " &35 " (88,4 &88,9 cm)
REMARQUE • Pour mettre le compacteur de niveau en
position ,, 3 _, vous aurez peut-_tre besoin d'ajouter des
cales sous les pieds de nivellement avant.
Serrer la vis. Rep6ter ces operations pour I'autre roue
arriere.
A
D
A. Bride porte-roue
B. Armoire
C. Piston de positionnement
D. Vis autotaraudante (pivot)
2. Utiliser la pince pour abaisser les pieds de nivellement avant
hers de la caisse. Ajuster les pieds de sorte qu'il y ait un
espace de 1 " (3 mm) & W'(6,4 mm) entre le sommet du
compacteur et le sommet de I'ouverture de I'armoire. Placer
le compacteur & la verticale.
3. Deplacer le compacteur pros de son emplacement final.
4. Installation de la poignee :
• Inserer les vis dans les trous depuis I'interieur du tiroir.
• Placer la poignee sur la fagade du tiroir; aligner les trous
de la poignee avec les extremit6s des vis.
5. Bien serrer les vis.
Determiner si vous voulez que le cadre du compacteur ou le
devant du tiroir soit en affleurement avec le devant de
I'armoire de cuisine.
A I'aide de deux vis #8-18 x 1/2"(13 mm), fixer au besoin les
brides de retenue au haut de I'armoire : les vis pour la
position 2 sent fournies.
• Si le cadre du compacteur doit _tre en affleurement avec
I'avant de I'armoire, placer les vis de retenue de la bride
dans les trous ,, 1 _ des brides.
• Si le devant de la bride du tiroir du compacteur doit _tre
en affleurement avec I'avant de I'armoire, placer les vis de
retenue de la bride dans les trous ,, 3 _des brides.
Si le compacteur doit _tre installe & une position
intermediaire entre ,, 1 _ et ,, 3 _, placer les vis de retenue
de la bride dans le trou ,,2 _.
1- o-..
A. Comptoir
B.Bride de retenue
8. Soulever lentement et legerement le devant et faire rouler le
compacteur dans I'ouverture de I'armoire.
9. A I'aide des deux vis no 8 - 18 x Y2"(13 mm), fixer les brides
de retenue en dessous du comptoir avec les vis de montage.
Installation au comptoir
A
B
C
A. Comptoir
B. Bride de retenue
C. Vis de montage
REMARQUE : Si les brides de retenue ne peuvent pas _tre fixees
sous le comptoir, fixer les agrafes de montage aux brides. Fixer le
compacteur sur le devant de I'armoire de cuisine par les brides
de montage & I'aide des vis.
B
A. 2 vis ins#r_es dans les trous, depuis I'int#rieur du tiroir
B. Dessus du tiroir
C. Poign#e install#e sur I'avant du tiroir
6. Brancher I'appareil sur une prise 3 alveoles reliee & la terre.
19

Installation & I'avant de I'armoire
A
D
A. Bride de montage
B. Fagade de I'armoire
C. Bride de retenue
D. Vis
10. Saisir les c6tes du tiroir du compacteur et placer les roues du
tiroir dans les glissieres. Soulever le tiroir par la poignee pour
faire passer I'avant du tiroir au-dessus des butees. Fermer le
tiroir. Verifier que le tiroir s'ouvre et se referme librement. Si le
chasse-pieds frotte contre le plancher, consulter les autres
instructions & la section "Reglage du chasse-pieds".
R_glage du chasse-pieds
Si le chasse-pieds frotte contre le rev_tement de sol, on peut en
modifier la hauteur comme suit :
1. Marquer de chaque c6te du chasse-pieds la largeur du
materiau qui cause le frottement sur le rev_tement de sol.
2. Retirer le tiroir du compacteur. (Voir I'etape 7-9 & la section
"Deballage du compacteur".)
3. A I'aide d'une r_gle et d'un crayon ou d'une craie, tracer une
ligne entre les marques tracees de chaque c6te du chasse-
pieds.
4. A I'aide de ciseaux ou d'un couteau tout usage, decouper le
chasse-pieds le long de la ligne.
5. Reinstaller le tiroir. Si le chasse-pieds frotte toujours sur le
rev_tement de sol, rep6ter les etapes 1 & 4.
Installation d'un panneau personnalis6
Dimensions
Utiliser ces dessins de dimensions pour creer un panneau
personnalise & utiliser sans trousse de garniture. Le panneau doit
avoir une epaisseur minimale de 1/2"(1,3 cm) pour prevenir le
gauchissement.
293/8"
(74,6 cm)
REMARQUE : Le bas du panneau personnalise ne devrait
pas aller plus basque le bas de la languette d'appui qui est
situ6e au niveau le plus bas au centre et & I'avant du tiroir
exterieur.
2. Fixer le panneau personnalise & I'avant du tiroir exterieur en
utilisant quatre vis & bois #8 x 1 ". Viser de I'interieur du tiroir
& I'emplacement indiqu6 sur I'image. Sept trous peuvent _tre
utilises pour les vis.
3. Fixer un joint d'un quart de rond de 15 " x 1/2"le long du
sommet du tiroir a I'avant en utilisant de la colle ou des vis.
D
A. Panneau personnafis#
B. Quart de fond de 15 "x V2"
C. Avant du tiroir
D. Position des quatre vis a bois #8 x 1"
sept trous pour les vis
UTILISATIONDU
COMPACTEUR
La presse du compacteur fait partie du compacteur qui
compresse les dechets. La presse du compacteur s'arr_te & 7"
(178 mm) du bas du tiroir. Vous ne verrez pas les dechets se faire
compacter avant que le tiroir ne soit & moitie plein.
REMARQUE : Vous pouvez entendre un bruit Iorsque le verre se
brise. Les bouteilles en verre robuste peuvent ne passe briser.
Les dechets dans un sac de compacteur plein feront environ le
quart du volume original.
15"
(38,1 cm)
Installation
1. Aligner le bas du panneau personnalise au bas avant
exterieur du tiroir et appuyer le panneau sur la languette
d'appui.
I-'- -'" "--
i ll'rll i
I I 1
I I I
I I t
1 1 I
20
La page est en cours de chargement...
La page est en cours de chargement...
La page est en cours de chargement...
La page est en cours de chargement...
La page est en cours de chargement...
La page est en cours de chargement...
La page est en cours de chargement...
La page est en cours de chargement...
-
 1
1
-
 2
2
-
 3
3
-
 4
4
-
 5
5
-
 6
6
-
 7
7
-
 8
8
-
 9
9
-
 10
10
-
 11
11
-
 12
12
-
 13
13
-
 14
14
-
 15
15
-
 16
16
-
 17
17
-
 18
18
-
 19
19
-
 20
20
-
 21
21
-
 22
22
-
 23
23
-
 24
24
-
 25
25
-
 26
26
-
 27
27
-
 28
28


Jenn-Air TC607X4 Le manuel du propriétaire
- Catégorie
- Compacteur de déchets
- Taper
- Le manuel du propriétaire
dans d''autres langues
- English: Jenn-Air TC607X4 Owner's manual
