Jenn-Air TC707S0 Le manuel du propriétaire
- Catégorie
- Compacteur de déchets
- Taper
- Le manuel du propriétaire

JENN-AIR_COM PACTORS/COMPACTEURS
TC607
Use& CareGuide
For questions about features, operation/performance, parts, accessories, or service in the U.S.A., call:
1-800-JENNAIR (1-800-536-6247} or visit our website at www.jennair.com.
In Canada, call: 1-800-807-6777, or visit our website at www.jennair.ca.
Guided'utilisationetd'entretien
Au Canada, pour assistance, installation ou service, composez le 1-800-807-6777 ou visitez notre site Web www.jennair.ca.
Table of Contents/Table des matieres ............. 2
_IENN-AIRo
W10122183A

TABLEOF CONTENTS
COMPACTOR SAFETY .................................................................. 2
INSTALLATION INSTRUCTIONS .................................................. 3
Unpacking .................................................................................... 3
Location Requirements ................................................................ 4
Electrical Requirements ............................................................... 4
Undercounter Installation ............................................................. 5
COMPACTOR USE ......................................................................... 6
How Your Compactor Works ....................................................... 6
Loading ......................................................................................... 7
Starting Your Compactor ............................................................. 7
Using Compress (Locked) Cycle ................................................. 7
Using the Air Filter ........................................................................ 7
Removing a Filled Bag ................................................................. 8
Installing a New Bag ..................................................................... 8
COMPACTOR CARE ...................................................................... 8
Changing the Air Filter .................................................................. 8
Cleaning ........................................................................................ 8
TROUBLESHOOTING .................................................................... g
RECYCLING WITH YOUR COMPACTOR .................................. 10
ASSISTANCE OR SERVICE ......................................................... 11
In the U.S.A................................................................................ 11
In Canada ................................................................................... 11
Accessories ................................................................................ 11
WAR RANTY .................................................................................. 12
TABLEDESMATIERES
SECURITI :!:DU COMPACTEUR ................................................... 13
INSTRUCTIONS D'INSTALLATION ............................................ 14
Deballage .................................................................................... 14
Exigences d'emplacement ......................................................... 14
Specifications electriques .......................................................... 15
Installation sous un comptoir ..................................................... 16
UTILISATION DU COMPACTEUR .............................................. 18
Fonctionnement du compacteur ............................................... 18
Chargement ................................................................................ 18
Mise en marche du compacteur ................................................ 18
Utilisation du programme Compress (Verrouille)....................... 18
Utilisation du filtre a air............................................................... 19
Enlevement d'un sac rempli ....................................................... 19
Installation d'un nouveau sac ..................................................... 19
ENTRETIEN DU COMPACTEUR ................................................. 20
Changement du filtre a air .......................................................... 20
Nettoyage ................................................................................... 20
DI:!:PANNAGE................................................................................. 21
RECYCLAGE AVEC VOTRE COMPACTEUR ............................. 22
ASSISTANCE OU SERVICE ......................................................... 23
Aux I_tats-Unis ............................................................................ 23
Au Canada .................................................................................. 23
Accessoires ................................................................................ 23
GARANTIE ..................................................................................... 24
COMPACTOR SAFETY
Your safety and the safety of others are very important.
We have provided many important safety messages in this manual and on your appliance. Always read and obey all safety
messages.
This is the safety alert symbol.
This symbol alerts you to potential hazards that can kill or hurt you and others.
All safety messages will follow the safety alert symbol and either the word "DANGER" or "WARNING."
These words mean:
You can be killed or seriously injured if you don't immediately
follow instructions.
You can be killed or seriously injured if you don't follow
instructions.
All safety messages will tell you what the potential hazard is, tell you how to reduce the chance of injury, and tell you what can
happen if the instructions are not followed.

IMPORTANT SAFETY INSTRUCTIONS
WARNING:when using an electrical appliance, basic precautions should always be followed, including the following:
• Read all instructions before using the compactor.
• Close supervision is necessary when used by or near
children. Do not allow to be used as a toy, or to run
unattended at any time. Lock Key Switch when not in use
and store key out of reach of children.
• Do not touch moving parts.
• Do not operate with a damaged cord set, plug, motor, or
after damage in any manner. Have the compactor
examined, repaired or adjusted by an authorized
serviceperson.
• Use only for intended use as described in this manual. Do
not use other than manufacturer's recommended
attachments.
[] Do not compact toxic or volatile flammable material such as
oily rags and insect sprays. Do not compact lighted
cigarettes, cigars, or other hot or burning items. Do not
overload the compactor.
[] Do not take apart the compactor. Incorrect reassembly can
cause electric shock when subsequently used.
[] Handle a loaded trash bag with care. Sharp objects can
pierce the bag and cause injury. Do not overload trash bag
with heavy material such as glass.
[] This compactor is intended for household use only.
SAVE THESE INSTRUCTIONS
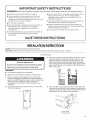
INSTALLATIONINSTRUCTIONS
Installer: Leave Use and Care Guide with the homeowner.
Homeowner: Keep Use and Care Guide for future reference and for local electrical inspector's use, if required.
Excessive Weight Hazard
Use two or more people to move and install compactor.
Failure to do so can result in back or other injury.
IMPORTANT:
• Do not grasp console to move compactor.
• Begin in the room where the compactor will be located.
1. Remove compactor from shipping carton. Remove all
protective packaging materials such as tape and shipping
pads. Use a mild detergent and warm water to remove waxy
residue caused by protective shipping material. Dry
thoroughly with a soft cloth. For more information, see
"Cleaning."
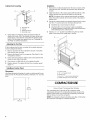
2. Be sure the power cord is attached to the cord clip on the
rear of the compactor.
A. Cord clip
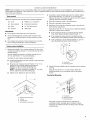
3.
4.
Place the 2 corner posts from the carton on the floor near the
compactor. Open the compactor drawer and remove any
shipping materials or other items from the drawer. Do not
remove the compactor bag. Grasp the handle and raise the
front of drawer until it clears the drawer stops. Grasp sides of
drawer and lift drawer out of compactor. Place the drawer on
the 2 corner posts.
Place the other 2 corner posts on the floor to the side of the
compactor. Grasp the sides of the compactor cabinet and put
compactor on its side on top of the corner posts. Remove the
shipping base from the bottom of the compactor.
A. Leveling legs
B. Shipping base

Product dimensions
341/8 ''
(86,7 cm)
_'24
15"
(38.1 cm) (61 cm)
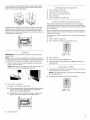
Cutout dimensions
Clearance dimensions
i
A. Leave 6" (15.2 cm) of clearance space to the right side of the
compactor in order to remove the compactor bags.
B. Leave 23" (58.4 cm) of clearance in front of the compactor in order
to fully open or remove the compactor drawer:
\
3" mirL
(7,6 cm)_
24" rain.
(61cm)
18,,iin.
(45,7 crn)
151/4'' rain.
(38.7 cm)
341/4 '' rain.
(87 cm)
A. Grounded electrical outlet must be a minimum of 3" (7.6 cm) away
from surrounding cabinets or nearby walls as shown. It can be
placed either to the left or the right side of the product.
Electrical Shock Hazard
Plug into a grounded 3 prong outlet.
Do not remove ground prong.
Do not use an adapter.
Do not use an extension cord,
Failure to follow these instructions can result in death,
fire, or electrical shock.
Recommended Grounding Method
This compactor is for use on a single phase, 115-volt, 60 Hz, AC
only, 15- or 20-amp fused and properly grounded circuit and is
equipped with a grounding plug as shown below. It is
recommended that a separate circuit serving only this appliance
be 3rovided.
This compactor must be grounded while in use to reduce the risk
of electric shock. The compactor is equipped with a three-
conductor cord and 3 prong grounding-type plug to fit the proper
grounding-type receptacle. The green (or green and yellow)
conductor in the cord is the grounding wire. Do not connect the
green (or green and yellow) wire to a live terminal.

NOTE:Properinstallationisyourresponsibility.Makesureyouhaveeverythingnecessaryforcorrectinstallation,Itisthepersonal
responsibilityandobligationofthecustomertocontactaqualifiedinstallertoassurethatelectricalinstallationmeetsallnationaland
• Level
• Tapemeasure
• Pliers
• Scissors
IMPORTANT:
localcodesandordinances.
Toolsneeded:
Gathertherequiredtoolsandpartsbeforestartinginstallation.
• Phillipsno.2screwdriver
• Flat-headscrewdriver
• ¾6"Box-endwrench
• Utilityknife
Donotgraspcontrolpaneltomovecompactor.
Toavoiddamagingfloorcovering,slidecompactoronto
cardboardorhardboardbeforemovingcompactoracross
floor.
Donotallowtherearframeofthecompactortotouchthe
floorcoveringwhenliftingormovingcompactor.
Undercounter Installation
Measure the height of your cabinet opening. The top of the
compactor should be at least 1/8"(3 mm) from the top of the
cabinet opening.
The rear wheels are preset for a cabinet opening of 34Y4"
(87 cm). See Position "1" in picture following.
To adjust for other cabinet opening heights:
• Loosen self-tapping screw just enough to clear stud from
hole in Position "1 ."
• Move the rear wheel and stud to Position "2" or "3" as
needed for your cabinet opening measurement:
Position "2": 34%" to 347/16'' (87 to 87.5 cm)
Position "3": 347/_6'' to 34%" (87.5 to 88 cm)
NOTE: To level the compactor in position "3," you may
need to add shims under the leveling legs.
• Tighten screw. Repeat for other rear wheel.
2. Use pliers to lower leveling legs away from cabinet. Adjust
legs so there will be a W' (3 mm) to %" (6.4 mm) space
between the top of the compactor and the top of the cabinet
opening. Stand the compactor upright.
3. Move the compactor close to its final location.
4. Plug into a grounded 3 prong outlet.
5. Determine if you want the compactor frame or drawer front
flush with the cabinet front.
Using the two #8-18 x %6"(8 mm) screws, install the retaining
brackets to cabinet top as needed:
If the compactor frame is to be flush with the cabinet
front, place retaining bracket screws through "1 ."
If the compactor drawer front is to be flush with the
cabinet front, place retaining bracket screws through "3."
If the compactor is to be midway between "1" and "3,"
place the retaining bracket screws through "2."
"",,..
A. Countertop
B. Retaining bracket
6.
Slowly lift the front slightly and roll compactor into the cabinet
opening.
Using the two #8-18 x _/2"(12 mm) screws, fasten the
retaining brackets to the countertop with the mounting
screws.
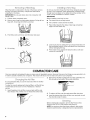
Countertop Mounting
A. Wheel bracket assembly
B. Cabinet
C. Locating stud
D. Self-tapping screw (pivot)
A. Countertop
B. Retaining bracket
C. Mounting screw
If brackets cannot be attached to the underside of
countertop, attach mounting clips to brackets. Fasten
compactor to cabinet front with mounting screws through
mounting clips.

Cabinet-front mounting
B
JJ
A. Mounting clip
B. Cabinet
C. Retainingbracket
D. Mounting screw
7. Grasp sides of compactor drawer and place bottom of
drawer into tracks. Lift at the handle so drawer will go over
drawer stops. Close drawer. Check that the drawer opens
freely. If the toe plate rubs against floor, see "Adjusting the
Toe Plate" for further instructions.
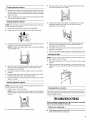
Adjusting the Toe Plate
If the toe plate rubs the floor covering, the toe plate clearance
may be changed as follows:
1. Mark on each side of the toe plate the amount of toe plate
that rubs the floor covering.
2. Remove the drawer from the compactor. (See Step 3 in the
"Unpacking" section.)
3. Use a ruler and a pencil or chalk to draw a line between the
marks on each side of toe plate.
4. Use scissors or utility knife to cut toe plate along line.
5. Replace drawer. Iftoe plate still rubs floor covering, repeat
steps 1-4.
Installing a Custom Panel
Dimensions
Use these dimension drawings to create a custom panel for use
without a trim kit. The panel should be a minimum of 1/2"(13 mm)
thick.
29 3/8"
(74.8 cm)
15" *'1
(38.1 cm)
Installation
1. Remove the 2 rubber bumpers from the lower corners of the
inside drawer front. Set aside the bumpers and discard the
screws.
2. Align the bottom of the custom panel with the bottom of the
exterior drawer front and rest the panel on the rest tab.
NOTE: The bottom of the custom panel should not extend
below the bottom rest tab at the lower center of the exterior
drawer front.
3. Secure the custom panel to the exterior drawer front by using
four #8 x 1" wood screws from the inside drawer front.
• Install the top 2 wood screws as shown.
• Use the bottom 2 wood screws to also re-install the
2 rubber bumpers on each side of the lower inside drawer
while attaching to the custom panel.
4. Attach a 15" x 1/2"quarter-round filler along the top inside
edge of the drawer front using glue or screws.
D
A. Custom panel
B. 15" x ½" quarter round
C. Drawer front
D. Four #8 x 1" wood screws placement
E. Rubber bumper (one on each side)
COMPACTOR USE
The compacting ram is the part of the compactor which
compresses the trash. The compacting ram does not go to the
bottom of the drawer. You will not see compacting of trash the
first few times you load the compactor.
NOTE: The compactor drawer should be more than 1/2full before
the compactor can begin to compress the load.

Youmayhearanoisewhenglassbreaks.Strongglassbottles
maynotbreakatall.Thetrashinafullcompactorbagwillbe
about1/4thesizeofitsoriginalbulk.
i-I i
I I I
t I I
I I I
I I I
t I I
I 1 I
t I I
"-.. I i I I
Load bulky trash, bottles, and cans in the center of the drawer.
Bottles or cans not placed in the center may become caught
between the ram and the drawer. The Drawer Monitor Switch
then senses a "misload" and causes the ram to return to the "up"
position without compacting.
1. Open container. Load trash.
2. Leave Key-Knob in ON position.
3. Set Compress Cycle switch to OFR
4. Close container.
5. Lift foot pedal UP to START cycle.
The Compress (Locked) Cycle extends the use of the bag by
putting constant pressure on the trash to keep it from springing
back. Regular use of a compress cycle can increase bag capacity
up to 25 percent,
During Compress Cycle, the ram will stay in the down position for
extra compacting, The drawer is locked and cannot be opened
when the ram is down.
For best results, use the Compress Cycle for at least 30 minutes
at a time.
1. Open container. Load trash.
2. Set compactor Compress Cycle switch to ON.
IMPORTANT: Do not push items down into compactor with
hands or feet.
NOTE: You will not see compacting of trash the first few times
you load the compactor. The compactor drawer should be about
1/2full before the compactor can begin to compress the load.
1. Open the drawer. Lift and pull the handle or press the foot
pedal to open the drawer.
NOTE: Pressing the foot pedal opens the container only 3" to
6" (7.6 cm to 15.2 cm), depending on the load.
3.
4.
5.
Compress Air
Cycle Filter
Close container.
Lift the foot pedal UP to START cycle.
Container remains LOCKED untill you RESET by lifting the
foot pedal UR
1. Set the Air Filter switch to ON. The fan creates air movement
in the compactor for odor removal.
NOTE: The charcoal Air Flter works only when the Key-Knob
is in the ON position.
2. Set the Air Filter switch to OFF to turn off the fan.
2.
Place trash in compactor.
• Wrap or cover wet or messy trash.
• Do not compact items that may develop offensive odors
such as raw meat, fish, grapefruit rinds, disposable
diapers, or personal hygiene items.
• Load bottles or cans on their sides in the center of the
drawer. Do not load bottles in an upright position.
Compress Air
Cycle Filter
3. Close the drawer.

Whenthetrashiscompactedtothetopofthedrawer,remove
thebag.Ifthebagistooheavy,compactlesstrashbefore
emptyingitinthefuture.
IMPORTANT:Donotpushitemsdownintocompactorwith
handsorfeet.
1. Pullthedrawercompletelyopen.
2. Removetopofbagfrombagretainerbuttons.Pullupallfour
bagcuffs.Closebagwithtwisttieprovided.
3,
Push Side-Lock Latch down and tilt drawer side open.
4. Lift out bag.
Do not use any kind of bag other than those designed especially
for use in your compacton Order replacement compactor bags
through your local dealer or by calling the toll-free number on the
cover or in the "Assistance or Service" section.
IMPORTANT:
Before installing a new bag, be sure:
• The drawer side is securely locked.
• The container is clean and free of debris.
1. Place folded bag into the drawer. Open bag and pull top
edges over the drawer top.
2. Lock bag in place by pulling the four prepunched holes over
the bag retainer buttons. Holes will expand over the buttons
without damaging the bag.
3. Press inside of bag against the drawer bottom, sides and
corners for a smooth fit.
COMPACTOR CARE
Your new compactor is designed to give you many years of dependable service. However, there are a few things you are expected to do
in order to properly maintain your compactor. This section will tell you how to clean and care for your compactor.
It is recommended that you use the charcoal air filter in the filter
compartment.
To order the correct replacement charcoal filters, call the toll-free
number listed on the cover or in the "Assistance or Service"
section.
1. Insert fingertips in the air filter cover and pull until the side
tabs release. Then, lift the cover to release the bottom tabs.
2. Remove the air filter by pulling the top edge of the filter. The
filter should pull out easily. Throw away used filter.
3. To replace air filter, push the replacement filter into place.
4. Insert the bottom tabs of the air filter cover and push in until
the side tabs snap into place.
Before cleaning the compactor, turn the Key-Knob (or Key-
Switch) to the OFF & LOCK position and remove it.
NOTE: Any services other than those outlined in this section
should be performed by a designated serwce representative.

Cleaning Exterior Surfaces
1. Wash exterior surfaces (including stainless steel) with a clean
sponge or soft cloth and a mild detergent in warm water. Do
not use abrasive or harsh cleaners. Rinse and dry thoroughly
with a soft cloth.
2. Wipe up spills right away. Some foods can damage the finish
if left on the compactor surface.
Cleaning Inside the Drawer
NOTE: You may want to wear protective gloves since there may
be bits of glass in the drawer.
1. Remove the bag. See the "Removing a Filled Bag."
2. Press down on the lever-action lock (or Side-Lock latch).
3= Hold the lever-action lock down and tilt the side of the drawer
out until the lock clears the drawer front.
NOTE: If desired, the drawer side can be removed by tilting it
up, then lifting it out.
4. Wash the interior of the drawer with a clean sponge or soft
cloth and a mild detergent in warm water. Rinse and dry
thoroughly with a soft cloth.
5. If the drawer side was removed, slide it back into the tilted
position.
6. Press the lever-action lock (or Side-Lock Latch) down while
pushing the drawer side to the upright position.
7. Latch the drawer side by pushing up the lever-action lock (or
Side-Lock Latch).
Cleaning Inside the Cabinet
NOTE: You may want to wear protective gloves since there may
be bits of glass in the cabinet.
1. Pull the drawer out until it stops.
NOTE: Look to see how the drawer rollers move in the tracks.
It will be easier to replace the drawer after you have finished
cleaning.
2. Lift the front of the drawer to clear the stops.
3. Grasp the drawer on the sides and pull it out the rest of the
way. Set the drawer down gently.
4=
Vacuum the inside of the cabinet. Liquid spills or wet trash
should be cleaned up by hand, or by using a vacuum
designed to pick up liquids.
5. Wash the inside of the cabinet with a clean sponge or soft
cloth and a mild detergent in warm water. Rinse and dry
thoroughly with a soft cloth.
6. To replace the drawer, grasp it by the sides and insert the
rollers onto the tracks.
7. Lift the front of the drawer and push it in fully past the stops.
Cleaning the Ram
NOTE: You may want to wear protective gloves since there may
be bits of glass on the ram cover.
1. Wipe glass particles off of the ram cover with a cloth or paper
towels.
2. Remove foods with a clean sponge or soft cloth and a mild
detergent in warm water. Rinse and dry thoroughly with a soft
cloth.
Cleaning Before a Vacation
If you will be away for more than a couple of days, remove the
compactor bag. Remove the Key-Knob (or Key-Switch) and store
it out of children's reach.
TROUBLESHOOTING
Trythe solutions suggested here first in order to avoid the
cost of an unnecessary service call.
Trash is not compacting
• Isthe drawer lessthan half-full? Drawer must be more than
half full before trash is compacted.

Your compactor won't operate
• Is the power supply cord unplugged? Plug into a grounded
3 prong outlet.
• Has a household fuse blown, or has a circuit breaker
tripped? Replace the fuse or reset the circuit breaker. If the
problem continues, call an electrician.
• Is the drawer completely closed? Close the drawer firmly
and start the compactor again.
• Is the Key-Knob turned all the way to START? Turn the
Key-Knob (Key-Switch) fully to START and release (on some
models). See "Starting Your Compactor."
• Did you press ON before pressing START? Press ON
before pressing START (on some models). See "Starting Your
Compactor."
The drawer won't open
• Is the ram all the way up? Drawer will open only when ram is
fully raised.
To raise the ram on models with a Key-Knob (or Key-
Switch): Turn the Key-Knob (Key-Switch) to START and
release. See "Starting Your Compactor."
To raise the ram on models with push button controls:
Press OFF, and then press ON. See "Starting Your
Compactor."
• Is the Compress Cycle engaged? Drawer remains LOCKED
until you reset by lifting the foot pedal up.
There is not enough compaction or force
• Do you use the compacting cycle frequently enough?
Compacting works best when only afew items are loaded.
Bottles don't break
• How often do you notice this? Bottles will not break every
time. The thickness of the bottle's glass and the content of
the trash load below it may keep the bottle from breaking.
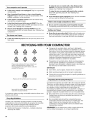
RECYCLINGWITHYOURCOMPACTOR
PETE HDPE V
LDPE PP PS
These codes indicate which type of plastic was
used in manufacturing the container. Your
recycling program will confirm which codes are
accepted for recycling.
OTHER
Plastics with this symbol cannot be recycled.
®
Items with this symbol can be recycled or were
made from recycled materials.
A compactor makes recycling and landfill reduction efforts more
effective and efficient.
Recycling Guidelines
Contact your community recycling program or local recycling
organizations to find out which items are accepted for recycling
and how they should be prepared and organized. These
programs will provide essential recycling guidelines:
• Method and frequency of collection--curbside collections
and drop-off centers.
Categories of recyclable items, and how to distinguish
between them. Plastic containers are identified by codes on
the bottom. Sort by the numbers inside the triangular arrows.
For example, most plastic soda bottles and some cleaning
bottles have code 1; most milk and water jugs, laundry and
personal hygiene product containers have code 2. Paper and
cardboard containers (paperboard) also have recycle
symbols to indicate a container is recyclable.
Preparations of recyclable items. Most recycling programs
provide specific guidelines on preparation. For example,
aluminum cans and plastic containers need to be rinsed out,
lids removed, but often labels can be left on.
IMPORTANT:
• Some items, such as glass, should not be compacted.
• Most recycling programs will not accept crushed glass.
• Check with your recycling program for specific guidelines on
preparing recyclables.
Organizing the Recycling Workspace
Convenient recycle bins are made to fit in the compactor drawer.
These bins, as well as plastic compactor bags, can be purchased
in a variety of colors at hardware stores and supermarkets. Set
up a system of color-coded bags in an area chosen for
processing recyclables. Each color can represent a category of
recyclable items, based on types specified by your recycling
program. Separate recyclable items from non-recyclable items:
• Recyclable items can be sorted using the color-coded bags.
Prepare items according to guidelines provided by your
recycling program.
Non-recyclable items should be compacted because
compaction reduces trash volume to its original size: four
bags of trash can be compacted into one bag. This
contributes to reducing landfill volume and related waste
transportation burdens.
REMEMBER: Do not expect items which contain minimal air,
such as folded newspapers, to compact significantly.
10

Compacting Recyclable Items
Then follow instructions in "Compactor Use." When the
compacting cycle is complete, remove the plastic bag as shown
in "Removing a Filled Bag" and return it to storage until it is full
enough to recycle..Most recycling programs want the consumer to crush or flatten
recyclable items such as plastics, cans, and paperboard. Reduce - Reuse - Recycle
Compacting recyclable items consolidates volume and thereby
reduces transportation costs--and also helps manage recycling
workspace more effectively. The compactor is ideal for such a
task. When a plastic bag is full enough to require compacting,
place the bag in the drawer as shown in "Installing a New Bag."
ASSISTANCEORSERVICE
Before calling for assistance or service, please check
"Troubleshooting." It may save you the cost of a service call. If
you still need help, follow the instructions below.
When calling, please know the purchase date and the complete
model and serial number of your appliance. This information will
help us to better respond to your request.
If the problem is not due to one of the items listed in the
"Troubleshooting" section...
Call the dealer from whom your appliance was purchased, or call
Jenn-Air at 1-800-JENNAIR (1-800-836-8247} to locate an
authorized service company. When calling, please know the
purchase date and the complete model and serial number of your
appliance. Be sure to retain proof of purchase to verify warranty
status.
If the dealer or service company cannot resolve your problem,
write to:
Jenn-Air Brand Home Appliances
Customer eXperience Center
553 Benson Road
Benton Harbor, MI 49022-2692
Web address: www.jennair.com
Or call: 1-800-JENNAIR (1-800-536-6247).
U.S. customers using TTY for deaf, hearing impaired or speech
impaired, call: 1-800-688-2080 (Monday - Friday, 8:00 a.m. -
8:00 p.m. Eastern Time).
NOTE: When writing or calling about a service problem, please
include the following information:
1. Your name, address and daytime telephone number.
2. Appliance model number and serial number.
3. Name and address of your dealer or servicer.
4. A clear description of the problem you are having.
5. Proof of purchase (sales receipt).
User's guides, service manuals and parts information are
available from Jenn-Air Brand Home Appliances, Customer
eXperience Center.
n
If the problem is not due to one of the items listed in the
"Troubleshooting" section...
Call the dealer from whom your appliance was purchased, or call
Jenn-air at 1-800-807-8777 to locate an authorized service
company. When calling, please know the purchase date and the
complete model and serial number of your appliance. Be sure to
retain proof of purchase to verify warranty status.
If the dealer or service company cannot resolve your problem,
write to:
Jenn-Air Brand Home Appliances
Customer Interaction Centre
1901 Minnesota Court
Mississauga, ON L5N 3A7
Web address: www.jennair.ca
Or call: 1-800-807-6777.
NOTE: When writing or calling about a service problem, please
include the following information:
1. Your name, address and daytime telephone number.
2. Appliance model number and serial number.
3. Name and address of your dealer or servicer.
4. A clear description of the problem you are having.
5. Proof of purchase (sales receipt).
User's guides, service manuals and parts information are
available from Jenn-Air Brand Home Appliances, Customer
Interaction Centre.
To order a color custom panel and handle, contact your local
authorized dealer.
Replacement Bags - Call for Part Number.
Charcoal Air Filter - Part Number 4151750
Color Custom Panel and Handle:
Part Number W10122178 (Black)
Part Number W10122177 (White)
Part Number W10122193 (Oiled Bronze)
Part Number W10122189 (Black Floating Glass)
Part Number W10122161 (Euro Handle)
11

JENN-AIR MAJOR APPLIANCEWARRANTY
ONE YEAR LIMITED WARRANTY
For one year from the date of purchase, when this major appliance is operated and maintained according to instructions attached to or
furnished with the product, Jenn-Air brand of Maytag Corporation or Maytag Limited (hereafter "Jenn-Air") will pay for factory specified
replacement parts and repair labor to correct defects in materials or workmanship. Service must be provided by a Jenn-Air designated
service company. This limited warranty applies only when the major appliance is used in the country in which it was purchased.
ITEMS JENN-AIR WILL NOT PAY FOR
1. Service calls to correct the installation of your major appliance, to instruct you how to use your major appliance, to replace or repair
house fuses or to correct house wiring or plumbing.
2. Service calls to repair or replace appliance light bulbs, air filters or water filters. Those consumable parts are excluded from warranty
coverage.
3. Repairs when your major appliance is used for other than normal, single-family household use.
4. Damage resulting from accident, alteration, misuse, abuse, fire, flood, acts of God, improper installation, installation not in
accordance with electrical or plumbing codes, or use of products not approved by Jenn-Air.
5. Any food loss due to refrigerator or freezer product failures.
6. Replacement parts or repair labor costs for units operated outside the United States or Canada.
7. Pickup and delivery. This major appliance is designed to be repaired in the home.
8. Repairs to parts or systems resulting from unauthorized modifications made to the appliance.
g. Expenses for travel and transportation for product service in remote locations.
10. The removal and reinstallation of your appliance if it is installed in an inaccessible location or is not installed in accordance with
published installation instructions.
11. Replacement parts or repair labor costs when the major appliance is used in a country other than the country in which it was
purchased.
DISCLAIMER OF IMPLIED WARRANTIES; LIMITATION OF REMEDIES
CUSTOMER'S SOLE AND EXCLUSIVE REMEDY UNDER THIS LIMITED WARRANTY SHALL BE PRODUCT REPAIR AS PROVIDED
HEREIN. IMPLIED WARRANTIES, INCLUDING WARRANTIES OF MERCHANTABILITY OR FITNESS FOR A PARTICULAR PURPOSE,
ARE LIMITED TO ONE YEAR OR THE SHORTEST PERIOD ALLOWED BY LAW. MAYTAG SHALL NOT BE LIABLE FOR INCIDENTAL
OR CONSEQUENTIAL DAMAGES. SOME STATES AND PROVINCES DO NOT ALLOW THE XCLUSION OR LIMITATION OF
INCIDENTAL OR CONSEQUENTIAL DAMAGES, OR LIMITATIONS ON THE DURATION OF IMPLIED WARRANTIES OF
MERCHANTABILITY OR FITNESS, SO THESE XCLUSIONS OR LIMITATIONS MAY NOT APPLY TO YOU. THIS WARRANTY GIVES
YOU SPECIFIC LEGAL RIGHTS AND YOU MAY ALSO HAVE OTHER RIGHTS, WHICH VARY FROM STATETO STATE OR PROVINCE
TO PROVINCE.
Outside the 50 United States and Canada, this warranty does not apply. Contact your authorized Jenn-Air dealer to determine if another
warranty applies.
If you need service, first see the "Troubleshooting" section of the Use & Care Guide. After checking "Troubleshooting," additional help
can be found by checking the "Assistance or Service" section or by calling Jenn-Air. In the U.S.A., call 1-800-JENNAIR
(1-800-536-6247). In Canada, call 1-800-807-6777. 2/o7
Keep this book and your sales slip together for future
reference. You must provide proof of purchase or installation
date for in-warranty service.
Write down the following information about your major appliance
to better help you obtain assistance or service if you ever need it.
You will need to know your complete model number and serial
number. You can find this information on the model and serial
number label located on the product.
Dealer name
Address
Phone number
Model number
Serial number
Purchase date
12

SECURITEDU COMPACTEUR
Votre s_curit_ et celle des autres est tres importante.
Nous donnons de nombreux messages de securite importants dans ce manuel et sur votre appareil menager. Assurez-vous de
toujours lire tousles messages de securite et de vous y conformer.
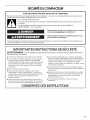
Voici le symbole d'alerte de securit&
Ce symbole d'alerte de securite vous signale les dangers potentiels de deces et de blessures graves &vous
et & d'autres.
Tous les messages de securite suivront le symbole d'alerte de securite et le mot "DANGER" ou
"AVERTISSEMENT". Ces roots signifient :
Risque possible de deces ou de blessure grave si vous ne
suivez pas immediatement lee instructions.
Risque possible de deces ou de blessure grave si vous
ne euivez pas lee instructions.
Tousles messages de securite vous diront quel est le danger potentiel et vous disent comment reduire le risque de blessure et
ce qui peut se produire en cas de non-respect des instructions.
IMPORTANTES INSTRUCTIONS DE Si CURITE
AVERTISSEMENT :Lors de I'utilisation d'appareils 61ectrom6nagers, il convient d'observer certaines pr6cautions
616mentaires dont les suivantes :
[] Lire toutes les instructions avant d'utiliser le compacteur.
[] Une surveillance etroite est necessaire, Iorsque I'appareil
est employe par ou pres d'enfants. Ne pas permettre
d'utiliser I'appareil comme un jouet, ou le faire fonctionner
sans surveillance. Verrouiller I'interrupteur a cle Iorsque
I'appareil n'est pas utilise et garder la cle hors d'atteinte
des enfants.
[] Ne pas toucher les pieces mobiles.
[] Ne pas faire fonctionner le compacteur si le cordon
d'alimentation, la fiche de branchement, le moteur sont
endommages ou apres tout dommage quelconque. Faire
examiner, reparer ou ajuster le compacteur par un
technicien autoris&
[] Utiliser uniquement pour I'usage auquel il est destine, tel
que decrit dans ce manuel. Ne pas utiliser des accessoires
autres que ceux qui sont recommandes par le fabricant.
[] Ne pas utiliser cet appareil pour compacter des produits
toxiques ou fluides inflammables tels que chiffons imbibes
d'huile et vaporisateurs insecticides. Ne pas soumettre au
compacteur les articles comme cigarettes ou cigares
allumes, ou autres objets en combustion ou chauds. Ne pas
surcharger le compacteur.
[] Ne pas demonter le compacteur. Un remontage incorrect
peut 6tre a I'origine d'un choc electrique, lots de I'utilisation
subsequente.
[] Manipuler avec soin un sac rempli de dechets. Des objets
pointus peuvent percer le sac et causer des blessures. Ne
pas surcharger le sac de dechets avec des materiaux
pesants tels que le verre.
[] Ce compacteur est destine a I'usage domestique
uniquement.
CONSERVEZ CES INSTRUCTIONS
13

INSTRUCTIONSD'INSTALLATION
Installateur : Laissez le Guide d'utilisation et d'entretien au proprietaire.
Propri_taire : Gardez le Guide d'utilisation et d'entretien pour reference ulterieure et pour I'usage de I'inspecteur local d'electricite, au
besoin.
Risque du poids e×cessif
Utiliser deux ou plus de personnes pour d_placer et
installer le compacteur.
Le non-respect de cette instruction peut causer
une blessure au dos ou d'autre blessure.
IMPORTANT :
• Ne pas saisir la console pour deplacer le compacteur.
1.
2.
Commencer dans la piece ou le compacteur sera installe.
Retirer le compacteur de son emballage de carton. Enlever
tous les materiaux d'emballage et de protection comme
ruban adhesif et cabs. Avec une solution d'eau tiede et de
produit de nettoyage menager doux, enlever les residus de
cire laisses par les materiaux de protection. Secher
completement avec un chiffon doux. Pour de plus amples
renseignements, voir la section "Nettoyage".
Verifier que le cordon d'alimentation electrique est fixe
I'agrafe a I'arriere du compacteur.
3.
A. Agrafe du cordon d'alimentation
Placer les 2 corni_res de protection sur le plancher, pros du
compacteur. Ouvrir le tiroir du compacteur et retirer tousles
materiaux d'emballage ou autres articles expedies dans le
tiroir. Ne pas retirer le sac du compacteur. Saisir la poignee et
soulever I'avant du tiroir pour le faire passer au-dessus des
butees. Saisir les c6tes du tiroir et soulever le tiroir pour le
retirer du compacteur. Placer le tiroir sur les 2 cornieres de
protection.
4.
Placer les 2 autres cornieres de protection sur le plancher,
pres du compacteur. Saisir les c6tes de la caisse du
compacteur et placer le compacteur sur le c6te, sur les
cornieres de protection. Retirer la base placee au fond du
compacteur avant I'expedition.
A. Pieds de nivellement
B. Base d'exp_dition
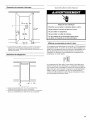
Dimensions du produit
341/8"
(86,7 cm)
24
15"
(38,1 cm) (61 cm)
14

Dimensions de ouverture & d_couper
\
3"
(7,6 cm)--_,,_l
15W' rain.
(38,7 cm)
_.1/4"rnin.
(87 cm)
A. La prise _lectrique reli_e a la terre qui dolt _tre a une distance
minimum de 3" (7,6 cm) des armoires voisines ou des tours
lat_raux tel qu'ifiustr_. Efie peut _tre plac_e du cOt_ gauche ou du
cOtE droit du produit.
Dimensions de d_gagement
Risque de choc electrique
Brancher sur une prise a 3 alveoles reliee a la terre.
Ne pas enlever la broche de liaison a la terre.
Ne pas utiliser un adaptateur,
Ne pas utiliser un c&ble de rallonge.
Le non-respect de ces instructions peut causer
un deces, un incendie ou un choc electrique.
M6thode recommand_e de raise & la terre
Le compacteur est alimente par un circuit de 115 V CA seulement
monophase, 60 Hz, 15 ou 20 A; le circuit dolt _tre protege par un
fusible et convenablement relie a la terre par I'intermediaire de la
fiche de branchement avec broches de liaison a la terre (voir
I'illustration ci-dessous). II est preferable que cet appareil soit
alimente par un circuit distinct.
Le compacteur dolt _tre relie a la terre Iorsqu'il est utilise pour
reduire le risque de choc electrique. Le compacteur est equipe
d'un cordon atrois conducteurs et d'une fiche a trois broches de
liaison a la terre, pour convenir a la prise de courant appropriee
reliee a la terre. Le conducteur vert (ou vert et jaune) dans le
cordon est le fil de liaison a la terre. Ne pas connecter le fil vert
(ou vert et jaune) a une borne active.
A. Laisser un espace fibre de 6" (15,2 cm) du cOt_ droit du
compacteur pour extraire les sacs du compacteur.
B. Laisser un espace fibre de 23" (58,4 cm) en avant du cempacteur
pour ouvrir completement ou retirer le tiroir du compacteur.
15

,,_O<J,,,,W"_COt";qp_Oil_
REMAROUE : C'est a I'utilisateur qu'incombe la responsabilite de realiser une installation correcte. S'assurer d'avoir tout le necessaire
pour une installation convenable. C'est au client qu'incombent la responsabilite et Fobligation personnelle de contacter un installateur
qualifie pour s'assurer que I'installation electrique repond aux codes et reglements nationaux et Iocaux.
Outillage n_cessaire :
Rassembler lesoutilset piecesnecessaires avant de commencer
I'installation.
• Niveau • Tournevis Phillips n° 2
• Ruban a mesurer • Tournevis a lame plate
• Pince • Cle polygonale de %6"
• Ciseaux • Couteau utilitaire
IMPORTANT :
• Ne pas saisir la console pour deplacer le compacteur.
• Glisser le compacteur sur le carton ou le panneau de bois dur
avant de deplacer le compacteur sur le plancher, pour
emp_cher d'endommager le rev_tement du plancher.
• Ne pas laisser le ch&ssis arriere du compacteur toucher le
rev_tement du plancher Iors du soulevement ou du
deplacement du compacteur.
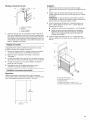
Installation sous un comptoir
Mesurer la hauteur de I'ouverture de I'armoire. Le sommet du
compacteur devrait _tre au moins a %" (3 mm) du sommet de
I'ouverture de I'armoire.
Les roues arriere sont prer6glees pour I'ouverture d'une
armoire d'une hauteur de 34 W' (87 cm). Voir Position "1" sur
I'illustration suivante.
Pour ajuster les autres hauteurs d'ouverture d'armoire :
• Desserrer la vis autotaraudante, juste assez pour pouvoir
extraire le piton du trou de positionnement "1".
• Deplacer la roue arriere et le piton a la position "2" ou "3"
au besoin, pour la mesure d'ouverture de I'armoire :
Position "2" : hauteur libre de 34 W' a 34 7A6"
(87 a 87,5 cm)
Position "3" : hauteur libre 34 7/_6"a 34 %" (87,5 a 88 cm)
REMARQUE : Pour mettre d'aplomb I'appareil en
position "3", vous devez peut-_tre ajouter des cales sous
les pieds de nivellement.
• Serrer la vis. Repeter ces operations pour I'autre roue
arriere.
2. Utiliser la pince pour abaisser les pieds de nivellement hors
de I'armoire. Ajuster les pieds de sorte qu'il y aura un espace
de W' (3 mm) a V4"(6,4 mm) entre le sommet du compacteur
et le sommet de I'ouverture de I'armoire. Placer le
compacteur verticalement.
3. Deplacer le compacteur jusqu'au voisinage immediat de la
position d'installation finale.
4. Brancher sur une prise a 3 alveoles reliee a la terre.
5. Determiner si vous voulez que le cadre du compacteur ou le
devant du tiroir soit en affleurement avec le devant de
I'armoire.
En utilisant les deux vis n° 8 de 18 x %6"(8 mm), installer les
brides qui restent au sommet de la caisse, au besoin :
• Si le ch&ssis du compacteur doit _tre en affleurement
avec I'avant de I'armoire, placer les vis de retenue de la
bride darts les trous "1 ".
• Si le devant de la bride du tiroir du compacteur doit _tre
en affleurement avec I'avant de I'armoire, placer les vis de
retenue de la bride dans les trous "3".
• Si le compacteur doit _tre installe a une position
intermediaire, entre "1" et "3" placer les vis de retenue de
la bride dans le trou "2".
"', _( i
A. Dessusdu comptoyr
B. Bride de retenue
6=
Soulever lentement et leg_rement le devant et faire fouler le
compacteur dans I'ouverture de I'armoire.
En utilisant les deux vis n° 8 de 18 x W' (12 mm), fixer les
brides de retenue en-dessous du comptoir avec les vis de
montage.
Installation sous lecomptoir
A
D
A. Bride porte-roue
B. Caisse
C. Piston de positionnement
D. Vis autotaraudante (pivot)
A. Dessus du comptoir
B. Bride de retenue
C. Vis de montage
Si les brides ne peuvent pas _tre fixees au-dessous du
comptoir, fixer les agrafes de montage aux brides. Fixer le
compacteur au devant de I'armoire avec les vis dans les
agrafes de montage.
16

Montage _ ravant de rarmoire
A.......... .....................C
B ....................
A. Agrafe de montage
B. Armoire
C. Bride de retenue
D. Vis de montage
7. Saisir les c6tes du tiroir du compacteur et placer le fond du
tiroir dans les glissieres. Soulever le tiroir par la poignee pour
faire passer I'avant du tiroir au-dessus des butees. Fermer le
tiroir. Verifier qu'il est possible d'ouvrir facilement le tiroir. Si la
pedale frotte contre le plancher, voir d'autres instructions a la
section "Reglage de la pedale",
R_glage de la p6dale
Si la pedale frotte contre le rev_tement du plancher, on peut
modifier la hauteur de la pedale comme suit :
1. Marquer de chaque c6te de la pedale la largeur du materiau
qui cause le frottement sur le rev_tement du plancher.
2. Retirer le tiroir de I'appareil. (Voir I'etape 3 a la section
"Deballage",)
3. A I'aide d'une r_gle et d'un crayon ou d'une craie, tracer une
ligne entre les marques tracees de chaque c6te de la pedale,
4. ,&,I'aide de ciseaux ou d'un couteau utilitaire, decouper la
pedale le long de la ligne.
5. Reinstaller le tiroir. Si la pedale frotte toujours sur le
rev6tement du plancher, rep6ter les etapes 1 a 4.
Installation d'un panneau personnalis_
Dimensions
Utiliser ces dessins de dimensions pour creer un panneau
personnalise a utiliser sans trousse de garniture. Le panneau doit
avoir une epaisseur minimale d'au moins 1/2"(13 mm).
Installation
1. Oter les deux butees de caoutchouc dans les angles
inferieurs de la fagade du tiroir. Conserver les butees; jeter les
vis.
2. Aligner le bas du panneau personnalise avec le bas de la
fagade exterieure du tiroir et le reste du panneau sur la patte
de support,
REMARQUE : Le bas du panneau personnalise ne devrait
pas depasser au-dessous de la patte de support inferieure en
bas/au centre de la fagade exterieure du tiroir.
3. Fixer le panneau personnalise sur la fagade exterieure du
tiroir - utiliser quatre visa bois n° 8 x 1", placer depuis la
fagade interne du tiroir.
• Installer les deux visa bois superieures - voir I'illustration.
• Utiliser les deux visa bois inferieures pour reinstaller
egalement les deux butees de caoutchouc de chaque
c6te du tiroir en bas/a I'interieur Iors de la fixation du
panneau personnalis&
4. Fixer les tringles quart de rend 15" x 1/2"le long de la rive
interne superieure de la fa9ade du tiroir- utiliser de la colle ou
des vis,
D
A. Panneau personnalis_
B. Quart-de-rond de 15" x 1/2"
C. Fagade du tiroir
D. Position des quatre vis a bois n° 8 x 1"
E. Butte de caoutchouc (une de chaque c6t_)
293/8"
(74,6 cin)
15" _1
(36,1 cm)
17

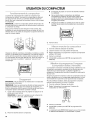
UTILISATIONDUCOMPACTEUR
Fonc onnen" ent,du cot...........ssp(/sc 'eu
La presse de cornpactage est la partie du compacteur qui
compresse les dechets. La presse de compactage ne descend
pas jusqu'au fond du tiroir. Les premiers dechets charges ne
seront donc pas comprimes les premieres fois que vous chargez
le compacteur.
REMARQUE : Le tiroir du compacteur dolt _tre rempli a plus de
la moitie avant que le compacteur de dechets puisse commencer
compresser la charge.
Vous pouvez entendre un bruit Iorsque le verre se brise. Des
bouteilles en verre robuste peuvent ne passe briser du tout. Les
dechets dans un sac plein de compacteur occuperont environ le
quart du volume original.
Envelopper de papier ou recouvrir les dechets humides
ou salissants.
Ne pas mettre dans le compacteur des matieres
susceptibles de degager des mauvaises odeurs, telles
que de la viande crue, du poisson, des pelures de
pamplemousse, des couches jetables ou des articles
d'hygiene personnelle.
Charger les bouteilles ou canettes sur le c6te au centre
du tiroir. Ne pas placer les bouteilles dans une position
verticale.
--:.ft p:- ""
Charger les dechets volumineux, bouteilles et canettes au centre
du tiroir. Les bouteilles ou les canettes qui n'ont pas ete mises au
centre du tiroir peuvent _tre coincees entre la presse et le tiroir.
Le commutateur du tiroir peut detecter une "erreur de charge" et
renvoyer la presse a la position "superieure" sans qu'il y ait
compactage.
3. Fermer le tiroir.
1. Ouvrir le contenant. Deposer les dechets.
2. Laisser le bouton a cle a la position ON (marche).
3. Regler I'interrupteur du programme Compress (compression
solide) a OFF (arr_t).
4. Fermer le contenant
5. SOULEVER la pedale pour METTRE le programme EN
MARCHE.
IMPORTANT : Ne pas enfoncer les articles dans le compacteur
avec les pieds ou les mains.
REMARQUE : Vous ne verrez pas les dechets se faire presser les
quelques premieres fois que vous chargez le compacteur. Le
tiroir du compacteur dolt _tre environ a moitie rempli avant que le
compacteur puisse commencer a presser la charge.
1. Ouvrir le tiroir. So@ever et tirer la poignee ou appuyer sur la
pedale pour ouvrir le tiroir.
REMARQUE : L'appui sur la pedale ouvre le contenant de
3" a 6" (7,6 cm a 15,2 cm), selon la charge.
Le programme Compress (verrouill@ prolonge I'utilisation du sac
en exergant une pression constante sur les dechets pour les
emp_cher de se decompresser. L'utilisation reguliere du
programme Compress peut accroftre la capacite du sac jusqu'a
25 pour cent.
Durant le programme Compress, le bras de compression reste en
position abaissee pour un compactage supplementaire. Le tiroir
est verrouille et ne peut _tre ouvert quand le bras est abaisse.
Pour les meilleurs resultats, utiliser le programme Compress
pendant des periodes d'au moins 30 minutes.
1. Ouvrir le contenant Deposer les dechets.
2. Regler I'interrupteur du programme Compress du
compacteur sur ON (marche).
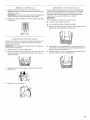
2. Placer les dechets dans le compacteur.
Compress Air
Cycle Filter
3. Fermer le contenant.
4. SOULEVER la pedale pour METTRE le programme EN
MARCHE.
5. Le contenant reste VERROUILL¢: jusqu'& ce que Fen precede
au RC:ENCLENCHEMENT en SOULEVANT la pedale.
18

2=
Lt iss o i! ss (i!s s
Regler I'interrupteur du filtre a air sur ON (marche). Le
ventilateur cree un mouvement d'air dans le compacteur pour
eliminer les odeurs.
REMARQUE : Le filtre a air au charbon fonctionne seulement
Iorsque le bouton a cle est a la position ON (marche).
Regler I'interrupteur du filtre a air sur OFF (art@) pour eteindre
le ventilateur.
Compress Air
Cycle Filter
Lorsque les dechets sont comprimes jusqu'au sommet du tiroir,
enlever le sac. Si le sac est trop Iourd, comprimer moins de
dechets la fois suivante.
IMPORTANT : Ne pas enfoncer les articles dans le compacteur
avec les pieds ou les mains.
1. Tirer le tiroir pour I'ouvrir completement.
2. Degager le haut du sac des boutons de retenue du sac. Tirer
vers le haut sur les 4 revers du sac. Fermer le sac avec les
attaches fournies.
3=
Abaisser le levier de verrouillage et incliner le c6te du tiroir
pour I'ouvrir.
4. Retirer le sac en le soulevant.
Ne pas utiliser d'autres sacs que ceux qui sont sp@cialement
congus pour @treutilis@s clans votre compacteun Oommander
des sacs de remplacement pour le compacteur chez votre
marchand local ou en composant le numero sans frais sur la
couverture ou a la section "Assistance ou Service".
IMPORTANT :
Avant d'installer un nouveau sac, s'assurer que :
• Le c6te du tiroir est bien verrouille.
• Le contenant est propre et exempt de debris.
1. Placer le sac pile dans le tiroir. Ouvrir le sac et replier le bord
superieur du sac par-dessus le bord du tiroir.
2. Immobiliser le sac en engageant les 4 trous pre-perces sur
les boutons de retenue du sac. Les trous s'agrandiront sur les
boutons sans endommager le sac.
3. Pousser I'interieur du sac contre le fond du tiroir, les c6tes et
les coins du tiroir, pour qu'il s'adapte bien.
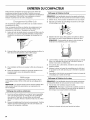
19

ENTRETIENDUCOMPACTEUR
Votre nouveau compacteur est con(_u pour vous donner de
nombreuses annees de service fiable. Toutefois vous avez
quelques mesures a prendre pour bien maintenir le rendement de
votre compacteur. Cette section vous expliquera comment
nettoyer et prendre soin de votre compacteur.
On recemmande d'utiliser soit le filtre a air au charbon dans le
compartiment du filtre.
Pour commander les filtres au charbon de remplacement qui
conviennent, composer le num@o sans frais indique sur la
couverture ou a la section "Assistance ou Service".
1. Inserer le bout des doigts dans le couvercle du filtre a air et le
tirer jusqu'a ce que les languettes laterales se declenchent.
Soulever le couvercle pour le degager des languettes a la
base.
Nettoyage de I'int_rieur du tiroir
REMARQUE : II est preferable de porter des gants protecteurs
car des petits debris de verre peuvent se trouver dans la caisse.
1. Enlever le sac. Voir la section "Enlevement d'un sac rempli".
2. Appuyer sur le levier de verrouillage a bascule (ou le Ioquet
de verrouillage sur le c6te).
3. Maintenir le levier dans cette position et incliner le c6te du
tiroir jusqu'a ce que le Ioquet depasse le devant du tiroir.
REMARQUE : IIest possible de retirer le c6te du tiroir en
I'inclinant vers I'exterieur, puis en le soulevant.
2.
Enlever le filtre aair en tirant sur le bord superieur du filtre. Le
filtre devrait sortir facilement. Jeter le filtre usag&
3. Pour reinstaller le filtre &air, pousser le filtre de rechange en
place.
4. Inserer les attaches & la base du couvercle du filtre a air et
pousser jusqu'a ce que les languettes laterales
s'enclenchent
Avant de nettoyer le compacteur, tourner le bouton a cle (ou
commutateur a cle) a OFF & LOCK (arr@ et verrouillage) et le
retirer.
REMARQUE : Les services autres que les services decrits dans
cette section doivent _tre execut6s par un representant de
service design&
Nettoyage des surfaces ext_rieures
1. Laver les surfaces ext@ieures (y compris I'acier inoxydable)
avec une eponge propre ou un linge doux et un detergent
doux dans de I'eau tiede. Ne pas utiliser de nettoyants
abrasifs ou rugueux. Rincer et secher a fond avec un chiffon
doux.
2. Essuyer immediatement les traces de renversement. Certains
aliments peuvent endommager le fini s'ils sont laisses a la
surface du compacteur a dechets.
4. Laver I'interieur du tiroir avec une eponge propre ou un linge
doux et un detergent doux dans de I'eau tiede. Rincer et
secher afond avec un chiffon doux.
5. Si le c6te du tiroir a ete enleve, remettre le c6te du tiroir en
position inclinee.
6. Abaisser le levier (ou Ioquet de verrouillage sur le c6te) tout
en poussant sur le c6te du tiroir pour le remettre en position
verticale.
7. Verrouiller le c6te du tiroir en poussant le levier (ou Ioquet de
verrouillage sur le c6te) vers le haut.
Nettoyage de I'int_rieur de la caisse
REMARQUE : II est preferable de porter des gants protecteurs
car des petits debris de verre peuvent se trouver dans le tiroir.
1. Tirer le tiroir vers I'ext@ieur jusqu'& la butee.
REMARQUE : Remarquer comment les roulettes du tiroir se
deplacent dans les rainures. IIsera plus facile de replacer le
tiroir Iorsque vous aurez termine le nettoyage.
2. So@ever le devant du tiroir pour franchir les butees.
2O
La page charge ...
La page charge ...
La page charge ...
La page charge ...
-
 1
1
-
 2
2
-
 3
3
-
 4
4
-
 5
5
-
 6
6
-
 7
7
-
 8
8
-
 9
9
-
 10
10
-
 11
11
-
 12
12
-
 13
13
-
 14
14
-
 15
15
-
 16
16
-
 17
17
-
 18
18
-
 19
19
-
 20
20
-
 21
21
-
 22
22
-
 23
23
-
 24
24


Jenn-Air TC707S0 Le manuel du propriétaire
- Catégorie
- Compacteur de déchets
- Taper
- Le manuel du propriétaire
dans d''autres langues
- English: Jenn-Air TC707S0 Owner's manual
Documents connexes
-
Jenn-Air TC607X Manuel utilisateur
-
Jenn Air TC707S0 Manuel utilisateur
-
-
-
-
-
-
-
Jenn Air TC507Q1 Le manuel du propriétaire
Autres documents
-
-
Whirlpool TU950QPXS Le manuel du propriétaire
-
-
-
-
JennAir TC607X Le manuel du propriétaire
-
Jenn Air TC507W1 Le manuel du propriétaire
-
GE ZCGP150PII-00 Le manuel du propriétaire