Jenn-Air Trash Compactor TC507 Manuel utilisateur
- Catégorie
- Compacteur de déchets
- Taper
- Manuel utilisateur

JENN-AIR COMPACTORS/COMPACTEURS
TC507
Use & Care Guide
For assistance, call: 1-800-688-1100.
Guide d’utilisation
et d’entretien
Pour assistance, composer le 1-800-688-1100.
Table of Contents/Table des matières .............2
9871894

2
TABLE OF CONTENTS
COMPACTOR SAFETY ..................................................................3
INSTALLATION INSTRUCTIONS ..................................................4
Unpacking ....................................................................................4
Location Requirements................................................................4
Electrical Requirements ...............................................................5
Undercounter Installation.............................................................6
Air Freshener ................................................................................7
Changing the Decorative Panel ...................................................7
COMPACTOR USE.........................................................................9
How Your Compactor Works.......................................................9
Loading.........................................................................................9
Starting Your Compactor...........................................................10
Stopping Your Compactor.........................................................10
Removing a Filled Bag ...............................................................10
Installing a New Bag ..................................................................11
COMPACTOR CARE....................................................................11
Cleaning......................................................................................11
TROUBLESHOOTING ..................................................................12
RECYCLING WITH YOUR COMPACTOR ..................................12
ASSISTANCE OR SERVICE.........................................................13
In the U.S.A. ...............................................................................13
Accessories ................................................................................13
WARRANTY ..................................................................................14
TABLE DES MATIÈRES
SÉCURITÉ DU COMPACTEUR ...................................................15
INSTALLATION DU COMPACTEUR ...........................................16
Deballage....................................................................................16
Spécifications d’emplacement...................................................16
Spécifications électriques ..........................................................17
Installation en-dessous du comptoir .........................................18
Assainisseur d'air .......................................................................19
Changement du panneau décoratif ...........................................19
UTILISATION DU COMPACTEUR...............................................21
Fonctionnement du compacteur................................................21
Chargement................................................................................21
Mise en marche du compacteur ................................................22
Pour arrêter le compacteur ........................................................22
Enlèvement d’un sac rempli.......................................................22
Installation d’un nouveau sac.....................................................23
ENTRETIEN DE VOTRE COMPACTEUR....................................23
Nettoyage ...................................................................................23
DÉPANNAGE.................................................................................24
RECYCLAGE AVEC VOTRE COMPACTEUR.............................25
ASSISTANCE OU SERVICE.........................................................26
Aux États-Unis............................................................................26
Accessoires ................................................................................26
GARANTIE.....................................................................................27

3
COMPACTOR SAFETY
You can be killed or seriously injured if you don't
immediately follow instructions.
You
can be killed or seriously injured if you don't
follow instructions.
All safety messages will tell you what the potential hazard is, tell you how to reduce the chance of injury, and tell you
what can
happen if the instructions are not followed.
Your safety and the safety of others are very important.
We have provided many important safety messages in this manual and on your appliance. Always read and obey all
safety messages.
This is the safety alert symbol.
This symbol alerts you to potential hazards that can kill or hurt you and others.
All safety messages will follow the safety alert symbol and either the word “DANGER” or
“WARNING.” These words mean:
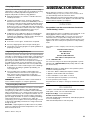
IMPORTANT SAFETY INSTRUCTIONS
WARNING: When using an electrical appliance, basic precautions should always be followed, including the
following:
Read all instructions before using the compactor.
Close supervision is necessary when used by or
near children. Do not allow to be used as a toy, or
to run unattended at any time. Lock Key Switch
when not in use and store key out of reach of
children.
Do not touch moving parts.
Do not operate with a damaged cord set, plug,
motor, or after damage in any manner. Have the
compactor examined, repaired or adjusted by an
authorized serviceperson.
Use only for intended use as described in this
manual. Do not use other than manufacturer's
recommended attachments.
Do not take apart the compactor. Incorrect
reassembly can cause electric shock when
subsequently used.
Handle a loaded trash bag with care. Sharp objects
can pierce the bag and cause injury. Do not
overload trash bag with heavy material such as
glass.
■ This compactor is intended for household use only.
Do not compact toxic or volatile flammable material
such as oily rags and insect sprays. Do not compact
lighted cigarettes, cigars, or other hot or burning
items. Do not overload the compactor.
■
■
■
■
■
■
■
■
SAVE THESE INSTRUCTIONS

4
INSTALLATION
INSTRUCTIONS
Installer: Leave Use and Care Guide with the homeowner.
Homeowner: Keep Use & Care Guide for future reference and for
local electrical inspector’s use, if required.
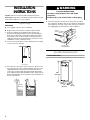
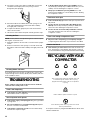
Unpacking
IMPORTANT:
■ Do not grasp console to move compactor.
■ Begin in the room where the compactor will be located.
1. Remove compactor from shipping carton. Remove all
protective packaging materials such as tape and shipping
pads. Use a mild solution of liquid household cleaner and
warm water to remove waxy residue caused by protective
shipping material. Dry thoroughly with a soft cloth. For more
information, see the “Cleaning” section.
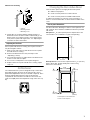
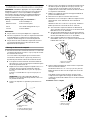
2. Check to be sure the power cord is attached to the cord clip
on the rear of the compactor.
1. Cord clip
3. Place the two corner posts from the carton on the floor near
the compactor. Open the compactor drawer and remove any
shipping materials or other items from the drawer. Do not
remove the compactor bag. Grasp the handle and raise the
front of drawer until it clears the drawer stops. Grasp sides of
drawer and lift drawer out of compactor. Place the drawer on
the two corner posts.
4. Place the other two corner posts on the floor to the side of
the compactor. Grasp the sides of the compactor cabinet and
put compactor on its side on top of the corner posts. Remove
the shipping base from the bottom of the compactor.
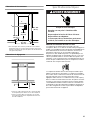
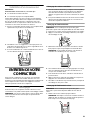
Location Requirements
Product dimensions
1
1. Leveling legs
2. Shipping base
WARNING
Excessive Weight Hazard
Use two or more people to move and install
compactor.
Failure to do so can result in back or other injury.
2
1
34
1
⁄8"
(86.7 cm)
24"
(61 cm)
15"
(38.1 cm)

5
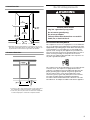
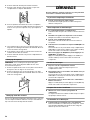
Cutout dimensions
Clearance dimensions
Electrical Requirements
Recommended Grounding Method
This compactor is for use on a single phase, 115-volt, 60 Hz, AC
only 15 or 20 ampere fused and properly grounded circuit and is
equipped with a grounding plug as shown below. Time delay fuse
or circuit breaker is recommended. It is recommended that a
separate circuit serving only this appliance be provided. In the
event of an electrical short circuit, grounding reduces the risk of
electric shock by providing an escape wire for the electric
current. Do not modify the plug attached to the compactor; use
only with a grounded receptacle.
This compactor must be grounded while in use to reduce the risk
of electric shock. The compactor is equipped with a three-
conductor cord and three-prong grounding-type plug to fit the
proper grounding-type receptacle. The green (or green and
yellow) conductor in the cord is the grounding wire. Never
connect the green (or green and yellow) wire to a live terminal.
The outlet should be properly installed and grounded in
accordance with the National Electrical Code and Local codes
and ordinances. No adapter should be used with this appliance.
1. Grounded electrical outlet must be a minimum of 3 in. (7.6 cm)
away from surrounding cabinets or nearby walls as shown. It can
be placed either to the left or the right side of the product.
1. Leave 6 in. (15.2 cm) of clearance space to the right side of
the compactor in order to remove the compactor bags.
2. Leave 23 in. (58.4 cm) of clearance in front of the compactor
in order to fully open or remove the compactor drawer.
18" min.
(45.7 cm)
24" min.
(61 cm)
1
15 min.
(38.7 cm)
34 " min.
(87 cm)
3"
(7.6 cm)
"
WARNING
Electrical Shock Hazard
Plug into a grounded 3 prong outlet.
Failure to follow these instructions can result in
death, fire, or electrical shock.
Do not use an adapter.
Do not remove ground prong.

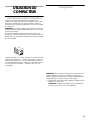
6
Undercounter Installation
NOTE: Proper installation is your responsibility. Make sure you
have everything necessary for correct installation. It is the
personal responsibility and obligation of the customer to contact
a qualified installer to assure that electrical installation meets all
national and local codes and ordinances.
Tools and materials needed for installation:
IMPORTANT:
■
Do not grasp control panel to move compactor.
■
To prevent damaging floor covering, slide compactor onto
cardboard or hardboard before moving compactor across
floor.
■ Do not allow the rear frame of the compactor to touch the
floor covering when lifting or moving compactor.
Undercounter Installation
1. Measure the height of your cabinet opening. The top of the
compactor should be at least
¹₈
in.
(3 mm) from the top of the
cabinet opening.
The rear wheels are preset for a cabinet opening of 34
¹⁄₄
in.
(87 cm). See Position A in picture following.
To adjust for other cabinet opening heights:
■ Loosen self-tapping screw just enough to clear stud from
hole in Position “A.”
■ Move the rear wheel and stud to Position “B” or “C” as
needed for your cabinet opening measurement:
Position B: 34
¹⁄₄
in. to 34
⁷⁄₁₆
in. (87 to 87.5 cm)
Position C: 34
⁷⁄₁₆
in. to 34
⁵⁄₈
in. (87.5 to 88 cm)
NOTE: To level the unit in position “C,” you may need to
add shims under the leveling legs.
■
Tighten screw. Repeat for other rear wheel.
2. Use pliers to lower leveling legs away from cabinet. Adjust
legs so there will be a
¹⁄₈
in. (3 mm) to
¹₄
in. (6.4 mm) space
between the top of the compactor and the top of the cabinet
opening. Stand the compactor upright.
3. Move the compactor close to its final position.
4. Plug into a grounded 3 prong outlet.
5. Determine if you want the compactor frame or drawer front
flush with the cabinet front.
Using the two #8-18 x
⁵₁₆
in. screws, install the retaining
brackets to cabinet top as needed:
■ If the compactor frame is to be flush with the cabinet
front, place retaining bracket screws through “A.”
■
If the compactor drawer front is to be flush with the
cabinet front, place retaining bracket screws through “C.”
■ If the compactor is to be midway between “A” and “C,”
place the retaining bracket screws through “B.”
6. Carefully lift the front slightly and roll compactor into the
cabinet opening.
Using the two #8-18 x
¹₂
in. screws, fasten the retaining
brackets to the countertop with the mounting screws.
If brackets cannot be attached to the underside of
countertop, attach mounting clips to brackets. Fasten
compactor to cabinet front with mounting screws through
mounting clips.
Countertop Mounting
Level Phillips No. 2 Screwdriver
Tape Measure Flat-Head Screwdriver
Pliers
⁵⁄₁₆
in. Hex-Head Socket Wrench
Scissors Utility Knife
1. Wheel bracket assembly
2. Cabinet
3. Locating stud
4. Self-tapping screw (pivot)
2
A
B
C
3
4
1
1. Countertop
2. Retaining bracket
1. Countertop
2. Retaining bracket
3. Mounting screw
2
1
A
B
C
1
2
3

7
Cabinet-front mounting
7. Grasp sides of compactor drawer and place bottom of
drawer into tracks. Lift at the handle so drawer will go over
drawer stops. Close drawer. Check to see if drawer opens
freely. If the toe plate rubs against floor, see “Adjusting the
To e P l a te ” for further instructions.
Adjusting the Toe Plate
If the toe plate rubs the floor covering, the toe plate clearance
may be changed as follows:
1. Mark on each side of the toe plate the amount of toe plate
that rubs the floor covering.
2. Remove the drawer from the unit. (See Step 3 in the
“Unpacking” section.)
3. Use a ruler and a pencil or chalk to draw a line between the
marks on each side of toe plate.
4. Use scissors or utility knife to cut toe plate along line.
5. Replace drawer. If toe plate still rubs floor covering, repeat
steps 1-4.
Air Freshener
The solid air freshener system is designed to help control odors
that might develop in the trash. An air freshener disc can be
purchased in department stores (not sold with compactor). Place
the disk-shaped solid air freshener into the air freshener
compartment. The air freshener should last 4 to 6 weeks. It is
used more rapidly when the temperature is high or the air is very
dry.
Changing the Decorative Panel
There are three options for changing the decorative panel:
■
Order an acrylic panel
■
Create a custom panel for use with a trim kit
■ Create a custom panel for installation without trim
To order an acrylic panel or a trim kit, see the “Assistance or
Service” section for information or call the toll-free number on the
cover.
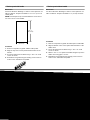
Trim kit panel dimensions
Use these dimension drawings to create a custom panel for use
with a trim kit. Then, follow the installation instructions provided
with the kit.
Flat panel: A ⁷
³²
in. (5.6 mm) thick panel is required. This is the
same thickness as a standard ¹₄ in. plywood or paneling.
Raised panel: The outer section of panel must be ⁷
³²
in. (5.6 mm)
thick to fit into trim. Design raised panel sections using
dimensions shown above.
1. Mounting clip
2. Cabinet
3. Retaining bracket
4. Mounting screw
1
4
3
2
1. Raised panel or decorative trim
2. Outer section of panel
23
"
13
1
6
(
60.5 cm
)
14 "
5
8
(
37.2 cm
)
23 "
13
1
6
(
60.5 cm
)
1 "
1
4
(
32 mm
)
14 "
5
8
(
37.2 cm
)
"
7
32
(
5.6 mm
)
"
5
16
(
8 mm
)
both sides
1
2
"
5
16
(
8 mm
)

8
Trimless panel with handle
Dimensions
Use these dimension drawings to create a custom panel for use
without a trim kit. The panel should be ¹⁄₂ in. to ⁵⁄₈ in. (13 mm to
16 mm) thick.
NOTE:
A thicker panel may need rounded front corners and a
cut-out for access to the handle.
Installation
1.
Remove foot pedal, toe guard, and decorative panel.
2.
Align the top of the custom panel with the bottom of the
handle.
3.
Secure the panel from the back using 4 – #8 x 1 in. wood
screws as shown.
4.
Reinstall the toe guard using the existing screws and ¹⁄₂ in.
washer. Then, reinstall the foot pedal.
Trimless panel without handle
Dimensions
Use these dimension drawings to create a custom panel for use
without a trim kit. The panel should be ¹⁄₂ in. (13 mm) min. thick.
Installation
1.
Remove foot pedal, toe guard, decorative panel, and handle.
2.
Align the bottom of the custom panel with the bottom of the
drawer front.
3.
Secure the panel from the back using 4 – #8 x 1 in. wood
screws as shown.
4.
Attach a 15 in. x ¹⁄₂ in. quarter-round filler along the top of the
drawer front using glue or screws.
5.
Reinstall the toe guard using the existing screws and ¹⁄₂ in.
washer. Then, reinstall the foot pedal.
1. Handle
2. Custom Panel
3. #8 x 1” Wood Screws
4. Toe Guard
5. Washer
6. Toe Guard Screw
23
13
/
16
"
(
60.5 cm
)
15"
(
38.1 cm
)

9
COMPACTOR USE
How Your Compactor Works
The compacting ram is the part of the compactor which
compresses the trash. The compacting ram does not go to the
bottom of the drawer. You will not see compacting of trash the
first few times you load the compactor.
NOTE: The compactor drawer should be more than ¹⁄₂ full before
the compactor can begin to compress the load.
You may hear a noise when glass breaks. Strong glass bottles
may not break at all. The trash in a full compactor bag will be
about ¹⁄₄ the size of its original bulk.
Load bulky trash, bottles, and cans in the center of the drawer.
Bottles or cans not placed in the center may become caught
between the ram and the drawer. The Drawer Monitor Switch
then senses a “misload” and causes the ram to return to the “up”
position without compacting.
Loading
NOTE: You will not see compacting of trash the first few times
you load the compactor. The compactor drawer should be about
¹⁄₂ full before the compactor can begin to compress the load.
1. Open the drawer. Lift and pull the handle or press the toe bar
to open the drawer.
NOTE: Pressing the toe bar opens the container only 3 in. to
6 in. (7.6 cm to 15.2 cm), depending on the load.
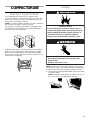
WARNING
Explosion Hazard
Do not compact any container, aerosol cans, or
Doing so can result in death, explosion, or fire.
cloths which might contain insecticide, hair spray,
engine starting fluid, paints, liquids, thinners, or
any other poisonous or explosive products.
WARNING
Cut Hazard
Do not push items down into compactor with
Doing so can result in cuts.
hands or feet.

10
2. Place trash in compactor.
■
Wrap or cover wet or messy trash.
■ Do not compact items that may develop offensive odors
such as raw meat, fish, grapefruit rinds, disposable
diapers, or personal hygiene items.
■
Load bottles or cans on their sides in the center of the
drawer. Do not load bottles in an upright position.
3. Close the drawer.
Starting Your Compactor
1. Turn the Control Knob to START. As soon as the compactor
starts, release the Control Knob. The knob will then advance
to the RUN position and begin the compacting cycle.
2. A complete compacting cycle takes about 27 seconds. The
compactor will automatically stop.
NOTE: When the compacting cycle is done, turn the Key-Knob to
OFF & LOCK. Remove the Key-Knob and store it out of children’s
reach.
Stopping Your Compactor
1. Turn the Control Knob to OFF & LOCK.
2. Turn the Control Knob to RUN. This will raise the ram to its
topmost position.
The compactor will automatically advance to the end of the
cycle and stop.
3. You can open the drawer after the compactor stops.
Removing a Filled Bag
When the trash is compacted to the top of the drawer, remove
the bag. If the bag is too heavy, compact less trash before
emptying it in the future.
1. Pull the drawer completely open.
2. Remove top of bag from bag retainer buttons. Pull up all four
bag cuffs. Close bag with twist tie provided.
3. Push Side-Lock Latch down and tilt drawer side open.
4. Lift out bag.
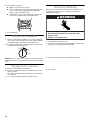
WARNING
Cut Hazard
Do not push items down into compactor with
Doing so can result in cuts.
hands or feet.

11
Installing a New Bag
IMPORTANT:
Before installing a new bag, be sure:
■
The drawer side is securely locked.
■ The container is clean and free of debris.
Do not use any kind of bag other than those designed especially
for use in your compactor. Order replacement compactor bags
through your local dealer or by calling the toll-free number on the
cover or in the “Assistance or Service” section.
1. Place folded bag into the drawer. Open bag and pull top
edges over the drawer top.
2. Lock bag in place by pulling the four prepunched holes over
the bag retainer buttons. Holes will expand over the buttons
without damaging the bag.
3. Press inside of bag against the drawer bottom, sides and
corners for a smooth fit.
COMPACTOR CARE
Your new compactor is designed to give you many years of
dependable service. However, there are a few things you are
expected to do in order to maintain your compactor properly.
This section will tell you how to clean and care for your
compactor.
Cleaning
Before cleaning the compactor, turn the Key-Knob (or Key-
Switch) to the OFF & LOCK position and remove it.
NOTE: Any services other than those outlined in this section
should be performed by a designated service representative.
Cleaning Exterior Surfaces
1. Wash exterior surfaces (including stainless steel) with a clean
sponge or soft cloth and a mild detergent in warm water. Do
not use abrasive or harsh cleaners. Rinse and dry thoroughly
with a soft cloth.
2. Wipe up spills right away. Some foods can damage the finish
if left on the compactor surface.
Cleaning Inside the Drawer
NOTE: You may want to wear protective gloves as there may be
bits of glass in the drawer.
1. Remove the bag. (See the “Removing a Filled Bag” section.)
2. Press down on the lever-action lock (or Side-Lock latch).
3. Hold the lever-action lock down and tilt the side of the drawer
out until the lock clears the drawer front.
NOTE: If desired, the drawer side can be removed by tilting it
up, then lifting it out.
4. Wash the interior of the drawer with a clean sponge or soft
cloth and a mild detergent in warm water. Rinse and dry
thoroughly with a soft cloth.
5. If the drawer side was removed, slide it back into the tilted
position.
6. Press the lever-action lock (or Side-Lock Latch) down while
pushing the drawer side to the upright position.
7. Latch the drawer side by pushing up the lever-action lock (or
Side-Lock Latch).
Cleaning Inside the Cabinet
NOTE: You may want to wear protective gloves as there may be
bits of glass in the cabinet.
1. Pull the drawer out until it stops.
NOTE: Look to see how the drawer rollers move in the tracks.
It will be easier to replace the drawer when you are finished
cleaning.
2. Lift the front of the drawer to clear the stops.
3. Grasp the drawer on the sides and pull it out the rest of the
way. Set the drawer down gently.

12
4. Vacuum the inside of the cabinet. Liquid spills or wet trash
should be cleaned up by hand, or by using a vacuum
designed to pick up liquids.
5. Wash the inside of the cabinet with a clean sponge or soft
cloth and a mild detergent in warm water. Rinse and dry
thoroughly with a soft cloth.
6. To replace the drawer, grasp it by the sides and insert the
rollers onto the tracks.
7. Lift the front of the drawer and push it in fully past the stops.
Cleaning the Ram
NOTE: You may want to wear protective gloves as there may be
bits of glass on the ram cover.
1. Wipe glass particles off of the ram cover with a cloth or paper
towels.
2. Remove foods with a clean sponge or soft cloth and a mild
detergent in warm water. Rinse and dry thoroughly with a soft
cloth.
Cleaning Before a Vacation
If you will be away for more than a couple of days, remove the
compactor bag. Remove the Key-Knob (or Key-Switch) and store
it out of children’s reach.
TROUBLESHOOTING
Try the solutions suggested here first in order to avoid the
cost of an unnecessary service call.
Trash is not compacting
■
Is the drawer less than half full? Drawer must be more than
half full before trash is compacted.
Your compactor won’t operate
■
Is the power supply cord unplugged? Plug into a grounded
3 prong outlet.
■
Has a household fuse or circuit breaker tripped? Replace
the fuse or reset the circuit breaker.
■
Is the drawer completely closed? Close the drawer firmly
and start the compactor again.
■ Is the Key-Knob turned all the way to START? Tur n the
Key-Knob (Key-Switch) fully to START and release (on some
models). See the “Starting the Compactor” section.
■
Did you press ON before pressing START? Press ON
before pressing START (on some models). See the “Starting
the Compactor” section.
The drawer won’t open
■ Is the ram all the way up? Drawer will open only when ram is
fully raised.
■
To raise the ram on models with a Key-Knob (or Key-
Switch): Turn the Key-Knob (Key-Switch) to START and
release. See the “Starting the Compactor” section.
■ To raise the ram on models with push button controls:
Press OFF, and then press ON. See the “Starting the
Compactor” section.
There is not enough compaction or force
■
Do you use the compacting cycle frequently enough?
Compacting works best when only a few items are loaded.
Bottles don’t break
■
How often do you notice this? Bottles will not break every
time. The thickness of the bottle’s glass and the content of
the trash load below it may prevent the bottle from breaking.
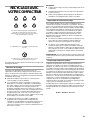
RECYCLING WITH YOUR
COMPACTOR
These codes indicate which type of plastic was used
in manufacturing the container. Your recycling
program will confirm which codes are accepted for
recycling.
Plastics with this symbol cannot be recycled.
Items with this symbol can be recycled or were made
from recycled materials.
A compactor makes recycling and landfill reduction efforts more
effective and efficient.
1
PETE
2
HDPE
3
V
4
LDPE
5
PP
6
PS
7
OTHER

13
Recycling Guidelines
Contact your community recycling program or local recycling
organizations to find out which items are accepted for recycling
and how they should be prepared and organized. These
programs will provide essential recycling guidelines:
■ Method and frequency of collection—curbside collections
and drop-off centers.
■
Categories of recyclable items, and how to distinguish
between them. Plastic containers are identified by codes on
the bottom. Sort by the numbers inside the triangular arrows.
For example, most plastic soda bottles and some cleaning
bottles have code 1; most milk and water jugs, laundry and
personal hygiene product containers have code 2. Paper and
cardboard containers (paperboard) also have recycle
symbols to indicate a container is recyclable.
■
Preparations of recyclable items. Most recycling programs
provide specific guidelines on preparation. For example,
aluminum cans and plastic containers need to be rinsed out,
lids removed, but often labels can be left on.
IMPORTANT:
■ Some items, such as glass, should not be compacted.
■ Most recycling programs will not accept crushed glass.
■ Check with your recycling program for specific guidelines on
preparing recyclables.
Organizing the Recycling Workspace
Convenient recycle bins are made to fit in the compactor drawer.
These bins, as well as plastic compactor bags, can be purchased
in a variety of colors at hardware stores and supermarkets. Set
up a system of color-coded bags in an area chosen for
processing recyclables. Each color can represent a category of
recyclable items, based on types specified by your recycling
program. Separate recyclable items from non-recyclable items:
■
Recyclable items can be sorted using the color-coded bags.
Prepare items according to guidelines provided by your
recycling program.
■ Non-recyclable items should be compacted because
compaction reduces trash volume to its original size: four
bags of trash can be compacted into one bag. This
contributes to reducing landfill volume and related waste
transportation burdens.
REMEMBER:
Do not expect items which contain minimal air,
such as folded newspapers, to compact significantly.
Compacting Recyclable Items
Most recycling programs want the consumer to crush or flatten
recyclable items such as plastics, cans, and paperboard.
Compacting recyclable items consolidates volume and thereby
reduces transportation costs—and also helps manage recycling
workspace more effectively. The compactor is ideal for such a
task. When a plastic bag is full enough to require compacting,
place the bag in the drawer as shown in “Installing a New Bag.”
Then follow instructions in “Compactor Use.” When the
compacting cycle is complete, remove the plastic bag as shown
in “Removing a Filled Bag” and return it to storage until it is full
enough to recycle.
Remember
, compacting both recyclables and non-recyclables
means less solid waste and waste transportation costs—and a
better environment for all.
Reduce – Reuse – Recycle
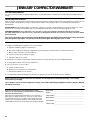
ASSISTANCE OR SERVICE
Before calling for assistance or service, please check
“Troubleshooting.” It may save you the cost of a service call. If
you still need help, follow the instructions below.
When calling, please know the purchase date and the complete
model and serial number of your appliance. This information will
help us to better respond to your request.
In the U.S.A.
If the problem is not due to one of the items listed in the
“Troubleshooting” section…
Call the dealer from whom your appliance was purchased, or call
Maytag Appliance Sales Company, Jenn-Air Customer
Assistance at 1-800-688-1100 or 1-423-472-3333 to locate an
authorized service company. When calling, please know the
purchase date and the complete model and serial number of your
appliance. Be sure to retain proof of purchase to verify warranty
status.
If the dealer or service company cannot resolve your problem,
write to:
Jenn-Air Customer Service
Attn.: CAIR
®
Center
P.O. Box 2370
Cleveland, TN 37320-2370
Web address: www.jennair.com
Or call:
1-800-688-1100
.
U.S. customers using TTY for deaf, hearing impaired or speech
impaired, call:
1-800-688-2080
(Monday-Friday, 8:00 a.m.-8:00
p.m. Eastern Time).
NOTE
: When writing or calling about a service problem, please
include the following information:
1. Your name, address and daytime telephone number.
2. Appliance model number and serial number.
3. Name and address of your dealer or servicer.
4. A clear description of the problem you are having.
5. Proof of purchase (sales receipt).
All specifications are subject to change by manufacturer without
notice.
Accessories
To order a color-matched trim kit for the installation of a custom-
made panel, contact your local authorized dealer.
Replacement Bags
- Call for Part Number
Trim Kits for Custom Front Panels:
Order Part #TCDW (white), TCDB (black), TCDQ (bisque) (Trim kit
for custom made panel)
Order Part #TCDS (Stainless steel door panel)

14
JENN-AIR
®
COMPACTOR WARRANTY
FULL ONE-YEAR WARRANTY
For one (1) year from the date of original retail purchase, any part which fails in normal home use will be repaired or replaced free of
charge.
LIMITED TWO-YEAR WARRANTY
From the second year through the end of the third year following the date of original retail purchase, parts which fail in normal home use
will be repaired or replaced free of charge for the part itself, with the owner paying all other costs, including labor, mileage and
transportation.
PLEASE NOTE: The full warranty applies only when the compactor is located in the United States or Canada. Compactors located
elsewhere are covered by the limited warranty only, including limited warranties for parts which fail during the first year.
CANADIAN RESIDENTS: These warranties cover only those compactors installed in Canada that have been listed with
Canadian Standards Association unless the compactors are brought into Canada due to transfer of residence from the United
States to Canada.
The specific warranties expressed above are the ONLY warranties provided by the manufacturer. These warranties
give you specific legal rights, and you may also have other rights that vary from state to state.
What is Not Covered by These Warranties:
1. Conditions and damages resulting from any of the following:
a. Improper installation, delivery or maintenance.
b. Any repair, modification, alteration or adjustment not authorized by the manufacturer or an authorized servicer.
c. Misuse, abuse, accidents or unreasonable use.
d. Incorrect electric current, voltage or supply.
e. Improper setting of any control.
2. Warranties are void if the original serial numbers have been removed, altered or cannot be readily determined.
3. Products purchased for commercial or industrial use.
4. The cost of service or service call to:
a. Correct installation errors.
b. Instruct the user on proper use of the product.
c. Transport the appliance to the servicer.
5. Consequential or incidental damages sustained by any person as a result of any breach of these warranties.
Some states do not allow the exclusion or limitation of consequential or incidental damages, so the above
exclusion may not apply.
User’s guides, service manuals and parts catalogs are available from Maytag Appliances Sales Company, Maytag
Customer Assistance.
10/01
Keep this book and your sales slip together for future
reference. You must provide proof of purchase or installation
date for in-warranty service.
Write down the following information about your compactor to
better help you obtain assistance or service if you ever need it.
You will need to know your complete model number and serial
number. You can find this information on the model and serial
number label located on the inside wall of the compactor drawer.
Dealer name____________________________________________________
Address ________________________________________________________
Phone number __________________________________________________
Model number __________________________________________________
Serial number __________________________________________________
Purchase date __________________________________________________

15
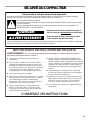
SÉCURITÉ DU COMPACTEUR
Risque possible de décès ou de blessure grave si
Risque
possible de décès ou de blessure grave
si vous ne suivez pas les instructions.
Tous les messages de sécurité vous diront quel est le danger potentiel et vous disent comment réduire le risque de
qui peut se produire en cas de non-respect des instructions.
Votre sécurité et celle des autres est très importante.
Nous donnons de nombreux messages de sécurité importants dans ce manuel et sur votre appareil ménager.
Ce symbole d’alerte de sécurité vous signale les dangers potentiels de décès et de blessures graves
Tous les messages de sécurité suivront le symbole d’alerte de sécurité et le mot “DANGER” ou
“AVERTISSEMENT”. Ces mots signifient :
DANGER
AVERTISSEMENT
Assurez-vous de toujours lire tous les messages de sécurité et de vous y conformer.
à vous et à d’autres.
Voici le symbole d’alerte de sécurité.
vous ne suivez pas immédiatement les instructions.
blessure et ce
IMPORTANTES INSTRUCTIONS DE SÉCURITÉ
AVERTISSEMENT : Lors de l'utilisation d'appareils électroménagers, il convient d'observer certaines
précautions élémentaires dont les suivantes :
Lire toutes les instructions avant d’utiliser le
compacteur.
Une surveillance étroite est nécessaire, lorsque
l’appareil est employé par ou près d’enfants. Ne
pas permettre d’utiliser l’appareil comme un jouet,
ou le faire fonctionner sans surveillance. Verrouiller
l'interrupteur à clé lorsque l’appareil n’est pas
utilisé et garder la clé hors d’atteinte des enfants.
Ne pas toucher les pièces mobiles.
Ne pas faire fonctionner le compacteur si le cordon
d'alimentation, la fiche de branchement, le moteur
sont endommagés ou après tout dommage
quelconque. Faire examiner, réparer ou ajuster le
compacteur par un technicien autorisé.
Utiliser uniquement pour l’usage auquel il est
destiné, tel que décrit dans ce manuel. Ne pas
utiliser des accessoires autres que ceux qui sont
recommandés par le fabricant.
Ne pas démonter le compacteur. Un remontage
incorrect peut être à l’origine d’un choc électrique,
lors de l’utilisation subséquente.
Manipuler avec soin un sac rempli de déchets. Des
objets pointus peuvent percer le sac et causer des
blessures. Ne pas surcharger le sac de déchets
avec des matériaux pesants tels que le verre.
■ Ce compacteur est destiné à l'usage domestique
uniquement.
■ Ne pas utiliser cet appareil pour compacter des
produits toxiques ou fluides inflammables tels que
chiffons imbibés d’huile et vaporisateurs insecticides.
Ne pas soumettre au compacteur les articles comme
cigarettes ou cigares allumés, ou autres objets en
combustion ou chauds. Ne pas surcharger le com-
pacteur.
■
■
■
■
■
■
■
CONSERVEZ CES INSTRUCTIONS

16
INSTALLATION DU
COMPACTEUR
Installateur : Laissez le guide d’utilisation et d’entretien au
propriétaire.
Propriétaire : Gardez le guide d’utilisation et d’entretien pour
référence ultérieure et pour l’usage de l’inspecteur local
d’électricité, au besoin.
Deballage
IMPORTANT :
■
Ne pas saisir la console pour déplacer le compacteur.
■
Commencer dans la pièce où le compacteur sera installé.
1. Retirer le compacteur de son emballage. Enlever tous les
matériaux d’emballage et de protection comme ruban adhésif
et cales. Enlever avec une solution d’eau et de produit de
nettoyage ménager liquide doux, les résidus de cire laissés
par les matériaux de protection. Sécher complètement avec
un chiffon doux. Pour de plus amples renseignements, voir la
section “Nettoyage”.
2. Vérifier que le cordon d’alimentation électrique est fixé à
l’agrafe à l’arrière du compacteur.
1. Agrafe du cordon d’alimentation
3. Placer les deux cornières de protection sur le plancher, près
du compacteur. Ouvrir le tiroir du compacteur et retirer tous
les matériaux d’emballage ou autres articles expédiés dans le
tiroir. Ne pas retirer le sac du compacteur. Saisir la poignée et
soulever l’avant du tiroir pour le faire passer au-dessus des
butées. Saisir les côtés du tiroir et soulever le tiroir pour le
retirer du compacteur. Placer le tiroir sur les deux cornières
de protection.
4. Placer les deux autres cornières de protection sur le plancher,
près du compacteur. Saisir les côtés de la caisse du
compacteur et placer le compacteur sur le côté, sur les
cornières de protection. Retirer la base placée au fond du
compacteur avant l’expédition.
Spécifications d’emplacement
Dimensions du produit
1

17
Dimensions de l’encastrement
Dimensions de dégagement
Spécifications électriques
Méthode recommandée de liaison à la terre
Le compacteur est alimenté par un circuit de 115 V CA
monophasé, 60 Hz, 15 ou 20 A; le circuit doit être protégé par un
fusible et convenablement relié à la terre par l’intermédiaire de la
fiche de branchement avec broches de liaison à la terre (voir
l’illustration ci-dessous). On recommande l’emploi d’un
disjoncteur ou d’un fusible temporisé. Il est préférable que cet
appareil soit alimenté par un circuit distinct. Au cas où un court-
circuit se produirait, la liaison à la terre réduit le risque de choc
électrique, car le courant peut ainsi s’échapper directement vers
la terre. Ne pas modifier la fiche jointe au compacteur, et utiliser
seulement avec une prise reliée à la terre.
Le compacteur doit être relié à la terre lorsqu’il est utilisé pour
réduire le risque de choc électrique. Le compacteur est équipé
d’un cordon à trois conducteurs et d’une fiche à trois broches de
type relié à la terre, pour convenir à la prise de courant
appropriée reliée à la terre. Le conducteur vert (ou vert et jaune)
dans le cordon est le fil de liaison à la terre. Ne jamais connecter
le fil vert (ou vert et jaune) à une borne active. La prise doit être
convenablement installée et reliée à la terre en conformité avec
les dispositions du Code national des installations électriques et
des codes et règlements locaux. Ne pas utiliser un adaptateur
pour le branchement de cet appareil.
1. Prise électrique reliée à la terre qui doit être à une distance
minimum de 3 po (7,6 cm) des armoires voisines ou des murs
latéraux tel qu'illustré. Elle peut être placée du côté droit ou du
côté gauche du produit.
1. Laisser un espace libre de 6 po (15,2 cm) du côté droit
du compacteur pour extraire les sacs du compacteur.
2. Laisser un espace libre de 23 po (58,4 cm) en avant
du compacteur pour ouvrir complètement ou retirer le
tiroir du compacteur.
18" min.
(45,7 cm)
24" min.
(61 cm)
1
15
1
⁄4" min.
(38,7 cm)
34
1
⁄4" min.
(87 cm)
3"
(7,6 cm)
AVERTISSEMENT
Risque de choc électrique
Brancher sur une prise à 3 alvéoles reliée
à la terre.
Ne pas enlever la broche de liaison à la terre.
Ne pas utiliser un adaptateur.
Le non-respect de ces instructions peut causer
un décès, un incendie ou un choc électrique.

18
Installation en-dessous du comptoir
REMARQUE : L’installation appropriée est la responsabilité du
propriétaire. S’assurer que vous avez tout le nécessaire pour
corriger l’installation. C’est la responsabilité et l’obligation
personnel du client de contacter un installateur qualifié pour
s’assurer que l’installation électrique répond aux codes et
règlements nationaux et locaux.
Outillage et matériaux requis pour l’installation :
IMPORTANT :
■ Ne pas saisir la console pour déplacer le compacteur.
■
Glisser le compacteur sur le carton ou le panneau de bois dur
avant de déplacer le compacteur sur le plancher, pour
empêcher d’endommager le recouvrement du plancher.
■
Ne pas laisser le châssis arrière du compacteur toucher le
recouvrement du plancher lors du soulèvement ou du
déplacement du compacteur.
Montage en-dessous du comptoir
1. Mesurer la hauteur de l’ouverture de l’armoire. Le sommet du
compacteur devrait être au moins à ¹⁄₈ po (3 mm) du sommet
de l’ouverture de l’armoire.
Les roues arrière sont préréglées pour l’ouverture d’une
armoire d’une hauteur de 34 ¹⁄₄ po (87 cm) (Position “A”).
Ajustement pour d’autres hauteurs d’ouverture d’armoire:
■ Pour ajuster les autres hauteurs d’ouverture d’armoire,
desserrer la vis, juste assez pour pouvoir extraire le piton
du trou de positionnement “A”.
■
Déplacer la roue arrière et le piton à la position “B” ou “C”
au besoin, pour la mesure d’ouverture de l’armoire :
Position B : hauteur libre de 34 ¹⁄₄ po à 34 ⁷⁄₁₆ po (87 à
87,5 cm)
Position C : hauteur libre 34 ⁷⁄₁₆ po à 34 ⁵⁄₈ po (87,5 à
88 cm)
REMARQUE : Pour mettre d’aplomb l’appareil en
position C, vous devez peut-être ajouter des cales sous
les pieds de nivellement.
■
Serrer la vis. Répéter ces opérations pour l’autre roue
arrière.
2. Utiliser les pinces pour abaisser les pieds de nivellement hors
du cabinet. Ajuster les pieds de sorte qu’il y aura de ¹⁄₈ po
(3 mm) à ¹⁄₄ po (6,4 mm) d’espace entre le sommet du
compacteur et le sommet de l’ouverture de l’armoire. Placer
le compacteur verticalement.
3. Déplacer le compacteur jusqu’au voisinage immédiat de la
position d’installation finale.
4. Brancher sur une prise à 3 alvéoles reliée à la terre.
5. Déterminer si vous voulez que le cadre du compacteur ou le
devant du tiroir soit en affleurement avec le devant de
l’armoire.
Utilisant les deux vis nº 8 de 18 x ⁵⁄₁₆ po (8 mm), installer les
brides qui restent au sommet de la caisse, au besoin.
■ Si le châssis du compacteur doit être en affleurement
avec l’avant des armoires, placer les vis de retenue de la
bride dans les trous “A” des brides.
■
Si le devant de la bride du tiroir du compacteur doit être
en affleurement avec l’avant de l’armoire, placer les vis de
retenue de la bride dans les trous “C” des brides.
■ Si le compacteur doit être installé à une position
intermédiaire, entre “A” et “C” placer les vis de retenue de
la bride dans le trou “B”.
6. Soulever le devant légèrement et faire rouler le compacteur
dans l’ouverture de l’armoire.
En utilisant les deux vis nº 8 – 18 x ¹⁄₂ po (12 mm), fixer les
brides de retenue en-dessous du comptoir avec les vis de
montage.
Si les brides ne peuvent pas être fixées au-dessous du
comptoir, fixer les agrafes de montage aux brides. Fixer le
compacteur au devant du cabinet avec les vis dans les brides
de montage.
Installation sous le comptoir
Niveau Tournevis Phillips n
o
2
Ruban à mesurer Tournevis à lame plate
Pinces Clé à douille hexagonale de ⁵⁄₁₆ po
Ciseaux Couteau utilitaire
1. Bride porte-roue
2. Caisse
3. Piston de positionnement
4. Vis autotaraudante (pivot)
2
A
B
C
3
4
1
1. Dessus du comptoir
2. Bride de retenue
1. Dessus du comptoir
2. Bride de retenue
3. Vis de montage
2
1
A
B
C
1
2
3

19
Montage à l’avant de l’armoire
7. Saisir les côtés du tiroir du compacteur et placer le fond du
tiroir dans les glissières. Soulever le tiroir par la poignée pour
faire passer l’avant du tiroir au-dessus des butées. Fermer le
tiroir. Vérifier qu’il est possible d’ouvrir facilement le tiroir. Si la
pédale frotte contre le plancher, voir d’autres instructions à la
section “Réglage de la pédale”.
Réglage de la pédale
Si la pédale frotte contre le revêtement du plancher, on peut
modifier la hauteur de la pédale comme suit :
1. Marquer de chaque côté de la pédale la largeur du matériau
qui cause le frottement sur le revêtement du plancher.
2. Retirer le tiroir de l’appareil. (Voir l’étape 3 à la section
“Deballage”.)
3. À l’aide d’une règle et d’un crayon ou d’une craie, tracer une
ligne entre les marques tracées de chaque côté de la pédale.
4. À l’aide de ciseaux ou d’un couteau utilitaire, découper la
pédale le long de la ligne.
5. Réinstaller le tiroir. Si la pédale frotte toujours sur le
revêtement du plancher, répéter les étapes 1 à 4.
Assainisseur d'air
Le système d'assainisseur d'air solide est conçu pour aider à
contrôler des odeurs qui peuvent se développer dans les
déchets. Un assainisseur d'air en forme de disque peut être
acheté dans les grands magasins (non vendu avec le
compacteur). Placer l'assainisseur d'air solide en forme de
disque dans le compartiment de l'assainisseur d'air.
L'assainisseur d'air devrait durer de 4 à 6 semaines. Il s'use plus
rapidement lorsque la température est élevée or lorsque l'air est
très sec.
Changement du panneau décoratif
Il existe trois options pour changer le panneau décoratif :
■
Commander un panneau acrylique
■
Créer un panneau personnalisé à utiliser avec une trousse
de garniture
■ Créer un panneau personnalisé pour installation sans
garniture
Pour commander un panneau acrylique ou une trousse de
garniture, voir la section “Assistance ou service” pour des
renseignements ou composer sans frais le numéro de téléphone
sur la couverture.
Dimensions du panneau avec trousse de garniture
Utiliser ces dessins de dimensions pour créer un panneau
personnalisé à utiliser avec une trousse de garniture. Ensuite,
suivre les instructions d'installation fournies avec la trousse.
Panneau uni : Un panneau d'une épaisseur de ⁷
³²
po (5,6 mm)
est requis. C'est la même épaisseur qu'un panneau en
contreplaqué de ¹₄ po (6,4 mm) ou panneau standard.
Panneau en relief : La section externe du panneau doit être de
⁷
³²
po (5,6 mm) d'épaisseur pour convenir à

20
Panneau sans garniture avec poignée
Dimensions
Utiliser ces dessins de dimensions pour créer un panneau
personnalisé à utiliser sans trousse de garniture. Le panneau doit
mesurer ½ po à ⁵⁄₈ po (13 mm à 16 mm) d'épaisseur.
REMARQUE
: Un panneau plus épais peut avoir besoin de coins
avant arrondis et un découpage pour accès à la poignée.
Installation
1.
Enlever la pédale, le garde-pieds et le panneau décoratif.
2.
Aligner le sommet du panneau personnalisé avec la base de
la poignée.
3.
Fixer le panneau de l'arrière en utilisant 4 vis à bois n
o
8 x 1
po comme illustré.
4.
Réinstaller le garde-pieds en utilisant les vis existantes et une
rondelle de ½ po. Ensuite, réinstaller la pédale.
Panneau sans garniture sans poignée
Dimensions
Utiliser ces dessins de dimensions pour créer un panneau
personnalisé à utiliser sans trousse de garniture. Le panneau doit
mesurer ½ po (13 mm) d'épaisseur au minimum.
Installation
1.
Enlever la pédale, le garde-pieds, le panneau décoratif et la
poignée.
2.
Aligner la base du panneau personnalisé avec la base du
devant du tiroir.
3.
Fixer le panneau de l'arrière en utilisant 4 vis à bois n
o
8 x 1
po comme illustré.
4.
Fixer un joint d'un quart-de-rond de 15 po x ½ po le long du
sommet du tiroir à l'avant en utilisant de la colle ou des vis.
5.
Réinstaller le garde-pieds en utilisant les vis existantes et une
rondelle de ½ po. Ensuite, réinstaller la pédale.
1. Poignée
2. Panneau
personnalisé
3. Vis à bois n
o
8 x 1 po
4. Garde-pieds
5. Rondelle
6. Vis du garde-pieds
23
13
/
16
"
(
60,5 cm
)
15"
(
38,1 cm
)
1
2
4
3
5
6
3
1. Panneau personnalisé
2. Quart-de-rond de 15 po
x ½ po
3. Vis à bois n
o
8 x 1 po
4. Garde-pieds
5. Rondelle
6. Vis du garde-pieds
25"
(
63,5 cm
)
15"
(
38,1 cm
)
1
2
4
5
6
3
3
La page est en cours de chargement...
La page est en cours de chargement...
La page est en cours de chargement...
La page est en cours de chargement...
La page est en cours de chargement...
La page est en cours de chargement...
La page est en cours de chargement...
La page est en cours de chargement...
-
 1
1
-
 2
2
-
 3
3
-
 4
4
-
 5
5
-
 6
6
-
 7
7
-
 8
8
-
 9
9
-
 10
10
-
 11
11
-
 12
12
-
 13
13
-
 14
14
-
 15
15
-
 16
16
-
 17
17
-
 18
18
-
 19
19
-
 20
20
-
 21
21
-
 22
22
-
 23
23
-
 24
24
-
 25
25
-
 26
26
-
 27
27
-
 28
28


Jenn-Air Trash Compactor TC507 Manuel utilisateur
- Catégorie
- Compacteur de déchets
- Taper
- Manuel utilisateur
dans d''autres langues
Documents connexes
Autres documents
-
Jenn Air TC507Q1 Le manuel du propriétaire
-
Jenn Air TC507W1 Le manuel du propriétaire
-
Kenmore Kenmore 665.1361 Le manuel du propriétaire
-
Jenn Air TC607X1 Le manuel du propriétaire
-
Whirlpool TU950QPXS Le manuel du propriétaire
-
GE ZCGP150PII-00 Le manuel du propriétaire
-
-
-
-
Electrolux 99526808A Manuel utilisateur