GE ADER70LRQ1 Le manuel du propriétaire
- Catégorie
- Déshumidificateurs
- Taper
- Le manuel du propriétaire
Ce manuel convient également à

GEPpp/iances.com
0
L4--
E
Safety Instructions .........................2,3
Operating Instructions
About the Controls
on the Dehumidifier ....................................4
Automatic Defrost .........................................5
Choosing a Location ....................................5
How the Dehumidifier Operates ............5
Removing Collected Water ....................6
Water Level ......................................................6
Care and Cleaning
Air Filter .............................................................7
Grille and Case ................................................7
Water Bucket ...................................................7
Troubleshooting Tips .........................8
Consumer Support
Consumer Support ...................Back Cover
Ownership Registration for
Customers in Canada only ................9, 10
Warranty for Customers
in Canada ........................................................Z3
Warranty for Customers
in the U.S.A......................................................12
ENERGY STAR(R) labeled aroduct
ENERGYSTAR
AS an ENERGY STAR(R) partner, GE has
determined that this product meets the
ENERGYSTAR(R)guidelines for energy efficiency.
ADER50
ADER70
D6humidificateur
La section franqaise commence 8 la page 14
Deshumedificador
Lo seccidn en espahol empieza en la pdgina 26
Write the model and serial numbers here:
Model #
Serial #
You can find them on a label on the back
of the dehumidifier.
In Canada, contact us at:
www. GEApp/ian ces.ca
49-7705 09-12GE

iMPORTANTSAFETYINFORMATION.
READALLiNSTRUCTiONSBEFOREUSING.
A
m
For your safety, the information in this manual must be followed to minimize the risk of fire, electric shock
or personal injury.
SAFETYPRECAUTIONS
When using this dehumidifier, always follow basic safety
[] Use this appliance only for its intended []
[]
[]
[]
[]
[]
purpose as described in this Owner's Manual.
This dehumidifier must be properly installed
and grounded as described
in this manual before it is used.
Never operate this dehumidifier in an area
that is likely to accumulate standing water.
If this condition develops, for your safety
disconnect the power supply before stepping
into the water.
Never unplug your dehumidifier by pulling on
the power cord. Always grip plug firmly and
pull straight out from the receptacle.
[]
[]
Replace immediately all electric service
cords that have become frayed or otherwise []
damaged. A damaged power supply cord []
must be replaced with a new power supply
cord obtained from the manufacturer and not
repaired. Do not use a cord that shows cracks
or abrasion damage along its length or at
either the plug or connector end. []
If the receptacle does not match the plug,
the receptacle must be changed out by a
qualified electrician
precautions, including the following:
GE does not support any servicing of
the dehumidifier. We strongly recommend
that you do not attempt to service the
dehumidifier yourself.
For your safety, do not store or use
combustible materials, gasoline or other
flammable vapors or liquids in the vicinity
of this or any other appliance.
All dehumidifiers contain refrigerants, which
under federal law must be removed prior to
product disposal. If you are getting rid of an
old product with refrigerants, check with the
company handling disposal about what to
do.
Do not use outdoors.
This dehumidifier is intended for
indoor residential applications only.
This dehumidifier should not be used
for commercial or industrial applications.
These R410A Dehumidifier Systems require
contractors and technicians to use tools,
equipment and safety standards approved
for use with this refrigerant. DO NOT use
equipment certified for R22 refrigerant only.
[] Turn the dehumidifier OFFand unplug it
before cleaning.
HOWTOCONNECTELECTRICITY
Do not, under any circumstances, cut or remove
the third (ground) prong from the power cord.
For personal safety, this appliance must be properly
grounded.
DO NOT usean adapter plug with this appliance.
The power cord of this appliance is equipped
with a 3-prong (grounding) plug which mates
with a standard 3-prong (grounding) wall outlet
to minimize the possibility of electric
shock hazard from this appliance.
Have the wall outlet and circuit checked by a
qualified electrician to make sure the outlet is
properly grounded.
Where a 2-prong wall outlet is encountered,
it isyour personal responsibility and obligation to
have it replaced with a properly grounded
3-prong wall outlet.
The dehumidifier should always be
plugged into its own individual electrical
outlet, which has a voltage rating matching
the rating plate.
This provides the best performance and also
prevents overloading house wiring circuits, which
could cause a fire hazard from overheated wires.
2

GEAppliances.com
WARNING!
USEOF EXTENSION CORD5
RISK OF F/RE. Could cause serious injury or
death.
,, DO NOT use an extension cord with this
Dehumidifier.
,, DO NOT use surge protectors or multi-outlet
adaptors with this Dehumidifier.
flEAOANO,FOLLOWTills SAFETY/NFOflMATION6AflEFULLY.
SAlie THESEINSTRUCTIONS

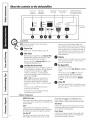
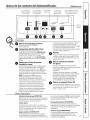
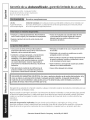
Aboutthecontrolsonthedehumidifier.
4houror2hour High,Medium
delayoff andLowfan
indicatorlights indicatorlights
CleantheFilter Continuousoperationon
indicatorlight indicatorlight
4 hour
2 hour
High
Mediul
Low
Humiditg %
o-
Continuous
Cteen the Filter
e,
Bucket Full
Power On
BucketFulllightindicates
bucketneedstobeemptied
orisnotinplaceintheunit
]
PowerOn
indicatorlight
4
Controls
NOTE:When the bucket isfull or removed,the
controls cannot be set.
Power Pad
Pressto turn the dehumidifier on and off.
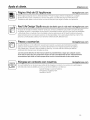
Filter Timer
After 250 hoursof operation,the CleantheFilter
indicGtorlightwill glow to remindyou to clean
the filter.Removethe filter and cleanit.
Pressto turn off the CleantheFilterlight.See
the CareandCleaningsection.
Humidity Set Control Pads
Thehumidity levelcan be set within a range of
35% RH(RelativeHumidity)to 80% RH(Relative
Humidity) in 5% increments or GtCOlor
continuous operation. Toset the unit for
continuous operation, pressthe T pad until
the screen reads CO.
NOTE:If CO(Continuous)isselected,the
dehumidifier will operate continuously at
its maximum dehumidification settings if
attached to a hoseto drain or until the bucket
isfull.
Fordrier air,pressthe V pad and set to
a lower percent value (%).
Fordamper air, pressthe A pad and set
to a higher percent value (%).
Other,Features
When you first usethe dehumidifier, set
the humidity control to 45% or 50%.Allow at
least 24 hours for the dehumidifier to achieve
the humidity level.Ifyou still have dumper air
than desired,set the humidity levelto a lower
setting or select Continuousfor maximum
dehumidification.
Display
Shows the set % humidity levelwhile setting,
then shows the actual (+/- 5% accuracy)
room % humidity level.
Fan Speed Pad
Controls the fan speed.
Pressto select either High,Medium or Lewfan
speed.
Setthe fan control to Highfor maximum
moisture removal. When the humidity
has been reduced and quiet operation is
preferred, set the fan control to Medium
or Low.
Delay Off
While the dehumidifier is in operation, press
this pad to set it to automatically turn off in 2
hours or 4 hours.
BUCKETFULLLight
Glowswhen the bucket isready to be emptied, or
when the bucket isremoved or not replaced in the
proper position.
Alarm
Ifthe bucket isfull ormissingfor morethan 3
minutes,an alarmwill soundfor about 10seconds
to remindyou to empty and replacethe bucket.
AutoShutOff
TheWater LevelControl Switchshuts off the
dehumidifier when the bucket isfull, or when
the bucket isremoved or not replaced in the
proper position. NOTE: Fanwill continue to run
approximately 3 minutes after bucket isremoved.
AutoDefrost
When frost builds up on the evaporator coils,the
compressor will cycle off and the fan will continue
to run untilthe frost disappears.
Power Outage
Inthe case of a power outage or interruption, the
unit will automatically restart, in the settings last
used,after the power isrestored.

Usingthedehumidifier, c rplia,oos.oom
When first using the dehumidifier, operate the unit continuously for 24 hours.
How the Behumidifier Operates Automatic Defrost
Hoist, humid air isdrawn over a cold refrigerated
dehumidifying coil. Hoisture in the air condenseson
this coil and drains into a bucket (orthrough
a hoseand drain).
Dry,clean air is drawn through the condenser where
it is heated and discharged out the top grille into the
room.
It is normalforthesurroundingair tobecomeslightly
warmerasthe dehumidifieroperates.
When frost buildsup on the evaporator coils,the
compressor will cycleoff and the fan will continue to
run until the frost disappears.
When the coil isdefrosted, the compressor or fan will
automatically restart and dehumidifying will resume.
Choosing a Location
A dehumidifier operating in a basement will have little
or no effect in drying an adjacent enclosed storage
area,such asa closet, unlessthere isadequate
circulation of air in and out of the area.
[]
[]
DOnotuseoutdoors.
Thisdehumidifieris intendedfor indoorresidential
appficationsonly.Thbdehumidifiershouldnotbe
usedfor commercialorindustrial appfications.
[] Placethe dehumidifierona smooth,levelfloorstrong
enoughto supporttheunitwith a furlbucketof water.
[] Allow at least 12-18inchesof airspace on allsides of
theunitforgood air circulation.
[] Placethe dehumidifierin anarea wherethe
temperaturewillnot fallbelow41°F(5°C).Thecoils
canbecomecovered with frostattemperatures
below 41°F,which mayreduceperformance.
[] Usethedehumidifierin cooking,laundry,bathing
anddishwashingareasthathaveexcessivemoisture.
NOTE'.Placethe dehumidifieraway
fromthe clothesdryer.
[] Usethedehumidifiertopreventmoisturedamage
anywherebooksor valuablesarestored.
[] Usethedehumidifierin a basementtohelpprevent
moisturedamage.
[] Thedehumidifiermustbe operatedin an enclosed
areato bemosteffective.
Closeall doors,windowsandotheroutsideopenings
totheroom.
YES NO
12"-18" rnin. 12"-18" rain.
NOTE:Thedehumidifierhasrollerstoaidplacement,
butit shouldonlybe rolled onsmooth,flatsurfaces.
Donot attempttorollthedehumidifieron carpet or
overobjects.

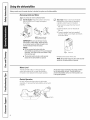
Usingthedehumidifier.
Alwaysmakesurethe waterbucketis lockedintoplace onthe dehumidifier.
Removing Collected Water
Thereare2 waystoremove collectedwater:
E_] use thebucket.When the bucket isremoved,
the unit will shut off. Empty and replace
the bucket.
NOTE:Supportbucketwith
bothhandswhenemptying.
IMPORTANT"Donot usethehoseff using
thebuckettocollect water. Whenthehose
is connected,water will flow throughit onto
thefloorinsteadofinto thebucket.
NOTES:
[] Donotremove thebucket whilethe
dehumidifierisoperatingorflit hasjust stopped
operating.Thismightcausesomewater to drip
fromthedrain pan.
[] Thebucketmustbe in place andsecurely
seatedforthe dehumidifiertooperate.
[] Usea hose.Water can be automatically
emptied into a floor drain byattaching
a garden water hose (notincluded).
1. Removethe bucket from the front of
the unit.
2.Open the drain cover on the side of
the unit.
3.Threada garden hose (notsupplied)
onto the nozzle,cut to length, and lead it
to the floor drain.
Sideofunit
4. Replacethe bucket in the unit.
NOTE:Thebucketmustbe inplace andsecurely
seatedfor thedehumidifiertooperate.
Water Level
Thedehumidifier will turn off automatically
when the bucket isfull, or when the bucket is
removed or not replacedin the proper position.
Thebucketmustbe replacedin theproperposition
for thedehumidifierto work.Thelight willbe on
and thedehumidifierwillnotrun ff thebucketb not
in theproperposition.
Bucket Operation
DONOTremove the foam piece in the bucket
assembly. If removed the Dehumidifier will not work
properly.
6

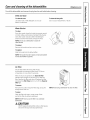
Careandcleaningofthedehumidifier. C .pliances.com
Turn offthe dehumidifier and remove the plug from the waft outlet before cleaning.
Grille and Case
Toclean thecase:
Usewoter ond o mild detergent. Do not use
bleoch or obrosives.
Tocleanthefrontgrifle:
Use o vocuum ottochment or brush.
Water Bucket
Toclean:
Everyfew weeks,cleon the bucket to prevent growth
of mold, mildew ond bucteriu. Portiullyfill the bucket
with cleon woter ond odd o little mild detergent.
Swish it oround in the bucket,empty ond rinse.
NOTE:Donotusea dishwashertocleanthe
waterbucket.
Toremove:
Removethe bucket ond pour out ony woter.
Toreplace:
Slidethe bucket into the dehumidifier.
NOTE:Thebucketmustbe in placeandsecurelyseated
for thedehumidifiertooperate.
Air Filter
Theair filter behind the front grille should
be checked ond cleoned ot leost every 250 hours
of operotion or more often if necessory.
After 250 hours of operotion, the CleantheFilter
indicotor lightwill glow to remind you to cleonthe
filter. Removethe filter ond cleon it. Replacethe filter
ond press the FilterTimerpod to turn off the Cleanthe
Filterlight.
Toremove:
Removethe bucket. Grospthe filter edge,ond pull it
stroight down ond out.
_c_a_
Cleonthe filter with worm, soupywoter. Rinse
ond let the filter dry before replocing it.
NOTE:DONOTrinseor put thefilterin anautomatic
dishwasher.
A CAUTION:
O0NOToperatethedehumidifierwithoutafilterbecause
dirtandlint willclogit andreduceperformance.
..:5> /
,/
NOTE:Avoidusinga dishwasherto cleanthe filter.

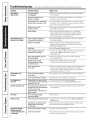
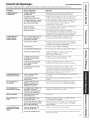
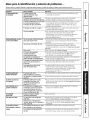
Troubleshootingtips...s b o firstyo. to for
Problem Possible Causes What To Do
Dehumidifier The dehumidifier • Hake surethe dehumidifier's plug is pushed completely
doesnotstart isunplugged, into the outlet.
The fuse isblown/circuit , Checkthe housefuse/circuit breaker box and replace
breaker istripped, the fuse or resetthe breaker.
Dehumidifier has reached its • The dehumidifier automatically turns off when either
preset level or bucket isfull. condition occurs. Change to a lower setting or empty
the bucket and replace properly.
Bucket is not in the • Thebucket must be in place and securelyseatedfor the
proper position, dehumidifier to operate.
Power failure. • There isa protective time delay (up to 3 minutes)to
prevent tripping of the compressor overload. Forthis
reason,the unit may not start normal dehumidifying
for 3 minutes after it isturned back on.
Dehumidifierdoesnot Did not allow enough time ,,When first installed,allow at least 24 hoursto maintain
drytheairas #should to remove the moisture, the desireddryness.
Airflow isrestricted. • Hake surethere are no curtains, blinds or furniture
blocking the front or back of the dehumidifier. Seethe
Choosinga Locationsection.
Dirty filter. , Seethe Careand Cleaningsection.
The Humidity Control may • Fordrier air, pressthe T pad and set to a lower percent
not be set low enough, value (%)or at CO(continuous)for maximum
dehumidification.
Doors end windows may not • Checkthat all doors,windows and other openings
be closed tightly, are securelyclosed.
Clothes dryer may be • Installthe dehumidifier away from the dryer.
blowing moisture-laden Thedryer should be vented to the outside.
air into the room.
Room temperature • Moisture removal is best at higher room temperatures.
is too low. Lower room temperatures will reduce the moisture
removal rate. Models are designed to be operated at
temperatures above 41°F (5°C).
Dehumidifier runs Area to be dehumidified * Thecapacity ofyour dehumidifier may not be adequate.
toomuch istoo large.
Doors and windows are open. * Closeall doors and windows to the outside.
Frostappearson Dehumidifier has been turned * This isnormal. Frostwill usually disappear
the coils on recently, or room temperature within 60 minutes. Seethe Automatic Defrostsection.
isbelow 41°F(5°C).
Controls cannot be set
The compressor will turn off
and the fan will automatically
continue to run for
approximately 3 minutes at o
fixed setting.
BucketFullLEDlight
flashing andalarm
soundswhile drainhose
is connected
• This isnormal. Wait approximately 3 minutes and set the
fan as desired.
Fannoise Air ismoving through "This isnormal.
the dehumidifier.
Water on floor Hose connection may be loose. • Checkthe hoseconnection. Seethe RemovingCollected
Watersection.
Intended to usethe bucket to • Disconnectthe hoseif using the bucket to collect water.
collect water, but a hose Seethe RemovingCollectedWater section
as attached.
Drain hose not tight on fitting * Checkdrain hoseconnection.
Drain hose is kinked
• Ensurethe drain hoseispointed straight down to the floor
and isnot kinked in anyway.
8

Notes.
GEAppliances.com
m
m=
0
m=
m
m=
0
m
m
m
m=
0
m
m=
0
,,-I
0
m
0
0
m=
,,-I
m=
0
O_
n=
9

Notes.
w
m
m
m

Notes.
GEAppliances.com
m
m=
0
m=
m
m=
0
m
m
m
m=
0
m
m=
0
,,-I
0
m
0
0
m=
,,-I
m=
0
O_
n=
11

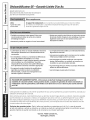
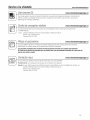
GE Dehumidifier--One-Year Limited Warranty. IForcustomers intheU.S.A.)
Staple yourreceipt here.
Proof of the original purchase date
is needed to make a warranty claim.
we 11Re ce-
ii i i _ i i
one}ear Replacementun#for any product which fails due to a defect in materials or workmanship.
Fromthedate ofthe Thereplacement unit iswarranted for the remainder of your product's original one-year
originaipurchase I warranty period.
[] Properly pack your unit. We recommend using the
original carton and packing materials.
[] Return the product to the retail location where it
was purchased.
[] Include in the package a copy of the sales receipt or
other evidence of date of original purchase. Also print
your name and address and a description of the defect.
[] Customer instruction. This owneffs manual provides
information regarding operating instructions and
user controls.
[] Improper installation, delivery or maintenance. If you
hove on installation problem, or if the dehumidifier is
of improper dehumidification capacity, contact your
dealer or installer. You ore responsible for providing
adequate electrical, plumbing and other connecting
facilities.
[] Failure of the product resulting from modifications to
the product or due to unreasonable use, including failure
to provide reasonable and necessary maintenance.
[]
Replacement of house fuses or resetting of circuit
breakers.
[] Failure due to corrosion on models not corrosion-
protected.
[] Damage to the product caused by improper power
supply voltage, accident, fire, floods or acts of God.
[] Incidental or consequential damage caused by possible
defects with this dehumidifier.
[]
Damage caused after delivery.
EXCLUSION OF/MPL/EB WARRANT/ES--Your sole and exclusive remedy is product replacement as provided
in this Limited Warranty. Any implied warranties, including the implied warranties of merchantability or fitness
for a particular purpose, are limited to one Fear or the shortest period allowed by law.
This wan'anty is extended to the original purchaser and any succeeding owner for products purchased for home
use within the USA.
Some states do not allow the exclusion or limitation of incidental or consequential damages. This warranty gives
you specific legal rights, and you may also have other rights which vary from state to state. To know what your
legal rights are, consult your local or state consumer affairs office or your state's Attorney General
Exclusion of implied warranties: Except where prohibited or restricted by law, there are no warranties, whether
express, oral or statutory which extend beyond the description on the face hereof, including specifically the
impfied warranties of merchantabifity or fitness for a particular purpose.
Warrantor: General Electric Company. Louisvifle, KY 40225
12

GE Dehumidifier--One-Year Limited Warranty. IForcustomers in Canada)
Staple your receipt here.
Proof of the original purchase date
is needed to make a warranty claim.
O'eVear
Fromthedateofthe
originaipurChase I
We Will Replace:
Replacementun#for any product which fails due to (] defect in materials or workmanship.
The replacement unit iswarranted for the remainder ofyour product's original one-year
warranty period.
[] Properly pack your unit. We recommend using the
original carton and packing materials.
[] Return the product to the retail location where it
was purchased.
[] Include in the package a copy of the sales receipt or
other evidence of dote of original purchase. Also print
your name and address and a description of the defect.
[] Customer instruction.This owner's manual provides
information regarding operating instructions and
user controls.
[] Improper installation,delivery or maintenance. If you
have on installation problem, or if the dehumidifier is
of improper dehumidification capacity, contact your
dealer or installer. You ore responsible for providing
adequate electrical, plumbing and other connecting
facilities.
[] Failure of the product resulting from modifications to
the product or due to unreasonable use, includingfailure
to provide reasonable and necessary maintenance.
Replacement of house fuses or resetting of circuit
breakers.
[] Failure due to corrosion on models not corrosion-
protected.
[] Damage to the product caused by improper power
supply voltage, accident, fire, floods or acts of God.
[] Incidental or consequential damage caused by possible
defects with this dehumidifier.
Damage caused after delivery.
EXCLUSION OFIMPL/EB WARRANTIES--Your sole and exclusive remedy is product replacement as provided
in this Limited Warranty. Any implied warranties, including the implied warranties ofmerchantability or fitness
for a particular purpose, are limited to one year or the shortest period aflowed bylaw.
This warranty is extended to the original purchaser and any succeeding owner for products purchased in
Canada for home use within Canada.
Some provinces do not allow the exclusion or limitation of incidental or consequential damages, so the above
exclusion may not apply to you. This warranty gives you specific legal rights, and you may also have other
rights which vary from province to province. To know what your legal rights are in your province, consult your
local or provincial consumer affairs office.
Exclusion of implied warranties: Except where prohibited or restricted by law, there are no warranties, whether
express, oral or statutory which extend beyond the description on the face hereof, including specificafly the
impfied warranties of merchantability or fitness for a particular purpose.
Warrantor: Mabe Canada Inc.,
Burlington, Ontario
13

m
w
r _
w_
m
m
.M
r L
-i
Consignes de s6curit6 ............15,16
Consignes d'utilisation
Apropos des commandes du
d6shumidificateur .....................................17
Choix d'un emplacement ......................18
D6givrage automatique .........................18
Fonctionnement du
d6shumidificateur .....................................18
Niveau d'eau .................................................19
Retrait de I'eau collect6e ........................19
Entretien et nettoyage
Filtre 6 air .......................................................20
Grille et bo/tier .............................................20
Seau collecteur ............................................20
Conseils de d6pannage ...............25
Assistance _ la clientele
Assistance 6 la client61e ..........................25
Garantie ..........................................................24
Enregistrement du titre
de propri@6 ...........................................21, 22
Produit avec I'etiquette ENERGYSTAR'zE
ENERGYSTAR
En qualit6 de partenaire ENERGYSTARA_,
GEa trouv_ que ce produit rencontre
les directives d'ENERGYSTAR'_en mati_re
d'efficience 6nerg@ique.
Inscrivez ici les hum#ms de modele et de
s#rie :
Num#m de modele :
Num#.ro de S#rie :
Vous les trouverez sur une @iquette plac6e 6
I'arri_re du d6shumidificateur.
Au Canada, visitez-nous au "
www.electromenagersge.ca
14

/MPORTANTESCONS/GNESBES CUR/T.
VEU/UEZL/RETOUTESLESCONS/GNESAVANTUT/L/SAT/ON.
AA
!
m
Pour votre s#curit#, les informations contenues clans ce manuel doivent #tre suivies afin de minimiser les
risques d'incendie, de chocs #lectriques ou de blessures corporelles.
CONS/GNESDESECUR/TE
Lorsque vous utilisez le d#shumidificatem; suivez toujours les consignes de s4cut#4 de base suivantes :
[] N'utilisez cet appareil qu'aux fins recommandons de mepas essayer
prTvues dTcrites dans le manuel d'effectuer vous-m@me I'entretien du
d'utilisation, d@shumidificateur.
[] Ce d_shumidificateur dolt 6tre []
correctement install_ et mis a la terre
avant toute utilisation, comme indiqu_
dens ce mGnuel.
[]
[]
[]
Ne faites jamais fonctionner le
d_shumidificateur dans une zone oQ de
I'eau stagnante pourrait s'accumuler.
Pour votre s@curitT,en cas d'eau
stagnante, d@branchez I'appareil avant
de marcher darts I'eau.
[]
Ne dTbranchezjamais I'humidificateur
en tirant sur le cordon d'alimentation.
Prenez toujours fermement la fiche en
main et tirez pour la sortir de la prise.
Remplacez imm_diatement tout cordon []
_lectrique us6 ou endommag& Un
cordon d'alimentation endommag6 dolt []
@treremplac@ par un nouveau cordon
d'alimentation obtenu du fabricant. Ne
r@parezpas le cordon endommag@.
N'utilisez pas un cordon fissur@ou
prTsentant des dommages dus aux
frottements soit,sur sa Iongueur ou aux []
extr@mit@sdu cUt@de la fiche ou du
raccord.
[] Si la prise de courant est d'un format
diffTrent de la fiche, cette prise dolt @tre
chang@e par un 61ectricien qualifi@.
[] Eteignez et d@branchez le
d@shumidificateur avant de le nettoyer.
[] GE n'offre pas de service d'entretien
pour les d@shumidificateurs. Nous vous
BRANCHEMENTSbLLECTRIOUES
Pour votre sTcuritT, ne stockez pas et
n'utilisez pas d'essence ou d'autres
vapeurs et liquides inflammables dans
les parages de cet appareil ou de tout
autre appareil.
Tousles d@shumidificateurs
contiennent des fluides frigorig@nes qui,
conformTment 6 la 16gislation fTdTrale,
doivent @treretirTs avant la mise au
rebut de I'appareil. Sivous mettez au
rebus un ancien appareil contenant des
fluides frigorig@nes, vTrifiez la procTdure
6 suivre aupr@s de la compagnie
responsable de 1'61imination.
N'utilisez pus le d_shumidificateur 6
I'ext_rieur.
Ce dTshumidificateur est seulement
conAu pour une utilisation 6 I'intTrieur
pour une application rTsidentielle. Ce
dTshumidificateur ne dolt pas Ctre utilis6
pour des applications commerciales ou
industrielles.
Ces syst@mes dTshumidificateurs
R410A exigent que les entrepreneurs
et techniciens adoptent les outils, le
matTriel et des normes de sTcurit6
approuvTs pour utilisation avec
ce rTfrigTrant. N'utilisez pas de
matTriel certifi6 pour le rTfrigTrant
R22 uniquement. N'utilisez PASde
matTriel certifi6 pour le rTfrig@ant R22
uniquement.
Ne coupez pas ou n'enlevez pas, sous aucun
pr#texte, la troisifime broche de mise _ la ten'e
du cordon d'alimentation. Pour des raisons de
s#curit#, cet appareil dolt #tre correctement mis
la terre.
N'uti/isez PAS d'adaptateursavec cet apparel/.
Le cordon d'alimentation de cet appareil est
6quip6 d'une fiche 6 trois broches (mise 6 la
terre) qui s'adapte 6 la prise de courant standard
6 3 broches (mise 6 la terre) pour minimiser les
risques de chocs 61ectriques par cet appareil.
Faites v@rifier les prises de courant et les circuits
par un 61ectricien qualifi6 pour s'assurer que le
syst@meest correctement mis 6 la terre.
Quand la prise de courant West 6quipTe que
de 2 broches, I'installateur a la responsabilit6 et
I'obligation de la remplacer par une prise 6 trois
broches correctement mise 6 la terre.
L'humidificateur dolt toujours @trebranch6 6 sa
propre prise61ectriqued'une tension nominale
correspondant 6 sa plaquesignal@ique.
Cecipermet d'obtenir un meilleur rendement
du dTshumidificateur et 6rite de surcharger
lescircuits 61ectriquesdu domicile qui en
surchauffant posent un risqued'incendie.
15

/MPORTANTESCONS/GNESDESECUR/T[:'.
VEU/UEZ/./RETOUTESLESCONS/GIVESAVANTUT/USAT/ON.
A AVERTISSEMENT!
UTILISATION DE RALLONGES
RISQUE D'INCENDIE. Peut occasionner des
blessures graves ou la mort.
• NE PASutiliser de rallonge avec ce
d_shumidificateur.
• NE PASutiliser de parasurtenseurs ou
d'adaptoteurs 8 sorties multiples avec ce
d_shumidificateur.
LISEZETSUIVEZSOIGNEUSEMENT
CESCONSIGNESDESCURIT.
CONSERVEZCESiNSTRUCTiONS
16

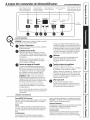
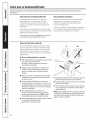
P proposdes commandosdudeshumidificateur.
Voyantsindiquantled61aide
2heuresoude4heuresavant
I'arr@dud6shumidificateur oubasseduventilateur
Voyantsindiquantla
vitesse61ev6e,moyenne
Voyantindiquantquale
filtredolt @renettoy6
Voyantdefonctionnement
encontinu
Voyant"BucketFulla(SeauPlein)
indiquequaleseaudolt6trevid6
ouqu'iln'estpasclansI'appareil
I I High
Mediul
Low
Humiditg %
Continuous Bucket Full
= Voyant
Clean the Filter Power On d'alimentation
After
ling
Commandes
REMARQUE:Lorsqueleseaucollecteurestpleinouabsent,
lescommandesnepeuvent_trer_gl@s.
Touched'a/imentation
Appuyezsurcettetouchepourallumerou_teindre
led_shumidificateur.
Compteurhorairedufiltm
Apres250heuresdefonctionnement,levoyant
"CleantheFiltera(nettoyerlefiltre)s'allumerapour
vousrappelerdenettoyervotrefiltre.Retirezlefiltre
et nettoyez-le.
Appuyezsurlatouchepour_teindrelevoyant
"CleantheFilter°(nettoyerlefiltre).Consultezla
sectionEntretienetIVettoyage.
TouchesdereglagedeI'humidite
Leniveaud'humidit_peut_trer_gl_dansune
gammevariantde35%d'HR(humidit_relative)
80%d'HRparincrementsde 5%ou surCOpour
uneutilisationencontinue.Pourr_glerI'appareil
pourI'op&ationcontinuel,appuyerlafleche
descendantejusqu'_ceque I'_cranreveleCO.
REMARQUE:SiCO(encontinu)ests_lectionn_,
led_shumidificateurfonctionneraen continuau
r_glageded_shumidificationleplus_lev_siilest
reli__ I'@acuationparuntwau oujusqu'_ceque
le collecteursoitpleindanslecascontraire.
Pourunair plussec,appuyezsurlatoucheT
etr_glezled_shumidificateur_ unpourcentage
d'HRplusfaible(%).
Pourunairplushumide,appuyezsurlatoucheA et
r_glezled_shumidificateur_ unpourcentaged'HR
plus_lev_(%).
Autresfonctions
Lorsquevousutilisezled_shumidificateurpourla
premierefois,r_glezlescommandesd'humidit_sur
O
/45ou 50_.Attendezaumoins24heurespourque
led_shumidificateurarrive_ ceniveaud'humidit_.
SiI'airestencoretrop humide,r_glezI'humidit_sur
unevaleurplusbasseou choisissezlafonctionEn
Continupouruned_shumidificationmaximale.
Pffichage
Affichele pourcentaged'humidit_s_lectionn_
pendantler_glage,puisaffichele niveau
d'humidit_r@ldanslapiece(precisionde
+I- 5%)
Touchede vitesseduventilateur
Contr01ela vitesseduventilateur.
Appuyezsurcettetouche pourchoisirunevitesse
de ventilation levee,Moyenneou Basse.
R_glezla vitesseduventilateursur lev@pourune
_liminationmaximalede I'humidit_.Unefoisque
I'humidit_a_t_r_duiteetqu'unfonctionnement
silencieuxest prd&_, r_glezleventilateursurune
vitesseMoyenneou Basse.
Be/ai avant arr_t
Lorsqueled_shumidificateuresten
fonctionnement,appuyezsurcettetouchepour
r_glerautomatiquementund_laide 2 heuresou
de4 heuresavant I'arr_tde I'appareil.
VoyantBUCKETFULL(Seaup/ein)
Cevoyants'allumeIorsqueleseaucollecteurestpr_t_ _tre
vid_ousicelui-cia _t_retir_deI'appareiloun'apas_t_
remisenplace.
Alarme
Sileseaucollecteurestpleinouabsentpendantplusde
3 minutes,unealarmesed_clenchependant10secondes
pourvousrappelerdeviderleseauet deleremettreen
place.
Arr_tAutomatique
LeCommutateurdecontrUleduniveaud'eau_teintle
d_shumidificateurIorsqueleseaucollecteurestpleinousi
celui-cia 6t6retir6deI'appareiloun'apas6t6remisenplace.
Remarque:Leventilateurcontinueradefonctionnerpendant
environSminutesunefoisleseauretir6
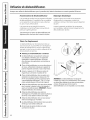
DegivrageAutomatique
Lorsquelegivres'accumulesurlesserpentinsd'@aporation,
lecompresseurs'arr@teetleventilateurcontinue
fonctionnerjusqu'@disparitiondu givre.
Pannedecourant
Encasde panneoud'interruptiondecourant,I'appareil
red@marreautomatiquementapresr@tablissementde
I'alimentation@lectriqueet conservelesderniersr@glages.
17

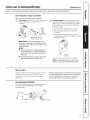
Utilisationdudeshumidificateur.
Lorsque vous utilisez le d#shumidificateur pour la premiere fois, faites le fonctionner en continu pendant24 heures.
Fonctionnement flu D#shumidificateur D#givrage Automatique
L'air humide estentraTn6vers lesserpentins r6frig_r6s
de d6shumidification. L'humidit6 deI'airse condense
sur ce serpentin et s'_coule dans leseaucollecteur
(ou par un tuyau d'6vacuation).
L'air propreet secest entraTn66 travers le
condenseur oQilest chauff6 puis renvoy6 dans la
piece par la grille sup6rieure.
fl est normalqueFairautourdu d#shumidificateursoit
I@#rementplus chaudque dansle reste dela piSce.
Lorsque legivre s'accumule sur lesserpentins
d'_vaporation, lecompresseur s'arr_te et le
ventilateur continue 6 fonctionnerjusqu'6 disparition
du givre.
Lorsque leserpentin est d6givr6, le compresseur
ou leventilateur red,matte automatiquement et la
d6shumidification reprend.
Choix d'un Emplacement
Un d6shumidificateur en fonctionnement dans un
sous-solaura peu ou pasd'effet sur les6chage d'un
endroit de stockage ferm6, comme un placard par
exemple,(3moins qu'une circulation ad6quate de I'air
dans le placard soit permise.
[]
[]
N'utilisezpasled#shumidificateura I'exterieur.
Ced#shumidificateurest seulementcon,4upour
uneutilisation_ I'int#rieurpour une application
r#sidentielle.Ced#shumidificateurnedo#pas
8treutilis#pour desapplicationscommercialesou
industrielles.
[] Placezle d#shumidificateursur unesurfaceplaneet
deniveau,suffisammentrobustepoursupporter/e
poidsdeI'appareilcontenantunseauremplid'eau.
[] Labsezun espacede 12_ 18pouces autourde
I'appareilpour unebonnecirculationde fair.
[] Placezle d#shumidificateurdansunepifice o#la
temp#raturene descendpas endessousde5 °C
(41°F).Lesserpentinspeuventsecouvrir degivre
destemp#raturesinf#rieures5 °C(41°F),ce qui
r#du#consid#rablementI'e_cacit# deI'appareil.
[] Utilisezle d#shumidificateurdansdespi#ces utilis#es
pourla cuisine,la lessive,lebain et la vaisselleet
ayantune humidit#excessive.REMARQUE:Eloignez
le d#shumidificateurde la s#cheuse.
[] Utilisezle d#shumidificateurpour #viterles
dommagesdus_ I'humidit#danstouteslespi#cesoff
deslivresou desobjetsde valeurssont rang#s.
[] Utilisezle d#shumidificateurdansunsous-solpour
#viterles dommagespar I'humidit&
[] Led#shumidificateurdoit fonctionnerclansunepiSce
ferm#epour unemeilleureefficacit&
[] Fermeztouteslesportes,fenStreset autres
ouverturesde lapi#ce.
QUI NON
12-18 porain. 12-18 porain.
REMARQUE: Led#shumidificateurest #quip#de
roulettespour aider _ sonpositionnement.Cesroulettes
ne doivent#treutilis#esquesurdessurfacesplanes
et lisses.N'essayezpasde fairefouler le
d#shumidificateursur unemoquetteou surdesobjets.
18

www.electromenagersge.ca
Assurez-vous toujours que le seau collecteur est verrouill# en place clans le d#shumidificateur.
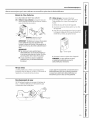
Retrait de/'Eau Co//ect#e
fly a deuxfaAonsde retirerI'eaucollect4e:
E_] utilisezle seaucellecteur. Lorsque leseau est
retir6, I'appareil s'arr_te defonctionner. Videzle
seauet remettez-le en place.
REMARQUE: Maintenezleseauavec
lesdeuxmainsIorsquevouslevidez.
iMPORTANT:N'utilisezpas le tuyaud'#vacuation
si vousutilisezle seaupour r#cup#rerI'eau.
Lorsquele tuyauest branch4,I'eaupassepar ce
demierversle solau lieu d'Strecollect4edartsle
seau.
REMAROUES:
[] Aleretirezpas/eseaupendantquele
d#shumidificateurest en fonctionnementou
si cedemier vientjuste de s'arrSter.DeI'eau
pourraitgoutterdons/e bacd_vacuation.
[] Leseaudof Streenplaceetsofidement
positionn4pour que/ed4shumidificateur
fonctionne.
[]
Utilisezletuyau.L'eaupeut s'6vacuer
automatiquement vers le siphon de sol par
I'interm6diaire d'un tuyau d'arrosage (non
fourni).
1. Retirezleseau de I'avantde I'appareil.
2.Ouvrez le couvercled'6vacuation sur le c0t6
de I'appareil.
3. Fixezletuyau d'arrosage (nonfourni),coup6 6
la Iongueurad6quate, 6 la buse et placez son
extr6mit6 au niveau du siphon de sol.
C0t_ de I'appareil
4. Remettezleseau en place dans I'appareil.
REMAROUE:Leseaudoff#treenplace
etsolidementpositionn#pour quele
d4shumidificateurfonctionne.
Niveau d'Eau
Led6shumidificateur s'6teint automatiquement
Iorsque le seauest plein ou sicelui-cia 6t6 retir6 de
I'appareilou n'a pas 6t6 remis en place.
Leseaudolt8trerepositionn#correctementdons/e
d4shumidificateurpour que cedemier fonctionne.
Le voyantseraallure4et le d4shumidificateurne
fonctionnerapassi le seauestrealpositionn&
Fonctionnement du seau
NEPASenlever la piece en mousse 0 I'int6rieur du
seau. Led6shumidificateur ne fonctionnera pas
correctement sanscette piece.
\ S
19

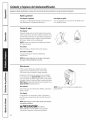
Entretienet nettoyagedu d#shumidificateur
Eteignez et d#branchez le d#shumidificateur avant tout nettoyage.
Grille et Bo#ier
Pournettoyerlebe#/or:
Utilisezde I'eauet un d6tergent doux. N'utilisezpas
d'euu deJuvel ou de nettoyunts ubrusifs.
Pournettoyerla grilleavant:
Utilisezun uspiruteur ou une brosse.
Sea# Cellecteur
Pournettoyer/eseaucollecteur :
A quelques semuinesd'intervulles,nettoyez le seau
collecteur pour 6viter la proliferation de la moisissure
et des bact_ries. Remplissezpartiellement le seau
avec de I'eau propre et ajoutez une petite quantit6 de
d_tergent doux. Faitestourner I'eau et led_tergent
duns le seuu, puisvidez celui-ci et rincez-le.
REMARQUE: Nenettoyezpasle seaudansun
lave-vaissefle.
Pourrotifer/eseau:
Retirezleseau et videz I'eau.
Pourremettrele seauenplace:
Faitesglissezle seau dans le d6shumidificateur.
REMARQUE: Leseaudoit 8treenplace etsolidement
positionn#pour que le d#shumidificateurfonctionne.
\
20
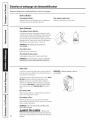
Filtre a Air
Lefiltre 6 air derr@e la grille avant doit _trev6rifi6 et
nettoy6 au bout de 250 heures de fonctionnement ou
plus souvent sin6cessaire.
Apr_s250 heuresde fonctionnement, levoyant Clean
theFi/ter(Nettoyerle filtre)s'allumera pour vous
rappeler de nettoyer votre filtre. Retirezle filtre et
nettoyez-le. Remettezlefiltre en place puisappuyez
sur la touche Fi/tertimer(Compteurhoraire du filtre)
pour 6teindre le voyant CleantheFilter(Nettoyerle
filtre).
Pourretirerle filtre
Retirezleseau collecteur. Attrapez le bord du filtre et
tirez-le vers le bas pour le sortir.
Pournettoyerlefiltre:
Nettoyezle filtre avec de I'eau savonneuse tilde.
Rincezle filtre et laissez-les6cher avant de le remettre
dans le d6shumidificateur.
REMARQUE: NErincezPASetNElavezPASle filtre
dansle lave-vaisselle.
AMISE ENGARBE: Ms
fonctionnerled_shumidificateursansle filtresouspeinedele
boucheravecdelapoussiereetdelacharpbetder4duireson
efficacit4.
REMARQUE:Evitezdenettoyerlefiltre au
ave-vaisselle.
La page charge ...
La page charge ...
La page charge ...
La page charge ...
La page charge ...
La page charge ...
La page charge ...
La page charge ...
La page charge ...
La page charge ...
La page charge ...
La page charge ...
La page charge ...
La page charge ...
La page charge ...
La page charge ...
-
 1
1
-
 2
2
-
 3
3
-
 4
4
-
 5
5
-
 6
6
-
 7
7
-
 8
8
-
 9
9
-
 10
10
-
 11
11
-
 12
12
-
 13
13
-
 14
14
-
 15
15
-
 16
16
-
 17
17
-
 18
18
-
 19
19
-
 20
20
-
 21
21
-
 22
22
-
 23
23
-
 24
24
-
 25
25
-
 26
26
-
 27
27
-
 28
28
-
 29
29
-
 30
30
-
 31
31
-
 32
32
-
 33
33
-
 34
34
-
 35
35
-
 36
36


GE ADER70LRQ1 Le manuel du propriétaire
- Catégorie
- Déshumidificateurs
- Taper
- Le manuel du propriétaire
- Ce manuel convient également à
dans d''autres langues
- English: GE ADER70LRQ1 Owner's manual
- español: GE ADER70LRQ1 El manual del propietario
Documents connexes
-
GE ADEW30LQQ1 Le manuel du propriétaire
-
-
-
-
-
-
-