
Please read this manual carefully
before using the Date & Time Capsule
Date & Time Capsule designed by Cloudnola Studio
#Instruction Manual
Français
Composants des Date & Time Capsule
1. Bouton réveil
2. Pile “AA”
3. Pile “AA”
4. Bouton semaine
5. Bouton mois
6. Système switch
7. Entaille de suspension du réveil
A. Ajustement de la fonction power
Veuillez installer trois piles AA dans les deux
emplacements (2 & 3) latéraux an d’activer
l’appareil et le réveil. Les batteries on une
durée de vie d’environ un an, ainsi veuillez
remplacer les piles tous les ans ou en tout
cas quand le réveil ralentit.
Assurez-vous de la bonne connexion et du
bon alignement des poles positif et négatifs
de la pile.
B. Réglages de l’heure du réveil
Le réveil fonctionne de la même façon que
tout autre réveil standard. Tournez le bouton
rotatif de l’horloge (1) à l’heure correcte.
Réglages pour test rapide de signaux:
Mettez le bouton power sur “ON” (6).
Un signal de stand-by sera émis à chaque
fois que le réveil indique 11:30 pendant les
ajustements.
Patientez pendant 3-5 secondes quand
vous entendez ce signal, puis procédez à
l’étape suivante.
A 12:00, un autre signal sera émis,
également accompagné du changement
du calendrier (de AM á PM, de lundi à
mardi, etc.). L’activation du movement du
calendrier se produit deux fois par jour (AM
et PM). Patientez pendant 3-5 secondes
quand vous entendez ce signal, puis
procédez lentement à l’étape suivante.
A 12:00, un deuxième signal est émis et le
calendrier bouge.
Vous pouvez avancer/revenir en arrière
an de tester les signaux sonores et les
mouvements de calendrier.
A 11:30, le premier signal (stand-by) est
émis.
C. Réglage du calendrier automatique
Quand vous ajustez le calendrier, mettez le
réveil sur “OFF” (6) en tournant les boutons
en contressens des aiguilles d’une montre
(HEURE, SEMAINE, JOUR et MOIS).
Réglez le réveil à l’heure actuelle, réglez
la SEMAINE suivante (AM ou PM inclus) en
tournant le bouton SEMAINE (4) dans le
sens des aiguilles d’une montre (cf. photo).
An d’ajuster le JOUR, mettez le bouton
power sur ‘RAPID DAY’ (6). Quand le jour
actual apparaît, patientez jusqu’à ce que
l’achage soit complet, puis mettez le
bouton sur “OFF” (6).
Réglez le MOIS en tournant le bouton MOIS
(5) en contresens des aiguilles d’une montre
(cf. photo).
Après avois eectué les réglages dans
l’ordre HEURE, SEMAINE, JOUR et MOIS,
activez “ON” (6).
Lorsque l’appareil est sur “ON” et que le
calendrier ne déle pas correctement,
veuillez suivre les étapes depuis le début.
Au 29 Février d’une année bissextile, le
calendrier indiquera automatiquement
Mars 1ler. Répétez les dierentes étapes de
réglage dès le début, puis arrêtez la date
au 29 février et et mettez le bouton power
sur “OFF” (6) pendand une journée. Le
lendemain, la date sera toujours la même.
A ce moment, réglez la date SEMAINE, puis
mettez le bouton power sur “ON” (6) et le
calendrier indiquera le 1ler Mars.
REMARQUE:
- Si les feuilles intégrées dans le
calendrier se sont détachées des
roues, ouvrez le boîtier devant et
remettez-les en place.
- Gardes le produit à l’abri des
sources de chaleur, de feu, des
zones humides ou encore du
soleil.
- Ne laissez pas tomber l’object et
éviter les impacts (lourds).
- Veuillez vous assurer que les piles
sont correctement installées.
- N’utilisez en aucun cas des
solutions corrosives pour nettoyer
les surfaces du boîtier. Il est
conseillé d’utiliser de l’alcool, du
savon ou du detergent de ménage
- Les piles de tous les composants
doivent être changées en même
temps et il est recommandé de les
remplacer chaque année
Share it with
others!
#cloudnola
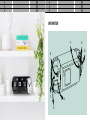
<- 18 cm ->
± 0.4 cm
-> <-
GABARIT DE MONTAGE

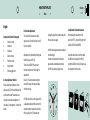
INFORMATION
English
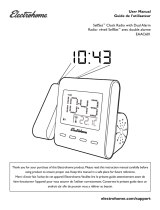
Components of Date & Time Capsule
1. Clock turn-knob
2. AA battery
3. AA battery
4. Week turn-knob
5. Month turn-knob
6. System switch
7. Clock hanging notch
A. Power adjustment-function
Please install three AA batteries in both
side covers (2 & 3) for the activations of the
system and the clock. Please make sure
the proper connection and alignment of
the positive (+) and negative (-) ends of the
battery.
B. Clock time adjustments
The clock works the same as any other
regular clocks. Turn the Clock turn-knob (1)
to the correct time.
Adjustments for rapid testing of the signals:
Switch the power to “ON” (6).
There will be a STAND-BY signal every
time the clock points at 11:30 during the
adjustments.
Pause for 3-5 seconds upon hearing the
sound of this signal, then proceed slowly
with the next step.
At 12:00, there will be an other signal, which
is also accompanied with the movement of
calendar movement occurs twice (AM and
PM) a day. Pause for 3-5 seconds upon
hearing the signal, then proceed slowly with
the next step once again.
At 12:00 second signal sounds and calendar
movement begin.
You can move back and forth to test the
signal sounds and calendar movements.
At 11:30, rst (stand-by) signal occurs.
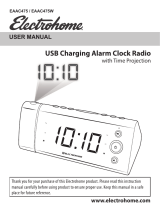
C. Adjustment of automatic calendar
When adjusting the calendar, turn the
switch to “OFF” (6), in order from right to left
(CLOCK, WEEK, DAY and MONTH):
Adjust the clock to the current time, adjust
the WEEK next, (including AM or PM) by
turning the WEEK turn-knob (4) clockwise as
the arrow shown on the picture.
For adjusting the DAY, switch the power to
“RAPID DAY” (6), when meets the current
day, wait until the current date panel
completes and in its position the turn switch
to “OFF” (6).
Adjusting the MONTH by turning the MONTH
turn-knob (5) anti-clockwise as the arrow
shown on the picture.
When completed the adjustments in order
by CLOCK, WEEK, DAY and MONTH, then turn
the power switch to “ON” (6).
When the power is ‘ON’ and the calendar has
not been moved correctly, please follow the
steps from the beginning.
On February 29 of the leap year, it will jump
right to March 1. Please follow the steps
from the beginning, stop the set at February
29 and set the power “OFF” (6) for one day.
Next morning will still remain the same,
adjust to the correct WEEK date then turn
the power to “ON” (6), and the auto-calendar
clock will jump to March 1.
IMPORTANT:
- If the calendar ippers ever slip o
the wheels, please open the front,
clear case and put the loosen
ipper(s) back to the wheel holes.
- Keep the unit away from heating
ducts, re places, humid or wet
areas, or direct sunlight.
- Do not drop the unit and avoid
heavy impacts.
- Please ensure batteries are
installed properly.
- Do not use corrosive solution
for cleaning and surface of the
ip clock unit. Recommended
cleaning solutions can be any one
of the following: rubbing alcohol,
soap or dish detergent.
- Batteries in all components should
be changed at the same time, and
are recommended to be replaced
every year.
7
4
6
1
2
5
3
PROBLEM SOLUTIONS
Flip panels came o 1. Open the unit case by unscrewing
the screws.
2. Carefully separate the front case
from the back case.
3. Insert loosened ip panel(s) back
onto the wheel.
Calendar does not ip 1. Ensure the batteries are installed
properly.
2. Ensure all batteries installed are
new and free from debris or residual
plastic wrapping.
3. Ensure the switch is in the ON positi-
on (available only on certain models)
Advanced Trouble Shooting:
If the calendar still does not ip after
you have completed the above steps.
Please try the following:
1. Manually adjust the time of the clock
to 11:30.
2. Starting from 11:30, slowly adjust the
time clockwise (going forward) to
12:05, you should hear a slight noise
from the motor, and the day of the
week panel should ip (AM or PM).
3. Continue to setup your ip clock
using the set-up instructions.
Leap year on February 29 1. Allow the ip clock to proceed to
March 1.
2. Wait until March 1, and follow the
standard set up instructions to
display current date and time
Share it with
others!
#cloudnola
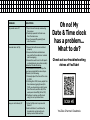
Oh no! My
Date & Time clock
has a problem...
What to do?
Check out our troubleshooting
videos at YouTube!
YouTube Channel: Cloudnola
<- 18 cm ->
± 0.4 cm
-> <-
MOUNTING TEMPLATE
Please read this manual carefully
before using the Date & Time Capsule
Date & Time Capsule designed by Cloudnola Studio
#Instruction Manual
Français
Composants des Date & Time Capsule
1. Bouton réveil
2. Pile “AA”
3. Pile “AA”
4. Bouton semaine
5. Bouton mois
6. Système switch
7. Entaille de suspension du réveil
A. Ajustement de la fonction power
Veuillez installer trois piles AA dans les deux
emplacements (2 & 3) latéraux an d’activer
l’appareil et le réveil. Les batteries on une
durée de vie d’environ un an, ainsi veuillez
remplacer les piles tous les ans ou en tout
cas quand le réveil ralentit.
Assurez-vous de la bonne connexion et du
bon alignement des poles positif et négatifs
de la pile.
B. Réglages de l’heure du réveil
Le réveil fonctionne de la même façon que
tout autre réveil standard. Tournez le bouton
rotatif de l’horloge (1) à l’heure correcte.
Réglages pour test rapide de signaux:
Mettez le bouton power sur “ON” (6).
Un signal de stand-by sera émis à chaque
fois que le réveil indique 11:30 pendant les
ajustements.
Patientez pendant 3-5 secondes quand
vous entendez ce signal, puis procédez à
l’étape suivante.
A 12:00, un autre signal sera émis,
également accompagné du changement
du calendrier (de AM á PM, de lundi à
mardi, etc.). L’activation du movement du
calendrier se produit deux fois par jour (AM
et PM). Patientez pendant 3-5 secondes
quand vous entendez ce signal, puis
procédez lentement à l’étape suivante.
A 12:00, un deuxième signal est émis et le
calendrier bouge.
Vous pouvez avancer/revenir en arrière
an de tester les signaux sonores et les
mouvements de calendrier.
A 11:30, le premier signal (stand-by) est
émis.
C. Réglage du calendrier automatique
Quand vous ajustez le calendrier, mettez le
réveil sur “OFF” (6) en tournant les boutons
en contressens des aiguilles d’une montre
(HEURE, SEMAINE, JOUR et MOIS).
Réglez le réveil à l’heure actuelle, réglez
la SEMAINE suivante (AM ou PM inclus) en
tournant le bouton SEMAINE (4) dans le
sens des aiguilles d’une montre (cf. photo).
An d’ajuster le JOUR, mettez le bouton
power sur ‘RAPID DAY’ (6). Quand le jour
actual apparaît, patientez jusqu’à ce que
l’achage soit complet, puis mettez le
bouton sur “OFF” (6).
Réglez le MOIS en tournant le bouton MOIS
(5) en contresens des aiguilles d’une montre
(cf. photo).
Après avois eectué les réglages dans
l’ordre HEURE, SEMAINE, JOUR et MOIS,
activez “ON” (6).
Lorsque l’appareil est sur “ON” et que le
calendrier ne déle pas correctement,
veuillez suivre les étapes depuis le début.
Au 29 Février d’une année bissextile, le
calendrier indiquera automatiquement
Mars 1ler. Répétez les dierentes étapes de
réglage dès le début, puis arrêtez la date
au 29 février et et mettez le bouton power
sur “OFF” (6) pendand une journée. Le
lendemain, la date sera toujours la même.
A ce moment, réglez la date SEMAINE, puis
mettez le bouton power sur “ON” (6) et le
calendrier indiquera le 1ler Mars.
REMARQUE:
- Si les feuilles intégrées dans le
calendrier se sont détachées des
roues, ouvrez le boîtier devant et
remettez-les en place.
- Gardes le produit à l’abri des
sources de chaleur, de feu, des
zones humides ou encore du
soleil.
- Ne laissez pas tomber l’object et
éviter les impacts (lourds).
- Veuillez vous assurer que les piles
sont correctement installées.
- N’utilisez en aucun cas des
solutions corrosives pour nettoyer
les surfaces du boîtier. Il est
conseillé d’utiliser de l’alcool, du
savon ou du detergent de ménage
- Les piles de tous les composants
doivent être changées en même
temps et il est recommandé de les
remplacer chaque année
Share it with
others!
#cloudnola
<- 18 cm ->
± 0.4 cm
-> <-
GABARIT DE MONTAGE

INFORMATION English
Components of Date & Time Capsule
1. Clock turn-knob
2. AA battery
3. AA battery
4. Week turn-knob
5. Month turn-knob
6. System switch
7. Clock hanging notch
A. Power adjustment-function
Please install three AA batteries in both
side covers (2 & 3) for the activations of the
system and the clock. Please make sure
the proper connection and alignment of
the positive (+) and negative (-) ends of the
battery.
B. Clock time adjustments
The clock works the same as any other
regular clocks. Turn the Clock turn-knob (1)
to the correct time.
Adjustments for rapid testing of the signals:
Switch the power to “ON” (6).
There will be a STAND-BY signal every
time the clock points at 11:30 during the
adjustments.
Pause for 3-5 seconds upon hearing the
sound of this signal, then proceed slowly
with the next step.
At 12:00, there will be an other signal, which
is also accompanied with the movement of
calendar movement occurs twice (AM and
PM) a day. Pause for 3-5 seconds upon
hearing the signal, then proceed slowly with
the next step once again.
At 12:00 second signal sounds and calendar
movement begin.
You can move back and forth to test the
signal sounds and calendar movements.
At 11:30, rst (stand-by) signal occurs.
C. Adjustment of automatic calendar
When adjusting the calendar, turn the
switch to “OFF” (6), in order from right to left
(CLOCK, WEEK, DAY and MONTH):
Adjust the clock to the current time, adjust
the WEEK next, (including AM or PM) by
turning the WEEK turn-knob (4) clockwise as
the arrow shown on the picture.
For adjusting the DAY, switch the power to
“RAPID DAY” (6), when meets the current
day, wait until the current date panel
completes and in its position the turn switch
to “OFF” (6).
Adjusting the MONTH by turning the MONTH
turn-knob (5) anti-clockwise as the arrow
shown on the picture.
When completed the adjustments in order
by CLOCK, WEEK, DAY and MONTH, then turn
the power switch to “ON” (6).
When the power is ‘ON’ and the calendar has
not been moved correctly, please follow the
steps from the beginning.
On February 29 of the leap year, it will jump
right to March 1. Please follow the steps
from the beginning, stop the set at February
29 and set the power “OFF” (6) for one day.
Next morning will still remain the same,
adjust to the correct WEEK date then turn
the power to “ON” (6), and the auto-calendar
clock will jump to March 1.
IMPORTANT:
- If the calendar ippers ever slip o
the wheels, please open the front,
clear case and put the loosen
ipper(s) back to the wheel holes.
- Keep the unit away from heating
ducts, re places, humid or wet
areas, or direct sunlight.
- Do not drop the unit and avoid
heavy impacts.
- Please ensure batteries are
installed properly.
- Do not use corrosive solution
for cleaning and surface of the
ip clock unit. Recommended
cleaning solutions can be any one
of the following: rubbing alcohol,
soap or dish detergent.
- Batteries in all components should
be changed at the same time, and
are recommended to be replaced
every year.
7
4
6
1
2
5
3
PROBLEM SOLUTIONS
Flip panels came o 1. Open the unit case by unscrewing
the screws.
2. Carefully separate the front case
from the back case.
3. Insert loosened ip panel(s) back
onto the wheel.
Calendar does not ip 1. Ensure the batteries are installed
properly.
2. Ensure all batteries installed are
new and free from debris or residual
plastic wrapping.
3. Ensure the switch is in the ON positi-
on (available only on certain models)
Advanced Trouble Shooting:
If the calendar still does not ip after
you have completed the above steps.
Please try the following:
1. Manually adjust the time of the clock
to 11:30.
2. Starting from 11:30, slowly adjust the
time clockwise (going forward) to
12:05, you should hear a slight noise
from the motor, and the day of the
week panel should ip (AM or PM).
3. Continue to setup your ip clock
using the set-up instructions.
Leap year on February 29 1. Allow the ip clock to proceed to
March 1.
2. Wait until March 1, and follow the
standard set up instructions to
display current date and time
Share it with
others!
#cloudnola
Oh no! My
Date & Time clock
has a problem...
What to do?
Check out our troubleshooting
videos at YouTube!
YouTube Channel: Cloudnola
<- 18 cm ->
± 0.4 cm
-> <-
MOUNTING TEMPLATE
-
 1
1
-
 2
2
-
 3
3
-
 4
4
-
 5
5


dans d''autres langues
- English: CLOUDNOLA 0187 User manual
Autres documents
-
Conrad Q Operating Instructions Manual
-
Lexibook HPI 500 Le manuel du propriétaire
-
 Electrohome ELEEAAC601 Manuel utilisateur
-
Magnasonic EAAC601W Manuel utilisateur
-
 Electrohome EAAC475 Manuel utilisateur
-
 Electrohome 22 Manuel utilisateur
-
-
-
Lenco CR-16 White Le manuel du propriétaire
-


