Razor Power Core E90 Glow Electric Scooter Manuel utilisateur
- Taper
- Manuel utilisateur

9
USAGE
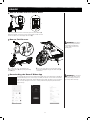
To manually disable the cruise control mode, press the power button (A)
quickly four (4) times. The electric scooter will then beep (sound) once and
the cruise control icon on the display will turn off (B).
How to Disable Cruise Control Mode
WARNING: Keep fingers
clear of the pivoting mechanism
when folding or unfolding the
scooter. Make sure others are
standing clear.
WARNING: Do not talk or
text on your mobile device while
riding. Only change your device’s
app settings when stationary.
How to Fold Scooter
Downloading the Razor E Rides App
A
D
C
1 To fold scooter, press and hold down the
Folding Latch Button (A) while pulling the Folding
Latch (B) open.
2 To use the Steer Tube as a carrying handle, deploy
the Handle Latch (C) and engage the Handle Hook (D)
on the frame.
A
B
B
A
Scan the QR Code on the left to install the Razor E Rides app to your mobile device. Available on
iOS and Android app stores. Once the app is installed your electric scooter can be connected to
your mobile device via Bluetooth. Downloading the Razor E Rides app allows you to personalize
your scooter by taking full control over its settings while tracking trip and speed information
while on the go.

10
REPAIR AND MAINTENANCE
10
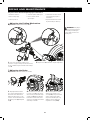
Adjusting the Folding Mechanism
Required Tool: 2.5 mm Allen Wrench (included)
Adjusting the Brake
Required Tool: 5 mm Allen Wrench (not included)
1 Fold scooter according to folding scooter
instructions on page 9. Using a 2.5 mm Allen wrench,
loosen screw A. Using a 2.5 mm Allen wrench adjust
screw B.
1 Adjusting brake at the brake
lever. The best braking distance is
when the distance between the
brake lever and the grip is 15 mm
to 20 mm. Fine tune the brake lever
by adjusting screw (A) and tighten
nut (B).
2 If the brake has too much slack,
loosen the screw (C) using a 5 mm
Allen wrench, pull the brake caliper
actuator arm (D) while holding the
brake cable to the desired tension.
Secure the screw (C), test the brake
and readjust if needed.
3 If the brake pads are rubbing
against the disc brake, loosen
screws (E & F) using a 5 mm Allen
wrench, and line up the brake
caliper until the brake pads stop
rubbing on the disc brake and
retighten the screws (E & F).
2 Tighten screw A and unfold to complete adjustment.
Turn power switch “OFF” before beginning repair or maintenance:
• Read the instructions
• Remove charger plug
• Turn the power off
• Secure the product under repair
• Exercise caution around
exposed parts
• Contact Razor customer service
if unsure about any repair or
maintenance
• Repair and maintenance should
be performed by an adult only
A
BA
WARNING: Keep fingers
clear of the pivoting mechanism
when folding or unfolding the
scooter. Make sure others are
standing clear.
A B
D
C
E
F

1111
REPAIR AND MAINTENANCE
WARNING: Risk of fire - no user serviceable electric parts.
Cleaning Your Scooter
Wipe with a damp cloth to remove dirt and dust. Do not use industrial cleaners or solvents as they may damage the
surfaces. Do not use alcohol, alcohol-based or ammonia-based cleaners as they may damage or dissolve the plastic
components or soften the decals or decal adhesive.
Battery Care and Disposal
Do not store in freezing or below freezing temperatures. To properly maintain your battery and ensure maximum
battery life, carefully read the “Charging the Battery” section on page 5 of this owner’s manual.
In the US and Canada only:
For more information regarding
recycling of rechargeable batteries,
call toll free
1-800-822-8837, or visit
http://www.call2recycle.org
Caution: Do not handle damaged
lithium-ion batteries.
Recycling Lithium-ion
Batteries: Lithium-ion batteries are
recyclable. You can help preserve
our environment by returning your
used rechargeable batteries to the
collection and recycling location
nearest you.
CONTAINS LITHIUM-ION BATTERY PACK. BATTERIES MUST BE RECYCLED.
Disposal: Your electric scooter uses a lithium-ion battery pack which must be recycled or disposed of in an
environmentally safe manner. Do not dispose of a battery pack in a fire. The battery pack may explode.
Do not dispose of a battery pack in your regular household trash. The incineration, land filling or mixing of batteries
with household trash is prohibited by law in most areas. Return exhausted batteries to a federal or state approved
lithium-ion battery recycler.
Charger
The charger supplied with the electric scooter should be regularly examined for damage to the cord, plug,
enclosure and other parts and in the event of such damage, the product must not be charged until it has been
repaired or replaced.
Use ONLY with the recommended charger.
Not intended for use at elevations greater than 2000 m above sea level.
Wheels
Wheels and drive system are subject to normal wear and tear. It is the responsibility of the user to periodically
inspect wheels for excess wear and replace hub motor components as required.
Repair Centers
For a list of authorized Razor repair centers:
• Check online at www.razor.com.
• Additional Customer Service contact information is listed on the back of this manual.
Need Help? Visit our website for replacement parts, product support, a list of authorized service centers in the US and customer service contact information
at www.razor.com. Please have the product I.D. code (located on the white label of your product) available for better assistance. Additional Customer
Service contact information is listed at the back of this manual.

12
Need Help? Visit our website for replacement parts, product support, a list of authorized service centers in the US and customer service contact information
at www.razor.com. Please have the product I.D. code (located on the white label of your product) available for better assistance. Additional Customer
Service contact information is listed at the back of this manual.
12
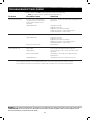
TROUBLESHOOTING GUIDE
Problem Possible Cause Solution
Does not work out of the box If using the factory set (default) kick-to-
start option, the unit must be traveling
at least 3 mph (5 km/h) before motor
will engage
Undercharged battery
Kick to start to at least 3 mph (5 km/h) while engaging throttle to
engage motor.
Check lights on charger:
Plugged into wall - Green
Plugged into wall & unit - Red (charging)
Plugged into wall & unit - Green (charging complete)
No lights/Blinking lights - Replace charger
No longer works No lights on charger
Undercharged battery
Battery will not hold a charge
Check power to wall outlet and/or try a different outlet.
Check lights on charger:
Plugged into wall - Green
Plugged into wall & unit - Red (charging)
Plugged into wall & unit - Green (charging complete)
No lights/Blinking lights - Replace charger
Replace battery.
Short run time/runs slow Rider’s weight
Riding conditions
Battery not fully charged
Old/damaged battery
Do not exceed 220 lb (100 kg) maximum weight limit.
Use only on flat, dry surfaces. Avoid inclines and areas with
heavy debris.
Charge product - refer to page 5 for charging information.
Replace battery.
Charge battery at least once a month when not in use.
For more troubleshooting tips, a list of available replacement parts or to locate an authorized Service Center in your area,
visit our website at www.razor.com or call toll free +1 866-467-2967 to speak to a live Customer Service Representative.
*Product(s) should be turned OFF and fully charged prior to doing any Troubleshooting.
NOTE: All troubleshooting steps should be performed by an adult only.

13
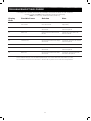
TROUBLESHOOTING GUIDE
Display
Error
Possible Cause Solution Note
E1 Bad connection between motor
and controller.
Check connectors between the
motor and controller.
The motor may be the issue but this is
highly unlikely.
E2 Throttle Failure. Check connections between the throttle
and controller.
If connections are correct then throttle
needs to be replaced.
E3 Motor issue. Cycle the throttle or turn the unit OFF,
then ON.
It may be necessary to wait for the
motor to cool down.
E4 Controller issue. Replace controller.
E6 Controller issue. Check connections between the display
and controller.
If connections are correct, the controller
needs to be replaced.
E7 Battery issue. Battery needs to be replaced.
E8 Motor or controller issue. Check connections between motor
and controller.
If connections are correct then controller
needs to be replaced.
E9 Brake issue. Check connections between the brake
and controller.
If connections are correct then brake
lever needs to be replaced.
For more troubleshooting tips, a list of available replacement parts or to locate an authorized Service Center in your area,
visit our website at www.razor.com or call toll free +1 866-467-2967 to speak to a live Customer Service Representative.
In the unlikely event of a problem, the controller can provide diagnostic information according to the codes listed below.
*Product(s) should be turned OFF and fully charged prior to doing any Troubleshooting.
NOTE: All shooting steps should be performed by an adult only.

1414
WARRANTY
Razor Limited Warranty
The manufacturer warranties this product to be free of manufacturing
defects for a period of 90 days from date of purchase. This Limited Warranty
does not cover normal wear and tear, tire, tube or cables, or any damage,
failure or loss caused by improper assembly, maintenance, storage or use of
the C45.
This Limited Warranty will be void if the product is ever:
• used in a manner other than for recreation or transportation;
• modified in any way;
• rented.
The manufacturer is not liable for incidental or consequential loss or damage
due directly or indirectly to the use of this product.
Razor does not offer an extended warranty. If you have purchased an
extended warranty, it must be honored by the store at which it was
purchased.
For your records, save your original sales receipt with this manual and write
the serial number below.
__________________________________________
FCC COMPLIANCE
FCC ID: 2AGU6008 IC : 21056-008
This device complies with part 15 of the FCC Rules. Operation is subject to the following two conditions:
(1) This device may not cause harmful interference
(2) this device must accept any interference received, including interference that may cause undesired operation.
Caution: Changes or modifications to this unit not expressly approved by the party responsible for compliance could
void the user's authority to operate the equipment.
This device contains licence-exempt transmitter(s)/receiver(s) that comply with Innovation, Science and Economic
Development Canada’s licence-exempt RSS(s). Operation is subject to the following two conditions:
(1) This device may not cause interference.
(2) This device must accept any interference, including interference that may cause undesired operation of the device.
L’émetteur/récepteur exempt de licence contenu dans le présent appareil est conforme aux CNR d’Innovation, Sciences
et Développement économique Canada applicables aux appareils radio exempts de licence. L’exploitation est autorisée
aux deux conditions suivantes :
1) L’appareil ne doit pas produire de brouillage;
2) L’appareil doit accepter tout brouillage radioélectrique subi, même si le brouillage est susceptible d’en compromettre le
fonctionnement.
NOTE: This equipment has been tested and found to comply with the limits for a Class B digital device, pursuant to
part 15 of the FCC Rules. These limits are designed to provide reasonable protection against harmful interference
in a residential installation. This equipment generates, uses and can radiate radio frequency energy and, if not installed
and used in accordance with the instructions, may cause harmful interference to radio communications. However, there is
, there is no guarantee that interference will not occur in a particular installation. If this equipment does cause harmful
interference to radio or television reception, which can be determined by turning the equipment off and on, the user is
encouraged to try to correct the interference by one or more of the following measures:
—Reorient or relocate the receiving antenna.
—Increase the separation between the equipment and receiver.
—Connect the equipment into an outlet on a circuit different from that to which the receiver is connected.
—Consult the dealer or an experienced radio/TV technician for help.
To satisfy FCC&IC RF exposure requirements, a separation distance of 5 mm or more should be maintained between
To ensure compliance, operations at closer than this distance is not recommended.
the antenna of this device and persons during device operation.
Les antennes installées doivent être situées de facon à ce que la population ne puisse y être exposée à une distance de
moin de 5 mm. Installer les antennes de facon à ce que le personnel ne puisse approcher à 5 mm ou moins de la position
centrale de l’ antenne.

18
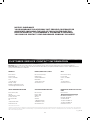
CUSTOMER SERVICE CONTACT INFORMATION
Need Help? Visit our website for product support, a list of authorized service centers in the US and customer service contact information at
www.razor.com. Please have the product I.D. code (located on the white label of your product) available for better assistance. Additional Customer
Service contact information is listed below:
AMERICAS
Razor USA LLC
P.O. Box 3610
Cerritos, CA 90703
USA
+1 866 467 2967
Monday - Friday
8:00 AM - 5:00 PM Pacific Time
customersupport@razorusa.com
EUROPE, MIDDLE EAST, AFRICA
Razor USA LLC (Europe)
Handelsweg 2
2742 RD Waddinxveen
Netherlands
+44 (0) 120 267 2702
info@razoreu.com
ASIA
Razor USA LLC (Asia)
P.O. Box 3610
Cerritos, CA 90703
USA
+81 50 7579 6622
info@razor-asia.com
UNITED KINGDOM AND IRELAND
Razor USA LLC (UK)
Unit 20
Hartnoll Business Centre
Post Hill, Tiverton
Devon EX16 4NG
UK
+44 (0) 120 267 2702
info@razoreu.com
AUSTRALIA AND NEW ZEALAND
Razor USA LLC
P.O. Box 4280
Auburn South
VIC 3122
Australia
+1 800 954 354 (AU)
+0 800 003 221 (NZ)
info@razoranz.com
IMPORTED IN JAPAN BY B-PLUS ASIA
CORP.
Razor USA LLC
Kurokawa 3-1, Asaoku,
Kawasaki, Kanagawa
215-0035 JAPAN
+81 (0) 44 328 9057 Tel
+81 (0) 44 328 9067 Fax
info@razor-asia.com
Printed in China for Razor USA LLC.
Copyright © 2003-2023 Razor USA, LLC. All rights reserved. Razor® and the Razor logo design are among the registered trademarks of Razor USA LLC in the United States and/or select foreign countries. C45™ and the C45 logo
design are trademarks of Razor USA LLC. The Bluetooth® word mark and logos are registered trademarks owned by Bluetooth SIG, Inc. and any use of such marks by Razor USA LLC is under license. Other trademarks and trade
names are those of their respective owners.
US_230119
NOTICE: INSURANCE
YOUR INSURANCE POLICIES MAY NOT PROVIDE COVERAGE FOR
ACCIDENTS INVOLVING THE USE OF THIS SCOOTER/ELECTRIC
RIDE-ON PRODUCT. TO DETERMINE IF COVERAGE IS PROVIDED,
YOU SHOULD CONTACT YOUR INSURANCE COMPANY OR AGENT.
-
 1
1
-
 2
2
-
 3
3
-
 4
4
-
 5
5
-
 6
6
-
 7
7


Razor Power Core E90 Glow Electric Scooter Manuel utilisateur
- Taper
- Manuel utilisateur
dans d''autres langues
Documents connexes
-
Razor E200 Series Le manuel du propriétaire
-
-
Razor Sportmod Le manuel du propriétaire
-
-
-
-
-
-
-