Hamilton Beach 33168 Manuel utilisateur
- Catégorie
- Mijoteuses
- Taper
- Manuel utilisateur
Ce manuel convient également à

Slow Cooker
840126500
English ................................................ 2
USA: 1-800-851-8900
Français ............................................ 15
Canada : 1-800-267-2826
Español .............................................. 26
México: 01 800 71 16 100
Le invitamos a leer cuidadosamente este
instructivo antes de usar su aparato.
Mijoteuse
Olla de cocción lenta
READ BEFORE USE
LIRE AVANT L’UTILISATION
LEA ANTES DE USAR
840126500 Ev03 7/6/04 3:36 PM Page 1

This product is intended for household
use only.
This appliance is equipped with a polarized
plug. This type of plug has one blade wider
than the other. The plug will fit into an
electrical outlet only one way. This is a
safety feature intended to help reduce the
risk of electrical shock. If you are unable to
insert the plug into the outlet, try reversing
the plug. If the plug should still fail to fit,
contact a qualified electrician to replace the
obsolete outlet. Do not attempt to defeat
the safety purpose of the polarized plug by
modifying the plug in any way.
To avoid an electrical circuit overload do
not use a high wattage appliance on the
same circuit with the slow cooker.
The length of the cord used on this appli-
ance was selected to reduce the hazards
of becoming tangled in, or tripping over a
longer cord. If a longer cord is necessary an
approved extension cord may be used.
The electrical rating of the extension cord
must be equal to or greater than the rating
of the slow cooker. Care must be taken to
arrange the extension cord so that it will not
drape over the countertop or tabletop
where it can be pulled on by children or
accidentally tripped over.
2
IMPORTANT SAFEGUARDS
SAVE THESE INSTRUCTIONS!
When using electrical appliances, basic
safety precautions should always be
followed, including the following:
1. Read all instructions.
2. Do not touch hot surfaces. Use handles
or knobs.
3. To protect against electrical shock do
not immerse cord, plug, or base in
water or other liquid.
4. Close supervision is necessary when
any appliance is used by or near chil-
dren.
5. Unplug from outlet when not in use and
before cleaning. Allow to cool before
putting on or taking off parts.
6. Do not operate any appliance with
a damaged cord or plug, or after the
appliance malfunctions or is dropped
or damaged in any manner. Call our
toll-free customer service number for
information on examination, repair, or
adjustment.
7. The use of accessory attachments not
recommended by Hamilton Beach/
Proctor-Silex, Inc. may cause fire, electric
shock or injury.
8. Do not use outdoors.
9. Do not let cord hang over edge of
table or counter, or touch hot surfaces,
including the stove.
10. Do not place on or near hot gas or an
electric burner, or in a heated oven.
11. Extreme caution must be used when
using an appliance containing hot oil or
other hot liquids.
12. To disconnect slow cooker, turn
control knob to Off ( O) then remove
plug from outlet.
13. Caution: To prevent damage or shock
hazard do not cook in base. Cook only
in removable liner.
14. Do not operate appliance in any way
other than intended use.
Other Consumer Safety Information
840126500 Ev03 7/6/04 3:27 PM Page 2

LOW
HIGH
KEEP
WARM
OFF
3
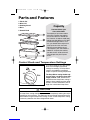
Parts and Features
1. Plastic Lid
2. Glass Lid
3. Cooking Vessel
4. Base
5. Control Knob
Capacity
How much does your
slow cooker hold?
The capacity of your slow cooker
refers to the amount the cooking
vessel can hold if it is filled to the
rim. However, in order to avoid food
boiling over and spilling, we DO NOT
recommend filling to the rim. As a
rule, you should select recipes that
yield 1 quart less than the listed
capacity of your cooking vessel.
For example, if your slow cooker is
labeled as a 6-quart slow cooker,
your best results will be achieved
using recipes that yield 5 quarts
or less.
The Control Knob on the slow cooker
offers Low and High temperature
settings for cooking. The Keep Warm
setting is for holding the prepared
recipe at a perfect serving temperature.
The Keep Warm setting should only
be used after a recipe has been thor-
oughly cooked. Food should not be
reheated on the Keep Warm setting. If
food has been cooked and then refrig-
erated it must be reheated on Low or
High, then switched to Keep Warm.
Control Knob and Temperature Settings
Health Hazard
The Keep Warm setting should only be used after completely cooking the recipe
according to the instructions. The food must be hot enough to prevent bacterial
growth before using the Keep Warm setting. Do not use the Keep Warm setting
to reheat any food that has been refrigerated or frozen.
CAUTION
840126500 Ev03 7/6/04 3:27 PM Page 3

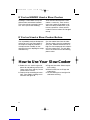
1. Before first use, wash the glass lid,
plastic lid and cooking vessel in hot,
soapy water. Rinse and dry. Do not
immerse base in water.
2. Prepare recipe according to instruc-
tions. Place food in cooking vessel
and cover with glass lid.
How to Use Your Slow Cooker
3. Plug cord into outlet. Select temper-
ature setting.
4. When finished, turn to Off (O) and
unplug base.
5. Let the cooking vessel and glass lid
cool before washing.
4
You are probably ready to develop new
recipes for use in your slow cooker. If
the recipe was originally cooked in a
saucepan on the stovetop, or slow
roasted in the oven, adapting the recipe
should be easy.
If You’ve Used a Slow Cooker Before
Cooking in a slow cooker is easy but
different from conventional methods.
Take a few minutes and read “How to
Use” and “Tips for Slow Cooking.”
You’ll soon be convinced that a slow
cooker is a necessity. There are also
many slow cooker recipe books avail-
able in the library or book store. If you
have any questions, call our toll-free
customer service number. We’ll be glad
to help.
Our slow cooker heats from the sides.
The base slowly raises the temperature
of the pan. Whether cooked on Low or
High, the final temperature of the food is
the same, about 200°F. The only differ-
ence is the amount of time the cooking
process takes.
If You’ve NEVER Used a Slow Cooker
840126500 Ev03 7/6/04 3:27 PM Page 4

5
HEAT SETTING LOW HIGH
2 5 pound/2.25 kg Whole Chickens 8 6
5-6 pounds (2.25-2.7 kg) Beef Roast 10 5
3-4 pounds (1.35-1.8 kg)
Boneless, Smoked Ham 8 5
Basic Cooking Chart/Hours Required
• The cover of the slow cooker does
not form a tight fit on the cooking
vessel but should be centered on the
cooking vessel for best results. Do
not remove the glass lid
unnecessarily—this results in major
heat loss. Do not cook without glass
lid in place.
• Stirring is not necessary when slow
cooking. However, if cooking on High,
you may want to stir occasionally.
• Slow cooking retains most of the
moisture in foods. If a recipe results
in too much liquid at the end of the
cooking time, remove the glass lid,
turn the control knob to High, and
reduce the liquid by simmering. This
will take 30 to 45 minutes.
Tips for Slow Cooking
• The slow cooker should be at least
half-filled for best results.
• If cooking soups or stews, leave a
2-inch space between the top of the
cooking vessel and the food so that
the recipe can come to a simmer.
• Many recipes call for cooking all day.
If your morning schedule doesn’t
allow time to prepare a recipe, do it
the night before. Place all ingredients
in the cooking vessel, cover with plas-
tic lid and refrigerate overnight. In the
morning, simply replace plastic lid
with glass lid and place cooking ves-
sel in the slow cooker. Select the
temperature setting.
• Meat and poultry require at least 7 to
8 hours on Low. Do not use frozen
meat in the slow cooker. Thaw any
meat or poultry before slow cooking.
840126500 Ev03 7/6/04 3:27 PM Page 5

6
The 9x13 (23x33x10 cm) slow cooker will be a party/entertaining essential to keep
slow cooked or conventionally baked dishes warm for hours safely.
How to Use Slow Cooker as
Warmer/Server
Slow-cooked recipes in the cooking vessel
1. Prepare slow cooker recipe accord-
ing to instructions in a 9x13x4 inch
(23x33x10 cm) dish.
2. Set temperature control to Keep
Warm.
3. Food temperature will be maintained
at an ideal serving temperature.
4. When finished, turn to Off ( O) and
unplug base.
Conventional-baked recipes in
cooking vessel
1. Prepare recipe according to instruc-
tions in a 9x13x4 inch (23x33x10 cm)
cooking vessel and bake in oven.
2. Use oven mitts to carefully place
baked dish in base.
3. Set temperature control to Keep
Warm.
4. Food temperature will be maintained
at an ideal serving temperature.
5. When finished, turn to Off ( O) and
unplug base.
Conventional baked recipes in oven-safe
glass bakeware (glass bakeware not included)
1. Prepare slow cooker recipe accord-
ing to instructions in a 9x13x2 inch
(23x33x5 cm) dish and bake in oven.
2. Use oven mitts to carefully place
baked dish in base.
3. Set temperature control to Keep
Warm.
4. Food temperature will be maintained
at an ideal serving temperature.
5. When finished, turn to Off ( O) and
unplug base.
840126500 Ev03 7/6/04 3:27 PM Page 6

7
Adapting Recipes
Some ingredients are not suited for
extended cooking in the slow cooker.
Pasta, seafood, milk, cream, or sour
cream should be added 2 hours before
serving. Evaporated milk or condensed
soups are perfect for the slow cooker.
Many things can affect how quickly a
recipe will cook. The water and fat
content of a food, the temperature of
the food, and the size of the food will
all affect the cooking time. Food cut
into pieces will cook faster than whole
roasts or poultry.
Most meat and vegetable combinations
require at least 7 hours on Low.
The higher the fat content of the meat,
the less liquid is needed. If cooking
meat with a high fat content, place
thick onion slices underneath, so the
meat will not sit and cook in the fat.
Some recipes call for browning the
meat before slow cooking. This is only
to remove excess fat or for color; it is
not necessary for successful cooking.
Slow cookers have very little evapora-
tion. If making your favorite soup, stew,
or sauce, reduce the liquid or water
called for in the original recipe. If too
thick, liquids can be added later.
If cooking a vegetable-type casserole,
there will need to be liquid in the
recipe to prevent scorching on the
sides of the cooking vessel.
Cleaning
1. Turn the control knob to Off (O).
Unplug cord from outlet.
2. Remove cooking vessel and glass lid
from base and let cool.
3. Wash the cooking vessel, glass lid
and plastic lid in hot, soapy water.
Rinse and dry. Cooking vessel, glass
lid, and plastic lid may also be
washed in the dishwasher.
4. Wipe the base with a damp cloth.
Do not use abrasive cleansers.
Electrical Shock Hazard
Do not immerse base in water.
This can result in death or electrical shock.
WARNING
840126500 Ev03 7/6/04 3:27 PM Page 7

8
Dips and Sauces
Salsa con Queso
2 (2-pound/900 g) blocks pasteurized processed cheese product, cut in 2-inch
pieces
11⁄2quarts (1.5 L) salsa
4 (6-ounce/170 g) cans chopped green chilies, do not drain
2-3 tablespoons (30-45 ml) chili powder
2 teaspoons (10 ml) garlic powder
2 (8-ounce/450 g) bags shredded Monterey Jack cheese
Combine all ingredients in the cooking vessel. Stir well. Stir halfway through cook-
ing time. Serve with chips. Cover and cook:
Low – 4 hours OR High – 3 hours.
Makes: 5 quarts (4.7 L).
Basic Spaghetti Sauce
2 (28-ounce/795 g) cans crushed tomatoes
3 (10-ounce/285 g) cans tomato puree
2 (6-ounce/175 g) cans tomato paste
4 cups (1 L) water
2 cups (500 ml) chopped green pepper
2 cups (500 ml) chopped onion
3 teaspoons (30 ml) Italian seasonings
3 teaspoons (30 ml) dried basil
3 teaspoons (30 ml) chopped garlic
2 teaspoons (20 ml) salt
2 teaspoons (20 ml) sugar
16 ounces (450 g) sliced pepperoni, optional
Combine all ingredients in the cooking vessel. Stir well. Cover and cook:
Low – 8
hours OR High – 4 hours. Makes: 5 quarts (4.7 L).
840126500 Ev03 7/6/04 3:27 PM Page 8

9
Soups and Stews
Jambalaya
11⁄2pounds (675 g) boneless, skinless chicken breast, cut into 1-inch (2.5 cm) cubes
1 pound (450 g) sausage, cooked
2 (28-ounce/795 g) cans tomatoes, crushed
1 cup (250 ml) onion, chopped
1 cup (250 ml) green pepper, chopped
1 cup (250 ml) chicken broth
1⁄2cup (125 ml) white wine
2 teaspoons (10 ml) oregano
2 teaspoons (10 ml) parsley
1 teaspoon (5 ml) salt
2 teaspoons (10 ml) seasoning
11⁄2pounds (675 g) shrimp, cooked
2 cups (500 ml) quick cooking rice
Combine all ingredients in the cooking vessel except shrimp and rice. Stir well.
Cover and cook:
Low – 8 hours OR High – 5 hours. Stir in rice and shrimp. Cover
and cook for an additional 15 minutes. Makes: 5 quarts (4.7 L).
Easy Meatball Stew
2 pounds (900 g) frozen cooked Italian meatballs, thawed
2 pounds (900 g) cheese tortellini, cooked according to package directions
3 (101⁄4-ounce/285 g) cans cream of mushroom soup
2 pounds (900 g) frozen mixed vegetables
1 teaspoon (5 ml) garlic, crushed
2 cups (500 ml) water
Combine all ingredients in the cooking vessel. Stir well. Cover and cook:
Low – 5
hours OR High – 3 hours.
840126500 Ev03 7/6/04 3:27 PM Page 9

10
Main Dish
Arroz con Pollo
2 (3-pound/1.35 kg) chickens, cut in pieces
1 14.5-ounce (415 g) can Italian-style stewed tomatoes
1 16-ounce (450 g) bag frozen peas
2 (14-ounce/400 g) cans chicken broth
1 12-ounce (350 g) jar roasted red peppers, drained and cut in strips
2 (8-ounce/225 g) boxes Spanish-style yellow rice mix
2 teaspoons (10 ml) garlic salt
Combine all ingredients in the cooking vessel. Stir well. Cover and cook:
Low – 8
hours OR High – 5 hours. Makes: 8 servings.
Chicken in a Pot
2 (16-ounce/450 g) packages frozen mixed vegetables
2 (1.5-ounce/40 g) envelopes beef stroganoff sauce mix
2 (3-pound/1.35 kg) whole chickens
Paprika, onion powder, and garlic powder
Combine vegetables and sauce mix in the cooking vessel. Sprinkle seasonings on
the chicken. Place the chicken in the cooking vessel over the vegetables. Cover
and cook:
Low – 8 hours OR High – 5 hours. Makes: 8 servings.
German-Style Pot Roast
3⁄4cup (175 ml) cider vinegar
1⁄4cup (60 ml) ketchup
1⁄2cup (125 ml) chopped onion
1 teaspoon (5 ml) chopped garlic
2 (14-ounce/470 ml) cans beef broth
12 ginger snap cookies
2 (0.8 ounce/20 g) envelopes brown gravy mix
5-6 pound (2.25-2.7 kg) boneless chuck or bottom round roast
Combine all ingredients, except the meat, in the cooking vessel. Stir well. Add the
meat and stir well to coat. Cover and cook:
Low – 10 hours OR High – 5 hours.
Makes: 8 to 10 servings.
Onion-Coated Beef Roast
1⁄2cup (125 ml) steak sauce
6 pounds (2.7 kg) bottom round or rump beef roast
2 tablespoons (90 ml) dried minced onion
Pour steak sauce into the cooking vessel. Place meat in the cooking vessel and
coat both sides with the sauce. Sprinkle each side with 1 tablespoon of the dried
onion. Cover and cook:
Low – 10 hours OR High – 5 hours. Makes: 14 servings.
840126500 Ev03 7/6/04 3:27 PM Page 10

11
Main Dish
Sweet & Pungent Meat Balls
5 pounds (2,250 g) frozen cooked meatballs
2 (12-ounce/375 ml) jars grape jelly
2 (12-ounce/375 ml) jars currant jelly
2 (12-ounce/375 ml) bottles chili sauce
2 (12-ounce/375 ml) bottles cocktail sauce
Combine all ingredients in the cooking vessel. Stir well. Cover and cook:
Low – 6
hours OR High – 4 hours. Makes: 5 quarts (4.7 L).
Tex-Mex Beef Barbecue
6 pound (2.7 kg) brisket of beef
2 18-ounce (1.18 kg) bottles hickory-smoked barbecue sauce
2 (1.25-ounce/33 g) envelopes chili seasoning
2 teaspoons (10 ml) chopped garlic
2 teaspoons (10 ml) lemon juice
2 tablespoons (60 ml) Worcestershire sauce
1 cup (250 ml) chopped onion
Combine all ingredients, except meat, in the cooking vessel. Stir well. Add meat
and stir well to coat. Cover and cook:
Low – 10 hours OR High – 5 hours.
Remove the meat and shred. Return the meat to the cooking vessel. Stir well.
Serve on soft rolls.
Makes: 16 servings.
Sunday Chicken
7 pounds (3.15 kg) chicken, cut up
Paprika, salt, and pepper
2 (10-ounce/285 g) cans condensed cream of celery soup
3⁄4cup (175 ml) white wine or chicken broth
Rinse chicken in cold water. pat dry. Sprinkle chicken with paprika, salt, and
pepper. Combine soup and wine. Place half of chicken in cooking vessel and pour
half of soup mixture over chicken. Repeat layers. Cover and cook:
Low – 6 hours
OR High – 5 hours. Makes: 12 servings.
840126500 Ev03 7/6/04 3:27 PM Page 11

12
Side Dishes
Glazed Carrots
5 pounds (2.25 kg) baby carrots
1 medium onion, sliced
1⁄4teaspoon (1.25 ml) salt
3⁄4cup (175 ml) honey
3⁄4cup (175 ml) apricot preserves
2 tablespoons (30 ml) parsley
1⁄4cup (60 ml) bourbon, optional
Combine all ingredients in cooking vessel. Cover and cook:
Low – 7 hours OR
High – 4 hours.
Mixed Italian Bean Casserole
3 16-ounce/500 ml cans red kidney beans, drained
3 16-ounce/500 ml cans chick peas (garbanzo beans), drained
3 16-ounce/500 ml cans cannellini beans, drained
3 16-ounce/500 ml cans great northern beans, drained
1 teaspoon (5 ml) salt
1 teaspoon (5 ml) garlic powder
1 teaspoon (5 ml) Italian seasonings
2 1-ounce/25 g envelopes dry onion soup mix
Combine all ingredients in the cooking vessel. Stir well. Cover and cook:
Low –
6-8 hours OR High – 4-5 hours.
Makes 5 quarts (4.7 L).
Zesty New Potatoes
6 pounds (2.7 kg) (small) new red potatoes, unpeeled
2 tablespoons (30 ml) olive oil
2 1-ounce/25 g envelopes zesty Italian dressing mix
Potatoes should be the size of golf balls. If not, cut in half or quarter.
Pour the oil in a plastic bag and add the potatoes and shake to coat well. Add the
salad dressing mix and shake well until all the potatoes are coated. Place pota-
toes into the cooking vessel. Cover and cook:
Low – 7-8 hours OR High – 5
hours.
Baked Potatoes
Scrub baking potatoes and pierce skin in several places with a fork. Stack pota-
toes in a pyramid in cooking vessel so as not to touch the sides. Cover and
cook:
Low – 8-9 hours OR High – 5-6 hours.
840126500 Ev03 7/6/04 3:27 PM Page 12

13
Desserts
New Orleans Bread Pudding
16 cups (4 L) bread cubes, diced
10 cups (2.5 L) milk, scalded
8 eggs, beaten
3 cups (750 ml) sugar
2 teaspoons (10 ml) cinnamon
1 teaspoon (5 ml) nutmeg
Combine all ingredients in cooking vessel. Cover and cook:
Low – 5 hours OR
High – 3
1⁄2
hours.
Makes about 6 quarts (5.7 L).
Wild Berry Cobbler
4 pounds (1.8 L) berries, fresh
2 cups (500 ml) sugar
1⁄2
cup (125 ml) quick-cooking tapioca
1⁄2
cup (125 ml) butter, melted
1⁄2
cup (125 ml) sugar
Combine berries, 2 cups (500 ml) sugar, and tapioca in cooking vessel. For biscuit
topping: mix butter,
1⁄2
cup (125 ml) sugar, baking powder, salt, flour, and milk in a
bowl. Drop spoonfuls of biscuit on top of fruit. Bake at 350ºF in conventional oven
for 60 to 75 minutes. Makes about 16 servings.
Chocolate Fondue
2 8-ounce/225 g boxes semi-sweet baking chocolate
2 8-ounce/225 g boxes unsweetened baking chocolate
2 6-ounce/170 g boxes white baking chocolate
2 14-ounce/400 g cans sweetened condensed milk, not evaporated
2 cups (500 ml) milk
1⁄2cup (125 ml) blackberry-flavored brandy, or other fruit-flavored brandy
Suggested foods for dipping: Strawberries, pineapple chunks, banana chunks,
cake cubes, marshmallows, and cookies.
Combine all fondue ingredients in the cooking vessel. Stir well. Cover and cook
on High for 45 minutes* to 1 hour 15 minutes or until melted.
Stir well after 45 minutes. Turn Control Knob to Low. Serve immediately or keep
warm as desired. Refrigerate leftovers and use as chocolate sauce. Recipe can be
doubled.
Makes: about 1 or 2 quarts.
*Only the High setting is recommended for this recipe.
1⁄2teaspoon (2.5 ml) salt
1 tablespoon (15 ml) vanilla
1⁄2cup (125 ml) butter, melted
2 cups (500 ml) raisins
1⁄2cup (125 ml) whiskey, optional
4 teaspoons (20 ml) baking powder
1 teaspoon (5 ml) salt
3 cups (750 ml) flour
2 cups (500 ml) milk
840126500 Ev03 7/6/04 3:27 PM Page 13

14
Customer Service
If you have a question about your slow cooker, call our toll-free customer service
number. Before calling, please note the model, type, and series numbers and fill in
that information below. These numbers can be found on the bottom of your slow
cooker. This information will help us answer your question much more quickly.
MODEL: ______________ TYPE: _______________ SERIES: _________________
This warranty applies to products purchased in the U.S. or Canada.
LIMITED WARRANTY
This product is warranted to be free from defects in material and workmanship for a period
of two (2) years for Hamilton Beach Portfolio products, one (1) year for Hamilton Beach
products or one hundred eighty (180) days for Proctor-Silex products from the date of
original purchase, except as noted below. During this period, we will repair or replace this
product, at our option, at no cost. THE FOREGOING WARRANTY IS IN LIEU OF ANY
OTHER WARRANTY, WHETHER EXPRESS OR IMPLIED, WRITTEN OR ORAL
INCLUDING ANY WARRANTY OF MERCHANTABILITY OR FITNESS FOR A
PARTICULAR PURPOSE. ANY LIABILITY IS EXPRESSLY LIMITED TO AN AMOUNT
EQUAL TO THE PURCHASE PRICE PAID, AND ALL CLAIMS FOR SPECIAL, INCIDENTAL
AND CONSEQUENTIAL DAMAGES ARE HEREBY EXCLUDED. There is no warranty with
respect to the following, which may be supplied with this product: glass parts, glass
containers, cutter/strainer, blades, and/or agitators. This warranty extends only to the
original consumer purchaser and does not cover a defect resulting from abuse, misuse,
neglect, use for commercial purposes, or any use not in conformity with the printed
directions. This warranty gives you specific legal rights, and you may also have other legal
rights which vary from state to state, or province to province. Some states or provinces do
not allow limitations on implied warranties or special, incidental or consequential damages,
so the foregoing limitations may not apply to you.
If you have a claim under this warranty, DO NOT RETURN THE APPLIANCE TO THE
STORE! Please call our CUSTOMER SERVICE NUMBER. (For faster service please have
model, series, and type numbers ready for operator to assist you.)
CUSTOMER SERVICE NUMBERS
In the U.S. 1-800-851-8900
In Canada 1-800-267-2826
hamiltonbeach.com or proctorsilex.com
KEEP THESE NUMBERS FOR FUTURE REFERENCE!
840126500 Ev03 7/6/04 3:27 PM Page 14

15
Autres renseignements de sécurité aux consommateurs
IMPORTANTES PRÉCAUTIONS
CONSERVEZ CES INSTRUCTIONS !
Lors de l’utilisation d’appareils
électroménagers, des précautions
fondamentales de sécurité doivent toujours
être observées, y compris ce qui suit :
1.
Lire toutes les instructions.
2.
Ne pas toucher les surfaces chaudes.
Utiliser les poignées ou boutons.
3.
Pour protéger contre le risque de choc
électrique, ne pas immerger le cordon,
la fiche ou la base dans l’eau ou tout autre
liquide.
4.
Une bonne surveillance est nécessaire
pour tout appareil utilisé par des enfants
ou près d’eux.
5.
Débrancher l’appareil de la prise de
courant électrique lorsqu’il n’est pas utilisé
et avant un nettoyage. Le laisser refroidir
avant un nettoyage et avant d’y placer ou
d’y enlever des pièces.
6.
Ne pas faire fonctionner un appareil
électroménager avec un cordon ou une
fiche endommagé, ou lorsque l’appareil ne
fonctionne pas bien, ou a été échappé ou
endommagé d’une manière quelconque.
Composer notre numéro de service aux
clients, sans frais d’interurbain, pour des
renseignements concernant l’examen, la
réparation ou l’ajustement.
7.
L’utilisation d’accessoires non
recommandés par Hamilton Beach/
Proctor-Silex, Inc. peut causer un
incendie, un choc électrique ou des
blessures.
8.
Ne pas utiliser à l’extérieur.
9.
Ne pas laisser le cordon pendre du bord
d’une table ou d’un comptoir, ou toucher
des surfaces chaudes, y compris la
cuisinière.
10.
Ne pas placer l’appareil sur ou près d’un
brûleur à gaz chaud, ou d’un élément
électrique, ou dans un four chauffé.
11.
Une grande précaution doit être prise lors
de l’utilisation d’un appareil
électroménager contenant de l’huile
chaude ou autres liquides chauds.
12.
Pour déconnecter la mijoteuse, tourner
le bouton de commande à Off
(O)
;
débrancher la fiche de la prise.
13.
Mise en garde : Afin de prévenir
l’endommagement ou le risque de choc,
ne pas cuire dans la base. Cuire
seulement dans le plat amovible.
14.
Ne pas utiliser l’appareil électroménager
à une fin autre que l’utilisation prévue.
Ce produit est destiné à l’utilisation
domestique seulement.
Cet appareil est muni d’une fiche polarisée.
Ce type de fiche présente une broche plus
large que l’autre. Par mesure de sécurité, la
fiche ne peut être introduite dans une prise
que dans un sens seulement. Il s’agit d’une
caractéristique de sécurité visant à réduire le
risque de choc électrique. Si la fiche ne peut
pas être insérée dans la prise, la tourner dans
l’autre sens. Si elle ne peut toujours pas être
insérée dans la prise, contacter un électricien
pour qu’il remplace la prise désuète. Ne pas
essayer de contourner l’objectif de sécurité
de la fiche polarisée en la modifiant de
quelque manière que ce soit.
Pour éviter une surcharge du circuit électrique,
ne pas utiliser un appareil électroménager à
forte consommation sur le même circuit que
la mijoteuse.
La longueur du cordon de cet appareil a été
choisie de façon à ce que l’on ne risque pas
de trébucher dessus. Si un cordon plus long
est nécessaire, utiliser une rallonge appropriée.
Le calibrage de la rallonge doit être le même
que celui de l’appareil ou supérieur. Lorsqu’on
utilise une rallonge, s’assurer qu’elle ne tra-
verse pas la zone de travail, que des enfants
ne puissent pas tirer dessus par inadvertance
et qu’on ne puisse pas trébucher dessus.
840126500 Fv03 7/6/04 3:27 PM Page 15

16
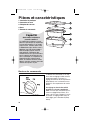
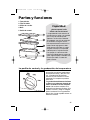
Pièces et caractéristiques
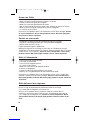
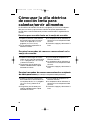
Le bouton de commande sur la mijo-
teuse offre un réglage à faible et haute
température pour la cuisson. Le
réglage de maintien de la température
(Keep Warm) sert à maintenir le mets
préparé à une température de service
idéale.
Ce réglage ne devrait être utilisé
qu’après la cuisson complète du
mets. Il ne faut pas réchauffer des ali-
ments au réglage Keep Warm. Si le
mets a été cuit, puis réfrigéré, il faut le
réchauffer au réglage faible (Low) ou
élevé (High), puis sélectionner (Keep
Warm).
Bouton de commande
LOW
HIGH
KEEP
WARM
OFF
1. Couvercle en plastique
2. Couvercle en verre
3. Récipient de cuisson
4. Base
5. Bouton de commande
Capacité
Quel volume la mijoteuse
peut-elle contenir ?
La capacité de la mijoteuse se rap-
porte à la quantité que le récipient de
cuisson peut contenir s’il est rempli
jusqu’en haut. Toutefois, pour éviter
le débordement des aliments suite à
ébullition, nous NE recommandons
PAS de remplir jusqu’en haut. En
règle générale, sélectionner des
recettes fournissant 1 pinte de moins
que la capacité du récipient de cuis-
son. Par exemple, si la mijoteuse est
étiquetée comme mijoteuse de 6
pintes, les meilleurs résultats seront
obtenus avec des recettes créant des
volumes de 5 pintes au plus.
840126500 Fv03 7/6/04 3:28 PM Page 16

17
Mode d’utilisation de la mijoteuse
1. Avant l’utilisation initiale, laver le
couvercle et le plat dans de l’eau
chaude savonneuse. Rincer et sécher.
Ne pas immerger la base dans l’eau.
2. Préparer la recette conformément
aux instructions. Placer les aliments
dans le plat et couvrir.
3. Brancher le cordon dans une prise.
Régler la température.
4. Après la cuisson, tourner le bouton
sur Off ( O) et débrancher la base.
Retirer les aliments du plat.
5. Laisser le plat et le couvercle refroidir
avant les laver.
Si vous n’avez JAMAIS utilisé de mijoteuse
Si vous avez déjà utilisé une mijoteuse
La cuisson dans une mijoteuse est
facile, mais différente des méthodes
conventionnelles. Prenez quelques
minutes pour lire les sections «Mode
d’utilisation» et «Conseils de mijotage».
Vous ne tarderez pas à devenir convain-
cu(e) qu’une mijoteuse est une
nécessité. Vous trouverez également
de nombreux livres de recettes pour
mijoteuse à la bibliothèque ou chez un
libraire. Si vous avez des questions,
veuillez composer notre numéro sans
frais du Service à la clientèle. Nous nous
ferons un plaisir de vous aider.
Vous êtes probablement prêt(e) à
mettre au point de nouvelles recettes
pour votre mijoteuse. Si la recette était
antérieurement préparée dans une
casserole sur le dessus de la cuisinière,
ou par lent rôtissage au four, il devrait
être facile de l’adapter.
Notre mijoteuse chauffe par les côtés.
La base fait monter lentement la
température dans le plat. Que la cuisson
se fasse à réglage faible ou élevé, la
température finale du mets sera la
même, environ 200°F. La seule dif-
férence est le temps de cuisson requis.
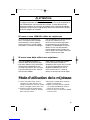
Risque pour la santé
Le réglage Keep Warm ne devrait être utilisé qu’après la cuisson complète d’un
mets conformément aux instructions de la recette. Le mets doit être assez
chaud pour empêcher la croissance de bactéries avant l’utilisation du réglage
Keep Warm. Ne pas utiliser le réglage Keep Warm pour réchauffer des aliments
qui ont été réfrigérés ou congelés.
ATTENTION
840126500 Fv03 7/6/04 3:28 PM Page 17

18
Conseils de mijotage
• Le couvercle de la mijoteuse ne ferme
pas hermétiquement sur le plat, mais
doit être centré sur le plat pour donner
les meilleurs résultats. Ne pas enlever
le couvercle sans raison—il en
résulte une perte importante de
chaleur. Ne pas faire cuire sans cou-
vercle en verre.
• Il n’est pas nécessaire de remuer
la préparation durant la cuisson lente.
Toutefois, à cuisson élevée, il peut
être nécessaire de remuer le mets
occasionnellement.
• La cuisson lente conserve aux ali-
ments leur humidité. Si une recette
comporte trop de liquide à la fin de la
cuisson, enlever le couvercle, tourner
sur le bouton de commande High
(élevé) et réduire le liquide par
mijotage. Il faudra 30 à 45 minutes.
• La mijoteuse doit être remplie au
moins à moitié pour donner les
meilleurs résultats.
• Lors de la cuisson de potages ou de
ragoûts, laisser un espace de 5 cm
(2 po) entre le bord supérieur du plat et
l’aliment de manière à ce que le mets
puisse mijoter.
• De nombreuses recettes nécessitent
une cuisson toute la journée. S'il n'y
a pas assez de temps le matin pour
préparer la recette, la préparer la
veille. Placer tous les ingrédients dans
le récipient de cuisson, couvrir du
couvercle en plastique et réfrigérer
jusqu’au lendemain. Le matin, rem-
placer le couvercle en plastique par
celui en verre et placer le récipient de
cuisson dans la mijoteuse.
Sélectionner la bonne température.
• La viande et la volaille nécessitent une
cuisson d’au moins 7 à 8 heures à
faible réglage. Ne pas utiliser de
viande congelée dans la mijoteuse.
Décongeler toute viande ou volaille
avant la cuisson dans la mijoteuse.
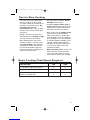
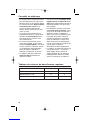
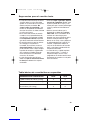
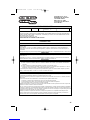
RÉGLAGE DE TEMPÉRATURE FAIBLE (LOW) ÉLEVÉE (HIGH)
Poulet entier de 4 lb 8 6
Rôtif de boeuf 5 à 6 lb 10 5
Jambon fumé désossé 3 à 4 lb 8 5
Tableau de cuisson de base/heures requises
840126500 Fv03 7/6/04 3:28 PM Page 18

19
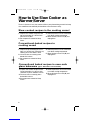
La mijoteuse 23 x 33 x 10 cm (9 x 13 po) sera essentielle pour les réceptions
pour garder pendant des heures au chaud sans danger les plats mijotés ou cuits
de manière conventionnelle.
Comment utiliser une mijo-
teuse comme réchauffe-plat
Recettes mijotées dans le récipient de cuisson
1. Préparer la recette de mijoteuse con-
formément aux instructions dans un
plat 23 x 33 x 10 cm (9 x 13 x 4 po).
2. Régler la commande de température
sur Keep Warm (garder chaud).
3. La température des aliments sera
maintenue à une température idéale.
4. Lorsque l’utilisation de la mijoteuse
est terminée, tourner le bouton sur
« Off / O» et débrancher la base.
Recettes de cuisson conventionnelles
dans un récipient de cuisson
1. Préparer les recettes selon les
instructions dans un récipient de
cuisson 23 x 33 x 10 cm (9 x 13 x 4
po) et cuire au four.
2. Porter des gants isolants pour placer
soigneusement le plat cuit au four
dans la base.
3. Régler la commande de température
sur Keep Warm (garder chaud).
4. La température des aliments sera
maintenue à une température idéale.
5. Lorsque l’utilisation de la mijoteuse
est terminée, tourner le bouton sur
« Off / O» et débrancher la base.
Recettes de cuisson conventionnelle dans un plat
allant au four en verre (plat allant au four en verre non fourni)
1. Préparer la recette de mijoteuse con-
formément aux instructions dans un
plat 23 x 33 x 5 cm (9 x 13 x 2 po) et
faire cuire au four.
2. Porter des gants isolants pour placer
soigneusement le plat cuit au four
dans la base.
3. Régler la commande de température
sur Keep Warm (garder chaud).
4. La température des aliments sera
maintenue à une température idéale.
5. Lorsque l’utilisation de la mijoteuse
est terminée, tourner le bouton sur
« Off / O» et débrancher la base.
840126500 Fv03 7/6/04 3:28 PM Page 19

20
Adaptation de recettes
Certains ingrédients ne conviennent
pas à la cuisson prolongée dans la
mijoteuse. Les pâtes alimentaires, les
fruits de mer, le lait, la crème ou la crème
sure doivent être ajoutés 2 heures avant
de servir. Le lait évaporé ou les soupes
condensées conviennent parfaitement à la
mijoteuse.
De nombreux facteurs peuvent affecter
la rapidité de cuisson d’un mets. La
quantité d’eau et de matières grasses
d’un aliment, la température de l’aliment
et sa taille affectent tous le temps de cuis-
son. Les aliments découpés en morceaux
cuisent plus rapidement qu’une volaille ou
un rôti d’une pièce.
La plupart des combinaisons de viandes
et de légumes exigent au moins 7 heures
de cuisson à faible réglage.
Plus la viande contient de matières
grasses, moins il faut de liquide. Pour la
cuisson de viande à haute teneur en
matières grasses, placer de grosses
tranches d’oignon en dessous pour que la
viande ne repose ni ne cuise dans la
graisse.
Certaines recettes exigent de faire brunir
la viande avant la cuisson lente. C’est
seulement pour la couleur ou pour
enlever l’excédent de graisse; ce n’est
pas nécessaire pour une cuisson réussie.
Les mijoteuses ont un très faible taux
d’évaporation. Pour la préparation de
potage, sauce, ou ragoût préféré,
réduire la quantité de liquide ou d’eau
recommandée dans la recette originale.
Si la consistance est trop épaisse, des
liquides peuvent être ajoutés plus tard.
Lors de la préparation d'un mets végé-
tarien, il faut prévoir un liquide dans la
recette pour empêcher que l’aliment ne
brûle sur les côtés du plat.
Nettoyage
1. Tourner le bouton de commande sur
Off
(O)
. Débrancher le cordon de la
prise.
2. Retirer le récipient de cuisson et le
couvercle de verre de la base et les
laisser refroidir.
3. Laver le récipient de cuisson, le cou-
vercle en verre et le couvercle en
plastique dans une eau chaude savon-
neuse. Rincer et sécher.
On peut
également laver au lave-vaisselle.
4. Essuyer la base avec un chiffon
humide. Ne pas utiliser de nettoyants
abrasifs.
Risque de choc électrique
Ne pas immerger la base dans l’eau.
Ceci peut causer des chocs électriques, voire la mort.
AVERTISSEMENT
840126500 Fv03 7/6/04 3:28 PM Page 20
La page est en cours de chargement...
La page est en cours de chargement...
La page est en cours de chargement...
La page est en cours de chargement...
La page est en cours de chargement...
La page est en cours de chargement...
La page est en cours de chargement...
La page est en cours de chargement...
La page est en cours de chargement...
La page est en cours de chargement...
La page est en cours de chargement...
La page est en cours de chargement...
La page est en cours de chargement...
La page est en cours de chargement...
La page est en cours de chargement...
La page est en cours de chargement...
-
 1
1
-
 2
2
-
 3
3
-
 4
4
-
 5
5
-
 6
6
-
 7
7
-
 8
8
-
 9
9
-
 10
10
-
 11
11
-
 12
12
-
 13
13
-
 14
14
-
 15
15
-
 16
16
-
 17
17
-
 18
18
-
 19
19
-
 20
20
-
 21
21
-
 22
22
-
 23
23
-
 24
24
-
 25
25
-
 26
26
-
 27
27
-
 28
28
-
 29
29
-
 30
30
-
 31
31
-
 32
32
-
 33
33
-
 34
34
-
 35
35
-
 36
36


Hamilton Beach 33168 Manuel utilisateur
- Catégorie
- Mijoteuses
- Taper
- Manuel utilisateur
- Ce manuel convient également à