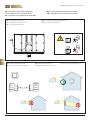
FläktGroup COM4plus Guide d'installation
- Taper
- Guide d'installation

INSTALLATION | INSTALLAZIONE | INSTALLATIE
COM4plus
WITH ISYteq

LIMITS OF RESPONSIBILITIES
Although FläktGroup has tested and reviewed the documentation contained in this manual, FläktGroup makes no warranty, neither expressed nor
implied, with respect to this manual, including its quality, performance, or fitness for a particular purpose. FläktGroup shall under no circumstances
be liable for direct, indirect, special, incidental or consequential damage arising from the use or the inability to use information contained in this
manual. FläktGroup reserves the right to revise this publication at any time and to make changes to its content without prior notice and has no
duty to provide notice to previous or current owners with respect to such revisions or changes.

COM4plus with ISYteq – Installation manual
We reserve the right to make changes without prior notice
FläktGroup DC-10593-UN_Europa 2021-09-20/RO
1. Key to symbols .................................................................................5
2. Tools for assembly ..........................................................................6
3. Included components ....................................................................7
4. General safety risks ........................................................................9
5. Unloading and lifting –
where to find loose supplied accessories ........................... 11
6. Positioning of the unit ..................................................................12
7. Foundation requirements ...........................................................13
8. Docking (Mechanical and electrical) ......................................14
9. Mounting of the rain roof .............................................................17
10. Connecting of coils ........................................................................18
11. Connection to ducts ...................................................................... 19
12. Installation of included components ......................................20
13. Connecting of incoming supply ............................................... 29
14. Control cabinet ..............................................................................32
1. Symbolerklärung .............................................................................. 5
2. Montagewerkzeuge ........................................................................6
3. Lose gelieferte Komponenten .....................................................7
4. Allgemeine Sicherheitsrisiken ....................................................9
5. Entladen und Heben – Lage von losen Komponenten ..... 11
6. RLT-Anlage positionieren ............................................................. 12
7. Anforderungen an das Fundament .........................................13
8. Blockverbindung (mechanisch und elektrisch) ..................14
9. Montage des Regendachs .........................................................17
10. Anschluss der Register ...............................................................18
11. Kanalanschluss ..............................................................................19
12. Lose gelieferte Komponenten installieren ...........................20
13. Stromzuleitung anschließen ..................................................... 29
14. Schaltschrank ................................................................................ 32
1. Legenda dei simboli .......................................................................5
2. Attrezzi necessari per l'assemblaggio ....................................6
3. Componenti forniti ...........................................................................7
4. Norme generali di sicurezza .......................................................9
5. Scarico e sollevamento - posizione degli accessori
forniti separatamente ................................................................... 11
6. Posizionamento dell’unità ...........................................................12
7. Requisiti per la fondazione ......................................................... 13
8. Attacco (meccanico ed elettrico) .............................................14
9. Montaggio del tettuccio antipioggia ........................................17
10. Collegamento delle batterie ....................................................... 18
11. Collegamento ai condotti ............................................................19
12. Installazione dei componenti forniti ....................................... 20
13. Collegamento dell'alimentazione ............................................29
14. Quadro di comando .....................................................................32
1. Symboles utilisés dans ce manuel ........................................... 5
2. Outils requis pour l’assemblage ................................................6
3. Accessoires non montés ..............................................................7
4. Consignes générales de sécurité ..............................................9
5. Déchargement et levage –
Les accessoires non montés sont à l’intérieur .................. 11
6. Mise en place de la centrale .....................................................12
7. Exigences de base .......................................................................13
8. Assemblage (mécanique et électrique) ................................14
9. Montage de la toiture ...................................................................17
10. Raccordement des batteries ..................................................... 18
11. Raccordement aux gaines .........................................................19
12. Installation des accessoires non montés ...........................20
13. Raccordement de l’alimentation électrique ........................ 29
14. Armoire de commande ..............................................................32
GB - CONTENTS DE - INHALT
IT- INDICE FR - TABLE DES MATIÈRES

COM4plus with ISYteq – Installation manual
We reserve the right to make changes without prior notice
FläktGroup DC-10593-UN_Europa 2021-09-20/RO
1. Symbolen ............................................................................................ 5
2. Gereedschap voor montage ........................................................6
3. Meegeleverde onderdelen ............................................................ 7
4. Algemene veiligheidsrisico’s .......................................................9
5. Uitladen en heffen -
plaats van meegeleverde onderdelen .................................... 11
6. Plaatsing van de unit .................................................................... 12
7. Eisen aan het fundament ............................................................13
8. Samenbouwen (mechanisch en elektrisch) ........................ 14
9. Montage van het regendak ........................................................17
10. Aansluiten van batterijen ............................................................18
11. Aansluiting op de kanalen ..........................................................19
12. Installatie van meegeleverde onderdelen ............................20
13. Aansluiting van de voeding ....................................................... 29
14. Regelkast .........................................................................................32
NL - INHOUD

5
COM4plus with ISYteq – Installation manual
We reserve the right to make changes without prior noticeFläktGroup DC-10593-UN_Europa 2021-09-20/RO
GB – Key to symbols
IT – Legenda dei simboli
NL – Symbolen
DE – Symbolerklärung
FR – Symboles utilisés dans ce manuel
GB DE IT FR NL
Do NOT throw the
manual away Handbuch
aufbewahren NON gettare il
manuale NE PAS jeter le
manuel BEWAAR de
handleiding
Warning Allgemeine
Warnung Avvertenza Précaution Waarschuwing
High voltage
warning Hochspannungs-
warnung Alta tensione Attention – Haute
tension Waarschuwing hoge
spanning
Kg
See weight, heavy Schweres Gewicht Componente
pesante Élément lourd Zie gewicht, zwaar
Outdoors Außenbereich Esterni Extérieur Buiten
Humidity / Rain Feuchtigkeit/Regen Umidità / Pioggia Humidité / Pluie Vocht / regen
Indoors Innenbereich Interni Intérieur Binnen
Electrician Elektriker Elettricista Électricien Elektricien
Refrigeration
technician Kältetechniker Tecnico frigorista Technicien Frigoriste Koeltechnicus
11

6
COM4plus with ISYteq – Installation manual
2 mm 5 mm PZ26mm 1/4"5 mmPZ2Ø 8 mm
8 mm
8 mm 13 mm 17 mm
10 mm 13 mm
We reserve the right to make changes without prior noticeFläktGroup DC-10593-UN_Europa 2021-09-20/RO
12
GB – Tools for assembly
IT – Attrezzi necessari per l'assemblaggio
NL – Gereedschap voor montage
DE – Montagewerkzeuge
FR – Outils requis pour l’assemblage

7
COM4plus with ISYteq – Installation manual
6.
2. 4. 5.
3.
1.
8. 10.9.7.
We reserve the right to make changes without prior noticeFläktGroup DC-10593-UN_Europa 2021-09-20/RO
13
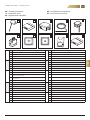
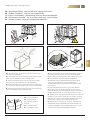
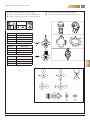
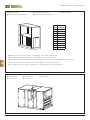
GB – Included components
IT – Componenti forniti
NL – Meegeleverde onderdelen
DE – Lose gelieferte Komponenten
FR – Accessoires non montés
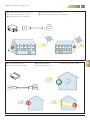
1. GB Duct temperature sensor 2. GB Room temperature sensor
DE Kanaltemperaturfühler DE Raumtemperaturfühler
IT Sensore temperatura condotto IT Sensore temperatura ambiente
FR Sonde de température pour gaine FR Sonde de température ambiante
NL Sensor kanaaltemperatuur NL Kamertemperatuursensor
3. GB Outdoor temperature sensor (fasade sensor) 4. GB Freeze protection sensor (immersion)
DE Außentemperaturfühler (Fassadenfühler) DE Frostschutzsensor (Tauchfühler)
IT Sensore temperatura esterna (facciata) IT Sensore di protezione antigelo (sensore a immersione)
FR Sonde de température extérieure (sonde de façade) FR Sonde de protection antigel (sonde d'immersion)
NL Buitentemperatuursensor (gevelsensor) NL Vorstbeveiligingssensor (dompelsensor)
5. GB Change over (heating/cooling) sensor (immersion) 6. GB Duct pressure sensor
DE Umschaltsensor (Heizung/Kühlung) (Tauchfühler) DE Kanaldrucksensor
IT Sensore di commutazione (riscaldamento/raffreddamento)
(sensore a immersione) IT Sensore di pressione del condotto
FR Sonde change-over (chauffage/refroidissement) (sonde
d'immersion)
FR Capteur de pression de gaine
NL Change over (verwarmen/koelen) sensor (dompelsensor) NL Kanaaldruksensor
7. GB Timer 8. GB Push button
DE Timer DE Drucktaste
IT Timer IT Pulsante
FR Minuterie FR Bouton poussoir
NL Timer NL Drukknop
9. GB Presence detector 10. GB CO2/VOC sensor (Room)
DE Anwesenheitssensor DE CO2/VOC Fühler (Raum)
IT Rilevatore di presenza IT Sensore CO2/VOC (ambiente)
FR Détecteur de présence FR Sonde CO2/VOC (pièce)
NL Aanwezigheidsdetector NL CO2/VOC-sensor (kamer)

8
COM4plus with ISYteq – Installation manual
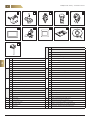
15.
11. 12
17.
14.
13.
18.16.
11. GB CO2/VOC sensor (Duct)
DE CO2/VOC Fühler (Kanal)
IT Sensore CO2/VOC (condotto)
FR Sonde CO2/VOC (gaine)
NL CO2/VOC-sensor (leiding)
12. GB Valve 13. GB Pressure independent valve
DE Ventil DE Druckunabhängiges Ventil
IT Valvola IT Valvola indipendente dalla pressione
FR Vanne FR Vanne indépendante de la pression
NL Ventiel NL Drukonafhankelijk ventiel
14. GB Valve actuator 15. GB Pressure independant valve actuator
DE Ventilstellantrieb DE Stellantrieb Druckunabhängiges Ventil
IT Attuatore valvola IT Attuatore della valvola indipendente dalla pressione
FR Actionneur de vanne FR Actionneur vanne indépendante de la pression
NL Ventielaandrijving NL Servomotor Drukonafhankelijk ventiel
16. GB Control panel, ISYteq touch 7.1 17. GB Water trap
DE Bediengerät, ISYteq touch 7.1 DE Siphon
IT Pannello di controllo, ISYteq touch 7.1 IT Sifone
FR Boîtier de commande, ISYteq touch 7.1 FR Siphon
NL Bedieningspaneel, ISYteq touch 7.1 NL Sifon
18. GB Control panel, ISYteq touch 2.1 19. GB Docking kit
DE Bediengerät, ISYteq touch 2.1 DE Verbindungsset
IT Pannello di controllo, ISYteq touch 2.1 IT Kit di collegamento
FR Boîtier de commande, ISYteq touch 2.1 FR Kit de connexion
NL Bedieningspaneel, ISYteq touch 2.1 NL Verbindingsset
20. GB Sealing strip 21. GB Supply air temperature/humidity sensor
DE Dichtungsband DE Zulufttemperaturfühler/Feuchtefühler
IT Guarnizione di tenuta IT Sensore temperatura/umidità aria mandata
FR Joint d’étanchéité FR Capteur de température d’air soufflé/d’humidité
NL Afdichtstrip NL Temperatuur toevoerlucht/vochtigheidssensor
20.
21.
19.
We reserve the right to make changes without prior noticeFläktGroup DC-10593-UN_Europa 2021-09-20/RO
²3

9
COM4plus with ISYteq – Installation manual
• Local provisions and regulations shall ALWAYS be observed.
• Follow separate instruction for replacement of components.
• Planning for work of this type is a condition that must be
complied with in order for the air handling unit to meet national
standards.
• No unauthorized person shall be allowed to work with the air
handling unit. Only qualified personnel.
• Read and understand these instructions before you begin
installing the air handling unit. The owner or the fitter of the
air handling unit is responsible for seeing to it that the safety
regulations in force are followed.
GB – General safety risks
IT – Norme generali di sicurezza
NL – Algemene veiligheidsrisico’s
GB
WARNING!
• The air handling unit must not be taken into operation before all
electrical and mechanical safety devices have been installed.
Take great care when opening the air vent of the heating coil
(hot water).
• Wear suitable protective equipment during installation or other
work on the product.
• If the air handling unit is disassembled prior to installation,
FläktGroup declines any responsibility for conformance of the
unit to its rated tightness class.
• The air handling unit doors are equipped with lockable handles.
Be sure that you always leave the unit with the doors locked
and keep the keys inaccessible to unauthorized persons.
DE
WARNUNG!
• Die Lüftungseinheit darf erst in Betrieb genommen
werden, wenn sämtliche elektrische und mechanische
Sicherheitsvorrichtungen installiert wurden. Gehen Sie beim
Öffnen des Lüftungsanschlusses für den Heizkonvektor
(Warmwasser) besonders vorsichtig vor.
• Tragen Sie bei der Installation und anderen Arbeiten am Gerät
geeignete Schutzausrüstung.
• Wird die Lüftungseinheit vor der Installation demontiert,
übernimmt FläktGroup keine Verantwortung dafür, dass die
Einheit mit der angegebenen Dichtheitsklasse übereinstimmt.
• Die Türen der Lüftungseinheit sind mit verschließbaren Griffen
ausgestattet. Vergewissern Sie sich stets, dass Sie die Einheit
mit verriegelten Türen verlassen und die Schlüssel nicht in
unbefugte Hände gelangen können.
• Lokale Bestimmungen und Regelungen sind STETS einzuhalten.
• Befolgen Sie die separate Anleitung zum Austausch von
Komponenten.
• Die Planung von Arbeiten dieser Art ist eine Bedingung, die
erfüllt werden muss, damit das Lüftungsgerät den nationalen
Normen entspricht.
• Die Lüftungseinheit darf nur von qualifiziertem Fachpersonal
bedient werden.
• Lesen Sie diese Anleitung sorgfältig, bevor Sie mit der
Installation der Lüftungseinheit beginnen. Der Eigentümer oder
Monteur der Lüftungseinheit ist dafür verantwortlich, dass die
geltenden Sicherheitsbestimmungen eingehalten werden.
DE – Allgemeine Sicherheitsrisiken
FR – Consignes générales de sécurité
AVVERTENZA!
• L’unità di trattamento aria non deve essere messa in funzione
finché non sono stati installati tutti i dispositivi di sicurezza elettrici
e meccanici. Prestare molta attenzione in sede di apertura delle
valvole e/o dei collegamenti idraulici della batteria calda.
• Indossare dispositivi di protezione adeguati durante l'installazione o
altri lavori sul prodotto.
• Qualora l’unità di trattamento aria sia stata smontata prima
dell’installazione, FläktGroup declina ogni responsabilità
relativamente alla conformità alla classe di tenuta specificata.
• Gli sportelli dell’unità di trattamento aria sono dotati di serrature.
Si raccomanda di chiudere sempre a chiave gli sportelli e di
conservare le chiavi in un luogo inaccessibile ad eventuale
personale non autorizzato.
• Rispettare SEMPRE i regolamenti e le norme locali.
• Seguire le istruzioni separate per la sostituzione dei componenti.
• La pianificazione di lavori di questo tipo è una condizione che deve
essere rispettata per far sì che l'unità di trattamento dell'aria sia
conforme alle norme nazionali.
• I lavori sull’unità di trattamento aria non devono essere effettuati da
personale non autorizzato. Solamente personale qualificato.
• Leggere attentamente le presenti istruzioni prima di installare
l’unità di trattamento aria. Il proprietario o l’installatore dell’unità
di trattamento aria è responsabile dell’osservanza delle norme di
sicurezza vigenti.
IT
We reserve the right to make changes without prior noticeFläktGroup DC-10593-UN_Europa 2021-09-20/RO
4

10
COM4plus with ISYteq – Installation manual
We reserve the right to make changes without prior noticeFläktGroup DC-10593-UN_Europa 2021-09-20/RO
4
AVERTISSEMENT!
• La centrale de traitement de l’air ne doit pas être mise en
service avant que tous les dispositifs de sécurité électriques et
mécaniques n’aient été installés. Attention en ouvrant le robinet de
purge des batteries de chauffage (eau brûlante).
• Portez un équipement de protection approprié pendant l'installation
ou toute autre intervention sur le produit.
• FläktGroup décline toute responsabilité quant à la conformité de la
centrale de traitement de l’air en matière de classe d’étanchéité
nominale dans le cas où celle-ci serait démontée avant installation.
• Les portes de la centrale de traitement d’air sont équipés de
poignées verrouillables. Toujours s’assurer que les portes de la
centrale sont correctement verrouillés et conserver les clés hors
de portée de toute personne non autorisée.
WAARSCHUWING!
• De luchtbehandelingsunit mag pas in bedrijf worden genomen
als alle elektrische en mechanische veiligheidsvoorzieningen
zijn geïnstalleerd. Wees zeer voorzichtig bij het openen van de
luchtopening voor het verwarmingselement (heet water).
• Draag geschikte beschermingsmiddelen tijdens de installatie of
andere werkzaamheden aan het product.
• Als de luchtbehandelingsunit vóór installatie uit elkaar wordt
gehaald, aanvaardt FläktGroup geen aansprakelijkheid voor het
voldoen aan de aangegeven dichtheidsklasse.
• De deuren van de luchtbehandelingsunit zijn voorzien van
vergrendelbare handgrepen. Zorg ervoor dat de deuren van de
unit vergrendeld zijn als u er niet bent en dat onbevoegden niet
FR
• L’ensemble des dispositions et des réglementations locales doit
toujouis être respecté.
• Suivre les instructions spécifiques pour le remplacement des
composants.
• La planification de ce type de travaux est une condition à respecter
pour que la centrale de traitement d'air soit conforme aux normes
nationales.
• L’utilisation de la centrale de traitement d’air est strictement
interdite aux personnes non autorisées. Personnel qualifié
uniquement.
• Il est indispensable de lire et de comprendre les présentes
instructions avant de procéder à l’installation de la centrale de
traitement d’air. Le propriétaire ou l’installateur de la centrale de
traitement d’air est tenu de s’assurer du respect de l’ensemble des
réglementations de sécurité en vigueur.
bij de sleutels kunnen.
• Lokale wet- en regelgeving moet ALTIJD worden nageleefd.
• Volg de aparte instructies voor het vervangen van onderdelen.
• Het plannen van dit soort werkzaamheden is een voorwaarde
waaraan moet worden om ervoor te zorgen dat de
luchtbehandelingskast voldoet aan de nationale normen.
• Laat onbevoegden niet met de luchtbehandelingsunit werken.
Zet alleen gekwalificeerd personeel in.
• Zorg ervoor dat u deze instructies hebt doorgelezen
en begrepen voordat u begint met de installatie van de
luchtbehandelingsunit. De eigenaar of installateur van de
luchtbehandelingsunit is verantwoordelijk voor de naleving van
de van kracht zijnde veiligheidsvoorschriften.
NL

11
COM4plus with ISYteq – Installation manual
L
L
GB - Use transport lugs only once. Units with roof: ensure that the
roof sheets are not damaged
DE - Transportösen nur einmal verwenden. Geräte mit Dach: Darauf
achten, dass die Dachbleche nicht beschädigt werden
IT - Usare gli occhielli di trasporto solo una volta. Unità con tetto:
assicurarsi che le lamiere del tetto non siano danneggiate
FR - N'utilisez les œillets de transport qu'une seule fois. Unités avec
toit : assurez-vous que les tôles du toit ne soient pas endommagées
NL - Gebruik de transportogen slechts één keer. Units met dak: zorg
ervoor dat de dakplaten niet beschadigd worden
90 - 120°
max. 1500 kg
Kg
A
max. 4000 kg
A = max. 60°
Kg
GB – stored inside device
DE – platziert im Gerät
IT – posizionato all'interno
dell'unità
FR – stocké dans l'unité
NL – opgeslagen in de unit
GB - Use transport gear only once! Use provided timber spacers!
Units with roof: Ensure that the roof sheets are not damaged!
Remove slanting roof fastening device before lifting unit by crane!
DE - Transportmittel nur einmal verwenden! Mitgelieferte
Abstandshalter aus Holz verwenden! Geräte mit Dach: Darauf
achten, dass die Dachbleche nicht beschädigt werden!
Schrägdachbefestigung vor dem Anheben des Gerätes mit dem
Kran entfernen!
IT - Usare l'attrezzatura di trasporto solo una volta! Utilizzare i
distanziatori in legno forniti! Unità con tetto: Assicurarsi che le
lamiere del tetto non siano danneggiate! Rimuovere il dispositivo di
fissaggio del tetto inclinato prima di sollevare l'unità con la gru!
FR - N'utilisez qu'une seule fois le dispositif de transport ! Utilisez les
entretoises en bois fournies ! Unités avec toit : Veiller à ce que les
tôles du toit ne soient pas endommagées ! Retirer le dispositif de
fixation du toit incliné avant de soulever l'unité à la grue !
NL - Gebruik het transportmateriaal slechts één keer! Gebruik de
meegeleverde houten afstandhouders! Eenheden met dak: Zorg
ervoor dat de dakplaten niet beschadigd worden! Voor het hijsen
met de kraan de schuine dakbevestiging verwijderen!
We reserve the right to make changes without prior noticeFläktGroup DC-10593-UN_Europa 2021-09-20/RO
5
GB – Unloading and lifting – where to find loose supplied accessories
DE – Entladen und Heben – Lage von losen Komponenten
IT – Scarico e sollevamento - posizione degli accessori forniti separatamente
FR – Déchargement et levage – Les accessoires non montés sont à l’intérieur
NL – Uitladen en heffen - plaats van meegeleverde onderdelen

12
COM4plus with ISYteq – Installation manual
A
A
B
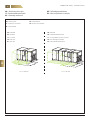
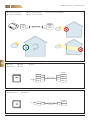
GB – Service space DE – Servicebereich
IT – Spazio per l’assistenza FR – Espace pour l’entretien
NL – Serviceruimte
A
C
A
B > A + 500 mm C > A + 200 mm
GB – with RHE
DE – mit Rotor
IT – con rotore
FR – avec roue
NL – met rotor
GB – with PHE
DE – mit Plattenwärmetauscher
IT – con scambiatore di calore a piastre
FR – avec échangeur à plaques
NL – met platenwarmtewisselaar
We reserve the right to make changes without prior noticeFläktGroup DC-10593-UN_Europa 2021-09-20/RO
6
GB – Positioning of the unit
IT – Posizionamento dell’unità
NL – Plaatsing van de unit
DE – RLT-Anlage positionieren
FR – Mise en place de la centrale

13
COM4plus with ISYteq – Installation manual
7
We reserve the right to make changes without prior noticeFläktGroup DC-10593-UN_Europa 2021-09-20/RO
7
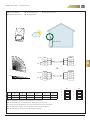
GB - Ensure site base is stable and leveled. Deflection ≤ 4mm/m.
DE - Sicherstellen, dass der Untergrund der Baustelle stabil und eben ist. Durchbiegung ≤ 4 mm/m.
IT - Assicurarsi che la base del sito sia stabile e livellata. Deformazione ≤ 4 mm/m.
FR - S'assurer que la base du site est stable et nivelée. Déflexion ≤ 4 mm/m.
NL - Zorg ervoor dat de ondergrond stabiel en waterpas is. Doorbuiging ≤ 4 mm/m.
GB - On-site steel beam
DE - Stahlträger
IT - Trave di acciaio
FR - Poutre en acier
NL - Stalen ligger
GB - Concrete base
DE - Betonfundament
IT - Base in cemento
FR - Base en béton
NL - Betonsokkel
GB - Do not mount air intakes towards prevailing wind direction. Check load-bearing capacity of roof (incl. snow weight). Prevent
on-site roof frame condensation.
DE - Lufteinlässe nicht gegen die vorherrschende Windrichtung montieren. Tragfähigkeit des Daches prüfen (inkl. Schneelast).
Verhindern Sie bauseitige Dachstuhlkondensation.
IT - Non montare le prese d'aria verso la direzione prevalente del vento. Controllare la capacità portante del tetto (compreso il
peso della neve). Prevenire la condensazione del telaio del tetto in loco.
FR - Ne pas monter les prises d'air dans le sens du vent dominant. Vérifiez la capacité de charge du toit (y compris le poids de
la neige). Empêchez la condensation du cadre de la toiture sur place.
NL - Monteer de luchtinlaten niet in de richting van de heersende windrichting. Controleer de draagkracht van het dak (incl.
sneeuwgewicht). Voorkom condensatie ter plaatse van het dakframe.
GB – Foundation requirements
IT – Requisiti per la fondazione
NL – Eisen aan het fundament
DE – Anforderungen an das Fundament
FR – Exigences de base
GB - On-site steel support
DE - Stahlträgerfundament
IT - Fondazione con travi in acciaio
FR - Fondations en poutres d'acier
NL - Fundering met stalen balken

14
COM4plus with ISYteq – Installation manual
8
We reserve the right to make changes without prior noticeFläktGroup DC-10593-UN_Europa 2021-09-20/RO
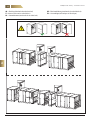
GB – Docking (Mechanical and electrical)
IT – Attacco (meccanico ed elettrico)
NL – Samenbouwen (mechanisch en elektrisch)
DE – Blockverbindung (mechanisch und elektrisch)
FR – Assemblage (mécanique et électrique)

15
COM4plus with ISYteq – Installation manual
➌
A
A
A
A
A
A
A
A
➊ ➋
We reserve the right to make changes without prior noticeFläktGroup DC-10593-UN_Europa 2021-09-20/RO
8

16
COM4plus with ISYteq – Installation manual
eQ 005-018 eQ 023-050
EQKR (ReCooler HP)
eQ 005-018 eQ 023-050
EQKR (ReCooler HP)
➎ ➏
➑
GB - Must be aligned in the right position
DE - Kabel richtig zueinander ausrichten
IT - Deve essere allineato correttamente
FR - Doit être aligné dans la position correcte
NL - Moet in de juiste positie worden uitgelijnd
M8 x 30
➍
GB – Pulling together with base frame
DE – Zusammenziehen mit Grundrahmen
IT – Montaggio con il telaio di base
FR – Assemblage avec le cadre de base
NL – Samenbouwen met basisframe
GB – Pulling together without base frame
DE – Zusammenziehen ohne Grundrahmen
IT – Montaggio senza telaio di base
FR – Assemblage sans cadre de base
NL – Samenbouwen zonder basisframe
➐
GB - Seal pipe and cable ducts
DE - Abdichtung von Rohr- und Kabelkanälen
IT - Sigillare tubi e condotti per cavi
FR - Sceller les tuyaux et les conduits de câbles
NL - Pijp- en kabelkanaal afdichten
Red Green Blue Yellow White
F-bus Modbus Analog signal
(no bus) 1 Phase
230 V 3 Phase
400 V
We reserve the right to make changes without prior noticeFläktGroup DC-10593-UN_Europa 2021-09-20/RO
max. 100 mm
8

17
COM4plus with ISYteq – Installation manual
We reserve the right to make changes without prior noticeFläktGroup DC-10593-UN_Europa 2021-09-20/RO
9
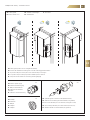
GB – Mounting of the rain roof
IT – Montaggio del tettuccio antipioggia
NL – Montage van het regendak
DE – Montage des Regendachs
FR – Montage de la toiture
➊ ➋ GB - Insert sealing washers below all screws.
DE - Dichtungsscheiben unter alle Schrauben legen.
IT - Inserire le rondelle di tenuta sotto tutte le viti.
FR - Insérez des rondelles d'étanchéité sous toutes les vis.
NL - Plaats afdichtingsringen onder alle schroeven.
➌ ➍
GB - Secure the separately supplied joint strip.
DE - Befestigen Sie das separat mitgelieferte Fugenband.
IT - Fissare la striscia di giunzione fornita separatamente.
FR - Fixez la bande de jonction fournie séparément.
NL - Bevestig de afzonderlijk bijgeleverde voegband.
GB - Attach clamping profiles to chamber joints. Remove last steel
clamp and apply sealant (A).
DE - Befestigen Sie die Klemmprofile an den Kammerverbindungen.
Letzte Stahlklammer entfernen und Dichtungsmasse (A) auftragen.
IT - Fissare i profili di serraggio ai profili dell'unità. Rimuovere ultimo
morsetto in acciaio e applicare il sigillante (A).
FR - Fixez les profils de serrage aux joints de la section. Retirez le
dernier collier en acier et appliquez le mastic (A).
NL - Bevestig klemprofielen aan de unitverbindingen. Verwijder laatste
stalen klem en breng afdichtmiddel (A) aan.
A

18
COM4plus with ISYteq – Installation manual
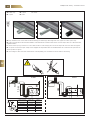
GB – Counter-hold when connecting. Avoid mechanical tension on the fitting.
DE – Halten Sie beim Anschließen gegen. Vermeiden Sie mechanische Spannungen an der Verbindung.
IT – Tenere contro quando si collega. Evitare le tensioni meccaniche sulla connessione.
FR – Maintenez le contrepoids lors de la connexion. Évitez toute tension mécanique sur le raccord.
NL – Tegenhouden bij het aansluiten. Vermijd mechanische spanning op de aansluiting.
We reserve the right to make changes without prior noticeFläktGroup DC-10593-UN_Europa 2021-09-20/RO
10
GB – Connecting of coils
IT – Collegamento delle batterie
NL – Aansluiten van batterijen
DE – Anschluss der Register
FR – Raccordement des batteries

19
COM4plus with ISYteq – Installation manual
9
D
C
AD
D
DD
C
C
B
B
BB
A
A
A A
A
B
GB - A: COM4plus, B: Seal, C: Intermediate frame, D: Duct
DE - A: COM4plus, B: Dichtung, C: Zwischenrahmen, D: Kanal
IT - A: COM4plus, B: Guarnizione, C: Telaio intermedio,
D: Condotto
FR - A : COM4plus, B : Joint, C : Cadre intermédiaire,
D : Conduit
NL - A: COM4plus, B: afdichting, C: tussenframe, D: kanaal
We reserve the right to make changes without prior noticeFläktGroup DC-10593-UN_Europa 2021-09-20/RO
GB – Connection to ducts
IT – Collegamento ai condotti
NL – Aansluiting op de kanalen
DE – Kanalanschluss
FR – Raccordement aux gaines
11

20
COM4plus with ISYteq – Installation manual
12
We reserve the right to make changes without prior noticeFläktGroup DC-10593-UN_Europa 2021-09-20/RO
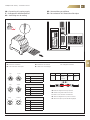
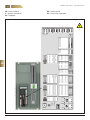
GB – Installation of included components
IT – Installazione dei componenti forniti
NL – Installatie van meegeleverde onderdelen
DE – Lose gelieferte Komponenten installieren
FR – Installation des accessoires non montés
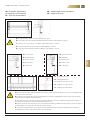
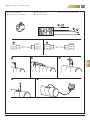
GB – Connecting ISYteq touch 7.1 DE – Anschließen der Regelung ISYteq touch 7.1
IT – Collegamento di ISYteq touch 7.1 FR – Connexion de ISYteq touch 7.1
NL – Aansluiten ISYteq touch 7.1
GB – Control panel ISYteq touch 2.1 DE – Bedienfeld ISYteq touch 2.1 IT – Pannello di controllo ISYteq touch 2.1
FR – Panneau de commande ISYteq touch 2.1 NL – Bedieningspaneel ISYteq touch 2.1
A+
B-
Vdd
GND
X18:5
X18:6
X5:7
X5:2
COM4plus
La page est en cours de chargement...
La page est en cours de chargement...
La page est en cours de chargement...
La page est en cours de chargement...
La page est en cours de chargement...
La page est en cours de chargement...
La page est en cours de chargement...
La page est en cours de chargement...
La page est en cours de chargement...
La page est en cours de chargement...
La page est en cours de chargement...
La page est en cours de chargement...
La page est en cours de chargement...
La page est en cours de chargement...
La page est en cours de chargement...
La page est en cours de chargement...
La page est en cours de chargement...
La page est en cours de chargement...
La page est en cours de chargement...
La page est en cours de chargement...
La page est en cours de chargement...
La page est en cours de chargement...
La page est en cours de chargement...
La page est en cours de chargement...
La page est en cours de chargement...
La page est en cours de chargement...
La page est en cours de chargement...
La page est en cours de chargement...
-
 1
1
-
 2
2
-
 3
3
-
 4
4
-
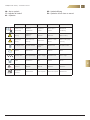 5
5
-
 6
6
-
 7
7
-
 8
8
-
 9
9
-
 10
10
-
 11
11
-
 12
12
-
 13
13
-
 14
14
-
 15
15
-
 16
16
-
 17
17
-
 18
18
-
 19
19
-
 20
20
-
 21
21
-
 22
22
-
 23
23
-
 24
24
-
 25
25
-
 26
26
-
 27
27
-
 28
28
-
 29
29
-
 30
30
-
 31
31
-
 32
32
-
 33
33
-
 34
34
-
 35
35
-
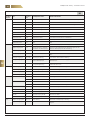 36
36
-
 37
37
-
 38
38
-
 39
39
-
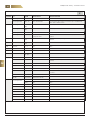 40
40
-
 41
41
-
 42
42
-
 43
43
-
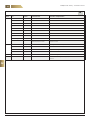 44
44
-
 45
45
-
 46
46
-
 47
47
-
 48
48


FläktGroup COM4plus Guide d'installation
- Taper
- Guide d'installation
dans d''autres langues
Documents connexes
Autres documents
-
sauermann CA 310 Guide de démarrage rapide
-
Marley TBX Manuel utilisateur
-
Aldes Dee Fly Cube 550+ Installation Instructions Manual
-
Lego 10592 Guide d'installation
-
-
-
Lego 10592 Duplo Building Instructions
-
-
Cumberland Smart Climate 24 Le manuel du propriétaire
-