Blomberg DND 1972 ED Manuel utilisateur
- Catégorie
- Frigos
- Taper
- Manuel utilisateur

Bedienungsanleitung
Operating instructions
Refrigerator
Kühlschrank
لاچخی
Ψυγείο
جيلثت نودب
DND 1972 XD
DND 1972 ED
DND 1976
DND 1976 X
Réfrigérateur
Frigorifero

Please read this manual first!
Dear Customer,
We hope that your product, which has been produced in modern plants and
checked under the most meticulous quality control procedures, will provide you
an effective service.
For this, we recommend you to carefully read the entire manual of your product
before using it and keep it at hand for future references.
This manual
• Will help you use your appliance in a fast and safe way.
• Read the manual before installing and operating your product.
• Follow the instructions, especially those for safety.
• Keep the manual in an easily accessible place as you may need it later.
• Besides, read also the other documents provided with your product.
Please note that this manual may be valid for other models as well.
Symbols and their descriptions
This instruction manual contains the following symbols:
C Important information or useful usage tips.
A Warning against dangerous conditions for life and property.
B Warning against electric voltage.
This product is supplied with the selective sorting symbol for waste electrical
and electronic equipment (WEEE).
This means that this product must be handled pursuant to European Directive
2002/96/EC in order to be recycled or dismantled to minimise its impact on
the environment. For further information, please contact your local or regional
authorities.
Electronic products not included in the selective sorting process are potentially
dangerous for the environment and human health due to the presence of
hazardous substances.
Recycling

EN
2
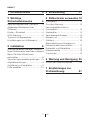
1 Your Refrigerator 3
2 Important Safety
Warnings 4
Intended use ..................................... 4
For products with a water dispenser; . 6
Child safety ........................................ 6
HCA Warning .................................... 6
Things to be done for energy saving .. 7
Reccomendations for freshfood
compartment .....................................7
3 Installation 8
Points to be considered when re-
transporting your refrigerator ............. 8
Before operating your refrigerator ......8
Electric connection ............................9
Disposing of the packaging ............... 9
Disposing of your old refrigerator ....... 9
Placing and Installation ......................9
Adjusting the feet ............................. 10
4 Preparation 11
5 Using your refrigerator 12
Indicator Panel ................................. 12
Open door warning .......................... 14
Humidity control in the crisper .........15
Egg tray ........................................... 15
Sliding Body Shelves .......................15
Blue light .........................................16
Chiller compartment ........................ 16
Description and cleaning of odor
filter: ................................................ 16
Icematic and ice storage container . 17
Water dispenser ............................. 18
Water tray ....................................... 19
6 Maintenance and
cleaning 20
Protection of plastic surfaces .......... 20
7 Recommended solutions
for the problems 21
CONTENTS

EN
3
4
6
6
6
5
*2
7 8 7*91011
12
*13
14
15
16
17
*19
20
21
22
1
*3
14
*9
18
*
*
*
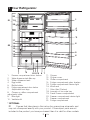
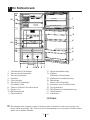
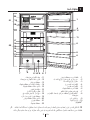
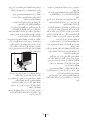
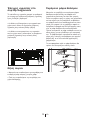
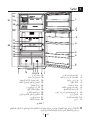
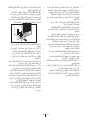
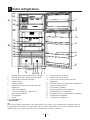
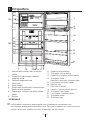
1 Your Refrigerator
1-
Freezer compartment door
shelves
2- Water dispenser tank filler cap
3-
Water dispenser tank
4-
Egg holder
5-
Bottle holder
6- Fridge compartment door shelves
7-
Adjustable front legs
8-
Crisper or chiller compartment
adjustment slider
9-
Blue light
10- Ventilation lid
11- Crispers
12-
Crisper cover
13-
Chiller compartment
14-
Fridge compartment glass shelves
15- Fridge compartment interior light
16- Wine rack
17- Odor filter (Carbon)
18- Icematic or Ice cupe tray
19- Fresh Freeze compartment
20- Freezer compartment interior light
21-
Freezer compartment
22-
Fridge compartment
C Figures that take place in this instruction manual are schematic and
may not correspond exactly with your product. If the subject parts are not
included in the product you have purchased, then it is valid for other models.
* OPTIONAL

EN
4
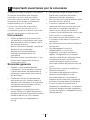
2 Important Safety Warnings
Please review the following
information. Failure to observe this
information may cause injuries or
material damage. Otherwise, all
warranty and reliability commitments
will become invalid.
The usage life of the unit you
purchased is 10 years. This is the
period for keeping the spare parts
required for the unit to operate as
described.
Intended use
This product is intended to be used
– indoors and in closed areas such as
homes;
– in closed working environments such
as stores and offices;
– in closed accommodation areas such
as farm houses, hotels, pensions.
• This product should not be used
outdoors.
General safety
• When you want to dispose/scrap
the product, we recommend you
to consult the authorized service in
order to learn the required information
and authorized bodies.
• Consult your authorized service for
all your questions and problems
related to the refrigerator. Do not
intervene or let someone intervene to
the refrigerator without notifying the
authorised services.
• For products with a freezer
compartment; Do not eat cone ice
cream and ice cubes immediately
after you take them out of the freezer
compartment! (This may cause
frostbite in your mouth.)
• For products with a freezer
compartment; Do not put bottled and
canned liquid beverages in the freezer
compartment. Otherwise, these may
burst.
• Do not touch frozen food by hand;
they may stick to your hand.
• Unplug your refrigerator before
cleaning or defrosting.
• Vapor and vaporized cleaning
materials should never be used in
cleaning and defrosting processes of
your refrigerator. In such cases, the
vapor may get in contact with the
electrical parts and cause short circuit
or electric shock.
• Never use the parts on your
refrigerator such as the door as a
means of support or step.
• Do not use electrical devices inside
the refrigerator.
• Do not damage the parts, where
the refrigerant is circulating, with
drilling or cutting tools. The refrigerant
that might blow out when the gas
channels of the evaporator, pipe
extensions or surface coatings are
punctured causes skin irritations and
eye injuries.
• Do not cover or block the ventilation
holes on your refrigerator with any
material.
• Electrical devices must be repaired
by only authorised persons. Repairs
performed by incompetent persons
create a risk for the user.
• In case of any failure or during
a maintenance or repair work,
disconnect your refrigerator’s mains
supply by either turning off the
relevant fuse or unplugging your
appliance.

EN
5
• Do not pull by the cable when pulling
off the plug.
• Place the beverage with higher proofs
tightly closed and vertically.
• Never store spray cans containing
flammable and explosive substances
in the refrigerator.
• Do not use mechanical devices
or other means to accelerate the
defrosting process, other than those
recommended by the manufacturer.
• This product is not intended to be
used by persons with physical,
sensory or mental disorders or
unlearned or inexperienced people
(including children) unless they are
attended by a person who will be
responsible for their safety or who will
instruct them accordingly for use of
the product
• Do not operate a damaged
refrigerator. Consult with the service
agent if you have any concerns.
• Electrical safety of your refrigerator
shall be guaranteed only if the earth
system in your house complies with
standards.
• Exposing the product to rain, snow,
sun and wind is dangerous with
respect to electrical safety.
• Contact authorized service when
there is a power cable damage to
avoid danger.
• Never plug the refrigerator into
the wall outlet during installation.
Otherwise, risk of death or serious
injury may arise.
• This refrigerator is intended for only
storing food items. It must not be
used for any other purpose.
• Label of technical specifications is
located on the left wall inside the
refrigerator.
• Never connect your refrigerator to
electricity-saving systems; they may
damage the refrigerator.
• If there is a blue light on the
refrigerator, do not look at the blue
light with optical tools.
• For manually controlled refrigerators,
wait for at least 5 minutes to start the
refrigerator after power failure.
• This operation manual should be
handed in to the new owner of the
product when it is given to others.
• Avoid causing damage on power
cable when transporting the
refrigerator. Bending cable may cause
fire. Never place heavy objects on
power cable. Do not touch the plug
with wet hands when plugging the
product.
• Do not plug the refrigerator if the wall
outlet is loose.
• Water should not be sprayed directly
on inner or outer parts of the product
for safety purposes.
• Do not spray substances containing
inflammable gases such as propane
gas near the refrigerator to avoid fire
and explosion risk.
• Never place containers filled with
water on top of the refrigerator,
otherwise this may cause electric
shock or fire.
• Do not overload your refrigerator
with excessive amounts of food. If
overloaded, the food items may fall
down and hurt you and damage
refrigerator when you open the
door. Never place objects on top
of the refrigerator; otherwise, these
objects may fall down when you
open or close the refrigerator's door.

EN
6
• As they require a precise temperature,
vaccines, heat-sensitive medicine and
scientific materials and etc. should
not be kept in the refrigerator.
• If not to be used for a long time,
refrigerator should be unplugged. A
possible problem in power cable may
cause fire.
• The plug's tip should be regularly
cleaned; otherwise, it may cause fire.
• Refrigerator may move if adjustable
legs are not properly secured on the
floor. Properly securing adjustable
legs on the floor can prevent the
refrigerator to move.
• When carrying the refrigerator, do not
hold it from door handle. Otherwise, it
may be snapped.
• When you have to place your product
next to another refrigerator or freezer,
the distance between devices should
be at least 8cm. Otherwise, adjacent
side walls may be humidified.
For products with a water
dispenser;
Pressure of water mains should be
minimum 1 bar. Pressure of water
mains should be maximum 8 bars.
• Use only potable water.
Child safety
• If the door has a lock, the key should
be kept away from reach of children.
• Children must be supervised to
prevent them from tampering with the
product.
HCA Warning
If your product's cooling system
contains R600a:
This gas is flammable. Therefore, pay
attention to not damaging the cooling
system and piping during usage and
transportation. In the event of damage,
keep your product away from potential
fire sources that can cause the
product catch a fire and ventilate the
room in which the unit is placed.
Ignore this warning if your
product's cooling system contains
R134a.
Type of gas used in the product is
stated in the type plate which is on the
left wall inside the refrigerator.
Never throw the product in fire for
disposal.

EN
7
Things to be done for energy
saving
• Do not leave the doors of your
refrigerator open for a long time.
• Do not put hot food or drinks in your
refrigerator.
• Do not overload your refrigerator so
that the air circulation inside of it is not
prevented.
• Do not install your refrigerator
under direct sunlight or near heat
emitting appliances such as ovens,
dishwashers or radiators.
• Pay attention to keep your food in
closed containers.
• For products with a freezer
compartment; You can store
maximum amount of food items in
the freezer when you remove the
shelf or drawer of the freezer. Energy
consumption value stated for your
refrigerator has been determined
by removing freezer shelf or drawer
and under maximum load. There
is no harm to use a shelf or drawer
according to the shapes and size of
food to be frozen.
• Thawing frozen food in fridge
compartment will both provide energy
saving and preserve the food quality.
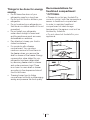
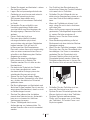
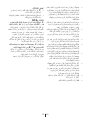
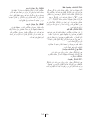
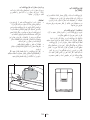
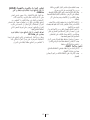
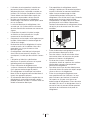
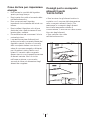
Reccomendations for
freshfood compartment
* OPTIONAL
• Please do not let any foodstuff to
come to contact with the temperature
sensor in freshfood compartment.
In order to maintain freshfood
compartment at ideal storage
temperature, the sensor must not be
blocked by fodstuffs.
• Do not place hot foodstuff in your
appliance.
temperature
sensor
food
MILK
juice
etc.
temperature
sensor
temperature
sensor
food
MILK
juice
etc.
temperature
sensor

EN
8
3 Installation
BPlease remember that the
manufacturer shall not be held liable if
the information given in the instruction
manual is not observed.
Points to be considered
when re-transporting your
refrigerator
1.Your refrigerator must be emptied and
cleaned prior to any transportation.
2.Shelves, accessories, crisper and etc.
in your refrigerator must be fastened
securely by adhesive tape against any
jolt before repackaging.
3.Packaging must be tied with thick
tapes and strong ropes and the
rules of transportation printed on the
package must be followed.
Please do not forget…
Every recycled material is an
indispensable source for the nature
and for our national resources.
If you wish to contribute to recycling
the packaging materials, you can
get further information from the
environmental bodies or local
authorities.
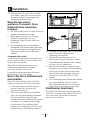
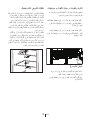
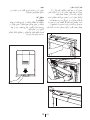
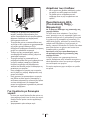
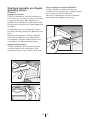
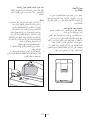
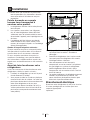
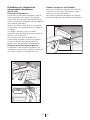
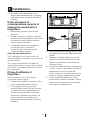
Before operating your
refrigerator
Before starting to use your refrigerator
check the following:
1.Is the interior of the refrigerator dry and
can the air circulate freely in the rear
of it?
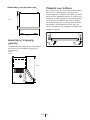
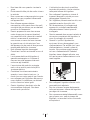
2.Please install the 2 plastic wedges
as illustrated in the figure. Plastic
wedges will provide the required
distance between your refrigerator
and the wall in order to allow the air
circulation. (The illustrated figure is
only an example and does not match
exactly with your product.)
3.Clean the interior of the refrigerator as
recommended in the “Maintenance
and cleaning” section.
4.Plug the refrigerator into the wall outlet.
When the fridge door is open, the
fridge compartment interior light will
come on.
5.You will hear a noise as the
compressor starts up. The liquid and
gases sealed within the refrigeration
system may also give rise to noise,
even if the compressor is not running
and this is quite normal.
6.Front edges of the refrigerator may feel
warm. This is normal. These areas
are designed to be warm to avoid
condensation

EN
9
Electric connection
Connect your product to a grounded
socket which is being protected by a
fuse with the appropriate capacity.
Important:
• The connection must be in compliance
with national regulations.
• The power cable plug must be easily
accessible after installation.
• The specified voltage must be equal to
your mains voltage.
• Extension cables and multiway plugs
must not be used for connection.
BA damaged power cable must be
replaced by a qualified electrician.
BProduct must not be operated before
it is repaired! There is danger of
electric shock!
Disposing of the packaging
The packing materials may be
dangerous for children. Keep the
packing materials out of the reach
of children or dispose of them by
classifying them in accordance
with the waste instructions. Do not
dispose of them along with the normal
household waste.
The packing of your refrigerator is
produced from recyclable materials.
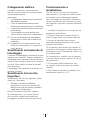
Disposing of your old
refrigerator
Dispose of your old refrigerator without
giving any harm to the environment.
•You may consult your authorised dealer
or waste collection center of your
municipality about the disposal of
your refrigerator.
Before disposing of your refrigerator, cut
out the electric plug and, if there are
any locks on the door, make them
inoperable in order to protect children
against any danger.
Placing and Installation
A If the entrance door of the room
where the refrigerator will be
installed is not wide enough for the
refrigerator to pass through, then call
the authorised service to have them
remove the doors of your refrigerator
and pass it sideways through the
door.
1. Install your refrigerator to a place that
allows ease of use.
2. Keep your refrigerator away from heat
sources, humid places and direct
sunlight.
3. There must be appropriate air
ventilation around your refrigerator
in order to achieve an efficient
operation. If the refrigerator is to be
placed in a recess in the wall, there
must be at least 5 cm distance with
the ceiling and at least 5 cm with
the wall. If the floor is covered with
a carpet, your product must be
elevated 2.5 cm from the floor.
4. Place your refrigerator on an even floor
surface to prevent jolts.
5. Do not keep your refrigerator in
ambient temperatures under 10°C.

EN
10
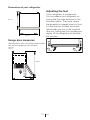
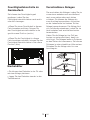
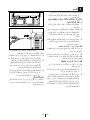
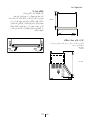
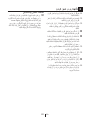
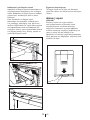
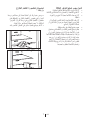
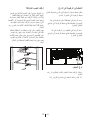
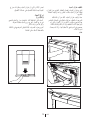
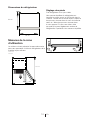
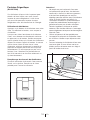
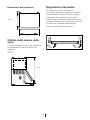
Adjusting the feet
If your refrigerator is unbalanced;
You can balance your refrigerator by
turning the front legs as shown in the
illustration below. The corner where
the leg exists is lowered when you turn
it in the direction of black arrow and
raised when you turn in the opposite
direction. Taking help from someone to
slightly lift the refrigerator will facilitate
this process.
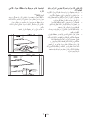
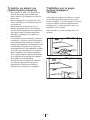
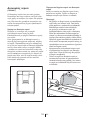
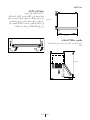
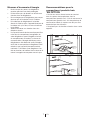
Dimensions of your refrigerator
Usage area measures
Following figure shows the required place to allow
you use your refrigerator most efficiently.
143.5 cm
134 cm
80 cm
84 cm
142 cm
154 cm

EN
11
4 Preparation
C Your refrigerator should be installed at
least 30 cm away from heat sources
such as hobs, ovens, central heater
and stoves and at least 5 cm away
from electrical ovens and should not
be located under direct sunlight.
C The ambient temperature of
the room where you install your
refrigerator should at least be 10°C.
Operating your refrigerator under
cooler conditions than this is not
recommended with regard to its
efficiency.
C Please make sure that the interior
of your refrigerator is cleaned
thoroughly.
C If two refrigerators are to be installed
side by side, there should be at least
2 cm distance between them.
C When you operate your refrigerator
for the first time, please observe the
following instructions during the initial
six hours.
- The door should not be opened
frequently.
- It must be operated empty without
any food in it.
- Do not unplug your refrigerator. If
a power failure occurs out of your
control, please see the warnings in
the “Recommended solutions for
the problems” section.
C Original packaging and foam
materials should be kept for future
transportations or moving.

EN
12
5 Using your refrigerator
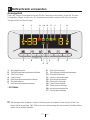
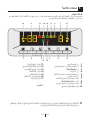
Indicator Panel
This touch-control indicator panel allows you to set the temperature without
opening the door of your refrigerator. Just touch the relevant button with your
finger to set the temperature.
1. Fast Freeze Button
2. Freezer Compartment Temperature
Setting Button
3. Eko-Ekstra Button
4. Vacation Button
5. Fridge Compartment Temperature
Setting Button
6. Quick Cool Button
7. Fridge Compartment Temperature
Indicator
8. Eco Extra Function Indicator
9. Freezer Compartment Temperature
Indicator
10. Quick Cool Function Indicator
11. Vacation Function Indicator
12. Quick Freeze Function Indicator
13. Economy Mode Indicator
14. Error Status Indicator
15. Key Lock Indicator
16. Ionizer Indicator Light
17. Humidity Indicator
* OPTIONAL
C Figures that take place in this instruction manual are schematic and may
not correspond exactly with your product. If the subject parts are not included in
the product you have purchased, then it is valid for other models.
12
1 2 3 4 5 6
8 15
9 14 *16 13 17 11 7 10

EN
13
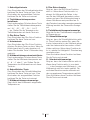
1- Fast Freeze Button
Press this button briefly to activate
the Fast Freeze function. Press this
button again to deactivate the selected
function.
2- Freezer Compartment
Temperature Setting Button
Press this button to set the
temperature of the freezer
compartment to -18, -20, -22, -24,
-18... respectively. Press this button
to set the desired temperature for the
Freezer Compartment.
3- Eko-Ekstra Button
Press this button briefly to activate the
Eco Extra function.
4- Vacation Button
Press this button briefly to activate
the Vacation function. To stop ice
formation, press the same button for 3
seconds.
5- Fridge Compartment
Temperature Setting Button
Press this button to set the
temperature of the fridge compartment
to 8, 6, 4, 2, 8... respectively.
Press this button to set the
desired temperature for the Fridge
Compartment.
6. Quick CoolButton
Press this button briefly to activate
the Quick Cool function. Press this
button again to deactivate the selected
function.
7- Fridge Compartment
Temperature Indicator
Indicates the temperature set for
Fridge Compartment.
8- Eco Extra Function Indicator
Indicates that the Eco Extra function
is active. If this function is active, your
refrigerator will automatically detect
the least usage periods and energy-
efficient cooling will be performed
during those times. Economy indicator
will be active while energy-efficient
cooling is performed.
9- Freezer Compartment
Temperature Indicator
It indicates the temperature set for
Freezer Compartment.
10- Quick Cool Function Indicator
Indicates that the Quick Cool function
is active. Use this function when
you place fresh food into the fridge
compartment or when you need to
cool your food quickly. When this
function is active, your refrigerator will
run for 2 hours without stopping.
Press the relevant button again to
deactivate this function.
11- Vacation Function Indicator
Indicates that the vacation function
is active. If this function is active,
“- -” appears on the indicator of the
fridge compartment and no cooling is
performed in the fridge compartment.
Other compartments will be cooled in
accordance with the temperature set
for them.
Press the relevant button again to
deactivate this function.
12- Quick Freeze Function
Indicator
Indicates that the Quick Freezer
function is active. Use this function
when you place fresh food into the
freezer compartment or when you
need ice. When this function is active,
your refrigerator will run for 6 hours
without stopping.
Press the relevant button again to
deactivate this function.

EN
14
13- Economy Mode Indicator
Indicates that the refrigerator is
running in energy-efficient mode. This
indicator will be active if the Freezer
Compartment temperature is set to
-18 or the energy efficient cooling is
being performed due to Eco-Extra
function.
14- Error Status Indicator
If your refrigerator does not cool
adequately or if there is a sensor
failure, this indicator will be activated.
When this indicator is active,
Freezer Compartment Temperature
indicator will display “E” and Fridge
Compartment Temperature Indicator
will display numbers such as “1,2,3…”.
These numbers on the indicator
provides information about the error to
the service personnel.
15- Key Lock Indicator
Use this function if you do not want
your refrigerator temperature setting
changed. Press Eco Extra Button and
Freezer Compartment Temperature
Setting Button simultaneously for
a long time (3 sec) to activate this
feature.
Press the relevant buttons again to
deactivate this function.
16- Ionizer Indicator Light
Indicator light lights up continuously.
This light indicates that your
refrigerator is protected against the
bacteria.
17- Humidity Indicator
Indicator light lights up continuously.
This light indicates that the food kept
in the refrigerator is preserved for a
long time under ideal humidity.
Open door warning
An audio warning will be given when
the fridge or freezer compartment
door of your product is left open for
a certain period of time. This audio
warning signal will mute when any
button on the indicator is pressed or
when the door is closed.

EN
15
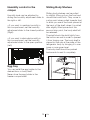
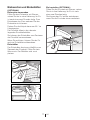
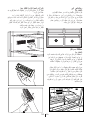
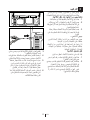
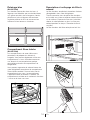
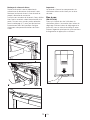
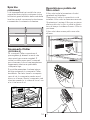
Sliding Body Shelves
Sliding body shelves can be pulled
by slightly lifting up from the front and
moved back and forth. They come to
a stop point when pulled towards front
to allow you reach the foods placed at
the back of the shelf; when it is pulled
after slightly lifted upwards at the
second stop point, the body shelf will
be released.
The shelf should be hold tightly from
the bottom as well in order to prevent
it from tipping over. The body shelf is
placed on the rails at the sides of the
refrigerator body by bringing it to one
lower or one upper level.
The body shelf should be pushed
backwards to seat it completely.
1
2
3
4
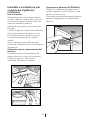
Humidity control in the
crisper
Humidity level can be adjusted by
sliding the humidity adjustment slider to
the right or left.
• If you want to maintain humidity in
this compartment, set the humidity
adjustment slider to the closed position.
(Right)
• If you want to eliminate humidity in
this compartment, set the humidity
adjustment slider to the open position.
(Left)
Egg tray
You can install the egg holder to the
desired door or body shelf.
Never store the egg holder in the
freezer compartment

EN
16
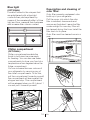
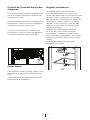
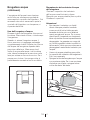
Chiller compartment
(OPTIONAL)
Chiller compartments enable the
foods to be frozen become ready
for freezing. You can also use these
compartments to store your food at a
temperature a few degrees below the
fridge compartment.
You can increase the inner volume of
your refrigerator by removing any of
the chiller compartments. To do this,
pull the compartment towards yourself;
the compartment will lean against the
stopper and stop. This compartment
will be released when you lift it about 1
cm and pull it towards yourself.
Blue light
(OPTIONAL)
Foodstuff stored in the crispers that
are enlightened with a blue light
continue their photosynthesis by
means of the wavelength effect of blue
light and thus, preserve their freshness
and increase their vitamin content.
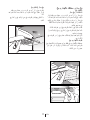
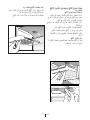
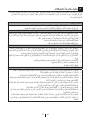
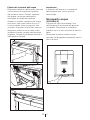
Description and cleaning of
odor filter:
Odor filter prevents unpleasant odor
build-up in your refrigerator.
Pull the cover, into which the odor
filter is installed, downwards and
remove as illustrated. Leave the filter
under sunlight for one day. Filter will
be cleaned during this time. Install the
filter back to its place.
Odor filter must be cleaned once in a
year.

EN
17
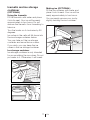
Icematic and ice storage
container
(OPTIONAL)
Using the Icematic
Fill the Icematic with water and place
it into its seat. Your ice will be ready
approximately in two hours. Do not
remove the Icematic from its seating to
take ice.
Turn the knobs on it clockwise by 90
degrees.
Ice cubes in the cells will fall down into
the ice storage container below.
You may take out the ice storage
container and serve the ice cubes.
If you wish, you may keep the ice
cubes in the ice storage container.
Ice storage container
Ice storage container is only intended
for accumulating the ice cubes. Do not
put water in it. Otherwise, it will break.
Making ice (OPTIONAL)
Fill the ice container with water and
place it into its seat. Your ice will be
ready approximately in two hours.
You can easily remove your ice by
slightly twisting the ice container.

EN
18
Water dispenser
(OPTIONAL)
Water dispenser is a very useful feature
to obtain chilled water without opening
the door of your fridge. Since you do
not have to open the door of your
fridge frequently, you also save on
electricitiy.
Using the water dispenser
Push in the lever of the water
dispenser with your glass. By releasing
the lever, you cut off the dispensing.
When operating the water dispenser,
maximum flow is achieved by fully
depressing the lever. Please note, how
much water flows from the dispenser
depends on how far you depress the
lever. As the level of water in your
cup / glass rises, gently reduce the
amount of pressure on the lever to
avoid overflow. If you depress the lever
a small amount, then water will trickle;
this is perfectly normal and is not a
fault.
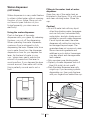
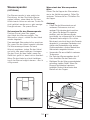
Filling in the water tank of water
dispenser
Open the cap of the water tank as
illustrated in the figure. Fill in with pure
and clean drinking water. Close the
cap.
Caution!
• Do not fill water tank with any liquid
other than drinking water; beverages
such as fruit juice, carbonated fizzy
soda drinks, alcoholic drinks are not
suitable for use with water dispenser.
If such liquids are used, the water
dispenser will malfunction and may
be damaged beyond repair. The
guarantee does not cover such uses.
Some chemical ingredients and
additives in such drinks / beverages
may also attack and damage water
tank material.
• Only use clean pure drinking water.
• Capacity of water dispenser tank is 3
litres [6.4 pints], do not overfill.
• Push the water dispenser lever with
a rigid cup. If you are using a plastic
disposable cup, then push the lever
with your fingers from behind the cup.

EN
19
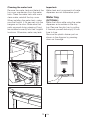
Cleaning the water tank
Remove the water tank,and detach the
top cover mechanism from the water
tank. Clean the water tank with warm
clean water, reinstall the top cover.
When installing the water tank, make
sure that hooks it fits securely into the
hangers on the door. Make sure that
parts removed during cleaning (if any)
are installed correctly into their original
locations. Otherwise, water may leak.
Important:
Water tank and components of water
dispenser are not dishwasher-proof.
Water tray
(OPTIONAL)
Water that drips while using the water
dispenser accumulates in the drip
tray. Remove the drip tray by pulling
it towards yourself and empty it from
time to time.
Remove the plastic drainer part as
shown in the diagram by pressing
down on the edge.
La page est en cours de chargement...
La page est en cours de chargement...
La page est en cours de chargement...
La page est en cours de chargement...
La page est en cours de chargement...
La page est en cours de chargement...
La page est en cours de chargement...
La page est en cours de chargement...
La page est en cours de chargement...
La page est en cours de chargement...
La page est en cours de chargement...
La page est en cours de chargement...
La page est en cours de chargement...
La page est en cours de chargement...
La page est en cours de chargement...
La page est en cours de chargement...
La page est en cours de chargement...
La page est en cours de chargement...
La page est en cours de chargement...
La page est en cours de chargement...
La page est en cours de chargement...
La page est en cours de chargement...
La page est en cours de chargement...
La page est en cours de chargement...
La page est en cours de chargement...
La page est en cours de chargement...
La page est en cours de chargement...
La page est en cours de chargement...
La page est en cours de chargement...
La page est en cours de chargement...
La page est en cours de chargement...
La page est en cours de chargement...
La page est en cours de chargement...
La page est en cours de chargement...
La page est en cours de chargement...
La page est en cours de chargement...
La page est en cours de chargement...
La page est en cours de chargement...
La page est en cours de chargement...
La page est en cours de chargement...
La page est en cours de chargement...
La page est en cours de chargement...
La page est en cours de chargement...
La page est en cours de chargement...
La page est en cours de chargement...
La page est en cours de chargement...
La page est en cours de chargement...
La page est en cours de chargement...
La page est en cours de chargement...
La page est en cours de chargement...
La page est en cours de chargement...
La page est en cours de chargement...
La page est en cours de chargement...
La page est en cours de chargement...
La page est en cours de chargement...
La page est en cours de chargement...
La page est en cours de chargement...
La page est en cours de chargement...
La page est en cours de chargement...
La page est en cours de chargement...
La page est en cours de chargement...
La page est en cours de chargement...
La page est en cours de chargement...
La page est en cours de chargement...
La page est en cours de chargement...
La page est en cours de chargement...
La page est en cours de chargement...
La page est en cours de chargement...
La page est en cours de chargement...
La page est en cours de chargement...
La page est en cours de chargement...
La page est en cours de chargement...
La page est en cours de chargement...
La page est en cours de chargement...
La page est en cours de chargement...
La page est en cours de chargement...
La page est en cours de chargement...
La page est en cours de chargement...
La page est en cours de chargement...
La page est en cours de chargement...
La page est en cours de chargement...
La page est en cours de chargement...
La page est en cours de chargement...
La page est en cours de chargement...
La page est en cours de chargement...
La page est en cours de chargement...
La page est en cours de chargement...
La page est en cours de chargement...
La page est en cours de chargement...
La page est en cours de chargement...
La page est en cours de chargement...
La page est en cours de chargement...
La page est en cours de chargement...
La page est en cours de chargement...
La page est en cours de chargement...
La page est en cours de chargement...
La page est en cours de chargement...
La page est en cours de chargement...
La page est en cours de chargement...
La page est en cours de chargement...
La page est en cours de chargement...
La page est en cours de chargement...
La page est en cours de chargement...
La page est en cours de chargement...
La page est en cours de chargement...
La page est en cours de chargement...
La page est en cours de chargement...
La page est en cours de chargement...
La page est en cours de chargement...
La page est en cours de chargement...
La page est en cours de chargement...
La page est en cours de chargement...
La page est en cours de chargement...
La page est en cours de chargement...
La page est en cours de chargement...
La page est en cours de chargement...
La page est en cours de chargement...
La page est en cours de chargement...
La page est en cours de chargement...
La page est en cours de chargement...
La page est en cours de chargement...
La page est en cours de chargement...
La page est en cours de chargement...
La page est en cours de chargement...
La page est en cours de chargement...
La page est en cours de chargement...
La page est en cours de chargement...
La page est en cours de chargement...
La page est en cours de chargement...
La page est en cours de chargement...
La page est en cours de chargement...
La page est en cours de chargement...
La page est en cours de chargement...
La page est en cours de chargement...
La page est en cours de chargement...
La page est en cours de chargement...
La page est en cours de chargement...
La page est en cours de chargement...
La page est en cours de chargement...
La page est en cours de chargement...
La page est en cours de chargement...
La page est en cours de chargement...
-
 1
1
-
 2
2
-
 3
3
-
 4
4
-
 5
5
-
 6
6
-
 7
7
-
 8
8
-
 9
9
-
 10
10
-
 11
11
-
 12
12
-
 13
13
-
 14
14
-
 15
15
-
 16
16
-
 17
17
-
 18
18
-
 19
19
-
 20
20
-
 21
21
-
 22
22
-
 23
23
-
 24
24
-
 25
25
-
 26
26
-
 27
27
-
 28
28
-
 29
29
-
 30
30
-
 31
31
-
 32
32
-
 33
33
-
 34
34
-
 35
35
-
 36
36
-
 37
37
-
 38
38
-
 39
39
-
 40
40
-
 41
41
-
 42
42
-
 43
43
-
 44
44
-
 45
45
-
 46
46
-
 47
47
-
 48
48
-
 49
49
-
 50
50
-
 51
51
-
 52
52
-
 53
53
-
 54
54
-
 55
55
-
 56
56
-
 57
57
-
 58
58
-
 59
59
-
 60
60
-
 61
61
-
 62
62
-
 63
63
-
 64
64
-
 65
65
-
 66
66
-
 67
67
-
 68
68
-
 69
69
-
 70
70
-
 71
71
-
 72
72
-
 73
73
-
 74
74
-
 75
75
-
 76
76
-
 77
77
-
 78
78
-
 79
79
-
 80
80
-
 81
81
-
 82
82
-
 83
83
-
 84
84
-
 85
85
-
 86
86
-
 87
87
-
 88
88
-
 89
89
-
 90
90
-
 91
91
-
 92
92
-
 93
93
-
 94
94
-
 95
95
-
 96
96
-
 97
97
-
 98
98
-
 99
99
-
 100
100
-
 101
101
-
 102
102
-
 103
103
-
 104
104
-
 105
105
-
 106
106
-
 107
107
-
 108
108
-
 109
109
-
 110
110
-
 111
111
-
 112
112
-
 113
113
-
 114
114
-
 115
115
-
 116
116
-
 117
117
-
 118
118
-
 119
119
-
 120
120
-
 121
121
-
 122
122
-
 123
123
-
 124
124
-
 125
125
-
 126
126
-
 127
127
-
 128
128
-
 129
129
-
 130
130
-
 131
131
-
 132
132
-
 133
133
-
 134
134
-
 135
135
-
 136
136
-
 137
137
-
 138
138
-
 139
139
-
 140
140
-
 141
141
-
 142
142
-
 143
143
-
 144
144
-
 145
145
-
 146
146
-
 147
147
-
 148
148
-
 149
149
-
 150
150
-
 151
151
-
 152
152
-
 153
153
-
 154
154
-
 155
155
-
 156
156
-
 157
157
-
 158
158
-
 159
159
-
 160
160
-
 161
161
-
 162
162


Blomberg DND 1972 ED Manuel utilisateur
- Catégorie
- Frigos
- Taper
- Manuel utilisateur
dans d''autres langues
- italiano: Blomberg DND 1972 ED Manuale utente
- Deutsch: Blomberg DND 1972 ED Benutzerhandbuch
Documents connexes
Autres documents
-
Fulgor Milano F6FBM36S1 Manuel utilisateur
-
BlueStar Freestanding Refrigerator Manuel utilisateur
-
BlueStar FBFD360 Le manuel du propriétaire
-
-
Beko CN 153221 DH Le manuel du propriétaire
-
Beko GNEV120S Le manuel du propriétaire
-
Teka NFE4 900 X Manuel utilisateur
-