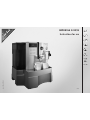
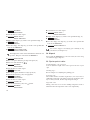
Jura 95 Instructions For Use Manual
- Catégorie
- Cafetières
- Taper
- Instructions For Use Manual
Ce manuel convient également à

IMPRESSA XS90/95
Instructions for use
9/05
Art. Nr. 65591

Legend:
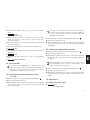
DISPLAY: serves as information.
DISPLAY: please follow the instructions shown.
= Note = Important = Tip
JURA Elektroapparate AG, CH-4626 Niederbuchsiten,
Internet http://www.jura.com

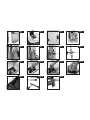
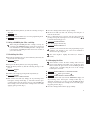
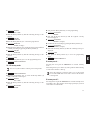
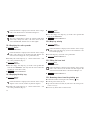
Fig. 1 Fig. 2 Fig. 3 Fig. 4
Fig. 11
Fig. 5 Fig. 6 Fig. 7 Fig. 8
Fig. 12Fig. 9 Fig. 10
Fig. 13
1
2
3
Fig. 14 Fig. 15

12
3
17
7
10
9
8
12
11
13
14
16
15
18
19
21
20
22
26
25
24
23
27
6
4
5
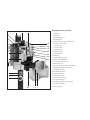
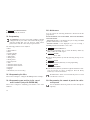
Description of the machine
1. Drip tray
2. Drip grate
3. Programming door
4. Rotary Switch
5. Selection key for pre-ground coffee
6. Coffee à la Carte key
7. 1 Coffee key
8. 2 Coffees key
9. 1 Espresso key
10. 2 Espressos key
11. ON / OFF key
12. Rinse key
13. Display dialog system
14. Water tank with handle
15. Aroma preservation cover
16. Bean tank cover
17. Lid for pre-ground coffee filler funnel
18. Height-adjustable coffee spout
19. Heatable cup shelf
20. Constant Steam key
21. Steam Portion key
22. Hot Water switch
23. Pivoting steam spout
24. 2-stage frothing jet
25. Height-adjustable hot water spout
26. Coffee grounds bin
27. Power switch

5
Contents
1. Safety information ..............................................page 6
1.1 Warnings ................................................page 6
1.2 Precautions..............................................page 6
2. Before you start using the IMPRESSA .................... page 6
2.1 Checking the mains voltage ..........................page 6
2.2 Checking electrical fuse...............................page 6
2.3 Filling the water tank .................................page 7
2.4 Filling the bean tank...................................page 7
2.5 Adjusting the grinding gear ..........................page 7
2.6 Power switch ............................................page 7
3. First use ...........................................................page 7
3.1 Cup illumination........................................page 8
4. Adjusting your machine to the water hardness.............page 8
5. Using a CLARIS plus filter cartridge........................page 9
5.1 Installing the filter.....................................page 9
5.2 Changing the filter .....................................page 9
6. Rinsing the machine.............................................page 10
7. Making coffee (1 espresso, 2 espressos, 1 coffee,
2 coffees) ..........................................................page 10
7.1. Making coffee with pre-ground coffee powder....page 10
8. Making coffee à la carte .......................................page 11
9. Making hot water................................................page 11
10. Drawing off steam ...............................................page 12
11. Frothing milk .....................................................page 12
11.1 Frothing one portion of milk (with the
2-stage frothing jet) ...................................page 12
11.2 Frothing milk (with the 2-stage frothing jet) .....page 12
11.3 Attaching the Professional-Cappuccino Frother
to the IMPRESSA .....................................page 13
11.4 Making cappuccino and hot milk with the
Professional-Cappuccino Frother ...................page 13
11.5 Cleaning the Professional-Cappuccino Frother
and jet ....................................................page 13
12. Switching the IMPRESSA off ................................page 13
13. Programming.....................................................page 14
13.1 Programming the filter ...............................page 14
13.2 Programming your machine to the correct
water hardness (only with FILTER NO) ...........page 14
13.3 Maintenance ............................................page 14
13.4 Programming the amount of powder for coffee
and espressso............................................ page 14
13.5 Setting the amount of water for coffee,
espresso and coffee à la carte........................page 15
13.6 Programming the temperature for coffee,
espresso and coffee à la carte........................page 16
13.7 Programming the water portion.....................page 16
13.8 Programming the steam portion ....................page 16
13.9 Economy mode..........................................page 17
13.10 Setting the time ........................................page 18
13.11 Programming the automatic switch-on time ......page 18
13.12 Programming the automatic switch-off time .....page 19
13.13 Programming the language ..........................page 19
13.14 Programming the display .............................page 20
13.15 Information..............................................page 20
14. Lock functions....................................................page 21
14.1 Locking/releasing the drawing of coffee
à la carte.................................................page 21
14.2 Locking the programming function .................page 21
15. Maintenance ......................................................page 21
15.1 Filling the water tank .................................page 21
15.2 Emptying the coffee grounds.........................page 22
15.3 Emptying the drip tray ................................page 22
15.4 Drip tray missing .......................................page 22
15.5 Filling the bean tank...................................page 22
15.6 Removing stones from the grinding gear ..........page 22
15.7 Changing the filter .....................................page 23
15.8 Prompt to run cleaning cycle ........................page 23
15.9 Prompt to run decalcifying cycle....................page 23
15.10 Emptying the system ..................................page 23
15.11 General cleaning instructions ........................page 24
16. Cleaning ...........................................................page 24
17. Decalcifying.......................................................page 25
18. Disposal............................................................page 26
19. Tips for perfect coffee...........................................page 26
20. Problems ..........................................................page 27
21. Legal information ...............................................page 28
22. Technical data....................................................page 28
E

6
Before you begin
Congratulations on having bought this IMPRESSA!
In order to ensure perfect operation of your IMPRESSA, carefully
read this operating manual and keep it for future reference.
Should you need more information or meet with particular prob-
lems not specified in these operating instructions in sufficient
detail, please contact JURA Elektroapparate AG directly or your
local authorized dealer.
You will also find useful tips on operation and maintenance
of the machine on our website at www.jura.com.
Don’t forget to check out the knowledge builder – our ani-
mated operating instructions. LEO, our assistant, will take
you through all the functions.
1. Safety information
1.1 Warnings
Children are not aware of the dangers involved in using electric
appliances. Therefore, never leave the machine unattended with
unsupervised children around.
The coffee machine must only be used by persons who know
how to operate it.
Never use a defective machine or a machine with a defective
mains cable.
Never repair or open the coffee machine yourself. Repairs may
only be carried out by authorized service shops using original
spare parts and accessories.
Never immerse the IMPRESSA in water.
1.2.Precautions
Never expose the coffee machine to weather (rain, snow, frost),
never touch the machine when your hands are wet.
Place the IMPRESSA on a firm, level base that is resistant to any
water that may leak. Never stand on hot or warm surfaces (oven
hobs). Keep out of the reach of children.
If you intend not to use the machine for a longer time (holidays,
etc.), always turn off the power switch.
Always turn off the power switch before cleaning the machine.
When disconnecting the mains cable, never pull on the mains
cable or the machine itself.
The IMPRESSA is connected to the mains supply via a mains
cable. Make sure nobody can trip over the mains cable. Keep out
of reach of children and pets.
Never put the coffee machine or parts of it into a dishwasher.
Make sure to install the machine at a place with sufficient air
circulation to prevent it from overheating.
2. Before you start using the IMPRESSA
2.1 Checking the mains voltage
The coffee machine is preset to the correct mains voltage. Check if
your local mains supply voltage complies with the information giv-
en on the type plate on the underside of the coffee machine.
2.2 Checking electrical fuse
The machine is designed for an electric current of 10 amperes.
Check if the electrical fuse has sufficient capacity.

7
2.3 Filling the water tank
Only use fresh, cold water. Never fill the water tank with
milk, mineral water or other liquids.
Take out the water tank and thoroughly rinse it out with cold tap
water.
Then fill it with water and place it back into the coffee machine.
Make sure the tank is installed correctly and that it engages
properly.
2.4 Filling the bean tank
To ensure your IMPRESSA will have a long service life and
to avoid repairs, please note that the grinding gear is not suit-
able for coffee beans that have been treated with additives
(e.g. sugar) during or after roasting. Coffee blends of this
type may damage the machine’s grinding gear. Repair costs
resulting from such use are not subject to the terms of guar-
antee.
Open the cover of the bean tank (Fig. 2) and remove the aroma
preservation cover (15).
Remove any dirt or foreign matter from the bean tank.
Fill the bean tank with coffee beans (Fig. 2), replace the aroma
preservation cover (15) and close the lid.
2.5 Adjusting the grinding gear
You can adjust the grinding gear to the roast of your coffee. We
recommend that you use:
a finer setting for a lighter roast
a coarser setting for a darker roast
The grinding degree may only be adjusted while the grinding
gear is running.
Open the lid of the bean tank (16).
To adjust the grinding degree, turn the Rotary Switch (Fig. 2) to
the required position.
The smaller the dots, the finer the grind
The larger the dots, the coarser the grind
2.6 Power switch
Actuate the power switch (27) on your IMPRESSA before
using the machine for the first time.
We recommend that you switch off your IMPRESSA with
the power switch (27) if you intend not to use the machine
for longer periods of time (e.g.during holidays)
3. First use
Press the power switch (27) on the back (bottom left) of the
machine (Fig. 3).
The ON / OFF key (11) lights up to indicate that the machine
has been switched on with the power switch.
Switch the machine on using the ON / OFF key (11). The
light of the ON / OFF key goes off.
Open the programming door (3).
LANGUAGE
ENGLISH
Turn the Rotary Switch (4) until the required language is dis-
played.
Example:
LANGUAGE
ENGLISH
Confirm your selection by pressing the Rotary Switch (4).
FILL SYSTEM / PRESS STEAM
E

8
Place a receptacle under the 2-stage frothing jet (24) and press
one of the Steam keys .
The system now fills up automatically. A little water will leak
from the frothing jet.
SYSTEM FILLING
HEATING UP
PRESS RINSE
Place a cup under the height-adjustable coffee spout (18).
Press Rinse .
MACHINE RINSING
Now the water lines are flushed with fresh water. A little water
will leak from the coffee spout (18).
SELECT PRODUCT
You can now make a product of your choice by pressing the
corresponding key.
If FILL BEANS appears on the display, press one of the
coffee product keys again. The grinder is not yet completely
filled with coffee beans.
For a perfect frothing result, adjust the height-adjustable
coffee spout (18) to the size of your cup (Fig. 4).
3.1 Cup illumination
The cup illumination puts your coffee in a good light, making it a
treat for the eyes as well.
When you switch on the IMPRESSA or press any key, the cup illu-
mination is activated for 1 minute.
4. Adjusting your machine to the water hardness
The IMPRESSA heats up water. As a result, calcification
occurs during normal use. This is indicated automatically.
The IMPRESSA must therefore be adjusted to the hardness
of the water used. Use the supplied test sticks to determine
the water hardness or contact your local waterworks.
1° German hardness is equivalent to 1.79° French hardness.
The water hardness programming step is no longer displayed
if the filter is activated.
The IMPRESSA is preset to 16°dH. This setting can be changed.
To do so, proceed as follows:
SELECT PRODUCT
Open the programming door (3). Press the Rotary Switch (4)
until you hear an acoustic signal.
FILTER NO
Turn the Rotary Switch (4) until the following message is dis-
played:
HARDNESS
16°dH
Now press the Rotary Switch (4) to start programming.
16°dH
Now turn the Rotary Switch (4) until the required water hardness
is set.
20°dH (example)
Confirm the selected setting by pressing the Rotary Switch (4).
HARDNESS
20°dH (example)

9
Now turn the Rotary Switch (4) until the following message is
displayed:
EXIT
Now press the Rotary Switch (4) to leave the programming mode.
SELECT PRODUCT
5. Using a CLARIS plus filter cartridge
When using the CLARIS plus filter cartridge correctly, de-
calcifying your IMPRESSA will no longer be necessary. For
more information on the CLARIS plus filter cartridge refer
to the brochure “CLARIS plus. Hard on limescale. Gentle on
your coffee machine.”
5.1 Installing the filter
Open the programming door (3). Press the Rotary Switch (4) un-
til you hear an acoustic signal.
FILTER
NO
Now press the Rotary Switch (4) to start programming.
Turn the Rotary Switch (4) until the following message is dis-
played:
FILTER
YES
Confirm your setting by pressing the Rotary Switch (4).
INSERT
FILTER / PRESS STEAM
Take out the water tank (14). Empty out any remaining water.
Fold up the cartridge holder (Fig. 1). Attach the extension piece
(contained in the Welcome Pack) to the top of the CLARIS plus
filter cartridge. Now insert the filter cartridge in the water tank,
applying gentle pressure (Fig. 1)
Close the cartridge holder until it engages audibly.
Fill the water tank (14) with cold, fresh tap water and place it
back into the machine.
Place a sufficiently large receptacle (min. 0.5 litres) under the
pivoting steam spout (23) and press one of the Steam keys
to start the filter rinsing process.
FILTER RINSING
Filter rinsing stops automatically.
SELECT PRODUCT
You have now activated the filter. The programming step for
adjusting your machine to the correct water hardness is
therefore no longer displayed.
The water might be slightly discoloured (no hazard to
health).
5.2 Changing the filter
After 50 litres of water the filter cartridge will need to be
replaced. The display will prompt you to change the filter.
Please monitor the period of use of the CLARIS plus filter
cartridge (max. 2 months) using the scale on the cartridge
holder by the water tank.
SELECT PRODUCT / CHANGE FILTER
The Rinse key lights up. Press Rinse .
INSERT FILTER / PRESS STEAM
Remove the water tank (14) from the IMPRESSA. Empty out
any remaining water. Fold up the cartridge holder (Fig. 1).
Attach the extension piece to the top of the CLARIS plus filter
cartridge. Now insert the filter cartridge in the water tank, apply-
ing gentle pressure (Fig. 1)
Close the cartridge holder until it engages audibly.
E

10
Fill the water tank (14) with cold, fresh tap water and place it
back into the machine.
Place a sufficiently large receptacle (min. 0.5 litres) under the
pivoting steam spout (23) and press one of the Steam keys
to start the filter rinsing process.
FILTER RINSING
Filter rinsing stops automatically.
SELECT PRODUCT
You can also trigger a change of filter manually from the
Maintenance menu at any point in time (only if the filter has
been activated) - see Chapter 13.3.
6. Rinsing the machine
If the coffee machine is switched off and has cooled down,
you will be prompted to start a rinsing cycle when switching
the machine back on. The rinsing cycle starts automatically
when you switch the machine off.
PRESS RINSE
Place a cup under the coffee spout (18).
Press Rinse .
MACHINE RINSING
SELECT PRODUCT
You can also trigger a rinsing cycle manually from the Main-
tenance menu at any point in time (see Chapter 13.3).
7. Making coffee
(1 espresso, 2 espressos, 1 coffee, 2 coffees)
SELECT PRODUCT
Place 1 or 2 cups (as required) under the coffee spout (18) and
press a key of your choice , , , . The pre-brewing
process (I.P.B.A.S.) moistens the coffee powder, briefly inter-
rupts the flow of hot water and then begins with the actual brew-
ing process.
1 ESPRESSO (example)
NORMAL (example)
The coffee brewing process stops automatically as soon as the
set amount of water has run through.
SELECT PRODUCT
To stop the brewing process prematurely, press any of the
product keys.
You can change the amount of water while the machine is
brewing coffee. Open the programming door. Turn the
Rotary Switch (4) until the display indicates the required
amount (ML). The amount of water can be selected in incre-
ments of 5 ML.
The amounts given in ML are approximate values and may
vary from the effective quantity.
7.1. Making coffee with pre-ground coffee powder
Never use water-soluble instant coffee.
SELECT PRODUCT
Place 1 or 2 cups (as required) under the coffee spout (18) and
open the programming door (3). Press the selection key for pre-
ground coffee .
FILL
POWDER / SELECT PRODUCT
Now fill 1 or 2 level scoops of pre-ground coffee into the filler
funnel for pre-ground coffee (17).
Then press a product key of your choice.

11
1 ESPRESSO (example)
POWDER
The coffee brewing process stops automatically as soon as the
set amount of water has run through.
SELECT PRODUCT
To stop the brewing process prematurely, press any of the
product keys.
We recommend always using powder from fresh coffee
beans or pre-ground, vacuum-packed coffee. Never fill in
more than 2 scoops of powder. The filler funnel is no storage
tank. Make sure the coffee powder you use is not too fine.
This may block the system and cause the coffee only to drip
out of the coffee spout.
If you have pressed the selection key unintentionally,
press any of the product keys to cancel your selection.
You can change the amount of water while the machine is
brewing coffee. To do so, turn the Rotary Switch (4) until the
display indicates the required amount (ML). The amount of
water can be selected in increments of 5 ML.
The amounts given in ML are approximate values and may
vary from the effective quantity.
8. Making coffee à la carte
SELECT PRODUCT
Place 1 cup under the coffee spout (18) and open the program-
ming door (3). Press the Coffee à la Carte key .
A LA CARTE
XMILD
Turn the Rotary Switch (4) until the display indicates the desired
coffee strength and press the Rotary Switch (4) to make the cof-
fee. The pre-brewing process (I.P.B.A.S.) moistens the coffee
powder, briefly interrupts the flow of hot water and then begins
with the actual brewing process.
A LA CARTE
XSTRONG (example)
The coffee brewing process stops automatically as soon as the
set amount of water has run through.
SELECT PRODUCT
To stop the brewing process prematurely, press any of the
product keys.
You can change the amount of water while the machine is
brewing coffee. To do so, turn the Rotary Switch (4) until the
display indicates the required amount (ML). The amount of
water can be selected in increments of 5 ML.
The amounts given in ML are approximate values and may
vary from the effective quantity.
9. Making hot water
SELECT PRODUCT
Place 1 cup or 1 glass under the hot water spout (25) and turn the
Hot Water switch (22) to .
WATER
PORTION
The machine stops dispensing water automatically as soon as the
set amount of water has been dispensed.
CLOSE TAP
Turn the switch (22) back to .
SELECT PRODUCT
E

12
To stop the process prematurely, turn the switch (22) back
to .
You can also change the amount of water set while the
machine is brewing coffee. Open the programming door.
Turn the Rotary Switch (4) until the display indicates the
required amount (ML). The amount of water can be selected
in increments of 5 ML.
The amounts given in ML are approximate values and may
vary from the effective quantity.
10. Drawing off steam
Make sure the nozzle has engaged properly. If the nozzle is
clogged with dried milk or has not been attached properly, it
might suddenly come off during operation.
To ensure perfect operation, clean the 2-stage frothing jet
(24) regularly. Use the opening provided on the handle of the
measuring spoon for the purpose to unscrew the 2-stage
frothing nozzle (Fig. 14). Thoroughly rinse the 3 parts under
running water.
Steam can be used for heating liquids and frothing milk for
cappuccino. When heating liquids, make sure the 2-stage
frothing jet (24) is pushed up. To froth liquids, push the
2-stage frothing jet (Fig. 5) downwards, turning it slightly.
A small amount of water leaks from the jet when you start
frothing. This does not affect the result, e.g. when frothing
milk.
There might be some initial splashing when drawing off
steam. The steam jet gets hot. Avoid direct contact with the
skin!
SELECT PRODUCT
Place a cup under the pivoting steam spout (23) and dip the
2-stage frothing jet (24) in the milk to be frothed or the liquid to
be heated.
Press the Steam Portion key .
STEAM PORTION
You can stop the process any time by pressing the Steam Portion
key .
SELECT PRODUCT
You can set the duration of drawing off steam in 1-second
increments with the Rotary Switch (4).
11. Frothing milk
The IMPRESSA is ready to froth milk when both Steam key lights
light up constantly.
If the lights are off, press one of the two Steam keys .
11.1 Frothing one portion of milk
(with the 2-stage frothing jet)
SELECT PRODUCT
Pour milk into a jug or similar receptacle.
Dip the 2-stage frothing jet (24) into the milk and press the
key.
STEAM PORTION
The steam dispensing process stops automatically.
11.2 Frothing milk
(with the 2-stage frothing jet)
SELECT PRODUCT
Pour milk into a jug or similar receptacle.

13
Dip the 2-stage frothing jet (24) into the milk and press the
key.
DRAW OFF STEAM
When you have frothed the milk to your liking, pres the key
again.
11.3 Attaching the Professional-Cappuccino Frother
to the IMPRESSA
Remove the 2-stage frothing jet (24).
Now attach the Professional-Cappuccino Frother (Fig. 6).
Press the hose into one side of the opening behind the dial
(Fig. 7).
11.4 Making cappuccino and hot milk with the
Professional-Cappuccino Frother
Fill the milk pitcher with milk or dip the milk hose directly into
the milk.
Place a cup under the Professional-Cappuccino Frother.
Press the Steam Portion key .
STEAM PORTION
The machine will froth or heat milk according to the time you
programmed (see “Programming the steam portion”, Chapter
13.8)
For cappuccino, turn the selector switch (1, Fig. 7) to (2).
For hot milk, turn the selector switch (1, Fig. 7) to (3).
Now place the cup with the cappuccino froth or hot milk under
the coffee spout (18) and make a coffee of your choice.
11.5 Cleaning the Professional-Cappuccino Frother
and jet
After heating or frothing milk, you should clean the Profes-
sional-Cappuccino Frother. We recommend cleaning it on a
daily basis.
Your IMPRESSA will not prompt you to clean the Profes-
sional-Cappuccino Frother.
The Professional-Cappuccino Frother and the Easy-Cappuc-
cino Frother are best cleaned using the JURA Auto-Cappuc-
cino cleaner. Please contact an authorized dealer. We recom-
mend cleaning these devices daily.
Fill water into a receptacle and dip the milk hose into it.
Draw steam until the water / steam from the Frother runs clear.
We also recommend regularly disassembling the Frother and
rinsing it under running water.
Remove the Professional-Cappuccino Frother from the IMPRES-
SA and take it apart as shown in Fig. 8.
Thoroughly rinse all the parts of the Professional-Cappuccino
Frother under running water.
Re-assemble the Professional-Cappuccino Frother and attach it
to your IMPRESSA.
12. Switching the IMPRESSA off
Switching the IMPRESSA off causes the coffee spout to be rinsed
first. Therefore, please make sure to place a suitable receptacle un-
der the coffee spout (18).
SELECT PRODUCT
Switch the IMPRESSA off with the ON / OFF key (11).
E

14
MACHINE RINSING
The coffee spout (18) is rinsed.
13. Programming
The IMPRESSA leaves the factory with a number of default
settings that allow you to make coffee without having to pro-
gram the machine first. You can, however, adjust various
parameters to make the coffee suit your personal taste.
The following parameters can be adjusted:
Filter
Water hardness
Rinse
Powder quantity
Water quantity
Temperature
Water portion
Steam portion
Economy mode
Time
Automatic switch-on time
Automatic switch-off time
Language
Display
Information (to be viewed only)
13.1 Programming the filter
Please refer to Chapter 5 “Using the CLARIS plus filter cartridge”.
13.2 Programming your machine to the correct
water hardness (only with FILTER NO)
Please refer to Chapter 4 “Adjusting your machine to the water
hardness”.
13.3 Maintenance
You can activate the following maintenance functions from this
program item:
RINSE MACHINE, CLEAN MACHINE, DE-SCALE MACHINE,
CHANGE FILTER.
“DE-SCALE machine” is not displayed if you are using a CLARIS
plus filter and the filter is set to “YES”.
“CHANGE FILTER” is not displayed if you are not using a
CLARIS plus filter and the filter is set to “NO”.
SELECT PRODUCT
Open the programming door (3). Press the Rotary Switch (4)
until you hear an acoustic signal.
FILTER
NO or YES
Turn the Rotary Switch (4) until the following message is dis-
played:
RINSE
Now press the Rotary Switch (4) to start programming.
RINSE
MACHINE
Turn the Rotary Switch (4) until the required maintenance func-
tion (for selection see above) is displayed. Press the Rotary
Switch (4) to activate the function.
The Maintenance menu closes automatically after 5 seconds
if no function is selected.
13.4 Programming the amount of powder for coffee
and espresso
You can adjust the amount of powder for coffee and espresso
separately.

15
SELECT PRODUCT
Open the programming door (3). Press the Rotary Switch (4)
until you hear an acoustic signal.
FILTER
NO or YES
Turn the Rotary Switch (4) until the following message is dis-
played:
POWDER
QUANTITY
Now press the Rotary Switch (4) to start programming.
SELECT
PRODUCT
Then press a product key of your choice.
NORMAL (example)
–
_ _ _ +
Now turn the Rotary Switch (4) until the required amount of
powder is set.
STRONG (example)
–
_ _ +
Confirm the selected setting by pressing the Rotary Switch (4).
POWDER
QUANTITY
Now turn the Rotary Switch (4) until the following message is
displayed:
EXIT
Now press the Rotary Switch (4) to leave the programming
mode.
SELECT PRODUCT
13.5 Setting the amount of water for coffee,
espresso and coffee à la carte
The system’s basic settings include pre-defined amounts of water
(coffee 130 ml, espresso 60 ml, 2 coffees 260 ml, coffee à la carte
145 ml). However, these can be modified as required.
SELECT PRODUCT
Open the programming door (3). Press the Rotary Switch (4) un-
til you hear an acoustic signal.
FILTER
NO or YES
Turn the Rotary Switch (4) until the following message is dis-
played:
WATER
QUANTITY
Press the Rotary Switch (4) to activate the program item.
SELECT
PRODUCT
Press a product key of your choice.
1 ESPRESSO (example)
60 ML
Turn the Rotary Switch (4) to adjust the amount of water and
then confirm your setting by pressing the Rotary Switch (4).
WATER
QUANTITY
Turn the Rotary Switch (4) until the following message is dis-
played:
EXIT
Press the Rotary Switch (4) to leave the programming mode.
SELECT PRODUCT
E

16
13.6 Programming the temperature for coffee,
espresso and coffee à la carte
You can adjust the temperature for each type of coffee
separately. The temperature can be set to 2 different levels
(NORMAL, HIGH).
SELECT PRODUCT
Open the programming door (3). Press the Rotary Switch (4)
until you hear an acoustic signal.
FILTER
NO or YES
Turn the Rotary Switch (4) until the following message is dis-
played:
TEMPERATURE
Now press the Rotary Switch (4) to start programming.
SELECT PRODUCT
Then press a product key of your choice.
TEMPERATURE
NORMAL (example)
Now turn the Rotary Switch (4) until the required temperature is
set.
TEMPERATURE
HIGH (example)
Confirm the selected setting by pressing the Rotary Switch (4).
TEMPERATURE
Now turn the Rotary Switch (4) until the following message is
displayed:
EXIT
Now press the Rotary Switch (4) to leave the programming
mode.
SELECT PRODUCT
13.7 Programming the water portion
The system’s basic settings include a pre-defined amount of water
(225 ml). However, this amount can be modified as required.
SELECT PRODUCT
Open the programming door (3). Press the Rotary Switch (4)
until you hear an acoustic signal.
FILTER
NO or YES
Turn the Rotary Switch (4) until the following message is dis-
played:
WATER
PORTION
Press the Rotary Switch (4) to activate the program item.
PORTION
225 ML (example)
Turn the Rotary Switch (4) to adjust the amount of water and
then confirm your setting by pressing the Rotary Switch (4).
WATER
PORTION
Turn the Rotary Switch (4) until the following message is dis-
played:
EXIT
Press the Rotary Switch (4) to leave the programming mode.
SELECT PRODUCT
13.8 Programming the steam portion
The system’s basic settings include a pre-defined steam portion (20
sec.). However, this amount can be modified as required.
SELECT PRODUCT
Open the programming door (3). Press the Rotary Switch (4)
until you hear an acoustic signal.

17
FILTER
NO or YES
Turn the Rotary Switch (4) until the following message is dis-
played:
STEAM
PORTION
Press the Rotary Switch (4) to activate the program item.
PORTION
20 SEC (example)
Turn the Rotary Switch (4) to modify the steam portion and then
confirm your setting by pressing the Rotary Switch (4).
STEAM
PORTION
Turn the Rotary Switch (4) until the following message is dis-
played:
EXIT
Press the Rotary Switch (4) to leave the programming mode.
SELECT PRODUCT
13.9 Economy mode
You can set your machine to various power saving modes.
SELECT PRODUCT
Open the programming door (3). Press the Rotary Switch (4)
until you hear an acoustic signal.
FILTER
NO or YES
Turn the Rotary Switch (4) until the following message is dis-
played:
ECONOMY
MODE –
Now press the Rotary Switch (4) to start programming.
ECONOMY
MODE -
Now turn the Rotary Switch (4) until the required economy
mode is displayed.
ECONOMY
MODE 2 (example)
Confirm the selected setting by pressing the Rotary Switch (4).
ECONOMY
MODE 2 (example)
Now turn the Rotary Switch (4) until the following message is
displayed:
EXIT
Now press the Rotary Switch (4) to leave the programming
mode.
SELECT PRODUCT
Economy mode –
Selecting this level puts the IMPRESSA in constant stand-by
mode.
This setting allows you to make any of the products without having
to wait for the machine to heat up.
Select this setting if you want to make a lot of coffees with
hot or frothed milk and do not want to wait for the machine
to heat up first.
Economy mode 1
Selecting this level puts the IMPRESSA in constant stand-by mode
for making coffee. The machine is heated up separately if you need
steam for hot or frothed milk.
E

18
Select this setting if you make mostly black coffees and are
prepared to wait for approx. 1 minute before being able to
draw steam.
Economy mode 2
Selecting this level does not put the IMPRESSA in stand-by mode
(economy temperature). The machine heats up each time you make
coffee or need to draw steam.
The IMPRESSA switches to economy temperature 5 minutes after
you last used it.
Select this setting if you make very few coffees (with or
without milk) and are prepared to wait for approx. 30 sec-
onds for the machine to get ready.
13.10 Setting the time
You must program the time if you want to use the automatic
switch-on function.
SELECT PRODUCT
Open the programming door (3). Press the Rotary Switch (4)
until you hear an acoustic signal.
FILTER
NO or YES
Turn the Rotary Switch (4) until the following message is dis-
played:
TIME
—:—
Now press the Rotary Switch (4) to start programming.
TIME
—:—
Turn the Rotary Switch (4) to set the hours.
TIME
13:00 (example)
Press the Rotary Switch (4) to confirm the hours and to activate
the minutes.
TIME
13:00
Turn the Rotary Switch (4) to set the minutes.
TIME
13:50 (example)
Press the Rotary Switch (4) to confirm the minutes.
TIME
13:50
Now turn the Rotary Switch (4) until the following message is
displayed:
EXIT
Now press the Rotary Switch (4) to leave the programming
mode.
SELECT PRODUCT
13.11 Programming the automatic switch-on time
You must program the time if you want to use the automatic
switch-on function.
SELECT PRODUCT
Open the programming door (3). Press the Rotary Switch (4)
until you hear an acoustic signal.
FILTER
NO or YES
Turn the Rotary Switch (4) until the following message is dis-
played:
UNIT ON
—:—

19
Now press the Rotary Switch (4) to start programming.
UNIT ON
—:—
Turn the Rotary Switch (4) to set the hours.
UNIT ON
07:00 (example)
Press the Rotary Switch (4) to confirm the hours and to activate
the minutes.
UNIT ON
07:00
Turn the Rotary Switch (4) to set the minutes.
UNIT ON
07:15 (example)
Press the Rotary Switch (4) to confirm the minutes.
UNIT ON
07:15
Now turn the Rotary Switch (4) until the following message is
displayed:
EXIT
Now press the Rotary Switch (4) to leave the programming mode.
SELECT PRODUCT
If the IMPRESSA is switched off with the power switch
(27), you will need to set the time again next time you switch
the machine on. The machine will prompt you to do so.
13.12 Programming the automatic switch-off time
SELECT PRODUCT
Open the programming door (3). Press the Rotary Switch (4)
until you hear an acoustic signal.
FILTER
NO or YES
Turn the Rotary Switch (4) until the following message is dis-
played:
OFF AFTER
5 HRS
Now press the Rotary Switch (4) to start programming.
OFF AFTER
5 HRS
Turn the Rotary Switch (4) to set the switch-off time.
OFF AFTER
4 HRS (example)
Confirm the set switch-off time by pressing the Rotary Switch
(4).
OFF AFTER
4 HRS
Now turn the Rotary Switch (4) until the following message is
displayed:
EXIT
Now press the Rotary Switch (4) to leave the programming mode.
SELECT PRODUCT
13.13 Programming the language
SELECT PRODUCT
Open the programming door (3). Press the Rotary Switch (4)
until you hear an acoustic signal.
FILTER
NO or YES
Turn the Rotary Switch (4) until the following message is dis-
played:
LANGUAGE
ENGLISH
Now press the Rotary Switch (4) to start programming.
E

20
LANGUAGE
ENGLISH
Turn the Rotary Switch (4) to set the language.
LANGUAGE
ENGLISH (example)
Confirm your selection by pressing the Rotary Switch (4).
LANGUAGE
ENGLISH
Now turn the Rotary Switch (4) until the following message is
displayed:
EXIT
Now press the Rotary Switch (4) to leave the programming mode.
SELECT PRODUCT
13.14 Programming the display
This program item allows you to change the time format
from 24 hrs. to AM/PM and the units from ml (millilitres) to
oz (ounces).
SELECT PRODUCT
Open the programming door (3). Press the Rotary Switch (4)
until you hear an acoustic signal.
FILTER
NO or YES
Turn the Rotary Switch (4) until the following message is dis-
played:
DISPLAY
24HRS / ML
Now press the Rotary Switch (4) to start programming.
DISPLAY
24HRS / ML
Turn the Rotary Switch (4) to change the time format.
DISPLAY
AM/PM / ML
Confirm your selection by pressing the Rotary Switch (4).
DISPLAY
AM/PM / ML
Turn the Rotary Switch (4) to change the unit of measurement.
DISPLAY
AM/PM / OZ
Confirm your selection by pressing the Rotary Switch (4).
DISPLAY
AM/PM / OZ
Turn the Rotary Switch (4) until the following message is dis-
played:
EXIT
Now press the Rotary Switch (4) to leave the programming
mode.
SELECT PRODUCT
13.15 Information
This program item enables you to check the number of
products you made and how often you selected a specific
function.
SELECT PRODUCT
Open the programming door (3). Press the Rotary Switch (4)
until you hear an acoustic signal.
FILTER
NO or YES
Turn the Rotary Switch (4) until the following message is dis-
played:
INFO
La page est en cours de chargement...
La page est en cours de chargement...
La page est en cours de chargement...
La page est en cours de chargement...
La page est en cours de chargement...
La page est en cours de chargement...
La page est en cours de chargement...
La page est en cours de chargement...
-
 1
1
-
 2
2
-
 3
3
-
 4
4
-
 5
5
-
 6
6
-
 7
7
-
 8
8
-
 9
9
-
 10
10
-
 11
11
-
 12
12
-
 13
13
-
 14
14
-
 15
15
-
 16
16
-
 17
17
-
 18
18
-
 19
19
-
 20
20
-
 21
21
-
 22
22
-
 23
23
-
 24
24
-
 25
25
-
 26
26
-
 27
27
-
 28
28


Jura 95 Instructions For Use Manual
- Catégorie
- Cafetières
- Taper
- Instructions For Use Manual
- Ce manuel convient également à
dans d''autres langues
- English: Jura 95
Documents connexes
Autres documents
-
Philips HD8652/51 Manuel utilisateur
-
Gaggia 886970203530 Manuel utilisateur
-
Krups EA8255J4 Manuel utilisateur
-
Saeco RI9944 Manuel utilisateur
-
Gaggia RI9702 Manuel utilisateur
-
Saeco RI9946/47 Manuel utilisateur
-
-
Jura Capresso 13572 Manuel utilisateur
-
Siemens TI301509DE/02 Manuel utilisateur