BLACK DECKER BIMH326S Manuel utilisateur
- Taper
- Manuel utilisateur

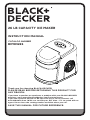
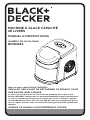
INSTRUCTION MANUAL
26 LB CAPACITY ICE MAKER
Thank you for choosing BLACK+DECKER!
PLEASE READ BEFORE RETURNING THIS PRODUCT FOR
ANY REASON.
If you have a question or experience a problem with your BLACK+DECKER
purchase, go to www.blackanddecker.com/instantanswers
If you can’t find the answer or do not have access to the Internet, call
844-299-0879 from 10:30 a.m. to 6:30 p.m. EST Mon. - Fri. to speak with an
agent. Please have the catalog number available when you call.
SAVE THIS MANUAL FOR FUTURE REFERENCE.
CATALOG NUMBER
BIMH326S

Page 2

Thank you for purchasing our
BLACK+DECKER product. This
easy-to-use manual will guide you
in getting the best use of your
product.
Remember to record the model and
serial numbers. They are on a label
on the rear.
Staple your receipt to your manual.
You will need it to obtain warranty service.
Model number
Serial number
Date of purchase
PRODUCT REGISTRATION
CONTENTS
SAFETY INFORMATION
Important Safety Instructions ......................................................................................................................................... 4-6
Electrical Requirements ....................................................................................................................................................... 5
SET UP & USE
Parts & Features........................................................................................................................................................................ 7
Operation & Use ................................................................................................................................................8-10
CLEANING & CARE .............................................................................................................................................. 10
Cleaning and Maintenance ................................................................................................................................ 10
TROUBLESHOOTING & WARRANTY
Before You Call For Service ................................................................................................................................11
Troubleshooting ......................................................................................................................................................12
Limited Warranty ....................................................................................................................................................................13
Page 3

Page 4
SAFETY INFORMATION
IMPORTANT SAFETY INSTRUCTIONS
1. READ ALL INSTRUCTIONS BEFORE USE
2. When using electrical appliances, basic safety precautions should be followed,
including the following:
3. Burn hazard. Do not touch the metal parts of the interior while the unit is making
ice, it may burn your skin. Children should be supervised when appliance is in use.
4. Fire hazard. Do not store or use gasoline or other flammable vapors and liquids
in the vicinity of this or any other appliance. Do not operate the dispenser with
a damaged cord. Do not use with an underrated extension cord or an extension
cord without a ground.
5. Shock hazard. Unplug the Portable Ice Maker before cleaning or wiping up spilled
water on the unit. Do not attempt to service the Portable Ice Maker. Do not
operate with a damaged cord.
6. Do not let power cord hang over edge of table or counter, or touch hot surfaces.
Do not let the power cord cross over carpeting or other heat insulators. Do not
cover the cord.
7. Never use this unit with water that is unsafe to drink or is from an unknown
source. Never use any other liquid in the unit other than drinking water.
8. If the unit is brought inside from cold outdoor temperatures, allow it to warm
up to room temperature for at least a few hours before operating. Ambient
temperature of the unit should be not be less than 50˚F/10˚C.
9. Install the unit in a dry place away from direct sunlight. Do not place on or near a
hot gas or electric burner, or in a heated oven. For indoor use only.
10. Never put anything flammable close to the unit.
11. Leave a minimum of 5” (13 cm) around the back and sides of the unit for proper
ventilation.
12. Regular cleaning of the unit is required for proper operation. Clean the unit every
four months using the instructions in this manual.
SAVE THESE INSTRUCTIONS
HOUSEHOLD USE ONLY
WARNING
WARNING - Hazards or unsafe
practices which COULD result in
severe personal injury or death
DANGER
DANGER - Immediate hazards
which WILL result in severe
personal injury or death
CAUTION
CAUTION - Hazards or unsafe
practices which COULD result in
minor personal injury
WARNING
When using electrical appliances, basic safety precautions
should be followed, including the following

Page 5
SAFETY INFORMATION
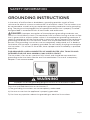
GROUNDING INSTRUCTIONS
In the event of malfunction or breakdown, grounding provides a path of least
resistance for electric current to reduce the risk of electric shock. The ice maker must
be connected to a cord having an equipment-grounding conductor and a grounding
plug. The plug must be plugged into an appropriate outlet that is properly installed
and grounded in accordance with all local codes and ordinances.
DANGER: Improper connection of the equipment grounding conductor can
result in a risk of electric shock. The conductor with insulation having an outer surface
that is green with or without yellow stripes is the equipment grounding conductor. If
repair or replacement of the cord or plug is necessary, do not connect the equipment-
grounding conductor to a live terminal. Check with a qualified electrician or service
person if the grounding instructions are not completely understood, or if in doubt as
to whether the ice maker is properly grounded. Do not modify the plug connected to
the ice maker – if it will not fit the outlet, have a proper outlet installed by a qualified
electrician.
FOR GROUNDED, CORD-CONNECTED ICE MAKER RATED LESS THAN 15A AND
INTENDED FOR USE ON A NOMINAL 120V SUPPLY CIRCUIT.
The ice maker is for use on a nominal 120V circuit and should be connected to a
grounding outlet that looks like the one illustrated below. The use of a temporary
adaptor is not recommended.
WARNING
Improper use of the grounding plug can result in a risk of electric shock.
Consult a qualified electrician or serviceman if:
1) The grounding instructions are not completely understood.
2) You are unsure that the appliance is properly grounded.
3) You have any questions about the grounding or electrical instructions.

Page 6
SAFETY INFORMATION
POWER SUPPLY CORD
1. Avoid the use of an extension cord because of potential safety hazards under
certain conditions. It is recommended to have a qualified electrician or serviceman
install an outlet near the appliance.
2. If it is absolutely necessary to use longer cord sets or an extension cord; extreme
care must be exercised.
a) Use only a grounding type 3-wire extension cord that has a 3-blade grounding
plug and a 3-slot receptacle that will accept the plug on the appliance.
b) The marked electrical rating of the cord set or extension cord must equal to or
greater than the electrical rating of the appliance.
c) The longer cord should be arranged so that it will not drape over the counter top
or table top where it can be pulled on by children or tripped over unintentionally.
NOTE: Neither BLACK+DECKER nor the dealer can accept any liability for damage to
the product or personal injury resulting from failure to observe the electrical
connection procedures.
WARNING - RISK OF FIRE
It is important the plug fits tightly into the wall outlet. if the plug does not fit securely
and appears loose, it should not be used. Have a licensed electrician replace the
receptacle.
USE OF EXTENSION CORDS WITH ICE MAKER
Only use a grounded extension cord that is rated at least 15 amps and has a third-wire
ground. When a long extension cord is used to connect the ice maker, a voltage drop
occurs. The longer the cord, the greater the voltage drop. This results in less voltage
being supplied to the ice maker and increases the amount of current (amp) draw or
reduces performance. A heavier cord with a larger wire size will reduce the voltage
drop. Be sure to choose a cord that will supply enough voltage to operate the ice
maker. The table below indicates appropriate gauge for extension cords.
Minimum Gauge for Cord Sets
Ampere Rating
Volts Total Length of Cord in Feet (meters)
120V 25 (7.6) 50 (15.2) 100 (30.5) 150 (45.7)
240V 50 (15.2) 100 (30.5) 200 (61.0) 300 (91.4)
More
Than
Not More
Than
0 6 18 16 16 14
610 18 16 14 12
10 12 16 16 14 12
12 16 14 12 Not Recommended
WARNING: Keep electrical cords in good condition. Do not use worn, bare, or
frayed cords because they can cause electrical shock.
WARNING: Operating equipment at low voltage can cause it to overheat. Using
an excessively long extension cord can cause the cord to overheat.

Page 7
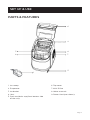
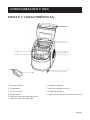
PARTS & FEATURES
SET UP & USE
1. Ice scoop
2. Evaporator
3. Ice basket
4. Vent
5. Drain and drain cap (front bottom side
of the unit)
6. Top cover
7. MAX fill line
8. Water reservoir
9. Power Cord (not shown)
2
6
3
8
5
4
7
1

Page 8
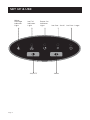
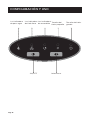
SET UP & USE
Power On
Indicator
Light
Ice Full
Indicator
Light
Water
Shortage
Indicator
Light Ice Size - Small Ice Size - Large
SelectON/OFF

BEFORE USE
1. Remove the packaging, packaging material and tape.
2. Remove the ice basket and scoop. Clean the interior of the unit, basket and
scoop prior to use.
3. Put the ice maker on a flat level surface away from direct sunlight and other
sources of heat (i.e.: stove, furnace, radiator). Maker sure that there is at least
5”/13 cm clearance between the back and sides of the unit.
4. After transporting the unit, allow one hour for the refrigerant fluid to settle
before plugging the ice maker in.
WARNING: Fill with potable water only. Only use drinking water.
HOW TO USE
Do not use the appliance within 30 minutes after transportation. Switching on the
power too early might cause damage to your ice maker.
1. Open the lid, remove the ice basket and pour water into the tank. Keep water
level below the MAX fill line.
Press “ON/OFF” on the control panel to begin the ice making cycle.
2. Select the ice cube size by pressing the “SELECT” button. If the room
temperature is lower than 60°F, it is recommended to select small ice cube in
order to avoid ice sticking together.
3. The ice making cycle lasts approx. 6 to 13 minutes.
4. If there is not enough water, the ice maker will stop automatically, and the
WATER SHORTAGE indicator light will go on. Press “ON/OFF” button, fill
water up to the max. water level mark and press “ON/OFF” button again to
turn on the unit again.
NOTE: Wait at least 3 minutes before restarting the unit.
5. The ice maker stops when the ice basket is full and the “ICE FULL” indicator
will be on. Use the scoop to remove the ice.
WARNING:
• Direct sunlight or sunlight reflection may cause the unit to malfunction.
• Change the water in the water tank every 24 hours to ensure a reasonable hygiene
level.
• If unit will not be in use, drain all the water, clean the water tank and dry it
thoroughly.
WARNING: Unplug unit before draining water, cleaning and drying.
NOTE: The ice cubes in the basket will melt gradually so use the scoop to remove the
ice cubes before they melt. The melted water will be collected into the water
tank. To remove the water in water tank, unplug the drain cap on the base of
the ice maker. Make sure to clean and dry the unit thoroughly and replace the
cap prior to use.
WARNING: Unplug unit before draining water, cleaning and drying.
Page 9
SET UP & USE

Ice Full Indicator Light
The ice maker stops when the ice basket is full. The “ICE FULL” indicator will be
on. Use the scoop to remove the ice.
Water Shortage Indicator Light
If there is not enough water, the ice maker will stop automatically, and the WATER
SHORTAGE indicator light will go on. Press “ON/OFF” button, fill water up to
the max. water level mark and press “ON/OFF” button again to turn on the unit
again.
NOTE: Wait at least 3 minutes before restarting the unit.
Page 10
SET UP & USE
Self-cleaning function:
The unit is equipped with a self cleaning function. It is recommended to use equal
parts white vinegar and water with this function. Press and hold the “ON/OFF” button
for 5 seconds to activate self-cleaning. The function will take 30 minutes. When
the program is complete, rinse with clear water and drain, making sure the vinegar
solution is removed before making ice. Dry thoroughly.
CLEANING AND MAINTENANCE
WARNING: Before using your ice maker, it is recommended to clean it thoroughly.
Always make sure the ice maker is unplugged prior to cleaning.
1. Remove the ice basket.
2. Clean the interior with a mild soap and water solution and a soft sponge or cloth.
3. Rinse all interior parts.
4. Rinse and drain any remaining water by unplugging the drain cap located on the
front of the base.
5. The outside of the ice maker should be cleaned regularly with a mild detergent
solution and warm water.
6. Dry the interior and exterior with a clean soft cloth.
7. When the machine is not to be used for a long time, drain water completely &
dry the interior.
CLEANING & CARE

Page 11
BEFORE YOU CALL FOR SERVICE
IF THE APPLIANCE FAILS TO OPERATE:
A) Check to make sure that the appliance is plugged in securely. If it is not, remove
the plug from the outlet, wait 10 seconds and plug it in again securely.
B) Check for a blown circuit fuse or a tripped main circuit breaker. If these seem to be
operating properly, test the outlet with another appliance.
IF NONE OF THE ABOVE SOLVES THE PROBLEM, CONTACT A QUALIFIED
TECHNICIAN.
WARNING: USER SHOULD NOT TRY TO ADJUST OR REPAIR THIS APPLIANCE.
THERE ARE NO USER SERVICEABLE PARTS INSIDE.
IMPORTANT
DO NOT RETURN THIS PRODUCT TO THE STORE
If you have a problem with this product, please contact the
BLACK+DECKER Customer Satisfaction Center at
844-299-0879 or service@equitybrands.com
DATED PROOF OF PURCHASE, MODEL # AND SERIAL #
REQUIRED FOR WARRANTY SERVICE
TROUBLESHOOTING & WARRANTY

Page 12
TROUBLE POSSIBLE CAUSE POSSIBLE REMEDY
“ADD WATER” indicator is
on. Lack of Water.
Stop the ice maker, fill water,
and press “ON/OFF” button
again to restart the unit.
“ICE FULL” indicator is
on. Ice is full in basket.
Remove ice from ice basket.
Press “Select” button for 5
seconds, the unit can make
10 more ice cycles when “Ice”
indicator is on.
Ice cubes stick together.
The ice making cycle is too
long.
Stop the ice maker, and
restart it when the ice blocks
melt. Select the small size ice
cube selection.
Water temperature in inner
tank is too low.
Replace the water.
Temperature of water
recommended at 40°F-90°F.
Ice making cycle is
normal but no ice formed.
Room temperature or water
temperature in inner tank is
too high.
The room temperature
should be 50°F-105°F, water
temperature should be
40°F-90°F.
Refrigerant in cooling system
leaks.
Verify by a qualified
technician.
Pipe in the cooling system is
blocked.
Verify by a qualified
technician.
Troubleshoot your problem by using the chart below. If the unit still does not
work properly, contact BLACK+DECKER customer service center or the nearest
authorized service center.
WARNING: Users must never troubleshoot internal components.
TROUBLESHOOTING & WARRANTY

Page 13
TROUBLESHOOTING & WARRANTY
LIMITED WARRANTY
Any repair, replacement, or warranty service,
and all questions about this product should
be directed to W Appliance at 844-299-0879
from the USA or Puerto Rico.
W Appliance warrants to the original purchaser that
the product will be free from defects in material,
parts and workmanship for the period designated for
this product. The warranty commences the day the
product is purchased and covers up to a period of 1
year (12 months) for labor/1 year (12 months) for parts
(manufacturing defects only).
W Appliance agrees that it will, at its option,
replace the defective product with either a new
or remanufactured unit equivalent to your original
purchase during the warranty period.
Exclusions: This warranty does not apply to the
below:
1. If the appearance or exterior of
the product has been damaged or
defaced, altered or modified in design or
construction.
2. If the product original serial number
has been altered or removed or cannot
be readily determined.
3. If there is damaged due to power line
surge, user damage to the AC power
cord or connection to improper voltage
source.
4. If damage is due to general misuse,
accidents or acts of God.
5. If repair attempts are done by
unauthorized service agents, use of
parts other than genuine parts or parts
obtained from persons other than
authorized service companies.
6. On units that have been transferred
from the original owner.
7. On products that have been purchased
as refurbished, like new, second-hand, in
a “As-Is” or “Final Sale” terms.
8. To products used in a commercial or
rental setting.
9. To products used in settings other than
ordinary household use or used other
than in accordance with the provided
instructions.
10. To damages for service calls for
improper installations.
11. Transportation and shipping costs
associated with the replacement of the
unit.
12. Service calls to instruct you how to use
your product.
13. Service calls to repair or replace the
house fuse, reset the circuit breaker or
correct the wiring in the house.
REPAIR OR REPLACEMENT AS PROVIDED UNDER
THIS WARRANTY IS THE EXCLUSIVE REMEDY OF
THE CUSTOMER; BLACK+DECKER. SHALL NOT BE
LIABLE FOR ANY INCIDENTAL OR CONSEQUENTIAL
DAMAGES FOR BREACH OF ANY EXPRESS OR
IMPLIED WARRANTY ON THIS PRODUCT, EXCEPT
TO THE EXTENT PROHIBITED BY APPLICABLE LAW.
ANY IMPLIED WARRANTY OF MERCHANTABILITY
OF FITNESS FOR A PARTICULAR PURPOSE ON THIS
PRODUCT IS LIMITED TO THE DURATION OF THE
WARRANTY.
Some states do not allow the exclusion or limitations
of incidental or consequential damages, or limitations
on how long the warranty lasts. In these cases the
above exclusions or limitations may not apply to you.
This warranty gives you specific legal rights and you
may also have other rights which vary from state to
state.
Obtaining Service: To obtain service, product
literature, supplies or accessories please call
844-299-0879 to create a ticket for exchange/repair.
Please make sure to provide the date of purchase,
model number and a brief description of the problem.
Our customer service representative will contact you
or send detailed return instructions.
W Appliance does not warrant that the appliance will work
properly in all environmental conditions, and makes no warranty
and representation, either implied or expressed, with respect
to the quality, performance, merchantability, or fitness for a
particular purpose other than the purpose identified within this
user’s manual. W Appliance has made every eort to ensure
that this user’s manual is accurate and disclaims liability for any
inaccuracies or omissions that may have occurred. Information in
this user’s manual is subject to change without notice and does
not represent a commitment on the part of W Appliance. W
Appliance reserves the right to make improvements to this user’s
manual and/or to the products described in this user’s manual
at any time without notice. If you find information in this manual
that is incorrect, misleading, or incomplete, please contact us at
844-299-0879.
W Appliance Co.
1356 Broadway
New York, NY 10018

BLACK & DECKER, BLACK+DECKER, the BLACK & DECKER and
BLACK+DECKER logos and product names and the orange and black color
scheme are trademarks of The Black & Decker Corporation, used under
license. All rights reserved.
Product in this box may differ slightly from that pictured. Does not affect
function. Not all accessories shown in photography are included in this
package.
Imported by W Appliance, Inc., 1356 Broadway, New York, NY 10018
July 2021 Printed in China

Page 15
MANUEL D’INSTRUCTIONS
MACHINE À GLACE CAPACITÉ
26 LIVRES
Merci d’avoir choisi BLACK+DECKER!
VEUILLEZ LIRE AVANT DE RETOURNER CE PRODUIT POUR
UNE RAISON QUELCONQUE.
Si vous avez une question ou rencontrez un problème avec votre achat
BLACK+DECKER, rendez-vous sur www.blackanddecker.com/instantanswers
Si vous ne trouvez pas la réponse ou n’avez pas accès à l’internet, appelez
le 844-299-0879 de 10 h 30 à 18 h 30 HNE du lundi au vendredi pour parler
avec un agent. Veuillez avoir le numéro de catalogue disponible quand vous
appelez.
GARDEZ CE MANUEL POUR RÉFÉRENCE FUTURE.
NUMÉRO DE CATALOGUE
BIMH326S

Page 16Page 16

Page 17
Merci d’avoir acheté notre produit
BLACK+DECKER. Ce manuel facile
à utiliser vous guidera pour tirer le
meilleur parti de votre appareil de
chauage.
N’oubliez pas d’enregistrer les
numéros de modèle et de série. Ils
sont sur une étiquette à l’arrière.
Agrafez votre reçu à votre manuel.
Vous en aurez besoin pour obtenir le service
de garantie.
Numéro de modèle
Numéro de série
Date d’achat
ENREGISTREMENT DU PRODUIT
TABLE DES MATIÈRES
INFORMATION SUR LA SÉCURITÉ
Consignes De Sécurité Importantes ........................................................................................................................ 18-20
Exigences Électriques .............................................................................................................................................................19
CONFIGURATION ET UTILISATION
Pièces Et Caractéristiques ....................................................................................................................................................21
Fonctionnement Et Utilisation ..................................................................................................................... 22-24
CONFIGURATION ET UTILISATION ............................................................................................. 24
Nettoyage Et Entretien .......................................................................................................................................24
DÉPANNAGE ET GARANTIE
Avant De Faire Appel Au Service.......................................................................................................................25
Dépannage ..............................................................................................................................................................26
Garantie Limitée .....................................................................................................................................................................27
Page 17

Page 18
CONSIGNES DE SÉCURITÉ IMPORTANTES
1. LISEZ TOUTES LES INSTRUCTIONS AVANT UTILISATION
2. Lors de l’utilisation d’appareils électriques, des précautions de sécurité de base
doivent être suivies, y compris les suivantes:
3. Risque de brûlure. Ne touchez pas les parties métalliques de l’intérieur pendant
que l’appareil fabrique de la glace, cela pourrait vous brûler la peau. Les enfants
doivent être surveillés quand l’appareil est en cours d’utilisation.
4. Risque d’incendie. N’entreposez pas et n’utilisez pas d’essence ou d’autres
vapeurs et liquides inflammables à proximité de cet appareil ou de tout autre
appareil. Ne pas utiliser le distributeur avec un cordon endommagé. Ne pas utiliser
avec une rallonge sous-estimée ou une rallonge sans mise à la terre.
5. Risque de choc. Débranchez la machine à glace portable avant de nettoyer ou
d’essuyer l’eau renversée sur l’appareil. N’essayez pas de réparer la machine à
glace portable. Ne pas utiliser avec un cordon endommagé.
6. Ne laissez pas le cordon d’alimentation pendre du bord de la table ou
du comptoir, ou toucher des surfaces chaudes. Ne laissez pas le cordon
d’alimentation traverser de la moquette ou d’autres isolants thermiques. Ne
couvrez pas le cordon.
7. N’utilisez jamais cette unité avec de l’eau impropre à la consommation ou
provenant d’une source inconnue. N’utilisez jamais d’autre liquide dans l’unité que
de l’eau potable.
8. Si l’unité est amenée à l’intérieur à cause de températures extérieures froides,
laissez-la se réchauer à température ambiante pendant au moins quelques
heures avant de l’utiliser. La température ambiante de l’unité ne doit pas être
inférieure à 50˚F/10˚C.
9. Installez l’unité dans un endroit sec à l’abri de la lumière directe du soleil. Ne pas
placer sur ou à proximité d’un brûleur à gaz ou électrique chaud, ou dans un four
chaué. Utilisez à l’intérieur seulement.
10. Ne placez jamais d’objet inflammable à proximité de l’unité.
11. Laissez un minimum de 5” (13 cm) autour de l’arrière et des côtés de l’unité pour
une bonne ventilation.
12. Un nettoyage régulier de l’unité est nécessaire pour son bon fonctionnement.
Nettoyez l’unité tous les quatre mois en suivant les instructions de ce manuel.
AVERTISSEMENT
AVERTISSEMENT - Les dangers ou
pratiques dangereuses qui POURRAIENT
entraîner des blessures graves ou la mort
DANGER
DANGER - Les dangers immédiats
qui VONT entraîner des blessures
graves ou la mort
ATTENTION
ATTENTION - Les dangers ou pratiques
dangereuses qui POURRAIENT entraîner
des blessures mineures
AVERTISSEMENT
Lors de l’utilisation d’appareils électriques, des précautions de sécurité
de base doivent être suivies, y compris les suivantes
INFORMATION SUR LA SÉCURITÉ

Page 19
INFORMATION SUR LA SÉCURITÉ
GARDEZ CES INSTRUCTIONS
USAGE MÉNAGER UNIQUEMENT
INSTRUCTIONS DE MISE À LA TERRE
En cas de mauvais fonctionnement ou de rupture d’isolation, la mise à la terre fournit
un chemin de moindre résistance pour le courant électrique afin de réduire le risque
de choc électrique. La machine à glace doit être connectée à un cordon doté d’un
conducteur de mise à la terre et d’une fiche de mise à la terre. La fiche doit être
branchée dans une prise appropriée qui est correctement installée et mise à la terre
conformément à tous les codes et ordonnances locaux.
DANGER: Une mauvaise connexion du conducteur de mise à la terre de
l’équipement peut entraîner un risque de choc électrique. Le conducteur avec
isolation ayant une surface extérieure verte avec ou sans rayures jaunes est le
conducteur de mise à la terre de l’équipement. Si la réparation ou le remplacement
du cordon ou de la fiche est nécessaire, ne connectez pas le conducteur de mise à
la terre de l’équipement à une borne sous tension. Vérifiez auprès d’un électricien ou
d’un technicien qualifié si les instructions de mise à la terre ne sont pas complètement
comprises, ou en cas de doute quant à savoir si l’appareil est correctement mis à la
terre. Ne modifiez pas la fiche connectée à l’appareil - si elle ne correspond pas à la
prise, faites installer une prise appropriée par un électricien qualifié.
POUR UN APPAREIL MIS À LA TERRE, RACCORDÉ PAR CORDON ÉVALUÉ
INFÉRIEUR À 15A ET CONÇU POUR UNE UTILISATION SUR UN CIRCUIT
D’ALIMENTATION NOMINAL DE 120V.
La machine à glace est conçue à être utilisée sur un circuit nominal de 120V et doit
être connectée à une prise mise à la terre qui ressemble à celle illustrée ci-dessous.
L’utilisation d’un adaptateur temporaire n’est pas recommandée.
AVERTISSEMENT
Une mauvaise utilisation de la prise mise à la terre peut entraîner un risque de choc électrique
Consultez un électricien ou un technicien qualifié si:
1) Les instructions de mise à la terre ne sont pas complètement comprises.
2) Vous n’êtes pas sûr que l’appareil soit correctement mis à la terre.
3) Vous avez des questions sur la mise à la terre ou les instructions électriques.

Page 20Page 20
INFORMATION SUR LA SÉCURITÉ
ALIMENTATION ÉLECTRIQUE
1. Évitez d’utiliser une rallonge à cause des risques potentiels pour la sécurité sous
certaines conditions. Il est recommandé de faire installer une prise de courant à
proximité de l’appareil par un électricien ou un technicien qualifié.
2. S’il est absolument nécessaire d’utiliser des cordons plus longs ou une rallonge; une
extrême prudence doit être exercée.
a) Utilisez uniquement une rallonge à 3 fils de type mise à la terre qui a une prise de
terre à 3 broches et une prise à 3 fentes qui acceptera la fiche de l’appareil.
b) Les caractéristiques électriques marquées du jeu de cordon ou de la rallonge
doivent être égales ou supérieure à la puissance électrique de l’appareil.
c) Le cordon le plus long doit être disposé de manière à ce qu’il ne tombe pas sur le
comptoir ou dessus de table où il peut être tiré dessus par des enfants ou trébucher
dessus par inadvertanc
REMARQUE: Ni BLACK+DECKER ni le marchand ne peuvent accepter aucune
responsabilité pour les dommages au produit ou des blessures résultant
du non-respect des procédures de connexion.
AVERTISSEMENT - RISQUE D’INCENDIE
Il est important que la fiche s’insère fermement dans la prise murale. Si la fiche ne
s’insère pas fermement et semble lâche, il ne doit pas être utilisé. Demandez à un
électricien agréé de remplacer le réceptacle.
UTILISATION DE RALLONGES AVEC LA MACHINE À GLACE
Utilisez uniquement une rallonge mise à la terre d’au moins 15 ampères et dotée
d’un troisième fil de terre. Lorsqu’une longue rallonge est utilisée pour connecter
la machine à glace, une chute de tension se produit. Plus le cordon est long, plus la
chute de tension est importante. Cela réduit la tension fournie à la machine à glace et
augmente la quantité de courant (ampères) consommé ou réduit les performances.
Un plus gros cordon avec un fil plus gros réduira la chute de tension. Assurez-vous de
choisir un cordon qui fournira une tension susante pour faire fonctionner la machine
à glace. Le tableau ci-dessous indique le calibre approprié pour les rallonges.
Jauge minimale pour les jeux de cordons
Ampère
Volts Longueur totale du cordon en pieds (mètres)
120V 25 (7.6) 50 (15.2) 100 (30.5) 150 (45.7)
240V 50 (15.2) 100 (30.5) 200 (61.0) 300 (91.4)
Plus que Pas plus
de
0 6 18 16 16 14
610 18 16 14 12
10 12 16 16 14 12
12 16 14 12 Non recommandé
AVERTISSEMENT: Gardez les cordons électriques en bon état. N’utilisez pas de
cordons usés, nus ou elochés car ils peuvent provoquer un choc électrique.
AVERTISSEMENT: L’utilisation d’équipements à basse tension peut provoquer leur
surchaue. L’utilisation d’une rallonge trop longue peut provoquer une surchaue du
cordon.
La page est en cours de chargement...
La page est en cours de chargement...
La page est en cours de chargement...
La page est en cours de chargement...
La page est en cours de chargement...
La page est en cours de chargement...
La page est en cours de chargement...
La page est en cours de chargement...
La page est en cours de chargement...
La page est en cours de chargement...
La page est en cours de chargement...
La page est en cours de chargement...
La page est en cours de chargement...
La page est en cours de chargement...
La page est en cours de chargement...
La page est en cours de chargement...
La page est en cours de chargement...
La page est en cours de chargement...
La page est en cours de chargement...
La page est en cours de chargement...
La page est en cours de chargement...
La page est en cours de chargement...
La page est en cours de chargement...
La page est en cours de chargement...
-
 1
1
-
 2
2
-
 3
3
-
 4
4
-
 5
5
-
 6
6
-
 7
7
-
 8
8
-
 9
9
-
 10
10
-
 11
11
-
 12
12
-
 13
13
-
 14
14
-
 15
15
-
 16
16
-
 17
17
-
 18
18
-
 19
19
-
 20
20
-
 21
21
-
 22
22
-
 23
23
-
 24
24
-
 25
25
-
 26
26
-
 27
27
-
 28
28
-
 29
29
-
 30
30
-
 31
31
-
 32
32
-
 33
33
-
 34
34
-
 35
35
-
 36
36
-
 37
37
-
 38
38
-
 39
39
-
 40
40
-
 41
41
-
 42
42
-
 43
43
-
 44
44


BLACK DECKER BIMH326S Manuel utilisateur
- Taper
- Manuel utilisateur
dans d''autres langues
- English: BLACK DECKER BIMH326S User manual
- español: BLACK DECKER BIMH326S Manual de usuario
Documents connexes
Autres documents
-
BLACK+DECKER BLACK+DECKER BHDC201 Portable Space Heater Manuel utilisateur
-
Frigidaire EFIC Series Ice Maker Manuel utilisateur
-
-
Magic Chef MCIM22RT Guide d'installation
-
-
Avanti IM4520G-IS Manuel utilisateur
-
-
-
Black & Decker CMD3400MBC Manuel utilisateur
-
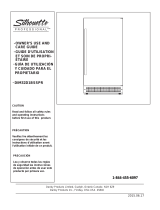 Danby Products DIM32D1BSSPR Manuel utilisateur
