PDi PDI-P16TV-GA-C MedTV16 16-Inch Arm-Mounted Healthcare-Grade LED Backlit HDTV Manuel utilisateur
- Catégorie
- Téléviseurs LCD
- Taper
- Manuel utilisateur
Ce manuel convient également à

mymedTV.com
USER MANUAL
Document Number: PD196-405R4
16” Arm-Mounted, Healthcare-grade
LED Backlit HDTV

MODEL: medTV16
Document Number:
PD196-405R4
User Manual
Page 2 of 22
PDi Communication Systems, Inc. ▪ 40 Greenwood Ln ▪ Springboro, Ohio 45066 USA ▪ www.pdiarm.com and www.mymedTV.com ▪ Phone 800.628.9870
Table of Contents
IMPORTANT SAFETY INSTRUCTIONS ................................................................................................................................................................................................................................ 5
INSTALLING THE TELEVISION .............................................................................................................................................................................................................................................. 6
Installation Precautions ....................................................................................................................................................................................................................................................... 6
Coax Cable Specifications .................................................................................................................................................................................................................................................... 6
Category Cable Specifications ........................................................................................................................................................................................................................................... 6
Arm Mounting ........................................................................................................................................................................................................................................................................... 6
DIRECT ENTRY KEYPAD ........................................................................................................................................................................................................................................................... 6
PROGRAMMING MENUS AND SETUP ................................................................................................................................................................................................................................. 7
SERVICE LEVEL ........................................................................................................................................................................................................................................................................ 7
PICTURE....................................................................................................................................................................................................................................................................................... 7
Brightness, Contrast, Color, Tint, and Sharpness .................................................................................................................................... 7
Color Temperature .................................................................................................................................................................................. 8
Noise Reduction ..................................................................................................................................................................................... 8
SOUND .......................................................................................................................................................................................................................................................................................... 8
Balance Volume ..................................................................................................................................................................................... 9
Minimum Volume .................................................................................................................................................................................. 9
Maximum Volume .................................................................................................................................................................................. 9
Power on Volume .................................................................................................................................................................................. 9
Internal Speaker Enable ...................................................................................................................................................................... 10
Volume Leveling .................................................................................................................................................................................. 10
Headphone Sound Mode ..................................................................................................................................................................... 10
Pillow Speaker Boost ........................................................................................................................................................................... 10
CHANNELS ................................................................................................................................................................................................................................................................................ 11
Signal .................................................................................................................................................................................................... 11
Channel Sequence ................................................................................................................................................................................ 11
Auto Program ....................................................................................................................................................................................... 11
Auto Channel Alias ............................................................................................................................................................................... 12
Configure Channels .............................................................................................................................................................................. 12
Clear Service Level............................................................................................................................................................................... 12
Copy Service Level ............................................................................................................................................................................... 13
Parental Control ................................................................................................................................................................................... 13
MPAA Rating ........................................................................................................................................................................................ 14
Television Rating Guides ..................................................................................................................................................................... 14
Auxiliary Block Source ........................................................................................................................................................................ 15
Parental Lock ....................................................................................................................................................................................... 15

MODEL: medTV16
Document Number:
PD196-405R4
User Manual
Page 3 of 22
PDi Communication Systems, Inc. ▪ 40 Greenwood Ln ▪ Springboro, Ohio 45066 USA ▪ www.pdiarm.com and www.mymedTV.com ▪ Phone 800.628.9870
Power on Channel ................................................................................................................................................................................ 15
Channel Lock ........................................................................................................................................................................................ 15
Channel Memory Override/Auto Ch Update...................................................................................................................................... 15
FEATURES ................................................................................................................................................................................................................................................................................. 16
Power on Captions Mode .................................................................................................................................................................... 16
Auto Power On/Lock ........................................................................................................................................................................... 16
Inactive Power Off (h: mm) ................................................................................................................................................................. 16
Bed A/B/C/D ....................................................................................................................................................................................... 16
Caption Text Modes ............................................................................................................................................................................. 16
Digital Captions .................................................................................................................................................................................... 17
Digital Mode Time Setup ..................................................................................................................................................................... 17
Channel Up Power Off ......................................................................................................................................................................... 17
Channel to Other Sources .................................................................................................................................................................... 18
Power on ARC Mode ............................................................................................................................................................................ 18
Analog Pillow Speaker ......................................................................................................................................................................... 18
Splash Image ........................................................................................................................................................................................ 18
OSD LANGUAGE (On-Screen Display) ......................................................................................................................................................................................................................... 18
SOURCES .................................................................................................................................................................................................................................................................................... 19
Power on Source .................................................................................................................................................................................. 19
SYSTEM ...................................................................................................................................................................................................................................................................................... 19
Diagnostics ........................................................................................................................................................................................... 20
Reset to Factory Defaults .................................................................................................................................................................... 20
Standby Power ..................................................................................................................................................................................... 20
USB Cloning/Firmware/Splash Updates ........................................................................................................................................... 20
MTI/SmartPort Personality ................................................................................................................................................................... 21
Security ................................................................................................................................................................................................. 22
Support Information ............................................................................................................................................................................. 22
Limited Warranty .................................................................................................................................................................................................................................................................. 22

MODEL: medTV16
Document Number:
PD196-405R4
User Manual
Page 4 of 22
PDi Communication Systems, Inc. ▪ 40 Greenwood Ln ▪ Springboro, Ohio 45066 USA ▪ www.pdiarm.com and www.mymedTV.com ▪ Phone 800.628.9870
Overhead Falling Hazard
WARNING: To prevent injury, this apparatus must be
securely attached to the floor/wall in accordance with the
installation instructions.
TV can pose a striking hazard when mounted at an
elevated position. Use only PDi mounting brackets,
support arms, and appropriate hardware to assure TV
will not fall from the mounted position
Rain and Moisture
WARNING: To avoid the hazards of fire or electrical shock,
DO NOT expose this television to rain or moisture.
Oxygen Environment
WARNING: Do not use in any oxygen tent or oxygen
chamber. Such use may cause a fire hazard.
Note to Cable TV Installer
This reminder is provided to call the cable TV system installer’s
attention to Article 820-40 of the National Electrical Code. The code
provides guidelines for proper grounding and in particular specifies
that the
cable
ground
shall be
connected
to the
grounding
system of
the
building, as
close to the
point of
the cable entry as practical. Canadian installations shall be properly
grounded in accordance with the Canadian Electrical Code, Part 1.
FCC
This equipment has been tested and found to comply with the limits
for a Class A digital device, pursuant to part 15 of the FCC Rules. These
limits are designed to provide reasonable protection against harmful
interference when the equipment is operated in a commercial
environment. This equipment generates, uses, and can radiate radio
frequency energy and, if not installed and used in accordance with the
instruction manual, may cause harmful interference to radio
communications. Operation of this equipment in a residential area is
likely to cause harmful interference in which case the user will be
required to correct the interference at his own expense.
Maintenance and Servicing
The TV does not require periodic maintenance other than cleaning.
Never remove the back cover of the TV; this can expose you to high
voltage and other hazards. If the TV does not operate properly, unplug
it and call an authorized service center or PDi.
Cleaning and Disinfection
Clean the exterior of this television by removing dust with a lint-free
cloth. Spot test a new disinfectant by test cleaning a non-obvious small
spot on the TV’s back cabinet, keypad, and LCD panel. PDi recommends
using a premoistened disinfectant cloth, like PD600-001 Super Sani-
Cloth or similar, or spraying cleaner onto a dry cloth and then wiping
the unit. Specific recommendations can be found at www.pdiarm.com.
CAUTION: To avoid damage to the surface of the television, do not use
abrasive or chemical cleaning agents.
Product Modification
Do not attempt to modify this product in any way without written
authorization. Unauthorized modification could void the user’s
authority to operate this product.
Copyright, Trademarks
© 2020 PDi Communication Systems, Inc. All rights reserved. PDi®, medTV®
and medTAB® are registered trademarks of PDi Communication Systems,
Inc. Manufactured under license from Dolby Laboratories. Dolby, Dolby Audio,
and the double-D symbol are trademarks of Dolby Laboratories. The terms
HDMI, HDMI High-Definition Multimedia Interface, and the HDMI Logo are
trademarks or registered trademarks of HDMI Licensing Administrator, Inc.
Product logos, brands and other trademarks displayed within PDi’s products
are the property of their respective trademark holders, who are not affiliated
with, endorsing, or sponsoring PDi Communication Systems, Inc. or our
products.
Underwriters Laboratories
The model medTV16 Hospital Grade LCD HDTV is a
specialized TV and should be installed to National
Electrical Code specifications. This device is safety
tested and listed by the Underwriters Laboratories as a
product suitable for use in healthcare facilities in both
the United States and Canada.
Disclaimer
The author and publisher have used their best efforts in preparing
this manual. PDi Communication Systems, Inc. makes no
representation or warranties with respect to the accuracy or
completeness of the contents of this manual and specifically
disclaims any implied warranties or merchantability or fitness for
any purpose and shall in no event be liable for any loss of profit or
any other damages. The information contained herein is believed
accurate, but is not warranted, and is subject to change without
notice or obligation.

MODEL: medTV16
Document Number:
PD196-405R4
User Manual
Page 5 of 22
PDi Communication Systems, Inc. ▪ 40 Greenwood Ln ▪ Springboro, Ohio 45066 USA ▪ www.pdiarm.com and www.mymedTV.com ▪ Phone 800.628.9870
IMPORTANT SAFETY INSTRUCTIONS
CAUTION: THIS INSTALLATION SHOULD BE MADE BY A
QUALIFIED SERVICE PERSON AND SHOULD CONFORM TO ALL
LOCAL CODES. READ AND FOLLOW THE SAFETY INSTRUCTIONS
BEFORE ATTEMPTING THIS INSTALLATION.
1. Read Instructions – All the safety and operating instructions
should be read before the product is operated.
2. Keep these Instructions – The safety and operating instructions
should be retained for future reference.
3. Heed all Warnings – All warnings on the product and in the
operating instructions should be adhered to.
4. Follow all Instructions – All warnings on the product and in the
operating instructions should be followed.
5. Water and Moisture – Do not expose this product to rain or
moisture. Do not use this product near water – for example, near
a bath tub, wash bowl, kitchen sink, or laundry tub; in a wet
basement; near a swimming pool; and the like.
6. Cleaning – Please see specific recommendations under “Cleaning
and Disinfection” on previous page.
7. Ventilation – Slots and openings in the cabinet are provided for
ventilation to ensure reliable operation of the product and to
protect it from overheating. These openings must not be blocked
or covered. The openings should never be blocked by placing the
product on a bed, sofa, rug, or other similar surface. This product
should not be placed in a built-in installation such as a bookcase
or rack unless proper ventilation is provided, or the
manufacturer’s instructions have been adhered to.
8. Heat – The product should be situated away from heat sources
such as radiators, heat registers, stoves, or other products
(including amplifiers) that produce heat.
9. Power-Cord Protection – Protect the power cord from being
walked on or pinched, particularly at plugs, convenience
receptacles, and the point where they exit from the product.
10. Attachments – Only use attachments/accessories specified by the
manufacturer.
11. Use only with cart, stand, tripod, bracket, or table
specified by the manufacturer, or sold with the
apparatus. When a cart is used, use caution when
moving the cart/apparatus combination to avoid
injury from tip-over.
12. Lightning – For added protection for this product during a
lightning storm, or when it is left unattended and unused for long
periods of time, unplug it from the wall outlet and disconnect the
antenna or cable system. This will prevent damage to the product
due to lightning and power-line surges.
13. Servicing – Refer all servicing to qualified service personnel.
Servicing is required when the apparatus has been damaged in
any way, such as power cord or plug is damaged, liquid has been
spilled or objects have fallen into the apparatus, the apparatus
has been exposed to rain or moisture, does not operate normally,
or has been dropped.
14. Oxygen Environment – Do not use in an oxygen tent or oxygen
chamber. Such use may cause a fire hazard.
15. To prevent injury, this apparatus must be securely attached to the
wall in accordance with the installation instructions. TV’s can
pose a striking hazard when mounted at an elevated level.
16. Power Sources – This product should be operated only from the
type of power source indicated on the marking label. If you are
not sure of the type of power supply to your home, consult your
product dealer or local power company. For products intended to
operate from battery power, or other sources, refer to the
operating instructions.
CONSIGNES DE SÉCURITÉ IMPORTANTES
CETTE INSTALLATION DOIT ÊTRE EFFECTUÉE PAR UN
TECHNICIEN QUALIFIÉ ET DOIT ÊTRE CONFORME À TOUS LES
CODES LOCAUX. LIRE ET SUIVRE LES CONSIGNES DE SÉCURITÉ
AVANT DE PROCÉDER À L’INSTALLATION.
1. Lire ces instructions.
2. Conserver ces instructions.
3. Respecter tous les avertissements.
4. Suivre toutes les instructions.
5. Ne pas utiliser cet appareil près de l'eau - par exemple près
d'une baignoire, d'un lavabo, dans un sous-sol humide, ou près
d'une piscine ou similaire.
6. Veuillez voir les recommandations sous “Nettoyage et
Désinfection” à la Page précédente.
7. Ne pas obstruer les ouvertures de ventilation. Installer
conformément aux instructions du fabricant. Les ouvertures ne
doivent jamais être obstruées en plaçant le produit sur un lit, un
canapé, un tapis ou toute autre surface similaire.
8. NE PAS installer près de sources de chaleur telles que
radiateurs, registres de chaleur, poêles ou tout autre appareil (y
compris les amplificateurs) qui produit de la chaleur.
9. NE PAS neutraliser le dispositif de sécurité de la fiche polarisée
ou de terre. Ce produit est équipé d'une prise de terre à trois fils,
une fiche ayant une troisième broche (mise à la terre). Cette
fiche ne peut s'insérer que dans une prise de courant avec mise
à la terre. Il s'agit d'une caractéristique de sécurité. Si vous êtes
incapable d’insérer la fiche dans la prise, contacter votre
électricien pour remplacer votre prise obsolète.
10. Protéger le cordon d'alimentation pour qu’il ne soit pas piétiné
ni pincé, en particulier au niveau des fiches, des prises de
courant et au point de sortie de l’appareil.
11. Accessoires - Utiliser uniquement les attaches/accessoires
recommandés par le fabricant.
12. Utiliser uniquement avec un chariot, stand, trépied, support ou
table recommandé par le fabricant ou vendu avec l'appareil.
Lorsqu’un chariot est utilisé, faire attention lors du déplacement
de l'ensemble chariot/appareil afin d’éviter des blessures en cas
de basculement.
13. Débrancher cet appareil en cas d'orages ou lorsqu'il reste
inutilisé pendant de longues périodes.
14. Confier toute réparation à un personnel de service qualifié. Des
réparations sont nécessaires si l'appareil est endommagé d'une
façon quelconque, par exemple : cordon ou prise d'alimentation
endommagé, liquide renversé ou des objets sont tombés dans
l'appareil, l'appareil a été exposé à la pluie ou à l'humidité, ne
fonctionne pas normalement ou s'il est tombé.
15. Sources d'alimentation - Ce produit doit être utilisé uniquement
à partir du type de source d'alimentation indiqué sur l'étiquette.
Si vous n'êtes pas sûr sur le type d'alimentation de votre
domicile, consultez le détaillant de votre produit ou la
compagnie d'électricité locale. Pour les produits proposés de
fonctionner par piles, ou autres sources d’alimentation,
reportez-vous aux consignes d’utilisation.
16. Environnement d’oxygène - Ne pas utiliser sous une tente à
oxygène ou chambre à oxygène. Une telle utilisation peut causer
un risque d'incendie.

MODEL: medTV16
Document Number:
PD196-405R4
User Manual
Page 6 of 22
PDi Communication Systems, Inc. ▪ 40 Greenwood Ln ▪ Springboro, Ohio 45066 USA ▪ www.pdiarm.com and www.mymedTV.com ▪ Phone 800.628.9870
INSTALLING THE TELEVISION
Installation Precautions
For models powered over coax, use only a power source from PDi suitable for use in a healthcare facility. The single coaxial cable
on top of the TV is used to supply both low voltage AC or DC power (28VAC or 24VDC) and RF signal to the television.
For models powered by ethernet (PoE) use only UL listed power sourcing equipment that offers 60W per port using all 4 pairs for
power delivery. This is sometimes called UPoE, PoE++ or 802.3bt type 3. PDi recommends the
Microchip Microsemi PD-9506G/ACDC/M midspan power inserter. The ethernet cable on top of the TV is used to supply both
power and data. Be sure power is not applied to the coaxial cable entering the TV.
Coax Cable Specifications
When using a central coax power supply, cable selection is crucial. Due to long coax cable runs encountered in hospital
installations, coax cable employing a solid copper center conductor and copper shield is required. Cable run lengths MUST NOT
exceed 150 feet. Required coaxial cable numbers include Alpha 9804C (non-plenum), Belden 9248 (non-Plenum), West Penn 806
(non-Plenum), or West Penn 25806 (Plenum), which have been tested with coax-powered TVs.
Category Cable Specifications
PoE models are IEEE 802.3bt compatible. When using a PoE power inserter to apply power to ethernet, CAT5e or better cable may
be used. The total cable length from network switch to PDI device may be up to the standard 330ft.
Arm Mounting
This television is designed to attach to a PDi suspension arm adjusted to support seven pounds.
Arm Recoil Hazard: The safety brake pin must remain in the SAFETY BRAKE PIN HOLE whenever the television is removed from
the arm or when the arm is removed from the wall bracket to prevent INJURY from the arm springing open. Note: Contact PDi for
additional information on arm compatibility and cable requirements.
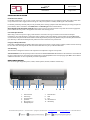
DIRECT ENTRY KEYPAD
You can use the glass keypad for power, volume, closed captions, channel, and direct channel entry.
1. Volume Down
2. Volume Up
3. Closed Caption
4. Speakers
5. Direct Entry 1-0
6. Headphone Jack
7. Power Button
8. USB
9. Last
10. Channel Down
11. Channel Up
1
2
3
6
7
8
4
9
10
11
5

MODEL: medTV16
Document Number:
PD196-405R4
User Manual
Page 7 of 22
PDi Communication Systems, Inc. ▪ 40 Greenwood Ln ▪ Springboro, Ohio 45066 USA ▪ www.pdiarm.com and www.mymedTV.com ▪ Phone 800.628.9870
PROGRAMMING MENUS AND SETUP
Note: The following instructions assume you have a programming remote, have correctly mounted the TV, and connected a coax
cable that provides both power and RF signal. The PDi programming remote Part Number PD108-420 must be ordered separately.
If the blue SETUP screen goes blank while you are changing any settings, simply press SETUP on the PD108-420 remote.
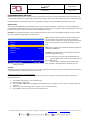
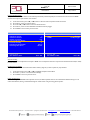
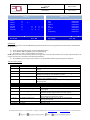
SERVICE LEVEL
This TV offers three different programmable Service Levels: Free, Basic, and Premium. Service levels are three independently
programmable channel maps that can be used in manner desired. Some typical uses of service levels are described below. Only one
Service Level is usable at a time. The TV also offers a Disabled service level.
Disabled is like a mechanical key lock – when in Disabled service level, the TV can be turned OFF and ON, but cannot be used for
viewing. A standard message appears on a black screen.
Free lets patients watch hospital education and information
channels without renting the TV. The channels containing
programming for no charge are typically programmed into this
level of service. This is the factory default setting for service
level.
Basic service typically allows additional channels beyond those
offered in the FREE level.
Premium is the highest Service Level with typically the most
channels available for viewing.
To set the active service level, using the PD108-420 Remote:
1. Press the SETUP button on the remote to display the on-
screen SETUP menu.
2. Press the VOL► to disable or select desired service
level. (Free, Basic, Premium). Refer to Channels setup for
additional settings.
PICTURE
Adjustment of picture Brightness, Contrast, Color, Tint, Color Temperature, Sharpness, and picture Noise Reduction is available to
customize the levels you prefer using the on-screen menus.
Brightness, Contrast, Color, Tint, and Sharpness
These settings have a range of 1-100, except Tint range is R50 to G50. To change one of them, simply change the number by
following this process.
1. Press SETUP to display the on-screen SETUP menu.
2. Select the Picture menu item.
3. Press the CH▲ / CH▼ buttons to highlight the desired picture item – Brightness, Contrast, Color, Tint (R50 to G50), and
Sharpness.
4. Adjust the picture item using the VOL◄ / VOL► buttons to the desired level.
5. Press SETUP to store the picture values and to exit the menu.
SETUP
■ Service Level
Free
■ Picture
►
■ Sound
►
■ Channels
►
■ Features
►
■ OSD Language
English
■ Sources
►
■ System
►
Position: ▲▼
Exit: SETUP or LAST
Next: ◄►

MODEL: medTV16
Document Number:
PD196-405R4
User Manual
Page 8 of 22
PDi Communication Systems, Inc. ▪ 40 Greenwood Ln ▪ Springboro, Ohio 45066 USA ▪ www.pdiarm.com and www.mymedTV.com ▪ Phone 800.628.9870
SETUP
■ Service Level
Free
■ Picture
►
■ Sound
►
■ Channels
►
■ Features
►
■ OSD Language
English
■ Sources
►
■ System
►
Position: ▲▼
Exit: SETUP or LAST
Next: ◄►
Picture
■ Brightness
82
■ Contrast
80
■ Color
77
■ Tint
0
■ Color Temperature
►
■ Sharpness
60
■ HDMI Picture
►
■ Noise Reduction
Disabled
Position: ▲▼
Exit: SETUP or LAST
Next: ◄►
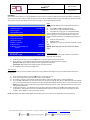
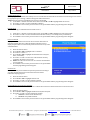
Color Temperature
The color temperature menu adjusts the color balance of the picture.
“Standard”, “Reddish”, “Greenish”, “Bluish” color temperatures are
available for selection. The “USER” setting allows individual
adjustment of each of the TV’s primary colors. The color temperature
setting is best set using a calibrated signal source capable of generating
a test signal containing both pure white and pure black picture
components.
1. Press the SETUP button on the remote to display the on-
screen SETUP menu.
2. Press CH▲ / CH▼ to select the Picture menu.
3. Press CH▲ / CH▼ to highlight Color Temperature.
4. Press CH▲ / CH▼ to see the individual settings.
5. On User, press VOL◄ / VOL► to highlight R, G, or B or to get
out of the customized adjustments. Press CH▲ / CH▼ to
adjust R, G, or B.
NOTE: When you select one of the three colors to adjust, the
other two will turn grey.
6. Press SETUP to return to the previous menu. To exit, press
SETUP until the programming menus disappear.
Noise Reduction
Additional picture improvement may be achieved by enabling Noise Reduction function found in the Picture menu.
1. Press the SETUP button to display the on-screen SETUP menu.
2. Select the Picture menu item.
3. Press the CH▲ / CH▼ buttons to highlight Noise Reduction.
4. Use the VOL◄ / VOL► buttons to alternate Enable or Disable.
5. Press SETUP to return to the previous menu.
SOUND
The Sound menu allows precise adjustment of several parameters.
1. Press the TV remote SETUP button to display the SETUP menu.
2. Press the CH▲ / CH▼ buttons to highlight the Sound menu item.
3. Use the VOL◄ / VOL► to display the Sound sub-menu.

MODEL: medTV16
Document Number:
PD196-405R4
User Manual
Page 9 of 22
PDi Communication Systems, Inc. ▪ 40 Greenwood Ln ▪ Springboro, Ohio 45066 USA ▪ www.pdiarm.com and www.mymedTV.com ▪ Phone 800.628.9870
Balance Volume
You can adjust speaker volume left to right. ZERO will balance sound or move from more left sound (L50) to more right sound
(R50).
1. In Sound menu, press the CH▲ / CH▼ to select Balance.
2. Press the VOL◄ / VOL► to select your preferred setting for volume balance.
3. Press SETUP to return to the previous menu.
Minimum Volume
Sets the minimum volume level the TV can reach. Setting this to any value other than 0 guarantees that some level of sound will
always be heard when the TV is operating.
1. In Sound menu, press the CH▲ / CH▼ to select Minimum Volume.
2. Press the VOL◄ / VOL► to select your preferred minimum volume.
3. Press SETUP to return to the previous menu.
Maximum Volume
Sets the maximum volume level the TV can reach.
1. In Sound menu, press the CH▲ / CH▼ button to select Maximum Volume.
2. Press the VOL◄ / VOL► button to select your preferred maximum volume allowed.
3. Press SETUP to return to the previous menu.
Power on Volume
Sets the initial volume for the TV upon powering on. Once the TV is on, the volume can be set to any allowable level. NOTE: If
Power on Volume is set to LAST, and physical power is removed, the TV will power on with a volume of zero.
1. In Sound menu, press the CH▲ / CH▼ button to select Power on Volume.
2. Press the VOL◄ / VOL► button to determine your preferred volume when the TV turns on. Setting range is from 0 to
100 or LAST. Setting the level to LAST causes the TV to remember the last volume level used by the TV prior to turning
off.
3. Press SETUP to return to the previous menu.

MODEL: medTV16
Document Number:
PD196-405R4
User Manual
Page 10 of 22
PDi Communication Systems, Inc. ▪ 40 Greenwood Ln ▪ Springboro, Ohio 45066 USA ▪ www.pdiarm.com and www.mymedTV.com ▪ Phone 800.628.9870
Internal Speaker Enable
The speakers inside the TV cabinet can be Enabled (turned ON) or Disabled (OFF) for each TV Service Level and source. Note:
Sound to the earphone jack remains on at all times.
1. In the Sound menu, press CH▲ / CH▼ button to select the Internal Speaker Enable menu item.
2. Press VOL◄ / VOL► to enter the menu.
3. Press the CH▲ / CH▼ button to select the desired Source.
4. Press VOL◄ / VOL► to select Disabled or Enabled or Vol Key Toggle.
5. Press SETUP to return to the previous menu.
Sound
■ Balance
L 6
■ Minimum Volume
0
■ Maximum Volume
100
■ Power on Volume
Last
■ Internal Speaker Enable
►
■ Volume Leveling
►
■ Headphone Sound Mode
Stereo
■ Pillow Speaker Boost
Normal
Position: ▲▼
Exit: SETUP or LAST
Next: ◄►
Internal Speaker Enable
Speaker
■ TV
Enabled
■ HDMI
Vol Key Toggle
Position: ▲▼
Exit: SETUP or LAST
Next: ◄►
Volume Leveling
Volume leveling can be adjusted for TV input or HDMI. You can adjust the volume in 10 percent increments between 50% to 100%
for each source.
Headphone Sound Mode
The earphone jack sound can be heard with either a Mono (single ear) or Stereo (dual ear) style headset.
1. In the Sound menu, press CH▲ / CH▼ to highlight Headphone Sound Mode.
2. Press VOL ◄ / VOL ► to choose between settings.
3. Press SETUP to return to previous menu.
Pillow Speaker Boost
For units having the OPTIONAL Pillow Speaker controls, the Pillow Speaker Boost is set to Disabled for default setting. You can
choose from Normal, Strong, or Disabled settings for volume boost using an analog pillow speaker.

MODEL: medTV16
Document Number:
PD196-405R4
User Manual
Page 11 of 22
PDi Communication Systems, Inc. ▪ 40 Greenwood Ln ▪ Springboro, Ohio 45066 USA ▪ www.pdiarm.com and www.mymedTV.com ▪ Phone 800.628.9870
CHANNELS
The Channels menu allows you to program different signal sources or select from three Service Levels (Free, Basic, or Premium).
Only one service level is usable at a time. Each Service Level contains a different channel map. It also allows you to block channels,
TV programs, movies, and auxiliary sources that can be input to the TV (See Parental Control).
Signal
1. Press the SETUP button on the PD108-420 remote
control.
2. Press CH▲ or CH▼ to highlight Channels.
3. Press VOL► to enter the Channels sub-menu.
4. Four different tuning types are available depending
upon the healthcare facility’s signal type. Selection of the
correct signal type is required for the TV to recognize all
possible channels and before any channel programming can
begin.
5. Enter the Channels menu.
6. Highlight Signal.
7. Press VOL ► to select Air, Cable STD, Cable IRC, or Cable
HRC.
NOTE: Most hospitals use the Cable STD signal
style.
Channel Sequence
This allows you to set the order in which the channels are
displayed after searching.
1. From the Channels menu, press the CH▼ button to select the Channel Sequence menu item.
2. Press ◄VOL► to set the Channel Sequence in which the channels are displayed after searching.
Interleave A+D: In the order of channel number regardless of the system.
All A then D: Digital channels are displayed after all analog channels.
3. Press SETUP to return to the preceding menu.
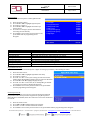
Auto Program
The TV automatically scans each available channel for activity. Channels that display activity are memorized into the selected
Service Level.
1. From the Channels menu, press the CH▼ button to select Auto Program.
2. In the Auto Program menu, press the VOL► button to select Mode.
3. Press VOL► to toggle to set the mode of channel scanning: Analog Only, Digital Only, or Analog and Digital.
4. Press the CH▲ / CH ▼ button to select the service level you wish to program (Free, Basic or Premium). The menu displays
the current programming status of each level as either Programmed or Blank. Press the VOL► to choose the service level.
NOTE: Free service level is automatically programmed with Analog channels 1-125. A Programmed service level can be
reprogrammed if desired.
5. Confirm Auto Program - A confirmation menu will appear before proceeding. Press CH▲ to select YES and start auto
programming. The TV will now search all available channels with an on-screen progress percentage displayed. Once
complete, press SETUP to return to normal TV viewing.
NOTE: Any tuning mode that includes Digital channels will require several minutes to complete the auto programming.
Channels
■ Signal
Air
■ Channel Sequence
All A then D
■ Auto Program
►
■ Auto Channel Alias
►
■ Configure Channels
►
■ Clear Service Level
►
■ Copy Service Level
►
■ Parental Control
►
■ Power on Channel
►
■ Channel Lock
Disabled
■ CH Mem Override/Auto Ch
Update
Disabled
Position: ▲▼
Exit: SETUP or LAST
Next: ◄►

MODEL: medTV16
Document Number:
PD196-405R4
User Manual
Page 12 of 22
PDi Communication Systems, Inc. ▪ 40 Greenwood Ln ▪ Springboro, Ohio 45066 USA ▪ www.pdiarm.com and www.mymedTV.com ▪ Phone 800.628.9870
Auto Program
■ Mode
Digital Only
■ Additional Digital Signal
■ Free
Programmed ►
■ Basic
Blank ►
■ Premium
Blank ►
Position: ▲▼
Exit: SETUP or LAST
Next: ◄►
Confirm Auto Program
Current Service Level
Premium
Service Level Selected for
Auto Program
Free
■ Auto program Free level?
Yes ▲ No
▼
Exit: SETUP or LAST
Auto Channel Alias
This setting automatically assigns a sequential channel number to the channels in the list.
1. From the Channels menu, press the CH▲ / CH▼ to highlight Auto Channel Alias.
2. Press VOL► to select and make your changes, e.g. Fill Analog Gaps with Digital Channels, Renumber Channels, Remove
Aliases. Press SETUP to return to the previous menu.
Configure Channels
This menu allows you to manually adjust individual channel settings. It allows you to create a: Channel Alias, Channel Label, and to
assign a channel to a service level. If you use this feature, all channels must be manually configured.
1. From the Channels menu, press the CH▲ / CH▼ to highlight Configure Channels.
2. Press VOL► to enter the menu
3. Press the CH▲ / CH▼ to highlight the channel you want to configure.
4. Press VOL► to the setting you want to change. Text turns red or has a red box to indicate the setting you are changing.
Press OK to select
5. Press CH▲ / CH▼ to change the numbers or letters to your desired setting. Press OK when complete.
6. Press SETUP to return to the previous menu.
Clear Service Level
This empties a service level of all its programmed channels, leaving it blank.
1. From the Channels menu, press the CH▲ / CH▼ to highlight Clear Service Level.
2. Press VOL► to select.
3. Press CH▲ / CH▼ to highlight the Service Level (Free, Basic, or Premium).
4. Press VOL► to select the highlighted service level.
5. A confirmation page will appear. Press Yes▲ to proceed. Press ▼ or SETUP to return to the previous menu.
6. NOTE: After a Service Level is cleared, the TV returns to the Clear Service Level menu. “Blank” will appear to the right of the
Service Level.
7. Press SETUP to return to the previous menu. To exit, press SETUP until the programming menus disappear.

MODEL: medTV16
Document Number:
PD196-405R4
User Manual
Page 13 of 22
PDi Communication Systems, Inc. ▪ 40 Greenwood Ln ▪ Springboro, Ohio 45066 USA ▪ www.pdiarm.com and www.mymedTV.com ▪ Phone 800.628.9870
Copy Service Level
This copies one service level’s channels to another service level, e.g. from FREE to BASIC.
1. In the Channels menu, Press CH▲ / CH▼ to highlight
Copy Service Level.
2. Press VOL► to select.
3. Press CH▲ to set the From: Service Level. Press CH▼
to set the To: Service Level.
4. Press VOL ►to copy the Service Level.
5. A confirmation screen will appear. Press CH▲ to
proceed. Press CH▼ or SETUP to return to the
previous menu.
6. NOTE: After a Service Level is copied, the TV returns
to the Copy Service Level menu. If the To Service Level
has been set to active in the Service Level setting (see
Service Levels), TV programming will appear.
7. Press SETUP to return to the previous menu.
8. To exit, press SETUP until the programming menus
disappear.
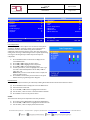
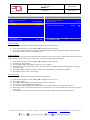
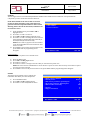
Parental Control
Parental Control allows you to block channels, TV shows, movies, and connected devices.
1. In the Channels menu, press CH▲ / CH▼ to
highlight Parental Control sub-menu.
2. From the Parental Control menu, press VOL►
to enter the TV Rating menu.
3. Press CH▼ to move to one of the six age-based
categories.
4. Press VOL◄ or VOL► to cycle through the sub-
ratings (ALL, FV, V, S, L or D) or press VOL◄ to exit out of
the sub-categories in that category. Definitions include
ALL is appropriate for all children. FV indicates fantasy
violence may be more intense for children younger than age 7. V contains violence, S contains sexual situations, L contains
crude language, and D suggestive dialogue which usually means talks about sex.
NOTE: The U or B (unblocked or blocked) will turn red when highlighted.
5. Press CH▲ or CH▼ to change the sub-rating.
6. Press SETUP to return to the previous menu. Or press VOL◄ to get out of the sub-category.
NOTE: Categories that are rated for older audiences will be automatically blocked. If you block TV-Y category, then TV-Y7 will be
blocked automatically. Similarly, if you block TV-G category, then TV-PG, TV-14 and TV-MA will also be blocked.
Copy Service Level
From: Free
To: Premium
Adjust From: ▲
Adjust To: ▲
Exit: SETUP or LAST
Next: ◄►
Grade
Meaning
ALL
Family Friendly All Ages
FV
Fantasy Violence
V
Violence
S
Sexual Situation
L
Adult Language
D
Sexual Suggestive Dialogue
Parental Control
■ TV Rating
►
■ MPAA Rating
►
■ Digital Rating
►
■ Clear Digital / Download New
►
■ Block Aux. Sources
Unblocked
■ Parental Lock
Disabled
Position: ▲▼
Exit: SETUP or LAST
Next: ◄►

MODEL: medTV16
Document Number:
PD196-405R4
User Manual
Page 14 of 22
PDi Communication Systems, Inc. ▪ 40 Greenwood Ln ▪ Springboro, Ohio 45066 USA ▪ www.pdiarm.com and www.mymedTV.com ▪ Phone 800.628.9870
MPAA Rating
Most televised movies are now rated. MPAA Rating selectively allows the TV to only present movie content that is unblocked per
the preset level.
1. From the Parental Control menu, enter the MPAA Rating menu.
2. Press CH ▲ or CH ▼ to highlight a particular MPAA Rating.
3. Press VOL ◄ or VOL ► to select Blocked or Unblocked.
NOTE: Parental Control will automatically block any category that is rated for older audiences. For example, if you block the PG-13
category, then R, NC-17 and X will be automatically blocked also.
4. Press SETUP to return to the previous menu. To exit, press SETUP until the programming menus disappear.
Television Rating Guides
Guide
Meaning
TV-Y
Young Children
Content not offensive to most viewers
TV-Y7
Children 7 and over
Considered suitable for children over 7, may contain Fantasy Violence
Scenes
TV-G
General Audience
Considered suitable for all audiences; children may watch unattended
TV-PG
Parental Guidance
Suggested Unsuitable for younger children, may contain: Suggestive
Dialogue, Bad Language, Sex, and Violence Scenes
TV-14
Parents Strongly Cautioned
Unsuitable for children under 14, may contain; Strong Dialogue, Bad
Language, Sex, and Violence Scenes.
TV-MA
Mature Audience Only
Adults only, may contain: Strong Dialogue, Bad Language, Sex, and
Violence Scenes
Grade
Meaning
G
General Audiences
Content not offensive to most viewers
PG
Parental Guidance Suggested
Content is such that parents may not want their children to view
the program
PG-13
Parents Strongly Cautioned
Program is inappropriate for preteens, with a greater degree of
offensive material suggested than a PG rated program
R
Restricted Viewing
Not for children under age 17.
Strong elements of sex and/or violence
NC-17
No Children under age 17
Not for children under age 17 under any circumstances
Strong sexual content
X
Hard Core Films
Same as NC-17 rating
No Rating
No Rating
MPAA not rated
TV Rating
ALL
FV
V
S
L
D
■ TV-Y
U
■ TV-Y7
U
U
■ TV-G
U
■ TV-PG
U
U
U
U
U
■ TV-14
U
U
U
U
U
■ TV-MA
U
U
U
U
Position: ▲▼
Exit: SETUP
Next: ◄►
MPAA Rating
■ G
Unblocked
■ PG
Unblocked
■ PG-13
Unblocked
■ R
Unblocked
■ NC-17
Unblocked
■ X
Unblocked
■ No Rating
Unblocked
Position: ▲▼
Exit: SETUP
Next: ◄►

MODEL: medTV16
Document Number:
PD196-405R4
User Manual
Page 15 of 22
PDi Communication Systems, Inc. ▪ 40 Greenwood Ln ▪ Springboro, Ohio 45066 USA ▪ www.pdiarm.com and www.mymedTV.com ▪ Phone 800.628.9870
Auxiliary Block Source
Like TV programs and channels, the auxiliary sources can be blocked too. When the TV encounters an external signal source that is
not appropriate per its settings, a black screen appears with muted sound.
NOTE: Parental Lock must be enabled for the sources to be blocked.
1. Go to SETUP – Channels -Parental Control menu. Press CH ▲ or CH ▼ to highlight Block Aux. Sources.
2. Press VOL ◄ or VOL ► to select Unblocked or Blocked.
3. Press SETUP to return to the previous menu. To exit, press SETUP until the programming menus disappear.
Parental Lock
This sets how long an enabled Parental Lock will be active.
1. Under Setup – Channels - Parental Control menu, press CH ▲ or CH ▼ to highlight Parental Lock Duration.
2. Press VOL ◄ or VOL ► to select the desired time duration of lock (1 hr to 10 days, Always or Disabled).
3. Press SETUP to return to the previous menu. To exit, press SETUP until the programming menus disappear.
Power on Channel
Displays a certain channel each time the TV is turned on. This feature is
useful for hospitals that have a Welcome Channel and wish to have it
displayed upon initial use of the TV. The patient can then tune to any other
available channel.
1. Enter the Channels menu.
2. Press CH ▲ or CH ▼ to highlight Power on Channel.
3. Press VOL ► to select it.
4. Press CH ▲ or CH ▼ to highlight the desired Service Level (Free,
Basic, or Premium).
5. Press VOL ◄ or VOL ► to select one of the channels currently
available in the Service Level or Last.
6. NOTE: Last will cause the TV to turn on to the last channel before
it was turned off.
7. Press SETUP to return to the previous menu. To exit, press SETUP
until the programming menus disappear.
Channel Lock
Locks the currently viewed channel and prevents patients from tuning to
any other channel. This feature is useful when the TV is used for
information display purposes.
1. Enter the Channels menu.
2. Press CH ▲ or CH ▼ to highlight Channel Lock.
3. Press VOL ◄ or VOL ► to select Enable or Disable.
4. Press SETUP to return to the previous menu. To exit, press SETUP until the programming menus disappear.
Channel Memory Override/Auto Ch Update
Allows a channel to be entered with the remote’s number buttons that is not memorized in the current Service Level.
1. Enter the Channels menu.
2. Press CH ▲ or CH ▼ to highlight Ch Mem Override/Auto Ch Update.
3. Press VOL ◄ or VOL ► to select Enabled or Disabled.
a. DISABLED = Service Level Channels only.
b. ENABLED = All possible channels.
4. Press SETUP to return to the previous menu. To exit, press SETUP until the programming menus disappear.

MODEL: medTV16
Document Number:
PD196-405R4
User Manual
Page 16 of 22
PDi Communication Systems, Inc. ▪ 40 Greenwood Ln ▪ Springboro, Ohio 45066 USA ▪ www.pdiarm.com and www.mymedTV.com ▪ Phone 800.628.9870
FEATURES
The Features menu provides adjustable settings that
customize the TV.
1. Press the SETUP button.
2. Press CH▲ or CH▼ to highlight Features.
3. Press VOL► to enter the Features sub-menu.
Power on Captions Mode
Power on Captions Mode memorizes the caption setting upon
powering the TV off. With this feature set to off, the TV will
always power on with the captions disabled. With this feature
set to Last, the TV turns on with the last caption setting
enabled.
1. Enter the Features menu.
2. Press CH▲ or CH▼ to highlight Power on Captions
Mode.
3. Press VOL◄ or VOL► to select Last or Off.
4. Press SETUP to return to the previous menu. To exit,
press SETUP until the programming menus
disappear.
Auto Power On/Lock
The TV will turn on and stay on whenever electrical power is applied to the set. The feature is useful for controlling the TV from a
wall switch or preventing the TV from being turned off by the TV power button or the remote control.
1. Enter the Features menu.
2. Press CH▲ or CH▼ to highlight Auto Power On.
3. Press VOL◄ or VOL► to select Disabled or Enabled.
4. Press SETUP to return to the previous menu.
Inactive Power Off (h: mm)
The TV will automatically power off after a specific period of viewer inactivity providing energy savings.
1. Enter the Features menu.
2. Press CH▲ or CH▼ to highlight Inactive Power Off.
3. Press VOL◄ or VOL► to select an active time (10 min to 8 hrs) or select Disabled to disable this feature.
4. Press SETUP to return to the previous menu. To exit, press SETUP until the programming menus disappear.
NOTE: Auto Power On must be set to Disabled for this function to operate.
Bed A/B/C/D
The TV can be controlled by a patient IR remote. The TV offers selectable codes Bed A, Bed B, Bed C, and Bed D for independent
control of a single television in a multi-television room. The patient remote can be toggled between Bed A, Bed B, Bed C, and Bed D
codes by using a paperclip to press the CODE button on the remote.
1. Enter the Features menu.
2. Press CH▲ or CH▼ to highlight Bed A/B/C/D.
3. Press VOL◄ or VOL► to select A, B, C, or D.
4. Press SETUP to return to the previous menu. To exit, press SETUP until the programming menus disappear.
Caption Text Modes
Teletext can be displayed in addition to Captions. Teletext is not normally broadcast in the USA. Caption Text Modes should be set
to Disabled for TVs operated in the USA.
1. Enter the Features menu.
2. Press CH▲ or CH▼ to highlight Caption Text Modes.
3. Press VOL◄ or VOL► to select Disabled or Enabled.
4. Press SETUP to return to the previous menu. To exit, press SETUP until the programming menus disappear.
Features
■ Power on Captions Mode
Last
■ Auto Power On / Lock
Disabled
■ Inactive Power Off (h:mm)
Disabled
■ Bed A/B/C/D
Bed A
■ Caption Text Modes
Disabled
■ Digital Captions
►
■ Digital Mode Time Setup
►
■ Channel Up Power Off
Disabled
■ Channel To Other Sources
Enabled
■ Power On ARC Mode
16:9
■ Analog Pillow Speaker
Enabled
■ Splash Image
Enabled
Position: ▲▼
Exit: SETUP or LAST
Next: ◄►

MODEL: medTV16
Document Number:
PD196-405R4
User Manual
Page 17 of 22
PDi Communication Systems, Inc. ▪ 40 Greenwood Ln ▪ Springboro, Ohio 45066 USA ▪ www.pdiarm.com and www.mymedTV.com ▪ Phone 800.628.9870
Digital Captions
Customization of Closed Captions on ATSC/QAM channels.
1. Enter the Features menu.
2. Press CH ▲ or CH ▼ to highlight Digital Captions.
3. Press VOL ► to select it.
4. Press CH ▲ or CH ▼ to highlight the attribute you
wish to change.
5. Press VOL ► to change it. (See the table below for
the settings of each attribute.)
6. Press SETUP to return to the previous menu. To exit,
press SETUP until the programming menus
disappear.
Attribute
Settings
Font Size
Small, Standard, Large, Default
Font Style
Style 0 – Style 7, Default
Foreground Color
White, Black, Red, Green, Blue, Yellow, Magenta, Cyan, Default
Background Color
White, Black, Red, Green, Blue, Yellow, Magenta, Cyan, Default
Edge Color
White, Black, Red, Green, Blue, Yellow, Magenta, Cyan, Default
Foreground Opacity
Solid, Translucent, Transparent, Flashing, Default
Background Opacity
Solid, Translucent, Transparent, Flashing, Default
Edge Style
None, Raised, Depressed, Uniform, Left Drop Shadow, Right Drop Shadow, Default
Digital Mode Time Setup
The current time will be set automatically from a digital channel signal provided by a broadcasting TV station.
1. Enter the Features menu.
2. Press CH ▲ or CH ▼ to highlight Digital Mode Time Setup
3. Press VOL ► to select it.
4. Press CH ◄ or CH ► to select your viewing area time zone: Pacific,
Alaska, Hawaii, Newfoundland, Atlantic, Eastern, Central or Mountain.
5. Press VOL ▲ or VOL ▼ to highlight Daylight Savings.
6. Press CH ◄ or CH ► to select Auto, On, or Off depending on whether
your viewing area observes Daylight Savings Time.
7. Press SETUP to return to the previous menu. To exit, press SETUP
until the programming menus disappear.
Channel Up Power Off
This feature causes the TV to turn off once it reaches the highest numbered
(last) channel and is usually used with single button style pillow speakers.
When the feature is disabled, the TV will continue on to the lowest channel and
not turn off.
1. Enter the Features menu.
2. Press CH▲ or CH▼ to highlight Channel Up Power Off.
3. Press VOL ◄ or VOL ► to select Enabled or Disabled.
4. Press SETUP to return to the previous menu. To exit, press SETUP until the programming menus disappear.
Digital Captions
■ Font Size
Default
■ Font Style
Default
■ Foreground Color
Default
■ Background Color
Default
■ Edge Color
Default
■ Foreground Opacity
Default
■ Background Opacity
Default
■ Edge Style
Default
Position: ▲▼
Exit: SETUP
Next: ►

MODEL: medTV16
Document Number:
PD196-405R4
User Manual
Page 18 of 22
PDi Communication Systems, Inc. ▪ 40 Greenwood Ln ▪ Springboro, Ohio 45066 USA ▪ www.pdiarm.com and www.mymedTV.com ▪ Phone 800.628.9870
Channel to Other Sources
External signal sources connected to the TV, such as DVD players or video-game systems, are shown in the current channel lineup
after the highest channel and then shown on the TV. Set this feature to Disabled to require the activation of the external sources by
pressing the remote’s TV/AV button. Set this feature to Enabled to allow access to external devices by pressing channel up or down
buttons on a remote or most pillow speakers.
1. Enter the Features menu.
2. Press CH▲ or CH▼ to highlight Channel to Other Sources.
3. Press VOL ◄ or VOL ► to select Enabled or Disabled.
4. Press SETUP to return to the previous menu. To exit, press SETUP until the programming menus disappear.
Power on ARC Mode
The TV powers on with a set screen sized aspect ratio of 4:3, 14:9, 16:9, 16:9 Panorama, or Last.
1. Enter the Features menu.
2. Press CH▲ or CH▼ to highlight Power On ARC Mode.
3. Press VOL ► to select 4:3, 14:9, 16:9, 16:9 Panorama, or Last.
4. Press SETUP to return to the previous menu. To exit, press SETUP until the programming menus disappear.
Analog Pillow Speaker
For units having the OPTIONAL Pillow Speaker control, use this setting to Enable or Disable an Analog Pillow Speaker.
Splash Image
Use this setting to Enable or Disable a custom splash screen. You can upload the custom image under Cloning and Firmware FW
Updates menu.
OSD LANGUAGE (On-Screen Display)
You can select the language you wish to use in your on-screen displays.
1. Press SETUP.
2. Press CH▲ or CH▼ to select the OSD Language menu (English, French, Spanish).
3. Press VOL ◄ or VOL ► to select your desired language.
4. Press SETUP to return to the previous menu. To exit, press SETUP until the programming menus disappear.

MODEL: medTV16
Document Number:
PD196-405R4
User Manual
Page 19 of 22
PDi Communication Systems, Inc. ▪ 40 Greenwood Ln ▪ Springboro, Ohio 45066 USA ▪ www.pdiarm.com and www.mymedTV.com ▪ Phone 800.628.9870
SOURCES
The TV’s signal sources can be individually Enabled or Disabled. The available sources in this menu correspond with the
components you have connected to the TV’s connectors.
NOTE: Please disable all TV sources that are not to be
used. A TV that is switched to a non-connected source
generates nuisance hospital maintenance calls of TV Not
Working, when in fact the TV does work, but has been set
to an inactive source.
1. From the SETUP menu, press CH▲ or CH▼ to
highlight Sources.
2. Press VOL ◄ or VOL ► to select it.
3. Press CH▲ or CH▼ to highlight a desired source.
4. Press VOL ◄ or VOL ► to change the source status to
either Disabled or Enabled/APO (Auto Power Off) or
Enabled/No APO (No Auto Power Off).
NOTE: Sources that are grayed out are not installed
in the TV. Enabled/APO means the TV will turn off if
there is no video.
5. Press SETUP to return to the previous menu. To exit,
press SETUP until the programming menus
disappear.
Power on Source
The TV can be preset to power on to a selected source.
1. Enter the SETUP menu
2. Press CH▲ or CH▼ highlight Sources.
3. Press VOL ► to select it.
4. Press VOL◄ or VOL► to change to the source that you want the TV to power on to.
NOTE: The source must be enabled before it can be chosen as a power on source. The Last entry causes the TV to power
on to the Last source selected.
5. Press SETUP to return to the previous menu. To exit, press SETUP until the programming menus disappear.
SYSTEM
The System menu provides access to settings and
information that affects your entire hospital TV.
1. Press the SETUP button.
2. Press CH▲ or CH▼ to highlight System.
3. Press VOL► to enter the System sub-menu.
Sources
■ Source Enable
►
■ Source Name
►
■ Power On Source
Last
Position: ▲▼
Exit: SETUP or LAST
Next: ◄►
System
■ Diagnostics
►
■ Reset to Factory Defaults
►
■ Standby Power
Normal
■ USB Cloning, Firmware, Splash Update
►
■ RF Cloning, Firmware, Splash Update
►
■ MTI/SmartPort Personality
MTI
■ Security
►
■ Support Information
►
Position: ▲▼
Exit: SETUP or LAST
Next: ◄►

MODEL: medTV16
Document Number:
PD196-405R4
User Manual
Page 20 of 22
PDi Communication Systems, Inc. ▪ 40 Greenwood Ln ▪ Springboro, Ohio 45066 USA ▪ www.pdiarm.com and www.mymedTV.com ▪ Phone 800.628.9870
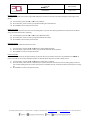
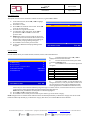
Diagnostics
This menu provides readouts of the TV’s internal operation. The
Diagnostics menu items are read-only and cannot be changed.
1. Enter the System menu.
2. Press CH▲ or CH▼ to highlight Diagnostics.
3. Press VOL ► to select it.
4. Press SETUP to return to the previous menu. To exit, press
SETUP until the programming menus disappear.
Field ON Hours: Cumulative time TV is actually on.
Field Powered Hours: Cumulative time TV is powered.
Reset to Factory Defaults
Use this setting to restore the TV to factory defaults. Select CH▲ for
YES or CH▼ for NO.
Standby Power
Controls power used by TV when in “Standby” or OFF stage.
1. Press the SETUP button on the remote control.
2. Press CH▲ or CH▼ to select System.
3. Press VOL ◄ or VOL ► to select it.
4. Press CH▲ or CH▼ to select Standby Power.
5. Press VOL ◄ or ► to select Low/Normal.
Note: If in “low” mode, TV consumes less power but takes longer to start when turned back on.
6. Press SETUP to return to the previous menu. To exit, press SETUP until the programming menus disappear.
USB Cloning/Firmware/Splash Updates
Cloning allows you to quickly and easily copy settings and channels from one TV to other TVs. Clone operation involves first
downloading setup information from a programmed host TV to a USB memory stick (thumb drive) and then uploading the setup
information to another TV. Alternatively, clone files can be loaded to the RF-HEMiS Head-end TV Server by PDi and distributed to
other TVs. Cloning can also be used to re-program an already programmed TV.
Save Settings to USB
1. Turn on the TV
2. Insert a USB thumb drive into the cloning port on the front of the TV. The USB Cloning and FW Update Menu will appear
on the TV screen.
3. Press CH▲ or CH ▼ to highlight Save Settings to USB.
4. Press VOL► to display the Save Settings to USB menu.
5. CH▼ to rename the *.TDF file. Press VOL◄/ VOL► to set each placeholder in filename. Press OK to lock-in each place.
6. Press OK to clear any red text and lock-in filename.
7. Press CH▲ to Save.
8. Press VOL◄/ VOL► to overwrite or Save filename to USB.
Diagnostics
■ Model
PDI-P16W
■ Firmware Ver
1.01
■ Boot Ver
0.4
■ Power On Cause
Cold
■ Pro:Idiom Status
Non Pro:Idiom Ch (D279)
■ CCI/MTI/SmartPort
Disconnected
■ CCI Ver
5.1
■ Field ON Hours
000204
■ Field Powered Hours
001204
Exit: SETUP or LAST
La page est en cours de chargement...
La page est en cours de chargement...
-
 1
1
-
 2
2
-
 3
3
-
 4
4
-
 5
5
-
 6
6
-
 7
7
-
 8
8
-
 9
9
-
 10
10
-
 11
11
-
 12
12
-
 13
13
-
 14
14
-
 15
15
-
 16
16
-
 17
17
-
 18
18
-
 19
19
-
 20
20
-
 21
21
-
 22
22


PDi PDI-P16TV-GA-C MedTV16 16-Inch Arm-Mounted Healthcare-Grade LED Backlit HDTV Manuel utilisateur
- Catégorie
- Téléviseurs LCD
- Taper
- Manuel utilisateur
- Ce manuel convient également à
dans d''autres langues
Documents connexes

Autres documents
-
Audiovox FPE6317P Manuel utilisateur
-
JVC KW-NT500HDT Manuel utilisateur
-
-
Eclipse CD7000 Le manuel du propriétaire
-
ProScan PLDED3273A Manuel utilisateur
-
ProScan PLDED3996A-C2 Manuel utilisateur
-
-
ProScan PLDED4016A Manuel utilisateur
-