Maxair P55GE25H1 25 25-Gallon Belt Drive Air Compressor Manuel utilisateur
- Catégorie
- Compresseurs d'air
- Taper
- Manuel utilisateur


3
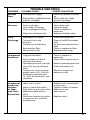
TABLE OF CONTENTS
Safety Precautions
Cautions............................................................ 4
Extension Cords..................................................... 4
Air Receiver......................................................... 4
Safety Valve......................................................... 5
Installation and Operating Instructions
Installation.......................................................... 5
Break-In Procedure.................................................. 5
Before Operating the Air Compressor . . . . . . . . . . . . . . . . . . . . . . . . . . . . . . . . 6
Compressor Lubrication............................................. 6
Filling Compressor with Oil.......................................... 7
Engine Lubrication.................................................. 7
Oil Changes......................................................... 7
Maintenance........................................................ 7
Checking Belt Tension............................................... 7
Operating Your Air Compressor ....................................... 8
Engine Gas Driven .................................................. 8
Electric Drive with Dual Control. . . . . . . . . . . . . . . . . . . . . . . . . . . . . . . . . . . . . . 9
Electric Drive........................................................ 9
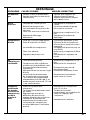
Compressor Maintenance Schedule.................................. 10
Troubleshooting...................................................... 11
Warranty ............................................................. 14
Carefully read this instruction
manual before attempting to
operate this compressor.

4
SAFETY PRECAUTIONS
Please familiarize yourself with the following information to prevent
damage to your compressor unit and injury to the operator.
The air compressor motor and/or engine will get hot
while in operation. Never touch the discharge tubing,
engine, motor or compressor pump while in operation.
The compressor operates automatically while the power is connected and
turned on, or the engine is running.
Compressed air from the unit may contain hazardous
fumes. Air produced by this compressor is not suitable
for breathing purposes. Always use a respirator when
spraying paint or chemicals, or when sandblasting. Always wear safety glasses
or goggles when using compressed air.
It is not practical or possible to warn you about all the hazards associated
with operating or maintaining this equipment. You must use your own good
judgment.
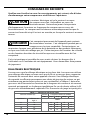
EXTENSION CORDS
The use of extensions cords is not recommended. Plug directly into a
dedicated circuit. If the use of an extension cord is unavoidable then make
sure your extension cord is in good condition. When using an extension
cord, be sure to use one heavy enough to carry the current your product will
draw. An undersized cord will cause a drop in line voltage resulting in loss of
power and overheating. Table 1 shows the correct size to use depending on
cord length and nameplate amperage rating. If in doubt, use the next heavier
gauge. The smaller the gauge number, the heavier the cord.
WARNING
CAUTION
Table 1 — Minimum Gauge for Cord
Volts Total length of cord in feet
Ampere Rating
120 V 25 ft. 50 ft. 100 ft. 150 ft.
More Than AWG
0
Not More Than
6
6
10
10
12
12
16
18 16 16 14
18 16 14 12
16 16 14 12
14 14 Not Recommended

5
Any replacement parts should be purchased with the same specifications
as the original equipment. Please contact the authorized dealer for
replacement parts or specifications.
SAFETY VALVE
This valve is factory installed to prevent over pressurizing of the air receiver.
It is factory set at a specific limit for your particular model, and should never
be tampered with.
Adjustment by user will automatically void the warranty.
INSTALLATION
1. INSTALLATION
Proper care, maintenance and lubrication ensures longevity. The compressor
should always be level for proper lubrication. Do not over tighten foot bolts
as excessive vibration may occur. Use only in a clean, dry, and well-ventilated
area. The compressor has heat dissipation fins for proper cooling. Keep
the fins and other parts that collect dust clean. Do not place rags or other
materials on top of the compressor, as this obstructs cooling and can be a
fire hazard.
2. BREAK-IN PROCEDURE
There is no break-in requirements for this model
NEVER WELD, DRILL OR CHANGE
THE AIR RECEIVER IN ANY WAY.
WARNING
DO NOT REMOVE, MAKE
ADJUSTMENTS TO OR
SUBSTITUTE THIS VALVE!
WARNING

6
3. BEFORE OPERATING THE AIR COMPRESSOR, PLEASE
CHECK THE FOLLOWING CAREFULLY:
1. Check to see that nuts and bolts are all snug.
2. Check if the quantity and quality of oil is correct.
3. If the intake filters are dirty, they should be replaced or cleaned.
4. COMPRESSOR LUBRICATION
Recommended Oil:
Eagle Compressor Oil #EAOIL10 (1 litre)
#EAOIL40 (4 litres)
Eagle compressor oil is a non-detergent mineral oil formulated with
additives to help minimize carbon build-up, increase ring life and reduce oil
consumption, for use at ambient temperatures of 0° to 30°C (32°F - 86°F).
Other Approved Oils:
Regular mineral oils can also be used in Eagle compressors.
Always use a non-detergent oil with the following specifications:
ALWAYS CHECK THE OIL LEVEL AND QUALITY
BEFORE START–UP. DO NOT ADD OR CHANGE
OIL WHILE THE UNIT IS RUNNING. USE ONLY
RECOMMENDED NON-DETERGENT OIL.
WARNING
AMBIENT TEMPERATURES AT
POINT OF OPERATION
SAE VISCOSITY ISO VISCOSITY
-16°C TO 0°C (3.2°F - 32°F) SAE 10W ISO 32
1°C TO 26°C (33.8°F - 78.8°F) SAE 20W ISO 68
ABOVE 27°C (80.6°F) SAE 30W ISO 100

7
5. FILLING COMPRESSOR WITH OIL
1. Remove the oil filler plug
2. Slowly pour the proper oil into the pump crankcase.
3. Always keep oil level in the middle of the sight glass.
6. ENGINE LUBRICATION (IF ENGINE DRIVEN)
Check engine Owner's manual for lubrication and maintenance
requirements.
7. OIL CHANGES
INITIAL OIL CHANGE DUE AT 100 HOURS
CHANGE OIL EVERY 300 HOURS OR 3 MONTHS, WHICHEVER COMES FIRST.
1. Remove the oil drain plug. Allow oil to drain completely.
2. Replace the oil drain plug.
3. Refill with the recommended oil to the proper level.
8. MAINTENANCE
Before doing any maintenance or adjustments to your air compressor, the
following safety precautions should be taken:
* TURN OFF AND UNPLUG POWER CORD.
* DRAIN AIR RECEIVER AND AIR LINES OF AIR PRESSURE.
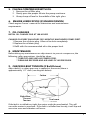
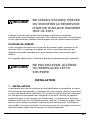
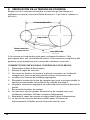
9. CHECKING BELT TENSION (If Belt Driven)
Adjust belt(s) so when pressure is applied at the center, there is
approximately 1/2" slack (see diagram below).
If the belt is installed too tight, the motor might be overloaded. This will
cause the motor to overheat. If the belt is installed too loosely, it will slip and
excessive wear and vibration will occur.
Centre
Too Loose
Too Tight
Slight Bow
Correct
Tension

8
HOW TO INSTALL NEW BELT IF REQUIRED (If belt driven)
1. Disconnect power supply.
2. Remove belt guard.
3. Loosen motor bolts and slide motor toward compressor head just
enough to allow old belt to be removed.
4. Install proper replacement belt.
5. Slide motor away from compressor head to provide recommended
tension as shown in diagram on page 5.
6. Align belt using a straight edge ruler against pulley’s edge.
7. Fasten motor bolts.
8. Ensure motor and compressor pulley’s are secure. Re-check alignment.
9. Re-install belt guard and reconnect power supply.
10.Belt tension should be checked after 20 hours of operation. Check
tension monthly thereafter.
OPERATING YOUR AIR COMPRESSOR
A) GAS ENGINE DRIVEN (continous run only)
1) Check entire unit for any damage.
2) Check compressor and engine oil level, fill or add if necessary.
3) Make sure gas tank is filled.
4) Read entire engine manual.
5) Starting the engine.
a) Move fuel lever to the "On" position.
- If engine is cold, move choke lever to the "Closed" position
- If engine is warm, leave choke lever in "Open" position
b) Turn engine switch to "On" position.
c) Pull starter grip lightly until you feel resistance, then pull briskly,
return starter grip gently - engine should start, if not repeat.
d) Once the engine starts running, slowly move the choke lever
to the "Open" position.
e) With the engine running properly, the compressor fills the air
receiver with compressed air, when maximum pressure (set by the
pilot valve control) is reached, the engine and compressor will slow
down to idle speed, and will return to full RPM when the cut-in
pressure is reached. The unit will continue to cycle automatically
until turned off.
6) Stopping the engine.
a) Turn engine switch to the "Off" position.
b) Turn the fuel lever to the "Off" position.
ENGINE IDLE SPEED MAY NEED TO
BE ADJUSTED, EVEN ON
YOUR BRAND NEW UNIT TO
COMPENSATE FOR DIFFERENCES IN ALTITUDE.
PLEASE CONSULT THE ENGINE OPERATING MANUAL.
WARNING

9
B) ELECTRIC DRIVE WITH DUAL CONTROL
1) Check unit for any damage.
2) Check compressor oil level, fill or add if necessary.
3) Pressure switch "Off/Auto" knob should be in "Off" position.
4) Plug in power cord to proper electrical outlet.
5 a) Stop/Start (pressure switch) control
1. Shut-off valve on pilot unloader should be closed ("knurled"
knob on top of the pilot unloader should be turned all the way
down).
2. Turn pressure switch "Off/Auto" switch to "Auto". Electric
motor should now start and fill air receiver(s) with compressed
air till cut-out pressure is reached. Compressor should stop
and remain stopped till air receiver pressure reaches the cut-in
pressure. The unit will continue to cycle in this automatic
operation until it is turned off.
b) Continuous run (Pilot unloader) control
1. Open the shut-off valve on pilot unloader ("knurled" knob on
top of the pilot unloader should be turned all the way up).
2. Turn pressure switch "Off/Auto" switch to "Auto", electric motor
should now start and fill air receiver(s) with compressed air till
full pressure is reached. To engage continous run, turn “knurled
knob down. Your compressor will idle down and continue to
idle once maximum pressure is acheived. When cut-in pressure
is reached, the unloader valves will de-activate and unit will
compress air. The unit will continue in this automatic operation
until the unit is stopped ("Off/Auto" switch turn to the "Off"
position and/or electric power supply is disconnected).
6) You
can
switch
at
anytime from Stop/Start
to
Continuous
Run
and
vice
versa
by
opening
or
closing
the
valve
on
the
pilot
unloader.
C) ELECTRIC DRIVE
1) Check unit for any damage.
2) Check compressor oil level, fill or add if necessary.
3) Pressure switch "Off/Auto" switch should be in "Off" position.
4) Plug in power cord to proper electrical outlet. If compressor is
not equipped with a male plug, hire an electrician to install one.

10
5) Stop/Start (pressure switch) control
Turn pressure switch "Off/Auto" switch to "Auto". Electric motor
should now start and fill air receiver(s) with compressed air until cut-
out pressure is reached. Compressor should stop and remain stopped
until air receiver pressure reaches the cut-in pressure. The unit will
continue to cycle in this automatic operation until the pressure switch
is turned to the "Off" position.
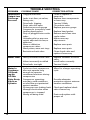
COMPRESSOR MAINTENANCE SCHEDULE
DAILY OR BEFORE EACH USE
• Check oil level
• %SBJODPOEFOTBUJPOGSPNBJSSFDFJWFSBGUFSFBDIVTF
• Check for any unusual noise or vibration
• Be sure all nuts and bolts are tight
WEEKLY
• Turn off power. Clean dust and foreign matter from cylinder head, motor,
fan blades, intercooler and air receiver.
• $MFDLBJSGJMUFSBOESFQMBDFJGOFDDFTTBSZ
• Worn filters should be replaced.
• Check V-belts for wear.
MONTHLY
• Inspect unit for leaks.
• Tighten joints if leaks are observed.
• Check V-belts for proper tension.
• Check compressor pulley and motor sheave are aligned and securely
fastened (see item 9).
QUARTERLY OR 300 HOURS (Whichever comes first)
• Inspect the air receiver for corrosion or other damage
• Change compressor oil.
• Replace air filter (more often if compressor is used near paint
spraying operations or in dusty environments).
H
WARNING
exTrA CAre ShOuld be TAkeN TO AvOId
PerSONAl INjur eS WITh Au llY
CONTrOlled COMPreSSOrS
TOMATICA
I

11
Will Not
Start
Low
Pressure
Oil In
Discharge
Compressor
Overheats
Compressor
Loads and
Unloads
or Stops
and Starts
Excessively
• Check power supply
• Please refer to Manufacturers
manual included
• Safety valve leaks
• Drain cock open
• Loose tubes or fittings
• Dirty or plugged air filter
• Defective unloader valve
• Improper oil viscosity
• Too much oil in the
crankcase
• Compressor overheated
• Restricted air filter
• Worn piston rings
• Clogged inlet filter
• Dirty compressor, head,
cylinder, intercooler
• Operating pressure too high
• Low oil or wrong oil being
used
• Compressor cycle too long,
proper cycle is 50 - 60% on
Stop/Start operation and
75 - 80% on continuous run
operation
• Leaks in air system
• Worn or loose drive belts
• Pilot valve or pressure switch
differential adjusted too
close
• Defective compressor valves
• Compressor too small for
intended use
• Make sure power is turned
on
• Please refer to FOHJOF
manual included
• Replace safety valve
• Close drain cock
• Tighten fittings
• Clean or replace as
necessary
• Replace unloader valve
• Drain and replace oil
• Drain oil and fill to proper
level
• Air pressure regulated too
high
• Clean or replace air filter
• Replace piston rings
• Clean or replace as
necessary
• Clean with compressed air
• Reduce operating pressure
• Drain and replace oil
• Allow for longer rest
between cycles
• Replace worn components
as necessary
• Tighten V-belts or replace
• Make necessary
adjustments
• Replace valves
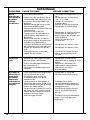
TROUBLE SHOOTING
PROBLEM POSSIBLE CAUSE CORRECTIVE ACTION

12
Insufficient
Output Low
Discharge
Pressure
Motor Stalls
Water In
Crankcase
Oil Break-
ing Up
Oil Gets
Dirty, Rusty
Valves or
Cylinder
• Clogged inlet filter
• Leaks in air lines, air valves,
fittings etc,..
• Drive belts slipping
• Drain valve left open
• Defective pressure gauge
• Compressor incorrectly sized
• Leaking head gasket
• Dirty or plugged inter cooler
tubes
• Unloader pilot or pressure
switch adjusted too low, or
defective
• Worn or defective
compressor valves
• Worn piston, worn out rings
• Restrictive check valve
• Faulty unloader/check valve
• Valves incorrectly installed
• Drive belts too tight
• Cycle too short; compressor
does not operate long
enough to vaporize
condensed moisture during
compression
• Compressor operating
outside in cold conditions
or inlet filter not protected
against weather
• System pressure leaking back
through check valve when
compressor is stopped
• Wrong oil being used
• Clean or replace as
necessary
• Replace worn components
as necessary
• Tension V-Belts
• Close drain valve
• Replace pressure gauge
• Replace head gasket
• Remove and clean inter
cooler tubes
• Make necessary
adjustments
• Replace worn parts
• Replace worn parts
• Clean check valve and
replace if necessary
• Replace unloader or check
valve
• Install valves correctly
• Tension V-belts
• Allow for a longer operating
cycle
• Provide adequate
protection against extreme
weather conditions
• Check and replace/check
valve if necessary
• Drain and replace with
proper oil
TROUBLE SHOOTING
PROBLEM POSSIBLE CAUSE CORRECTIVE ACTION

13
Excessive
Vibration
Compressor
Knocks
Compressor
uses too
much oil
Piston rings
not seated
• Loose compressor, motor,
engine or guard
• Excessive discharge pressure
• Compressor not level
• Leg bolts tightened too
tightly to floor
• Wrong oil being used
• Loose flywheel, drive pulley
or drive belts
• Worn rods, wrist pin or main
bearings
• Compressor valves loose or
broken
• Inspect check valve, it may
knock at low pressures
• Clogged inlet filter
• Wrong oil being used, wrong
viscosity
• Oil level too high
• Crankcase breather valve
malfunction
• Compressor runs unloaded
too long
• Compressor operating
outside in cold conditions
or inlet filter not protected
against weather
• Worn piston rings
• Piston rings not seated
• Allow 100 hours of normal
operation for new rings to
seat
• Drain oil and refill with &BHMF
EAOIL oil or other
approved oils
• Tighten components
• Reduce operating pressure
• Level compressor
• Loosen leg bolts
• Drain and replace with
proper oil
• Tighten loose components
and check belts
• Check and replace worn
parts
• Check and replace worn or
broken valves
• Remove and clean check
valve
• Clean inlet filter or replace if
necessary
• Drain and replace oil
• Fill compressor with oil to
proper level
• Replace crankcase breather
• Increase load or stop
compressor when not
needed (check for air/leaks)
• Provide adequate
protection against extreme
weather conditions
• Replace piston rings
• See instruction below
• Allow 100 hours of normal
operation for new rings to
seat
• Drain oil and refill with &BHMF
EAOIL oil or other
approved oils
TROUBLE SHOOTING
PROBLEM POSSIBLE CAUSE CORRECTIVE ACTION


15
1-800-551-2406
NOTES


17
TABLE DES MATIÈRES
Consignes de sécurité ............................................... 18
Précautions ...................................................... 18
Rallonges électriques............................................. 18
Réservoir d'air.................................................... 19
Soupape de sûreté ............................................... 19
Directives d'installation et mode d'emploi ........................... 19
Installation....................................................... 19
Rodage .......................................................... 20
Avant d'utiliser le compresseur d'air. . . . . . . . . . . . . . . . . . . . . . . . . . . . . . . 20
Lubrification du compresseur..................................... 20
Remplissage d'huile .............................................. 21
Lubrification du moteur .......................................... 21
Vidanges d'huile ................................................. 21
Entretien......................................................... 21
Vérification de la tension de courroie . . . . . . . . . . . . . . . . . . . . . . . . . . . . . 22
Mode d'emploi de votre compresseur d'air .......................... 23
Entraînement par moteur à essence. . . . . . . . . . . . . . . . . . . . . . . . . . . . . . . 23
Entraînement électrique à double commande. . . . . . . . . . . . . . . . . . . . . 24
Entraînement électrique.......................................... 25
Programme d'entretien du compresseur............................. 26
Dépannage . . . . . . . . . . . . . . . . . . . . . . . . . . . . . . . . . . . . . . . . . . . . . . . . . . . . . . . . . . 27
Garantie ............................................................. 30
Veuillez lire le présent manuel
d’utilisation avant d’essayer
d’utiliser ce compresseur.

18
CONSIGNES DE SÉCURITÉ
Veuillez vous familiariser avec les renseignements qui suivent, afin d'éviter
d'endommager votre compresseur et de blesser l'opérateur.
Le moteur électrique et/ou le moteur à essence
du compresseur d'air s'échauffent en cours de
fonctionnement. Ne touchez jamais la tuyauterie
d'échappement, le moteur ou la pompe du compresseur en cours de
fonctionnement. Le compresseur fonctionne automatiquement lorsque le
courant est branché et qu'il est mis en marche, ou lorsque le moteur à essence
tourne.
L'air comprimé provenant de l'appareil peut contenir
des émanations nocives. L'air comprimé produit par ce
compresseur n'est pas respirable. Portez toujours un
respirateur lorsque vous pulvérisez de la peinture ou des produits chimiques,
ou que vous faites du sablage par jet. Portez toujours des lunettes de sécurité
ou des lunettes étanches de sécurité lorsque vous travaillez avec de l'air
comprimé.
Il n'est ni pratique ni possible de vous avertir de tous les dangers liés à
l'utilisation ou à l'entretien de cet équipement. Vous devez donc faire preuve
de jugement.
RALLONGES ÉLECTRIQUES
Assurez-vous que la rallonge électrique est en bon état. Lorsque vous utilisez
une rallonge électrique, assurez-vous que le fil est assez gros pour supporter
l'intensité de courant dont votre appareil a besoin. Une rallonge électrique
de capacité insuffisante provoquera une chute de tension de secteur, ce qui
entraînera une perte de puissance et une surchauffe. Le Tableau 1 donne les
grosseurs de fil correctes en fonction de la longueur du cordon et du courant
nominal qui apparaît sur la plaque signalétique. En cas de doute, utilisez le fil
de grosseur immédiatement supérieur. Plus le numéro de jauge est petit, plus
AVERTISSEMENT
CAUTION
Table 1 — Minimum Gauge for Cord
Tension Longueur totale du cordon
Courant nominal (A)
120 V 25 pi 50 pi 100 pi 150 pi
Supérieur à AWG
0
Inférieur ou
égal à
6
6
10
10
12
12
16
18 16 16 14
18 16 14 12
16 16 14 12
14 14 Not Recommended

19
Achetez seulement des pièces de rechange conformes aux mêmes
spécifications que les pièces originales. Pour obtenir des pièces de rechange
ou des spécifications, veuillez communiquer avec le concessionnaire agréé.
SOUPAPE DE SÛRETÉ
Cette soupape a été posée en usine afin de prévenir toute surpression du
réservoir d'air. La soupape est réglée en usine à une limite donnée qui
dépend du modèle spécifique de votre appareil; elle ne doit jamais être
altérée.
Tout réglage effectué par l'utilisateur annule automatiquement la garantie.
INSTALLATION
1. INSTALLATION
La prudence ainsi qu'un entretien et une lubrification convenables assurent
la longévité de cet appareil. Le compresseur doit toujours être à niveau pour
assurer une lubrification suffisante. Ne serrez pas trop les boulons d'ancrage
car cela pourrait provoquer des vibrations excessives. Utilisez cet appareil
seulement dans un lieu propre, sec et bien aéré. Le compresseur est muni
d'ailettes afin d'assurer un refroidissement suffisant. Gardez les ailettes, ainsi
que les autres pièces auxquelles adhère la poussière, propres. Ne déposez
rien (chiffons ou autre matériel) sur le compresseur, car ces objets nuisent au
refroidissement et peuvent présenter un risque d'incendie.
NE JAMAIS SOUDER, PERCER
OU MODIFIER LE RÉSERVOIR
D'AIR DE QUELQUE MANIÈRE
QUE CE SOIT.
AVERTISSEMENT
NE PAS ENLEVER, ALTÉRER
OU REMPLACER CETTE
SOUPAPE!
AVERTISSEMENT

20
2. RODAGE
Il n’y a aucune condition rodage pour ce modèle
3. AVANT D'UTILISER LE COMPRESSEUR D'AIR, VEUILLEZ
PROCÉDER AUX VÉRIFICATIONS SUIVANTES AVEC SOIN :
1. Vérifiez que les écrous et les boulons sont tous bien serrés.
2. Vérifiez que l'appareil contient une quantité suffisante d'huile, de qualité
convenable.
3. Si les filtres d'aspiration sont sales, remplacez ou nettoyez-les.
4. LUBRIFICATION DU COMPRESSEUR
Huile recommandée :
Huile à compresseur Eagle nº EAOIL10 (1 litre)
nº EAOIL40 (4 litres)
VÉRIFIEZ TOUJOURS LE NIVEAU ET LA
QUALITÉ DE L’HUILE AVANT DE METTRE LE
COMPRESSEUR EN MARCHE. NE RAJOUTEZ
JAMAIS DE L’HUILE ET NE CHANGEZ JAMAIS
L’HUILE PENDANT QUE L’APPAREIL EST EN
MARCHE. UTILISEZ SEULEMENT UNE HUILE
NON DÉTERGENTE RECOMMANDÉE.
AVERTISSEMENT
La page charge ...
La page charge ...
La page charge ...
La page charge ...
La page charge ...
La page charge ...
La page charge ...
La page charge ...
La page charge ...
La page charge ...
La page charge ...
La page charge ...
-
 1
1
-
 2
2
-
 3
3
-
 4
4
-
 5
5
-
 6
6
-
 7
7
-
 8
8
-
 9
9
-
 10
10
-
 11
11
-
 12
12
-
 13
13
-
 14
14
-
 15
15
-
 16
16
-
 17
17
-
 18
18
-
 19
19
-
 20
20
-
 21
21
-
 22
22
-
 23
23
-
 24
24
-
 25
25
-
 26
26
-
 27
27
-
 28
28
-
 29
29
-
 30
30
-
 31
31
-
 32
32


Maxair P55GE25H1 25 25-Gallon Belt Drive Air Compressor Manuel utilisateur
- Catégorie
- Compresseurs d'air
- Taper
- Manuel utilisateur


