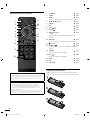
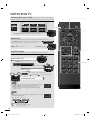
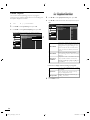
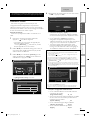
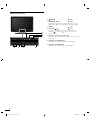
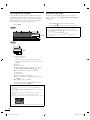
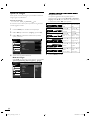
Sylvania LC190SL1 Manuel utilisateur
- Catégorie
- Téléviseurs LCD
- Taper
- Manuel utilisateur
Ce manuel convient également à

E
ng
li
s
h
F
rança
is
E
spaño
l
Need help?
P
lease call toll free or visit our web site belo
w
B
esoin d’aide?
A
ppelez notre numéro gratuit ou visitez notre site web
à
l’adresse
¿
Necesita ayuda
?
Llame por favor sin costo ó visite nuestro sitio web en
EN
O
wner's manual
FR
Manuel du propriétaire
ES
M
anua
l
d
e
l
propietari
o
©
2010 Funai Electric Co.
,
Ltd
.
MODEL NUMBE
R
S
ERIAL NUMBER
1
-866-
www
.
321-392
7
sy
l
vaniaconsumere
l
ectronics.com
L
C
220SL
1
LC190SL
1

Need help connecting this LCD TV? Call us at 1-866-3
Vous avez besoin d’aide pour connecter ce téléviseur LCD?
Appelez-nous au 1-866-3
¿Necesita ayuda para conectar esta TV LCD? Llame al número 1-866-3
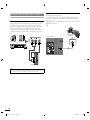
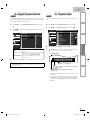
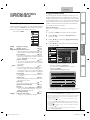
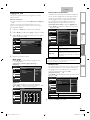
Installation
EN
Installation
FR
Instalación
ES
Model / Modèle / Modelo :
Serial / Série / Serie:
If you have any questions, please visit our website at
www.
sylvaniaconsumerelectronics .com
21-3927
21-3927
21-3927
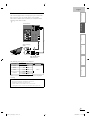
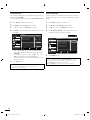
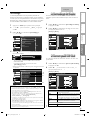
Quick
Start

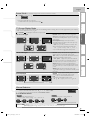
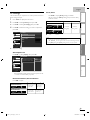
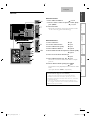
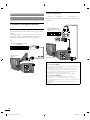
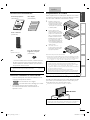
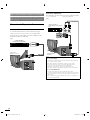
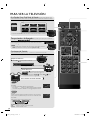
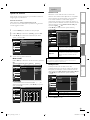
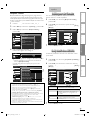
HD camcorder, game console,
Blu-ray Disc player, HD game console
FR
caméscope haute défi nition, console de jeu,
lecteur de disque Blu-ray, console de jeu HD
ES
cámara de video HD, consola de juegos,
reproductor de discos Blu-ray, consola de juegos HD
OUT
TV
HDMI 2
HDMI 2
SERVICE
TERMINAL
SERVICE
TERMINAL
HEAD PHONE
HEAD PHONE
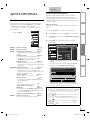
HD camcorder
Game
console
HD game
console
Blu-ray Disc player

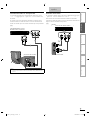
DVD recorder, cable receiver, satellite box
FR
Enregistreur DVD, décodeur câble, décodeur satellite
ES
Grabador DVD, receptor de cable, receptor de satélite
TV
OUT
IN
ANTE
NNA
IN
OUT
OUT
IN
A
N
TENN
A
OUT
DVD recorder
Cable receiver/
Satellite box

Specifi cations are subject to change without notice
© 2010 Funai Electric Co., Ltd.
www. sylvaniaconsumerelectronics .com
Printed in China
1EMN26266 ★★★★★
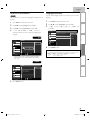
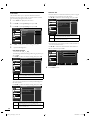
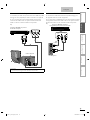
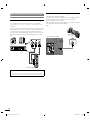
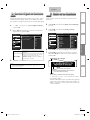
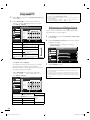
DVD player, home theater system
FR
Lecteur DVD, Système de cinéma maison
ES
Reproductor de DVD, sistema Home Theatre
TV
DIGITAL AUDIO
IN
IN
HDMI
OUT
OUT
OUT
HEAD PHONE
HEAD PHONE
Or use an HDMI connection
Ou utilisez une connexion HDMI
O use una conexión HDMI
DVD player
Home theater system
Caution
Disconnect the AC power cord before
connecting devices.
Attention
Déconnectez le cordon d’alimentation
avant de raccorder les appareils.
Precaución
Desconecte el cable de suministro eléctrico
antes de conectar dispositivos.

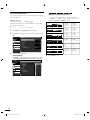
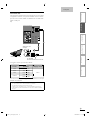
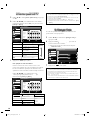
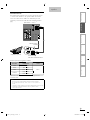
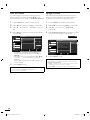
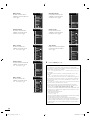
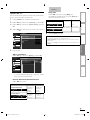
What’s in the box
FR
Contenu de la boîte
ES
Qué hay en la caja
AAA
AAA
Television
Téléviseur
Televisor
Remote control and 2 AAA, 1.5V batteries
Télécommande et 2 piles AAA, 1,5V
Mando a distancia y 2 baterías AAA, 1,5V
Base may differ according to TV model.
Le socle peut être différent d’un modèle de téléviseur à l’autre.
La base puede variar según el modelo de TV.
TV base and 3 bolts (M 4 x 12)
Socle du téléviseur et 3 boulons (M 4 x 12)
Base de TV y 3 pernos (M 4 x 12)
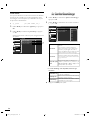
Installation
EN
Installation
FR
Instalación
ES
If you have any questions, please visit our website at
www.
sylvaniaconsumerelectronics .com
Quick
Start
Quick Start
Démarrage Rapide
Inicio Rápido
Owner’s manual
Manuel du propriétaire
Manual del propietario

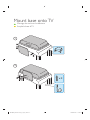
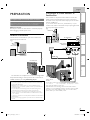
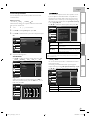
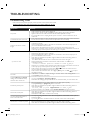
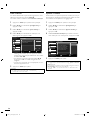
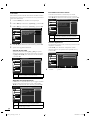
Mount base onto TV
FR
Montage du socle sur le téléviseur
ES
Acople la base al TV
2
1
x 3

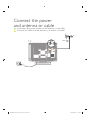
Connect the power
and antenna or cable
FR
Connexion de la prise secteur et de l’antenne ou du câble
ES
Conecte los cables a la red eléctrica y la antena o el cable
TV
a
b
Cable

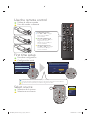
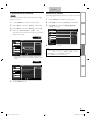
Use the remote control
FR
Utilisez la télécommande
ES
Uso del mando a distancia
AAA
AAA
1
3
2
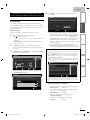
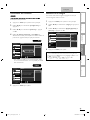
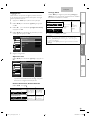
First time setup
FR
Première confi guration
ES
Confi guración inicial
Initial Setup
Select your menu language.
Seleccione el idioma para el menú.
Sélectionnez la langue du menu.
English
Español
Français
Select OK Skip
Initial Setup
Select “Retail” or “Home” for your location.
Retail
Home
Select OK
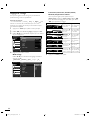
Select source
FR
Sélection de la source
ES
Seleccione una fuente
1
2
Source
TV
Video
Component
HDMI1
HDMI2
PC
CURSOR AND OK KEYS
Press ▲,▼ or ◄,► to navigate
the TV menu. Press OK to
confi rm selection.
TOUCHES CURSEUR ET OK
Appuyez sur ▲,▼ ou ◄,► pour
naviguer dans le menu du
téléviseur. Appuyer sur OK pour
confi rmer la sélection.
TECLAS DE CURSOR Y OK
Pulse ▲,▼ o ◄,► para navegar al
menú del TV. Pulse OK para
confi rmar la selección.
Follow the on-screen instructions to complete your TV setup.
Suivez les instructions apparaissant à l’écran pour terminer la confi guration de votre téléviseur.
Siga las instrucciones en pantalla para realizar la confi guración de la TV.

2
EN
WARNING:
TO REDUCE THE RISK OF FIRE OR ELECTRIC SHOCK
,
DO NOT EXPOSE THIS
APPARATUS TO RAIN OR MOISTURE.
APPARATUS SHALL NOT BE EXPOSED TO DRIPPING OR SPLASHING AND NO OB
J
ECTS
FILLED WITH LI
Q
UIDS, SUCH AS VASES, SHALL BE PLACED ON THE APPARATUS.
C
AUTION
:
T
O REDUCE THE RISK OF ELECTRIC SHOCK
,
DO
N
OT REMOVE COVER (OR BACK). NO USE
R
S
ERVICEABLE PARTS INSIDE. REFER SERVICING TO
Q
UALIFIED SERVICE PERSONNEL
.
C
AUTIO
N
RISK OF ELECTRIC SHOCK
DO NOT OPEN
Th
e exc
l
amat
i
on
p
o
i
nt w
i
t
hi
n an e
q
u
il
atera
l
tr
i
an
gl
e
i
s
i
ntended to alert the user to the
p
resence of im
p
ortant
o
p
eratin
g
and maintenance
(
servicin
g)
instructions in the
li
terature accom
p
an
yi
n
g
t
h
e a
pp
aratus
.
T
he lightning flash with arrowhead symbol, within an
equ
il
atera
l
tr
i
ang
l
e,
i
s
i
nten
d
e
d
to a
l
ert t
h
e user to t
h
e
p
resence of uninsulated “dan
g
erous volta
g
e” within the
a
pp
aratus’s enclosure that ma
y
be of sufficient ma
g
nitude
to constitute a risk of electric shock to
p
ersons
.
T
he caution markin
g
is located on the rear or bottom of the cabinet
.
Im
p
ortant Safety Instructions
1
.
R
ea
d
t
h
ese
i
nstruct
i
ons
.
2.
K
eep t
h
ese
i
nstruct
i
ons
.
3
.
H
ee
d
a
ll
warn
i
n
g
s
.
4.
F
o
ll
ow a
ll
i
nstruct
i
ons
.
5
.
D
o not use t
hi
s a
pp
aratus near wate
r
.
6
. Clean only with dry cloth
.
7
.
D
o not
bl
oc
k
an
y
vent
il
at
i
on o
p
en
i
n
g
s.
I
nsta
ll
i
n
accordance with the manufacturer’s instructions
.
8.
D
o not
i
nsta
ll
near an
y
h
eat sources suc
h
as ra
di
ators,
h
eat reg
i
sters, stoves, or ot
h
e
r
a
pp
aratus
(
includin
g
am
p
lifi ers
)
that
p
roduce
h
eat
.
9. Do not defeat the safet
y
p
ur
p
ose of the
polarized or grounding-type plug.
A
polarized
pl
u
g
h
as two
bl
a
d
es w
i
t
h
one w
id
er t
h
an t
h
e
o
ther. A
g
roundin
g
t
yp
e
p
lu
g
has two blades
an
d
a t
hi
r
d
g
roun
di
n
g
p
ron
g
.
Th
e w
id
e
bl
a
d
e o
r
t
he third
p
ron
g
are
p
rovided for
y
our safet
y
. I
f
t
he provided plug does not fi t into your outlet
,
c
onsult an electrician for re
p
lacement of the
ob
so
l
ete out
l
et
.
10. Protect the
p
ower cord from bein
g
walked on
o
r p
i
nc
h
e
d
part
i
cu
l
ar
l
y at p
l
ugs, conven
i
ence
rece
p
tacles, and the
p
oint where the
y
exit from
th
e a
pp
aratus
.
11. Onl
y
use attachments / accessories s
p
ecifi ed b
y
t
he manufacture
r
.
12.
U
se on
ly
w
i
t
h
t
h
e cart, stan
d,
t
ri
p
od, bracket, or table s
p
ecifi ed
by
the manufacturer, or sold with
th
e apparatus.
Wh
en a cart
i
s use
d,
u
se caution when movin
g
the cart / a
pp
aratus
c
ombination to avoid in
j
ur
y
from ti
p
-ove
r
.
13.
U
n
pl
u
g
t
hi
s a
pp
aratus
d
ur
i
n
g
ligh
tn
i
n
g
storms or
when unused for long periods of time
.
14. Refer all servicin
g
to
q
ualifi ed service
p
ersonnel
.
S
ervicin
g
is re
q
uired when the a
pp
aratus has
b
een
d
ama
g
e
d
i
n an
y
wa
y
, suc
h
as
p
ower-
su
pply
cor
d
or
pl
u
g
i
s
d
ama
g
e
d
,
liq
u
id
h
as
b
een
spilled or objects have fallen into the apparatus
,
th
e a
pp
aratus
h
as
b
een ex
p
ose
d
to ra
i
n o
r
mo
i
sture,
d
oes not o
p
erate norma
lly
, or
h
as
b
een
d
roppe
d.

3
EN
E
ng
li
s
h
F
CC WARNIN
G
This apparatus may generate or use radio frequency energy. Changes or modifications to this apparatus may cause harmful interference
unless the modifications are expressly approved in the manual. The user could lose the authority to operate this apparatus if an
unauthorized change or modification is made.
R
ADIO-TV INTERFERENC
E
This apparatus has been tested and found to comply with the limits for a Class B digital device, pursuant to Part 15 of the FCC Rules.
These limits are designed to provide reasonable protection against harmful interference in a residential installation. This apparatus
generates, uses, and can radiate radio frequency energy and, if not installed and used in accordance with the instructions, may cause
harmful interference to radio communications. However, there is no guarantee that interference will not occur in a particular installation.
If this apparatus does cause harmful interference to radio or television reception, which can be determined by turning the apparatus off
a
nd on, the user is encouraged to try to correct the interference by one or more of the following measures:
1
)
R
eorient or re
l
ocate t
h
e receiving antenna.
2)
I
ncrease t
h
e separation
b
etween t
h
e apparatus an
d
receiver.
3) Connect the apparatus into an outlet on a circuit different from that to which the receiver is connected.
4) Consult the dealer or an experienced radio/TV technician for help.
DECLARATION OF CONFORMIT
Y
T
ra
d
e
N
ame
:
S
YLVANI
A
R
es
p
onsible Party
:
F
UNAI CORPORATION
,
Inc
.
M
o
d
e
l:
LC220SL1/LC190SL
1
Add
ress
:
1
9900 Van Ness Avenue
,
Torrance
,
CA 90501 U.S.A
.
T
e
l
ep
h
one
N
um
b
er
:
1-866- 321-3927
T
his Class B di
g
ital a
pp
aratus com
p
lies with Canadian ICES-003. Standard Television Receivin
g
A
pp
aratus, Canada BETS-7 / NTMR-
7
C
AUTION
:
Danger of explosion if battery is incorrectly replaced. Replace only with the same or equivalent type.
W
ARNING
:
Batteries (battery pack or battery installed) shall not be exposed to excessive heat such as sunshine, fire or the like.
Disconnect the mains plug to shut off when find trouble or not in use. The mains plug shall remain readily operable
.
Th
is apparatus s
h
ou
ld
not
b
e p
l
ace
d
in a
b
ui
l
t-in insta
ll
ation suc
h
as a
b
oo
k
case or rac
k
un
l
ess proper venti
l
ation is provi
d
e
d
.
Make sure to leave a space of 2.8 inches
(
7
cm) or more around this apparatus.
W
ARNING
:
T
o prevent injury, t
h
is apparatus must
b
e secure
l
y attac
h
e
d
to t
h
e wa
ll
in accor
d
ance wit
h
t
h
e instructions.
LAMP IN LCD CONTAINS MERCURY, DISPOSE ACCORDING TO LOCAL, STATE OR
FEDERAL
LAW.
Do not place the unit on the furniture that is capable of being tilted by a child and an adult leaning, pulling, standing or
climbing on it. A falling unit can cause serious injury or even death.
NOTE ABOUT RECYCLIN
G
•
This unit
’
s packaging materials are recyclable and
c
an be reused. Please dispose of any materials in
accor
d
ance w
i
t
h
your
l
oca
l
recyc
li
ng regu
l
at
i
ons
.
•
B
atter
i
es s
h
ou
ld
never
b
e t
h
rown away o
r
i
ncinerated but disposed of in accordance with you
r
l
oca
l
regu
l
at
i
ons concern
i
ng c
h
em
i
ca
l
wastes.
T
O AVOID THE HAZARDS OF ELECTRICAL
SHOCK AND FIR
E
•
Do not handle the AC
p
ower cord with wet hands
.
•
Do not
p
ull on the AC
p
ower cord when disconnectin
g
it from an
A
C outlet. Grasp it by the plug
.
•
Do not put your fi ngers or objects into the unit
.
L
OCATION AND HANDLIN
G
•
D
o not
i
nsta
ll
t
h
e un
i
t
i
n
di
rect sun
li
g
h
t, near strong magnet
i
c
fi elds, or in a place subject to dust or strong vibration
.
•
A
void a place with drastic temperature changes
.
•
I
nsta
ll
t
h
e un
i
t
i
n a
h
or
i
zonta
l
an
d
sta
bl
e pos
i
t
i
on.
D
o not p
l
ace
anything directly on top or bottom of the unit. Depending on
y
our external devices, noise or disturbance of the
p
icture and / o
r
sound ma
y
be
g
enerated if the unit is
p
laced too close to them
.
I
n t
hi
s case,
pl
ease ensure enou
gh
s
p
ace
b
etween t
h
e externa
l
d
ev
i
ces an
d
t
h
e un
i
t
.
•
Depending on the environment, the temperature of this unit may
i
ncrease slightly. This is not a malfunction
.
•
Be sure to unplug the AC power cord from the AC outlet before
c
arr
yi
n
g
t
h
e un
i
t
.
Trademark Information
•
HDMI, the HDMI Logo, and High-Defi nition Multimedia Interface
are trademarks or registered trademarks of HDMI Licensing LLC
i
n the United States and other countries
.
•
Manufactured under license from Dolb
y
Laboratories. Dolb
y
and
the double-D s
y
mbol are trademarks of Dolb
y
Laboratories
.
•
ENERGY STAR
®
R
R
is a joint program of the U.S. Environmental
P
rotection Agency and the U.S. Department of Energy helping
us a
ll
save mone
y
an
d
p
rotect t
h
e env
i
ronment t
h
rou
gh
ener
gy
effi cient
p
roducts and
p
ractices
.
C
onsumer Notice:
T
his TV has been set to maximize ener
gy
effi cienc
y
while
d
eliverin
g
the best
p
ossible
p
icture usin
g
the factor
y
installed
h
ome mo
d
e sett
i
ngs
.
C
hanging or enabling other features in this TV (e.g. brightened
backli
g
htin
g)
will
p
ossibl
y
increase ener
gy
consum
p
tion be
y
ond
the original ENERGY STAR
®
R
R
q
ualifi ed limits
.
•
T
he American Academ
y
of Pediatrics discoura
g
es television
viewin
g
for children
y
oun
g
er than two
y
ears of a
g
e
.

4
EN
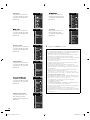
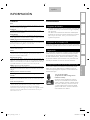
INTRODUCTION
Contents
Important Safety Instructions
2
T
rademark Information
3
INTRODUCTION
F
eatures
4
S
u
pp
lied Accessories
5
Sy
mbols Used in this Manual
5
A
ttachin
g
the Base
5
Fi
x
i
n
g
t
h
e
U
n
i
t on
Y
our
F
urn
i
ture
5
C
ontrol Panel 6
T
erm
i
na
l
s
7
Remote Control Function 8
I
nsta
lli
n
g
t
h
e
B
atter
i
es 8
PREPARATION
A
ntenna Connection
9
C
onnection to Cable Receiver or Satellite Box
9
External Device Connection 10
Plu
g
In the AC Power Cord 1
4
Initial Setup 15
WATCHING TV
Switching Each Input Mode
1
6
S
lee
p
Timer 16
S
ound Functions 16
F
reeze Mode
1
7
TV Screen Display Mode 1
7
C
hannel Selection 1
7
TV Screen Information 18
Reducing the Brightness 18
OPTIONAL SETTING
Main Menu 1
9
A
utoprogram 1
9
C
hannel List 20
A
dd Channels 20
A
ntenna Confi rmation 2
1
Language Selection 2
1
P
icture Adjustment 2
2
S
ound Adjustment 2
3
C
losed Caption 2
4
C
hild Lock 2
7
P
C Settings 2
9
F
un-Link 30
Energy Saving Mode 3
1
L
ocat
i
on
31
C
urrent Software Info
31
TROUBLESHOOTING
Troubleshootin
g
Guide 3
2
F
AQ 3
4
INFORMATION
G
lossary 35
Maintenance 3 5
G
eneral Specifi cations 3 6
Electrical Specifi cation 3 6
O
ther S
p
ecifi cations 36
Limited Warranty 3
7
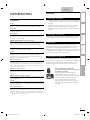
Features
• DTV / TV / CATV
Y
ou can use
y
our remote contro
l
to se
l
ect c
h
anne
l
s w
hi
c
h
are broadcast in di
g
ital format and conventional analo
g
format. Also
,
cable subscribers can access their cable TV
ch
anne
l
s
.
• Information Display (ATSC only)
Y
ou can dis
p
la
y
the title, contents and other information o
f
th
e current
DTV
p
ro
g
ram on t
h
e
TV
screen
.
•
A
utoprogram
Thi
s un
i
t automat
i
ca
lly
scans an
d
memor
i
zes c
h
anne
l
s
available in
y
our area, eliminatin
g
difficult setu
p
p
rocedures
.
•
C
hild Lock
T
his feature allows you to block children’s access to
i
nappropr
i
ate programs
.
•
C
losed Caption Decode
r
Built-in closed caption decoder displays text for closed
c
apt
i
on supporte
d
programs
.
• MTS / SAP Tuner
A
udio can be selected from the remote control
.
•
A
uto Shut Off Function
If there is no input signal and no operation for 15 minutes
,
t
he unit will turn off automatically
.
•
S
leep Time
r
T
his feature will automatically turn off the power of the unit at
a specific time
.
•
C
hoices for On-screen Language
S
elect
y
our on-screen lan
g
ua
g
e
:
English, Spanish or French
.
•
S
tereo Sound Function
•
P
LL Frequency Synthesized Tuning
P
rovides free and easy channel selection and lets you tune
di
rect
l
y to any c
h
anne
l
us
i
ng t
h
e num
b
er an
d
d
ec
i
ma
l
po
i
nt
"
•
"
buttons on the remote control
.
•
V
arious Adjustment for Picture and Soun
d
C
ustomizes image quality suitable for your room and sets
y
our sound preference
.
•
F
un-
L
in
k
via
HDMI
L
in
k
(HDMI Cable not Included)
F
un-Link allows your other HDMI link devices (such as
Magnavox DVD) to be controlled by the HDMI cable
c
onnecte
d
to your
TV
.
•
HDMI
I
npu
t
• Component Video Inpu
t
•
P
C Inpu
t
•
S
-Video Inpu
t
•
A
V Inpu
t
• Digital Audio Outpu
t
• Headphone Audio Output
©
2010 Funai Electric Co.
,
Ltd
.
A
ll rights reserved. No part o
f
this manual may be reproduced, copied,
t
ransm
i
tte
d
,
di
ssem
i
nate
d
, transcr
ib
e
d
,
d
own
l
oa
d
e
d
or store
d
i
n any storage
medium, in any form or for any purpose without the express prior written
c
onsent of Funai. Furthermore, any unauthorized commercial distribution of this
manua
l
or any rev
i
s
i
on
h
ereto
i
s str
i
ct
l
y pro
hibi
te
d.
Information in this document is subject to change without notice. Funai
reserves t
h
e r
i
g
h
t to c
h
ange t
h
e content
h
ere
i
n w
i
t
h
out t
h
e o
bli
gat
i
on to
notify any person or organization of such changes.
w
i
t
h
t
h
e design is a registered trademark of Funai Electric Co.,
L
t
d
. an
d
may not
b
e use
d
i
n any way w
i
t
h
out t
h
e express wr
i
tten consent
o
f Funai. All other trademarks used herein remain the exclusive
p
ro
p
ert
y
o
f their res
p
ective owners. Nothin
g
contained in this manual should be
c
onstrue
d
as
g
rant
i
n
g
,
by
i
m
pli
cat
i
on or ot
h
erw
i
se, an
y
li
cense or r
igh
t to
u
se an
y
of the trademarks dis
p
la
y
ed herein. Misuse of an
y
trademarks o
r
an
y
ot
h
er content
i
n t
hi
s manua
l
i
s str
i
ct
ly
p
ro
hibi
te
d
.
F
una
i
s
h
a
ll
a
gg
ress
i
ve
ly
enforce its intellectual
p
ro
p
ert
y
ri
g
hts to the fullest extent of the law.
S
YLVANIA is a re
g
istered trademark of OSRAM SYLVANIA Inc., used unde
r
li
cense
.

E
ng
li
s
h
5
EN
INTRODUCTION
PREPARATION
WATCHING TV
OPTIONAL SETTING
TROUBLESHOOTING
INFORMATION
Supplied Accessories
O
wner’s manual
(
1EM
N
26205
)
Q
uick Star
t
(
1EM
N
26266
)
R
emote contro
l
(
NH00
1
U
D
)
FREEZE
SLEEP
BACK
MENU INFO
CHVOL
SAP
MUTE
456
789
0.
123
SOURCE
FORMAT
ECO
PREV CH
OK
B
atterie
s
(AAA, 1.5V x 2)
AAA
AAA
Screw kit
f
or attaching the base
(
1ES
A
1
9876
)
•
If you need to replace these accessories, please refe
r
t
o t
h
e part
N
o. w
i
t
h
t
h
e
ill
ustrat
i
ons an
d
ca
ll
our to
ll
free customer support line found on the cover of this
manua
l.
Note
•
If you lose the screws, please purchase M
4
×
12
Philli
ps
h
ea
d
screws at you
r
l
oca
l
store
.
Symbols Used in this Manual
T
he following is the description for the symbols used in
t
his manual. Description refers to
:
AT S C
:
Digi
ta
l
TV
o
p
erat
i
on
NTSC
: Analog / Cable TV operation
•
If neither s
y
mbol a
pp
ears, the o
p
eration is a
pp
licable to
b
ot
h.
Attaching the Base
Y
ou must attac
h
t
h
e
b
ase to t
h
e un
i
t to
h
ave
i
t as a ta
bl
e top
u
nit. Be sure the front and rear of the base match the prope
r
di
rect
i
on
.
1
Spread a thick and soft
cl
ot
h
over a ta
bl
e as
sh
own
.
P
lace the main unit face
d
own onto
i
t.
M
a
k
e sure
not to
d
ama
g
e t
h
e screen.
Insert 2 hooks under the
bottom of the main unit
i
nto base holes.
(
shown b
y
arrow
➀
)
, then move the
b
ase
i
n t
h
e
di
rect
i
on as
sh
own
by
arrow
➁
unt
il
i
t
s
to
p
s an
d
t
h
e
3
mount
i
n
g
h
o
l
es are a
lig
ne
d
.
M
a
k
e
s
ure not to
p
ut the AC
p
ower cor
d
b
etween t
h
e
b
ase an
d
t
h
e un
i
t
.
➁
➀
3
D
r
i
ve
Philli
ps pan screws
i
nto t
h
e
3
t
h
rea
d
e
d
h
o
l
es
at the bottom of the base
unt
il
t
h
ey are t
i
g
h
t
.
To remove the base from this unit
•
U
nscrew t
h
e
Philli
ps pan screws on step
3
.
A
fter the screws are removed, move the base in the o
pp
osite direction as
sh
own
b
y arrow
➁
on s
t
ep
2
, t
h
en pu
ll
t
h
e
b
ase up towar
d
t
h
e rea
r
of the
r
u
nit. Be careful not to dro
p
the base when
y
ou remove it
.
Note
•
W
hen attachin
g
the base, ensure that all screws are ti
g
htl
y
fastened. If the
b
ase is not
p
ro
p
erl
y
attached, it could cause the unit to fall, resultin
g
in
i
n
j
ur
i
es as we
ll
as
d
amage to t
h
e un
i
t
.
•
Make sure to use a table which can su
pp
ort the wei
g
ht of this unit and is
l
arger t
h
an t
hi
s un
i
t
.
•
M
a
k
e sure t
h
e ta
bl
e
i
s
i
n a sta
bl
e
l
ocat
i
on
.
•
W
hen attaching the base, ensure that FRONT
↑
wr
i
tten on t
h
e
b
ase
i
s
up
ward. If it's not u
p
ward, the 2 hooks don't fi t in the base
.
Fixing the Unit on Your Furniture
S
crew this unit on
y
our furniture ti
g
htl
y
usin
g
wood screws
(
not su
pp
lied
)
in the 2 holes at the back of the base as shown
.
•
Recommended screw dimension : 5.1 x 20 mm
r
ear of this unit
Note
•
W
hen you remove this unit make sure to unscrew the wood screws from
y
our Wood Stand, Furniture and other wood item
.

6
EN
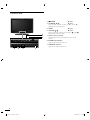
1
POWER
➠
p. 1
5
2
C
HANNEL ▲/
▼
➠
p. 1
7
Press to select channels or move up
(
▲
)
/ down (
▼
)
th
roug
h
t
h
e ma
i
n menu
i
tems
.
3
MENU
➠
p. 19
4
VOLUME /
➠
p. 16
Press to adjust the volume or move right
(
)
/ left (
)
th
roug
h
t
h
e ma
i
n menu
i
tems
.
5
Infrared sensor windo
w
Receives in
f
rared rays transmitted
f
rom the remote
c
ontro
l.
6
P
OWER ON indicato
r
Ligh
ts u
p
g
reen w
h
en
p
ower
i
s on
.
7
STAND BY indicato
r
Lights up red when power is off
.
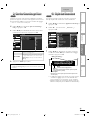
Control Panel
MENU
CHANNEL POWER
STAND BY POWER ON
VOLUME
42 13
7
5
6

E
ng
li
s
h
7
EN
INTRODUCTION
PREPARATION
WATCHING TV
OPTIONAL SETTING
TROUBLESHOOTING
INFORMATION
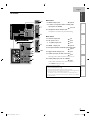
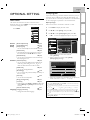
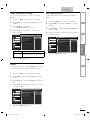
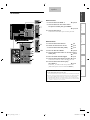
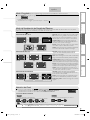
Terminals
HDMI 2
HDMI 2
TERMINAL
HEAD PHONE
HEAD PHONE
14
16
15
17
13
12
9
11
10
18
*
8
Side Pane
l
8 HDMI 2 Input jack
➠
p. 9, 1
0
9 S-Video / Composite Video / Audio (L/R)
Input jacks for VIDE
O
➠
p. 11, 12
1
0 Headphone Audio Output jack
Head
p
hone connection for
p
ersonal listenin
g.
R
ear
P
ane
l
11
A
ntenna Input jack
➠
p.
9
1
2
A
C power cord
➠
p. 1
4
1
3
P
C (VGA) Input jack
➠
p. 13
14
HDMI 1 Input jack
➠
p. 9, 1
0
1
5
C
omponent Video and Audio (L/R) Input jack
s
➠
p. 9, 1
1
1
6 Digital Audio Output jack
➠
p. 12
1
7
A
udio Input jack for PC connection
➠
p. 13
Mini-plug audio cable connection from your PC
.
1
8
A
udio (L/R) Input jacks for HDMI
1
➠
p. 1
0
Audio cable connection from
y
our DVI device
.
(
Fo
r
H
D
MI 1
In
p
ut
j
ack onl
y)
Note for service terminal
*
service terminal (service use only)
•
U
se this terminal only when a software update is necessary
.
•
U
ser s
h
ou
ld
not connect an
y
d
ev
i
ces to t
h
e term
i
na
l
suc
h
as
digi
ta
l
camera
,
keyboard, mouse, etc. (because these will not work)
.
•
T
he software u
p
date is, in most cases, handled b
y
an authorized service
person or in some circumstances the user may be asked to do the software
u
pd
ate t
h
emse
l
ves
.

8
EN
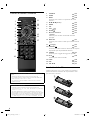
Remote Control Function
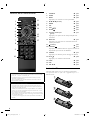
FREEZE
SLEEP
BACK
MENU INFO
CHVOL
SAP
MUTE
456
789
0.
123
SOURCE
FORMAT
ECO
PREV CH
OK
1
9
2
3
12
14
11
16
8
5
7
17
10
15
13
4
6
When using a universal remote control to operate this unit.
M
a
k
e sure t
h
e com
p
onent co
d
e on
y
our un
i
versa
l
remote contro
l
i
s set
t
o our brand. Refer to the manual accom
p
an
y
in
g
y
our remote control fo
r
more
d
eta
il
s
.
•
We do not
g
uarantee 100% intero
p
erabilit
y
with all universal remote
c
ontro
l
s
.
Battery Precautions:
•
Be sure to follow the correct
p
olarit
y
as indicated in the batter
y
c
om
p
artment.
R
everse
d
b
atter
i
es ma
y
cause
d
ama
g
e to t
h
e
d
ev
i
ce
.
•
Do not mix different t
yp
es of batteries to
g
ether
(
e.
g
. Alkaline and
C
arbon-Zinc, or rechar
g
eable batteries like ni-cad, ni-mh, etc
)
or old
b
atteries with fresh ones
.
•
If the device is not to be used for a long period of time, remove the
b
atteries to
p
revent dama
g
e or in
j
ur
y
from
p
ossible batter
y
leaka
g
e
.
•
D
o not tr
y
to rec
h
ar
g
e
b
atter
i
es; t
h
e
y
can over
h
eat an
d
ru
p
ture
.
1
SOURCE
➠
p. 16
2
SLEEP
➠
p. 16
3
BACK
➠
p. 18
P
ress to return to t
h
e
p
rev
i
ous menu o
p
erat
i
on
.
4
▲/
▼
/
◄
/►
(
cursor)
➠
p. 15
5
MENU
➠
p. 19
6
OK
➠
p. 15
7
VOL /
➠
p. 16
8
MUTE
➠
p. 16
9
N
um
b
er
b
uttons
➠
p. 1
7
•
(dot)
Press to shift the subchannel from the main
ch
anne
l.
1
0 PREV CH
➠
p. 1
7
P
ress to return to prev
i
ous
l
y v
i
ewe
d
c
h
anne
l.
11
(power)
➠
p. 15
1
2 FORMAT
➠
p. 1
7
Press to select aspect ratio available for the TV
screen
.
1
3
FREEZE
➠
p. 1
7
Press to freeze screen image
.
1
4 ECO
➠
p. 18
P
ress to re
d
uce t
h
e
b
r
i
g
h
tness
.
1
5 INFO
➠
p. 18
1
6 SAP
➠
p. 16
1
7 CH ▲/
▼
➠
p. 1
7
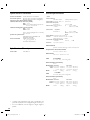
Installing the Batteries
Install the batteries (AAA, 1.5V x 2) matching the polarity
i
ndicated inside battery compartment of the remote control
.

E
ng
li
s
h
9
EN
INTRODUCTION
PREPARATION
WATCHING TV
OPTIONAL SETTING
TROUBLESHOOTING
INFORMATION
INTRODUCTION
PREPARATION
PREPARATION
No supplied cables are used with these connections:
Please purchase the necessary cables at your local store.
High Speed HDMI cable (also known as HDMI category 2
cable) is recommended for the better compatibility.
Before you connect:
B
e sure your antenna or ot
h
er
d
ev
i
ce
i
s connecte
d
proper
l
y
before plugging in the AC power cord
.
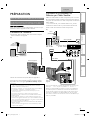
Antenna Connection
C
onnect the RF coaxial cable on
y
our home outlet to the
antenna in
p
ut
j
ack of this unit
.
e.g.)
VHF / UHF
a
na
l
og or
DTV
antenn
a
ca
bl
e
TV
signa
l
r
ear of this uni
t
or
RF
coaxia
l
ca
bl
e
O
nce connections are completed, turn on the unit and begin initial
setu
p
. Channel scannin
g
is necessar
y
for the unit to memorize all
ava
il
a
bl
e c
h
anne
l
s
i
n
y
our area
.
[
Initial Setup
]
➠
p. 1
5
Note
•
If you have any question about the DTV’s antenna, visit www.antennaweb
.
org for further information
.
•
Depending on your antenna system, you may need different types of
combiners (mixers) or separators (splitters). Contact your local electronics
store for these items
.
•
For your safety and to avoid damage to this unit, please unplug the RF
coaxial cable from the antenna input jack before moving the unit
.
•
If you use an antenna to receive analog TV, it should also work for DTV
reception. Outdoor or attic antennas will be more effective than a set top
or
i
ns
id
e antenna
.
•
T
o sw
i
tc
h
your recept
i
on source eas
il
y
b
etween antenna an
d
ca
bl
e,
i
nsta
ll
an
antenna se
l
ecto
r
.
•
If you are not receiving a signal from your cable service, contact the Cable
prov
id
e
r
.
Connection to Cable Receiver or
Satellite Box
U
se an
HDMI
or com
p
onent v
id
eo ca
bl
es to connect t
h
e
HDMI or the Component Video Input jacks of the unit to
t
he HDMI or the component video output jacks of the cable
receiver / satellite box
.
If
y
ou connect to the unit’s Com
p
onent Video In
p
ut
j
acks
,
c
onnect audio cables to the Audio L/R Input jacks right beside
t
he Component Video connecto
r
.
HDMI 2
HDMI 2
SERVICE
TERMINAL
STEREO
PCM
HDMI OUT
ANT IN
COMPONENT VIDEO OUT
Pr/CrPb/CbY
AUDIO OUT
RL
e.g.)
sate
ll
ite
d
is
h
cable receiver /
sate
ll
ite
b
o
x
ca
bl
e
TV
signa
l
inc
l
u
d
ing
PPV
component video cables
e
component video cables
id b
component video cables
red/blue/green)
(red/blue/green
/
( d/bl / )
(red/blue/green)
audio ca
d
and audio c
d
d audio cables
and audio cables
RF
coaxia
l
ca
bl
e
b
b
(blue)
re
(green)
re
re
d
d
(red)
r
r
d
d
d
(red)
b
b
b
(blue)
or
or
or
HDMI
ca
bl
e
s
ide or rear of
th
is unit
r
r
(green)
Y
ou can a
l
so connect t
hi
s un
i
t to t
h
e ca
bl
e rece
i
ver or sate
lli
te
b
ox
o
t
h
er t
h
an t
h
e
HDMI
or t
h
e component v
id
eo output
j
ac
k
s
b
ecause
t
hey might have different output jacks
.
Required cables and connecting methods of the cable receiver /
satellite box, or the availability channel for the clear QAM may diffe
r
d
epending on the cable / satellite provider. For more information
,
please contact your cable / satellite provide
r
.

10
EN
No supplied cables are used with these connections:
Please purchase the necessary cables at your local store.
High Speed HDMI cable (also known as HDMI category 2
cable) is recommended for the better compatibility.
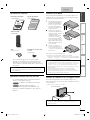
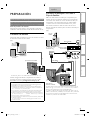
External Device Connection
HDMI Connection
HDMI connection offers the highest picture quality
.
HDMI
(High-Defi nition Multimedia Interface) transports high defi nition
v
id
eo an
d
mu
l
t
i
-c
h
anne
l
di
g
i
ta
l
au
di
o t
h
roug
h
a s
i
ng
l
e ca
bl
e.
BD/DVD recorder
wit
h
t
h
e
HDMI
output jac
k
e.g.)
HDMI 2
HDMI 2
SERVICE
TERMINAL
HDMI OUT
CHAPTER 15
REPEAT A-B
TITLE 5
HDMI
ca
bl
e
side or rear of this unit
or
HDMI-DVI Connection
U
se an
HDMI
-
DVI
convers
i
on ca
bl
e to connect t
h
e un
i
t to
e
xterna
l
v
id
eo
d
ev
i
ces e
q
u
ipp
e
d
w
i
t
h
DVI
out
p
ut
j
ac
k.
STEREO
PCM
AUDIO OUT
RL
DVI OUT
HDMI-DV
HDMI-DVI
conversion cableconversion cable
ca
bl
e receiver or sate
ll
ite
b
ox
w
it
h
t
h
e
DVI
output jac
k
a
u
d
io ca
bl
e
s
r
ear of this uni
t
e
.g.)
Note
F
or
HDMI
connection
•
T
he unit accepts 480i, 480p, 720p 1080i of video signals, and 32kHz
,
44.1kHz and 48kHz of audio signals
.
•
T
his unit accepts only 2 channel audio signal (LPCM)
.
•
Y
ou need to select "PCM" for the digital audio of the device you connected
o
r check the HDMI audio setting. There may be no audio output if you
s
elect
"
Bitstream
",
etc
.
•
T
his unit accepts only signals in compliance with EIA861
.
F
or
HDMI
-
DVI
connection
•
T
he unit acce
p
ts 480i, 480
p
, 720
p
1080i video si
g
nals
.
•
HDMI
-
DVI
connect
i
on re
q
u
i
res se
p
arate au
di
o connect
i
ons as we
ll
an
d
t
h
e
audio si
g
nals are converted from di
g
ital to analo
g.
•
DVI does not dis
p
la
y
480i ima
g
e which is not in com
p
liance with EIA/
C
EA-861/861B
.

E
ng
li
s
h
1
1
EN
INTRODUCTION
PREPARATION
WATCHING TV
OPTIONAL SETTING
TROUBLESHOOTING
INFORMATION
Component Video Connection
C
omponent Video connection offers better picture quality fo
r
v
id
eo
d
ev
i
ces connecte
d
to t
h
e un
i
t
.
If
y
ou connect to the unit’s Com
p
onent Video In
p
ut
j
acks
,
c
onnect audio cables to the Audio L/R In
p
ut
j
acks ri
g
ht beside
t
he Component Video connecto
r
.
CHAPTER 15
REPEAT A-B
TITLE 5
COMPONENT VIDEO OUT
Pr/CrPb/CbY
AUDIO OUT
RL
red
d
(red)
b
b
(blue)
ree
(green)
e.g.)
BD/DVD recorder with
t
h
e component vi
d
eo output jac
k
r
ear of this uni
t
audio cables
b
l
component video component video
cables
b
cables
(red/blue/green)(red/blue/green)
Note
•
T
he unit accepts 480i / 480p / 720p and 1080i of video signals for this
connect
i
on
.
S-Video Connection
S
-Video connection offers good picture quality for video
d
evices connected to the unit. If you connect to the unit’s
S
-Video In
p
ut
j
ack, connect audio cables to the Audio L/
R
In
p
ut
j
acks ri
g
ht beside the Com
p
osite Video connecto
r
.
e
.g.)
CHAPTER 15
REPEAT A-B
TITLE 5
AUDIO OUT
RL
S-VIDEO
OUT
HEAD PHONE
BD/DVD recorder
,
camcorder and VCR with the
S-Video output jac
k
S-Vide
o
ca
bl
e
audio cables
side of this uni
t

1
2
EN
No supplied cables are used with these connections:
Please purchase the necessary cables at your local store.
Composite Video Connection
C
om
p
osite Video connection offers standard
p
icture
q
ualit
y
for video devices connected to the unit. If
y
ou connect to
t
he unit’s Composite Video Input jack, connect audio cables
t
o the Audio L/R In
p
ut
j
acks ri
g
ht beside the Com
p
osite
V
ideo connector. When the audio
j
ack of the video device is
monaural, connect an audio cable to the Audio L In
p
ut
j
ack
.
e.g.)
STEREO
STAND-BY
AUDIO OUT
RL
VIDEO
OUT
HEAD PHONE
a
u
d
io ca
bl
e
s
v
i
d
eo ca
bl
e
camcor
d
er
v
i
d
eo game
VCR
side of this uni
t
Note
•
If
y
ou connect to the S-Video In
p
ut
j
ack and the Com
p
osite Video In
p
ut
jack at the same time, the S-Video connection will have priority
.
Digital Audio Output Connection
(for digital broadcasting only)
If you connect this unit to an external digital audio device, you
c
an en
j
o
y
multi-channel audio like 5.1ch di
g
ital broadcastin
g
soun
d.
U
se a
di
g
i
ta
l
au
di
o coax
i
a
l
ca
bl
e to connect t
h
e un
i
t to externa
l
di
g
i
ta
l
au
di
o
d
ev
i
ces
.
e.g.)
DIGITAL AUDIO
COAXIAL IN
D
o
lb
y
D
igita
l
d
eco
d
er
ital audio coaxial cable
dig
digital audio coaxial cable
r
ear of this unit
La page est en cours de chargement...
La page est en cours de chargement...
La page est en cours de chargement...
La page est en cours de chargement...
La page est en cours de chargement...
La page est en cours de chargement...
La page est en cours de chargement...
La page est en cours de chargement...
La page est en cours de chargement...
La page est en cours de chargement...
La page est en cours de chargement...
La page est en cours de chargement...
La page est en cours de chargement...
La page est en cours de chargement...
La page est en cours de chargement...
La page est en cours de chargement...
La page est en cours de chargement...
La page est en cours de chargement...
La page est en cours de chargement...
La page est en cours de chargement...
La page est en cours de chargement...
La page est en cours de chargement...
La page est en cours de chargement...
La page est en cours de chargement...
La page est en cours de chargement...
La page est en cours de chargement...
La page est en cours de chargement...
La page est en cours de chargement...
La page est en cours de chargement...
La page est en cours de chargement...
La page est en cours de chargement...
La page est en cours de chargement...
La page est en cours de chargement...
La page est en cours de chargement...
La page est en cours de chargement...
La page est en cours de chargement...
La page est en cours de chargement...
La page est en cours de chargement...
La page est en cours de chargement...
La page est en cours de chargement...
La page est en cours de chargement...
La page est en cours de chargement...
La page est en cours de chargement...
La page est en cours de chargement...
La page est en cours de chargement...
La page est en cours de chargement...
La page est en cours de chargement...
La page est en cours de chargement...
La page est en cours de chargement...
La page est en cours de chargement...
La page est en cours de chargement...
La page est en cours de chargement...
La page est en cours de chargement...
La page est en cours de chargement...
La page est en cours de chargement...
La page est en cours de chargement...
La page est en cours de chargement...
La page est en cours de chargement...
La page est en cours de chargement...
La page est en cours de chargement...
La page est en cours de chargement...
La page est en cours de chargement...
La page est en cours de chargement...
La page est en cours de chargement...
La page est en cours de chargement...
La page est en cours de chargement...
La page est en cours de chargement...
La page est en cours de chargement...
La page est en cours de chargement...
La page est en cours de chargement...
La page est en cours de chargement...
La page est en cours de chargement...
La page est en cours de chargement...
La page est en cours de chargement...
La page est en cours de chargement...
La page est en cours de chargement...
La page est en cours de chargement...
La page est en cours de chargement...
La page est en cours de chargement...
La page est en cours de chargement...
La page est en cours de chargement...
La page est en cours de chargement...
La page est en cours de chargement...
La page est en cours de chargement...
La page est en cours de chargement...
La page est en cours de chargement...
La page est en cours de chargement...
La page est en cours de chargement...
La page est en cours de chargement...
La page est en cours de chargement...
La page est en cours de chargement...
La page est en cours de chargement...
La page est en cours de chargement...
La page est en cours de chargement...
La page est en cours de chargement...
La page est en cours de chargement...
La page est en cours de chargement...
La page est en cours de chargement...
La page est en cours de chargement...
La page est en cours de chargement...
-
 1
1
-
 2
2
-
 3
3
-
 4
4
-
 5
5
-
 6
6
-
 7
7
-
 8
8
-
 9
9
-
 10
10
-
 11
11
-
 12
12
-
 13
13
-
 14
14
-
 15
15
-
 16
16
-
 17
17
-
 18
18
-
 19
19
-
 20
20
-
 21
21
-
 22
22
-
 23
23
-
 24
24
-
 25
25
-
 26
26
-
 27
27
-
 28
28
-
 29
29
-
 30
30
-
 31
31
-
 32
32
-
 33
33
-
 34
34
-
 35
35
-
 36
36
-
 37
37
-
 38
38
-
 39
39
-
 40
40
-
 41
41
-
 42
42
-
 43
43
-
 44
44
-
 45
45
-
 46
46
-
 47
47
-
 48
48
-
 49
49
-
 50
50
-
 51
51
-
 52
52
-
 53
53
-
 54
54
-
 55
55
-
 56
56
-
 57
57
-
 58
58
-
 59
59
-
 60
60
-
 61
61
-
 62
62
-
 63
63
-
 64
64
-
 65
65
-
 66
66
-
 67
67
-
 68
68
-
 69
69
-
 70
70
-
 71
71
-
 72
72
-
 73
73
-
 74
74
-
 75
75
-
 76
76
-
 77
77
-
 78
78
-
 79
79
-
 80
80
-
 81
81
-
 82
82
-
 83
83
-
 84
84
-
 85
85
-
 86
86
-
 87
87
-
 88
88
-
 89
89
-
 90
90
-
 91
91
-
 92
92
-
 93
93
-
 94
94
-
 95
95
-
 96
96
-
 97
97
-
 98
98
-
 99
99
-
 100
100
-
 101
101
-
 102
102
-
 103
103
-
 104
104
-
 105
105
-
 106
106
-
 107
107
-
 108
108
-
 109
109
-
 110
110
-
 111
111
-
 112
112
-
 113
113
-
 114
114
-
 115
115
-
 116
116
-
 117
117
-
 118
118
-
 119
119
-
 120
120


Sylvania LC190SL1 Manuel utilisateur
- Catégorie
- Téléviseurs LCD
- Taper
- Manuel utilisateur
- Ce manuel convient également à
dans d''autres langues
- English: Sylvania LC190SL1 User manual
- español: Sylvania LC190SL1 Manual de usuario
Documents connexes
-
Sylvania LC320SL1 Le manuel du propriétaire
-
-
-
-
-
-
Sylvania LC260SS2 Manuel utilisateur
-
Univex TV DVD Combo LD190SS1 Manuel utilisateur
-
-