Zanussi ZWK5120 Manuel utilisateur
- Catégorie
- Machines à laver
- Taper
- Manuel utilisateur

EN
User manual 2
FR
Notice d'utilisation 13
Washing machine
Lave-linge
ZWK 5120

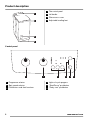
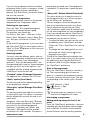
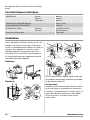
Product description
1
The control panel
2
Lid handle
3
Filter access cover
4
Adjustable levelling feet
Control panel
1 2 3 4 5 6
1
Programme selector
2
Spin speed selector
3
Pushbuttons and their functions
4
Lights of cycle progress
5
"Start/Pause" pushbutton
6
"Delay start" pushbutton
2
www.zanussi.com

Dispenser box
Prewash
Wash
Softener (do not fill above the MAX
symbol
M
)
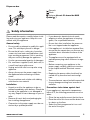
Safety information
Please read these points carefully before instal-
ling and using your appliance. Keep this user
manual with your appliance.
General safety
• Do not modify or attempt to modify this appli-
ance. This would put yourself in danger.
• Ensure that all coins, safety pins, brooches,
screws etc have been removed before start-
ing a washing programme. If left in washing,
they can seriously damage the appliance.
• Use the recommended quantity of detergent.
• Put small items together (socks, belts etc.) in
a small linen bag or pillow case.
• Unplug and close inlet hose tap after using
appliance.
• Always disconnect the power supply from
the appliance before cleaning or mainte-
nance.
• Do not machine wash clothes with ribbing,
unfinished or torn material.
Installation
• Unpack or ask for the appliance to be un-
packed immediately upon delivery. Check the
outside of the appliance is not damaged in
any way. Report all transit damage to your re-
tailer.
• Remove all transit bolts and packaging be-
fore installing the appliance.
• Connection to the water supply must be car-
ried out by a qualified plumber.
• If your domestic electrical circuit needs
adapting to allow the appliance to be plug-
ged in, use a qualified electrician.
• Ensure that, after installation, the power ca-
ble is not trapped under the appliance.
• If the appliance is installed on carpeted floor,
ensure that the carpet does not obstruct any
ventilation ducts located at the base of the
appliance.
• The appliance must be equipped with an
earthed power plug which conforms to regu-
lations.
• Before connecting your appliance to the
power supply, carefully read the instructions
in the chapter entitled “Electrical connec-
tion”.
• Replacing the power cable should only be
carried out by an authorised service engi-
neer.
• The manufacturer cannot be held responsible
for any damage resulting from incorrect in-
stallation.
Precautions to be taken against frost
If your appliance is exposed to temperatures
below 0°C, the following precautions must be
taken:
• Close the tap and disconnect the inlet hose.
• Place the end of this hose and the drain hose
in a basin on the floor.
• Select the Drain programme let it run until
the end of the cycle.
3
www.zanussi.com

• Disconnect the appliance from the power
supply by turning the programme selector to
“Stop”
.
• Unplug the appliance.
• Replace the inlet hose and drain hose.
This way, the water remaining in the hoses will
be drained away, avoiding any ice formation
which would damage your appliance.
Before turning your appliance on again, ensure
that it is installed in an area where the tempera-
ture will not fall below freezing.
NOTE ! This machine is made for use in normal
inside temperature. Manufacturer is not respon-
sible for freezing damages.
Use
• Your appliance is intended for normal do-
mestic use. Do not use the appliance for
commercial or industrial purposes or for any
other purpose.
• Refer to the instructions on the label of each
item before washing.
• Do not put items into the washing machine
which have had stains removed with petrol,
alcohol, trichlorethylen etc. If such stain re-
movers have been used, wait until the prod-
uct has evaporated before putting these
items into the drum.
• Empty pockets and unfold items.
• This appliance is not intended for use by per-
sons (including children) with reduced physi-
cal, sensory or mental capabilities, or lack of
experience and knowledge, unless they have
been given supervision or instruction con-
cerning use of the appliance by a person re-
sponsible for their safety.
Children should be supervised to ensure that
they do not play with the appliance.
How to run a wash cycle?
Using for the first time
• Ensure the electrical and water connec-
tions comply with the installation in-
structions.
• Remove the polystyrene insert and all
other items inside the drum.
• Run an initial wash cycle at 90°C, with-
out any washing but with detergent to
clean the water tank.
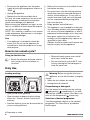
Daily Use
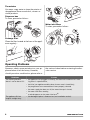
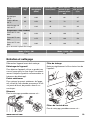
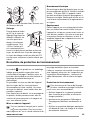
Loading washing
A
A
• Open the lid of the appliance.
• Open the drum by depressing the locking
button A
1)
: The two shutters unlock auto-
matically.
• Load the washing, close the drum and the lid
of your washing machine.
Warning! Before closing the lid of your
appliance, ensure that the drum is properly
closed :
• When the two shutters are closed,
• locking button A released.
Proportioning of detergents
Pour the amount of washing into the washing
and prewash compartments if you have
selected the “prewash” option. Pour fabric soft-
ener into the compartment
if necessary.
Selection of desired programme
Turn the programme selector to the required
programme. The “Start/Pause” pushbutton
flashes green.
1) Depending on model.
4
www.zanussi.com

If you turn the programme selector to another
programme while a cycle is in progress, the ap-
pliance will ignore the new selected pro-
gramme. The “Start/Pause” pushbutton flashes
red for a few seconds.
Selecting the temperature
Turn the temperature selector on the desired
temperature (see “Programmes table”).
Selecting the spin speed
Press the “Spin” (Essorage/Centrifugeren)
pushbutton to change the spin speed.
The maximum spin speeds are :
For Cottons, Eco, Jeans : 1200 rpm, for Syn-
thetics, Wool, Handwash, Intensiv Sport, Easy
iron : 900 rpm, for Delicates, Curtains: 700
rpm.
At the end of the programme, if you have selec-
ted “Rinse hold”
, you then need to select a
“Spin” or “Drain” programme to finish the cycle
and empty the water.
Selecting options
You must select the different options after se-
lecting the programme and before pressing the
“Start/Pause” button (see “Washing pro-
grammes”). Press the desired button(s) : the
corresponding lights come on. If pressed again,
the lights go out. If one of the options is not
compatible with the selected programme, the
“Start/Pause” button flashes red.
“Prewash” option (Prélavage/Voorwas)
The appliance runs a prewash at 30°C max.
“Quick” option (Court/Snel)
The washing time will be reduced depending
on the programme selected.
“Rinse plus” option (Rinçage Plus/Extra
spoelen)
The washing machine will add one or more rin-
ses during the cycle. This option is recommen-
ded for people with sensitive skin and in soft
water areas.
Temporary : Press the “Rinse plus” (Rinçage
Plus/Extra spoelen) pushbutton. The option is
only active for the selected programme.
Permanent : Hold down the “Option” and
“Rinse plus” (Rinçage Plus/Extra spoelen)
pushbuttons for a few seconds. The option is
permanently activated, even if the appliance is
switched off. To deactivate it, repeat the proc-
ess.
“Delay start” (Départ différé/Startuitstel)
This option allows you to delay the start of a
wash programme by 3, 6 or 9 hours by press-
ing the “Delay start” pushbutton.
You can change or cancel the delayed start
time at any time before you press the “Start/
Pause” pushbutton by pressing the “Delay
start” pushbutton again (when all indicators are
off, the wash programme will start immediately).
If you have already pressed the “Start/Pause”
pushbutton and you want to change or cancel
the delayed start, proceed as follows :
• To cancel the delay start and start the cycle
immediately, press “Start/Pause” and then
“Delay start”. Press “Start/Pause” to start the
cycle.
• To change the timer delay period, you must
go through the “Stop” position
and re-
programme your cycle.
The lid will be locked during the delayed start
time. If you need to open it, you must first pause
the appliance by pressing the “Start/Pause”
pushbutton. After closing the lid again, press
the “Start/Pause” pushbutton.
Start of the programme
Press the “Start/Pause” button to start the cy-
cle. The corresponding light will come on
green. It is normal for the programme selector
to remain stationary during the cycle. The light
corresponding to the current cycle is illumina-
ted.
+ : Prewash + Wash
+ : Rinses + Spin
: End of cycle
The drain pump can operate for a short
time when the appliance fills water.
Interrupting a programme
Adding washing during the first 10 mi-
nutes
Press the “Start/Pause” pushbutton : the corre-
sponding light will flash green while the appli-
ance is paused. The lid can only be opened
around 2 minutes after the washing machine
5
www.zanussi.com

has come to a stop. Press the “Start/Pause”
pushbutton again to continue the programme.
Modifying the programme in progress
Before making any changes to the current pro-
gramme, you need to pause the washing ma-
chine by pressing the “Start/Pause” pushbut-
ton. If the modification is not possible, the
“Start/Pause” pushbutton flashes red for a few
seconds. If you still decide to change the pro-
gramme, you must cancel the current pro-
gramme (see below).
Cancelling the programme
If you want to cancel the programme, turn the
programme selector to the “Stop” position
.
End of the programme
The washing machine stops automatically, the
“Start/Pause” pushbutton goes out and the
light “End of cycle”
comes on. The lid can
only be opened around 2 minutes after the
washing machine has come to a stop. Turn the
programme selector to the “Stop” position
.
Remove washing. Unplug and close water inlet
tap.
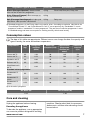
Programmes table
Programme / Type of washing Load/Time Possible options
Cotton Normal (Coton/Katoen) (cold - 90°) :
White or colour, e.g. normally soiled work
clothes, bed linen, table linen, body linen, towels.
5,5 kg Rinse hold, Prewash, Quick, Rinse plus,
Delay start
Cotton Eco (Coton/Katoen)
1)
(40° - 90°) :
White or colour, e.g. normally soiled work
clothes, bed linen, table linen, body linen, towels.
5,5 kg Rinse hold, Prewash, Rinse plus, Delay
start
Synthetics (Synthétiques/Synthetica) (cold
- 60°) : Synthetic fabrics, body linen,fab, col-
oured farics, non-iron shirts, blouses.
2,5 kg Rinse hold, Prewash, Quick, Rinse plus,
Delay start
Delicates (Délicats/Fijne was) (cold - 40°) :
For all delicate materials, for example curtains.
2,5 kg Rinse hold, Prewash, Quick, Rinse plus,
Delay start
Wool (Laine/Wol) (cold - 40°) : Machine
washable wool carrying the labels “pure new
wool, machine washable, does not shrink”.
1,0 kg Rinse hold, Delay start
Handwash (Lavage à la main/Handwas)
(cold - 40°) : Very delicate items carrying the
“wash by hand” label.
1,0 kg Rinse hold, Delay start
Jeans (40°) : For washing denim clothes. The
Rinse plus option is activated.
3,0 kg Rinse hold, Prewash, Delay start
Intensiv Sport (Sport intensif/Sport Inten-
sief) (40°) : For dirty outside sport clothes. The
Prewash option is activated.
2,5 kg Rinse hold, Rinse plus, Delay start
Curtains (Voilages/Gordijnen) (40°) : For
washing curtains. The Prewash option is activa-
ted.
2,5 kg Rinse hold, Rinse plus, Delay start
Easy iron (Facile à reppaser/Anti-kreuk)
(40°) : For cottons and synthetics. Reduces
creasing and makes ironing easier.
1,0 kg Rinse hold, Prewash, Rinse plus, Delay
start
Soak (Trempage/Inweken) (30°) : Soaking for
very dirty washing. The drum stops full of water.
5,5 kg Delay start
6
www.zanussi.com

Programme / Type of washing Load/Time Possible options
Rinses (Rinçages/Spoelen) : Hand washed
items can be rinsed in this programme.
5,5 kg Rinse hold, Rinse plus, Delay start
Drain (Vidange/Pompen) : Runs an empty cy-
cle after a Rinse hold.
5,5 kg
Spin (Essorage/Centrifugeren) : A spin cycle
from 500 to 1200 rpm after a Rinse hold.
5,5 kg Delay start
1) Standard programmes for the Energy Label consumption values. According to regulation 1061/2010, the
“Coton/Katoen Eco 60° C” and “Coton/Katoen Eco 40° C” are respectively the “standard 60° C cotton
programme” and the “standard 40° C cotton programme”. They are the most efficient programmes in terms
of combined energy and water consumption for washing normally soiled cotton laundry.
Consumption values
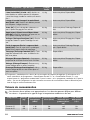
The data of this table are approximate. Different causes can change the data: the quantity and
type of laundry, the water and ambient temperature.
Programmes Load
(kg)
Energy con-
sumption
(kWh)
Water con-
sumption (litre)
Approximate
programme
duration (mi-
nutes)
Remaining
moisture
(%)
1)
Cottons 60 °C 5.5 1.20 58 145 53
Cottons 40 °C 5.5 0.70 58 120 53
Synthetics 40 °C 2.5 0.60 45 80 37
Delicates 40 °C 2.5 0.50 50 70 37
Wool/Hand wash
30 °C
1 0.40 45 54 32
Standard cotton programmes
Standard 60 °C
cotton
5.5 0.94 46 190 53
Standard 60 °C
cotton
2.75 0.75 33 130 53
Standard 40 °C
cotton
2.75 0.60 33 130 53
1) At the end of spin phase.
Off Mode (W) Left On Mode (W)
0.10 1.60
Care and cleaning
Unplug the appliance before cleaning.
Descaling the appliance
To descale the appliance, use an appropriate
non-corrosive product designed for washing
machines. Read product label for recommen-
ded amounts and how often descaling should
be carried out.
7
www.zanussi.com

The exterior
Use warm soapy water to clean the exterior of
the appliance. Never use alcohol, solvents or
similar products.
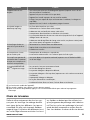
Dispenser box
To clean, proceed as follows :
1
2
4
3
Drainage filter
Clean the filter located at the base of the appli-
ance regularly :
1
2
3
5
4
7
6
Water inlet filters
To clean, proceed as follows :
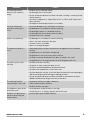
Operating Problems
Numerous checks were carried out on your ap-
pliance before it left the factory. However,
should you notice a malfunction, please refer to
the sections below before contacting the after-
sales service.
Problems Causes
The washing machine
doesn’t start or doesn’t fill:
• the appliance isn’t plugged in correctly, the electrical installation isn’t work-
ing, there is a power failure,
• the lid of your appliance and the drum shutters aren’t closed firmly,
• the programme start command hasn’t been properly selected,
• the water supply has been cut off, the water inlet tap is closed,
• the water inlet filters are dirty,
•
a red tab appears on the water inlet hose
1)
.
The appliance fills but
empties straight away:
• the drainage U-piece is fixed too low (see installation section).
8
www.zanussi.com

Problems Causes
The washing machine
doesn’t rinse or doesn’t
empty:
• the drain hose is blocked or bent,
• the drainage filter is obstructed,
• the out of balance detector has been activated : washing is unevenly distrib-
uted in the drum,
• the “Drain” programme or “Night Silence Plus” or “Rinse hold” option have
been selected,
• the height of the drainage U-piece is unsuitable.
You have found water
around the washing ma-
chine:
• too much detergent has caused foam to overflow,
• the detergent is unsuitable for machine washing,
• the drainage U-piece isn’t attached correctly,
• the drainage filter hasn’t been put back in place,
• the water inlet hose is leaking.
Wash is unsatisfactory: • the detergent is unsuitable for machine washing,
• there is too much washing in the drum,
• the wash cycle is unsuitable,
• there isn’t enough detergent.
The appliance vibrates, is
noisy:
• all packaging have not been removed from the appliance (see installation
section),
• the appliance isn’t level and is unbalanced,
• the appliance is too close to the wall or furniture,
• washing is unevenly distributed in the drum, the load is too small,
• the appliance is in running in period, noise will disappear with time.
The wash cycle is much
too long:
• the water inlet filters are dirty,
• the power or water supply has been cut off,
• the motor overheating detector has been activated,
• the water inlet temperature is lower than usual,
• the foam detection security system has been activated (too much detergent)
and the washing machine has begun draining the foam,
• the out of balance detector has been activated: an extra phase has been
added to distribute washing more evenly in the drum.
The washing machine
stops during a wash cycle:
• the water or electricity supply is defective,
• a Rinse hold has been selected,
• the drum shutters are open.
The lid doesn’t open at the
end of the cycle:
• the temperature inside the drum is too high,
• the lid unlocks 1 - 2 minutes after the end of the cycle.
Softener runs directly into
the drum when filling the
dispenser box:
• you have gone past the MAX indicator.
9
www.zanussi.com

Problems Causes
The “Start/Pause” push-
button
2)
flashes red
3)
:
• the lid is not closed properly,
• the drainage filter is obstructed,
• the drain hose is blocked or bent,
• the drain hose is fixed to high (see "Installation" section),
• the drainage pump is blocked,
• the standpipes blocked,
• the water tap is closed, the water supply has been cut off.
1) Depending on model.
2) On some models, the auditable signals can sound
3) After solving any problems, press "Start/Pause" pushbutton to restart the interrupted programme.
Detergents and Additives
Only use detergents and additives designed for
use in a washing machine. We do not recom-
mend mixing different types of detergents. This
may spoil the washing. There are no restrictions
on the use of powder detergents. Liquid deter-
gents must not be used when a prewash has
been selected. For cycles without prewash,
they must be added via means of a dosing ball.
Detergent tablets or doses must be placed in
the detergent compartment of your appliance's
dispenser box.
Technical Specifications
DIMENSIONS Height
Width
Depth
850 mm
400 mm
600 mm
LINE VOLTAGE /FREQUENCY
POWER CONSUMPTION
230 V / 50 Hz
2300 W
WATER PRESSURE Minimum
Maximum
0,05 MPa (0,5 bar)
0,8 MPa (8 bar)
Connection to water supply Type 20/27
Installation
Remove all protective packaging for transit be-
fore using for the first time. Keep in case nee-
ded for future transit: Transporting a non-se-
cured appliance may damage internal compo-
nents and cause leakages and malfunctions.
The appliance can also be damaged through
physical contact.
Unpacking
2
1
10
www.zanussi.com

Untying
AB
C
D
A
1
2
B
2
1
2
1
1
C
D
To install your washing machine at the same
level as surrounding furniture, proceed as
shown on picture D.
Water supply
Install the supplied water inlet hose at the rear
of your washing machine by proceeding as fol-
lows. Do not reuse an old hose. The water inlet
hose can not be extended. If it is too short,
please contact the after-sales service.
90
O
90
O
90
O
Open the water inlet tap. Check there are no
leaks.
Drainage
Fit the U-piece on the
drainage hose. Place
everything in a drainage
point (or in a sink) at a
height of between 70
and 100 cm. Ensure it
is positioned securely.
Air must be able to en-
ter the end of the hose,
to avoid any risk of siphoning.
The drain hose must never be stretched. If it is
too short, contact an engineer.
Electrical connection
This washing machine must only be connected
in single-phased 230 V. Check the fuse size:
10 A for 230 V. The appliance must not be
connected with an extension lead or multi-plug
adaptor. Ensure that the plug is earthed and
that it is in accordance with current regulations.
Positioning
Position the appliance on a flat and hard sur-
face in a ventilated location. Ensure the appli-
ance does not come into contact with the wall
or other furniture. Accurate levelling avoids vi-
brations, noise and prevents the appliance from
moving when running.
max
100 cm
min
70 cm
Environment concerns
The symbol on the product or on its
packaging indicates that this product may not
be treated as household waste. Instead it
should be taken to the appropriate collection
point for the recycling of electrical and
electronic equipment. By ensuring this product
is disposed of correctly, you will help prevent
11
www.zanussi.com

potential negative consequences for the
environment and human health, which could
otherwise be caused by inappropriate waste
handling of this product. For more detailed
information about recycling of this product,
please contact your local council, your
household waste disposal service or the shop
where you purchased the product.
Disposing of the appliance
All materials carrying the
symbol are re-
cyclable. Dispose of them at a waste col-
lection site (enquire at your local council) for
collection and recycling. When disposing of
your appliance, remove all parts which could be
dangerous to others: cut off the power supply
cable at the base of the appliance.
Protecting the environment
To save water and energy and therefore
help protect the environment, we recom-
mend the following:
• Whenever possible, use the appliance at full
capacity and avoid partial loads.
• Only use the prewash and soak programmes
for heavily soiled items.
• Use an appropriate amount of detergent for
the hardness of the water, the size of the
load and how soiled the washing is.
12
www.zanussi.com

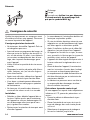
Description de l'appareil
1
Bandeau de commande
2
Poignée du capot
3
Cache d'accès au filtre
4
Pieds réglables
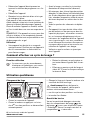
Bandeau de commande
1 2 3 4 5 6
1
Sélecteur de programme
2
Sélecteur de vitesse d'essorage
3
Touches et leurs fonctions
4
Voyants de progression du cycle
5
Touche « Départ/Pause »
6
Touche « Départ différé »
13
www.zanussi.com

Réservoir
Prélavage
Lavage
Assouplissant (veillez à ne pas dépasser
le niveau maximal de remplissage indi-
qué par le symbole MAX
M
)
Consignes de sécurité
Veuillez lire attentivement ces remarques avant
d’installer et d’utiliser votre appareil. Conservez
ce manuel à proximité de l'appareil.
Consignes générales de sécurité
• Ne tentez pas de modifier l'appareil. Cela se-
rait dangereux pour vous.
• Avant de lancer un programme de lavage, vé-
rifiez que toutes les broches de sécurité, vis,
etc. ont été retirées. En effet, si ces éléments
se trouvaient accidentellement dans le lave-
linge, cela risquerait d'endommager grave-
ment l'appareil.
• Veillez à utiliser la quantité de lessive recom-
mandée.
• Regroupez les articles de petite taille (chaus-
settes, ceintures, etc.) au sein d'un linge ou
d'une taie d'oreiller.
• Après toute utilisation, débranchez l'appareil
et fermez le rabat du tuyau d'arrivée d'eau.
• Vous devez systématiquement débrancher
l'appareil avant tout nettoyage ou opération
de maintenance.
• Ne lavez pas à la machine des vêtements
contenant des rubans ou du tissu torsadé.
Installation
• Déballez ou faites déballer l'appareil dès sa
livraison. Vérifiez que les parois extérieures
de l'appareil ne sont pas endommagées. En
cas de dommage occasionné par le trans-
port, signalez-le au vendeur.
• Retirez toutes les attaches de transport avant
d'installer l'appareil.
• Le raccordement à l'arrivée d'eau doit être ef-
fectué par un plombier qualifié.
• Si votre installation électrique nécessite une
adaptation en vue du branchement de l'appa-
reil, faites appel à un électricien qualifié.
• Après l'installation, vérifiez que le câble d'ali-
mentation n'est pas bloqué sous l'appareil.
• Si l'appareil est installé sur un tapis, assurez-
vous que celui-ci n'obstrue pas les tuyaux de
ventilation situés au bas de l'appareil.
• L'appareil doit être équipé d'une prise mise à
la terre conforme à la réglementation en vi-
gueur.
• Avant de brancher l'appareil, lisez attentive-
ment les instructions fournies dans le chapi-
tre consacré au branchement électrique.
• Le remplacement du câble d'alimentation ne
doit être effectué que par un technicien de
maintenance habilité.
• Le fabricant ne pourra en aucun cas être te-
nu responsable des dommages résultant
d'une installation incorrecte.
Précautions à prendre contre le gel
Si votre appareil est exposé à des températures
inférieures à 0 °C, prenez les précautions sui-
vantes :
• Fermez le robinet et débranchez le tuyau
d'arrivée d'eau.
• Placez l'extrémité de ce tuyau, ainsi que le
tuyau de vidange, dans une cuvette posée
sur le sol.
• Sélectionnez le programme de vidange et
laissez-le s'exécuter jusqu'à la fin.
14
www.zanussi.com

• Débranchez l'appareil électriquement en
tournant le sélecteur de programme sur « Ar-
rêt »
.
• Débranchez l'appareil.
• Remettez le tuyau d'arrivée d'eau et le tuyau
de vidange en place.
Cela permet à l'eau restant dans les tuyaux
d'être vidangée, évitant ainsi toute formation de
glace qui risquerait d'endommager l'appareil.
Avant de remettre l'appareil en marche, vérifiez
qu'il est installé dans une zone non exposée au
gel.
REMARQUE ! Cet appareil est conçu pour être
utilisé en intérieur, à une température normale.
Le fabricant décline toute responsabilité en cas
de dommages dus au gel.
Utilisation
• Votre appareil est destiné à un usage do-
mestique normal. N'utilisez pas cet appareil à
des fins commerciales ou industrielles ou
pour d'autres usages.
• Avant le lavage, consultez les instructions
d'entretien de chaque article (vêtement).
• N'insérez pas dans le lave-linge des articles
détachés à l'aide d'alcool, de tricholréthylène,
etc. Si des détachants de ce type ont été uti-
lisés, attendez l'évaporation totale de ce pro-
duit avant de placer les articles dans le tam-
bour.
• Videz les poches des vêtements et dépliez-
les.
• Cet appareil n’est pas destiné à être utilisé
par des enfants ou des personnes dont les
capacités physiques, sensorielles ou menta-
les, ou le manque d'expérience et de con-
naissances les empêchent d'utiliser l'appareil
sans risque lorsqu'ils sont sans surveillance
ou en l'absence d'instructions d'une person-
ne responsable qui puisse leur assurer une
utilisation de l'appareil sans danger.
Veillez à ce que les enfants ne jouent pas
avec l'appareil.
Comment effectuer un cycle de lavage ?
Première utilisation
• Assurez-vous que les raccordements
électriques et hydrauliques sont confor-
mes aux instructions d'installation.
• Retirez les éléments en polystyrène et
tout autre élément figurant dans le tam-
bour.
• Effectuez un premier cycle de lavage à
vide à 90 °C, avec lessive pour nettoyer
le réservoir d'eau.
Utilisation quotidienne
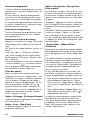
Chargement du linge
A
A
• Ouvrez le couvercle de l'appareil.
• Ouvrez le tambour en appuyant sur la tou-
che A
2)
: les deux portillons se déverrouillent
automatiquement.
• Chargez le linge, puis fermez le tambour et le
couvercle de votre lave-linge.
Avertissement Avant de fermer le
couvercle de l'appareil, vérifiez que le
tambour a été correctement fermé :
• une fois que les deux portillons sont fermés,
• la touche A est libérée.
Quantité de lessive
Versez la quantité de détergent nécessaire
dans les compartiments de lavage
et de
prélavage
si vous avez sélectionné l'option
« Prélavage ». Versez l'assouplissant dans le
compartiment
, si nécessaire.
2) (en fonction du modèle de l'appareil).
15
www.zanussi.com

Sélection du programme
Tournez le sélecteur de programmes sur le pro-
gramme choisi. La touche « Départ/Pause » cli-
gnote en vert.
Si vous tournez le sélecteur de programmes
pour choisir un autre programme alors qu'un
cycle est en cours, le lave-linge ne prend pas
en compte le nouveau programme sélectionné.
La touche « Départ/Pause » clignote en rouge
pendant quelques secondes.
Sélection de la température
Tournez le sélecteur de température sur la po-
sition souhaitée (reportez-vous au « Tableau
des programmes »).
Sélection de la vitesse d'essorage
Appuyez sur la touche « Essorage » (Essorage/
Centrifugeren) pour modifier la vitesse d'esso-
rage.
Les vitesses d'essorage maximales sont les sui-
vantes :
Coton, Eco, Jeans : 1 200 tr/min ; Synthéti-
ques, Laine, Lavage à la main, Sport intensif,
Facile à repasser : 900 tr/min ; Délicats, Voila-
ges : 700 tr/min.
À la fin du programme, si vous avez sélectionné
« Arrêt cuve pleine »
, vous devez sélection-
ner un programme d'essorage ou de vidange
afin de terminer le cycle et vider l'eau.
Choix des options
Après la sélection d'un programme et avant
d'appuyer sur la touche « Départ/Pause », vous
devez choisir les options souhaitées (reportez-
vous au chapitre « Programmes de lavage »).
Appuyez sur les touches appropriées ; les voy-
ants correspondants s'allument. Si vous ap-
puyez à nouveau, les voyants s'éteignent. Si
l'une des options n'est pas compatible avec le
programme sélectionné, la touche « Départ/
Pause » clignote en rouge.
Option « Prélavage » (Prélavage/Voorwas)
L'appareil effectue un prélavage à une tempéra-
ture maximale de 30 °C.
Option « Court » (Court/Snel)
La durée de lavage est réduite en fonction du
programme sélectionné.
Option « Rinçage plus » (Rinçage Plus/
Extra spoelen)
Un ou plusieurs rinçages sont ajoutés au cours
du cycle. Cette option est recommandée pour
les personnes à la peau sensible et dans les ré-
gions où l'eau ne présente pas un niveau élevé
de dureté.
Temporaire : Appuyez sur la touche « Rinçage
plus » Rinçage Plus/Extra spoelen. L'option est
uniquement active pour le programme sélec-
tionné.
Permanent : Maintenez enfoncées quelques se-
condes les touches « Option » et « Rinçage
plus » (Rinçage Plus/Extra spoelen). L'option
est alors activée de manière permanente, même
si l'appareil est arrêté. Pour la désactiver, répé-
tez la procédure.
« Départ différé » (Départ différé/
Startuitstel)
Cette option vous permet de retarder le départ
d'un programme de lavage de 3, 6 ou 9 heures.
Pour cela, appuyez sur la touche « Départ diffé-
ré ».
Vous pouvez modifier ou annuler le départ dif-
féré à tout moment avant d'appuyer sur la tou-
che « Départ/Pause », en appuyant à nouveau
sur la touche « Départ différé » (le programme
de lavage démarre immédiatement dès que
tous les voyants sont éteints).
Si vous avez déjà appuyé sur la touche « Dé-
part/Pause » et que vous souhaitez modifier ou
annuler le départ différé, procédez comme suit :
• Pour annuler le départ différé et lancer le cy-
cle immédiatement, appuyez sur « Départ/
Pause » puis sur « Départ différé ». Appuyez
sur la touche « Départ/Pause » pour lancer le
cycle.
• Pour modifier le délai du départ différé, vous
devez repasser par la position « Arrêt »
et
reprogrammer votre cycle.
Le capot est verrouillé pendant le délai du dé-
part différé. Si vous avez besoin de l'ouvrir,
vous devez d'abord mettre l'appareil en pause
en appuyant sur la touche « Départ/Pause ».
Après avoir refermé le capot, appuyez sur la
touche « Départ/Pause ».
16
www.zanussi.com

Départ du programme
Appuyez sur la touche « Départ/Pause » pour
lancer le cycle. Le voyant correspondant appa-
raît en vert. Il est normal que le sélecteur de
programmes demeure immobile pendant le cy-
cle. Le voyant correspondant au cycle en cours
s'allume.
+ : Prélavage + Lavage
+ : Rinçages + Essorage
: Fin de cycle
La pompe de vidange peut momentané-
ment se mettre en route lorsque l'appareil
se remplit d'eau.
Interruption d'un programme
Ajout de linge au cours des 10 premières
minutes
Appuyez sur la touche « Départ/Pause » : le
voyant correspondant clignote en vert tandis
que l'appareil est en pause. Le capot ne peut
être ouvert qu'environ 2 minutes après l'arrêt du
lave-linge. Appuyez sur la touche « Départ/Pau-
se » de nouveau pour continuer le programme.
Modification du programme en cours
d'exécution
Avant d'effectuer toute modification du pro-
gramme en cours, vous devez mettre le lave-lin-
ge en pause en appuyant sur la touche « Dé-
part/Pause ». Si cette modification est impos-
sible, la touche « Départ/Pause » clignote en
rouge pendant quelques secondes. Si vous
souhaitez malgré tout modifier le programme,
vous devez préalablement annuler le program-
me en cours (voir ci-après).
Annulation du programme
Si vous souhaitez annuler le programme, tour-
nez le sélecteur de programme sur la position
« Arrêt »
.
Fin du programme
Le lave-linge se met à l'arrêt automatiquement ;
la touche « Départ/Pause » s'éteint et le voyant
« Fin de cycle »
s'allume. Le couvercle ne
peut être ouvert qu'environ 2 minutes après l'ar-
rêt du lave-linge. Tournez le sélecteur de pro-
grammes sur la position « Arrêt »
. Retirez le
linge. Débranchez et fermez le robinet d'arrivée
d'eau.
Tableau des programmes
Programme / Type de lavage Charge/
Durée
Options possibles
Coton (Coton/Katoen) (à froid - 90°) : Blancs
ou couleurs normalement sales, notamment les
vêtements de travail, le linge de lit, le linge de ta-
ble, le linge de corps et les serviettes de toilette.
5,5 kg Arrêt cuve pleine, Prélavage, Court, Rin-
çage plus, Départ différé
Coton Eco (Coton/Katoen)
1)
(40° - 90°) :
Blancs ou couleurs normalement sales, notam-
ment les vêtements de travail, le linge de lit, le lin-
ge de table, le linge de corps et les serviettes de
toilette.
5,5 kg Arrêt cuve pleine, Prélavage, Rinçage
plus, Départ différé
Synthétiques (Synthétiques/Synthetica) (à
froid - 60°) : Textiles synthétiques, linge de
corps, textiles de couleur, chemises sans repas-
sage, chemisiers.
2,5 kg Arrêt cuve pleine, Prélavage, Court, Rin-
çage plus, Départ différé
Délicats (Délicats/Fijne was) (à froid - 40°) :
Pour tous les textiles délicats, par exemple les ri-
deaux.
2,5 kg Arrêt cuve pleine, Prélavage, Court, Rin-
çage plus, Départ différé
17
www.zanussi.com

Programme / Type de lavage Charge/
Durée
Options possibles
Laine (Laine/Wol) (à froid - 40°) : Articles en
laine lavables en machine portant les étiquettes
« pure laine vierge, lavable en machine, ne rétrécit
pas ».
1,0 kg Arrêt cuve pleine, Départ différé
Lavage à la main (Lavage à la main/Hand-
was) (froid - 40°) : Articles très délicats portant
une étiquette « lavage à la main ».
1,0 kg Arrêt cuve pleine, Départ différé
Jeans (40°) : Pour le lavage des vêtements en
jean. L’option Rinçage plus est activée.
3,0 kg Arrêt cuve pleine, Prélavage, Départ dif-
féré
Sport intensif (Sport intensif/Sport Inten-
sief) (40°) : Pour les vêtements de sport très sa-
les. L'option Prélavage est activée.
2,5 kg Arrêt cuve pleine, Rinçage plus, Départ
différé
Voilages (Voilages/Gordijnen) (40°) : Pour le
lavage des rideaux. L'option Prélavage est acti-
vée.
2,5 kg Arrêt cuve pleine, Rinçage plus, Départ
différé
Facile à repasser (Facile à reppaser/Anti-
kreuk) (40°) : Pour le coton et les synthétiques.
Réduit le froissage et facilite le repassage.
1,0 kg Arrêt cuve pleine, Prélavage, Rinçage
plus, Départ différé
Trempage (Trempage/Inweken) (30°) : Trem-
page des vêtements très sales. Le tambour s'ar-
rête cuve pleine.
5,5 kg Départ différé
Rinçages (Rinçages/Spoelen) : Ce program-
me permet de rincer des articles lavés à la main.
5,5 kg Arrêt cuve pleine, Rinçage plus, Départ
différé
Vidange (Vidange/Pompen) : Exécute un cy-
cle de vidange après un arrêt cuve pleine.
5,5 kg
Essorage (Essorage/Centrifugeren) : Un cy-
cle d'essorage de 500 à 1 200 tr/min après un
arrêt cuve pleine.
5,5 kg Départ différé
1) Programmes standard pour les valeurs de consommation de l'étiquette énergétique. Conformément à la
norme 1061/2010, les programmes « Coton/Katoen Eco 60 °C » et « Coton/Katoen Eco 40 °C » sont
respectivement le « programme standard à 60 °C pour le coton » et le « programme standard à 40 °C pour le
coton ». Ce sont les programmes les plus économes en termes de consommation d'eau et d'électricité pour
laver du linge en coton normalement sale.
Valeurs de consommation
Les données de ce tableau sont approximatives. Les données peuvent différer pour différen-
tes raisons : la quantité et le type de linge, la température ambiante ou de l'eau.
Programmes Charge
(kg)
Consommation
énergétique
(kWh)
Consommation
d'eau (litres)
Durée approxi-
mative du pro-
gramme (minu-
tes)
Taux d'humi-
dité restant
(%)
1)
Coton 60 °C 5.5 1.20 58 145 53
Coton 40 °C 5.5 0.70 58 120 53
18
www.zanussi.com

Programmes Charge
(kg)
Consommation
énergétique
(kWh)
Consommation
d'eau (litres)
Durée approxi-
mative du pro-
gramme (minu-
tes)
Taux d'humi-
dité restant
(%)
1)
Synthétiques
40 °C
2.5 0.60 45 80 37
Textiles délicats
40 °C
2.5 0.50 50 70 37
Laine/Lavage à la
main 30 °C
1 0.40 45 54 32
Programmes coton standard
Coton 60 °C stan-
dard
5.5 0.94 46 190 53
Coton 60 °C stan-
dard
2.75 0.75 33 130 53
Coton 40 °C stan-
dard
2.75 0.60 33 130 53
1) Au terme de la phase d'essorage.
Mode « Éteint » (W) Mode « Veille » (W)
0.10 1.60
Entretien et nettoyage
Débranchez l’appareil avant de le nettoyer.
Détartrage de l’appareil
Pour détartrer l'appareil, utilisez un produit non
corrosif conçu pour les lave-linge. Lisez attenti-
vement l'étiquette (quantités recommandées et
fréquence du détartrage).
Parois extérieures
Pour nettoyer les parois extérieures de l'appa-
reil, utilisez de l'eau chaude savonneuse. N'utili-
sez jamais d'alcool, de produits abrasifs ou
caustiques.
Réservoir
Pour le nettoyage, procédez comme suit :
1
2
4
3
Filtre de vidange
Nettoyez régulièrement le filtre situé au bas de
l'appareil :
1
2
3
5
4
7
6
Filtres de l'arrivée d'eau
Pour le nettoyage, procédez comme suit :
19
www.zanussi.com

Problèmes de fonctionnement
De nombreux contrôles ont été effectués sur
l'appareil avant le départ usine. Toutefois, en
cas de mauvais fonctionnement, reportez-vous
aux sections ci-dessous avant de contacter le
service après-vente.
Symptômes Causes
Le lave-linge ne démarre
pas ou ne se remplit pas :
• l'appareil n'est pas branché correctement, l'installation électrique ne fonc-
tionne pas, une panne d'alimentation s'est produite,
• le couvercle et le tambour de l'appareil ne sont pas fermés correctement,
• la commande de démarrage de programme n'a pas été sélectionnée correc-
tement,
• l'arrivée d'eau a été coupée, le robinet d'arrivée d'eau est fermé,
• les filtres d'arrivée d'eau sont sales,
•
une pastille rouge apparaît au niveau du tuyau d'arrivée d'eau
1)
.
L'appareil se remplit d'eau
mais vidange immédiate-
ment :
• la pièce de vidange n'est pas correctement fixée (reportez-vous à la section
consacrée à l'installation).
Le lave-linge n'effectue
pas de rinçage ou de vi-
dange :
• le tuyau de vidange est bloqué ou déformé,
• le filtre de vidange est obstrué,
• le détecteur de déséquilibre de charge a été activé, le linge n'est pas réparti
de façon uniforme dans le tambour,
• le programme de vidange ou l'une des options de fonctionnement silencieux
ou d'arrêt cuve pleine a été sélectionné(e).
• la taille (hauteur) de la pièce de vidange est inappropriée.
Un écoulement d'eau en-
toure le lave-linge :
• une trop grande quantité de lessive a entraîné un débordement de mousse,
• la lessive utilisée n'est pas adaptée à ce lave-linge,
• la pièce de vidange n'est pas correctement fixée,
• le filtre de vidange n'a pas été remis en place,
• le tuyau d'arrivée d'eau fuit.
Le linge n'est pas bien la-
vé :
• la lessive utilisée n'est pas adaptée à ce lave-linge,
• vous avez inséré trop de linge dans le tambour,
• le cycle de lavage sélectionné n'est pas approprié,
• la quantité de lessive est insuffisante.
20
www.zanussi.com
La page charge ...
La page charge ...
La page charge ...
La page charge ...
-
 1
1
-
 2
2
-
 3
3
-
 4
4
-
 5
5
-
 6
6
-
 7
7
-
 8
8
-
 9
9
-
 10
10
-
 11
11
-
 12
12
-
 13
13
-
 14
14
-
 15
15
-
 16
16
-
 17
17
-
 18
18
-
 19
19
-
 20
20
-
 21
21
-
 22
22
-
 23
23
-
 24
24


Zanussi ZWK5120 Manuel utilisateur
- Catégorie
- Machines à laver
- Taper
- Manuel utilisateur
dans d''autres langues
- English: Zanussi ZWK5120 User manual
Documents connexes
-
Zanussi ZWQ6120 Manuel utilisateur
-
-
-
-
-
Zanussi ZWY160 Manuel utilisateur
-
-
-
-